PPI SOFTIE 180 Back User manual

OWNER’S MANUAL AND PACKING INSTRUCTIONS
EMERGENCY PARACHUTE SYSTEMS

THIS PAGE INTENTIONALLY LEFT BLANK

Owners Manual - Revision 1.5
1
1. Training and/or experience are required to lower the risk of serious
bodily injury or death.
NEVER use this equipment unless you have:
A. Read the warning label and completed a“controlled
program of instruction”in the use of this parachute
assembly.
- OR-
B. Read the warning label and all appropriate owners / flight
manuals, packing instructions.
2. Lower the risk of death, serious injury, canopy damage
and hard openings by never exceeding the limits shown
on theTSO label.
Warning labels serial numbers and placard information, may be
found in the following locations:
Ram-air parachute- center cell top skin at trailing edge.
Circular reserve canopies- rear panel.
Harness/container system-TSO label.
WARNING !

Owners Manual - Revision 1.5
2
DISCLAIMER - NO WARRANTY
Because of the unavoidable danger associated with the use of the parachute system, the
manufacturer makes NOWARRANTY, either expressed or implied.The system is sold
with all faults and without any warranty of fitness for any purpose.Manufacturer also
disclaims any liability in tort of damages, direct or consequential, including personal
injuries resulting from a defect in design, material, workmanship or manufacturing
whether caused by negligence on the part of the manufacturer or otherwise.By using
this system, or allowing it to be used by others, the buyer WAIVES any liability of or by
the manufacturer for personal injuries or other damages arising from such use.
If the buyer declines to waive liability on the part of the manufacturer, buyer may obtain a
full refund of the purchase price by returning the system, before it is used, to the manu-
facturer within 15 days of the date of the original receipt of said system with a letter
stating the reason for its return.
WARNING !
You can substantially reduce risk by assuring that each component of the system has
been assembled and packed in strict compliance with the manufacturer’s instructions, by
obtaining proper instruction in the use of this system, and by operating each component
of the system in strict compliance with owner’s manual. However, parachute systems
sometimes fail to operate properly even when properly designed, assembled, packed and
operated so that you risk serious injury or death each time you use the system.
Do Not Purchase or use any parachute equipment designed, manufactured or sold by
Para-Phernalia, Inc.unless you fully understand and voluntarily accept these risks.
Do Not Purchase or use any parachute equipment designed, manufactured or sold by
Para-Phernalia, Inc.unless you agree to read completely, understand and follow all
manufacturers instructions, recommendations, requirements and limitations.
Do Not Purchase or use any parachute equipment designed, manufactured or sold by
Para-Phernalia, Inc.unless you have fully read , understand and accept this “Disclaimer -
No Warranty - Waiver”
* * * * * * * *

Owners Manual - Revision 1.5
3
Owner’s Record
Name:___________________________________________
Street:___________________________________________
City,State, Zip:____________________________________
Country:_________________________________________
SoftieModel:_____________________________________
Serial Number:____________________________________
DateofManufature:________________________________
DateofPurchase:__________________________________
Canopy Mfg.
Modeland Serial Number:___________________________
DateofManufacture:_______________________________
DateofPurchase:__________________________________
Notes
1. Serial numbers for both Softie and Canopy can be found as described in the Warning Placard
found just inside the front cover on page 1 of this manual.
2. If you receive your Softie assembled and packed by either the manufacturer or a properly licensed
Parachute Rigger, you will find the appropriate information listed on the Packing Data Card located
in the pocket on the TSO label in the open area between the backpad and the top of the Softie con-
tainer just behind the wearers neck.
3. The Packing Data card is your key to properly planning your repack schedule and requirements.
Refer to Section 2.1.3 of this manual, for further information regarding these requirements.
4. A separate copy of this page should be kept on file by the owner. Do not complete the form
above until you have fully read and understand the instructions, policies and limitations contained in
this manual.

Owners Manual - Revision 1.5
4
Table of Contents
Warning Placard-----------------------------------------------------------------------------------------------
Disclaimer- NoWarranty-Warning------------------------------------------------------------------------
Waiver------------------------------------------------------------------------------------------------------------
Owner’sRecord------------------------------------------------------------------------------------------------
TableofContents----------------------------------------------------------------------------------------------
CustomerService Policy andLimits----------------------------------------------------------------------
1.0GeneralInformation----------------------------------------------------------------------------
1.1 Ally in the Sky -------------------------------------------------------------------------
1.2 Softie letter ofTSO authorization ------------------------------------------------
1.3 SoftieTSO authorization -----------------------------------------------------------
1.4 Riggerqualifications ----------------------------------------------------------------
1.5 Softieparts list------------------------------------------------------------------------
2.0 UserInformation-------------------------------------------------------------------------------
2.1 Pre-flightprocedures ---------------------------------------------------------------
2.2 Wearing the Softie -------------------------------------------------------------------
2.3 Rigcleaning ---------------------------------------------------------------------------
3.0 Compatibility of Components ---------------------------------------------------------------
3.1 Canopy compatibility ----------------------------------------------------------------
3.2 Volume ----------------------------------------------------------------------------------
3.3 Softievolumechart ------------------------------------------------------------------
3.4 Optimum canopy selection --------------------------------------------------------
3.5 Canopy volume chart ---------------------------------------------------------------
3.6 Deployment type ---------------------------------------------------------------------
3.7 Deployment bag and bridle -------------------------------------------------------
3.8 Industry weight / deployment speed limitations -----------------------------
4.0 RiggerInformation-----------------------------------------------------------------------------
4.1 Parachute assembly inspection form -------------------------------------------
4.2 Round canopy packing instructions ---------------------------------------------
4.3 Assembly-------------------------------------------------------------------------------
4.4 Softie closing loop lengths --------------------------------------------------------
4.5 Flaking and folding the canopy --------------------------------------------------
4.6 Placing parachute in container ---------------------------------------------------
4.7 SoftieBack----------------------------------------------------------------------------
4.8 SoftieWedge --------------------------------------------------------------------------
4.9 SoftieSeat -----------------------------------------------------------------------------
4.10 SoftieChair --------------------------------------------------------------------------
4.11 SoftieOriginal-----------------------------------------------------------------------
4.12 Closingcontainer -------------------------------------------------------------------
4.13 Softie Back,Wedge, Chair and Original -------------------------------------
4.14 SoftieSeat ---------------------------------------------------------------------------
4.15 Installing the Softie Seat pad ---------------------------------------------------
4.16 Repairlog ----------------------------------------------------------------------------
1
2
2
3
4
8
9
10
11
12
13
14
15
16
17
19
20
21
21
21
21
22
23
23
24
25
26
29
29
30
31
31
32
33
35
37
39
41
41
43
45
45

Owners Manual - Revision 1.5
5
Customer Service Policy and Limits
Harness and Containers
PARA-PHERNALIA, INC. (PPI) will provide at no charge repair service for repairs determined to be
the resultant from defects in material or workmanship for a period of SIX MONTHS from the DATE
OF RECEIPT OF PRODUCT. Date of receipt and proof of purchase must be supplied to PPI by the
customer with the item in order to be repaired free of charge.
Service Bulletins
PPI will perform all MANDATED Service Bulletins repairs or modifications due to SAFETY con-
cerns free of charge.A fair market charge will be made for recommended Service Bulletin repairs or
modifications.
Unauthorized Modifications/Alterations
PPI will charge for repair service when the damage is determined to be caused by unauthorized
assembly, packing, modification, alteration or shipping of PPI products. PPI also reserves the right
to refuse to repair any product so handled.
Improper Use or Abuse
PPI will charge for repairs that results from improper use, or from abuse such as exposure to chemi-
cals, saltwater, improper washing, improper packing, excessive exposure to sunlight, or negligence
on the part of the user.
Product Limitations
PPI reserves the right to refuse to service equipment for which material and / or manufacturing
patterns and specifications no longer exist.
Shipping of Returns for Repairs
Articles sent in for repair should be sent in with all original components as purchased from PPI. PPI
may request and require additional information pertaining to the components sent. PPI will not be
responsible for compatibility of components not sent with system for repair and or evaluation.
Replacement Parts - Recommendations
PPI will recommend replacement of harness and container component parts based on inspection
when safety is a factor due to normal wear and tear or maintenance of the product.
Product Improvement
Product improvements are available as a cost option to customers.
January, 1997
Para-Phernalia, Inc.

Owners Manual - Revision 1.5
6
1.0 General Information

7
Owners Manual - Revision 1.5
1.1 Ally in the Sky:
Your Pilot Emergency Parachute
by: Dan Tarasievich
President, Para-Phernalia, Inc.
There is no question that a parachute can save
your life during an emergency bailout situation.
But, before you strap on that life-saving device,
you need to familiarize yourself with your
system. It is important to insure the proper fit of
a system, know how to store the system, famil-
iarize yourself with riggers who will maintain
your system on the ground, and understand how
to use the system in an emergency situation.
The size of a parachute is very important. Your
parachute system should be a size that can
handle your weight, and not specifically the
stated size of the parachute canopy. Some of
today’s 24’ and 26’canopies will descend at a
slower rate than the older and larger military
parachutes. The correct size is absolutely
mandatory when insuring safety.
Another important factor in familiarizing your-
self with your system is knowing how to store
the parachute. The longevity of your parachute
is your responsibility and is almost entirely
dependent on the proper maintenance and
storage. When not in use store the parachute in
a bag in well ventilated area away from direct
exposure to sunlight, oils, and or acids. If you
find that your parachute has come in contact
with any unsafe conditions including wetness,
have it inspected by a qualified rigger immedi-
ately.
While on the ground, besides good storage
habits, get to know your parachute rigger. If you
don’t have a local rigger get referrals from a
fellow pilot or the manufacturer of your system.
Make sure that the rigger is familiar with your
parachute system and has the proper packing
and instructions manual before having it re-
packed. At the time of the repack ask your
rigger to go over your parachute with you, Put
it on and pull the ripcord. This will insure your
awareness of the force it requires. (A 22
pound pull is all that the TSO allows.)
Establish a preflight routine of inspecting
your parachute. The condition of the para-
chute can be directly related to your safety.
A small oversight could create a safety
hazard. Check the fabric for stains or wear
and mildew. Inspect the hardware to be sure
snaps function properly and check for
corrosion. Look for fraying or knicks in the
webbing and inspect for broken or missing
stitches. Do a pin check on the ripcord by
lifting the pin protector flap and making sure
the pins are straight, and extend through the
closing loop at least 1/2” inch. Make sure
that the handle extracts from the pocket
easily. Also there should be no kinks or
dents in the housing. Finally inspect the
packing data card. Check the last date of the
inspection and repack. FAA regulations
require a parachute in use to have been
packed within the last 120 days. This
preflight routine is mandatory to maintain
the safety of your parachute.
During an emergency is not a good time to
start thinking about emergency procedures.
Plan in advance and know the three most
important variables in the decision to leave
your aircraft: attitude, altitude, and airspeed.
Attitude is not only the attitude of your
aircraft but also your personal attitude can
effect your egress. Atumbling aircraft can
be difficult to exit. Altitude is important
because a higher altitude means a better
chance of having a fully deployed parachute
before impact. A general rule of thumb is if
you have pack opening above 1000 ft. AGL,
you will have a fully deployed parachute
before hitting the ground.Airspeed will also
determine your exit. 100 MPH is ideal for a
fast parachute opening, however if you can
trade off airspeed for altitude do so.
The primary cause of most unsuccessful
bailouts are waiting too long to make the
decision to bailout and not being prepared.

Owners Manual - Revision 1.5
8
Using your parachute is most obviously your last
option. Be familiar with your particular aircraft
escape procedures and practice them often until
they are second nature. You must be able to
react instantly to save valuable time, altitude,
and your life. If you don’t have an emergency
egress procedure for your aircraft the best time
to develop one is before your next flight.
Once you have exited the aircraft, you will most
likely be tumbling. The most important thing to
do is pull the ripcord immediately and throw it
away. It takes approximately 2-3 seconds for the
parachute to fully deploy. Altitude used for
complete deployment at terminal velocity is
approximately 300-500 feet. That is not the
altitude to initiate emergency procedures, but the
distance required for deployment and opening.
Once the parachute is open, it is time to think
about steering. Guiding an open parachute
safely to the ground is a two fold operation. The
newer parachutes on the market today are
steerable and they have control toggles installed
on each riser. To turn left, pull down on the left
toggle and to turn right pull down on the right
toggle. The forward speed of a round parachute
is approximately 3-5 MPH and the 360 degree
turn rate is about 6-10 seconds. First, use this
forward speed and control of heading to maneu-
ver away from any life threatening obstacles
such as power lines or water hazards. Second,
use the forward speed of the canopy to reduce
ground speed at landing; by facing the canopy
into the wind. Your rate of decent will increase
during a turn, be careful not to make radical
turns below 100 ft.AGL. Make only small
corrections below that altitude to maintain
heading. Square parachutes have a much higher
turn rate, faster forward speed and are more
manuverable. They require that you face into
the wind and flare (similar to an aircraft) for
landing. Handled properly they land much
softer than a round parachute.
Landing is the final act in the bailout and it is
important to follow these instructions in order to
avoid injury. Steer into the wind and don’t
attempt any radical turns below 100ft. Look out
towards the horizon and hold your knees and
feet together tightly. Keep your knees
slightly bent with your toes pointed down.
Put your arms above your head holding on to
the risers and as you contact the ground, roll
in the direction you are moving when you
land.
Try to avoid obstacles if possible. If you are
going to land in a tree or power lines keep
your knees and feet together and present the
smallest possible profile to the obstacle.
Also, turn your face to the side. In the event
of a water landing, prepare for a regular
landing except land downwind so your
parachute will land out in front of you and
not on top of you. Unfasten the leg and
chest straps and swim upward away from the
parachute so as not to get entangled in the
lines. If you land during high winds, after
landing roll onto your back and deflate the
parachute by pulling in one; or two adjacent
lines hand over hand to spill the air from and
collapse the canopy. Also jettison the
parachute harness and cover the parachute
as to not re-inflate it. There is a lot to
remember in a bailout so it is important that
you plan ahead and review your plan of
action in case of an emergency.
Parachute systems may seem like expensive
cushions that we carry needlessly on our
back or sit on without regard. That cushion,
however is a highly specialized life saving
device and is vitally important to your air
safety. Get to know your parachute system
and soon you will realize what an ally that
cushion can be and why you should never
leave the ground without it.
* * * * *

9
Owners Manual - Revision 1.5
1.2 Softie Letter ofTSO Authorization

Owners Manual - Revision 1.5
10
1.3 SoftieTSO Certification
The Softie harness and container systems are approved under FAATSO-C23b, Standard Category
and certified for use in a variety of weight and speed combinations. Use limitations will depend on
the canopy weight and speed limitations and the TSO category under which canopy certification was
achieved. See section 3.8 for information concerning limitations of the canopy which has been
assembled with the users Softie. For questions regarding limitations and certifications consult a
qualified FAA Rigger or call Para-Phernalia, Inc. at 360-435-7220 or FAX at 360-435-7272.
1.4 Rigger Qualifications
In order to pack and maintain this parachute system, the FAA Senior or Master Rigger - or foreign
equivalent - must possess an appropriate rating endorsement to their certificate. All Softie models
require a Back rating except the Seat model which requires a Seat rating endorsement. Because the
Back models are also certified compatible with ramair parachutes when assembled with the Para-
Phernalia ramair parachute deployment bag, the Rigger should be appropriately trained in the assem-
bly and packing of these canopies prior to certifying the Softie for emergency use.
No certificated parachute rigger may -
(e) Pack, maintain, or alter a parachute in any manner that deviates from
the procedures approved by an FAA administrator OR the
manufacturer of the parachute; or
(f) Exercise the privileges of his certificate and type rating unless he
understands the current manufacturer’s instructions for the operation
involved.
Note:
ANYONE who circumvents Para-Phernalia, Inc., assembly and packing instructions, or the packing
instructions of the manufacturer of any of the component parts assembled with the Softie harness
and container system, is in violation of FAR Part 65.129 and is therefore performing an illegal
procedure.

11
Owners Manual - Revision 1.5
1.5 Softie Parts list
QUANTITY DESCRIPTION
1 HARNESS/CONTAINERASSEMBLY
1 SOFTIE RIPCORD - BACK (OR)
1 SOFTIE RIPCORD - SEAT
1 FREEBAG AND BRIDLE (SQUARE CANOPY ONLY)
1 PILOT CHUTE BRIDLE
2 STEERING LOOPS - (OR)
2 SQUARE CANOPY STEERING LOOPS (SQUARE CANOPY ONLY)
1 SAFETY STOW LOOP (SQUARE CANOPY ONLY)
1 CLOSING LOOP
1 PILOT CHUTE GROMMET STRAP
1 OWNER’S MANUAL AND PACKING INSTRUCTIONS
1 PILOT CHUTE - SUPPLIED ONLY WITH SOFTIE PURCHASED COM-
PLETE WITH PARACHUTE DIRECT FROM MANUFACTURER. PARA-PHERNALIA
SUPPLIES COMPLETE SOFTIES WITHTHE NATIONAL PARACHUTE INDUS-
TRIES - 357 MAGNUM PILOT CHUTE (OR EQUIVELENT). ONLY PILOTCHUTES
WITH SIX (6) INCH DIAMETER BASE AND CAP ARE COMPATIBLE WITH THE
SOFTIE SYSTEM.
NO SUBSTITUTION OFCOMPONENT PARTS ISAUTHORIZED

Owners Manual - Revision 1.5
12
2.0 User Information

13
Owners Manual - Revision 1.5
2.1 Pre-flight Procedures
The Softie harness and container system is designed, tested, manufactured and delivered according
to the highest possible industry standards. It is up to the owner to maintain it in top condition. Below
are certain areas that you and/or your rigger should check on a regular basis to ensure proper opera-
tion and long life of your equipment.
2.1.1 Before Each FlightYou Should Check:
1. Ripcord and housing for tackings, damage, proper seating and / or
obstructions.
2. Ripcord pins, cable, handle and pocket for proper seating, wear
and / or damage.
3. All harness webbing and hardware for wear or damage.
Note:
IFANYWEAR OR UNUSUAL CONDITION IS FOUND, CONSULT PARA-PHERNALIA, INC.
ORAQUALIFIED PARACHUTE RIGGER IMMEDIATELY!
2.1.2 After PuttingYour Rig On, Check:
1. Ripcord handle secure in its pocket.
2. Chest strap is properly threaded and running end secured
3. Leg straps are properly threaded and loose ends are stowed.
2.1.3 120 Day Maintenance
FAA Regulations require that: If you wear a parachute while operating an aircraft in US airspace or
allow a passenger to wear a parachute while you are operating an aircraft in US airspace; which has
not been certified as airworthy by an appropriately certificated FAA Senior or Master Rigger, you are
in violation of the pertinent FAARegulations.
During original assembly and packing and / or recertification, your rigger should thoroughly inspect
your Softie to ensure that all components are in airworthy condition. This inspection should include:
1. Pilot chute, grommet strap, bridle and tackings, (deployment bag and safety
stow if square canopy is employed),
2. Canopy fabric and lines (including orientation and continuity check).
3. Connector links tight.
4. Ripcord pocket secure.
5. Harness and container (including ripcord housing and tackings, and ripcord
assembly).in good airworthy condition.

Owners Manual - Revision 1.5
14
2.1.4 Major Alterations / Repair
Para-Phernalia, Inc. does NOT authorize major alterations or repairs to the Softie harness and con-
tainer system. Any major alterations or repairs must be made by the manufacturer or a designated
representative. Contact Para-Phernalia, Inc. at 360-435-7220 for the name of a properly certificated
FAA Master Rigger in your area.
2.2 Wearing the Softie
There are five points of adjustment on the Softie harness
1. Shoulder adapters (two): Factory preset at medium adjustment. should be
adjusted prior to donning the harness.
2. Chest strap (one): With either adjustable v-ring and snap hardware
or thread through adapters.
Note:
THE PAD ON THE LEFTSIDE OF THE HARNES IS DESIGNED TO PREVENTTHE CHEST
STRAPFROM BEING THREADEDTHROUGH THE RIPCORD HANDLE. WHENTHREADING
THE CHEST STRAPWITH THE BUCKLE ONTHE RIGHT SIDE OF THE HARNESS, BE
AWARE THAT IMPROPERTHREADING COULD RESULT INAN IMPOSSIBLE RIPCORD
PULL.
3. Leg straps (2): With either v-ring and snap hardware or thread through
adapters.
Note:
THE SOFTIE ISALSOAVAILABLE WITH THE “A” HARNESS OPTION. INTHIS CONFIGU-
RATION, NO CHESTSTRAP IS PRESENTBUT THE SAME CAUTIONS REGARDING
RIPCORD HANDLE INVOLVEMENTWHEN MAKING HARNESS CONNECTIONSAPPLY.
Figure 2.2
2.2.1 Fit
Your Softie should be, above all else, comfortable. But, the real reason any pilot or passenger in an
aircraft is wearing a parachute is in case an emergency bailout becomes necessary. If that should
happen, the person using the parachute will reduce the risk of problems during egress and opening if
the harness is worn snugly around the body. Take the time to properly adjust the fit of your Softie
whether for yourself or for a less experienced passenger. The following steps should be taken to
insure proper fit.
15
Owners Manual - Revision 1.5
Putting on the Conventional Harness:
1. Place the harness over the shoulders and hold each of the two (2) leg strap snaps snugly at each hip. If the
main lift webbing is correctly adjusted, the shoulder adapters will sit just in front of the shoulder below the
collarbone. The wearer should be able to stand erect and the container should not sit low on the back.
2. If necessary, remove the Softie to make any adjustments to the shoulder adapters and be sure to stow any
additional riser exposed during adjustment.
3. With the Softie back on your shoulders bend forward and grasp the bottom of the container; raising the
container so that it rests high on the back.
4. Reach between your legs and take hold of one of the leg straps.
5. Identify that it is either left or right. Remove any twists and fasten the leg strap v-ring adapter to the
appropriate snap. The snap should “Snap” shut. Be sure that no clothing or other obstructions are caught in
the snap.
6. Repeat steps 4 and 5 with the opposite leg strap.
7. Now stand erect and fasten the chest strap; either with the thread through buckle or with snap and adjustable
v-ring. Tighten the chest strap but not so much as to distort the main lift webbing. Stow any free-end excess
in the elastic band.
8. Reach down and grasp both leg strap free ends and tighten the leg straps. Stow any excess leg strap free-
end in the elastic keeper. Snug while standing erect is sufficient. When you sit down in the aircraft the
harness will now feel loose and comfortable.
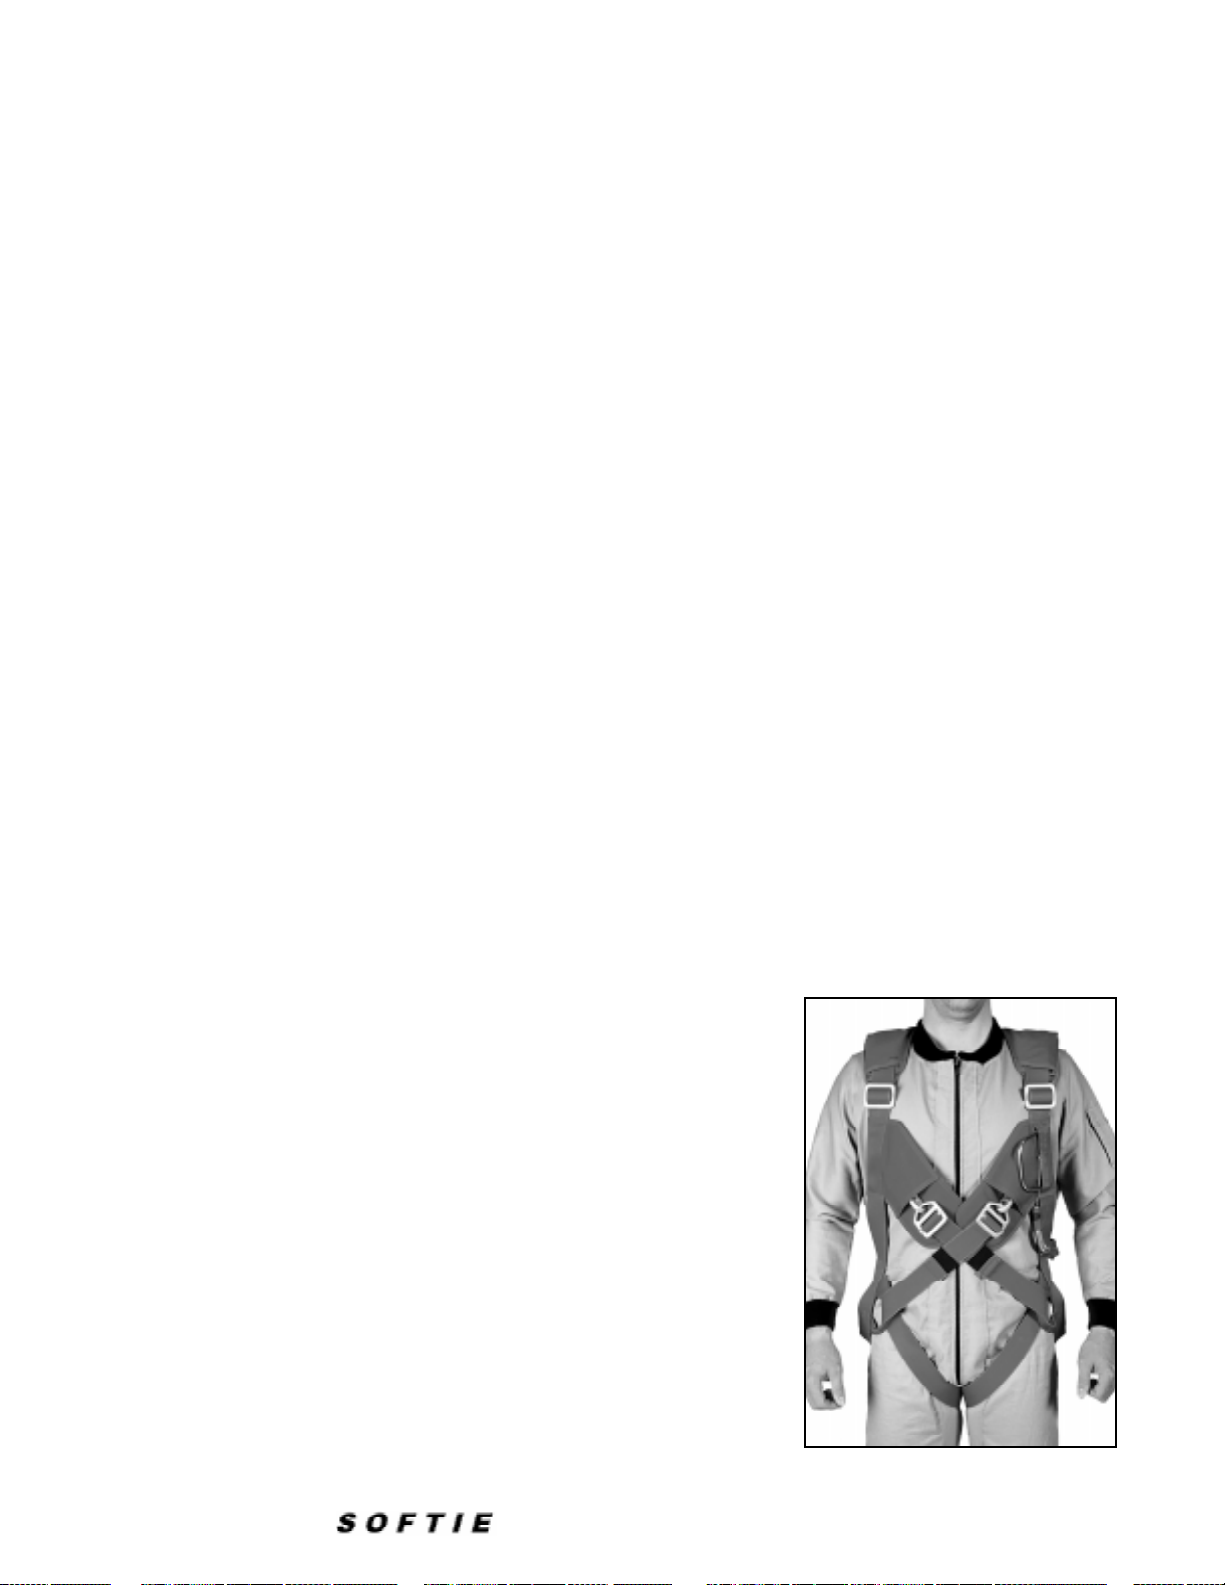
Putting on the“A” Harness:
1. Place the harness over your shoulders and hold each of the leg strap loops at each hip. If the main lift
webbing is adjusted correctly, the shoulder adapters will sit in front of your shoulder just under the collarbone.
2. If necessary, remove the Softie to make any adjustment to the shoulder adapters.. To make the main lift
web longer - pull abut 1” of the riser webbing out of the riser protector (velcro) flap and extend it thru the
shoulder adapters. To make the main lift web shorter - run the main lift webbing up thru the shoulder adapters
and stow the excess in the riser protector (velco) flaps.
3. With the Softie back on your shoulders bend forward and grasp the
bottom of the container, raising the container so that it rests high on the
back.
4. Reach between your legs and take hold of the left leg strap, remove
any twists.
5. Bring the left leg strap between your legs and thread it thru the loop
on your left hip (inside to out), then continue across your chest to the
snap on the right side of your chest.
6 Repeat steps 4 & 5 with the right leg strap. The harness configuration
should look as it does in figure 2.2
.
7. Stand erect and tighten the harness by pulling on the ends of the
harness webbing. Stow any excess webbing in the elastic keepers.
8. When you sit down the harness will feel much looser due to the
geometry of the “A” harness. When seated in the aircraft snug up the
harness and restow the excess webbing.
Figure 2.2

Owners Manual - Revision 1.5
16
Notes on Cleaning Agents
The following procedures should be used with all cleaning agents. A clean, white cloth dampened with
the recommended cleaning agent should be used in an inconspicuous place to test for colorfastness.
Optimum cleaning will be achieved by not overwetting the cloth and by turning it frequently to keep it
clean. Rings can be avoided by working from the outer edge of the spot toward the center. This process
should be repeated until the spot is removed or there is no further transfer to the cloth.
1Detergent.........................................................One teaspoon neutral powder detergent (e.g. Tide or All)
in 1 pint warm water.
2Ammonia.........................................................A 3% solution.
3Vinegar............................................................White vinegar or a 10% acetic acid solution
4Solvent.............................................................Dry cleaning fluid - preferably 1.1.1 trichlorethane
5Paint remover..................................................Paint remover with no oil in it.
NOTE: Oily and greasy stains — In addition to the recommended method, some stains (e.g. perspiration/
body oils) respond well to dry cleaners such as “HOST” (Racine Industries), “CAPTURE” (Milliken) and
“K2R” (Texize). Carefully follow directions on the label.
* Recommendations based on fabrics finished with Du Pont Teflon® WBC Soil and Stain Repellent for
CORDURA®. The methods were effective on stains that were allowed to sit untreated overnight. Re-
moval is usually easier when stains are cleaned immediately.
STAIN REMOVAL METHOD
Coffee, Fruit Juice, Milk, Soft Drinks,Tea, Tabasco Sauce,Wine, Urine Detergent1/blot/water/blot
Catsup, Chocolate, Blood Detergent/blot/ammonia2/blot/water/blot
Mustard Detergent/blot/vinegar3/blot/water/blot
Spicy mustard (turmeric), Kool- Aid® Solvent4/blot/detergent/blot/vinegar/blot/water/blot
Cooking oil, Crayon, Lipstick, Mayonnaise, Motor oil, Show polish Solvent4/blot/detergent/blot/water/blot
Chewinggum Freeze with ice cube/ scrape/solvent/blot/ deter
gent/blot/water/blot
Furniture polish, Ink (Permanent) Paint remover5/blot/solvent/blot/detergent/blot/
ammonia/blot/vinegar/blot/water/blot
Furniture polish, Shoe polish Seek the help of a professional upholstery cleaner
If you have any questions regarding proper fit consult a qualified rigger or parachute dealer or call Para-
Phernalia, Inc. at 360-435-7220. Or FAX at 360-435-7272.
2.3 Rig Cleaning - CORDURA®
Note:
These cleaning tips are for container only and are to be used for spot cleaning only. Para-Pherna-
lia, Inc. does not recommend attempting to clean major stains without the assistance of a quali-
fied rigger. Furthermore Para-Phernalia, Inc. does not in any way recommend the end user
attempt to clean the harness or the parachute components of the Softie system.
Table IV - CORDURA Recommended Stain Removal Methods*

17
Owners Manual - Revision 1.5
THIS PAGE INTENTIONALLY LEFT BLANK

Owners Manual - Revision 1.5
18
3.0 Compatibility of Components
This manual suits for next models
11
Table of contents


