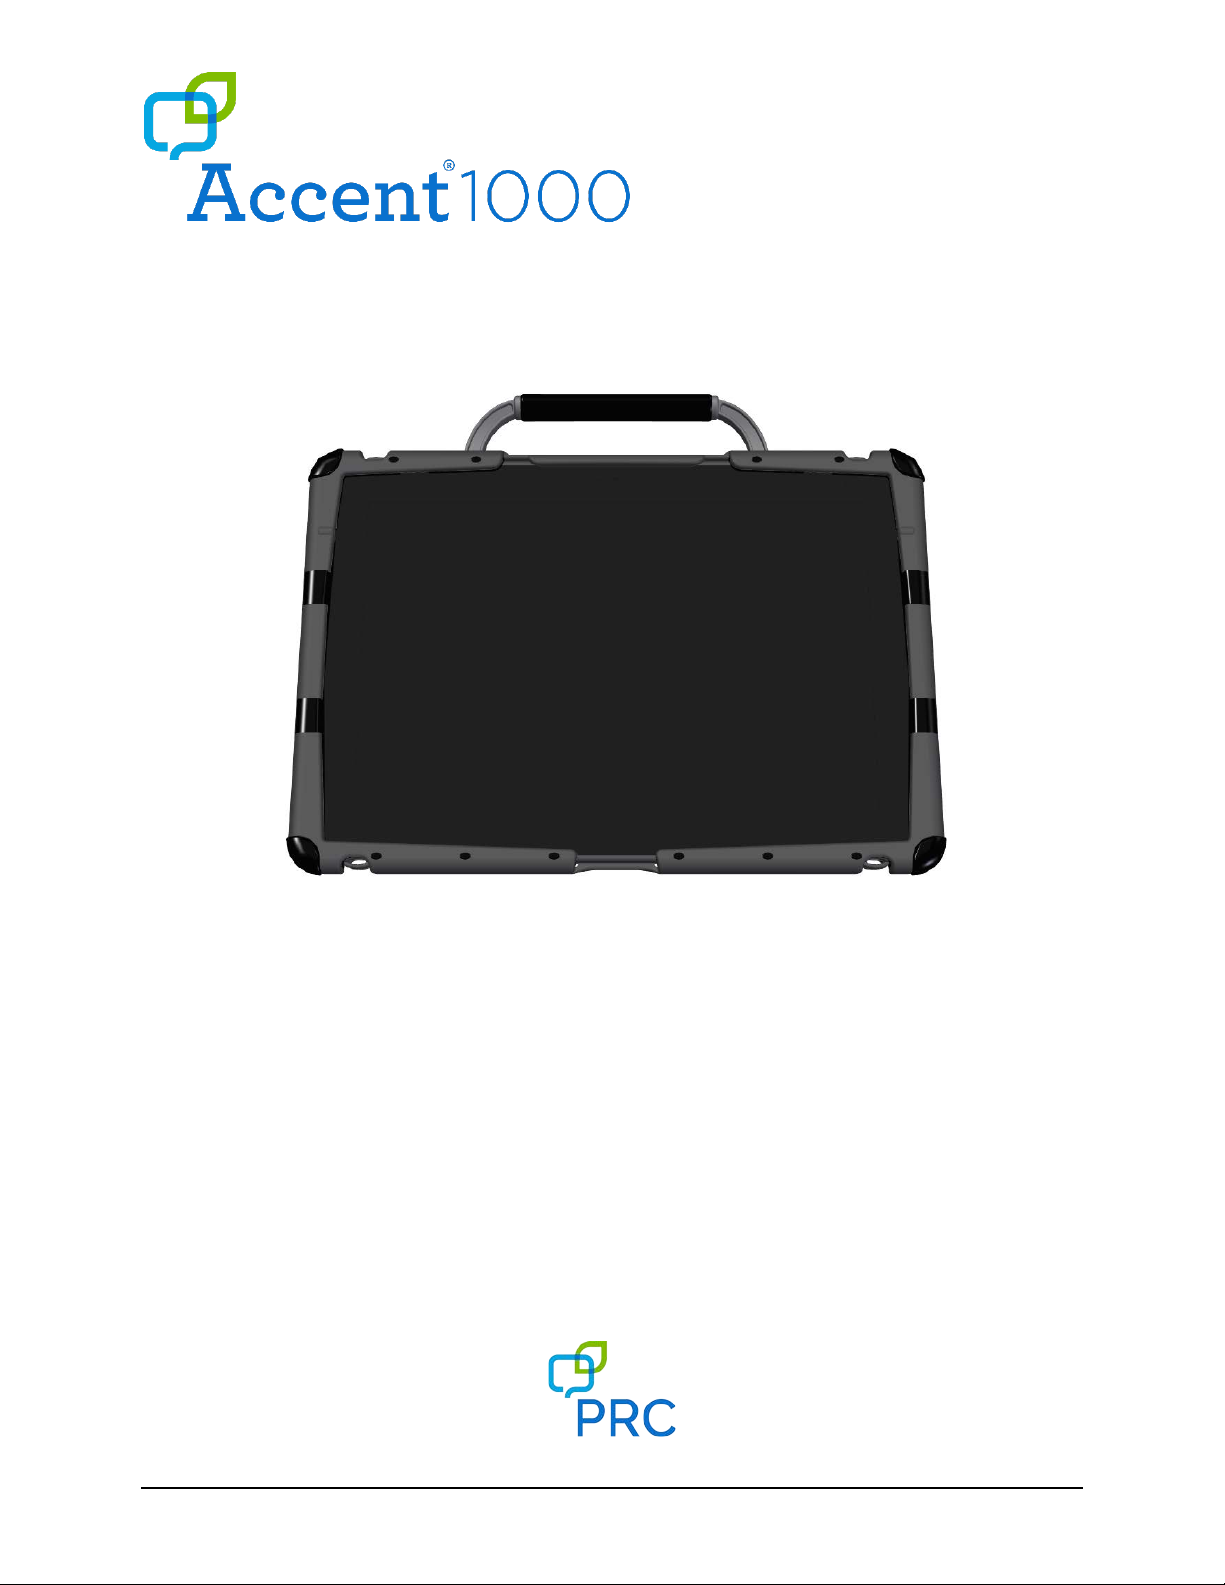
PRC-Saltillo Accent 1000 User manual
ACN100030hw-v1.01
Hardware Manual
For Accent®1000 Devices with Empower™Software
Applies to Accent 1000 Models with
Serial Numbers 10000AC10 and Higher

Accent 1000 Hardware Manual 2
Copyright and Trademark Information
© 2017-2019 PRC-Saltillo. Non-commercial reprint rights for clinical or personal use granted with inclusion of copyright notice. Commercial use prohibited; may not
be used for resale. Contact PRC-Saltillo for questions regarding permissible uses.
Accent, CoreScanner, Empower, Essence, Freedom Switch, LAMP Words for Life, Look, NuEye, NuPoint, and NuVoice are trademarks of PRC-Saltillo.
The MINSPEAK®, SEMANTIC COMPACTION®, UNITY®, and UNIDAD® trademarks are under license from Semantic Compaction Systems, Inc. in the United States and
other countries.
The Bluetooth® word mark and logos are registered trademarks owned by the Bluetooth SIG, Inc. and any use of such marks by PRC-Saltillo is under license.
CAVIWIPES is a trademark of Metrex Research LLC.
Intel and Intel Atom are trademarks of Intel Corporation or its subsidiaries in the U.S. and/or other countries.
Microsoft and Windows are registered trademarks of Microsoft Corporation in the United States and/or other countries.
The Skype name, associated trademarks and logos and the “S” logo are trademarks of Skype or related entities.
Velcro is a registered trademark of Velcro BVBA.
Wi-Fi is a registered trademark of Wi-Fi Alliance.
Windex is a registered trademark of S. C. Johnson & Son, Inc.
WordPower is a trademark of Inman Innovations, Inc.
Contact Information
PRC-Saltillo
1022 Heyl Rd
Wooster, OH 44691
(330) 262-1984 • (800) 262-1984
www.prentrom.com
Document Version
ACN10030hw-v1.01 ∙ 07/22/2019
Applies to Accent 1000 models with serial numbers 10000AC10 and higher

Accent 1000 Hardware Manual 3
End User Licensing Agreement
You have acquired a PRC device which includes software licensed by PRC-Saltillo from Microsoft Licensing Inc. or its affiliates ("MS"). Those installed software
products of MS origin, as well as associated media, printed materials and "online" or electronic documentation (software) are protected by international intellectual
property laws and treaties.
IF YOU DO NOT AGREE TO THIS END USER LICENSE AGREEMENT (EULA), DO NOT USE THE DEVICE OR COPY THE SOFTWARE. INSTEAD, PROMPTLY CONTACT PRC-
SALTILLO FOR INSTRUCTIONS ON RETURN OF THE UNUSED DEVICE(S) FOR A REFUND. ANY USE OF THE SOFTWARE, INCLUDING BUT NOT LIMITED TO USE ON THE
DEVICE, WILL CONSTITUTE YOUR AGREEMENT TO THIS EULA (OR RATIFICATION OF ANY PREVIOUS CONSENT).
GRANT OF SOFTWARE LICENSE.
This EULA grants you the following license:
•You may use the SOFTWARE only on your PRC device.
•NOT FAULT TOLERANT. THE SOFTWARE IS NOT FAULT TOLERANT. PRC-SALTILLO HAS INDEPENDENTLY DETERMINED HOW TO USE THE SOFTWARE AND MS
HAS RELIED UPON PRC-SALTILLO TO CONDUCT SUFFICIENT TESTING TO DETERMINE THAT THE SOFTWARE IS SUITABLE FOR SUCH USE.
•NO WARRANTIES FOR THE SOFTWARE. THE SOFTWARE is provided "AS IS" and with all faults. THE ENTIRE RISK AS TO SATISFACTORY QUALITY,
PERFORMANCE, ACCURACY, AND EFFORT (INCLUDING LACK OF NEGLIGENCE) IS WITH YOU. ALSO, THERE IS NO WARRANTY AGAINST INTERFERENCE WITH
YOUR ENJOYMENT OF THE SOFTWARE OR AGAINST INFRINGEMENT. IF YOU HAVE RECEIVED ANY WARRANTIES REGARDING THE DEVICE OR SOFTWARE,
THOSE WARRANTIES DO NOT ORIGINATE FROM, AND ARE NOT BINDING ON, MS.
•Note on Java Support. The SOFTWARE may contain support for programs written in Java. Java technology is not fault tolerant and is not designed,
manufactured, or intended for use or resale as online control equipment in hazardous environments requiring fail-safe performance, such as in the operation
of nuclear facilities, aircraft navigation or communication systems, air traffic control, direct life support machines, or weapons systems, in which the failure of
Java technology could lead directly to death, personal injury or severe physical or environmental damage. Sun Microsystems, Inc. has contractually obligated
MS to make this disclaimer.
•No Liability for Certain damages. EXCEPT AS PROHIBITED BY LAW, MS SHALL HAVE NO LIABILITY FOR ANY INDIRECT, SPECIAL CONSEQUENTIAL OR
INCIDENTAL DAMAGES ARISING FROM OR IN CONNECTION WITH THE USE OR PERFORMANCE OF THE SOFTWARE. THIS LIMITATION SHALL APPLY EVEN IF
ANY REMEDY FAILS OF ITS ESSENTIAL PURPOSE. IN NO EVENT SHALL MS BE LIABLE FOR ANY AMOUNT IN EXCESS OF U.S. TWO HUNDRED FIFTY DOLLARS
(U.S. $250.00).
•Limitations on Reverse Engineering, Decompilation and Disassembly. You may not reverse engineer, decompile, or disassemble the SOFTWARE, except and
only to the extent that such activity is expressly permitted by applicable law notwithstanding this limitation.
•SOFTWARE TRANSFER ALLOWED BUT WITH RESTRICTIONS. You may permanently transfer rights under this EULA only as part of a permanent sale or transfer
of the Device, and only if the recipient agrees to this EULA. If the SOFTWARE is an upgrade, any transfer must also include all prior versions of SOFTWARE.
•EXPORT RESTRICTIONS. You acknowledge that SOFTWARE is subject to U.S. export jurisdiction. You agree to comply with all applicable international and
national laws that apply to the SOFTWARE, including U.S. Export Administration Regulations, as well as end-user, end-use and destination restrictions issued
by U.S. and other governments. For additional information see http://www.microsoft.com/exporting/.

Accent 1000 Hardware Manual 4
Contents
Introduction........................................................................................................................................................... 5
Safety Information................................................................................................................................................. 5
Overview of Features............................................................................................................................................. 7
Front View .................................................................................................................................................................7
Back View ..................................................................................................................................................................8
Left Side View............................................................................................................................................................9
Right Side View..........................................................................................................................................................9
Commonly Used Features .......................................................................................................................................10
Charging the Battery............................................................................................................................................ 12
Positioning or Removing the Wire Stand ............................................................................................................. 13
Positioning the Wire Stand......................................................................................................................................13
Removing the Wire Stand........................................................................................................................................14
Removing or Reattaching the Handle................................................................................................................... 14
Attaching or Removing the Port Cover................................................................................................................. 15
Mounting the IR Reflector ................................................................................................................................... 16
Applying a Screen Protector ................................................................................................................................ 18
Removing or Replacing the Device Frame............................................................................................................ 19
Removing the Frame ...............................................................................................................................................19
Attaching the New Frame .......................................................................................................................................20
Attaching the Frame More Securely........................................................................................................................21
Attaching, Raising, and Removing a Keyguard ..................................................................................................... 22
Attaching the Keyguard ...........................................................................................................................................22
Raising the Keyguard ...............................................................................................................................................23
Removing the Keyguard ..........................................................................................................................................23
Attaching or Removing a TouchGuide.................................................................................................................. 24
Attaching the TouchGuide.......................................................................................................................................24
Removing the TouchGuide ......................................................................................................................................24
Attaching a Carry Strap ........................................................................................................................................ 25
Attaching a Strap Handle ..................................................................................................................................... 26
Attaching a QRM Mounting Plate ........................................................................................................................ 27
Mounting a NuPoint Module ............................................................................................................................... 28
Cleaning and Disinfecting..................................................................................................................................... 29
Routine Cleaning and Disinfecting ..........................................................................................................................29
Disinfecting a Device and Accessories for Multiple Users.......................................................................................30
Disposing of the Device or Battery....................................................................................................................... 31
Appendix A: Compliance Information .................................................................................................................. 32

Accent 1000 Hardware Manual 5
Introduction
The Accent® 1000 is a speech-generating device that offers user-friendly features to make speaking fast
and easy for individuals with severe speech impairments. This manual describes how to use and
maintain your device.
Safety Information
Emergencies
This device is not intended to be an emergency call device or sole communication aid.
Cleaning, Maintaining, and Servicing
Do not attempt to service or maintain the device while it is in use. Disconnect the charger and turn off the
device before cleaning or disinfecting the device.
If your device or an accessory is damaged, call Service for assistance. Do not attempt to make repairs yourself.
Accessories
Do not use accessories, detachable parts, or materials not described in this manual.
Do not use accessories, detachable parts, or materials in any other way than described in this manual.
Mounting and Positioning
Any mounts used should be fitted by a qualified person. Failure to install the mounting system according
to the manufacturer's instructions may result in an injury to the user. Be certain that the user’s view is not
obstructed by the mounting.
Analysis of positioning by a qualified person is required to prevent repetitive stress injuries to the user.
Vision and Hearing
Consult your vision care provider about device positioning considerations for the user.
Excessive volume or sound pressure level when using earphones or headphones can cause hearing loss
over extended periods of time. Set the volume at a low level and increase it only enough that you can
hear comfortably.
Small Parts, Cords, Cables, and Straps
Cords, cables, and straps are potential entanglement or strangulation hazards. Please consider this prior
to placing these items with device users.
Small parts could present a choking or other hazard.
If the stand is removed, it becomes a potential hazard for choking or for poking the eye. Store it in a safe
location.
Screen
Do not use the device if the screen is cracked or broken.
Interference
When operating this device in a medical environment, do not use with any product that is not medically
approved. Follow all rules for appropriate wireless device use.
Do not use this device close to sources of RF/RFID radiation or you may encounter interference. Move
away, if possible, from the source of the interference.

Accent 1000 Hardware Manual 6
Batteries and Charging
Use only the battery charger provided with your device.
Do not place the device where it is difficult to operate or difficult to disconnect from the charger.
Locate the device in a safe location while charging.
Do not insert any object into the charging port. This can result in damage to the port.
To avoid electric shock and damage to your device, do not charge the device while it is wet or in an area
where it could get wet. Do not handle the device, charger, or cords with wet hands.
If the charger or charger cord is damaged, call Service for a replacement.
Touching the Surface
Touching the surface of the device with broken skin may aggravate a wound.
Infants or high-risk groups should not touch the surface of the device if there is a chance of burning the
skin.
Implantable Medical Devices
A minimum separation of six (6) inches should be maintained between a handheld wireless mobile device and an
implantable medical device, such as a pacemaker, implantable cardioverter defibrillator, vagus nerve stimulator,
shunt, or stent, to avoid potential magnetic interference with the device. Persons who have such devices:
•Should ALWAYS keep the mobile device a minimum of six (6) inches from their implantable medical device;
•Should not carry the mobile device in a breast pocket;
•Should move the mobile device away from themselves immediately if there is any reason to suspect that
it is interfering with the implantable medical device;
•Should read and follow the directions from the manufacturer of the implantable medical device. If you
have any questions about using your wireless mobile device with an implantable medical device, consult
your health care provider.
Accent 1000 Hardware Manual 7
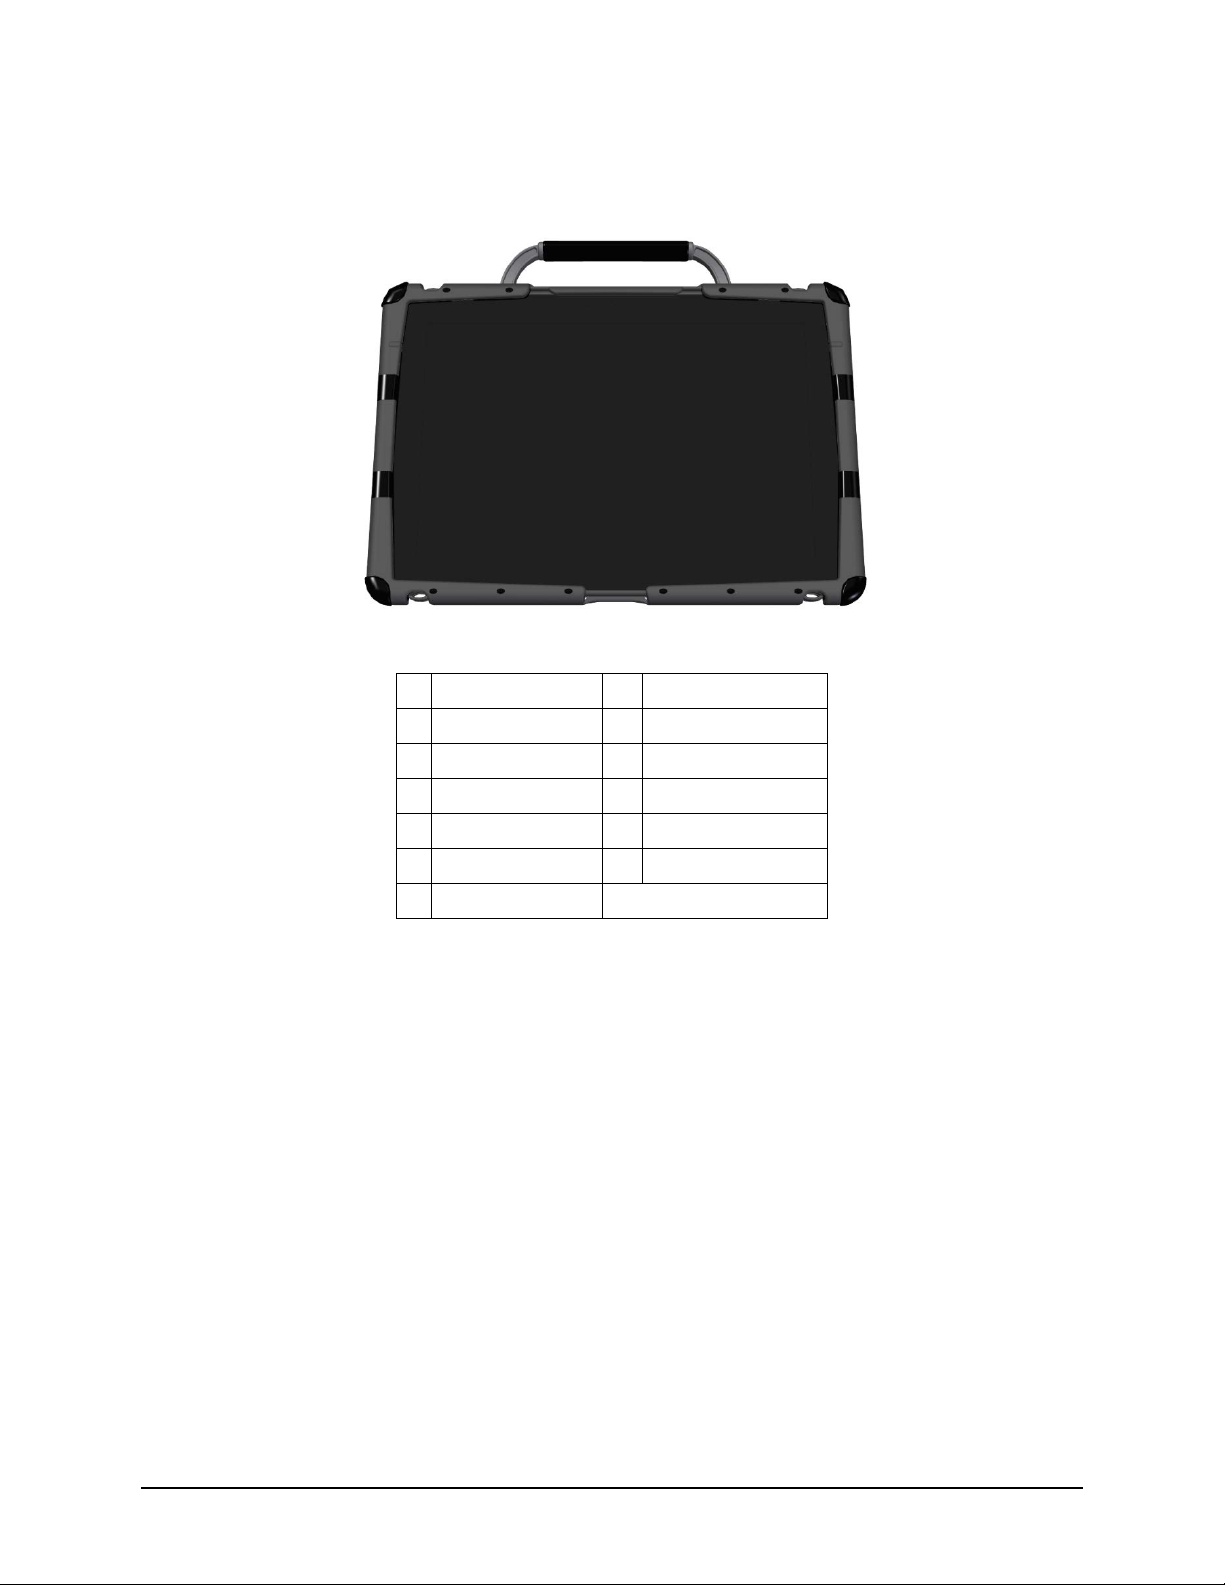
Overview of Features
Front View
1 Handle 8 Microphone
2 Light sensor 9 Battery/charging LED
3 Camera indicator 10 Power LED
4 Front camera 11 Display screen
5 Power button 12 Tools key
6 Carry strap holders 13 Microphone
7 Volume button
1
13
2
3
4
12
6
6
6
6
7
8
11
5
9
10
Accent 1000 Hardware Manual 8
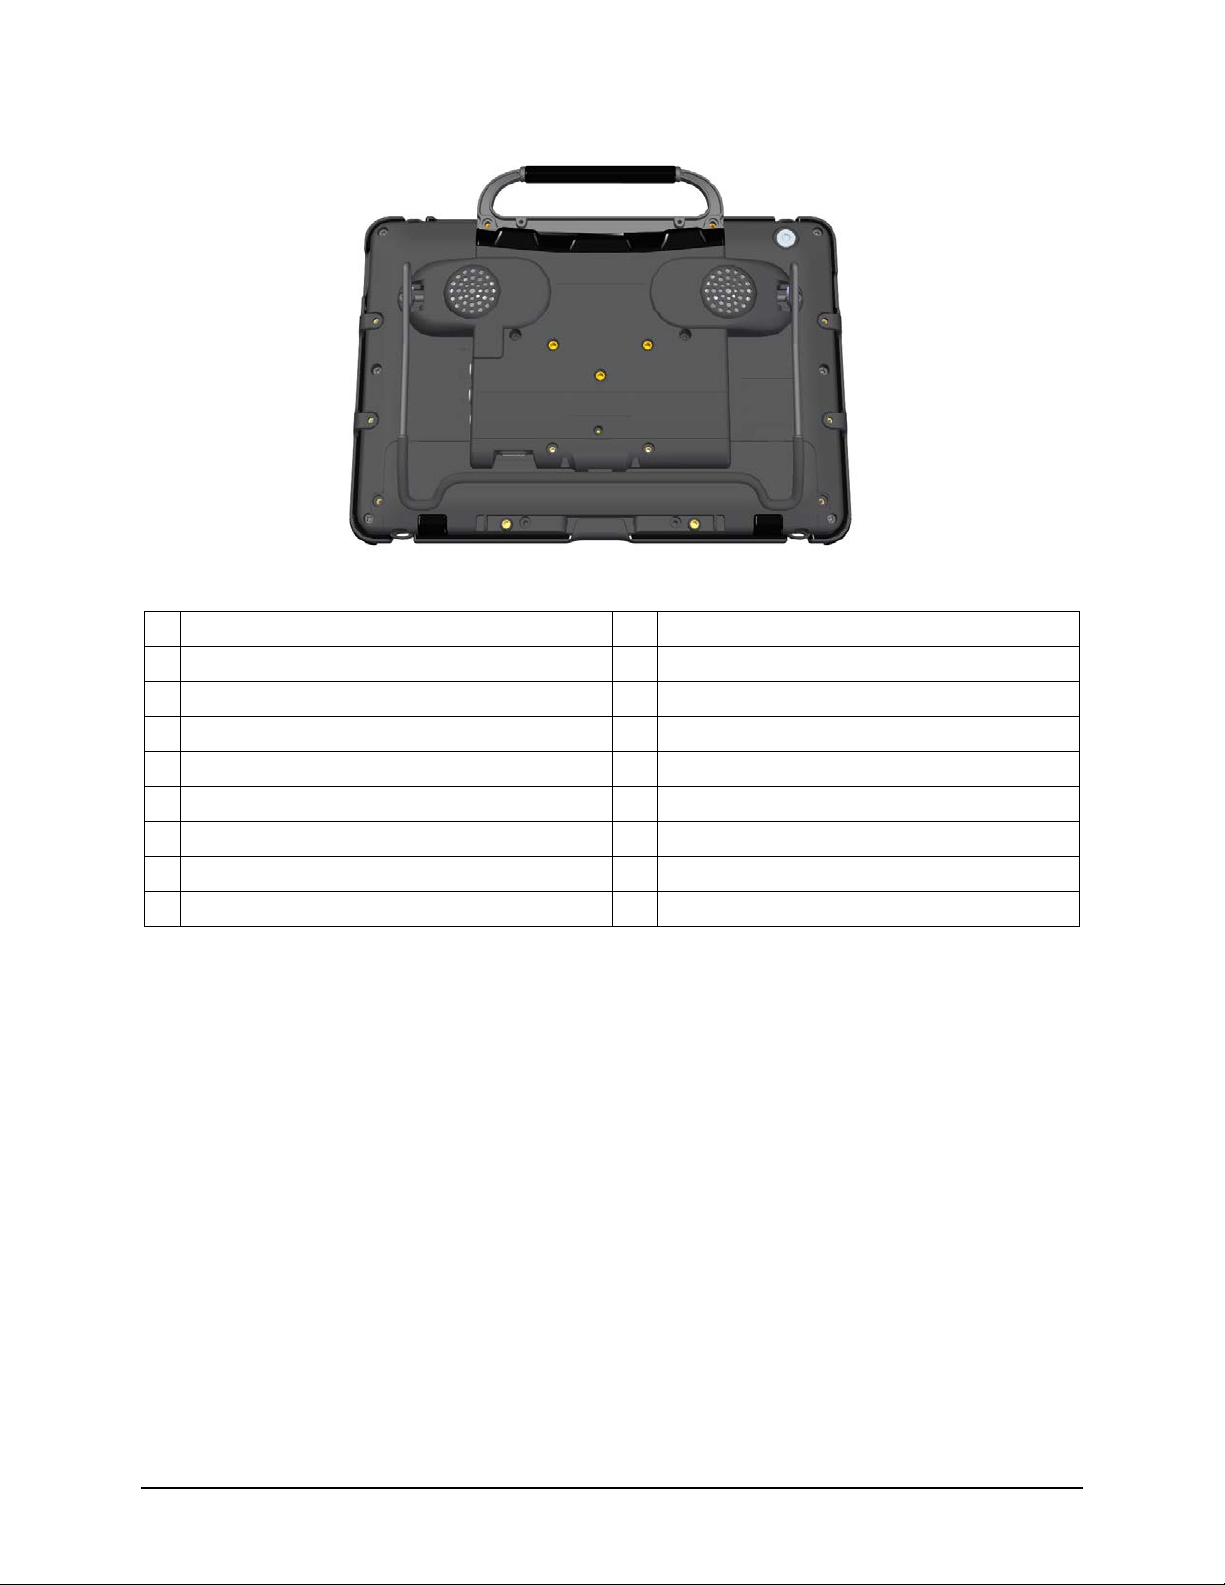
Back View
1 Handle 10 USB 2.0 port for eye tracking module
2 Mini USB connector for NuPoint®head tracker 11 Replaceable battery (under cover)
3 Attachment point for handle or NuPoint head tracker 12 Attachment points for eye tracking module
4 Rear camera 13 Battery cover screws
5 SD card slot 14 Headphone jack
6 USB 3.0 port 15 Switch jack B *
7 USB 2.0 ports 16 Switch jack A *
8 External computer access mini port 17 Charging port
9 QRM mounting plate location (plate optional) 18 HDMI port
* If you use a switch or switches for access to your device, plug them into switch jacks A and B. To use
a joystick, you will need a Y-adapter. If you have a joystick plugged in and it does not respond
normally, reverse the way it is plugged in (plug switch A into jack B, switch B into jack A).
1
2
3
3
4
9
10
12
12
11
13
13
5
6
7
8
14
15
17
18
16
7
Accent 1000 Hardware Manual 9
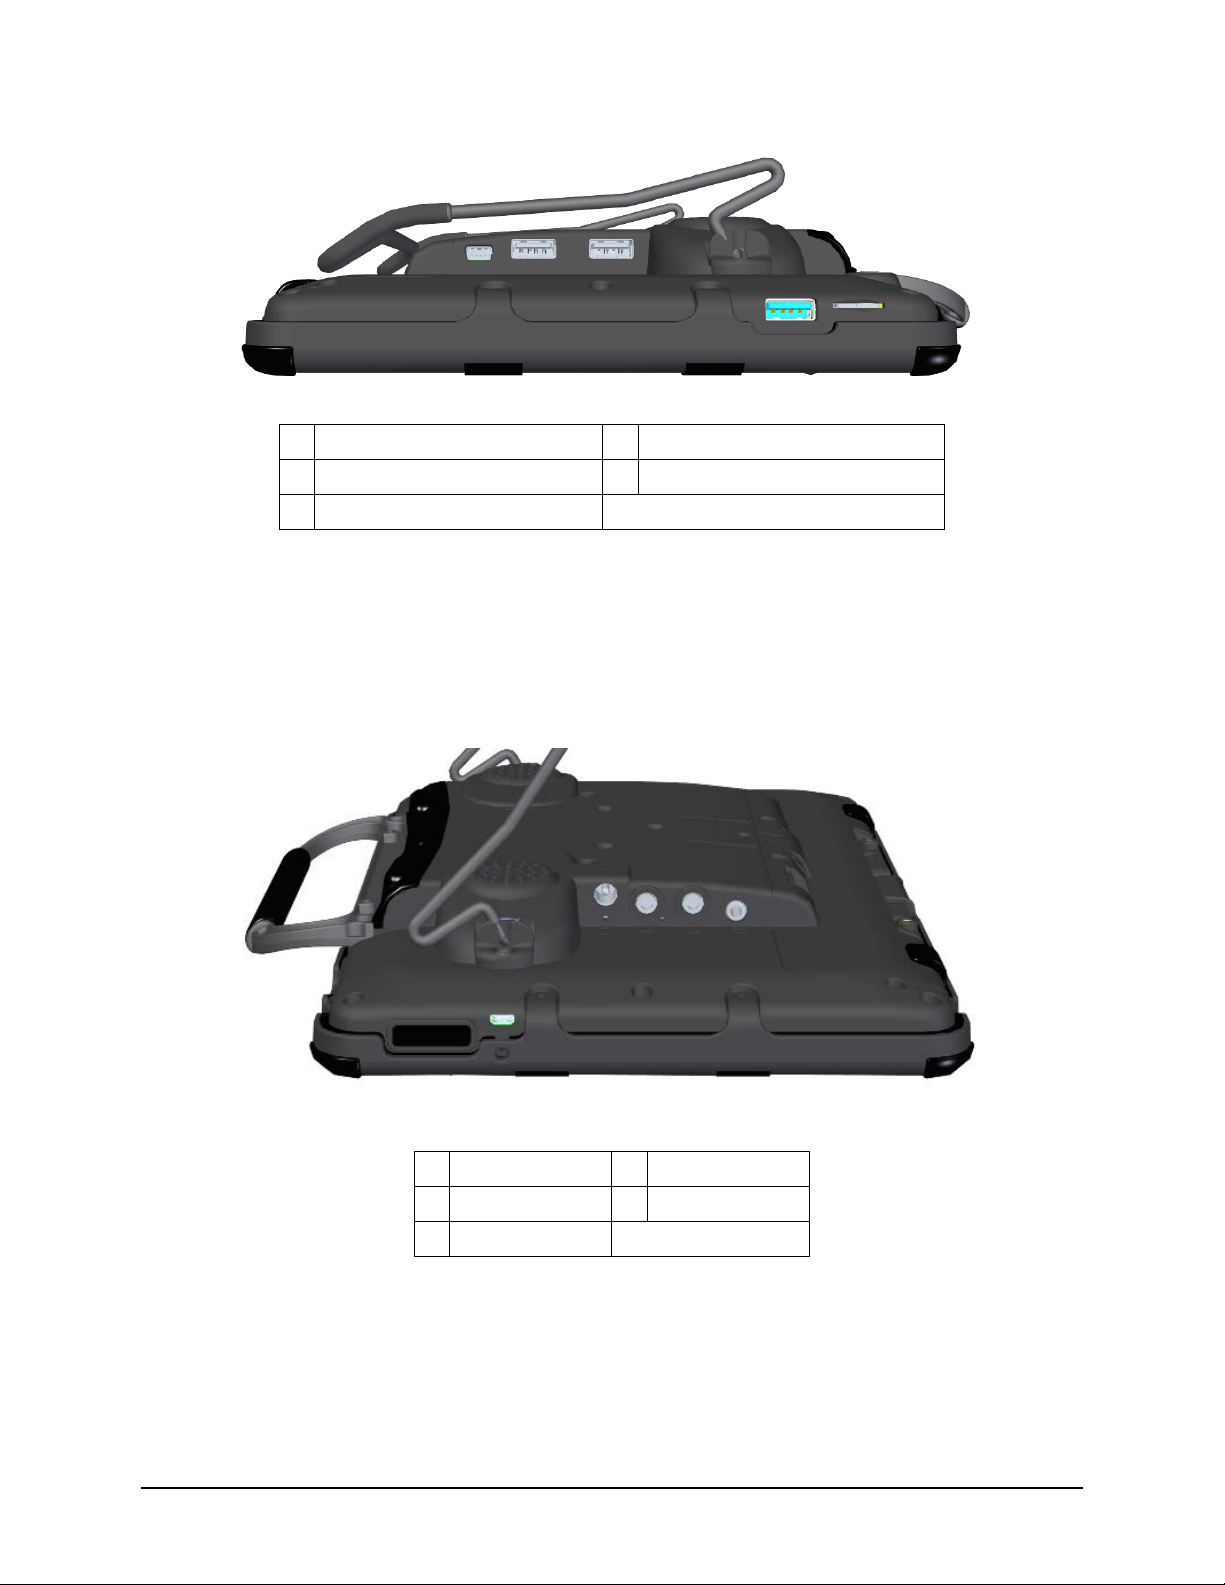
Left Side View
1 External computer access mini port 4 USB 3.0 port *
2 USB 2.0 port ** 5 SD card slot
3 USB 2.0 port **
*The USB 3.0 port supports USB 3.0, USB 2.0, and USB 1.0 accessories.
** The USB 2.0 ports support USB 2.0 and USB 1.0 accessories.
Right Side View
1 Charging port 4 Headphone jack
2 Switch jack A * 5 HDMI port
3 Switch jack B *
* If you use a switch or switches for access to your device, plug them into switch jacks A and B. To use
a joystick, you will need a Y-adapter. If you have a joystick plugged in and it does not respond
normally, reverse the way it is plugged in (plug switch A into jack B, switch B into jack A).
2
3
4
1
5
1
2
3
4
5
Accent 1000 Hardware Manual 10
Commonly Used Features
Touch Screen
Important! Do not use sharp, pointed objects on the touch screen. The touch screen is designed to be used
with your finger or the stylus that came with your device. This stylus is made specifically for a capacitive
touch screen. Anything else will harm your touch screen and may cause your device to stop working.
The touch screen is a liquid crystal display (LCD). Should the display break (unlikely except in extreme
circumstances) and you come into contact with the liquid crystal, wash and rinse your skin thoroughly. Be
careful to avoid splintered glass.
For information on cleaning the touch screen, see “Cleaning the Touch Screen” on page 29.
Power Button
When you press the power button, the power LED will illuminate and the device will open to the device
software.
Volume Button
Use the volume button to increase or decrease the volume. You can also use the volume controls in the
device software.
To prevent possible hearing damage, do not listen to earphones at high volume levels for long periods.
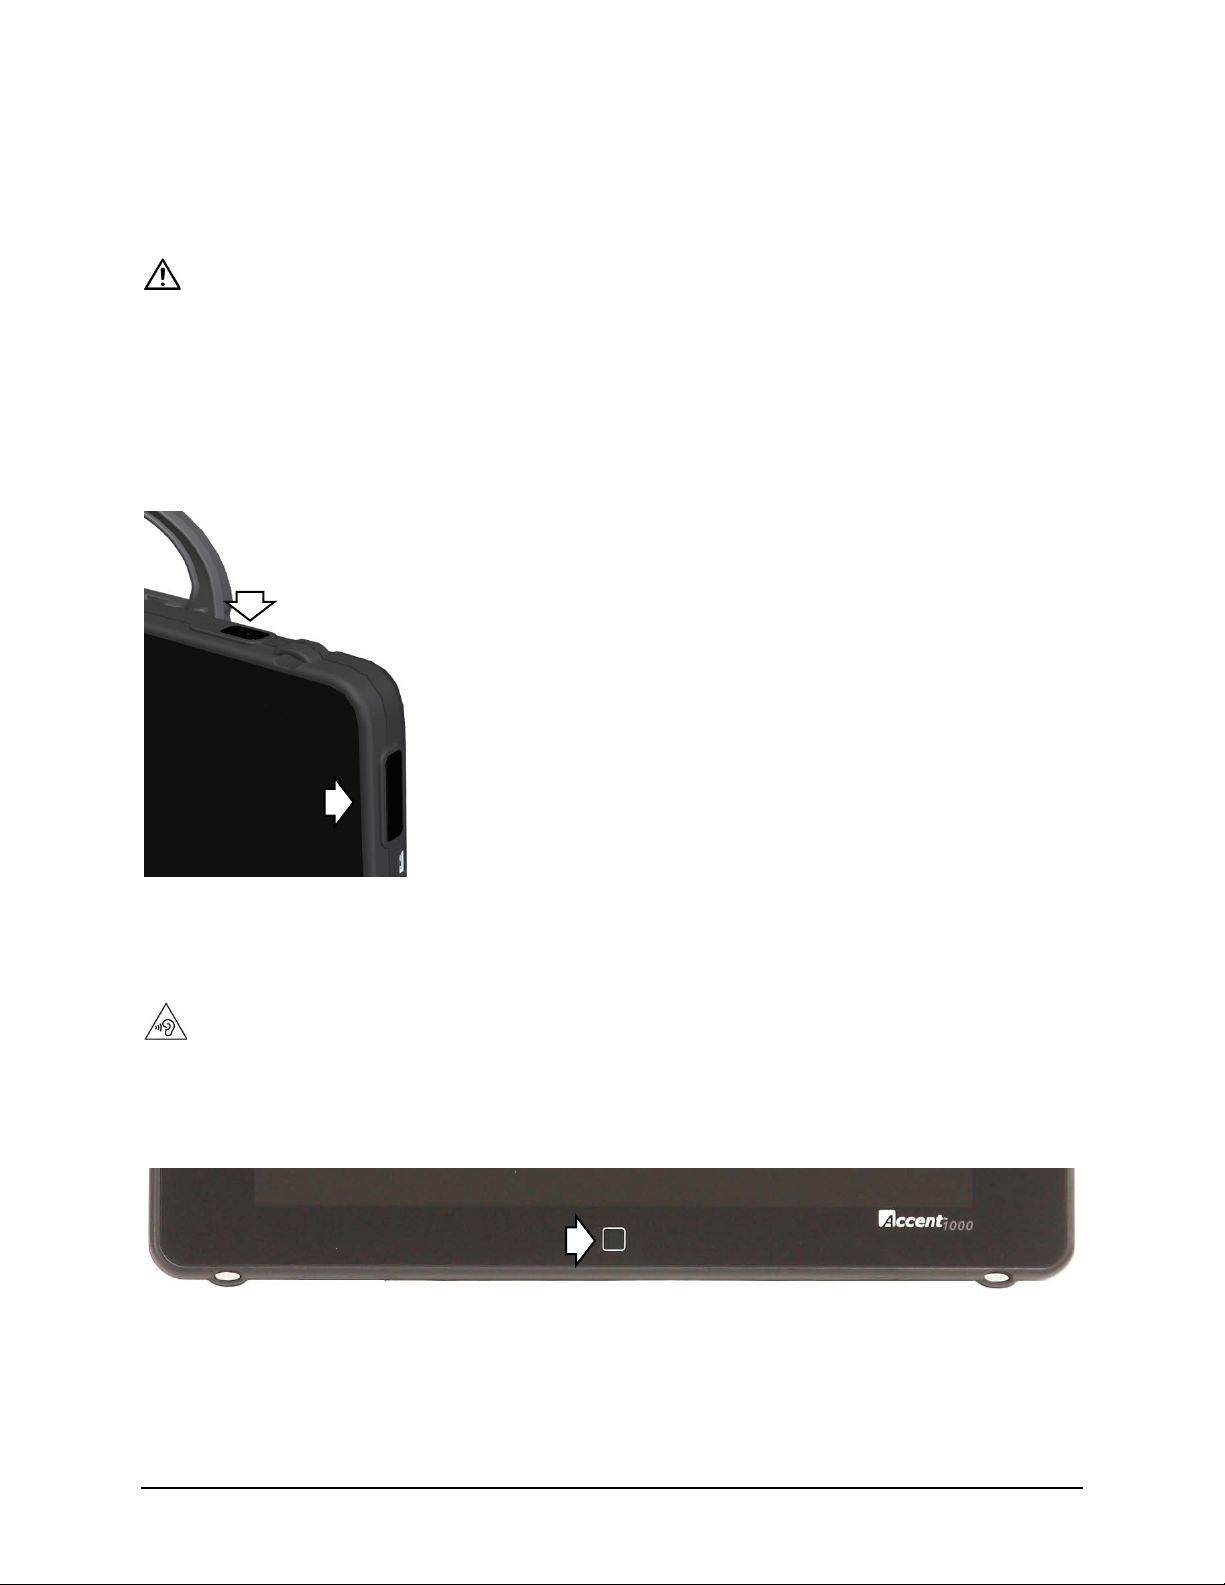
Tools Key
Press the Tools key twice to open the Toolbox.
Tools Key
Power Button
Volume Button
Accent 1000 Hardware Manual 11
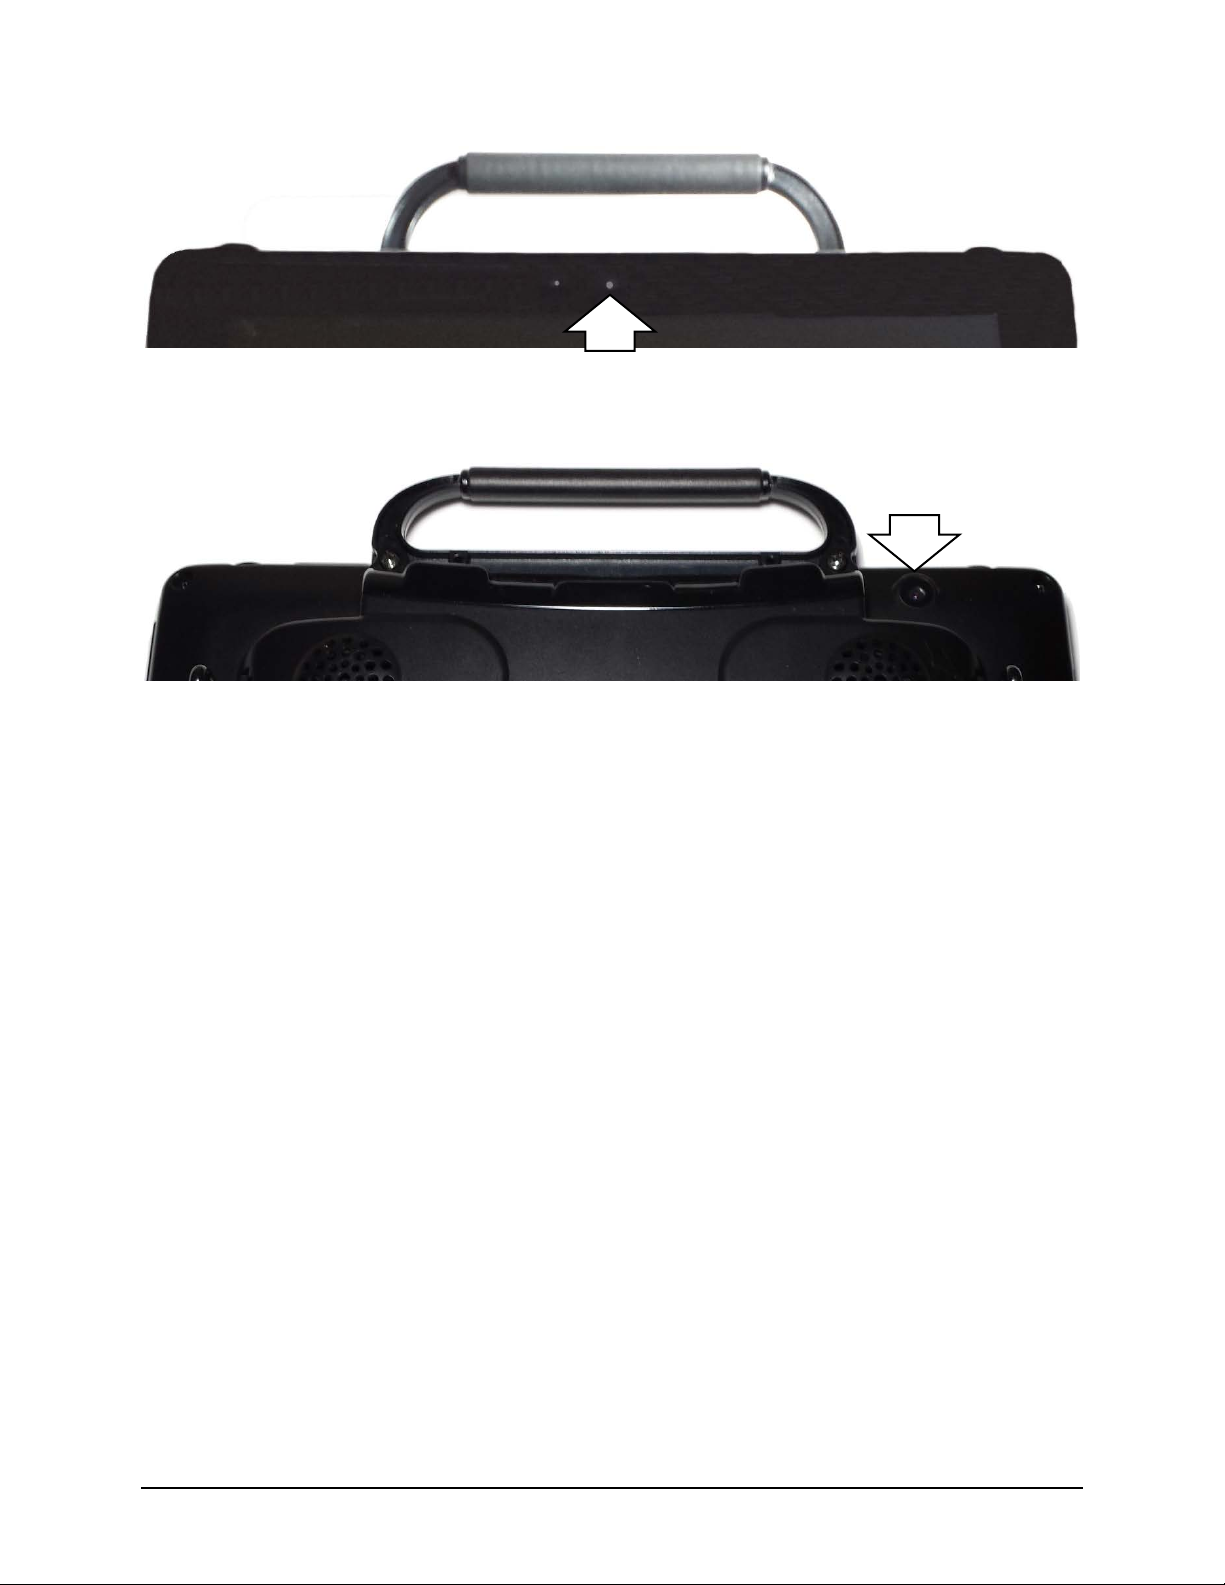
Cameras
The front camera is located in the center of the device at the top of the display.
The rear camera is located on the upper right side on the back of the device.
Front Camera
Rear Camera

Accent 1000 Hardware Manual 12
Charging the Battery
Important! Always use the battery charger that came with your device. Any other charger may damage the
batteries. If you think your charger needs to be replaced, call the PRC Service Department at 800-262-1990;
outside the U.S., call your distributor. Service can determine if replacement is necessary and direct you to the
correct charger.
Locate the device in a safe location while charging.
How long the battery lasts depends on how you use your device. The time required to fully charge the
battery varies depending on the charge level when the charge begins. When the device needs charging,
locate the charging port on the back of the device and connect the battery charger.
The battery charge icon in the device software’s status area allows you to quickly view the battery
charge level.
Charging a Dangerously Low or Dead Battery
To fully charge a dangerously low battery will take about 10 hours. If the battery is totally dead, an
additional two hours may be required. A battery that is not fully depleted will require less time to
recharge.
Note: If you need to use the device immediately, plug in the battery charger and leave it plugged in
while using the device.
Best Practice
Plug in your battery charger every night when you go to bed and any time you see the low battery
warning and/or see the low battery LED come on.
If you cannot plug in the charger overnight, it is best to power off the device to conserve battery charge.
The Battery/Charging LED
When the device is on and the charger is NOT plugged into the device:
•The battery/charging LED is not illuminated.
•When the battery has less than 15% (about three hours) of its power remaining, the
battery/charging LED will glow red.
When the device is plugged into the charger:
•If the device is on: The battery/charging LED will glow yellow. When the device is fully charged,
the LED will turn green.
•If the device is off: The battery/charging LED will glow yellow. When the device is fully charged,
the LED will turn off.
Accent 1000 Hardware Manual 13
Positioning or Removing the Wire Stand
Do not carry the device by the stand. When carrying the device, use the handle or carry strap.
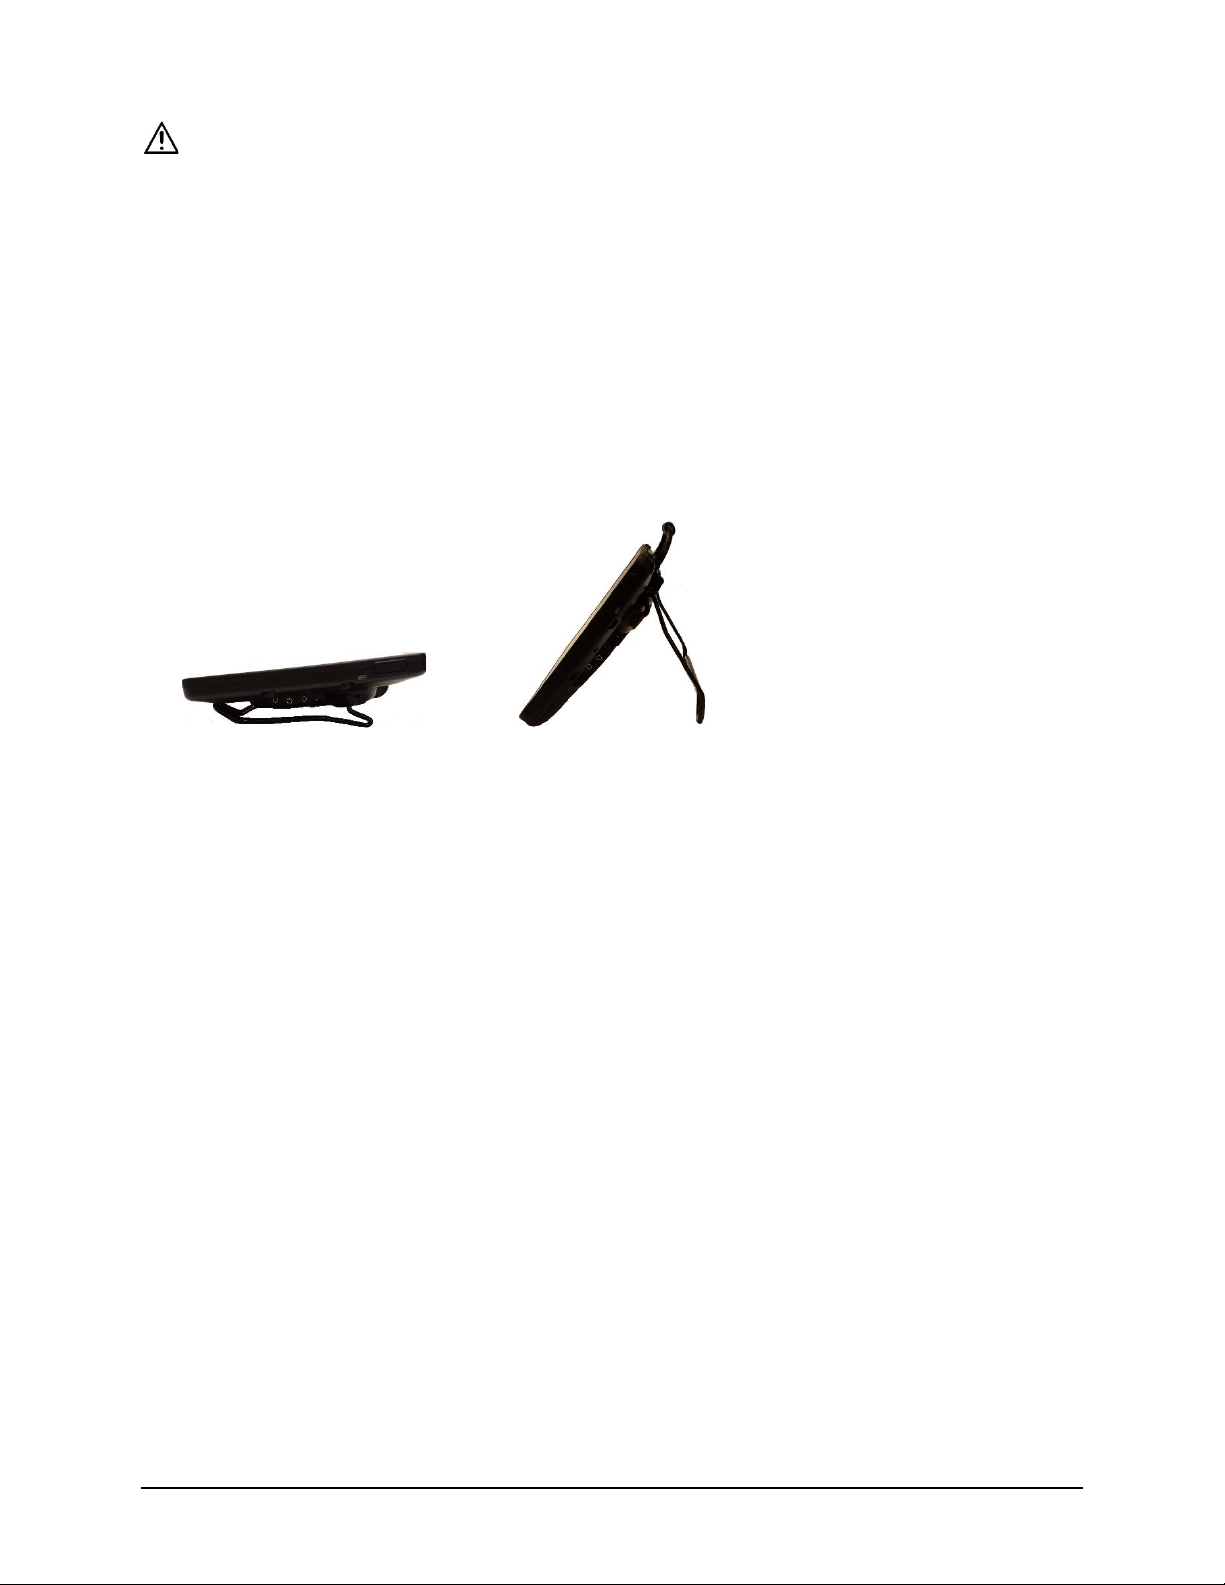
Positioning the Wire Stand
The stand provides two viewing positions. When latched against the back of the device, the stand
provides a slight angle for viewing the screen when the device is sitting on a flat surface.
When you need an additional angle, extend the legs of the stand away from the back of the
device by doing the following:
1. Place the device face-down on a flat surface.
2. Rotate the stand away from the back of the device.
3. Allow the stand to latch in the fully extended position.
Stand latched against
the back of the device
Stand latched in the
fully extended position
Accent 1000 Hardware Manual 14
Removing the Wire Stand
If you do not want to use the stand, you can remove it from the back of the device. You can reattach it
at any time.
1. Place the device face-down on a flat surface.
2. Using a Phillips screwdriver, remove the screws from the holders at the top of each of the stand’s legs.
3. Pull the holders free and put the holders and screws in a safe place in case you need to use them
later. Alternatively, you can reinsert the screws in the holes in the device.
Loose holders and screws could be a choking hazard.
4. Spread the legs apart to pull them out of the holes in the back of device.
5. Pull the stand free and put it in a safe place in case you need to use it later.
Important! If you reattach the stand, be sure to secure the legs with the holders to prevent
someone from pulling it loose accidentally.
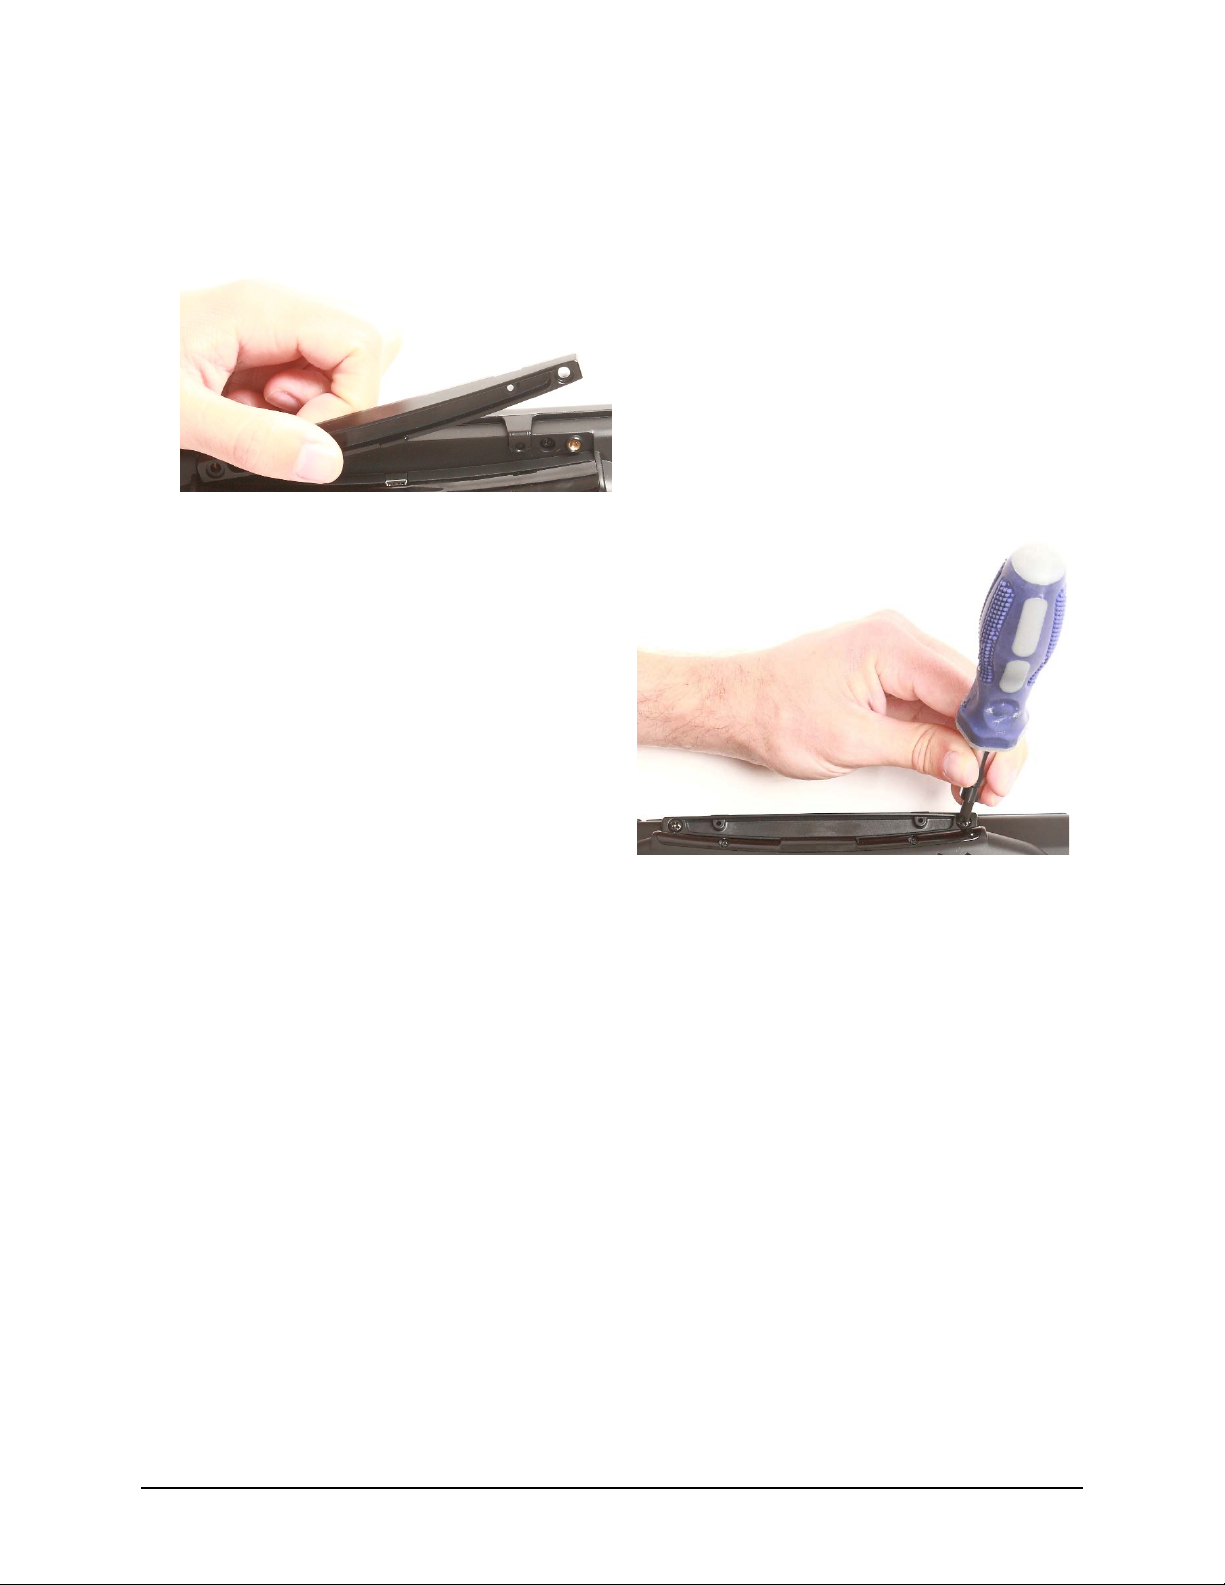
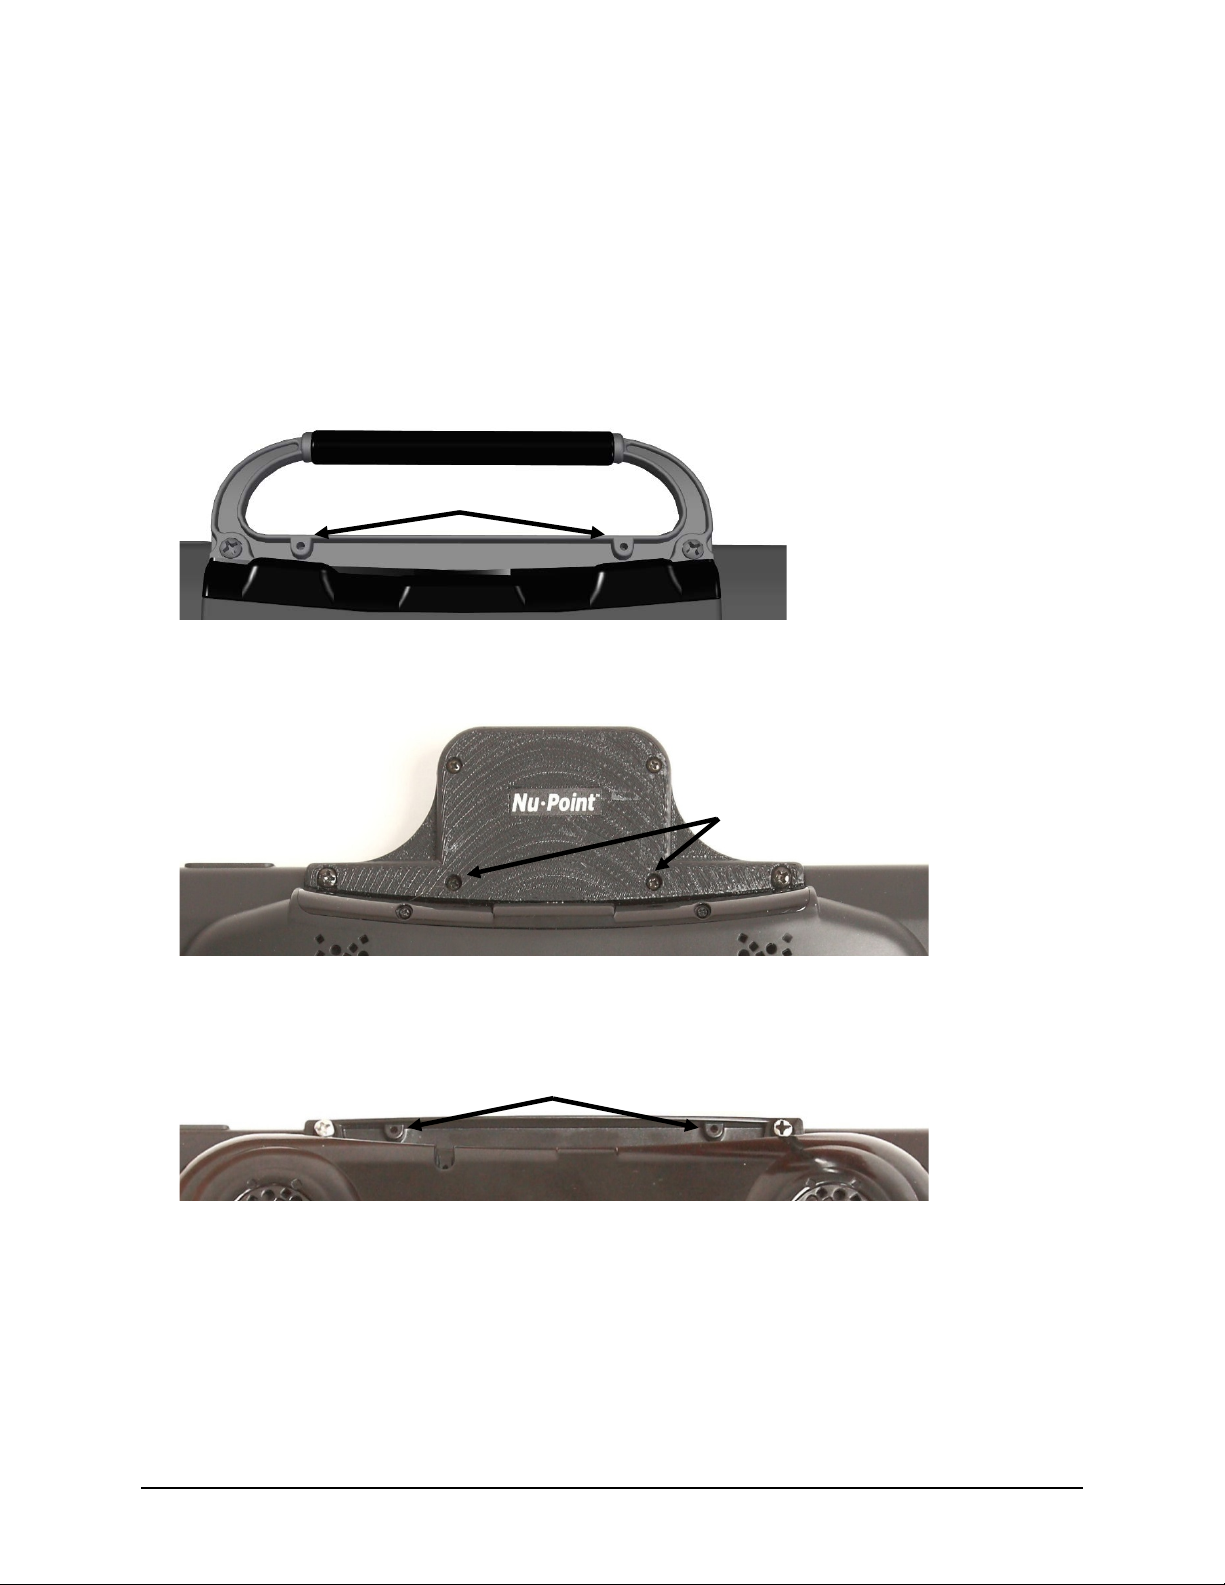
Removing or Reattaching the Handle
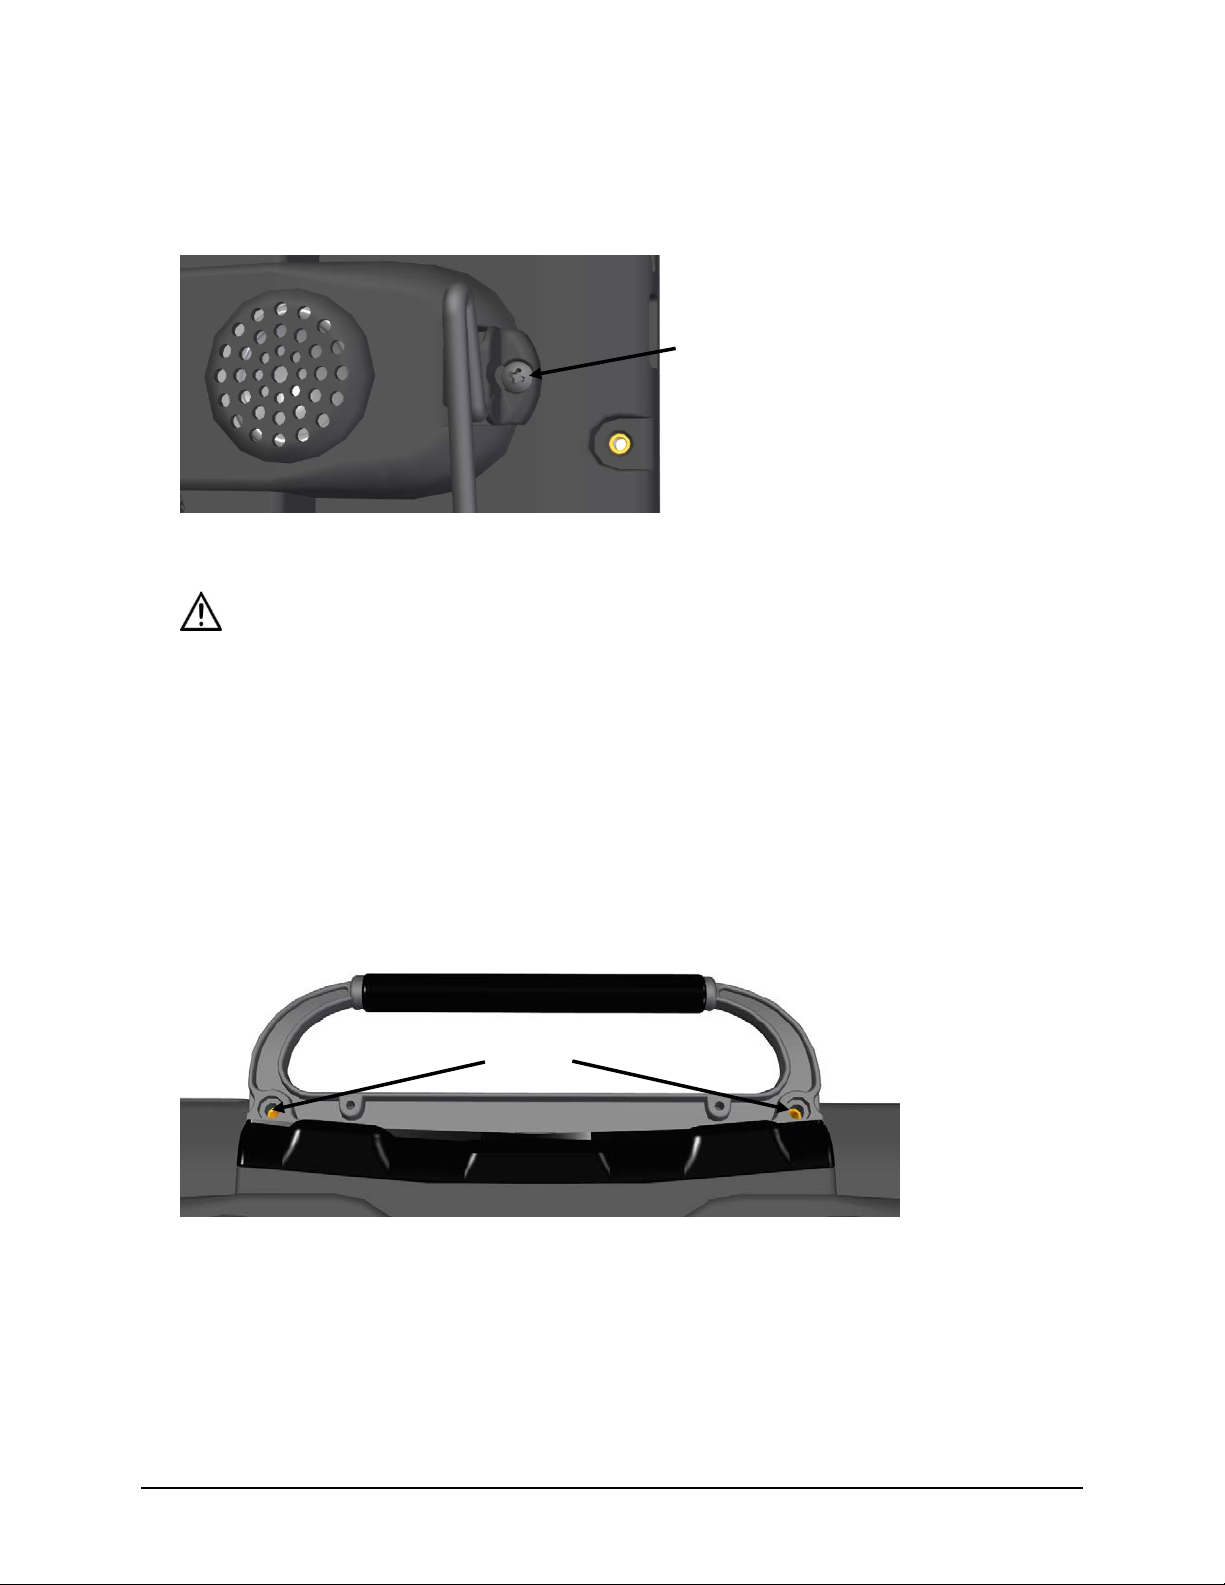
To remove the handle from the device:
1. Using a Phillips screwdriver, remove the two screws that hold the handle in place.
2. Pull the handle away from the device.
3. If you are not going to mount a NuPoint module, it is important to attach the port cover to protect
the mini USB connector. See “Attaching or Removing the Port Cover” on page 15.
To reattach the handle:
Remove the port cover or NuPoint module, line up the holes in the handle with the holes on the back of
the device, and insert the two screws.
Screw
Screw holes
Accent 1000 Hardware Manual 15
Attaching or Removing the Port Cover
If you removed the handle and are not going to mount a NuPoint module, it is important to attach the
port cover to protect the Mini USB Connector on the top of the device.
To attach the port cover to the device:
1. Line up the holes in the cover with the holes on the back of the device.
2. Insert the two screws that previously secured the handle and tighten them using a Phillips screwdriver.
To remove the port cover:
Remove the two screws that hold the port
cover in place. Use the screws to mount a
NuPoint module or to reattach the handle.
Note: Store the port cover where you can
find it if you need to use it again.
Accent 1000 Hardware Manual 16
Mounting the IR Reflector
Your device emits infrared signals from the IR area on the back of the device. The optional IR reflector
allows the user to better “aim” those signals from any position. If you have the IR reflector, follow these
instructions to attach it to the device.
The IR reflector can be mounted on the device handle, port cover, or NuPoint module, depending on
which is already attached to your device. The reflector kit includes the reflector, two short screws, and
two long screws.
1. Using a Phillips screwdriver, remove the appropriate screws, as shown.
Handle: If the handle is attached to your device and the front device frame is held in place with
screws, remove the top frame screws.
NuPoint Module: If a NuPoint module is attached to your device, remove the two inside screws
from the module.
Port Cover: If a port cover is attached to your device, and the front device frame is held in place with
screws, remove the top frame screws.
2. Align the holes in the reflector with the empty holes in the handle, port cover, or NuPoint module.
Important! Make sure the reflective shield is aimed downward toward the back of the device, as
shown in step 3 on the next page.
Remove these two screws
Remove these two
screws, if present
Remove these two
screws, if present
Accent 1000 Hardware Manual 17
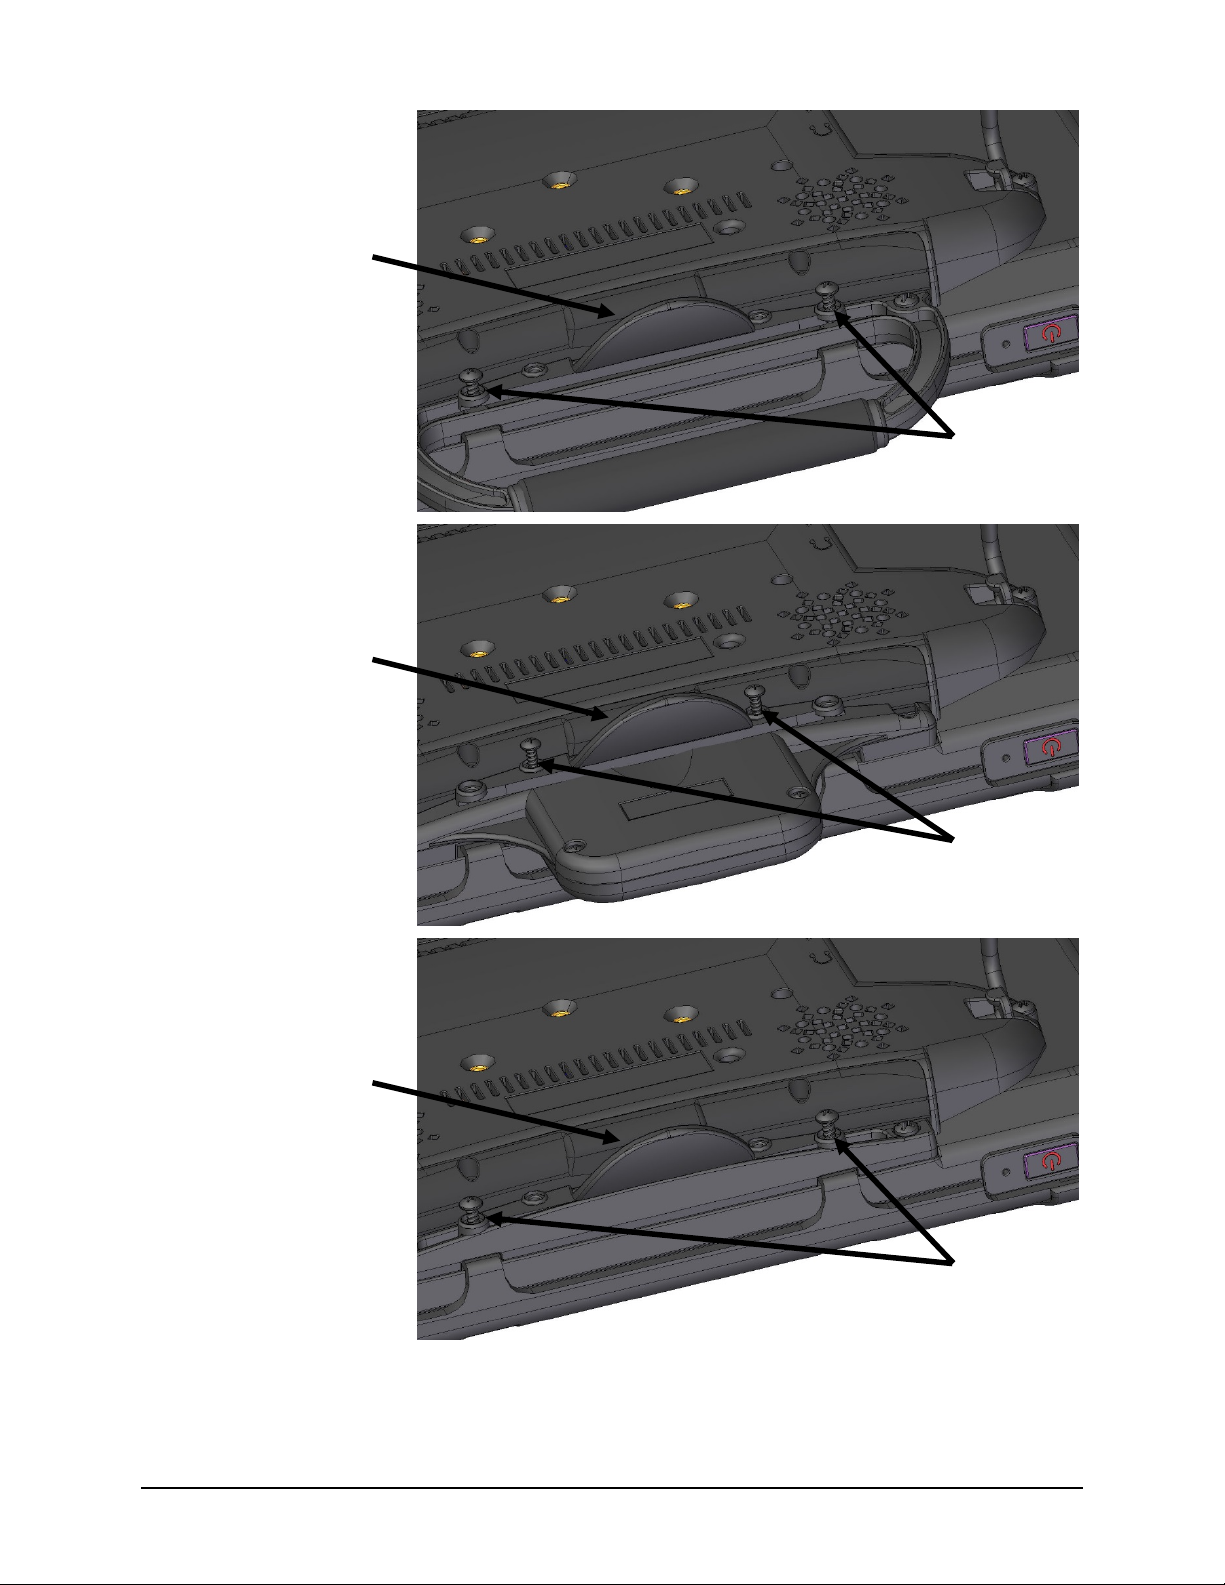
3. Insert the appropriate screws in the holes, as shown.
4. Tighten the screws.
Handle:
NuPoint Module:
Port Cover:
Insert the two
short screws
Insert the two
long screws
Insert the two
short screws
Reflector side
pointing downward
Reflector side
pointing downward
Reflector side
pointing downward
Accent 1000 Hardware Manual 18
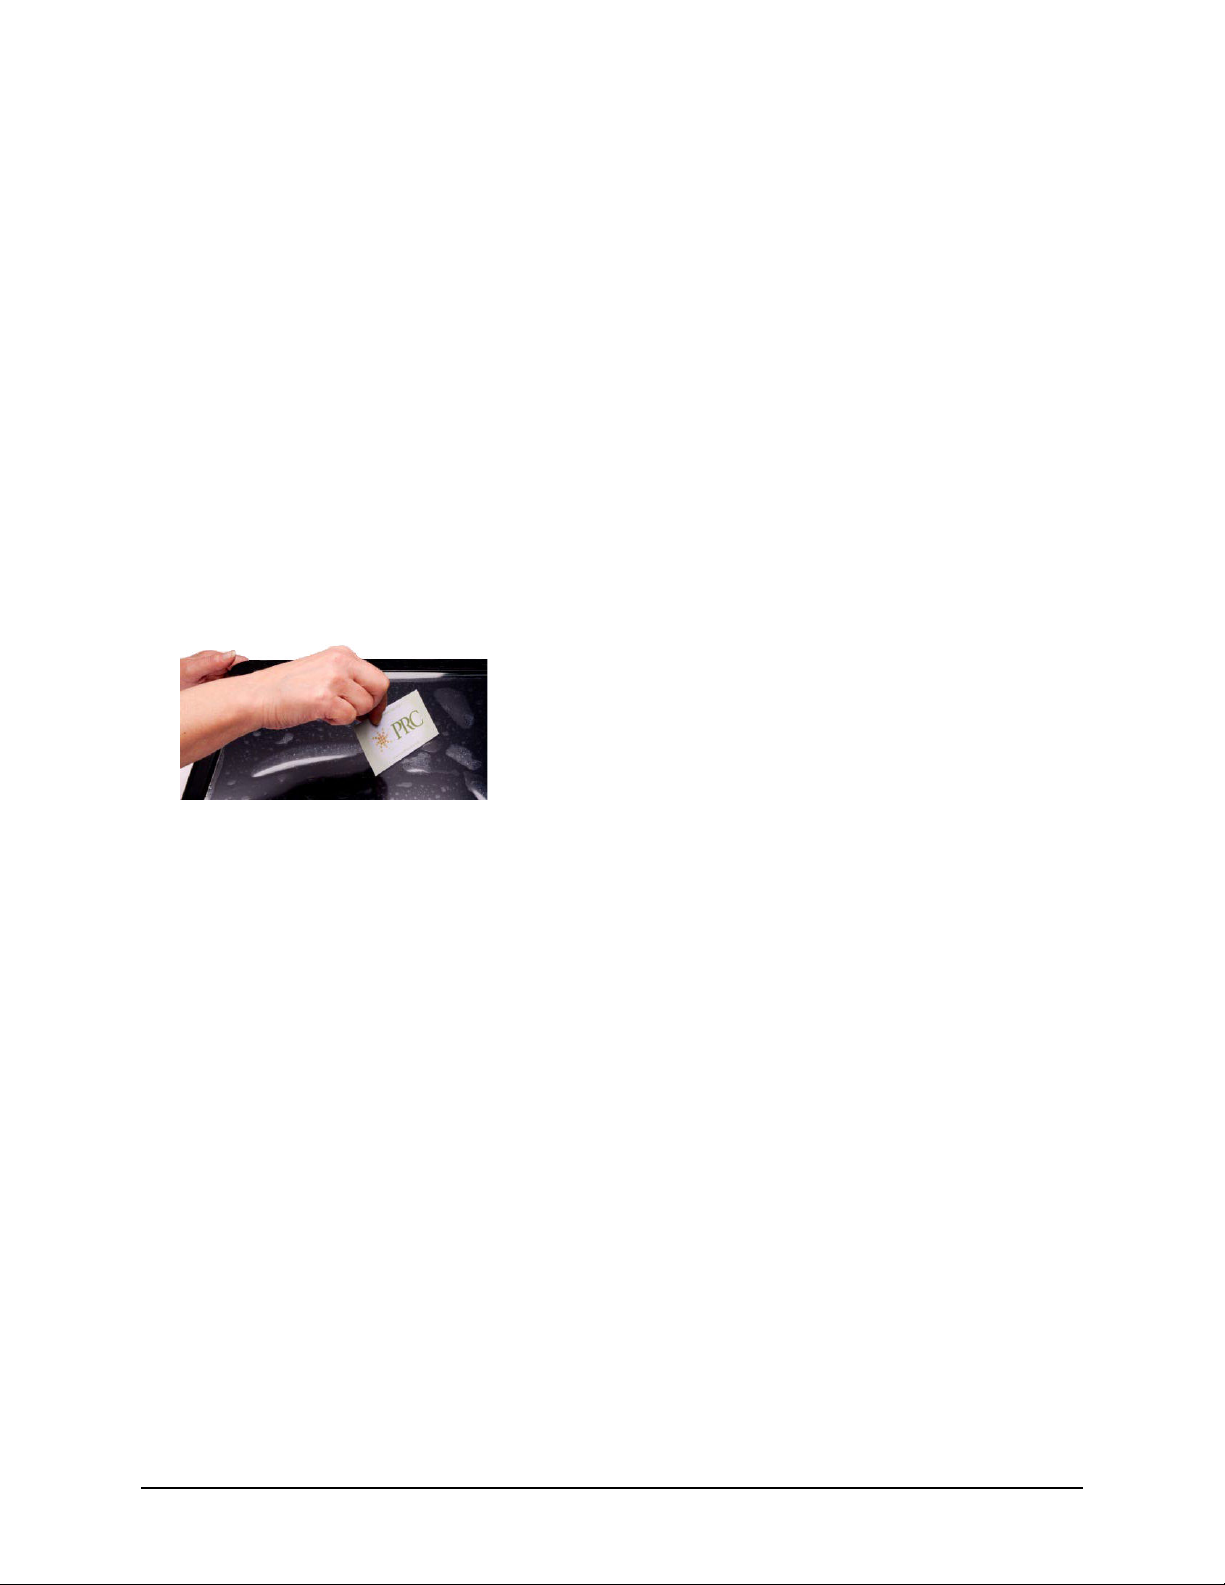
Applying a Screen Protector
If you plan to use a screen protector, you must first remove the device frame. To remove the frame, see
“Removing or Replacing the Device Frame” on page 19.
There are six screen protectors in the kit. Three have a matte finish and three have a luster finish. The
matte finish offers the most glare resistance. Matte protectors can be identified by the small red square
on the backing.
1. Turn your device off and lay it flat on a table.
2. Remove dust and fingerprints from the screen using a lint-free cloth dampened with water or flat-
screen TV cleaner.
Hint: Do not dry the screen before applying the screen protector. You may find it easier to smooth
out the protector and remove air bubbles (step 7 below) if the screen is slightly damp.
3. Peel a screen protector from its backing.
4. Hold the protector along the edges, with the side that was against the backing now facing the screen.
5. Align one edge of the protector with one edge of the screen.
6. Press the protector onto the screen, adjusting the protector until it covers the screen along all edges.
7. Use the squeegee included to smooth out the protector and remove air bubbles and wrinkles.
8. Wipe the protector with a lint-free cloth to remove any fingerprints.
Hint: Regularly wipe off the protector with a damp lint-free cloth to remove fingerprints, smudges,
etc. If the protector becomes too dirty, peel it off and replace it with a new protector.
Accent 1000 Hardware Manual 19
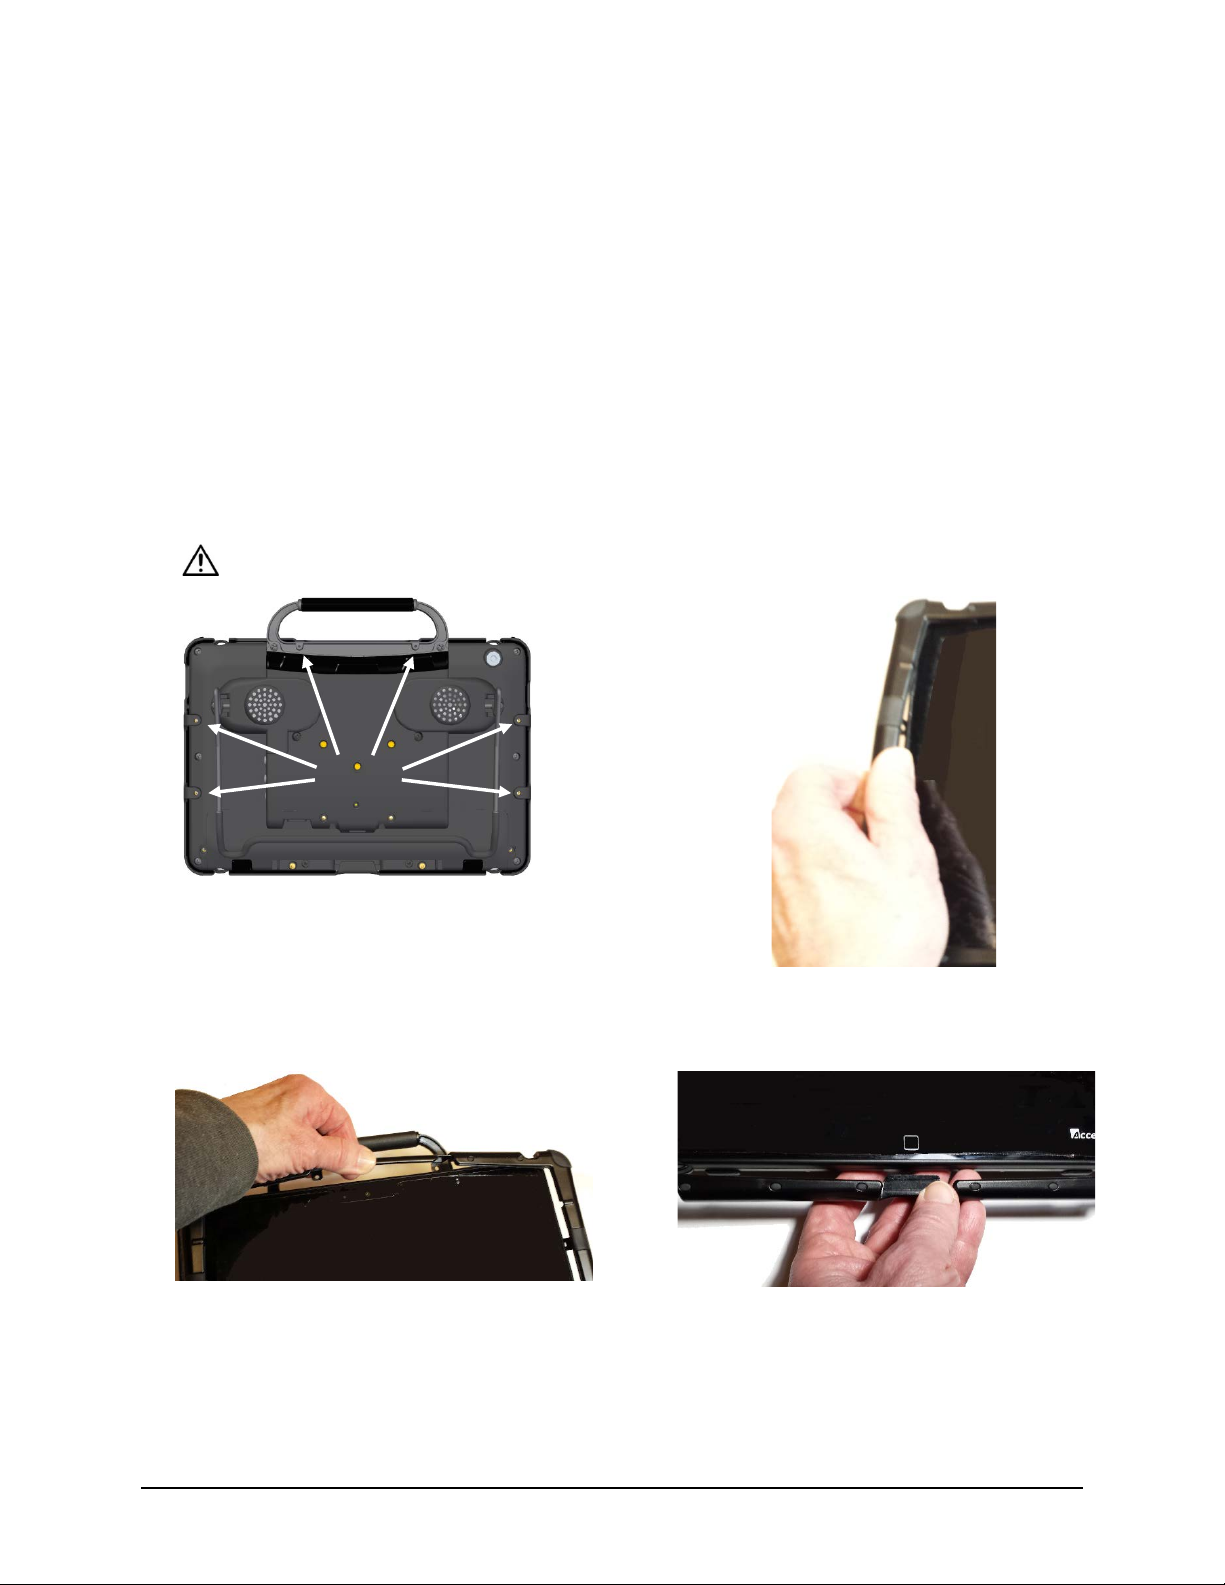
Removing or Replacing the Device Frame
Your device came with a frame mounted on it. If you need to remove or replace the frame, follow these
instructions.
Removing the Frame
1. If you are using a Keyguard or TouchGuide, remove it from the frame. See “Removing the Keyguard”
on page 23 or “Removing the TouchGuide” on page 24.
2. Using a Phillips screwdriver, remove the six screws
that secure the frame to the device—two on the
top and two on each side.
Important! If you are replacing the frame, set the
screws aside. You will use them to reattach the new
frame. If you are not replacing the frame, store the
screws in a safe location in case you later decide to
reattach the frame.
Loose screws could be a choking hazard.
3. Grasp one side of the frame and pull it
loose from the device.
Hint: You may want to use a flat-head
screwdriver or similar tool to gently lift
the side and bottom tabs on the back of
the device.
4. Grasp the other side of the frame and pull it loose from the device.
5. Pull the top of the frame loose.
6. Pull the bottom tab loose.
7. Proceed to the next section, “Attaching the New Frame”.
Screws
Accent 1000 Hardware Manual 20
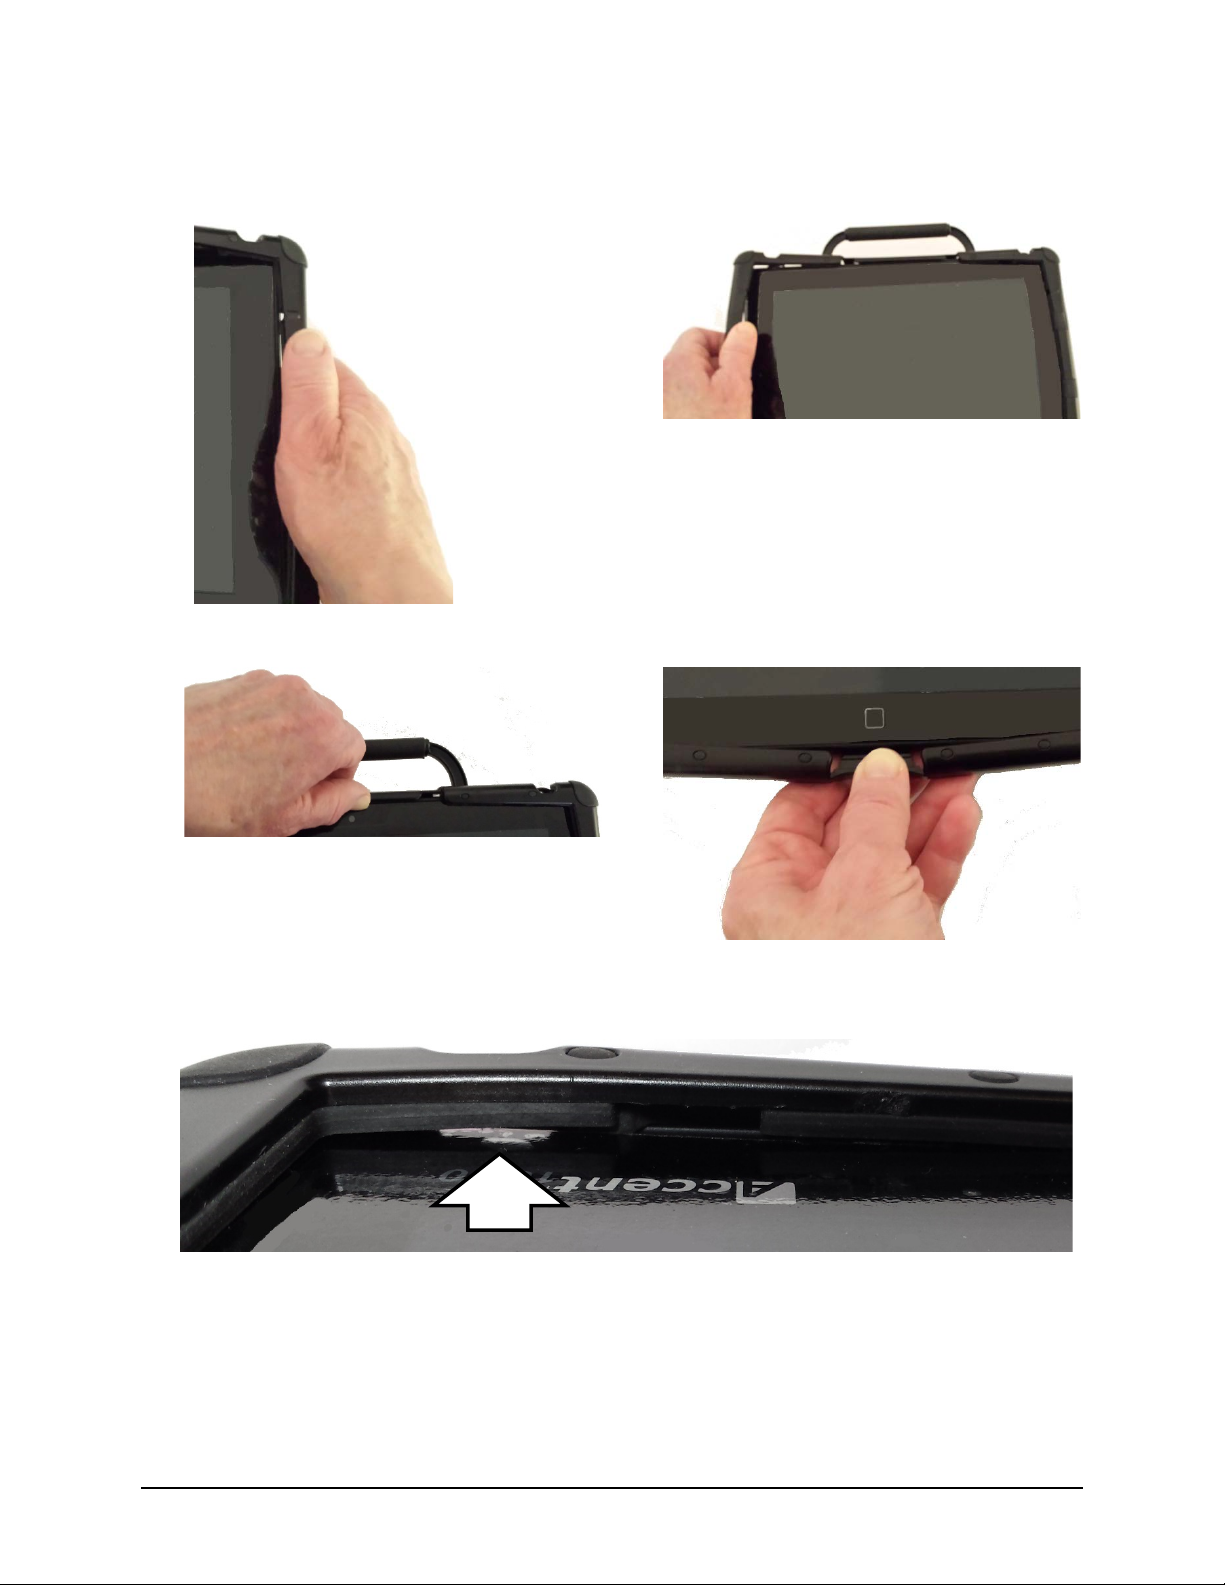
Attaching the New Frame
You must attach the device frame before you can mount a Keyguard or TouchGuide over the screen.
1. Press one side of the frame onto the edge of
the device.
2. Pull the other side into place.
Note: The top tabs may snap into place as you
pull on the side.
3. If necessary, press the top tabs into place.
4. Pull the bottom tab into place.
5. Look along the inside edge of the frame along the top, bottom, and sides to make sure the rubber
backing didn’t bunch up between the frame and the edge of the device. In this example, the rubber
is bunched up, leaving a gap between the frame and the edge of the device.
If necessary, lift up the inside edge slightly and press until the rubber backing fits smoothly between
the frame and device.
6. To secure the frame to the device with screws, proceed to the next section, “Attaching the Frame
More Securely”.
Table of contents
Other PRC-Saltillo Medical Equipment manuals


Popular Medical Equipment manuals by other brands


Getinge
Getinge Arjohuntleigh Nimbus 3 Professional Instructions for use

Mettler Electronics
Mettler Electronics Sonicator 730 Maintenance manual

Pressalit Care
Pressalit Care R1100 Mounting instruction

Denas MS
Denas MS DENAS-T operating manual

bort medical
bort medical ActiveColor quick guide

AccuVein
AccuVein AV400 user manual


