PRC-Saltillo ViaPro11.2 User manual
19076
Version 2.00
Via®Pro / Via Mini User's Guide
Dialogue®AAC English Edition
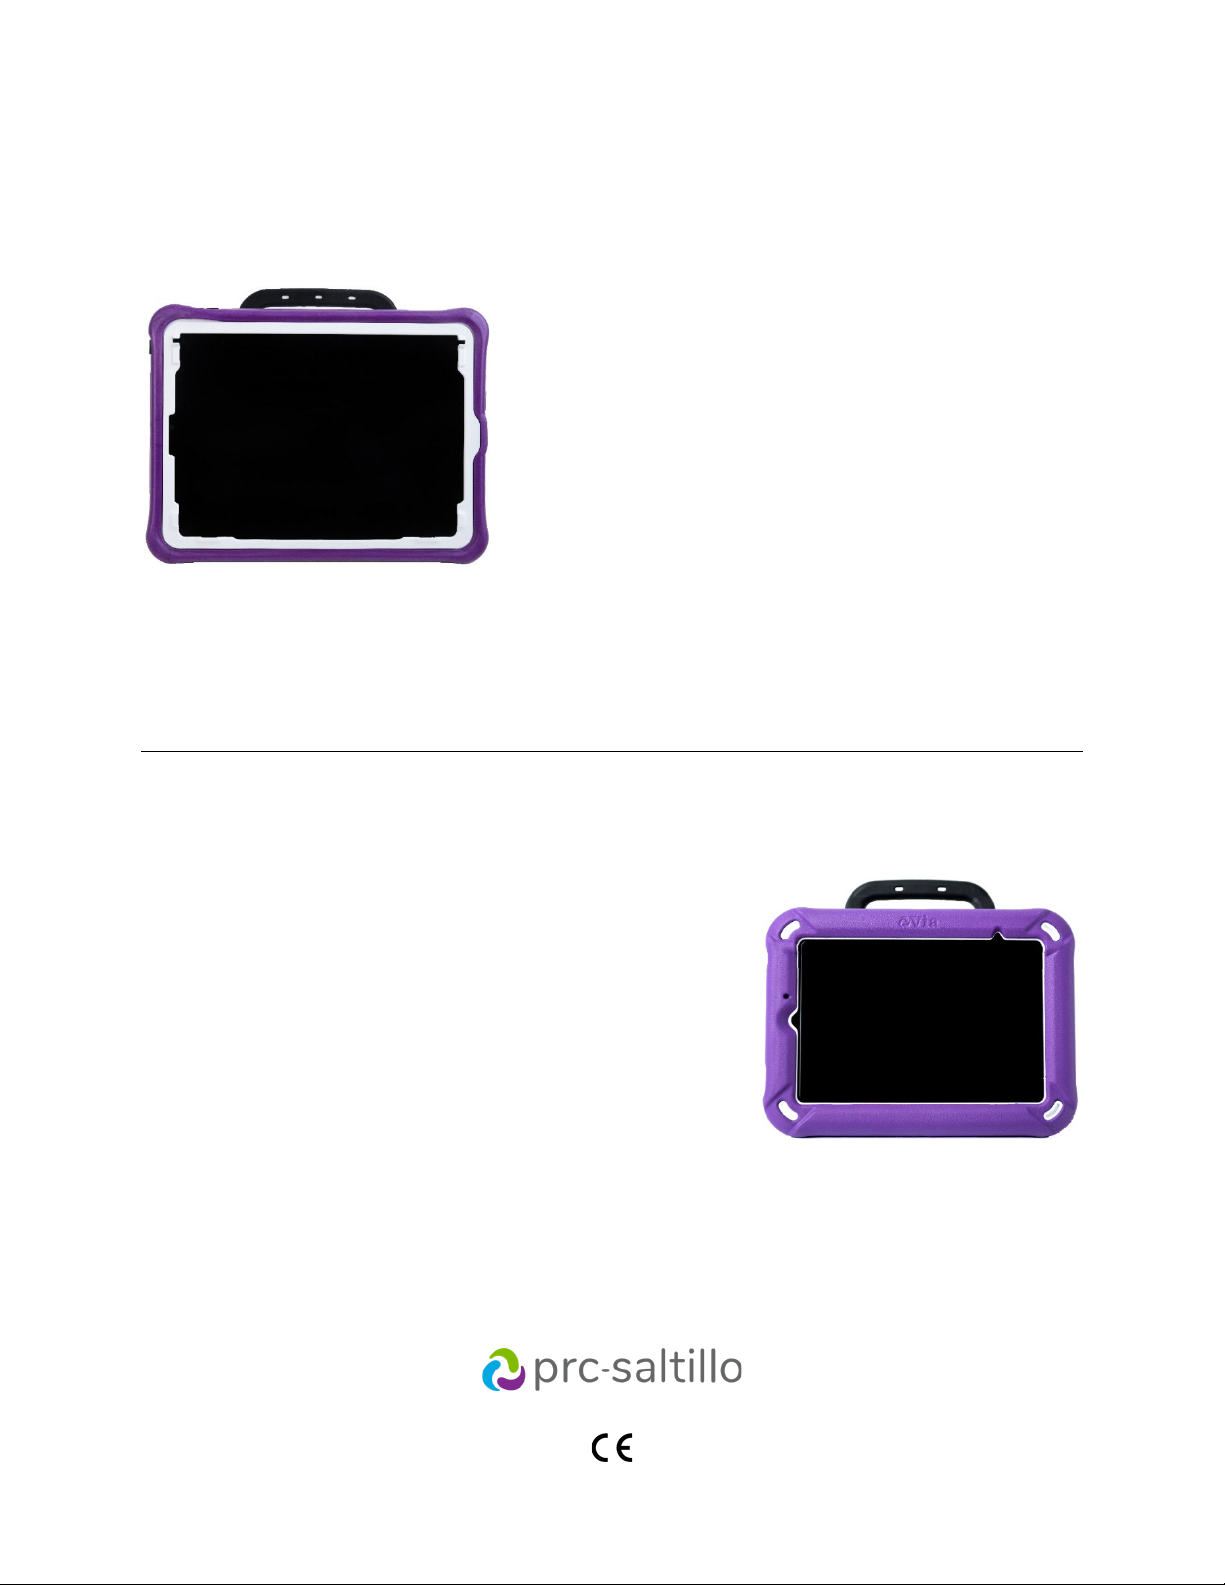
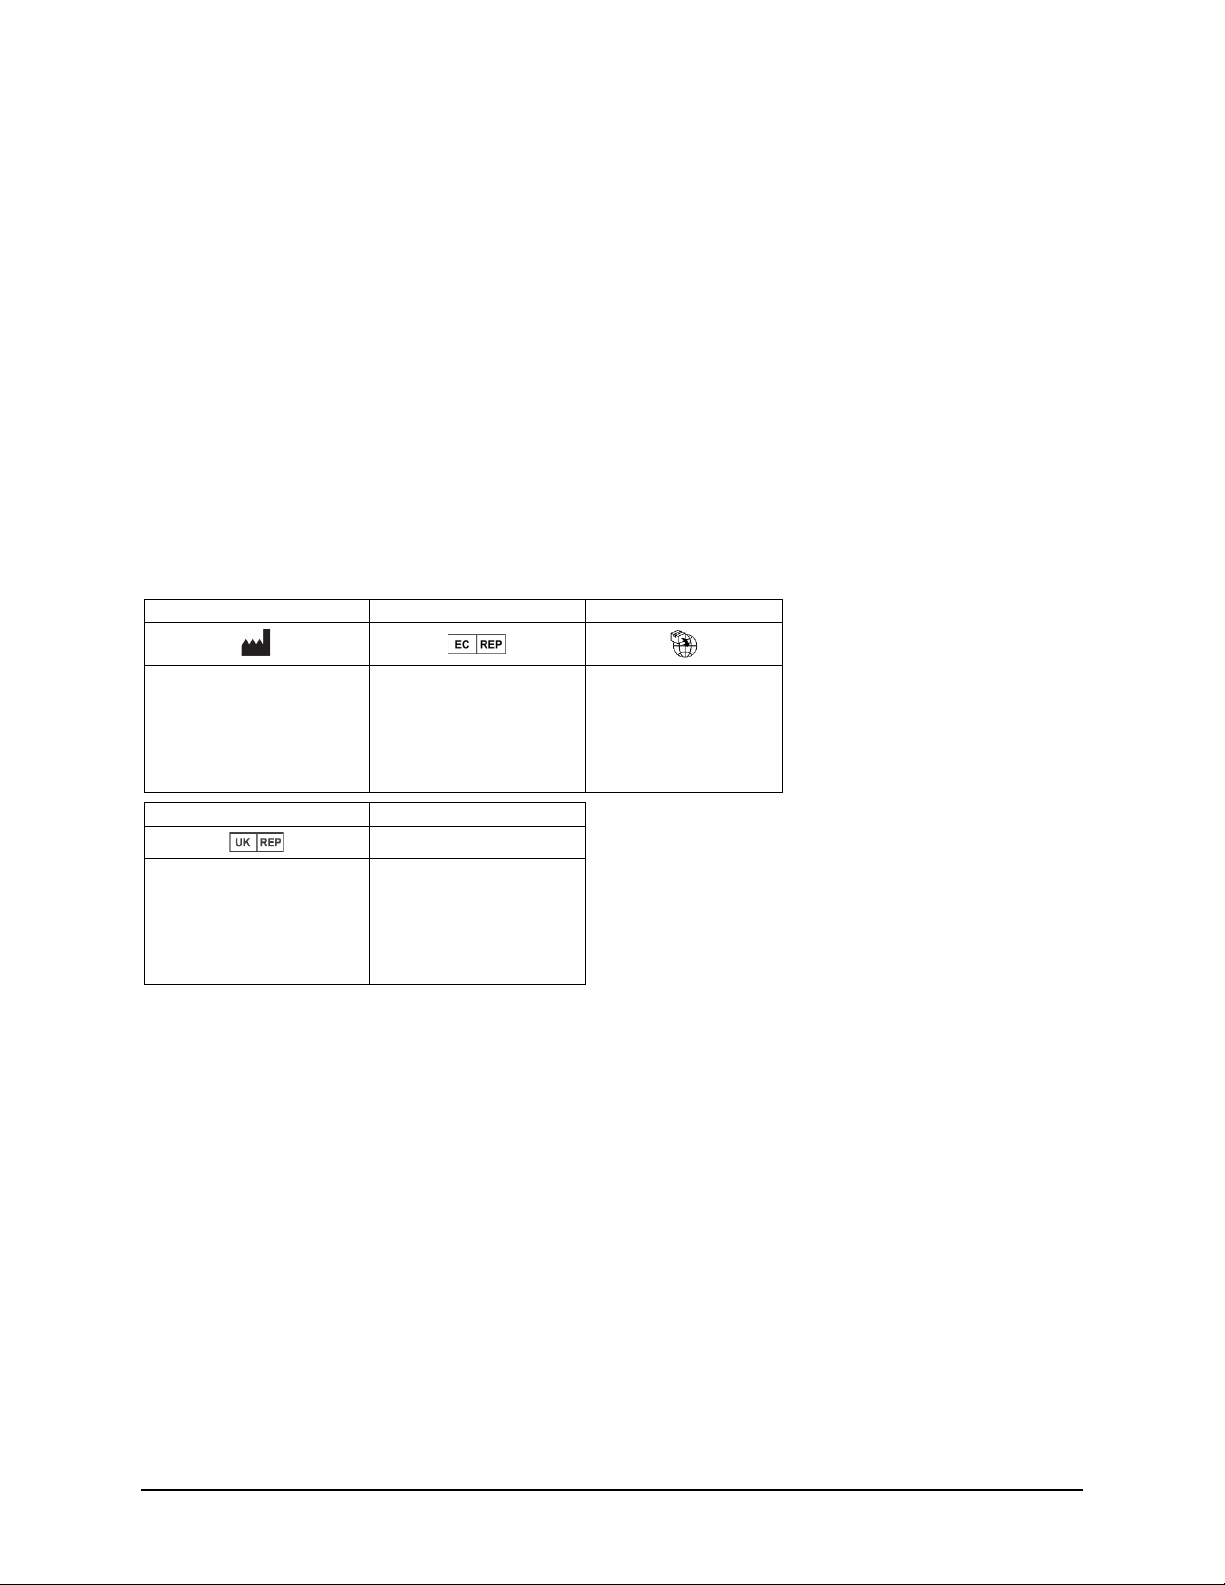
Via Pro
Model ViaPro11.2
Via Mini
Model ViaMini8.1
Via Pro/Via Mini User’s Guide: Dialogue AAC 2
Copyright and Trademark Information
©2020-2023PRC-Saltillo. Non-commercial reprint rights for clinical or personal use granted with inclusion ofcopyright notice. Commercial use prohibited; may not be
used for resale. Contact PRC-Saltillo for questions regarding permissible uses.
AAC Coaching Corner™, AAC Language Lab®, AAC Learning Journey™, Accent®, AeroSwitch®, AeroText™, ChatEditor™, ChatFusion™, ChatPoint™, ChatSMS®,
ChatWrap®, CoreScanner™, Dialogue®, Empower®,Engage®, Essence®, Freedom Switch™, iSharePRC®, LAMP™, LAMP Words for Life®, Look®, Minspeak®,
NovaChat®, NuEye®, NuPoint®, NuVoice®, PASS™, PRiO®, Realize Language™, Semantic Compaction®, Timocco-on-Accent™, TouchChat®, UNIDAD®, Unity®, Via®,
VersaChat™, VersaSpeaker™, VersaWrap™, and VocabPC™ are trademarks ofPRC-Saltillo.
AirDrop®, App Store®, Apple®, Apple Books®, FaceTime®, Guided Access®, iCloud®, iPad®, iPad Air®, iPad mini®, iPadOS®, iPad Pro®, iPhone®, iPod®, iTunes®,
Lightning®, Mac®, Macintosh®, Safari®, Siri®, TouchID®, and TrueDepth® are trademarks of Apple Inc., registered in the U.S. and other countries and regions.
Acapela Group® and my-own-voice™ are trademarks ofAcapela Group. Acapela Group, Copyright 2022.All rights reserved. Used with permission. The Acapela text
to speech technology and the synthetic voices contained in this software are included free of charge for the usage by the end user but may be used solely for
communication purposes and may notbe sold, copied or otherwise exploited for any type ofprofit.
The Bluetooth®word mark and logos are registered trademarks owned by the Bluetooth SIG, Inc. and anyuse of such marks byPRC-Saltillo is underlicense.
Dropbox® isa registered trademark ofDropbox, Inc.
Google™, Google Drive™, Google Play™, Android™, and YouTube™ are trademarks of Google Inc.
iOS® is a trademark orregistered trademark ofCisco inthe U.S. and other countries and is used under license.
Microsoft® and Windows® are either registered trademarks or trademarks ofMicrosoft Corporation inthe United States and/or other countries.
PCS® is a trademark ofTobii Dynavox LLC. All rights reserved. Used with permission.
The symbols used in this work are owned by n2y, LLC. Used with permission under license. © 2022.
VocaliD™ isa trademark ofVocaliD, Inc.
The Voice Keeper and Almagu voices are intellectual property ofAlmagu.
Wi-Fi® isa registered trademark ofWi-Fi Alliance.
WordPower® is a trademark ofInman Innovations, Inc.© 2001-2022;All rights reserved. Used with permission.
Contact Information
Manufacturer EU Authorised Representative EU Importer
Prentke Romich Company
1022 Heyl Rd
Wooster, OH 44691
USA
Tel.: +1 330 262-1984 · +1 800 262-1984
Fax: +1 330 262-4829
Email: info@prentrom.com
Web: www.prc-saltillo.com/
Prentke Romich GmbH
Karthäuserstr. 3
D-34117 Kassel
Germany
Tel.: +49 (0) 561 7 85 59-0
Fax: +49 (0) 561 7 85 59-29
Email: info@prentke-romich.de
Web : www.prentke-romich.de/
Prentke Romich GmbH
Karthäuserstr. 3
D-34117 Kassel
Germany
Tel.: +49 (0) 561 7 85 59-0
Fax: +49 (0) 561 7 85 59-29
Email: info@prentke-romich.de
Web : www.prentke-romich.de/
UK Responsible Person and Importer Authorised Representative in Australia
Liberator Ltd
“Whitegates”, 25-27 High Street
Swinstead, Lincolnshire NG33 4PA
UK
Tel.: +44 (0) 1733 370 470
Fax: +44 (0) 1476 552 473
Email: info@liberator.co.uk
Web: www.liberator.co.uk/
Liberator Pty Ltd
Level 4, 2-4 Holden Street, Ashfield,
NSW, 2131
Australia
Tel: +61 (0) 8 8211 7766
Fax: +61 (0) 8 8211 7733
Email: info@liberator.net.au
Web: www.liberator.net.au/
Document Version / Software Version
19076 Version 2.00 · 12/02/2022 / Software version 2.40
Applies to models ViaPro11.2 and ViaMini8.1 with the Dialogue AAC app
To view or download the latest version of this manual, please visit https://saltillo.com/support/downloads.

Via Pro/Via Mini User’s Guide: Dialogue AAC 3
Contents
Introduction........................................................................................................................................................... 7
Safety Information: Via Pro and Via Mini............................................................................................................... 8
Identifying Via Pro Features................................................................................................................................. 10
Identifying Via Mini Features............................................................................................................................... 12
Charging the Device and Amplifier....................................................................................................................... 14
Non-Dedicated Devices: Turning the Device On and Off ...................................................................................... 16
Turning the Amplifier On and Off......................................................................................................................... 17
Adjusting the Volume and Muting Sounds........................................................................................................... 18
Using the Touchscreen......................................................................................................................................... 18
Positioning the Stand........................................................................................................................................... 19
Removing the Handle .......................................................................................................................................... 20
Attaching a Wheelchair Mounting Plate .............................................................................................................. 21
Changing the Colored Wrap on a Via Pro Device.................................................................................................. 22
Changing the Colored Wrap on a Via Mini Device ................................................................................................ 23
Attaching a Strap ................................................................................................................................................. 25
Cleaning and Disinfecting the Device ................................................................................................................... 26
Routine Cleaning and Disinfecting ..........................................................................................................................26
Disinfecting the Device and Accessories for Multiple Users ...................................................................................27
Using the Dialogue AAC App................................................................................................................................ 28
Safety Information: Dialogue AAC App ...................................................................................................................28
Agreeing to the End User License Agreement.........................................................................................................29
Finding the App Version ..........................................................................................................................................29
Working with Dialogue App Menus ........................................................................................................................29
Working with Vocabulary Files ................................................................................................................................30
Loading a Vocabulary File ...................................................................................................................................30
Copying a Vocabulary File ...................................................................................................................................31
Creating a New Blank Vocabulary File ................................................................................................................31
Deleting a Customized Vocabulary File...............................................................................................................32
Backing up a Customized Vocabulary File using iTunes®.....................................................................................33
Backing up a Customized Vocabulary File using AirDrop®, Google Drive™, or Email ...........................................34
Backing up a Customized Vocabulary File using Dropbox®.................................................................................34
Exporting Vocabulary Files to a USB-C Drive from Your Device..........................................................................35
Importing a Vocabulary File from a USB Drive to Your Device ...........................................................................36
Importing Multiple Vocabulary Files from a USB Drive to Your Device ..............................................................36
Choosing a Voice .....................................................................................................................................................37
Adjusting the Voice .............................................................................................................................................38
Adding Voices in Additional Languages ..............................................................................................................39
Deleting a Voice Language ..................................................................................................................................41
Creating Your Voice with Voice Keeper ..............................................................................................................43
Changing How a Word is Pronounced by a Voice ...............................................................................................44
Activating Edit Mode...............................................................................................................................................45

Via Pro/Via Mini User’s Guide: Dialogue AAC 4
Working with Buttons .............................................................................................................................................46
Storing Text on a Button .....................................................................................................................................46
Editing a Button ..................................................................................................................................................47
Changing a Button Label or Message..................................................................................................................47
Changing the Pronunciation of a Word in a Button Message.............................................................................48
Inserting Special Characters in Text ....................................................................................................................49
Adding or Changing a Button Action...................................................................................................................50
Removing or Changing the Order of Actions ......................................................................................................50
Storing Text on a Button using a Button Action..................................................................................................51
Available Button Actions.....................................................................................................................................52
Adding an Image to a Button: Enter a Label and Browse ...................................................................................55
Adding an Image to a Button: Search .................................................................................................................56
Adding an Image to a Button: Select Categories.................................................................................................56
Adding an Image to a Button: Import .................................................................................................................57
Adding an Image to a Button: Take a Picture......................................................................................................58
Creating a Camera Button...................................................................................................................................59
Resizing a Button.................................................................................................................................................60
Changing a Button Style......................................................................................................................................60
Changing a Button’s Basic Colors ........................................................................................................................60
Customizing a Button’s Colors ............................................................................................................................61
Creating a Button to Link to a Page.....................................................................................................................62
Creating a Volume Control Button......................................................................................................................63
Creating a Battery Status Button ........................................................................................................................63
Creating a Button to Show the Date and/or Time ..............................................................................................63
Copying and Pasting a Button .............................................................................................................................64
Copying and Pasting the Same Button................................................................................................................65
Copying and Pasting a Button Style ....................................................................................................................65
Moving a Button .................................................................................................................................................66
Hiding a Button ...................................................................................................................................................66
Hiding or Showing Multiple Buttons at Once......................................................................................................67
Changing Button Timing......................................................................................................................................67
Using, Hiding, and Showing Button Navigation Arrows ......................................................................................68
Adding Extra Space around Buttons ...................................................................................................................69
Working with Pages.................................................................................................................................................70
Renaming a Page.................................................................................................................................................70
Duplicating a Page...............................................................................................................................................70
Loading Another Page.........................................................................................................................................70
Creating a New Page ...........................................................................................................................................71
Creating a New Page from a Navigate Action .....................................................................................................72
Copying a Page from a Different Vocabulary File ...............................................................................................73
Adding a Gesture to a Page.................................................................................................................................74
Overriding the Background Color of a Page........................................................................................................74
Editing an Abbreviation Expansion..........................................................................................................................75
Searching for a Word using Word Finder................................................................................................................75
Creating a Whiteboard Page ...................................................................................................................................76

Via Pro/Via Mini User’s Guide: Dialogue AAC 5
Enlarging Text in the Speech Display Bar ................................................................................................................78
Changing Text Size or Number of Lines in the SDB .............................................................................................78
Creating a Tap Action ..........................................................................................................................................78
Highlighting Words as They are Spoken in the SDB ................................................................................................79
Highlighting Words as They are Spoken during a Telephony Call ...........................................................................81
Setting up Switch Scanning in the Dialogue App.....................................................................................................82
Setting up One or Two Switches .........................................................................................................................82
Using the Scanning Settings ................................................................................................................................83
Using Auto-Scan ..................................................................................................................................................83
Selecting the Scan Pattern ..................................................................................................................................83
Including the Speech Display Bar (SDB) in Scans ................................................................................................84
Configuring Empty Cells Scans ............................................................................................................................84
Setting Scan Timing .............................................................................................................................................84
Configuring Re-scans...........................................................................................................................................84
Turning on Auto Restart......................................................................................................................................84
Setting Auditory Scan..........................................................................................................................................84
Choosing and Adjusting a Prompt Voice .............................................................................................................84
Setting up a Button to Play a Video ..................................................................................................................... 85
Setting up a Button to Play a YouTube™ Video.................................................................................................... 86
Setting up a Button to Open an App .......................................................................................................................87
Blocking and Restoring Access to the Editing Menus..............................................................................................88
Working with Profiles ..............................................................................................................................................89
Creating and Saving a Profile ..............................................................................................................................89
Loading a Profile by Navigating Menus...............................................................................................................89
Loading a Profile by Tapping a Button ................................................................................................................89
Renaming or Deleting a Profile ...........................................................................................................................90
Modifying a Profile..............................................................................................................................................90
Changing Dialogue App Settings..............................................................................................................................91
Updating the Dialogue App Software......................................................................................................................95
Analyzing Language Development ..........................................................................................................................96
Using the Realize Language Website ..................................................................................................................96
Turning on Data Logging from Your Device ........................................................................................................97
Creating a Privacy Password ...............................................................................................................................97
Manually Uploading Data for Analysis ................................................................................................................97
Clearing Usage Data ............................................................................................................................................98
Changing or Removing Your Privacy Password...................................................................................................98
Adding a Webhook Event to a Button.....................................................................................................................99
Terms Used in This Section .................................................................................................................................99
Adding a Webhook Event..................................................................................................................................100
Non-Dedicated Devices: Viewing Dialogue and Another App Side-by-Side ..........................................................101
Telephony: Using the Dialogue App to Make Phone Calls ....................................................................................102
Backing up Your Device .........................................................................................................................................104
Restoring Your Device ...........................................................................................................................................104
This manual suits for next models
1
Table of contents
Other PRC-Saltillo Medical Equipment manuals


Popular Medical Equipment manuals by other brands


Getinge
Getinge Arjohuntleigh Nimbus 3 Professional Instructions for use

Mettler Electronics
Mettler Electronics Sonicator 730 Maintenance manual

Pressalit Care
Pressalit Care R1100 Mounting instruction

Denas MS
Denas MS DENAS-T operating manual

bort medical
bort medical ActiveColor quick guide

AccuVein
AccuVein AV400 user manual


