1
1 Overview
1.1 Introduction
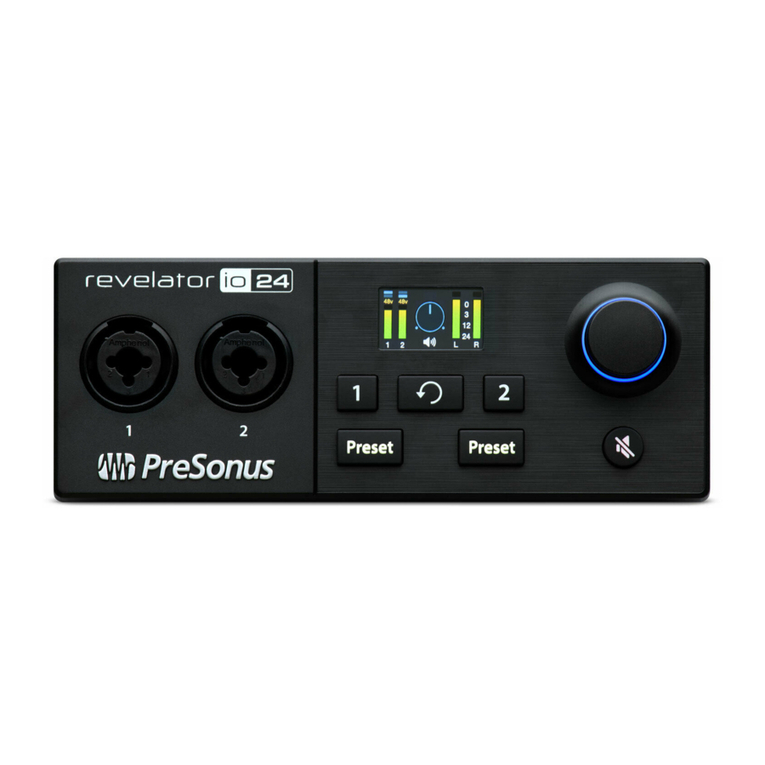
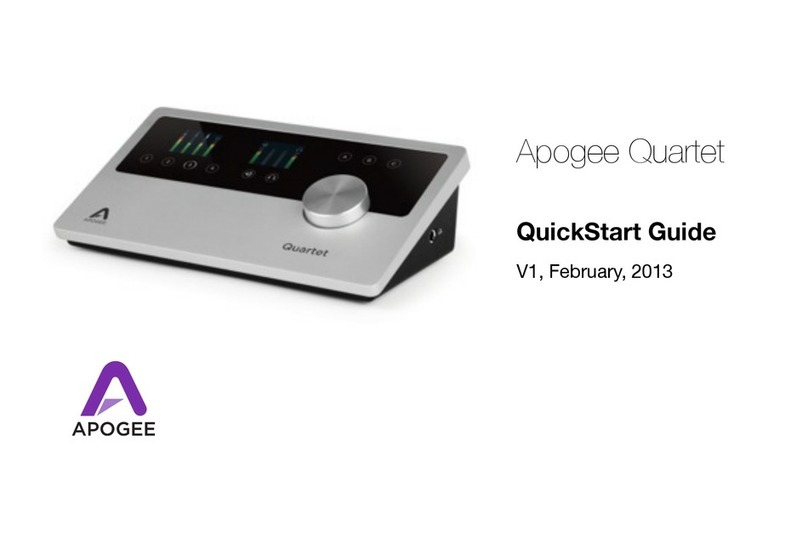
Revelator io24
Owner’s Manual
1Overview
1.1 Introduction
Thank you for purchasing the Revelator io24 audio interface! Revelator io24 is
the perfect audio interface for live streaming or podcasting, and is a powerful
recording solution for voice-overs and music production in your home studio. It’s
designed to deliver polished, professional-sounding results with ease. Once you’ve
registered your Revelator io24 at my.presonus.com, you’ll be able to download
your drivers, a complimentary copy of Studio One Artist, additional plug-ins,
content, and more. It’s our gift to you for becoming a PreSonus customer.
We suggest you read this manual to familiarize yourself with the features
and applications for your Revelator io24 before trying to connect it to your
computer. This will help you to avoid problems during installation and use.
Throughout this manual you will find Power User Tips. These tips and
tricks will help you to become a Revelator io24 expert—as well as help
you to better understand audio terminology, so you can get the most
from your purchase and get the best sound quality possible.
Thanks for joining the PreSonus family. We’re glad you’re here.
1.2 What is in the box
•Revelator io24 USB audio interface
•1M USB-C-to-USB-A Cable. Use this to connect your Revelator io24 to a USB
port on your computer or a powered USB hub.
•Quick Start Guide. Use this as a handy reference guide to your hardware
features while you familiarize yourself with your new interface
•PreSonus Health, Safety, and Compliance Guide. Legal language to cure your
insomnia.
•Warranty/Registration Card
Hookup•Conexiones • Verkabelung • Branchements • 连接连接©2021PreSonusAudioElectronics, Inc. All Rights Reserved. PreSonus is a registeredregistered
trademarksofPreSonusAudioElectronics, Inc. Other product names mentioned herein maybe trademarks
oftheirrespectivecompanies.All specifications subject to change without notice.
18011GrandBayCt.• Baton Rouge,
Louisiana70809USA•1-225-216-7887
www.presonus.com
Revelatorio24
2-channelaudiointerfacefor streamers and podcasters
QuickStartGuide
Revelatorio24
Interfazdeaudiode 2 canales para streamers y podcasters
Guíadearranquerápido
Revelatorio24
2-Kanal-Audio-InterfacefürStreamerund Podcaster
Kurzanleitung
Revelatorio24
Interfaceaudioàdeux canaux pour les streameurs et les podcasteurs
Guidedepriseen main
Revelatorio24
为流媒体工作者和播客设计的双通道音频接口为流媒体工作者和播客设计的双通道音频接口快速启动指南Part# 70-12000164-B MicrophoneorInstrumenttoInput 2
MicrófonooInstrumentoaEntrada 2
MikrofonoderInstrumentanInput 2
Microphoneouinstrumentversentrée 2
麦克风或乐器至Input2
MicrophoneorInstrumenttoInput 1
MicrófonooInstrumentoaEntrada 1
MikrofonoderInstrumentanInput 1
Microphoneouinstrumentversentrée 1
麦克风或乐器至Input1
MIDIInandOutto MIDI Controller
EntradaysalidaMIDIa controladorMIDI
MIDI-Ein-undAusganganMIDI-Controller
EntréeetsortieMIDIvers contrôleur MIDI
MIDI输入输出至MIDI控制器USB-CtoUSB-Atocomputer or USB power
USB-CaUSB-Aaordenador ó alimentación USB
USB-CaufUSB-AanComputer oder
USB-Stromversorgung
USB-CversUSB-Apourordinateur ou alimen-
tationUSB
USB-C至USB-A到电脑或USB电源OuttoHeadphones
Salidaparaauriculares
AusgabeüberKopfhörer
Sortieverscasque
输出至耳机Left/RightMainOuttoSpeakers
SalidaprincipalIzquierda/Derechaaaltavoces
LautsprecherandenMain-AusgängenLinks/
Rechts
Sortiesgauche/droiteversenceintes
左/右主输出至扬声器Basicfunctions• Funciones básicas • Grundlegende Funktionen • Fonctions de base • 基础功能基础功能Presschannel1or 2 button to select channel. Press encoder to cycle through
settings.Turnencoderto change chosen setting.
Pulseelbotóncanal 1 ó 2 para seleccionar el canal.Pulse el encoder para desplazarse
porlosajustes.Gire el encoder para cambiar el ajuste elegido.
Channel1oder2 drücken, um den Kanal auszuwählen. Endlosregler drücken, um
durchdieEinstellungenzu blättern. Endlosregler drehen, um die ausgewählte
Einstellungzuändern.
Pressezlatouchede canal 1 ou 2 pour sélectionner le canal. Pressezl’encodeur pour
parcourirlesréglages.Tournezl’encodeur pour modier le réglage choisi.
按下channel1或2 按钮进行轨道选择。按下编码器在设置中进行循环选择。旋转编码器对选中的设置进行更改。TapPresettocycle through sound presets. Press and hold Preset to turn presets
ooron.
ToquePresetparadesplazarseentre los presets de sonidos. Mantenga pulsado Preset
paradesactivaroactivar los presets.
Presetdrücken,umdurch die Sound-Presets zu blättern. Preset gedrückt halten,
umPresetszude-/aktivieren.
AppuyezsurPresetpour parcourir les préréglages de son. Pressez et maintenezPreset
pourdésactiverouactiver les préréglages.
按下Preset在声音预设中进行循环选择。按住Preset可开启或关闭预设。From Home screen, press Encoderto c yclethrough control of Headphone
volume,Mainvolume,or monitor blend. Turn encoder to adjust the
selectedparameter.
DesdelapantallaInicio, pulse Encoder para ir desplazándose entre el volumen
delosauriculares,el volumen Principal o la mezcla de monitoraje. Gire el
encoderparaajustarel parámetro seleccionado.
DrückenSiedenEndlosregler im Home-Screen, um z wischen
Kopfhörerpegel,GesamtlautstärkeundMonitormischung umzuschalten.
DrehenSiedenEndlosregler, um den ausgewählten Parameter anzupassen.
Enécrand’accueil,pressezl’encodeur pour faire déler les commandes de
volumeducasque,de volume principal ou de mélange pour l’écoutede
contrôle.Tournez-lepourréglerle paramètre ainsi sélectionné.
在主屏幕上,按编码器可循环控制耳机音量、主音量或监听混合。转动编码器来调整所选参数。PRESS
0
3
12
24
48v
2
+24dB
80Hz
PRESS
48v+24dB 80Hz
HOLD
Inputs
0
3
12
24
48v
2
80Hz
+30dB
Addedbonus:PreSonus’previouslyTopSecret recipe for…
FantasticVeganGumbo
Ingredients:
•80mlall-purposeflour
•70mlvegetableoil(e.g.high heat
sunfloweroil)
•1-2onions(diced)
•2celerystalks(diced)
•1greenbellpepper(diced)
•3clovesgarlic(minced)
•1literofvegetablebroth
•1handfulofokra,cutinto pieces
•1redbellbellpepper,cut into pieces
•250gmushrooms,cutintopieces
•1cauliflower,cutintoflorets
•PreSonus“SweetDarlin‘“CajunDry
Rub
•salt
•thyme
•smokedpaprika
•paprika(hot)
•blackpepper
•2-3bayleaves
•parsley,finelychopped
•springonion,finelychopped
CookingInstructions:
1. Makearoux:heat the oil in a pan set to medium heat. and stir in the our.Slowly
addour1-2Tbspat a time, stirring continuously. Continue cooking and stirring
therouxuntilit is a dark brown (it should look like melted chocolate—milk or dark
chocolateisaquestion of taste and patience.) Be carefulto not let the oil get too
hot,ortheour will burn and you’ll haveto star t over!I t’sbest to work with the
heatsettomedium and your patience set to high.
2. Oncerouxhasreached the desired color,add the onions, peppers and celery; stir
well.Afterafew moments,add the gar lic and fry briey.Then add the broth and
bringtoaboil.
3. Addbayleavesand okra, and season to taste with the spices.Simmer on lowest
heatforaboutone hour.
4. Inthemeantime,place cauliower,red bell peppers and mushrooms on a baking
sheet.Drizzlewithoil and sprinkle with Sweet Darlin‘.Brown in the oven at approx.
220°C.
5. Addthevegetablesto the stew and simmer a little more,or turn o the heat and
letitsitfor a few hours (Like any stew,it gets better overnight.)
6. Servewithriceand sprinkle with green onion and parsley. Season to taste with
Tabasco(orotherhotsauce).
Serves3-4
14
6
7
910 11 12
8
2 2
3
5
ENGLISH
1. Comboinputjacks.Suitable for XLR, Line, or Instrument connections.
2. ChannelSelectButtons.Press to display information about Input 1 or
input2onscreen (3).
3. Screen.Displaysmetering,preset selection, and other important
information.
4. BackButton.Returnsdisplay on screen (3) to default Home view.
5. PresetSelectors.Cyclesthrough presets for inputs 1 and 2,
respectively.Presstocycle through Presets; press and hold
tobypassPresets.
6. MultipurposeEncoder.Controlsmany parameters. From Home screen,
pressittocycle through controlling Headphone volume, Main volume,
ormonitorblend.From Channel screen, press it to cycle through
+48v,gain,andhigh-pass lter options. Rotate Encoder to adjust the
selectedparameter.
7. Mute.Enables/DisablestheMain Outs.
8. KensingtonLock.Connectthis port to a Kensington lock
topreventtheft.
9. USB-C.ConnectUSB-C to USB-A cable (included) to yourcomputer or
USBpowersource.
10.MIDI In/Out. Connect to external MIDI controllerslike keyboards for
controlofvirtualinstruments in Studio One.
11.Main Out. Balanced 1/4”TRS outputs for speakers or power amp.
12.Headphone Output. The rear-panel headphone output mirrors the
samestreamsasthe Main left/right outputs.
ESPAÑOL
1. Jackscombodeentrada. Adecuados para conexiones XLR, Línea o
Instrumento.
2. Botonesdeselecciónde canal. Pulse para mostrar información en pantalla
(3)sobrelaEntrada 1 ó la entrada 2.
3. Pantalla.Muestralamedición, selección de presets y otra información
importante.
4. BotónBack.Devuelvelo mostrado en pantalla (3) a la vista Inicio por defecto.
5. Selectoresdepresets.Se desplaza de forma cíclica por los presets para
lasentradas1y 2 respectivamente. Pulse para desplazarse por los presets;
mantengalapulsaciónpara poner los presets en bypass.
6. Encodermultifunción.Controlamuchos parámetros. Desde la pantalla Inicio,
pulseenéstepara ir desplazándose entre el volumen de los auriculares, el
volumenPrincipalola mezcla de monitoraje. Desde la pantalla Canal, pulse
enésteparair desplazándose entre las opciones +48v, ganancia y ltro paso
altos.Gireelencoder para ajustar el parámetro seleccionado.
7. Mute.Activa/desactivalasalida Principal (Main Outs).
8. Ranuraseseguridad.Conecte este puerto a una ranura de seguridad
(Kensingtonlock)paraprevenir su hurto.
9. USB-C.Conecteelcable USB- C a USB-A (incluido) a su ordenadorfuente de
alimentaciónUSB.
10.MIDI In/Out. Conecte a controladores MIDI externos como teclados para el
controldeinstrumentosvirtuales en Studio One.
11.Main Out. Salidas TRS balanceadas de 1/4”para altavoces o una etapa de
potencia.
12.Salida de auriculares. La salida de auriculares del panel posterior reproduce
lasmismastransmisionesque las salidas principales left/right.
DEUTSCH
1. Combo-Eingangsbuchsen.ZumAnschlussvon Mikrofonen, Line-Quellen
oderInstrumenten.
2. Kanalauswahltasten.Drücken,umim Display (3) Informationen zu Input 1
bzw.2einzublenden.
3. Display.BlendetwichtigeInformation wie Pegelanzeigen und ausgewählte
Presetsein.
4. Zurück-Taste.Drücken,umim Display (3) den Home-Screen einzublenden.
5. Preset-Wahltasten.Drücken,umdurch die Presets für die Inputs 1 und 2
zublättern.Drücken,um durch Presets zu blättern; drücken und halten, um
Presetszudeaktivieren.
6. Multifunktions-Endlosregler.SteuerteineVielzahl von Parametern.
DrückenSiedenRegler im Home -Screen,um z wischen Kopfhörerpegel,
GesamtlautstärkeundMonitormischungumzuschalten. Drücken Sie
ihnimChannel-Screen,um zwischen den Einstellungen für +48 V, Gain
undHochpasslterumzuschalten.Drehen Sie den Endlosregler, um den
ausgewähltenParametereinzustellen.
7. Mute.Aktiviert/DeaktiviertdieM ain-Ausgänge.
8. KensingtonLock.Önungfür ein Kensington-Schloss zur
Diebstahlsicherung.
9. USB-C.ZumAnschlussan einen Computer oder eine USB-Stromversorgung
miteinemUSB-KabelUSB- C auf USB-A (im Lieferumfangenthalten).
10.MIDI In/Out. Zum Anschluss externer MIDI-Controller wie beispielsweise
KeyboardsoderzurSteuerung virtueller Instrumente in Studio One.
11.Main Out. Symmetrische 6,35 mm TRS-Ausgänge zum Anschluss an
LautsprecheroderEndstufen.
12.Kopfhörerausgang. Der rückseitige Kopfhörerausgang gibt denselben
Streamauswiedie Ausgänge Main Links/Rechts.
FRANÇAIS
1. Prisesd’entréemixtes.Conviennent aux connexions XLR, ligne ou
instrument.
2. Touchesdesélectionde canal. Pressez pour acher à l’écran(3) des
informationssurl’entrée1 ou l’entrée2.
3. Écran.Achelamesure de niveau, la sélection de préréglage et
d’autresinformationsimportantes.
4. Touchederetour.Ramène la page d’accueilpar défaut à l ’écran(3).
5. Sélecteursdepréréglage.Font respectivement déler les préréglages
desentrées1et 2. Pressez-les pour parcourir les préréglages.
Maintenez-lespresséspourdésactiver les préréglages.
6. Encodeurmultifonction.Contrôlede nombreux paramètres. En écran
d’accueil,pressez-lepourfaire déler les commandes de volume du
casque,devolumeprincipal ou de mélange pour l’écoute de contrôle.
Enécrandecanal, pressez-le pour faire déler les options +48 V, gain et
ltrepasse-haut.Tournez-lepour régler le paramètre ainsi sélectionné.
7. Mute.Active/désactivelessorties principales.
8. FixationantivolKensington.Attachez-lui un antivol Kensington pour
empêcherlevol.
9. USB-C.Connectezlecâble USB- C versUSB -A(inclus) à votre ordinateur
ouàvotresource d’alimentation USB.
10.Entrée/sortie MIDI. Connectez-les à des contrôleurs MIDI externes
commedesclavierspour contrôler les instruments virtuels de Studio
One.
11.Sortie principale. Sortie sur jacks 6,35 mm 3 points (TRS) symétriques
pourenceintesouampli de puissance.
12.Sortie casque. La sortie casque de la face arrière produit les mêmes
uxquelessorties principales (M ain Out) gauche/droite.
中文1. 组合输入口。组合输入口。适用于XLR、线路或乐器连接。2.轨道选择按钮。轨道选择按钮。按下按钮可在屏幕(3)上显示Input1 或Input 2的信息。3. 屏幕。屏幕。显示咪表、预设选择和其他重要信息。4. 返回按钮。返回按钮。将屏幕(3)上的显示返回至默认的主页显示。5. 预设选择器。预设选择器。分别循环浏览Input1和2的预置。按下可循环浏览预置;按住可绕过预置。6. 多用途编码器。多用途编码器。控制许多参数。在主屏幕上,按下它可以循环控制耳机音量、主音量或监听混合。在通道屏幕上,按它可循环控制+ 48v,增益和高通滤波器选项。旋转编码器来调整所选参数。7. 静音。静音。启用/禁用主输出。8. Kensington锁。锁。将此端口连接到Kensington锁上以防止盗窃。9. USB-C。。将USB-C转USB-A电缆(附带)连接到您的电脑或USB电源。10.MIDI 输入输出。 输入输出。连接到外部MIDI控制器,如键盘,以控制StudioOne中的虚拟乐器。11.主输出。主输出。用于扬声器或功率放大器的平衡1/4“TRS输出。12. 耳机输出 。耳机输出 。
PreSonusSafety Warnings and Instructions
Electricalinformationand warning symbols for PreSonus products arelocated on the rear electrical panel of the unit
adjacenttothe electrical plug or on the bottom of the unit along with other product compliance information.
Thislightningflash with arrowheadsymbol within an equilateral triangle is intended to alert the user to the presence of non-
insulated“dangerousvoltage”withinthe product’senclosure that may be of sufficient magnitude to constitute a risk of electric shock.
WARNING:TOREDUCETHE RISK OF ELEC TRIC SHOCK, DO NOT REMOVE COVER (ORBACK) AS THERE
ARENOUSER-SERVICEABLE PARTSINSIDE. REFER SERVICING TO QUALIFIED PERSONNEL.
Theexclamationpoint within an equilateral triangle is intended to alert the user to the presence of
importantoperatingand maintenance instructions in the literatureaccompanying the appliance.
CAUTION:Toreducethe risk of electric shock, do not expose this appliance to rain and moisture. Do not expose this device
todrippingorsplashing liquids and no objec t filled with liquids,such as vases, should be placed on the device.
CAUTION:Theseserviceinstruc tions arefor use by qualified ser vice personnel only.To reduce the risk of electric shock,
donotperform any servicing other than that contained in the operation instructions. Qualified service personnel must
performrepairs.
1. Readtheseinstructions.
2. Keeptheseinstructions.
3. Heedallwarnings.
4. Followallinstructions.
5. Donotuse this device near water.
6. Cleanonlywith a dry cloth.
7. Donotblock any ventilation openings. Install in accordancewith the manufacturer’s instructions.
8. Donotinstall near any heat sources, such as radiators,heat registers, stoves,
orotherdevice (including amplifiers) that produceheat.
9. Donotdefeat the safety purpose of the polarized or grounding-type plug. A polarized plug has two blades
andathird groundingprong. The wide blade and the third prong are provided for yoursafet y.If the provided
plugdoesnot fit into youroutlet, consult an electrician for replacement of the obsolete outlet.
10. Protectthe power cord from being walked on or pinched, particularly at plugs,
conveniencereceptacles,andthe point where they exit from the device.
11. Useonly attachments/accessories specified by PreSonus.
12. Useonly with a cart, stand, tripod, bracket, or table specified by the manufacturer or sold with
thisdevice.Use caution when movinga car t/device combinationto avoid injury from tip- over.
13. Unplugthis device during lightning storms or when unused for long periods.
14. Servicing is requiredwhen the device has been damaged in any way, such as if a power-supply
cordorplug is damaged; or liquid is spilled,or objec ts havefallen into the device; or if
thedevicehas been exposed to rainor moisture, does not operate normally, or has been
dropped.AllPreSonusproducts in the USA should be ser viced atthe PreSonus fac tory
inBatonRouge, Louisiana.If your PreSonus product requires a repair, contact support@
presonus.comtoarrangefor a return authorization number. Customers outside the USA
shouldcontacttheir local distributor.Your distributor’scontact information is available at www.presonus.com.
15. Protectivegrounding(earthing) terminal. The apparatus should be connected to a
mainssocketoutlet with a protectivegrounding(earthing) connec tion.
16. Wherethe Mains plug or an appliance coupler is used as the disconnect device,
thedisconnectdevice shall remain readily operable.
17. Theuse of apparatus is in moderate climates.
18. Pleaseallow 5cm around the apparatus for sufficient ventilation; the ventilation should not be impeded
bycoveringtheventilation openings with items, such as newspapers, table-cloths, curtains, etc.
Rackmounting
• Useanequipment rackthat is 19-inches wide (482.6 mm) and rated for the total weight of your equipment.
• Useaminimum of (4) 10/32 threadedscrews per rack mounted device.
WARNING:
Cancerandreproductiveharm - ww w.p65warnings.ca.gov
PreSonusCompliance Information
EuropeanUnion (EU)
TheCEmark on this product indicatesthat the device is compliant with the
EUCouncilDirectives
2014/35/EULowVoltageDirective
2014/30/EUEMCDirective
2011/65/EURoHSRecast
EC1907/2006REACh
RoHSRecastDirective 2011/65/EU
REAChDirectiveEC1907/206
WEEEThissymbolon this product or its packaging indicates that this product must not be disposed of with other
waste.Instead,itis your responsibility to dispose of your waste equipment by handing it over to a designated
collectionpointfor the recycling of wasteelec trical and electronic equipment.The separate collection and recycling
ofyourwasteequipment at the time of disposal will help conserve natural resources and ensure that it is recycled
inamanner that protects human health and the environment.For more information about where you can drop
offyourwasteequipment for recycling, please contact your local city recycling office or the dealer from whom you
purchasedtheproduct.
Radioand TelevisionInterference
Ifthesesymbols are markedon the product, the device complies as follows:
AnyChangesor modificationsnot expressly approved by the party responsible for compliance could void the user’s authority to operate
theequipment.
USA:Thisequipmenthas been tested and found to comply with the limits for a Class B digital device, pursuant to
Part15of the FCCRules. Operation is subject to the following two conditions: (1) This device may not cause harmful
interference,and(2)this device must accept any interference received, including interference that may cause
undesiredoperation.Theselimits are designed to provide reasonable protection against harmful interference in a
residentialinstallation.Thisequipment generates, uses, and can radiate radio frequency energy,and, if not installed
inaccordancewiththe instructions, may cause harmful interference to radio communications. However, thereis no guarantee that
interferencewillnot occur in a particular installation. If this equipment does cause harmful interference to radioor television reception,
whichcanbe determined by turning the equipmentoff and on, the user is encouraged to tr y tocorrect the inter ferenceby one or more of
thefollowingmeasures:
• Reorientorrelocatethe receiving antenna.
• Increasetheseparationbetween the equipment and the receiver.
• Connecttheequipment intoan outlet on a circuit different from that to which the receiver is connected.
• Consultthedealeror an experienced radio/TV technician for help.
FCCRadiationExposureS tatement:
Thisequipmentcomplieswith FCC radiation exposure limits set forth for an uncontrolled environment. This equipment should be installed
andoperatedwithminimum distance 20cm between the radiator& your body.
Thistransmittermustnot be co-located or operating in conjunction with any other antenna or transmitter.
CAUTION:Changesor modifications to this devicenot expressly approved by PreSonus Audio Electronics could void the user’sauthorit y to
operatetheequipmentunder FCC rules.
AustralianCompliance:Thisequipment complies with Radio communication Devices Notice 2003; or Radio communication
Labeling(ElectromagneticCompatibility)Notice 2008; or Radio communication (Compliance Labeling Electromagnetic
Radiation)LabelingNotice 2003.
ICWARNING
ICRSSwarning:This device complies with Industry Canada licence-exempt RSS standard (s). Operation is subject to the following two
conditions:(1)this device maynot cause inter ference,and (2) this device must accept any interference,including interference that may
causeundesiredoperationof the device. Under Industry Canada regulations, this radio transmitter may only operate using an antenna of a
typeandmaximum (or lesser) gain approvedfor the transmitter by Industry Canada. To reduce potential radio interference toother users,
theantennatype and its gain should be so chosen that,the equivalent isotropically radiated power (e.i.r.p.)is not more than that necessary
forsuccessfulcommunication.
Thisradiotransmitter(identify the device by certifcation number, or model number if Category II) has been approved by Industry Canada
tooperatewiththe antenna types listed below with the maximum permissible gain and required antenna impedance for each antenna
typeindicated.Antennatypes not included in this list, having a gain greater than the maximum gain indicated for that type, are strictly
prohibitedforusewith this device.
ICRadiationExposure Statement:
Thisequipmentcomplieswith IC RF radiation exposure limits set forth for an uncontrolled environment. This transmitter must not be
co-locatedoroperatingin conjunc tion with anyother antenna or transmitter.
ICES003:ThisCANICES3 (B)/NMB3(B) digital apparatus complies with Canadian ICES003.
PreSonus Health, Safety,and Compliance Guide ClassB
PreSonus Health, Safety,and Compliance Guide ClassB
®
PreSonusHealth,Safety, and Compliance Guide. Part#70-00000013-C
©2018PreSonus Audio Electronics, Inc. All Rights Reserved.
18011GrandBay Ct. • Baton Rouge, Louisiana 70809 USA • 1-225-216-7887
www.presonus.com


