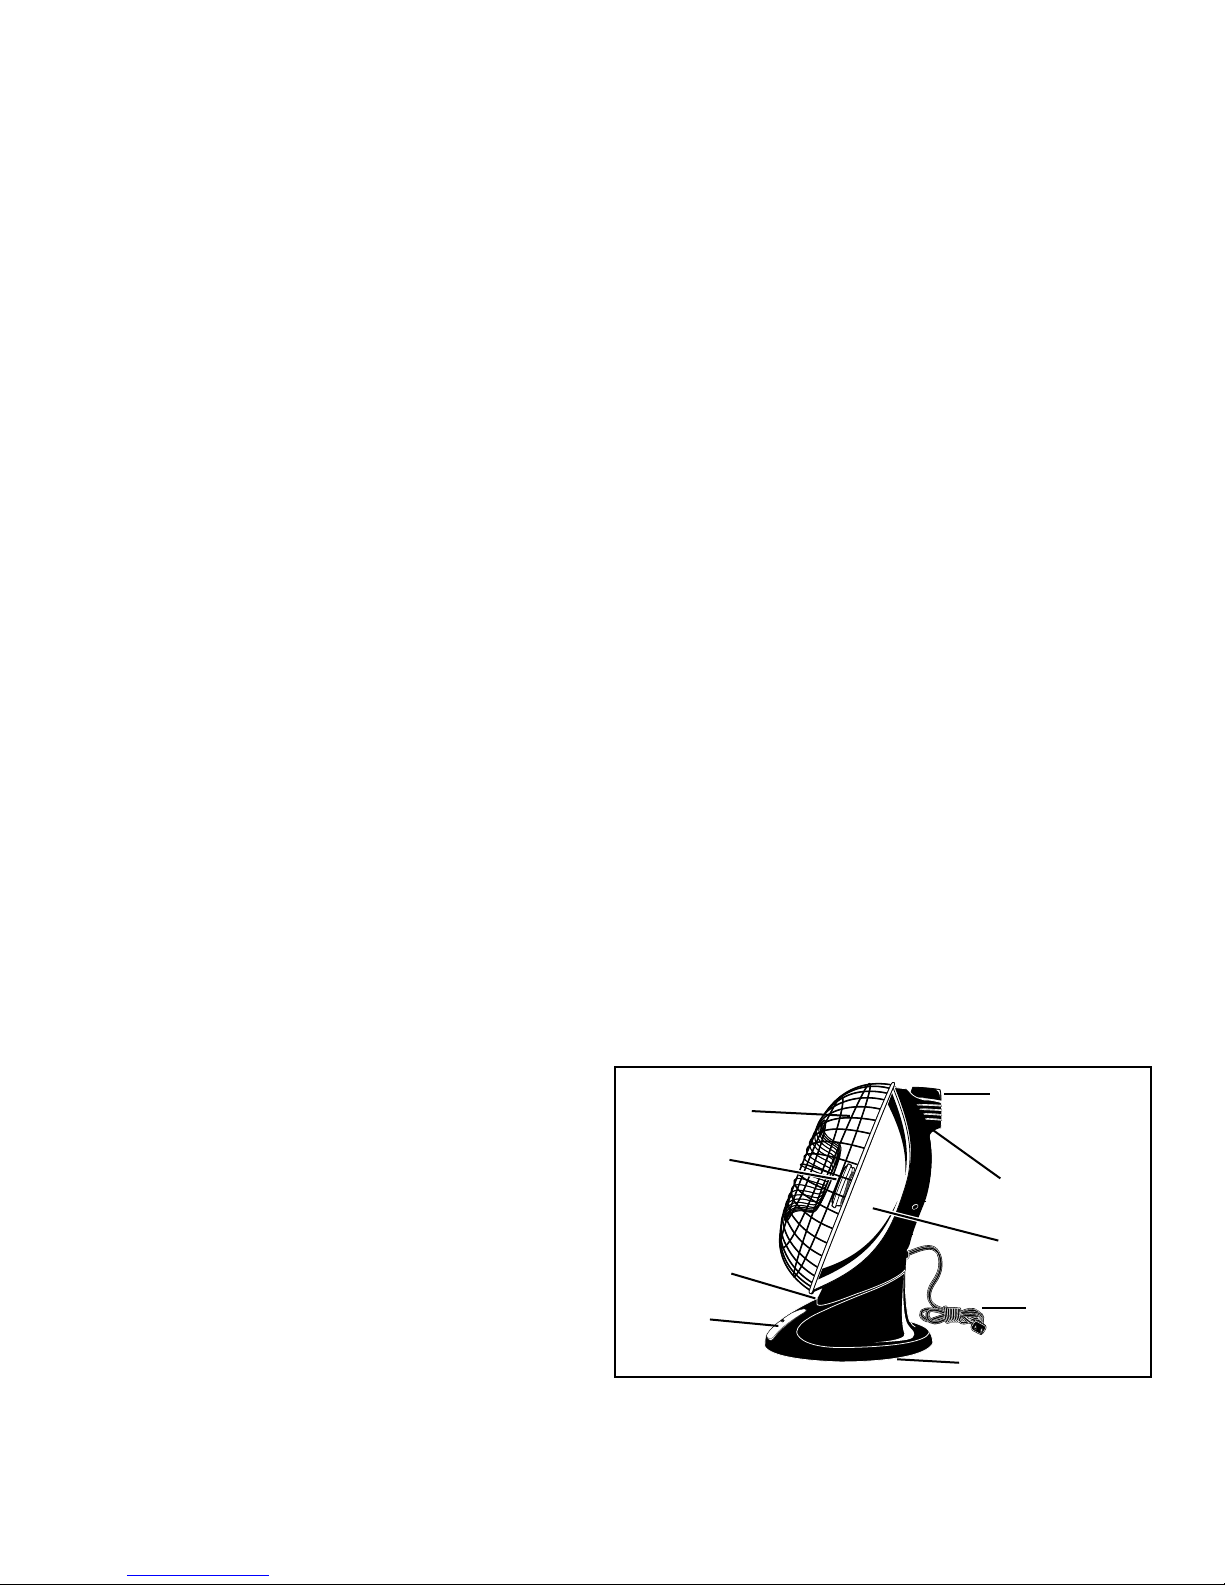
Presto HeatDish Plus User manual

1
InstructIons
Visit us on the web at www.GoPresto.com 2011 National Presto Industries, Inc.
This is a Listed appliance. The following important safeguards are recommended by most portable appliance manufacturers.
IMPORTANT SAFEGUARDS
When using electrical appliances, basic precautions should always be followed to reduce the risk of re, electrical shock,
and injury to persons, including the following:
1. Read all instructions before using this heater.
2. This heater is hot when in use. To avoid burns, do not let bare skin touch hot surfaces. Use handle when moving this
heater. Keep combustible materials, such as furniture, pillows, bedding, papers, clothes, and curtains at least 3 feet (.9m)
from the front of the heater and keep them away from the sides and rear.
3. Extreme caution is necessary when any heater is used by or near children or invalids and whenever the heater is left
operating and unattended.
4. Always unplug heater from wall outlet when not in use.
5. Do not operate this heater with a broken element or ceramic cone or with a damaged cord or plug, or after the heater
malfunctions, or after it has been dropped or damaged in any manner. Discard the heater or return it to the Presto Factory
Service Department for examination and/or repair.
6. Do not use outdoors.
7. This heater is not intended for use in bathrooms, laundry areas and similar indoor locations. Never locate heater where
it may fall into a bathtub or other water container.
8. Do not run cord under carpeting. Do not cover cord with throw rugs, runners, or similar coverings. Do not route cord
under furniture or appliances. Arrange cord away from trafc area and where it will not be tripped over.
9. To disconnect heater, turn controls to off, then remove plug from wall outlet.
HeatDishPlus
parabolic electric heater
◆Feels like three times the heat...costs a third less to operate.
◆Parabolic reector focuses energy like a satellite dish.
◆Warmth you can feel directly, almost instantly.
◆Heats you rather than the air. Keeps you toasty warm even in a
large, chilly room or open area.
◆Effective for heating enclosed rooms up to 10 by 12 feet (heater is
not designed to heat the air of larger areas).
1000 Watts
3415 BTUs
120 Volts AC
Estas instrucciones también están disponibles en español.
Para obtener una copia impresa:
• Descargue en formato PDF en www.GoPresto.com/espanol.
• Envíe un mensaje de correo electrónico a [email protected].
• Llame al 1-800-877-0441, oprima 2 y deje un mensaje.

2
10. Do not insert or allow foreign objects to enter the grille or any ventilation or exhaust opening as this may cause an elec-
trical shock, re, or damage the heater.
11. To prevent a possible re, do not block air intakes or exhaust in any manner. Do not use on soft surfaces, like a bed,
where openings may become blocked.
12. This heater has hot and arcing or sparking parts inside. Do not use it in areas where gasoline, paint, or ammable liquids
are used or stored.
13. Use this heater only as described in these instructions. Any other use not recommended by the manufacturer may cause
re, electric shock, or injury to persons.
14. Always plug heaters directly into a wall outlet/receptacle. Never use with an extension cord or relocatable power tap
(outlet/power strip).
15. This heater includes an audible alarm to warn that parts of the heater are getting excessively hot. If the alarm sounds,
immediately turn the heater off and inspect for any objects on or adjacent to the heater that may cause high temperatures.
DO NOT OPERATE THE HEATER WITH THE ALARM SOUNDING.
16. Do not operate heater with base removed.
17. Do not attempt to repair, adjust, or replace parts in the heater. The Presto Factory Service Department should check and
repair broken heaters.
SAVE THESE INSTRUCTIONS
Important Cord and Plug Information
This appliance has a polarized plug (one blade is wider than the other). To reduce the risk of electric shock, this plug is in-
tended to t into a polarized outlet only one way. If the plug does not t fully into the outlet, reverse the plug. If it still does
not t, contact a qualied electrician. Do not attempt to modify the plug in any way.
GETTING ACQUAINTED WITH YOUR PRESTOPARABOLIC HEATER
How the “Parabolic Heater” keeps you warm...
The Presto HeatDish Plus parabolic electric heater is designed to heat people and objects directly, without rst heating the
air space around them. The heater allows you to set the room temperature at a low level and still stay cozy warm.
Heat is produced by a coiled wire element wrapped around a ceramic cone. The heater’s parabolic reector reects this
heat in a concentrated beam that shines directly on you. The heat is controlled through an innite switch which cycles the
element on and off, in a fashion similar to your stove. The higher the setting, the longer the interval during which the element
is energized. The ceramic cone retains the heat, so that there is an even feeling of heat at each setting. At lower settings the
heat is less intense, while at higher ones, it is more intense.
How the “Parabolic Heater” can help save energy...
The parabolic reector focuses heat output, like a satellite dish concentrates TV signals, so it requires less energy than
convection electric heaters to deliver all the warmth you’ll
want.
It provides super concentrated heat to keep you much
warmer than 1500 watt convection heaters. Yet, because
it uses just 1000 watts, it costs a third less to operate and
could help you save money on electric bills.
A “parabolic heater” coupled with other conservation
measures will help save energy in your home. For example,
energy savings may be realized by keeping the thermostat
on your central heating system at a lower than normal setting
and thereby decreasing the average room temperature.
Personal comfort can be maintained at these lower room
temperatures by using a parabolic heater.
How your PrestoParabolic Heater works...
An automatic control switch or thermostat is built into the heater to control the heat output. The control knob (Fig. A),
located on the top of the heater, is used to adjust the thermostat. This thermostat works like the control for a burner on an
Protective grille
Heating element
Signal light
Wide base
Fig. A
Top-mounted
thermostatic control
knob
Recessed handle
Power cord
Parabolic reector
Model number location

3
Fig. B
electric stove by cycling the heating element on and off to regulate the amount of heat produced. At the highest setting, the
element is on 100% of the time. At lower settings, the element will cycle on and off automatically producing a lesser amount
of heat. The lower the heat setting, the longer the element will remain off during the cycle. This is normal. Additionally,
like the power control switch for any electric device, this thermostat may produce a small spark or ash of light each
time it opens or closes to cycle the element on or off. While this visual ash is normal for any electric switch, it may be
more noticeable in the heater, particularly if the room is darkened. Likewise, you may hear a slight humming sound at lower
settings as the thermostat turns the element back on and the unit heats up. This is also normal.
The heater features an automatic safety switch which turns the unit OFF in case of accidental tip-over. Plus a loud buzzer
sounds a warning if tip-over occurs while the element is cycled ON. The buzzer is designed to be extremely sensitive and
to provide a warning tone whenever the heater is moved while cycled ON. In addition, the buzzer
may sound and the heater will shut off if too much dust or dirt has accumulated on the parabolic
reector. To clean the parabolic reector, see cleaning instructions on page 4.
With the “Thermostatic Control” knob (Fig. B) set to the “HI” position, the electricity is supplied
to the heating elements 100% of the time and the heater is ON constantly. In the “LOW” position,
electricity is supplied to the heating elements only part of the time. This varies with the room
temperature. The colder the temperature is in the room, the more often the heater will cycle on.
The heater will automatically cycle on and off at the “LOW” setting and maintain a constant
temperature.
The desired comfort level can be maintained by adjusting the “Thermostatic Control” knob and thereby regulating the total
heat output of the unit.
Your Presto Parabolic Heater is shipped completely assembled. Before using the heater for the rst time, familiarize
yourself with the parts of the heater (Fig. A) and read the information on the following pages. For proper operating position,
stand the heater upright with the bottom of the base resting at on the oor.
Positioning the heater...
When positioned correctly, the parabolic heater will keep you toasty warm. Follow these suggestions for maximum
warmth:
1. Point the front grille towards the area in which heat is desired.
2. Check to make sure there are no objects between you and the heater. Such objects will absorb the heat and prevent it
from reaching you.
3. Place the heater at least 3 feet, but no more than 10 feet away. The parabolic design of the reector focuses heat at persons
3 to 10 feet away. Thus for your entire body to enjoy the heat produced by the heater, it must be placed at least 3 feet
from you. Placing it closer will turn the heater into a foot warmer, rather than a body warmer. Experiment with various
positions until you nd the one that is right for you.
4. Remember, this unit is primarily a people heater rather than a room heater, and using it to heat a large room or open area
is not recommended. The infrared heat produced by this heater will travel through glass, just like the sun’s rays. If the
heater is aimed at a window, objects outside will be heated.
When using any heater, the following safety precautions should always be observed:
Close attention is necessary when the heater is used where children are present.
The heater should always be in a stable, upright position with at least 3 feet of space between the front of the unit and
any other surface.
The heater should never be placed in a closed area such as beneath furniture, in cabinets, or beneath or behind curtains
or drapes. Nor should it be hung from a wall or ceiling.
Heat produced by any heater tends to pull moisture from the air. It is recommended that you avoid sitting with your face
directly in front of the heating element. The intense heat may dry your eyes and cause irritation. Warning: Some people
with sensitive skin may develop certain skin conditions such as erythema ab igne when they are exposed to heat sources
such as car heaters, electric blankets, heating pads, hot water bottles, and heaters. Symptoms may include irritation or
discoloration of the skin. Some people may have nerve conditions that reduce their ability to feel direct heat. The heater
is not recommended for use by or in close proximity to persons with these kinds of sensitive skin or nerve conditions.
Never use a heater with a damaged cord.

4
Operating the heater...
1. Turn the “Thermostatic Control” (Fig. B) to the OFF position.
2. Plug the power cord into a 120 volt, 60 cycle circuit which serves nothing else. Because the heater is a 1000 watt appli-
ance, it is normal for the plug to feel warm to the touch during operation.
Note: The signal light will glow whenever the cord is plugged into an outlet to indicate the heater is electrically
activated.
Caution: Plug directly into a wall outlet. This heater is not intended for use with an extension cord.
3. Turn the “Thermostatic Control” knob to its “HI” position. There may be a vibrating or humming sound when the heater
is turned on. This is normal and should last only about a half minute. When using the heater for the rst time, there may
also be a slight odor or light smoking as manufacturing coatings “burn” off. This, too, is normal during the rst several
uses.
4. Allow the heater to operate on its “HI” setting for at least three minutes to bring the heating element to its optimum
operating temperature. Anytime after that, the “Thermostatic Control” knob may be adjusted to a position that provides
the desired comfort level.
Remember, after the “Thermostatic Control” knob is turned to any ON position below “HI”, the heater will be continually
turning itself ON and OFF to control the heat output. This may not always be obvious because, due to residual heat in
the heating element, it will continue to glow at most settings. You may also hear a slight “clicking” or humming sound
as the automatic switch cycles the heating elements ON and OFF, or, when in a darkened room, see a small spark or ash
of light.
If additional heat is desired, turn the “Thermostatic Control” knob to a higher setting. This will lengthen the ON cycle
and the heater will produce more heat. If less heat is desired, turn the knob to a lower setting. The ON cycle will then be
shortened, producing less heat.
5. After use, turn the “Thermostatic Control” knob to the OFF position and disconnect the plug from the wall outlet. Always
disconnect by grasping the plug, not the cord. Pulling on or yanking the cord can damage the cord’s insulation and wires,
making the heater unsafe to use. Warning: Never use a heater with a damaged cord.
Care, Cleaning and Storage...
Allow heater to cool completely before any care or cleaning or storage. Also be sure heater is turned off and
unplugged.
1. Do not pour or spray any water, cleaners, or any liquid on or into any portion of the heater. Do not submerge heater in
any liquid.
2. Use a soft lint free damp cloth and a mild detergent to clean the exterior surfaces. Harsh or abrasive cleaners will damage
the nish.
3. Occasionally, the parabolic reector inside the grille will need to be cleaned to remove dust accumulation. To remove
dust from the parabolic reector, you may purchase a specially designed cleaning device such as the one offered on the
Important Instructions sheet enclosed. You may also dust the reector by following these simple steps: 1) Unplug the
heater and allow to cool; 2) support the heater on its back; 3) slip a soft lint free cloth through the grille; 4) move the
cloth over the surface of the parabolic reector by inserting a long thin handle (such as a dowel or the handle portion
of a wooden spoon) through the grille, using it to slide the cloth from spot to spot over the surface of the reector;
5) remove the handle and the cloth when the surface is dust free.
Note: If you allow dust to build up on the parabolic reector, the dust accumulation may cause the heater to
overheat and the warning buzzer to sound. If this should occur, clean the parabolic reector as previously instructed.
Once the dust is removed, the heater should work normally again. If however after cleaning, the heater does not work
properly or the buzzer continues to sound, send the heater to the Factory Service Department listed on page 5.
4. Wrap the cord around the base pedestal and store heater in a dry location.

5
Service Information...
If the heater is used with a loose or worn AC outlet, this poor connection may cause overheating and distortion of the plug.
If the plug is distorted, we suggest you contact the Presto Consumer Service Department.
If you have any questions regarding the operation of your Prestoappliance or need parts for your appliance, contact us by
any of these methods:
• Call 1-800-877-0441 weekdays 8:00 AM to 4:30 PM (Central Time)
• Email us at our website www.GoPresto.com
• Write: NATIONAL PRESTO INDUSTRIES, INC.
Consumer Service Department
3925 North Hastings Way, Eau Claire, WI 54703-3703
When contacting the Consumer Service Department, please indicate the model number and the series code for the heater.
These numbers can be found on the bottom side of the plastic base.
Please record this information:
Model Number ______________ Series Code ________ Date Purchased ________
Inquiries will be answered promptly by telephone, email, or letter. When emailing or writing, please include a phone number
and a time when you can be reached during weekdays if possible.
Any maintenance required for this product, other than normal household care and cleaning, should be performed by our
Factory Service Department. Be sure to indicate date of purchase and a description of problem when sending an appliance
for repair. Send appliances for repair to:
CANTON SALES AND STORAGE COMPANY
Presto Factory Service Department
555 Matthews Dr., Canton, MS 39046-0529
The Presto Factory Service Department is equipped to service all PRESTOappliances and supply genuine PRESTOparts.
Genuine PRESTO replacement parts are manufactured to the same exacting quality standards as PRESTOappliances and
are engineered specically to function properly with its appliances. Presto can only guarantee the quality and performance
of genuine PRESTO parts. “Look-alikes” might not be of the same quality or function in the same manner. To ensure that
you are buying genuine PRESTOreplacement parts, look for the PRESTOtrademark.
This quality PRESTOappliance is designed and built to provide many years of satisfactory performance
under normal household use. Presto pledges to the original owner that should there be any defects in material
or workmanship during the rst year after purchase, we will repair or replace it at our option. Our pledge
does not apply to damage caused by shipping. To obtain service under the warranty, return this PRESTO
appliance, shipping prepaid, to the Presto Factory Service Department. When returning a product, please
include a description of the defect and indicate the date the appliance was purchased.
We want you to obtain maximum enjoyment from using this PRESTOappliance and ask that you read and
follow the instructions enclosed. Failure to follow instructions, damage caused by improper replacement
parts, abuse or misuse will void this pledge. This warranty gives you specic legal rights, and you may also
have other rights which vary from state to state. This is Presto’s personal pledge to you and is being made
in place of all other express warranties.
NATIONAL PRESTO INDUSTRIES, INC.
Eau Claire, WI 54703-3703
PRESTOLimited Warranty
Form 72-923B
Other manuals for HeatDish Plus
1
Table of contents
Other Presto Electric Heater manuals
Popular Electric Heater manuals by other brands

Harvia
Harvia FU60 Instructions for installation and use

Harvia
Harvia BC60SEA Instructions for installation and use

Valor Fires
Valor Fires 809 Installer and owner guide

VeriSmart
VeriSmart EcoWifi 750W Installation and user manual

Slant/Fin
Slant/Fin VICTORY II VHS Series Brochure & specs

Bromic Heating
Bromic Heating Platinum Smart-Heat Electric II Installation, instruction and service manual