manuals.online logo
Brands
  1. Home
  2. •
  3. Brands
  4. •
  5. Pro's Kit
  6. •
  7. Multimeter
  8. •
  9. Pro's Kit MT-1509 User manual

Pro's Kit MT-1509 User manual

MT-1509
3-1/2 Auto Range Multimeter
1
User’s Manual 1st Edition, 2016
©2016 Copyright by Prokit’s Industries Co., Ltd.
The Statement
In accordance with the international copyright law, without permission
and written consent, one shall not copy the contents of this manual in any
form (including storage and retrieval or translation into languages of other
countries or regions). The manual is subject to change in future edition
without prior notice.
Caution
“Caution” mark refers to the condition and operation which may cause
damage to the instrument or equipment.
It requires that you must be careful during the execution of the operation.
If you incorrectly perform the operation or do not follow the procedure, it
may damage the instrument or equipment. In the circumstances that
such conditions are not met or not fully understood, please do not
continue to perform any operation indicated by the caution mark.
Warning
“Warning” mark indicates the condition and operation which may cause
danger to users.
It requires that you must pay attention during the execution of this
operation. If you incorrectly perform the operation or do not follow the
procedure, it may result in personal injury or casualties. In the
circumstances that such conditions are not met or not fully understood,
please do not continue to perform any operation indicated by the warning
mark.
Before using the instrument, please read this manual carefully
and pay attention to the relevant safety warning information.
Overview
The instrument is a portable Auto range digital multimeter. It has stable
performance, high precision, low power consumption, novel structure,
and is safe and reliable. It’s an ideal measuring instrument for the
majority of users.
2
The instrument can measure DC voltage, AC voltage, resistance and
connectivity; with non-contact voltage detection function, timely remind
the user to pay attention to operation safety, so it’s more safe for the user
to use.
This manual includes the relevant safety information, warning
notices and so on, please read the related contents carefully before using
the instrument, and strictly follow all warnings and precautions. Safety
Instructions
The instrument is designed and manufactured strictly in accordance with
the safety standard IEC61010 and in conformity with double insulation,
over-voltage standard 600V CAT III and pollution level 2 safety
standards.
Please follow the manual to use the instrument, otherwise the protection
function provided by the instrument may be reduced or invalid.
Safety Operation Specification
Warning
In order to avoid possible electric shock or personal injury, please
abide by the following specification:
⚫Before using the instrument, please read the “Safety Instructions” in
advance. Use the instrument in strict accordance with the
provisions”, otherwise the protection ability provided by the
instrument may be reduced or invalid.
⚫Check the external shell first, before using the instrument.
Check whether there are any cracks or defects on the plastic parts.
Please carefully check the insulator near the input terminal.
⚫If the instrument is not working properly or damaged, please do not
use.
⚫Do not touch the electrified body with more than 30V true effective
value AC, 42V AC peak or 60V DC.
⚫The instrument shall be used according to the specified
measurement category, voltage or current rating.
⚫When it shows low battery indication, please replace the battery in
time in case of any measurement error.
⚫Please comply with local and national safety code. Wear personal
protection equipment (such as approved rubber gloves, masks and
3
flame retardant clothes, etc.) to prevent being damaged by electric
shock and electric arc due to exposed hazardous live conductor.
⚫The voltage applied between input terminals or between each
terminal and earth point cannot exceed the specified ratings of the
instrument.
⚫Measure a known voltage to determine whether the instrument works
properly.
⚫Whenmeasuring, correct input terminal, function shift and range shift
must be used.
⚫Do not use the instrument around explosive gas, steam or in wet
environment.
⚫Do not use damaged probe. Check whether the insulation layer of
the probe is damaged, whether there’s any exposed metal or sign of
wear. Check the continuity of the probe.
⚫Whenmeasuring, please connect the zero line or the ground line first,
then connect the live wire; but when disconnecting, please cut off the
live wire first, then disconnect the zero line and ground line.
⚫When measuring, please keep your fingers behind the finger
protector of the probe.
⚫Before opening the back cover of the instrument, please disconnect
the probe with the measured object.
⚫Do not use the instrument in the environment of exceeding the
measurement category (CAT) rating of a single element with the
lowest rating among the instrument, probe or accessories.
Electrical Symbols
High voltage warning
AC (Alternating current)
DC (Direct current)
AC or DC
Warning, important safety signs
4
Ground
Equipment with double insulation or reinforced
insulation protection
Low battery
Conforms with European Union standard
It shows - do not discard this electrical/electronic product
into household garbage.
CAT II measurement is applicable for testing and
CAT II measuring circuits connected to the supply point
(socket and similarities ) of a low voltage power supply.
CAT III measurement is applicable for testing and
CAT III measuring circuits connecting to the distribution section of
building low voltage power supply.
CAT IV measurement is applicable for testing and
CAT IV measuring circuits connecting to the power supply of building
low voltage power supply.
5
Instrument Familiarization
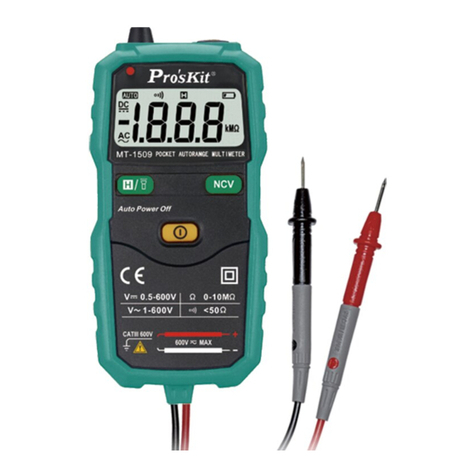
①. Flash light
②. Non-contact voltage detector
③. Non-contact voltage level indicator
④. LCD Display
Hold/Light/NCV keys:
Turn on/off backlight, flash light and data hold
Press down data hold, and then press again to cancel data hold, press
and hold more than 2 seconds, open the backlight and lighting, after
about15 secondsautomaticallyshutdownorrepressand holdmore than
2 seconds to manually turn off
NCV key,press this key for non-contact voltage detection
6
⑤. Power on/off button and measurement key:press for power and

long press more than 2 seconds for power off, while power on, press
this button for measurement.
⑥. Red test lead
⑦. Black test lead
Method of Measurement
AC /DC Voltage and Resistance Measurement
1. Press the power key to turn on the meter。
2. The probe is parallel to the circuit to be tested ACV, DCV or
resistance. Instrument automatic identification of AC voltage, DC
voltage or resistance.
3. Whenmeasured resistance, resistance is less than about 50, built-in
buzzer alarm.
4. Read measured results from the display, while measuring DC
voltage, it will show the voltage polarity of tested point of red and
black test lead at the same time.
5. When finished measurement, press the power key and hold for 2
seconds to turn off the instrument.
Warning
⚫To prevent possible electric shock, fire or personal injury, before
measuring the resistance, please disconnect the power supply of the
circuit under test firstly, and fully discharge all the high voltage
capacitors.
⚫After completed with all the measurement operations, make sure to
disconnect the probe and the circuit under test.
Non-contact Voltage Detection
7
1. Turn on power
2. Press and hold the "NCV" button, and then place the item under test
near the instrument non-contact voltage sensing area (less than
5mm) to sense AC voltage.
3. Non-contact voltage indicator light will light up, saying there is AC
voltage present.
General Specifications
Operation environment condition:
IEC/EN 61010-1 600V CAT III, pollution level 2
Altitude< 2000 m Working temperature:
0~40℃(do not consider when it’s <80% RH, <10℃)Storage
temperature:
-10~60℃(<70% RH, remove the battery)
Temperature coefficient: 0.1 accuracy /℃
Maximum voltage allowed between the measuring terminal and the
ground: 600V DC or AC RMS
Sampling rate: about 3 times/second. Display: 3
1/2 bit LCD
Over range indication: LCD display will show “OL”. Low battery
indication: when the battery voltage is lower than the normal
working voltage,
“ ” will be displayed on the LCD display. Input
polarity indication: automatically display “ ”
Power requirement: 2x1.5V AAA batteries
Dimension: 128x61x25mm
Accuracy Specifications
The accuracy applies within one year after the calibration.
Reference condition: the environment temperature 18℃to 28℃, the
relative humidity is no more than 80 .
DC Voltage
Range
Resolution
Accuracy
2V
0.001V
8
20V
0.01V
± (0.5% readings+3)
200V
0.1V
600V
1V
± (0.8% readings+5)
Sensitivity:The minimum DC voltage of 0.5V
Input impedance: 10MΩ
Maximum input voltage: 600V DC or AC RMS
AC Voltage
Range
Resolution
Accuracy
2V
0.001V
±(0.8 readings +3)
20V
0.01V
200V
0.1V
600V
1V
±(1.0% readings +5)
Sensitivity:The minimum 1V AC voltage
Input impedance: 10MΩ Maximum input: 600V DC or AC RMS.
Frequency range: 50Hz~60Hz; true RMS
Resistance
Range
Resolutio
n
Accuracy
2kΩ
0.001 kΩ
±(1.0% readings +3)
20kΩ
0.01 kΩ
200kΩ
0.1 kΩ
2MΩ
0.001MΩ
10MΩ
0.01 MΩ
±(1.2% readings +15)
Input protection: Maximum 600V DC or AC RMS.
9
Connectivity
Functio
n
Description
Testing environment
When the buzzer
sounds, the measured
resistance is less than
50 .
Test current: 100 A; open
circuit voltage: about -1.8V.
Input protection: Maximum 600V DC or AC RMS.
Instrument Maintenance
This section provides the basic maintenance information, including
description of replacing fuse and batteries.
Do not try to repair the instrument unless you are an experienced repair
person and have associated calibration, performance test and
maintenance information.
Warning
To prevent possible electric shock, fire or personal injury:
⚫When the housing is open, do not use the instrument to do any
measurement operation.
⚫Remove the input signal before cleaning the instrument.
⚫Specified replacement parts shall be used. Please ask the qualified
technicians to repair the instrument.
General Maintenance
Use a damp cloth and a small amount of detergent to clean the outer
casing of the instrument. Please do not use abrasive or chemical
solvents.
Replacing the Batteries Warning
⚫To prevent electric shock or personal injury caused by error reading,
when it displays “ ” on the screen, the batteries should be
replaced in a timely manner.
10
⚫To ensure safety operation and product maintenance, when the
instrument will not be used for an extended period of time, please
remove the batteries to avoid any product damage caused by battery
leakage.
⚫To avoid electric shock or personal injury, before opening the back
cover to replace batteries, the instrument should be shut down and
checked to ensure that the probe has already been disconnected
from the measuring circuit.
Please follow the following steps to replace the battery:
1. Turn off the power supply of the instrument.
2. Disconnect the probe from the circuit under test.
3. Loosen the screws fixing the back cover, remove the back cover.
4. Remove the old batteries, replace with new batteries.
5. Mount the back cover, tighten the screws.

Other Pro's Kit Multimeter manuals

Pro's Kit mt-1232 User manual

Pro's Kit

Pro's Kit mt-1232 User manual

Pro's Kit MT-1210 User manual

Pro's Kit

Pro's Kit MT-1210 User manual

Pro's Kit MT-1503 User manual

Pro's Kit

Pro's Kit MT-1503 User manual

Pro's Kit MT-1280 User manual

Pro's Kit

Pro's Kit MT-1280 User manual

Pro's Kit MT-2019 User manual

Pro's Kit

Pro's Kit MT-2019 User manual

Pro's Kit MT-3109 User manual

Pro's Kit

Pro's Kit MT-3109 User manual

Pro's Kit MT-2017 User manual

Pro's Kit

Pro's Kit MT-2017 User manual

Pro's Kit MT-7602 User manual

Pro's Kit

Pro's Kit MT-7602 User manual

Pro's Kit MT-1508 User manual

Pro's Kit

Pro's Kit MT-1508 User manual

Pro's Kit MT-1706 User manual

Pro's Kit

Pro's Kit MT-1706 User manual

Pro's Kit MT-2207 User manual

Pro's Kit

Pro's Kit MT-2207 User manual

Pro's Kit MT-1707 User manual

Pro's Kit

Pro's Kit MT-1707 User manual

Pro's Kit MT-1509-C User manual

Pro's Kit

Pro's Kit MT-1509-C User manual

Pro's Kit MT-1132 User manual

Pro's Kit

Pro's Kit MT-1132 User manual

Pro's Kit MT-1210 User manual

Pro's Kit

Pro's Kit MT-1210 User manual

Pro's Kit MT-7602 User manual

Pro's Kit

Pro's Kit MT-7602 User manual

Pro's Kit MT-1217 User manual

Pro's Kit

Pro's Kit MT-1217 User manual

Pro's Kit MT-2017 User manual

Pro's Kit

Pro's Kit MT-2017 User manual

Pro's Kit MT-2208 User manual

Pro's Kit

Pro's Kit MT-2208 User manual

Pro's Kit MT-1220 User manual

Pro's Kit

Pro's Kit MT-1220 User manual

Pro's Kit MT-1610 User manual

Pro's Kit

Pro's Kit MT-1610 User manual

Pro's Kit MT-1236 User manual

Pro's Kit

Pro's Kit MT-1236 User manual

Pro's Kit MT-1232 User manual

Pro's Kit

Pro's Kit MT-1232 User manual

Pro's Kit MT-1710N User manual

Pro's Kit

Pro's Kit MT-1710N User manual

Popular Multimeter manuals by other brands

Tenma 72-3540 manual

Tenma

Tenma 72-3540 manual

Tenma 72-7224 operating manual

Tenma

Tenma 72-7224 operating manual

Tektronix DMM4040 Safety and installation instructions

Tektronix

Tektronix DMM4040 Safety and installation instructions

Fluke 8508A Extended specifications

Fluke

Fluke 8508A Extended specifications

Unit UT131A user manual

Unit

Unit UT131A user manual

SATA 03022 user manual

SATA

SATA 03022 user manual

Sonel CMM-60 user manual

Sonel

Sonel CMM-60 user manual

Eproteca KPS KPS-MT720 instruction manual

Eproteca

Eproteca KPS KPS-MT720 instruction manual

Circuit-test DMR-6600 user manual

Circuit-test

Circuit-test DMR-6600 user manual

Vichy VC97 Operation manual

Vichy

Vichy VC97 Operation manual

Extech Instruments EX310 user guide

Extech Instruments

Extech Instruments EX310 user guide

Extech Instruments EX520 user guide

Extech Instruments

Extech Instruments EX520 user guide

Triplett 1401 instruction manual

Triplett

Triplett 1401 instruction manual

Velleman DVM345DI user manual

Velleman

Velleman DVM345DI user manual

Eurotron Mini MMX II instruction manual

Eurotron

Eurotron Mini MMX II instruction manual

ADCMT 7352A Operation manual

ADCMT

ADCMT 7352A Operation manual

SIGLENT SDM3000 Series quick start guide

SIGLENT

SIGLENT SDM3000 Series quick start guide

VOLTCRAFT VC-12A operating instructions

VOLTCRAFT

VOLTCRAFT VC-12A operating instructions

manuals.online logo
manuals.online logoBrands
  • About & Mission
  • Contact us
  • Privacy Policy
  • Terms and Conditions

Copyright 2025 Manuals.Online. All Rights Reserved.