manuals.online logo
Brands
  1. Home
  2. •
  3. Brands
  4. •
  5. Pro's Kit
  6. •
  7. Power Tools
  8. •
  9. Pro's Kit SI-137 User manual

Pro's Kit SI-137 User manual

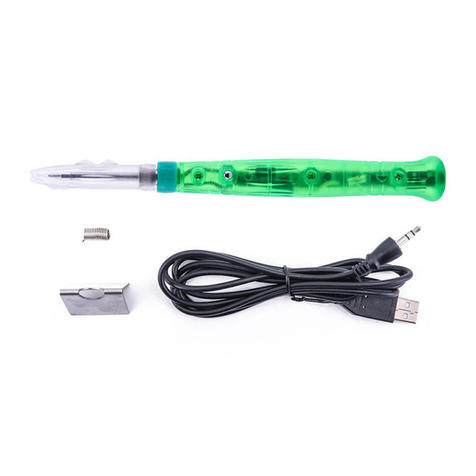
SI-137 Soldering iron and Wood
Burning Kit User’s Manual
Thank you for purchsing Pro'sKit
SI-137 Soldering iron and Wood
Burning Kit. Please read this manual
before operation and keep it for future
reference. SI-137 is a multifunction
soldering kit, which can be used as
soldering iron and as wood burning pen.
The kit comes with the most optimal set
of nozzles to meet most welding needs.
With the converter joints, the soldering
iron can be changed to wood burning
pen easily.
A. How to use Soldering Iron
1. Plug the power cord plug into the
power outlet. If the LED indicator is
not on, the soldering iron is powered
off.
2. Press power button, the soldering
iron will reach to 400℃in 3-5
minutes; and the LED indicator lights
blue.
3. Press power button again; the
soldering iron will reach to 500℃in
2-3 minutes; and the LED indicator
lights red.
4. Press power button again to turn off
the soldering iron, and LED indicator
will be off.
5. Note: Set high temperature for large
welding area or grounding point
welding work; set low temperature for
precision components or thermal
vulnerable components.
B. How to use Wood Burning Pen
1. Loosen the nut, remove the barrel
and take out the iron tip. Insert the
converter joint and then screw the
barrel back to the product. Connect
the desired tip to the product and
make sure the screw is fastened to
the end.
2. Plug in the power outlet and follow
the operation that the same as
soldering iron (A).
3. Pliers should only be used to tighten
the nut to avoid burning your fingers
when changing the soldering tips or
converter joint, but care should be
taken not to over-tighten as this could
damage the element.
4. Suggestion: The performance of
pyrography may be differed due to
different material surfaces. Thus,
high temperature is suggested to be
set.
CAUTION:
1.Misuse may potentially cause injury
to the user or physical damage to the
objects involved.
2.Do not use the product near
3.Advise other people in the work area
that the unit can reach a very high
temperature and should be
4.Turn the power off while taking
breaks and when finished using the
storing the unit, turn the power off
and allow the unit to cool to room
temperature.
5.Do not wet the unit or use the unit
when your hands are wet.
6.While using the unit, don't do
anything which may cause bodily
harm or physical damage.
7.Keep children and bystanders away
while operating a power tool.
SI-137 雙功率烙畫烙鐵筆套裝使用
說明書
非常感謝您購買 Pro’sKit 雙功率烙畫烙鐵 30
件組。在操作使用之前,請閱讀本手冊。請將
本手冊存放在安全、方便取用的地方,以備將
來參考。SI-137是一款多功能型內熱式電烙鐵,
可適用一般電子電器元件的焊接使用,也可用
於烙畫創作。產品加熱迅速,安全可靠,是一
機多用的理想選擇。
電烙鐵是手工焊接的基本工具,本產品配置常
用的烙鐵頭型,滿足大部分焊接需要。
烙畫創作需要不同的烙畫頭型,通過更換轉接
頭,本產品可以方便的由焊接烙鐵轉變為可更
換不同烙畫頭型的烙畫烙鐵,示意如下:
A.電烙鐵的使用方法
1.將插頭插入插座,此時電烙鐵 LED 指示燈不
亮,表示處在未通電關斷狀態。
2.按下電源按鍵,LED 指示燈亮藍色,代表處於
低溫狀態,放置大約 3~5分鐘,烙鐵穩定在
400℃左右。
3.再次按下按鍵,LED 指示燈亮紅色,指示高溫
狀態,放置大約 2~3分鐘穩定在 500℃左
右。
4.若再次按下按鍵,則關閉烙鐵,LED 燈不亮。
產品按照 關閉-低溫-高溫-關閉方式迴圈。
5.焊接注意說明:焊接一般產品中的較精密元器
件及受熱易損元器件,宜選用低溫檔,對一些
焊接面積大的結構件、金屬底板接地點的焊接,
則應選用高溫檔。
B.烙畫烙鐵使用方法
1.按照圖示方式,鬆開螺母,退出發熱管,取下
烙鐵頭。更換上轉接頭,裝上發熱管鎖好螺母,
確保鎖附穩定。再接上需要使用的烙畫頭型,
確認旋擰到位。
2.插上電源,同烙鐵使用方式,按下按鍵,LED
指示燈亮藍色,指示低溫狀態,放置大約 3~
5分鐘穩定在 400℃左右。再次按下按鍵,LED
指示燈亮紅色,指示高溫狀態,放置大約 2~
3分鐘穩定在 500℃左右。若再次按下按鍵,
則關閉烙鐵。
3.更換轉接頭或是烙畫頭型時,注意避免高溫燙
傷,建議冷切後,使用如尖嘴鉗等工具。
4.使用說明:烙畫在不同的材質表面,印痕效果
可能不同,為快速的烙畫,請使用高檔溫度。
C.注意事項:
1.電源線有破損時,請勿使用,以免觸電事故發
生。
Soldering iron
Wood burning pen
Change iron tip
to converter
joint
Power button
LED indicator
烙鐵
烙畫筆
烙鐵頭更換為
轉接頭
電源按鍵
LED 指示燈
2.不使用時,請及時拔掉電源,待烙鐵頭部冷卻
後再收納。
3.請勿在不正確的電源情況使用本產品,或會造
成損壞。
4.請勿在周邊有易燃的環境下使用烙鐵。
5.請勿在潮濕的環境下使用烙鐵,避免觸電危
險。
6.請使用合適的烙鐵支架,保證產品放置安全,
避免產品損壞或人身傷害。
7.烙鐵頭更換應該在冷卻後,並且拔除電源連接
後進行。
8.過高的溫度設定容易導致烙鐵頭氧化,烙鐵頭
應該及時上錫防護。
9.烙畫頭型螺紋配合,注意不可強力拆卸。
10.請勿將烙鐵放在兒童容易觸摸的地方。
SI-137 双功率烙画烙铁笔套装使用
非常感谢您购买 Pro’skit 双功率烙画烙鐵 30
件组。在操作使用之前,请阅读本手册。请将
本手册存放在安全、方便取用的地方,以备将
来参考。SI-137 是一款多功能型内热式电烙铁,
可适用一般电子电器组件的焊接使用,也可用
于烙画创作。产品加热迅速,安全可靠,是用
户一机多用的理想选择。
电烙铁是手工焊接的基本工具,本产品配置常
用的烙铁头型,满足大部分焊接需要。
烙画创作需要不同的烙画头型,通过更换转接
头,本产品可以方便的由焊接烙铁转变为可更
换不同烙画头型的烙画烙铁,示意如下:
A.电烙铁的使用方法
1.将电源线插头插入电源插座,此时电烙铁 LED
指示灯不亮,表示处在未通电关断状态。
2.按下按键,LED 指示灯亮蓝色,指示低温状
态,放置大约 3~5分钟稳定在 400℃左右。
3.再次按下按键,LED 指示灯亮红色,指示高
温状态,放置大约 2~3分钟稳定在 500℃左
右。
4.若再次按下按键,则关闭烙铁,LED 灯不亮。
产品按照 关闭-低温-高温-关闭方式循环。
5.焊接注意说明:焊接一般产品中的较精密元器
件及受热易损元器件,宜选用低温档,对一些
焊接面积大的结构件、金属底板接地点的焊接,
则应选用高温档。
B.烙画烙铁使用方法
1.按照图示方式,松开螺母,退出发热管,取下
烙铁头。更换上转接头,装上发热管锁好螺母,
确保锁附稳定。再接上需要使用的烙画头型,
确认旋拧到位。
2.插上电源,同烙铁使用方式,按下按键,LED
指示灯亮蓝色,指示低温状态,放置大约 3~
5分钟稳定在 400℃左右。再次按下按键,LED
指示灯亮红色,指示高温状态,放置大约 2~
3分钟稳定在 500℃左右。若再次按下按键,
则关闭烙铁。
3.更换转接头或是烙画头型时,注意高温烫伤,
建议冷切后,或使用诸如尖嘴钳等工具。
4.烙画使用说明:烙画在不同的材质表面,印痕
效果可能不同,为快速的烙画,请使用高档温
度。
C.使用注意事项:
1.电源线有破损时,请勿使用,以免触电事故发
生。
2.不使用时,请及时拔掉电源,请待烙铁头部冷
却后再收纳。
3.请勿在不正确的电源情况使用本产品,或会造
成损坏。
4.请勿在周边有易燃的环境下使用烙铁。
5.请勿在潮湿的环境下使用烙铁,避免触电危险。
6.请使用合适的烙铁支架,保证产品放置的安全,
避免产品损坏或人身出现伤害。
7.烙铁头更换应该在冷却后,并且拔除电源连接
后进行。
8.过高的温度设定容易导致烙铁头氧化,烙铁头
应该及时上锡防护。
9.烙画头型螺纹配合,注意不可强力拆卸。
10.请勿将烙铁放在儿童容易触摸的地方。
寶工實業股份有限公司
PROKIT’S INDUSTRIES CO., LTD.
https://www.prokits.com.tw
E-mail:[email protected]okits.com.tw
©2020 Copyright by Prokit’s Industries Co., Ltd(C).
All right reserved.
烙铁
烙画笔
烙铁头更换为
转接头
电源按键
LED 指示灯

Other Pro's Kit Power Tools manuals

Pro's Kit SS-331B User manual

Pro's Kit

Pro's Kit SS-331B User manual

Pro's Kit SS-979 User manual

Pro's Kit

Pro's Kit SS-979 User manual

Pro's Kit SS-628 Series User manual

Pro's Kit

Pro's Kit SS-628 Series User manual

Pro's Kit PT-1806 User manual

Pro's Kit

Pro's Kit PT-1806 User manual

Pro's Kit PT-0721 User manual

Pro's Kit

Pro's Kit PT-0721 User manual

Pro's Kit SS-611 User manual

Pro's Kit

Pro's Kit SS-611 User manual

Pro's Kit PT-1801 User manual

Pro's Kit

Pro's Kit PT-1801 User manual

Pro's Kit PT-1805 User manual

Pro's Kit

Pro's Kit PT-1805 User manual

Pro's Kit SI-168U User manual

Pro's Kit

Pro's Kit SI-168U User manual

Pro's Kit SS-615 Series User manual

Pro's Kit

Pro's Kit SS-615 Series User manual

Pro's Kit HT-5501 User manual

Pro's Kit

Pro's Kit HT-5501 User manual

Pro's Kit SS-612A User manual

Pro's Kit

Pro's Kit SS-612A User manual

Pro's Kit SS-611A User manual

Pro's Kit

Pro's Kit SS-611A User manual

Pro's Kit PT-1207 User manual

Pro's Kit

Pro's Kit PT-1207 User manual

Pro's Kit PT-5208U User manual

Pro's Kit

Pro's Kit PT-5208U User manual

Pro's Kit SS-988 User manual

Pro's Kit

Pro's Kit SS-988 User manual

Pro's Kit PT-1210 User manual

Pro's Kit

Pro's Kit PT-1210 User manual

Pro's Kit PT-5501 User manual

Pro's Kit

Pro's Kit PT-5501 User manual

Pro's Kit SI-B166 User manual

Pro's Kit

Pro's Kit SI-B166 User manual

Pro's Kit GS-23K User manual

Pro's Kit

Pro's Kit GS-23K User manual

Pro's Kit SI-168U User manual

Pro's Kit

Pro's Kit SI-168U User manual

Pro's Kit Pro'sKt SS-621 Series User manual

Pro's Kit

Pro's Kit Pro'sKt SS-621 Series User manual

Pro's Kit PT-1362U User manual

Pro's Kit

Pro's Kit PT-1362U User manual

Popular Power Tools manuals by other brands

Yokota YX-280SE manual

Yokota

Yokota YX-280SE manual

Bisonte PC60-L user guide

Bisonte

Bisonte PC60-L user guide

Kyocera TJEP VD-15/50 quick start guide

Kyocera

Kyocera TJEP VD-15/50 quick start guide

POSI LOCK 202 Instructions and parts manual

POSI LOCK

POSI LOCK 202 Instructions and parts manual

Meec tools 010764 operating instructions

Meec tools

Meec tools 010764 operating instructions

ReBach CATCH VCO-A DIY Assembly instruction

ReBach

ReBach CATCH VCO-A DIY Assembly instruction

Geberit Mapress user manual

Geberit

Geberit Mapress user manual

Seymour Z-500 Product information sheet

Seymour

Seymour Z-500 Product information sheet

RIDGID R86346 Operator's manual

RIDGID

RIDGID R86346 Operator's manual

Luna MD-30BV manual

Luna

Luna MD-30BV manual

Senco LS61H1P operating instructions

Senco

Senco LS61H1P operating instructions

Mountz K250 operating instructions

Mountz

Mountz K250 operating instructions

Makita DTW251RMJ instruction manual

Makita

Makita DTW251RMJ instruction manual

Sealey YK20F.V5 quick start guide

Sealey

Sealey YK20F.V5 quick start guide

Makita XMT04ZB user manual

Makita

Makita XMT04ZB user manual

STEINEL HL 1821 S Translation of the original operating instructions

STEINEL

STEINEL HL 1821 S Translation of the original operating instructions

Rothenberger RODRUM VarioClean Instructions for use

Rothenberger

Rothenberger RODRUM VarioClean Instructions for use

Porter-Cable PCE345-CA instruction manual

Porter-Cable

Porter-Cable PCE345-CA instruction manual

manuals.online logo
manuals.online logoBrands
  • About & Mission
  • Contact us
  • Privacy Policy
  • Terms and Conditions

Copyright 2025 Manuals.Online. All Rights Reserved.