PROEL NEOS118AXS User manual

USER MANUAL
NEOS118AXS
digital self-powered subwoofer
KEY FEATURES
• Premium transducers
• C-AUDIO CLASS D power amplifiers with SWITCH MODE power supply
• 96KHz, 40bit floang point C-AUDIO CORE DSP
• Network funconality thru PRONET control soware
• Access to EQ, DYNAMICS and DELAY and real me parameter control
• Plywood cabinets with die-cast handles, dual-angle pole holder and mulple flying points
INTRODUCTION
NEOS AXS series represents the highest expression of PROEL GROUP Research & Development applied in loudspeaker systems. A natural evoluon
of the NEOS Series, it incorporates the latest technologies developed by PROEL in advanced sound reinforcement systems able to provide premium
sound, maximum performance and up-to-date features.
NEOS AXS is a complete range of self-powered loudspeaker systems combining cung-edge transducers with C-AUDIO CLASS D amplifiers and
digital processors, thus ensuring the best integraon between acouscs and electronics for an opmal performance.
The NEOS AXS are designed for the use both as high-performance mobile systems for live applicaons and as versale and remotely controllable
systems for advanced fixed installaons.
All the models are powered by C-AUDIO DA power modules, a new generaon of CLASS D power amplifiers with SWITCH MODE power supply, able
to provide an exceponal sound definion together with very high dynamics and low distoron in an ultra-compact package.
The on board control electronics are based on the 96KHz, 40bit floang point C-AUDIO CORE DSP plaorm, able to opmize further the system
performances through the use of sophiscated EQ, crossover and dynamics algorithms. The CORE processing provides also network funconality
through the PRONET control soware based on CANBUS communicaon protocol (USB2CAN converter needed).
The PRONET control soware provides access to the major processing features, including full PARAMETRIC and DYNAMIC EQ, advanced
COMPRESSOR/LIMITERS and DELAY, together with the real me control of parameters such as temperature, supply voltage and protecons.
Seng created by the user can be saved in user presets that can be recalled through the control soware or from the unit’s interface.
TECHNICAL SPECIFICATION
AcousƟcal Mechanical
System type Sub-woofer, vented Construcon 15 and 18 mm birch plywood
Low frequency driver 18’’ woofer - 4” VC Finish An-scratch black paint
Frequency response from 30 Hz Flying hardware 2 x M10 - top
HP filter preset 120 Hz - 80 Hz Pole holder 1 top
Coverage omnidireconal Dimensions (W x H x D) 600 x 610 x 600 cm
Max SPL 133 dB Weight 49.5 kg (109 lbs)
Electrical
Input Impedance 20 kohm balanced, 10 kohm unbalanced Frequency Response Diagram
Input Sensivity +4 dBu / 1.25 V
black = 120 Hz gray = 80 Hz
Signal Processing CORE processing 24 bit / 96 kHz
Amplifier type C- AUDIO Class D with SMPS
Output power 1500 W
Connectors
IN - LINK: XLR M - XLR F
NETWORK IN - OUT: ETHERCON® (NE8FAV)
MAIN LINK: PowerCon® (NAC3MPB)
MAIN: PowerCon® (NAC3MPA)
Controls LEVEL, PRESET (80 Hz / 120 Hz / 180° / USER)
TERMINATE, GND LIFT
Cooling Variable speed DC fan
Power Supply 230 VAC or 120 VAC 50/60 Hz
Max consumpon 2200 VA
1/8 power out consumpon 730 VA
1k500200
100
502020 1kHz
120.0
dBSPL
110.0
100.0
90.0
80.0
70.0

MECHANICAL DRAWING
69.0 cm
27.2"
59.5 cm
23.4"
60.0 cm
23.6"
Pole Holder
M10 Flying PointM10 Flying Point
M10 Flying Point
Optional
Castors
OPTIONAL ACCESSORIES
USB2CAN USB PC-PRONET converter for speaker suspending:
KP210BK Sub-Speaker pole AC169A M10 black shoulder eyebolt
AC102GS 80 mm Caster AC171 L = 75 cm / 30 inch Aircracable sling
NAC3FCA Neutrik Powercon® BLUE POWER IN PLUG AC172 L = 1.5 m / 4.9 Aircracable sling
NAC3FCB Neutrik Powercon® WHITE POWER OUT PLUG AC173 Screw pin anchor shackle
see www.proel.com for detailed descripon and other available accessories.
SPARE PARTS
NAC3MPA Neutrik Powercon® BLUE POWER IN panel socket
NAC3MPB Neutrik Powercon® WHITE POWER OUT panel socket
91AMD118 Amplifier Module
98NEOS18SW8 18’’ woofer - 4” VC

POWER PANEL
MAINS IN - Powercon® NAC3FCA power input connector (blue). To switch the amplifier on, insert the Powercon® connector and turn it in a
clockwise direcon into the ON posion. To switch the amplifier off, pull back the switch on the connector and turn the connector in an an-
clockwise direcon into the POWER OFF posion.
NOTE: In the case of product failure or fuse replacement, disconnect the unit completely from the mains power. The power cable must only be
connected to a socket adequate to the specificaons indicated on the amplifier unit. The power supply must be protected by a suitably rated
thermo-magnec breaker. Preferably use a suitable switch to power on the whole audio system leaving the Powercon® always connected to each
speaker, this simple trick extend the life of the Powercon® connectors.
POWER OUT - Powercon® NAC3FCB power output connector (grey). This is connected in parallel with the MAINS ~ / IN; the maximum load
applicable is 10A/230V ~.
NOTE: the number of speaker units that can be connected in sequence depends by the sum of the speaker consumpon current.
PRODUCT LABEL - In this label are wrien the most important informaon about the acve loudspeaker, model, line voltage, consumpon, serial
number.
CONTROL PANEL
Ø REV
ON - This LED indicates power on status.
PROT - This red LED lights when the amplifier module is in protect mode for an internal fault and, consequently, the amplifier is muted.
SIGN LIMIT - This LED lights green to indicate the presence of the signal and lights red when an internal limiter reduces the input level.
LEVEL - This potenometer aenuates the input level in the most useful range starng from 0dB to -20dB with a -6dB aenuaon at the centre.
MODE - This buon selects one of the three preset available. If it is pressed when the unit is switched on, it forces the internal DSP to re-assign
an ID to the unit for the PRONET remote control operaon.
120Hz - This LED lights when the 120Hz preset is selected and engages a Low pass filter at 120Hz.
80Hz - This LED lights when the 80Hz preset is selected and engages a Low pass filter at 80Hz.
USER - This LED lights when the USER preset is loaded. This preset corresponds to USER MEMORY no. 1 of the DSP and, as a factory seng, it’s
the same to 120Hz. If you want to modify it, you have to connect the unit to a PC, edit the parameters with PRONET soware and save them into
USER MEMORY no. 1.
Ø REV - This buon engages a 180° phase reverse of the input signal (the LED lights consequently).
Note: usually all subwoofers in a sound system must be have the same phase.
NETWORK IN/OUT - These are a standard RJ45 CAT5 connectors (with oponal NEUTRIK NE8MC RJ45 cable connector carrier), used for PRONET
network transmission of remote control data over long distance or mulple unit applicaons.
TERMINATE - In a PRONET network the last connected device must be terminated (with an inner load resistance) especially in a long run cabling:
press this switch if you want to terminate the unit.
INPUT - Audio signal input with locking XLR connector, it has a fully electronically balanced circuitry including AD conversion for the best S/N rao
and input headroom. Use both inputs in case of a single sub in a stereo sound system.
LINK - A direct connecon from the input connector to link other speakers with same audio signal.
GND LIFT - This switch lithe ground of the balanced audio inputs from the earth-ground of the amplifier module.

PRONET
PRONET soware has been designed by Proel’s Research & Development Department to easily control a single unit or a network of devices, like
acve loudspeakers or speaker processors, equipped with the C-AUDIO CORE digital processing plaorm.
PRONET has been developed in collaboraon with sound engineers and sound designers, in order to offer an “easy-to-use” tool to setup and
manage your audio system. With PRONET you can visualize signal levels, monitor internal status and edit all the parameters of each connected
device.
Download the PRONET app from the PROEL website at hp://www.proel.com clicking on support secon.
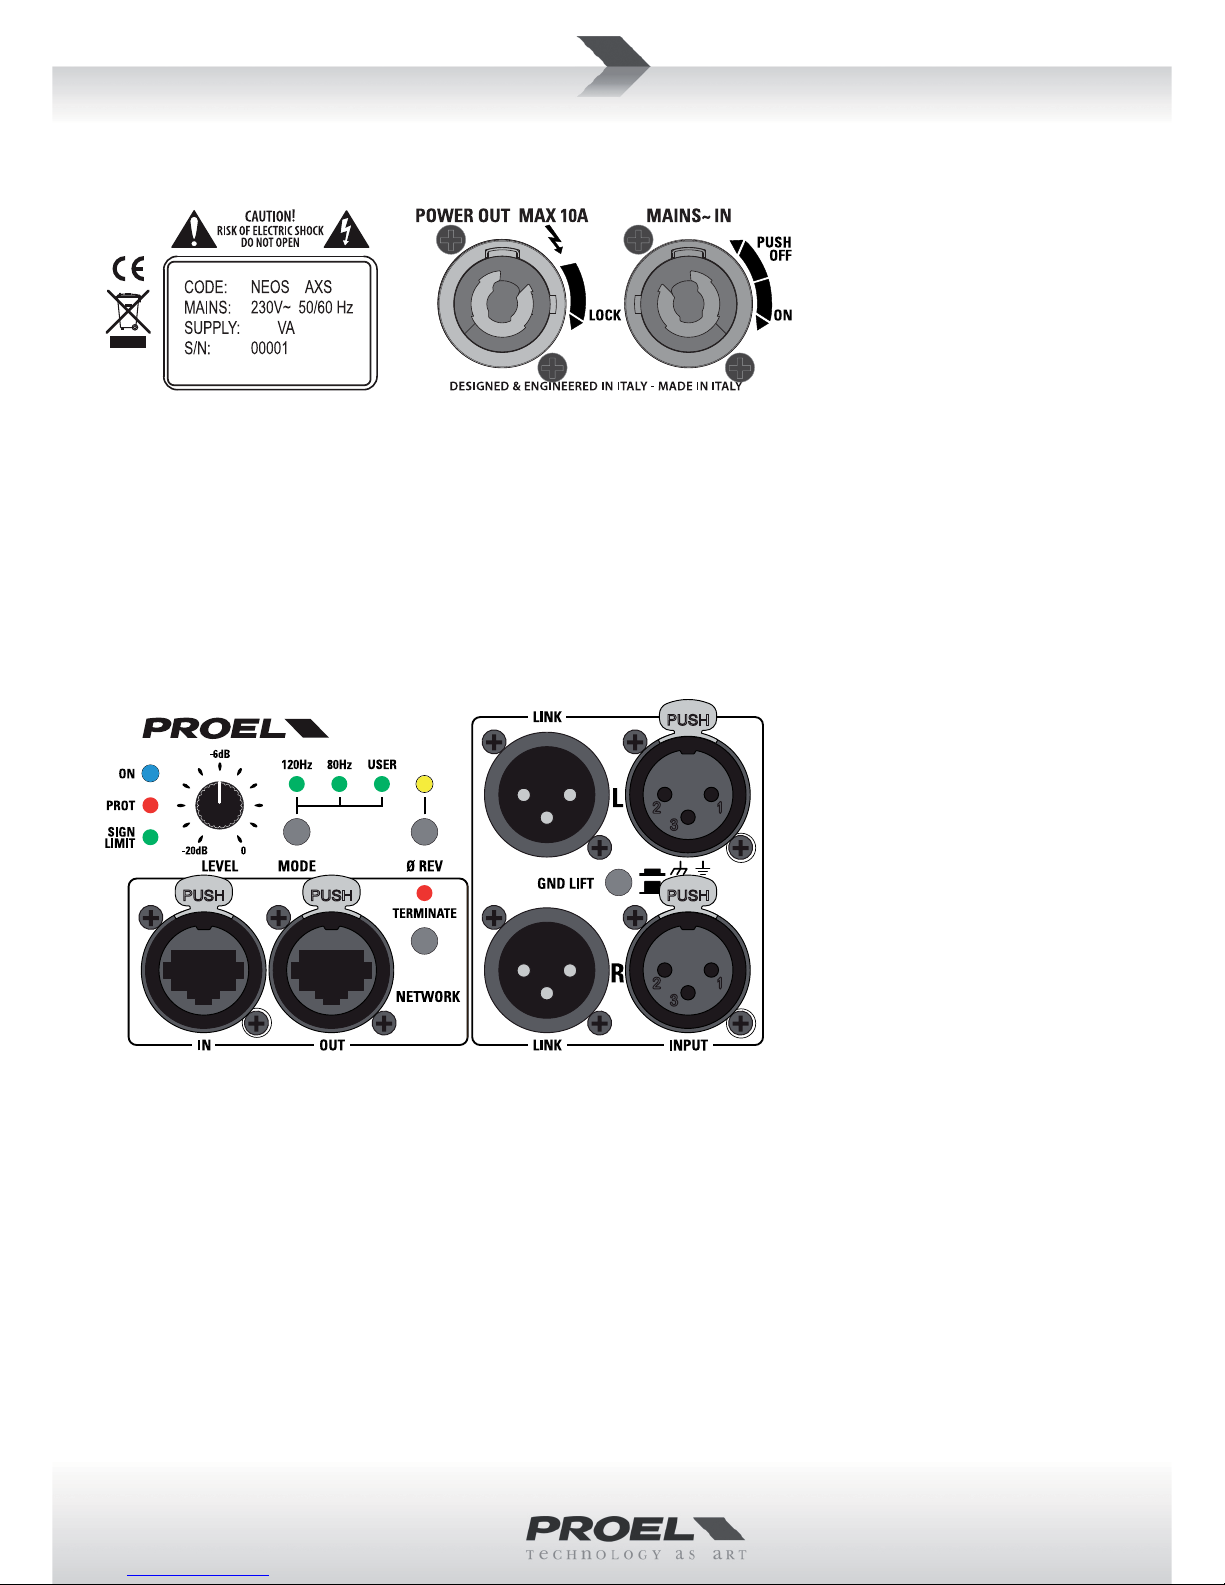
The NEOS AXS loudspeaker devices can be connected using the network connecon, in this case the PROEL USB2CAN converter oponal accessory
is needed. The first me you connect a device with the USB2CAN converter, Windows O.S. will ask you to install the driver files, which you can
find in the Driver folder within the Pronet applicaon folder (by default is C:\Program Files\Proel\Pronet\Driver, or if you changed it <your path>\
Driver). Please refer also to “Installaon” and “Drivers” paragraphs in the Pronet documentaon.
The PRONET NETWORK is based on a robust, reliable and fast communicaon protocol called CANBUS. The devices in a PRONET NETWORK are
connected together with a “linear bus topology”. The USB2CAN converter must be connected to the network input of the first device, the network
output of the first device is connected to the input of the second and so on. For the network connecons simple RJ45 cat.5 or cat.6 ethernet
cables can be used (please don’t confuse a ethernet network with a PRONET network these are completely different and must be fully separated
also both use the same kind of cable).
The beginning and the end of a PRONET NETWORK must be terminated. One side is terminated by the USB2CAN converter, the other side must
be terminated pressing the TERMINATE switch on the last device. All devices between these two points must have the TERMINATE switch lied.
Assign the ID number
To work properly in a PRONET network each connected device must have a unique idenfier number, called ID. By default the USB2CAN PC
controller has ID=0 and there can be only one PC controller. Every other device connected must have its own unique ID equal or greater than 1:
in the network cannot exist two devices with the same ID.
An ID number is assigned automacally to each devices when they are turned on for the first me connected to a network.
In order to correctly assign a new available ID to each device for working properly in a Pronet network, follow these instrucons:
1. Switch offall the devices.
2. Connect them correctly to the network cables.
3. “TERMINATE” the latest device in the network connecon.
4. Switch on the first device keep pressed “RTA” buon on the control panel.
5. Leaving the previous device switched on, repeat the previous operaon on the next device, unl the latest device is turned on.
The “Assign ID” procedure for a device makes the internal network controller to perform two operaons: reset the current ID; search the fi
rst free
ID in the network, starng from ID=1. If no other devices are connected (and powered on), the controller assume ID=1, that is the first free ID,
otherwise it searches the next one lefree.
These operaons ensure that every device has it’s own unique ID, if you need to add a new device to the network you simply repeat the operaon
of step 4. Every device maintains its ID also when it is turned-off, because the idenfier is stored in the internal memory and it is cleared only by
another “Assign ID” step, as explained above. This means that if your network is made always of the same devices the assigning ID procedure must
be executed only the first me the system is turned on.
See the more detailed instrucon about PRONET on the documentaon downloadable from the web site: www.proel.com.
LIMITED WARRANTY
Proel warrants all materials, workmanship and proper operaon of this product for a period of two years from the original date of purchase. If any defects are found
in the materials or workmanship or if the product fails to funcon properly during the applicable warranty period, the owner should inform about these defects the
dealer or the distributor, providing receipt or invoice of date of purchase and defect detailed descripon. This warranty does not extend to damage resulng from
improper installaon, misuse, neglect or abuse. Proel S.p.A. will verify damage on returned units, and when the unit has been properly used and warranty is sll
valid, then the unit will be replaced or repaired. Proel S.p.A. is not responsible for any “direct damage” or “indirect damage” caused by product defecveness.
• This unit package has been submied to ISTA 1A integrity tests. We suggest you control the unit condions immediately aer unpacking it.
• If any damage is found, immediately advise the dealer. Keep all unit packaging parts to allow inspecon.
• Proel is not responsible for any damage that occurs during shipment.
• Products are sold “delivered ex warehouse” and shipment is at charge and risk of the buyer.
• Possible damages to unit should be immediately nofied to forwarder. Each complaint for package tampered with should be done within eight days from product
receipt.
SAFETY INSTRUCTIONS
– To reduce the risk, close supervision is necessary when the product is used near children.
– Protect the apparatus from atmospheric agents and keep it away from water, rain and high humidity places.
– This product should be site away from heat sources such as radiators, lamps and any other device that generate heat.
– This product should be located so that its locaon or posion does not interfere with its proper venlaon and heang dissipaon.
– Care should be taken so that objects and liquids do not go inside the product.
– The product should be connected to a power supply mains line only of the type described on the operang instrucons or as marked on the product. Connect the
apparatus to a power supply using only power cord included making always sure it is in good condions.
– WARNING: The mains plug is used as disconnect device, the disconnect device shall remain readily operable.
– Do not cancel the safety feature assured by means of a polarized line plug (one blade wider than the other) or with a earth connecon.
– Make sure that power supply mains line has a proper earth connecon.
– Power supply cord should be unplugged from the outlet during strong thunderstorm or when leunused for a long period of me.
CE CONFORMITY
Proel products comply with direcve 2004/108/EC (EMC), as stated in EN 55103-1 and EN 55103-2 standards and with direcve 2006/95/CE (LVD), as stated in EN
60065 standard.
PROEL S.p.A. (World Headquarter) - Via alla Ruenia 37/43 - 64027 Sant’Omero (Te) - ITALY
Tel: +39 0861 81241 Fax: +39 0861 887862 www.proel.com
This manual suits for next models
1
Table of contents
Other PROEL Subwoofer manuals

PROEL
PROEL S Series User manual

PROEL
PROEL SW118A User manual

PROEL
PROEL SW115HA User manual

PROEL
PROEL NEOS215AXS User manual

PROEL
PROEL SW110A V2 User manual

PROEL
PROEL SW118H User manual

PROEL
PROEL NEOS PX Series User manual

PROEL
PROEL SW115A V2 User manual

PROEL
PROEL NEOS218PX User manual

PROEL
PROEL SW110 User manual
Popular Subwoofer manuals by other brands

NHT
NHT b-12d Setup guide

Optimal Speaker Design
Optimal Speaker Design Black TreVoce12 EQ DSP install guide

Kenwood
Kenwood SW-300 instruction manual

Origin Acoustics
Origin Acoustics EXPLORER CSUB10REX installation manual

OEM
OEM In-Ceiling Subwoofer System C-10SW installation guide

thomann
thomann Achat 108 Sub A user manual