manuals.online logo
Brands
  1. Home
  2. •
  3. Brands
  4. •
  5. PROLiNK
  6. •
  7. IP Phone
  8. •
  9. PROLiNK PIP 901 User manual

PROLiNK PIP 901 User manual

Popular IP Phone manuals by other brands

Cortelco C62 VoIP Phone user guide

Cortelco

Cortelco C62 VoIP Phone user guide

VanillaIP Polycom IP300 user manual

VanillaIP

VanillaIP Polycom IP300 user manual

Yealink Yealink SIP-T22P Quick installation guide

Yealink

Yealink Yealink SIP-T22P Quick installation guide

Viking SR-IP product manual

Viking

Viking SR-IP product manual

Yealink VP59 Teams user guide

Yealink

Yealink VP59 Teams user guide

Panasonic KX-UT133-B Administrator's guide

Panasonic

Panasonic KX-UT133-B Administrator's guide

Avaya one-X 9600 Series overview

Avaya

Avaya one-X 9600 Series overview

AVA Enterprises B179 Installation and administration guide

AVA Enterprises

AVA Enterprises B179 Installation and administration guide

Cisco Unified 7900 Series System guide

Cisco

Cisco Unified 7900 Series System guide

Polycom SoundPoint IP 450 datasheet

Polycom

Polycom SoundPoint IP 450 datasheet

Cisco SPA-500 Series user guide

Cisco

Cisco SPA-500 Series user guide

IPitomy IP290 user manual

IPitomy

IPitomy IP290 user manual

Polycom SoundPoint IP 650 user guide

Polycom

Polycom SoundPoint IP 650 user guide

Proximus Maestro 3016 IP quick start guide

Proximus

Proximus Maestro 3016 IP quick start guide

Polycom IP 450 user guide

Polycom

Polycom IP 450 user guide

Fanvil X4 user manual

Fanvil

Fanvil X4 user manual

Snom 320 quick start guide

Snom

Snom 320 quick start guide

Avaya Integral 5 R3.0 user guide

Avaya

Avaya Integral 5 R3.0 user guide

manuals.online logo
manuals.online logoBrands
  • About & Mission
  • Contact us
  • Privacy Policy
  • Terms and Conditions

Copyright 2025 Manuals.Online. All Rights Reserved.

Page 1 of 2
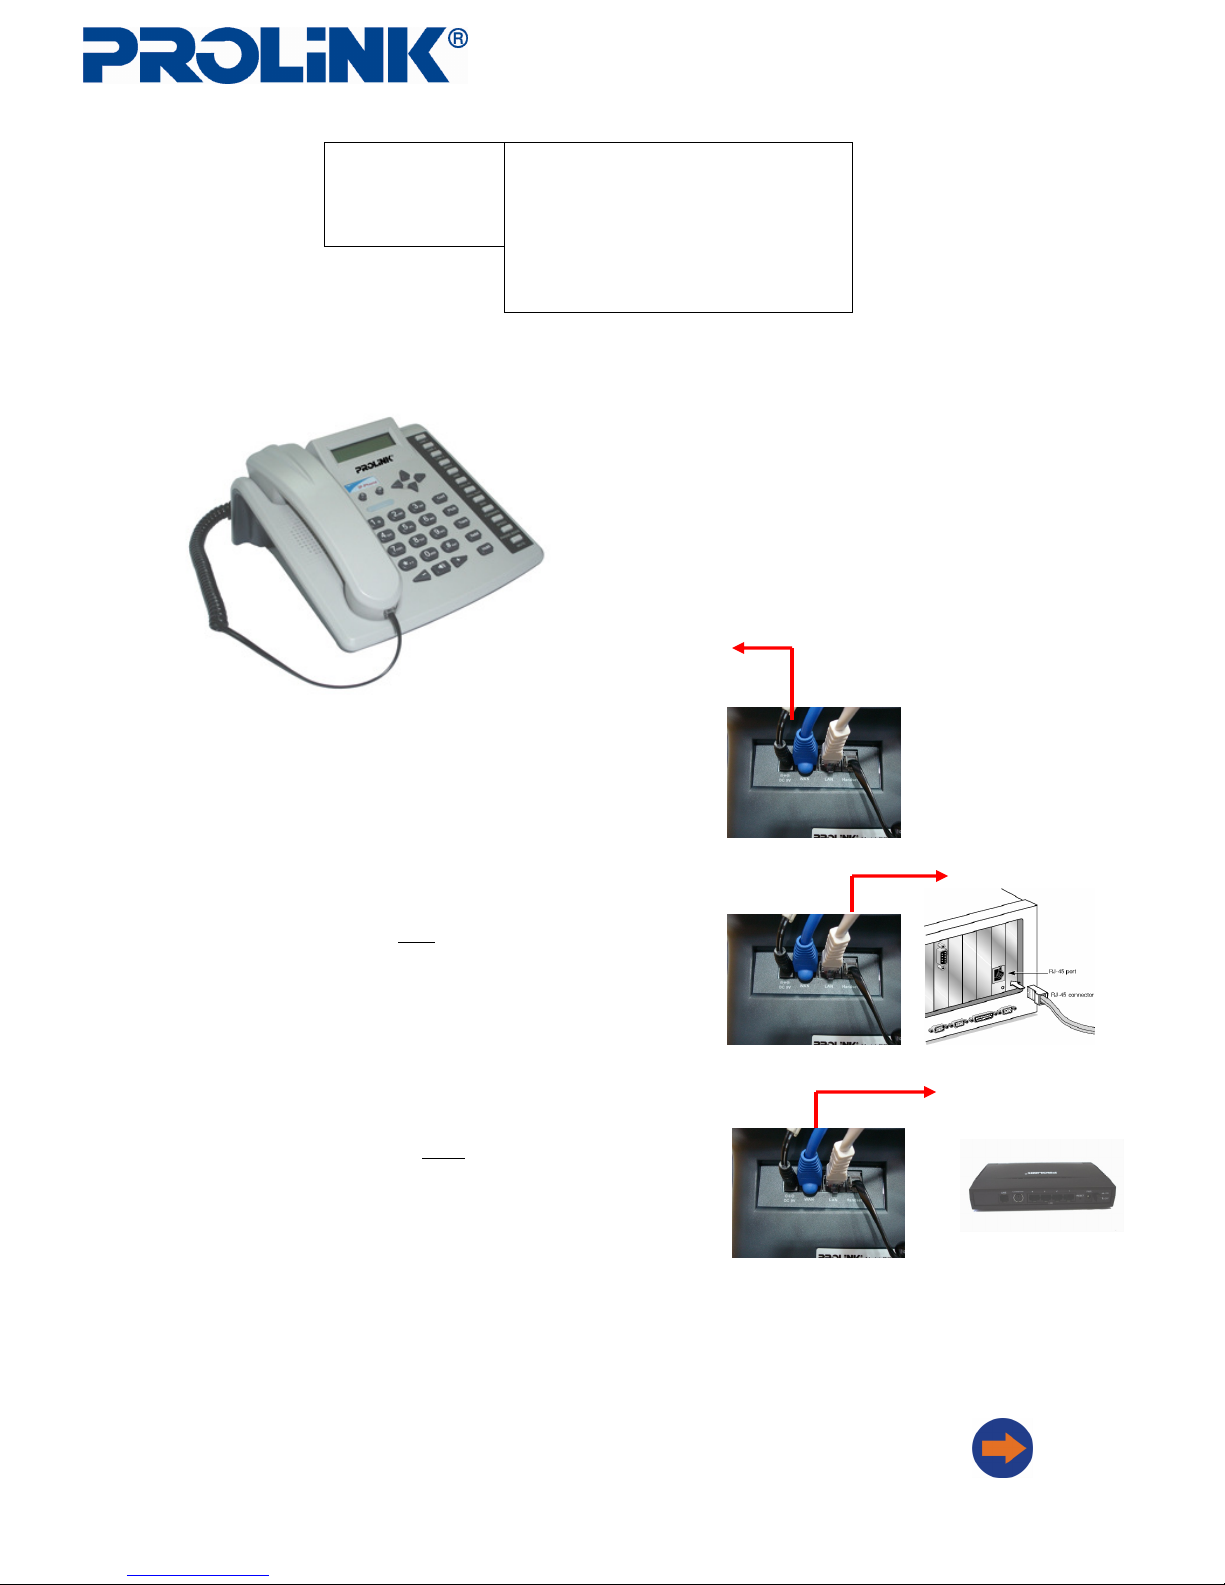
Plug in the DC power adapter to the back of the IP phone.
Plug in a Ethernet cable to the
LAN
port of the IP phone and connect to
the LAN port on the Computer
Setup (continued)
1
2
Technical Support Information
Support Email: [email protected]
Blk 16 Kallang Place , #06-02
Kallang Basin Industrial Estate
Singapore 339156
Support Hotline: (65) 6357 0666 (Singapore)
(603) 8023 9151 (Malaysia)
(62) 021 628 3205 (Indonesia)
For more product information,
please visit us @ www.prolink2u.com
Package Contents
1. 1 PIP901 IP phone
2. 1 DC power adaptor
3. CD with User manual
Minimum System Requirements
CPU: Intel Pentium 3 or equivalent and above
RAM : 128 MB ( 256 MB or above recommended)
Ethernet Port
ADSL modem router or Router with Ethernet port connected to Internet
Operating systems : Mac OS , Linux, Windows 2000 , Windows XP ,
Windows Vista
Web browser required for web based configuration on computer
PIP 901 Multi Lines IP phone solution
Getting Started - Hardware
Plug in a Ethernet cable to the
WAN
port of the IP phone and
connect to the LAN port on the Router or ADSL modem
3
DC power adapter
To: LAN (RJ45) port of Computer
To: LAN (RJ45) port of ADSL modem or Router
4
Turn on the power to the DC power supply, and wait for 20 secs for
the IP phone to complete the power on sequence.
Page 2 of 2
Version 1.0 December 2007. Subject to change without prior notice.
© Copyright 2007 PROLiNK All Rights Reserved. PROLiNK is manufactured under the
authority of FIDA INTERNATIONAL (S) PTE LTD. All brands or product names are
either trademarks or registered trademarks of their respective owners.
For more product information, please visit us @ www.prolink2u.com
Setting up your IP phone with SIP service provider
1
Open your web browser and key in the following web address :
http://192.168.123.1:9999
2
You will next be prompted to enter a username and password:
Enter the following:
Username : root Password : ( Leave this blank)
Then click on the “Login” button
3
Go to : SIP settings 

Service domain
You will see the following page.
You may enter your SIP account information in similar format.
Click on “submit” button once all the information have been
correctly entered.
4
Select the “ Save change” menu
Then Click on the “Save” button
The IP phone will reboot itself and take up to 30 seconds to register
Go to SIP settings 

Service domain setting to check if your
SIP account is registered ( registered means connected)
5
Congratulations ! You are now connected to your SIP service and
you may now make IP calls through your PIP901 IP phone.