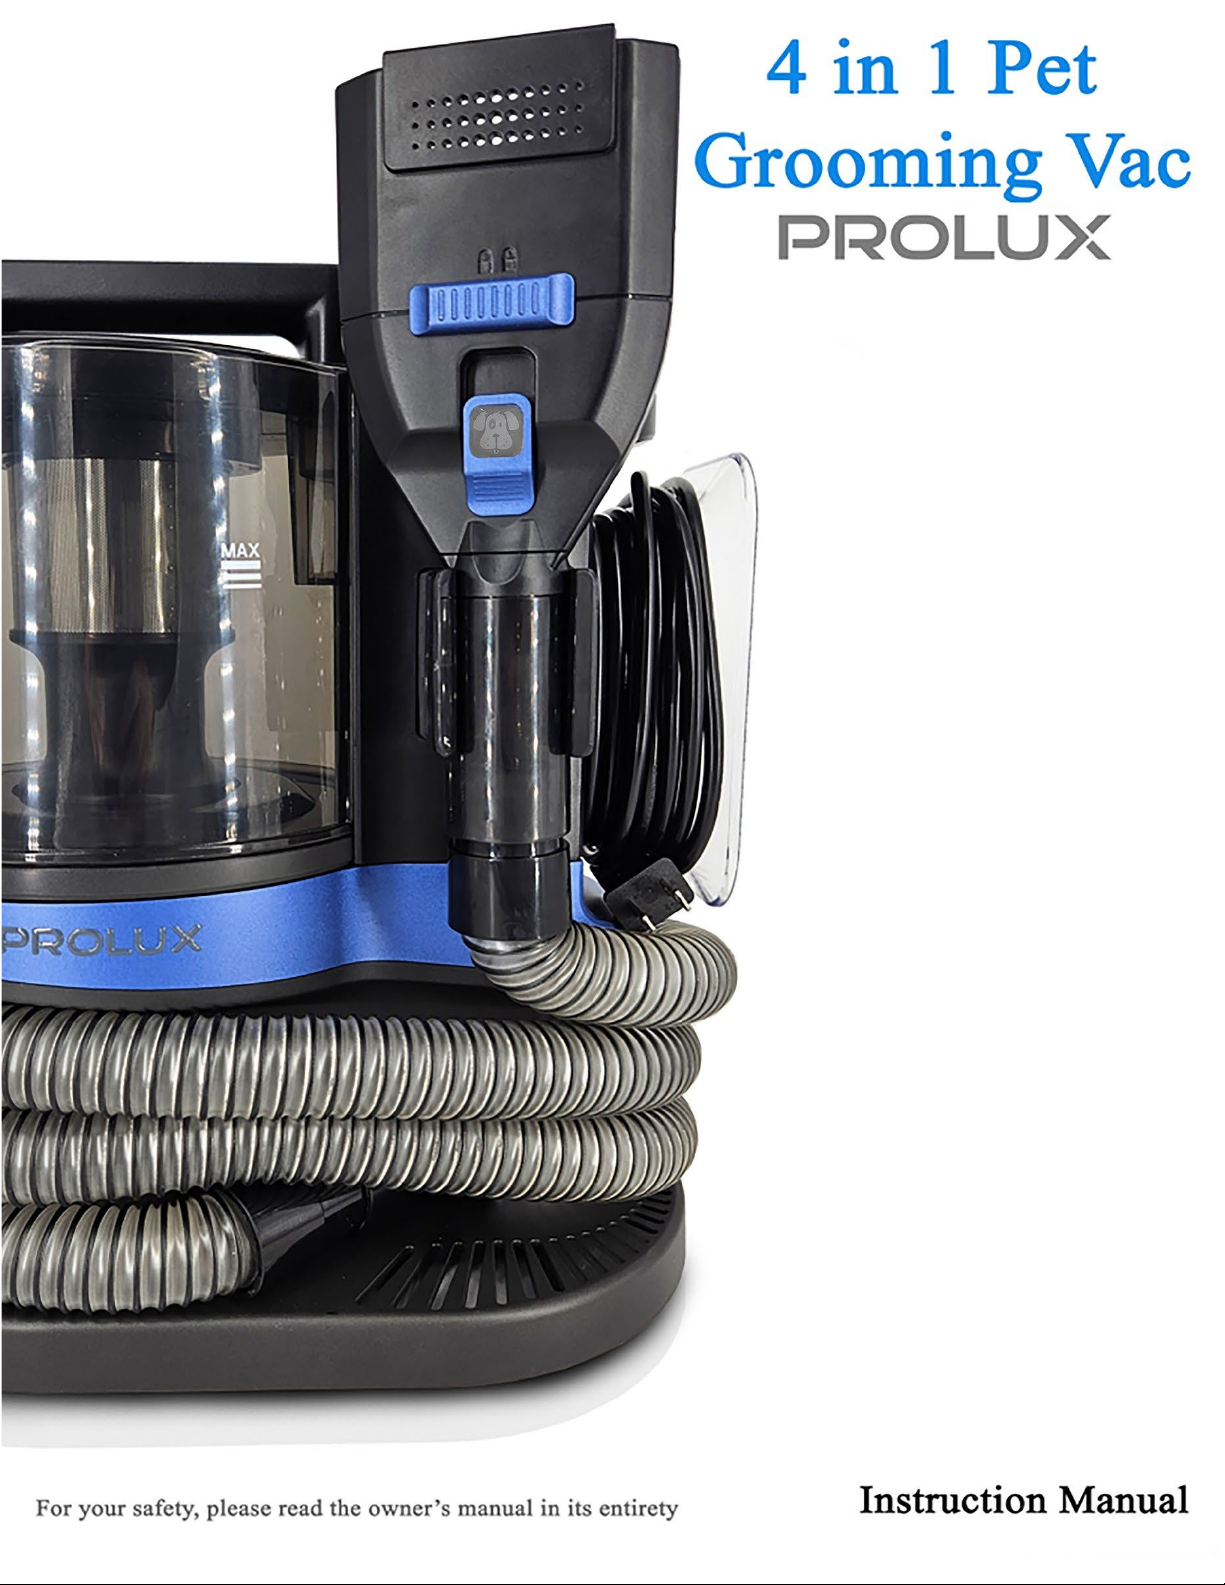
Prolux 4 in 1 Pet Grooming Vac User manual
1

2
For your safety, please read the owner’s manual in its entirety before use.
Congratulations on purchasing your very own Prolux Pet Grooming Vacuum Cleaner. This high-end
vacuum is designed to provide ample power and superior filtration. Keep your pet’s hair trimmed and
looking great and make clean up a breeze in just a few easy steps. Prolux…. Cleaning Reinvented!
Welcome to the Prolux family and don’t forget to register for your warranty at www.proluxcleaners.com

3
Table of Contents
Quick Assembly............................................................................................................................. 4
Specifications ................................................................................................................................. 5
WARRANTY ................................................................................................................................. 6
IMPORTANT SAFETY INSTRUCTIONS ................................................................................ 7
Description of Parts ...................................................................................................................... 9
Assembly and Operation ............................................................................................................ 10
Operation ......................................................................................................................................11
Vacuum Speed Options ............................................................................................................. 12
De-Shedding.............................................................................................................................. 13
Hair Clipper............................................................................................................................... 14
Comb and Guide Guard Replacement....................................................................................... 14
Dirt Bin Emptying..................................................................................................................... 17
Maintenance ................................................................................................................................ 18
Clipper Maintenance ................................................................................................................. 18
De-Shedder Maintenance .......................................................................................................... 19
Filter Maintenance..................................................................................................................... 19
Suction Port Channel Cleaning ................................................................................................. 21
Dirt Bin Cleaning ...................................................................................................................... 23
Storage ......................................................................................................................................... 23
Frequently Asked Questions ...................................................................................................... 24
Troubleshooting........................................................................................................................... 25
Warranty...................................................................................................................................... 26


5
Specifications
•Lightweight - Vacuum weighs just 8lbs
•Dependable - 3-year motor and 1 year body warranty
•Washable HEPA filter gives you excellent filtration
•3 Speed Motor – Eco, Standard and Boost
•9ft+ Power Cord
•6.5ft+ Long Tool Hose
•Powerful – 31 CFM on Eco, 37 CFM on Standard and 40 CFM on Boost
•3.3L Dirt Bin Capacity
•Battery Powered Clippers – Uses 2 AA Batteries (Sold Separately)

6
WARRANTY
Here at Prolux we take pride in the quality of our products, so much of our time and money is spent on
R&D rather than advertising. Because of this we feel very confident in the quality of our products and
feel very comfortable being able to offer a 3-year motor warranty and a 1-year body warranty. We only
require that you MUST register your machine within 90 days of purchase. If a machine is not registered
then we will only offer a 1-year warranty, which will cover both the motor and body. When you register
your machine not only will you receive the 3 year/1 year warranty you will also receive:
•FREE shipping on any warranty claims.
•FREE shipping on any order returned within the 61-day return period.
•Mailing list notifications - The #1 thing that kills vacuums is not keeping up on maintenance, so
when you register your product, we will provide reminders when it’s time to replace your filters
etc.
•Coupons and offers for discounts on supplies.
Registering is simple. Just go to the warranty section of our website below and fill out the form. Once
registration is complete, you’ll then be covered.
https://proluxcleaners.com/pages/warranty
With over 20 years in business, superior products, an honest, hardworking team, unparalleled leadership,
and many years spent on Utah's fastest growing business list, you can rest assured that Prolux will be here
to back up our warranty claims. We strive to provide responsive and pleasant customer service
experiences and to develop exceptional products that you can count on! - PROLUX

7
IMPORTANT SAFETY INSTRUCTIONS
Vacuum Safety
Read the owner's manual in its entirety before using this product.
Failure to do so can result in serious injury or death. Prolux takes no responsibility for
damages/injuries due to violations of the following operating instructions.
To reduce the risk of fire, electric shock, or injury:
Keep this operating manual for reference. Include the operating manual if you pass the appliance to third
parties.
When using an electrical appliance, basic precautions should always be followed, including the following:
Precautions
•Keep the appliance out of the reach of children, do not let children or pets play with the product
or the battery. Please pay special attention when using near children, especially do not allow
children to put batteries into their mouth.
•Do not use the hose to vacuum large amount of densely clustered hair at one time, which may cause
the hose to be blocked. In this case, turn off the appliance, remove the hose, and unclog.
•Do not use the appliance before installing the dustbin or filter.
•Place the appliance on a flat surface to prevent it from tipping over or shaking.
•Check that the plug is unplugged from the socket and the power cord is stored before moving
the appliance. If the hose is connected, please also store the hose before moving the appliance.
•Do not use it when the suction port is blocked. Keep the suction port free of dust, lint, hair, or
any substance that may obstruct the airflow.
•Use this appliance only on dry hair or other dry surfaces.
•People (including children) with limited physical, sensory, or mental abilities, or in absence
of experience and knowledge may fail to use this product safely without the supervision or
guidance of adults.
•After installation, please keep the product packaging materials out of the reach of children
to avoid unintentional injury.
Safety Instructions
•Do not damage the power plug, do not damage, stretch, bend, twist the power cord or place the
power cord near objects that are hot, and do not bind or lift heavy objects with the power cord.
•If there is moisture or dust on the power plug, completely unplug it for cleaning and firmly
insert it into the socket.
•Turn off the appliance and disconnect the plug before cleaning or servicing.
•Turn off the appliance before disconnecting the power plug.
•To unplug, press the socket and hold the plug, do not directly pull the power cord.
•Do not touch the power plug or the appliance with wet hands.

8
•If the appliance fails to work properly, is damaged, stays outdoors for a long time, or is dropped
into water, please contact customer service.
•If water enters any electrical components inside the product, please disconnect the power plug.
•Do not use when the power cord or power plug is damaged.
•Do not suck up toxic substances (chlorine bleach, ammonia, drainage detergent, etc.)
with this appliance.
•Do not use this appliance in a confined space filled with volatile gases (paint thinners,
cleaners, solvents, etc.).
•Do not suck anything burning with this appliance, such as cigarettes, matches, or hot ashes.
•Do not use this appliance to suck flammable materials (lighter oil, gasoline, etc.), and do not
use it in an environment with explosive liquids or volatile gases.
•Do not overheat the appliance. If the appliance overheats, immediately turn off the
appliance and disconnect the power to allow it to cool down.
•Do not modify or attempt to repair the appliance unless otherwise stated. Damaged or
modified appliances may have unexpected conditions that may cause fire, explosion or
personal injury and will also void the warranty.
•Do not use this product where it may fall (furniture, stairs, railings, sloping floors, etc.).
•Do not insert metal objects into the holes or gaps of the product.
Safety Instructions of the AA batteries (sold separately)
•The clipper uses 2 AA batteries, pay attention to the precautions.
•Do not attempt to regenerate the disposable battery by heating, charging, shaking, etc.
•Properly dispose of dead batteries.
•Do not mix the old batteries with the new ones or combine batteries of different types.
•Do not use deformed or damaged batteries.
•Do not let children replace the batteries alone without adult supervision.
•Before replacing the clipper batteries, please check whether the clipper and battery terminals
are clean, clean them with a soft cloth when necessary.
•If the battery leaks, be careful not to let the liquid contact your skin or eyes. If the liquid
does contact your skin or eyes, rinse immediately with plenty of water and follow a
doctor's instructions.
•Do not let any liquids enter the product or battery area.
•When the clipper is not used for a long time, please remove the batteries, and keep it in a
cool and dry place.
•Keep spare batteries in a cool and dry place without direct sunlight.

9
Description of Parts
1. Main Canister
2. Tool Hose
3. De-shedder
4. Hair Clipper
5. Cleaning Brush
6. Crevice Tool
7. Rake Comb
8. Flea Comb
9. Soft Comb
10. De-Shedding Comb
11. Clipper Guide Guards
12. Maintenance Brush

10
Assembly and Operation
Important: For the best results do not use the vacuum without all filters and dirt bin properly
installed.
Use for dry pets ONLY!
1. Remove everything from box and lay in easy view.
2. Ensure filter is installed and dirt bin is locked in place.
3. Place the main unit on a level surface and attach the hose to main canister. The hose is friction fit
so it can be pushed into the vacuum’s suction port and kept in place with friction.
4. Select proper attachments for current task. Operation section will go more over when certain
attachments should be used.
5. Uncoil the power cord and plug it into a wall outlet.

11
Operation
Attachment Overview
Prolux is proud to include the highest quality attachments available! Through research
and development and trial and error… Prolux has finally perfected vacuum attachments,
matching durability with functionality! This is Cleaning…Reinvented!
•De-Shedder - Quickly and easily remove loose hair for long and short
haired dogs and cats. Effectively reduce shedding by up to 95% and
help with the removal of fleas. Should be used with De-Shedder comb
attachments.
•Soft Comb - Used for removing loose hair from clothes, pets, or other
fabric surfaces.
•Flea Comb - Used for both short and long-haired pets for the removal
of fleas. Run the comb through pet hair to remove fleas and other bugs
which may be embedded in the pet hair.
•Rake Comb – Used for cleaning, brushing and smoothing pet hair. Run
the comb through pet hair to remove any loose hair, dirt or to just give
your pet’s hair a smooth finish.
•De-Shedding Comb - Used for removal of loose or built-up pet hair.
Run the comb through the pet hair to comb out any loose hair.
•Cleaning Brush – Works great for sucking up any leftover hair on
upholstery, clothes, or hard surfaces. Run the brush over these areas to
suck up any loose or leftover hair.
•Crevice Tool – Get into those tight areas where hair may be hiding.
Great for upholstery and couch cushions.
•Hair Clipper – Used for trimming hair. Give your pet a quick cut
without all the cleanup. Just clip the hair and it’s sucked up into the dirt
bin.
•Clipper Guides – Used to guard the clipper blade to give you the
perfect length for your pet’s hair. Slide the guard onto the clipper blade
and get to cutting.

12
Vacuum Speed Options
The 4 in 1 Pet Grooming Vacuum comes with 3 power/speed options based on what type of
grooming you’re currently doing. Choose between these 3 options by pressing the +/- button on
top of the main unit:
Eco Mode for Trimming:
Standard Mode for De-Shedding:
Boost Mode for Flea Removal:

13
De-Shedding
Note: During use, please pay attention to the comb attachment edge, do not use excessive force which can
cause scratches to the skin.
Note: Push comb cleaner button regularly during use to clean off built up hair on comb attachment
Tip: Placing the vacuum unit further away from your pet will lessen the amount of noise being introduced to
your pet, so if your pet is skittish, we would recommend doing this until they get used to the vacuum sound.
1. Attach the De-Shedder attachment to the hose end and unlock the comb attachment by sliding the
comb lock button sideways. This will allow the comb to unlock and allow the comb edge to stick
out. If a different comb attachment is needed review the comb replacement section for steps on
replacement.
2. Once the proper comb attachment has been selected turn the vacuum on and select the proper
vacuum speed for the type of task, you’ll be doing whether that be de-shedding (Standard Mode)
or flea removal (Boost Mode).
3. Run the comb through your pet’s hair making sure you’re not using excessive force downward and
allowing the comb to run smoothly through your pet’s hair. You don’t want to scratch your pet’s
skin or be pulling the hair to the point it’s painful for your pet. As the hair/pests are pulled out the
suction port on the de-shedder attachment will suck up the hair and dispose of it into the dirt bin.
Any hair which has built up on the comb attachment can be removed by pressing the comb cleaner
button on the back of the De-Shedder attachment. This will push the built-up hair off and into the
attachment suction port. Any leftover hair can be removed by hand and placed into the suction
port.
4. Continue combing your pet’s hair while also keeping an
eye on the amount of hair in the dirt bin and listening for
any changes to the sound of the vacuum motor. A higher
pitched sound, or loss of suction, can mean a clog has built
up. If this happens review the maintenance section.

14
Hair Clipper
Note: Do not touch the blade if the guide guard is not installed.
Note: Please be careful on the soft parts of the pet's skin and do not use excessive force which
can cause scratches to the skin.
Note: Clipper attachment will require (2) AA batteries which are sold separately.
1. Attach the clipper attachment to the hose end and select which guide guard is
preferred. We would recommend starting with a longer guide option and testing the
length. If a shorter length is desired replace it with a shorter guard until the desired
length has been reached. Review guide guard
replacement section.
2. Once the attachment is connected and the proper
guide guard has been selected you can then turn
on the vacuum and select the correct speed. For
trimming you’ll want to use Eco Mode.
3. Turn on the clippers by flipping the switch on
the clippers to ON and begin clipping your pet’s
hair while also keeping an eye on the amount of
hair in the dirt bin and listening for any changes
to the sound of the vacuum motor. A higher
pitched sound, or loss of suction, can mean a
clog has built up. If this happens review the
maintenance section.
Comb and Guide Guard Replacement
To change the comb attachment:
1. Unlock comb if locked by sliding the comb lock button sideways.
2. Once unlocked hold the de-shedder attachment so the
comb is facing you and grab the comb attachment
between your fingers.
3. Push the comb attachment to the right so it’s pressed
against the yellow panel on the side of the de-shedder
attachment.

15
4. Press down on the comb attachment and pull outward to remove it from the de-
shedder.
5. To replace the comb attachment put the right side of the attachment in first with the
pointy end facing you.
6. Push the right side of the comb into the yellow panel and insert the left side of the
attachment into the notch cut into the left side of the de-shedder attachment opening
until it locks into place.

16
To change the clipper guide guard:
1. If the clipper has a guard installed already you can unlock the guard by pressing
upward on the back of the guard. Press upward and this will unlock the guard from
the clipper and allow you to then slide the guard off removing it from the clipper
blade.
2. To install a guard, slide the back of the guard onto the clipper blade first, and into the
notches cut into the sides of the clipper end. Slide the guard down the notches until
it locks into place.

17
Dirt Bin Emptying
1. Turn vacuum off and unplug it from
the wall outlet.
2. Unlock dirt bin by pressing the bin
unlock button on top of the vacuum.
3. Grab the dirt bin by the top handle and lift the bin off the vacuum body.
4. Hold dirt bin over a garbage can or other receptacle and press the dirt bin bottom
cover release button. The bottom cover will open allowing the dirt bin contents to be
emptied.
5. Once empty close the bottom cover locking it back in place.
6. Insert the outer edge of the dirt bin into the slot on the outer edge of the vacuum
body.
7. Push dirt bin towards the vacuum until there is an audible click locking the dirt bin
back in place.

18
Maintenance
Note: Clean the clipper blade and de-shedder attachment after each use.
Note: Make sure clipper is switched off before performing any maintenance.
Note: Do not rinse the clipper or blade with water to clean.
Clipper Maintenance
1. Remove clipper from vacuum hose and make sure the clipper’s ON/OFF switch is set to OFF.
2. Remove the clipper blade by using your thumb to press the blade out
and away from the clipper.
3. Clean the blade and clipper using the provided maintenance brush. You
can also use the suction of the vacuum with the hose and crevice tool or a can of
compressed air to clean these parts.
4. Reassemble the blade onto the clipper by inserting the bottom of the blade into the clipper and pressing the
blade into the clipper with light pressure. It will click, locking it into place.
5. Turn the clippers on and make sure the blade is working properly. The clippers are now ready to use.

19
De-Shedder Maintenance
1. Remove de-shedder attachment from the vacuum hose and make sure the comb attachment lock is unlocked
allowing the comb attachment to stand up.
2. Remove the comb attachment from the de-shedder. Review the ‘Comb and Guide Guard
Replacement’ section.
3. Clean the comb and de-shedder attachment using the provided maintenance brush. You can also use the
suction of the vacuum with the hose and crevice tool or a can of compressed air to clean these parts.
4. Reinstall the comb attachment, review the ‘Comb and Guide Guard Replacement’ section.
5. The de-shedder is now ready to use.
Filter Maintenance
HEPA Filter:
1. Turn vacuum off and unplug from the wall outlet.
2. Remove dirt bin and empty if needed. Review ‘Dirt Bin Emptying’ section.
3. Once dirt bin is empty leave bottom cover open, reach inside the dirt bin and grab the HEPA filter and filter
cover. Twist counterclockwise and pull outward removing both parts from the dirt bin.
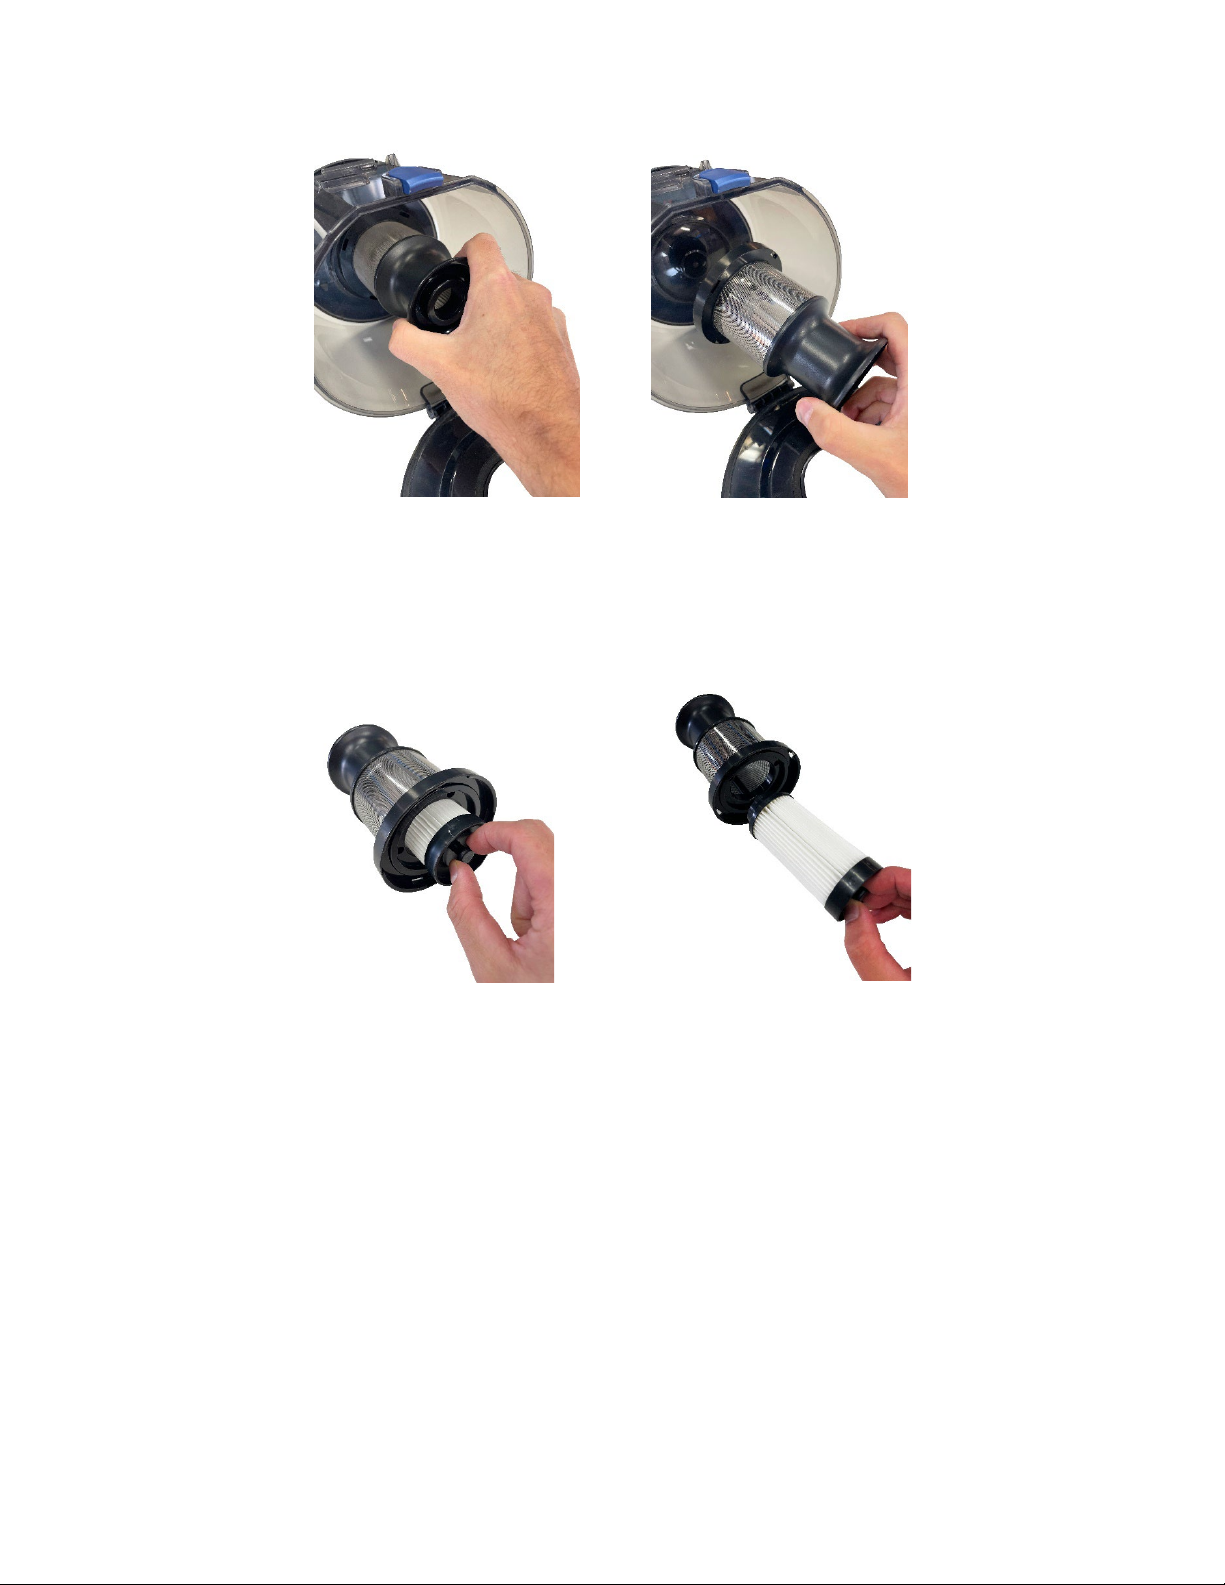
20
4. Grab the HEPA filter inside the filter cover and pull the filter out.
5. The filter can be cleaned by tapping it over a garbage can or other receptacle. A can of compressed air is
also a great way to clean the filter.
6. Any built up dust on the filter cover can be wiped off or blown off with compressed air.
7. Insert the cleaned HEPA filter back into the filter cover and insert the filter cover back into the dirt bin.
8. Twist the filter cover clockwise locking it into place and close the bottom cover lid.
9. Reinstall the dirt bin onto the vacuum unit. The vacuum is now ready to use.
Note: If deep cleaning is needed for the HEPA filter and filter cover these parts can be soaked in warm, soapy water,
cleaned with a cleaning brush, and rinsed off with clean water. Let these parts air dry completely for at least 24hrs
before reinstalling both parts.
Note: Make sure the filter and filter cover are properly assembled and locked in place before use. NEVER use the
vacuum without filters.
Table of contents
Popular Pet Care Product manuals by other brands

Petsafe
Petsafe IF-100 Operation guide

Little Cottage
Little Cottage Cozy Cottage Kennel Assembly instructions

Petsafe
Petsafe Happy Ride Get started

Waterdrop
Waterdrop PAWAii Wireless Pet Water Fountain Pro manual

Dog Care
Dog Care TC05 user manual

chipdeal
chipdeal Reader Plus Extra Elementary user's manual


