Promate Prime User manual

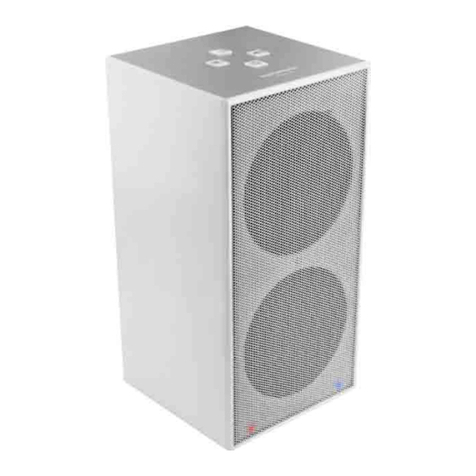
Prime
20 Watt
Wireless Tower Speaker
WITH PRO-CONNECT TECHNOLOGY

• Prime
• Aux Cable
• Power Cable
• User Guide
Introduction
Packaging Contents
Experience uninterrupted and enhanced surround sound experience with Prime,
a multi-function 20watt wireless speaker. Experience crystal clear calls with the
hands-free function. Play your favorite tracks wirelessly or via the 3.5mm audio
jack. One Touch connect via the NFC function. Create your own surround sound
experience by connecting up to 8 Pro-Connect enabled speakers to Prime.
Specication:
• Bluetooth Version: v3.0
• Bluetooth Chipset: ISSC IS1681S
• Bluetooth Frequency: 2.4GHz
• Bluetooth Proles: A2DP, HFP, HSP, AVRCP
• Battery Type: Li-ion
• Battery Capacity: 6600mAh
• Power Input: AC100-250V
• Speaker Output: 5W*2+10W
• Impedance:4Ω
• Operating Distance: 10m
• proConnect Range: 30m
• Music Playback Time: 8 hours
• Charging Time: ~8 hours
Features
•Powerful Speaker: A multi-function 20W speaker takes your music listening
experience on to the next level
•Enhanced Bass: Dual external passive radiators demonstrate just how
powerful your speakers are.
1
English

•Call Function: Engage in call function with the built-in hands-free function.
The built-in mic features advanced noise cancellation technology for clear
wireless hands-free calling
•Multiple Connectivity Options: Play your favourite tracks via various connectivity
options available with Prime. Play it wirelessly or via the 3.5mm audio jack.
•NFC Connectivity: Enjoy music via uninterrupted NFC connection
•Pro-Connect Technology: Create your own surround sound experience by
connecting up to 8 Pro-Connect enabled speakers.
•Long Lasting Battery: Play your favourite tracks for up to 8 hours with Prime’s
6600mAh rechargeable lithium-ion battery
•Built-In Backup Battery: Prime Features a built in 6600mAh backup battery
to charge mobile devices and ensures your devices never run out of power.
•Universal Compatibility: Prime is compatible with all Bluetooth enabled devices
Precautions
Please read all safety instructions and warnings thoroughly before using this product.
Improper use of this product may result in damage to this or attached products.
• Do not disassemble the device or attempt to x it.
• Kindly use the included cable to charge the product.
• Do not attempt to replace any part of this product.
• Do not crush, puncture or dispose of in re.
• Do not store or use the battery in a high temperature environment,
including intense sunlight or heat.
• Avoid excessive drops, bumps, abrasions and impacts.
• If there is any reason to believe that there is internal damage to the device,
discontinue use immediately.
• If you nd that the device is too hot, is emitting an odor, or is deformed,
punctured or exhibits any suspicious or abnormal behavior, discontinue use
immediately and contact our customer service.
• Always charge this product before extended storage.
English
2

Appearance & Interface Description:
1. Power Button
2. Pro-Connect Button
3. Multi-Function Button
4. Volume control Buttons
5. AC charge In
6. USB Charging Output
7. Aux Line In
3
.ﻲﻛذ ﻒﺗﺎھ زﺎﮭﺟ يأ ﻦﺤﺸﻟ ﻢﻳاﺮﺑ ماﺪﺨﺘﺳا ﻦﻜﻤﻳ •
.ﻪﻨﺤﺷ ﻲﻓ ﺐﻏﺮﺗ يﺬﻟازﺎﮭﺠﻟاﻲﻓىﺮﺧﻷاﺔﻳﺎﮭﻨﻟا و"ﻲﺑسا ﻮﻳﻦﺤﺷجﺮﺨﻣ"ﻲﻓﻞﺑﺎﻜﻟاتﺎﻳﺎﮭﻧﺪﺣاﻞﺧدا •
1 2 3 4
5 6 7
English

• Use the provided AC cable to charge Prime.
•Connect one end of the AC Cable provided to Prime and other end to a wall Power Socket.
• The Red LED will light up indicating that Prime is charging normally.
• The Red LED indicator will turn o once fully charged.
• The Red LED indicator will start ashing when the device is running out of power.
• To switch on Prime, press the“Power Button”once.
• The Green Power LED will turn on.
• Press the power button again to switch o Prime.
1. Charging Prime
• Prime automatically enters into Bluetooth pairing mode once powered on.
•To manually enter Bluetooth pairing mode, press and hold the “Multi-Function
Button”for about 2 Seconds.
• The“Bluetooth Mode Indicator” LED will begin ashing when in pairing mode.
•Turn on the Bluetooth function on your device and select“Prime”in the available devices list.
• Some Bluetooth devices may require you to enter a passcode to pair your device
to Prime. Enter“0000”and press submit.
•Once your device is successfully paired, the“Bluetooth Mode Indicator”LED will stop ashing.
• Control track playback and volume from your connected device.
3. Bluetooth Pairing
Operation Instructions:
2. Turning Prime On/O
•Turn On the NFC function of your device and touch it to Prime’s NFC Sensing Area.
• Your device will ask for permission to pair with Prime.
• Choose ‘YES’to complete pairing.
• After successful pairing, the indicator will change to solid Blue.
• Control track playback and volume from your connected device.
4. NFC Pairing:
•Connect your device to Prime via the 3.5mm Aux cable provided.
5. Playing Music via Auxiliary Connection:
English
4

5
• Prime will automatically enter into AUX playback mode.
• Control track playback and volume from your connected device.
•Control volume via the paired devices or using the Volume Control buttons on Prime.
•Pair your Bluetooth device to 1 Pro-Connect enabled speaker, by following
the instructions above.
•Press and hold the Pro-Connect Button on the speaker connected to your device
to send out a connection request.
• The Transmit LED will begin ashing.
•Press and hold the Pro-Connect Button on the receiving speaker to scan for
atransmission request.
• The Receive LED will begin ashing.
• The LED will stop ashing once the speakers are connected to each other.
• Follow the above steps to pair up to 8 Pro-Connect Speakers together.
6. Connecting Multiple Pro-Connect Enabled Speakers:
•Short press the Multi-function button to pick up incoming calls when
your device is paired.
• Short press the Multi-function button to end an ongoing call.
• Long press the Multi-function button to reject an incoming call.
• Double press the Multi-function button to re-dial the last caller.
• Press and hold the Multi-Function button during a call to Mute the mic.
• Press and hold the Multi-Function button again to unmute the mic.
7. Call/Hands-free Function:
8. Volume Control:
•Prime can be used to charge any Smartphone device.
•Plug in one end of the cable into the“USB Charging Output Port”and the other into
the device you wish to charge.
9. Charging devices using Prime:
.ﺪﯿﻨﮐ هدﺎﻔﺘﺳا Prime ندﺮﮐ ژرﺎﺷ یاﺮﺑ هﺪﺷ ﻪﺿﺮﻋ بوﺎﻨﺘﻣ قﺮﺑ ﻞﺑﺎﮐ زا •
.ﺪﯿﻧﺰﺑ یراﻮﯾد قﺮﺑ ﺰﯾﺮﭘ ﻪﺑ ار ﺮﮕﯾد ﺮﺳ و Prime ﻪﺑ ار هﺪﺷ ﻪﺿﺮﻋ بوﺎﻨﺘﻣ قﺮﺑ ﻞﺑﺎﮐ ﺮﺳ ﮏﯾ •
.ﺖﺳا یدﺎﻋ رﻮط ﻪﺑ نﺪﺷ ژرﺎﺷ لﺎﺣ رد Prime ﺪھد ﯽﻣ نﺎﺸﻧ ﻪﮐ دﻮﺷ ﯽﻣ ﻦﺷور ﺰﻣﺮﻗ LED •
.دﻮﺷ ﯽﻣ شﻮﻣﺎﺧ ﺰﻣﺮﻗ LED ﺮﮕﻧﺎﺸﻧ ژرﺎﺷ نﺪﺷ ﻞﻣﺎﮐ ﺎﺑ •
.ﺪﻨﮐ ﯽﻣ ندز ﮏﻤﺸﭼ ﻪﺑ عوﺮﺷ ﺪﺷﺎﺑ ﻪﺘﺷاﺪﻧ یﺮﺗﺎﺑ هﺎﮕﺘﺳد ﻪﮐ ﯽﻣﺎﮕﻨھ ﺰﻣﺮﻗ LED ﺮﮕﻧﺎﺸﻧ •
.ﺪﯿھد سﺎﻤﺗ نآ ﺎﺑ ار NFC Prime ﺮﮕﺴﺣ هدوﺪﺤﻣ و ﺪﯿﻨﮐ ﻦﺷور ار دﻮﺧ هﺎﮕﺘﺳد NFC دﺮﮑﻠﻤﻋ •
.دﺮﯿﮔ ﯽﻣ هزﺎﺟا Prime ﺎﺑ یزﺎﺳ ﺖﻔﺟ یاﺮﺑ ﺎﻤﺷ هﺎﮕﺘﺳد •
.ﺪﯿﻨﮐ بﺎﺨﺘﻧا ار «ﻪﻠﺑ» یزﺎﺳ ﺖﻔﺟ ﻞﯿﻤﮑﺗ یاﺮﺑ •
.ﺪﯾآ ﯽﻣ رد ﯽﺑآ ﮓﻧر ﻪﺑ ﺮﮕﻧﺎﺸﻧ ،ﺰﯿﻣآ ﺖﯿﻘﻓﻮﻣ یزﺎﺳ ﺖﻔﺟ زا ﺲﭘ •
.ﺪﯿﻨﮐ لﺮﺘﻨﮐ دﻮﺧ هﺪﺷ ﻞﺼﺘﻣ هﺎﮕﺘﺳد زا ار اﺪﺻ ناﺰﯿﻣ و ﮓﻨھآ ﺶﺨﭘ •
.دﻮﺷ ﯽﻣ ثﻮﺗﻮﻠﺑ یزﺎﺳ ﺖﻔﺟ ﺖﻟﺎﺣ دراو رﺎﮐدﻮﺧ رﻮط ﻪﺑ نﺪﺷ ﻦﺷور ﺎﺑ Prime •
2دوﺪﺣ ار «هرﺎﮐﺪﻨﭼ ﻪﻤﮐد» ،ﯽﺘﺳد ترﻮﺻ ﻪﺑ ثﻮﺗﻮﻠﺑ یزﺎﺳ ﺖﻔﺟ ﺖﻟﺎﺣ ﻪﺑ نﺪﺷ دراو یاﺮﺑ •
.ﺪﯾراد ﻪﮕﻧ و ﺪﯿھد رﺎﺸﻓ ﻪﯿﻧﺎﺛ
ندز ﮏﻤﺸﭼ ﻪﺑ عوﺮﺷ ﺪﺷﺎﺑ یزﺎﺳ ﺖﻔﺟ ﺖﻟﺎﺣ رد ﻪﮐ ﯽﻣﺎﮕﻨھ «ثﻮﺗﻮﻠﺑ ﺖﻟﺎﺣ ﺮﮕﻧﺎﺸﻧ» LED •
.ﺪﻨﮐ ﯽﻣ
ار «Prime» دﻮﺟﻮﻣ یﺎﮭھﺎﮕﺘﺳد ﺖﺳﺮﮭﻓ رد و ﺪﯿﻨﮐ ﻦﺷور دﻮﺧ هﺎﮕﺘﺳد یور ار ثﻮﺗﻮﻠﺑ دﺮﮑﻠﻤﻋ •
.ﺪﯿﻨﮐ بﺎﺨﺘﻧا
رﻮﺒﻋ ﺰﻣر ﮏﯾ Prime ﻪﺑ نﺎﺘھﺎﮕﺘﺳد یزﺎﺳ ﺖﻔﺟ یاﺮﺑ ﻪﮐ ﺪﻧراد زﺎﯿﻧ ثﻮﺗﻮﻠﺑ یﺎﮭھﺎﮕﺘﺳد ﯽﺧﺮﺑ •
.ﺪﯿھد رﺎﺸﻓ ار لﺎﺳرا و ﺪﯿﻨﮐ دراو ار 0000 .ﺪﯿﯾﺎﻤﻧ دراو ار
.ﺪﻧز ﯽﻤﻧ ﮏﻤﺸﭼ ﺮﮕﯾد «ثﻮﺗﻮﻠﺑ ﺖﻟﺎﺣ ﺮﮕﻧﺎﺸﻧ» LED ،ﺪﺷ ﺖﻔﺟ ﺖﯿﻘﻓﻮﻣ ﺎﺑ نﺎﺘھﺎﮕﺘﺳد ﯽﺘﻗو •
.ﺪﯿﻨﮐ لﺮﺘﻨﮐ دﻮﺧ هﺪﺷ ﻞﺼﺘﻣ هﺎﮕﺘﺳد زا ار اﺪﺻ ناﺰﯿﻣ و ﮓﻨھآ ﺶﺨﭘ •
English
6
1. Prime does not pair with a Bluetooth device:
•Check if the Bluetooth hardware on your device supports A2DP prole which is
necessary for sound transmission over Bluetooth.
English
10. LED Status Indicators:
Troubleshooting
LED LED Status
Note
Green Power LED On
Prime in “Power On” mode
Off
Prime in “Standby” mode
Red Charging LED
Off
Prime is fully charged
LED Flashing
Low baery
On
Charging in progress
Blue Bluetooth LED
On Prime is connected to a
Bluetooth device
LED Flashing Prime
is in “Bluetooth
Pairing” Mode
Amber Pro-Connect LED
On Pro-Connect enabled
speakers connected
LED flashing
Pro-Connect mode enabled

7
Apariencia y Descripción de la Interfaz:
1. Botón de encendido
2. Botón de Pro-Connect
3. Botón multifunción
4. Botones de control de volumen
5. Entrada de cargador de corriente
6. Salida de cargador USB
7. Entrada de línea auxiliar
1 2 3 4
5 6 7
Spanish

8
• Use el cable de corriente para cargar su Prime.
•Conecte un extremo del cable de corriente proporcionado al Prime y el otro e
xtremo a un tomacorriente de pared.
•La luz roja LED se encenderá indicando que su Prime se está cargando correctamente.
• El indicador de luz roja LED se apagará cuando esté totalmente cargado.
•El indicador de luz roja LED parpadeará cuando el dispositivo se esté quedando sin carga.
• Para apagar su Prime, presione el“botón de encendido”una vez.
• Se encenderá la luz verde LED de encendido.
• Presione el botón de encendido nuevamente para apagar su Prime.
1. Cómo cargar su Prime
•Prime entra automáticamente en modo de sincronización de Bluetooth una vez que se enciende.
• Para entrar manualmente en modo de sincronización de Bluetooth, presione y
mantenga presionado el“Botón multifunción”durante unos 2 segundos.
• La luz LED de “indicador de modo de Bluetooth” comenzará a parpadear cuando
esté en modo de sincronización.
• Encienda la función Bluetooth de su dispositivo y seleccione “Prime” de la lista de
dispositivos disponibles.
• Algunos dispositivos Bluetooth pueden pedirle que ingrese un código para
sincronizar el dispositivo con su Prime. Ingrese“0000” y presione enviar.
•Una vez que su dispositivo se haya sincronizado exitosamente, la luz LED de
“Indicador de modo de Bluetooth”dejará de parpadear.
• Controle el volumen y las pistas de sonido desde su dispositivo conectado.
3. Cómo sincronizar Bluetooth
Instrucciones de Funcionamiento:
2. Cómo encender y apagar su Prime
•Encienda la función NFC de su dispositivo y digite el área de detección de NFC
del Prime (Prime’s NFC Sensing Area).
• El dispositivo le pedirá permiso para sincronizarlo con su Prime.
4. Sincronización NFC:
Spanish

9
• Elija‘SÍ’ para completar la sincronización.
•Después de sincronizarlo exitosamente, el indicador cambiará a luz azul permanente.
• Controle el volumen y las pistas de sonido desde su dispositivo conectado.
• Conecte el dispositivo a su Prime usando el cable auxiliar de 3.5 mm provisto.
• Prime entrará automáticamente en modo de ejecución AUX (auxiliar).
• Controle el volumen y las pistas de sonido desde su dispositivo conectado.
5. Cómo ejecutar música desde la conexión auxiliar:
• Sincronice el dispositivo Bluetooth con 1 parlante enlazado con
Pro-Conexión, siguiendo las instrucciones descritas anteriormente.
• Presione y sostenga el botón de pro-conexión del parlante conectado a su
dispositivo para enviar una solicitud de conexión.
• La luz de transmisión LED comenzará a parpadear.
• Presione y sostenga el botón de pro-conexión en el parlante receptor para
detectar una solicitud de transmisión.
• La luz LED de recepción comenzará a parpadear.
•La luz LED dejará de parpadear una vez que los parlantes estén conectados entre sí.
•Siga los pasos anteriores para conectar hasta 8 parlantes Pro-Conexión juntos.
6. Cómo conectar múltiples parlantes enlazados con Pro-Conexión:
•Presione brevemente el botón multifunción para recibir llamadas
entrantes si su dispositivo está sincronizado.
• Presione brevemente el botón multifunción para nalizar una llamada en curso.
•Presione sostenidamente el botón multifunción para rechazar una llamada entrante.
•Presione dos veces el botón multifunción para discar nuevamente la última llamada.
•Presione y sostenga el botón multifunción durante una llamada para
dejar en silencio el micrófono.
• Presione y sostenga el botón multifunción de nuevo para hablar por el
micrófono nuevamente.
7. Función de llamada y manos libres:
Spanish

10
1. Prime no sincroniza con un dispositivo Bluetooth:
• Verique si el hardware Bluetooth de su dispositivo soporta perles A2DP, que
son necesarios para transmitir sonidos a través de Bluetooth.
8. Control de volumen:
•Controle el volumen a través de los dispositivos sincronizados o usando los botones de
control de volumen de su Prime.
•Prime se puede usar para cargar cualquier dispositivo de teléfono inteligente.
• Conecte un extremo del cable el“puerto de salida de carga USB”y el otro extremo
en el dispositivo que desee cargar.
9. Cómo cargar dispositivos usando su Prime:
Spanish
10. Indicadores de estado de luz LED:
Resolución de problemas
Luz LED
Estado LED
Nota
Luz LED verde de encendido
Encendido
Prime en modo “Encendido”
Apagado
Prime en modo de “Espera”
Luz LED roja de carga
Apagado
Prime totalmente cargado
LED parpadeante
Batería baja
Encendido
Carga en progreso
Luz LED azul de Bluetooth
Encendido Prime conectado a disposivo
Bluetooth
LED parpadeante Prime en modo “sincronizar
con Bluetooth”
Luz LED ámbar de pro-
conexión
Encendido Parlantes Pro-Conexión
conectados
LED parpadeante
Modo Pro-Conexión
habilitado

Description de l’interphase & Aspect
1. Bouton d’Alimentation
2. Bouton Pro-Connect
3. Bouton MultiFonction
4. Boutons contrôle Volume
5. Chargeur AC
6. Sortie de charge USB
7. Auxilaires entrée
1 2 3 4
5 6 7
11
French

12
• Utilisez le câble AC fourni pour le changement du Prime.
•Connectez une extrémité du Câble AC fourni au Prime et l’autre extrémité à une Prise Murale.
• Le voyant LED rouge s'allume indiquant que le Prime se recharge normalement.
• Le voyant LED rouge s’éteint quand le Prime est complètement chargé.
•Le voyant LED rouge commence à clignoter quand l’appareil commence à
manquer de puissance.
• Pour mettre en marche le Prime, appuyez une fois sur le bouton « Power ».
• Le voyant LED vert s’allume.
• Appuyez sur le bouton “Power” à nouveau pour éteindre le Prime.
1. Chargement du Prime
• Le Prime entre automatiquement en mode Appareillage Bluetooth dès qu’il est connecté.
• Pour entrer manuellement en mode appareillage Bluetooth, appuyez pendant 2 secondes
le Bouton Multifonction.
•LeVoyant LED“Mode Bluetooth”commencera à clignoter quand il sera en mode appareillage.
• Allumez la fonction Bluetooth de votre appareil et sélectionnez“Prime”sur la liste d’appareils
disponibles.
• Quelques appareils Bluetooth ont besoin d’un mot de passe pour se mettre en mode
appareillage avec le Prime. Entrez“0000”et validez.
• Une fois que votre appareil est appareillé avec succès, le voyant «Voyant du Mode Bluetooth
» cesse de clignoter.
• Contrôlez la lecture de piste et le volume de votre périphérique connecté.
3. Appareillage Bluetooth
Mode d’emploi
2. On/O (allumer et éteindre) le Prime
•Allumez la fonction NFC de votre appareil et mettez-le en contact avec la zone
de détection NFC du Prime.
• Votre appareil demandera alors l’autorisation pour s'appareiller avec le Prime.
• Choisissez ‘YES’ pour compléter l’appareillage.
4. Appareillage NFC :
French

• Après un appareillage réussi, le voyant devient Bleu.
• Contrôlez la lecture de la piste et le volume de votre appareil connecté.
• Connectez votre appareil au Prime avec le câble auxiliaire 3.5mm fourni.
• Le Prime passera automatiquement en mode de lecture AUX.
• Contrôlez la lecture des pistes et le volume de votre appareil connecté.
5. Ecouter de la Musique à travers une Connexion Auxiliaire :
• Appareillez votre appareil Bluetooth avec 1 enceinte Pro-Connect activée en
suivant les instructions suivantes.
• Appuyez un moment sur le Bouton Pro-Connect de l’enceinte connectée à
votre appareil pour envoyer une demande de connexion.
• Le voyant LED de transmission commencera à clignoter.
• Appuyez un moment sur le Bouton Pro-Connect sur l’enceinte de réception
pour rechercher une demande de transmission.
• Le voyant LED de réception commence à clignoter.
• Le voyant LED arrêtera de clignoter une fois que les enceintes seront
connectées entre elles.
•Suivez les étapes suivantes pour appareiller jusqu’à 8 Enceintes Pro-Connect ensemble.
6. Raccordement de plusieurs Enceintes Activées Pro-Connect :
• Appuyez brièvement le Bouton Multifonction pour prendre les appels
entrants lorsque votre appareil est appareillé.
•Appuyez brièvement le Bouton Multifonction pour mettre n à un appel en cours.
•Appuyez longuement sur le bouton Multifonction pour rejeter un appel entrant.
•Appuyez deux fois sur le bouton Multifonction pour recomposer le dernier numéro.
• Appuyez longuement sur le bouton Multifonction pendant un appel pour
couper le micro.
•Appuyez longuement à nouveau le bouton Multifonction pour activer le micro.
7. Appel et Fonction Mains Libres :
8. Contrôle du Volume :
• Contrôle du volume à travers les appareils appareillés ou utilisation des boutons
Contrôle de Volume sur Prime.
13
French

14
1. Le Prime ne s’appareille pas à un appareil Bluetooth :
• Vériez si le matériel Bluetooth de votre appareil prend en charge le prol A2DP
qui est nécessaire pour la transmission de sons via Bluetooth.
•Le Prime peut être utilisé pour charger votre appareil Smartphone.
• Branchez une extrémité du câble sur le“Port de Sortie USB de Chargement”et
l’autre extrémité sur l’appareil que vous souhaitez charger.
9. Chargement des périphériques via Prime :
French
10. Voyants LED Indicateurs de l’Etat :
Dépannage
LED
Etat LED Note
LED Alimentaon Vert
On Prime en mode “Power On”
Off
Prime en mode “Veille”
LED Chargement Rouge
Off
Prime complètement chargé
LED clignotant
Baerie Basse
On Chargement en cours
LED Bluetooth Bleu
On Prime est connecté à
l’appareil Bluetooth
LED Clignotant Prime est en mode
“Appareillage Bluetooth”
LED Pro-Connect Orange On Enceintes compables
connectées Pro-Connect
LED clignotant
Pro-Connect mode acvé

Aussehen & Schnittstellenbeschreibung
1. Einschalttaste
2. Pro-Connect-Schalter
3. Multifunktionstaste
4. Lautstärkenregler
5. AC-Netzanschluss
6. USB-Ladeausgang
7. Aux-Eingang
1 2 3 4
5 6 7
15
German

16
• Verwenden Sie das gelieferte AC-Kabel, um Prime zu laden.
•Stecken Sie ein Ende des gelieferten AC-Kabels mit Prime und das andere mit derWandsteckdose.
•Die rote LED leuchtet auf und zeigt an, dass Prime normal geladen wird.
•Die rote LED-Anzeige schaltet sich nach vollständiger Auadung aus.
• Die rote LED-Anzeige blinkt, wenn das Gerät Strom benötigt.
• Um Prime einzuschalten, drücken Sie die„Einschalttaste“ einmal.
• Die grüne Strom-LED leuchtet auf.
• Drücken Sie Einschalttaste erneut, um Prime auszuschalten.
1. Prime Laden
• Sobald Prime eingeschaltet ist, geht es automatisch in den Bluetooth-Pairing-Modus.
• Für den manuellen Bluetooth-Pairing-Modus halten Sie „Multifunktionstaste“ für etwa 2
Sekunden gedrückt.
• Die„Bluetooth-Modus-Anzeige”-LED blinkt im Pairing-Modes.
• Schalten Sie die Bluetooth-Funktion an Ihrem Gerät ein und wählen„Prime“ aus der
verfügbaren Geräteliste.
• Bei einige Bluetooth-Geräte müssen Sie einen Passcode eingeben, um Ihr Gerät mit Prime zu
pairen. Geben Sie„0000“ ein und drücken senden.
• Sobald Ihr Gerät erfolgreich gepaired ist, hört die„Bluetooth-Mode-Anzeige“-LED auf zu
blinken.
• Regeln Sie die Wiedergabe und Lautstärke von Ihrem angeschlossenen Gerät.
3. Bluetooth-Pairing
Bedienungsanleitung
2. Prime Ein-/Ausschalten
• Schalten Sie die NFC-Funktion ihres Gerätes an und ziehen diese in den
NFC-Erfassungsbereich von Prime.
• Ihr Gerät fragt nach der Erlaubnis für das Pairing mit Prime.
• Wählen Sie‚JA‘ für das Pairing.
• Nach dem erfolgreichen Pairing leuchtet die Anzeige blau.
4. NFC-Pairing:
German
1. Prime не может выполнить сопряжение с устройством Bluetooth:
• Проверьте, поддерживает ли аппаратное обеспечение Bluetooth на вашем
устройства профиль A2DP, необходимый для передачи звука через Bluetooth.
Поиск и устранение неисправностей

Зеленый светодиодный
индикатор питания
Красный светодиодный
индикатор зарядки
• Regeln Sie die Wiedergabe und Lautstärke von Ihrem angeschlossenen Gerät.
• Verbinden Sie Ihr Gerät mit Prime über das gelieferte 3,5 mm Aux-Kabel.
• Prime geht automatisch in den AUX-Wiedergabemodus.
• Regeln Sie die Wiedergabe und Lautstärke von Ihrem angeschlossenen Gerät.
5. Musik abspielen über den Hilfsanschluss:
•Pairen Sie Ihr Bluetooth-Gerät mit einem Pro-Connect-aktivierten Lautsprecher
gemäß der oben genannten Anweisungen.
• Halten Sie den Pro-Connect-Schalter an dem Lautsprecher gedrückt, der mit
Ihrem Gerät verbunden ist, um eine Verbindunganfrage zu senden.
• Die Übertragungs-LED blinkt.
• Halten Sie den Pro-Connect-Schalter an dem Empfängerlautsprecher
gedrückt, um nach einer Übertragungsanfrage zu scannen
•Die LED hört auf zu blinken, sobald die Lautsprecher miteinander verbunden sind.
•Folgen Sie den oben genannten Schritten, um bis zu 8 Pro-Connect-Lautsprecher
miteinander zu verbinden.
6. Anschließen mehrerer Pro -Connect aktivierte Lautsprecher:
•Drücken Sie kurz die Multifunktionstaste, um eingehende Anrufe anzunehmen,
wenn Ihr Gerät gepaired ist.
• Drücken Sie kurz die Multifunktionstaste, um einen Anruf zu beenden.
•Drücken Sie die Multifunktionstaste lang, um einen eingehenden Anruf anzulehnen.
•Drücken Sie die Multifunktionstaste zweimal, um den letzten Anruf erneut zu wählen.
• Halten Sie die Multifunktionstaste während eines Anrufes gedrückt, um das
Mikrofon stumm zu schalten.
• Halten Sie die Multifunktionstaste erneut gedrückt, um das Mikrofon wieder
einzuschalten.
7. Anruf- /Freisprechfunktion:
8. Lautstärkenregelung:
•Regeln Sie die Lautstärke über die gepairten Geräte oder über die Lautstärkenregler
an Prime.
17
German

18
1. Prime paired sich nicht mit einem Bluetooth-Gerät:
• Überprüfen Sie, ob die Bluetooth-Hardware an Ihrem Gerät das A2DP-Prol
unterstützt, das für eine Klangübertragung über Bluetooth notwendig ist.
•Prime kann zum Auaden aller Smartphones verwendet werden.
• Stecken Sie das eine Ende des Kabels in den„USB-Ladeausgangsport“ und das
andere in das Gerät, das Sie auaden wollen.
9. Auaden der Geräte über Prime:
German
10. LED-Status-Anzeigen:
Fehlerbehebung
LED
LED Status
Anmerkung
Grüne Netz- LED
Ein
Prime im „Eingeschaltet“-
Modus
Aus
Prime im „Standby”-Modus
Rote Lade- LED
Aus
Prime ist vollständig
aufgeladen
LED blinkt Schwache Baerie
Ein
Wird aufgeladen
Blaue Bluetooth-LED
Ein Prime ist mit einem
Bluetooth-Gerät verbunden
LED blinkt Prime ist im „Bluetooth
Pairing”-Modus
Gelbe Pro-Connect-LED
Ein Pro-Connect akvierte
Lautsprecher verbunden
LED blinkt
Pro-Connect-Modus akviert

Descrição da Aparência e da Interface
1. Botão liga/desliga (botão "Power")
2. Botão Pro-Connect
3. Botão Multifuncional
4. Botões de controle de volume
5. Entrada do adaptador AC
6. Saída de recarga USB
7. Entrada auxiliar
1 2 3 4
5 6 7
19
Portuguese
Table of contents
Languages:
Other Promate Speakers manuals

Promate
Promate JoyfulJazz User manual

Promate
Promate bluRock2 User manual

Promate
Promate Harmony User manual

Promate
Promate TimeBase-2 User manual

Promate
Promate Silox User manual

Promate
Promate Snowy User manual

Promate
Promate Rustic User manual

Promate
Promate MW-1309 User manual

Promate
Promate bikeRock User manual

Promate
Promate Cyclone User manual

Promate
Promate Spire User manual

Promate
Promate Rustic-2 User manual

Promate
Promate bikerMate User manual

Promate
Promate Globo-2 User manual

Promate
Promate bluRock2 User manual

Promate
Promate wee User manual

Promate
Promate Ape User manual

Promate
Promate Safari User manual

Promate
Promate Bonsai-Qi User manual

Promate
Promate Hummer User manual