Promate JoyfulJazz User manual

Mini Wireless Speaker with Handsfree
Easy-Touch Control • MicroSD Card Slot • AUX Port
JoyfulJazz

1
English
Introduction
This fun yet functional Speaker will be the heart and soul of your party. Small enough to t in your
pocket and loud enough for a picnic. Its wireless technology connects with compatible devices up to
10m away and allows you to control your music via the easy control buttons on the compact speaker –
so you do not have to take your phone out of your pocket. It’s fun designs act as an ideal gift to let
someone you know what you think about them. Get jamming with this fun speaker.
• Speaker
• AUX Cable
• USB Charging Cable
• User Guide
Packaging Contents
Specication
• Bluetooth Version: v2.1 + EDR
• Bluetooth Chipset: JianRong
• Bluetooth Frequency: 2.4GHz
• Bluetooth Proles: A2DP, AVRCP , HSP
• Battery Type: Li-Polymer
• Battery Capacity: 250mAh
• Power Input: 5V, 1A
• Speaker Output: 3W
• Impedance:4 Ω
• Operating Distance: 10m
• Music Playback Time: 2-3 Hours
• Charging Time: 1.5-2 Hours
Features
• High Denition Speaker: A multi-function 3watt speaker with enhanced sound drivers that takes your music
listening experience on to the next level
• Multiple Connectivity Options: Play your favourite tracks via various connectivity options available. Play it
wirelessly or via the 3.5mm audio jack or the microSD card slot.
• Call Function: Engage in call function with the built-in hands-free function. The built-in mic features advanced
noise cancellation technology for clear wireless hands-free calling
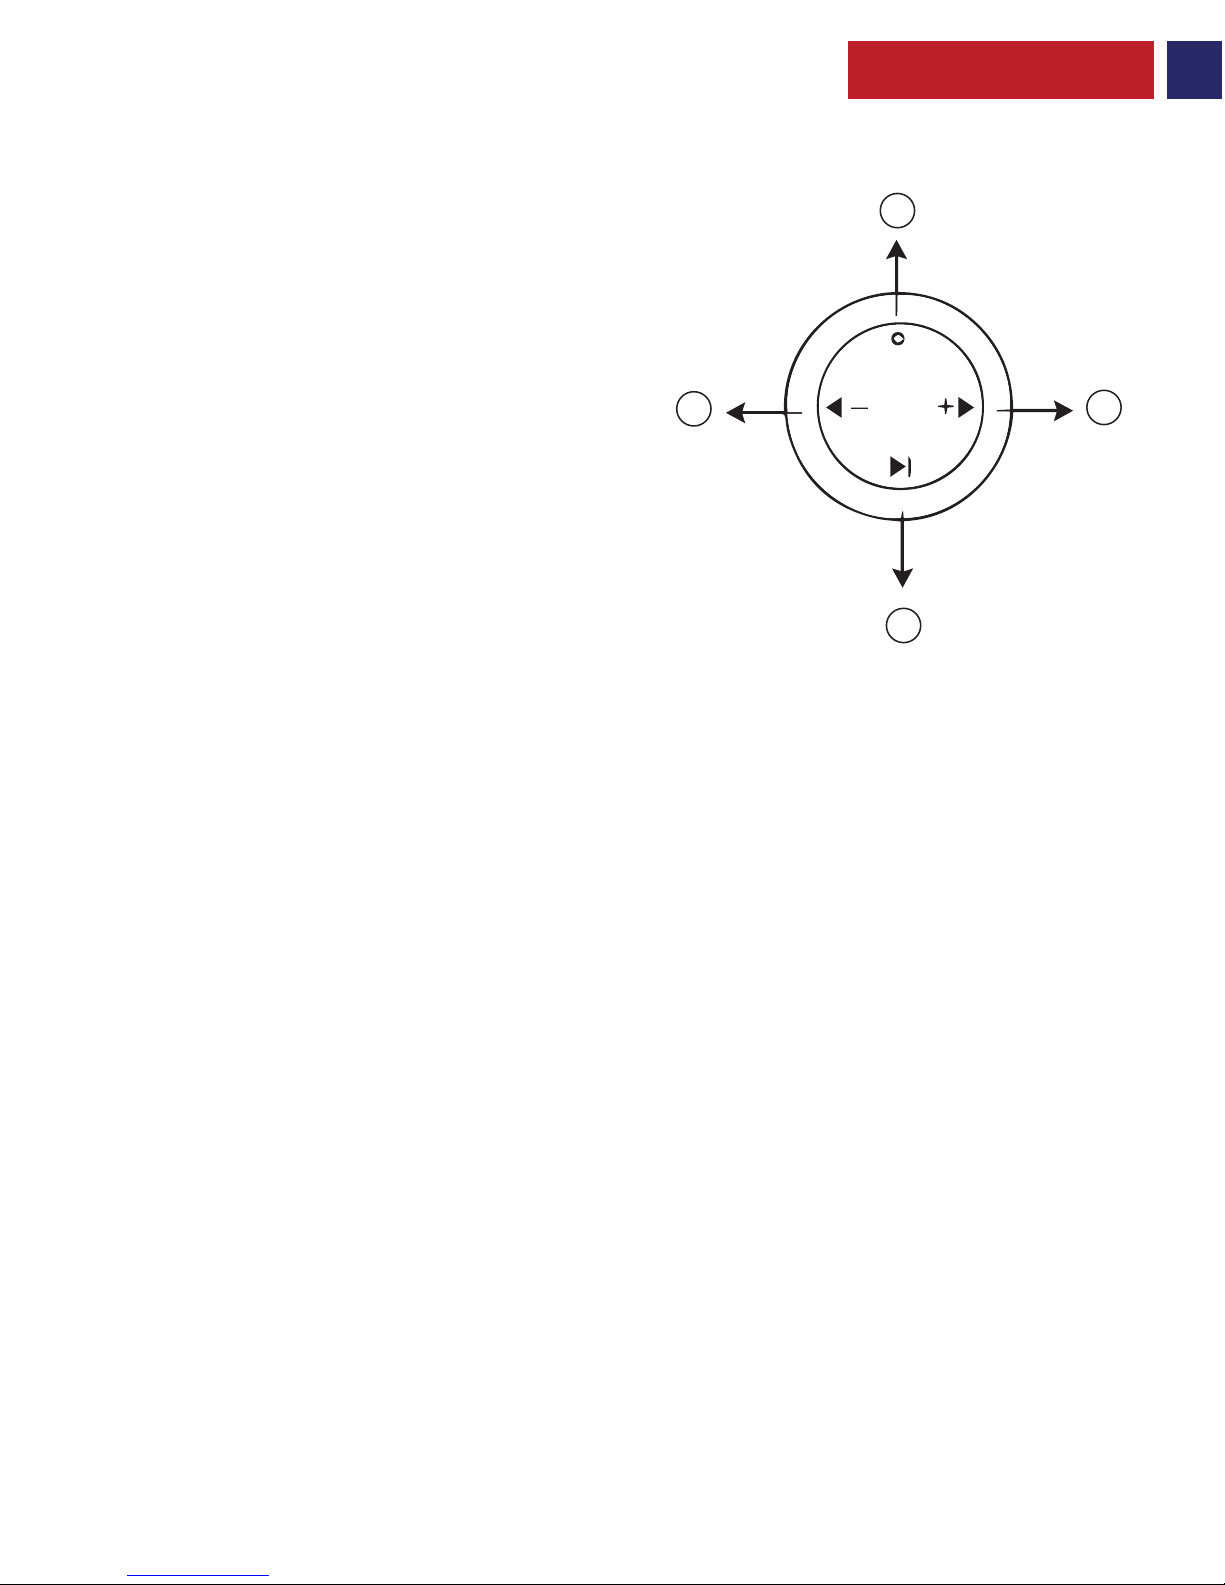
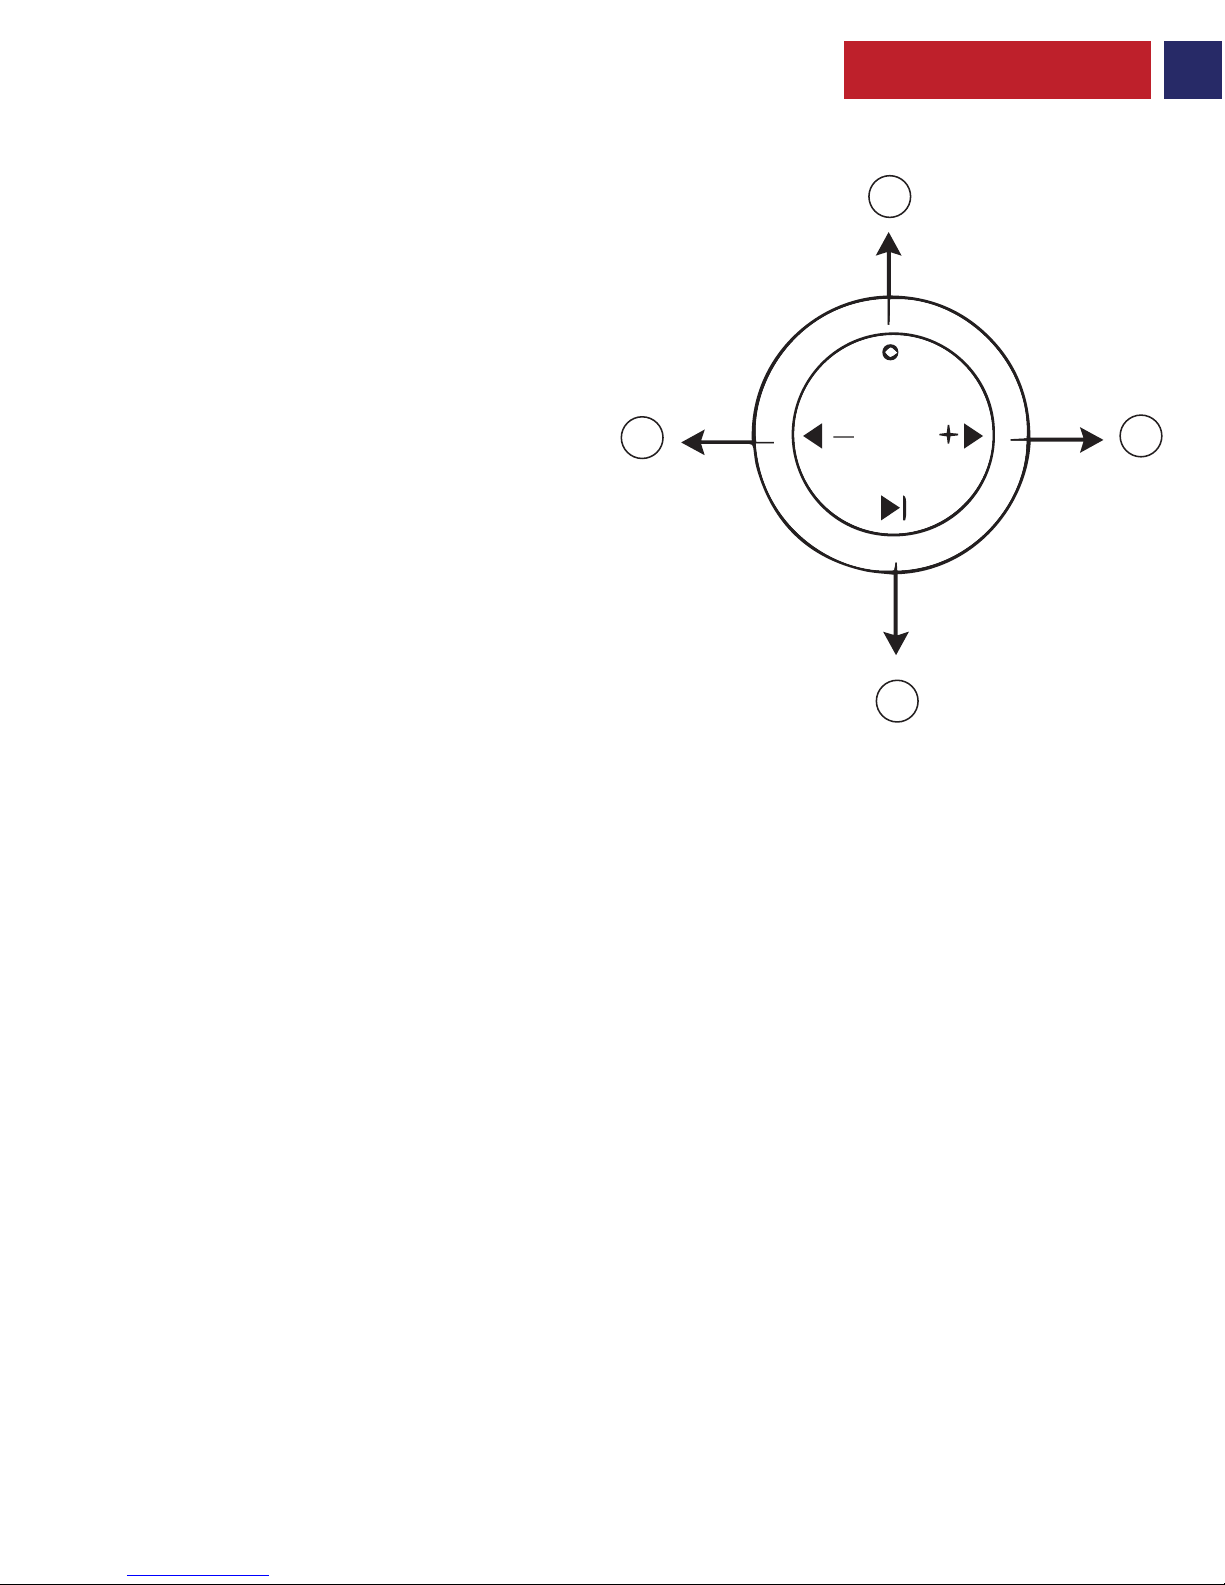
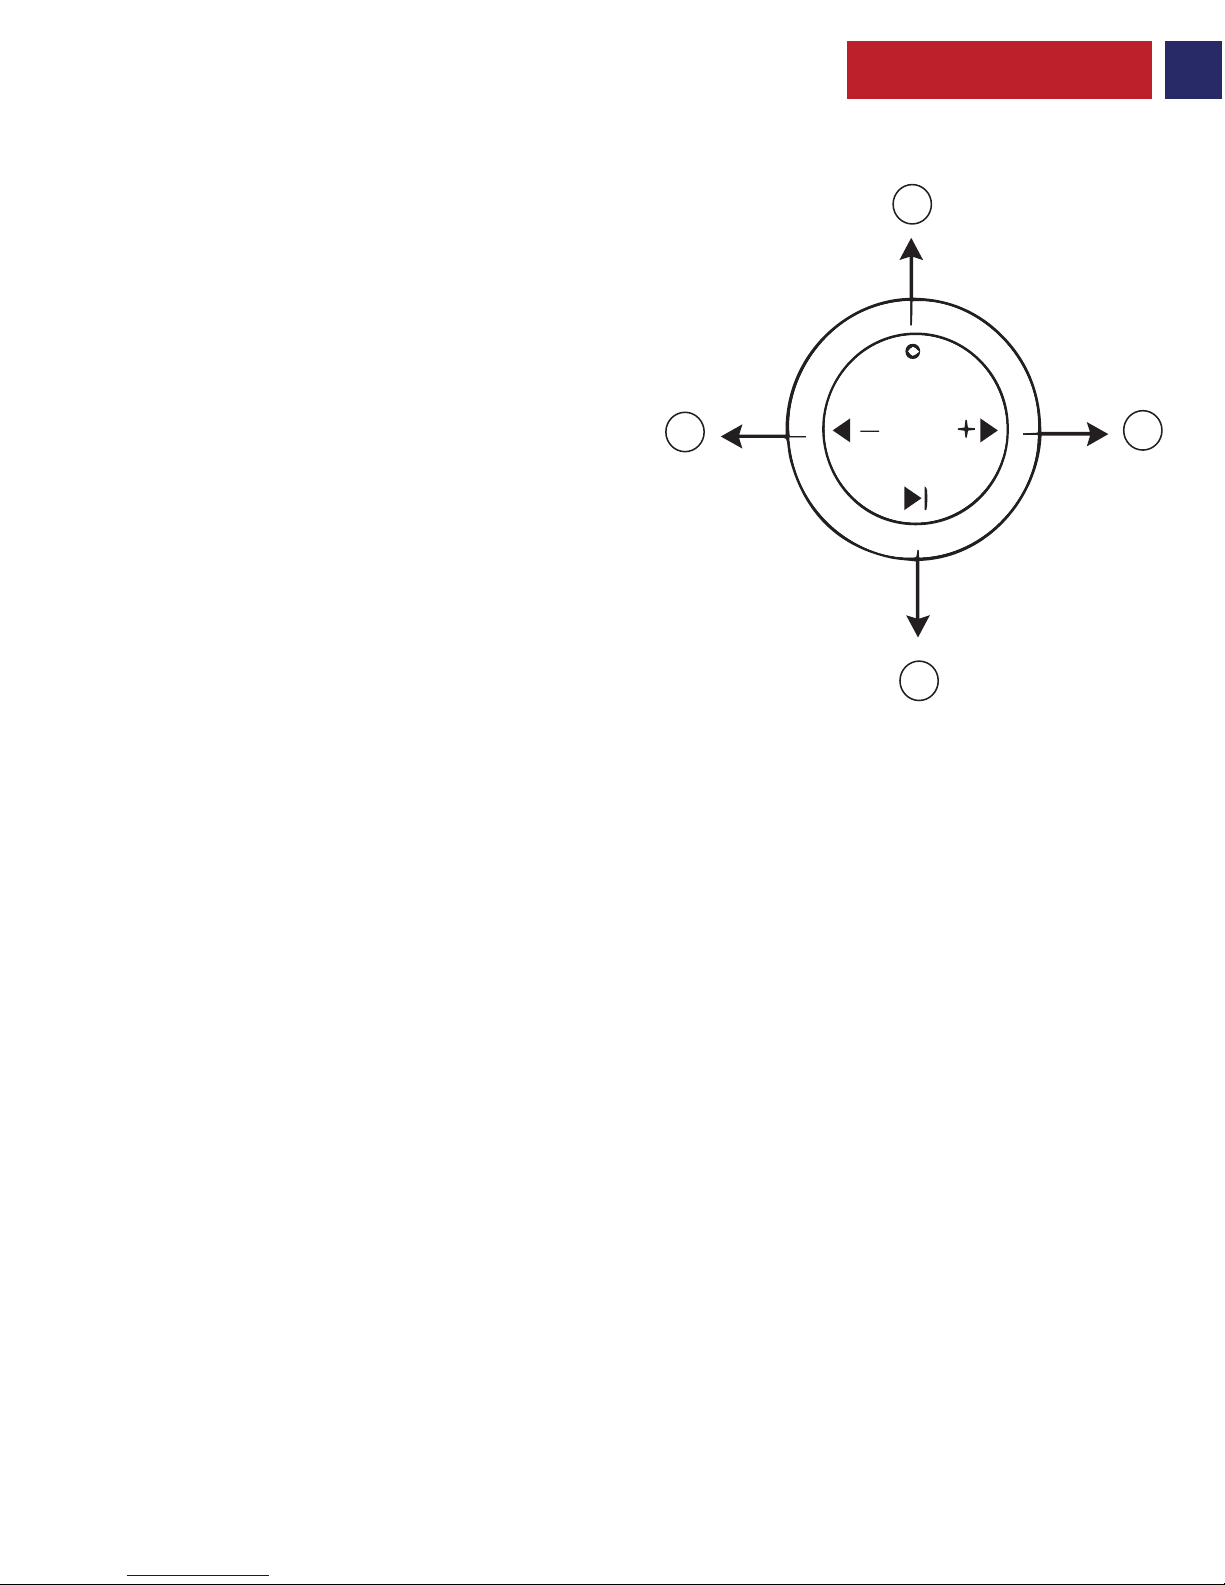
• Easy Music Navigation: Easy navigation through your playlist with the help of a soft touch control panel
• Long Lasting Battery: Play your favourite tracks for up to 3 hours with its 250mAh rechargeable lithium
polymer battery
• Universal Compatibility: This speaker is compatible with all Bluetooth enabled devices

English
2
Precautions
Please read all safety instructions and warnings thoroughly before using this product. Improper use of
this product may result in damage to this or attached products.
• Do not disassemble the device or attempt to x it.
• Kindly use the included cable to charge the product.
• Do not attempt to replace any part of this product.
• Do not crush, puncture or dispose of in re.
• Do not store or use the battery in a high-temperature environment, including intense sunlight or
heat.
• Avoid excessive drops, bumps, abrasions and impacts.
• If there is any reason to believe that there is internal damage to the device, discontinue using
immediately.
• If you nd that the device is too hot, is emitting an odour, or is deformed, punctured or exhibits any
suspicious or abnormal behaviour, discontinue use immediately and contact our customer service.
• Always charge this product before extended storage.

English
3
Appearance & Interface Description
1. Power Button
2. Next Track / Vol+ Button
3. Play/Pause Button
4. Previous Track / Vol- Button
1. Charging The Speaker
• Use the provided cable to charge the Speaker.
• Connect one end of the USB Cable provided to The Speaker and the other end to any 5V/1A USB Power
Socket.
2. Turning The Speaker On/Off
• To turn on The Speaker, press and hold the Power button until the Blue LED starts flashing.
• To turn off The Speaker, press and hold the Power button until the Blue LED turns off.
3. Bluetooth Pairing
• The Speaker automatically enters into Bluetooth pairing mode once powered on.
• Turn on the Bluetooth function on your device and select the speaker name in the available devices list.
• Some Bluetooth devices may require you to enter a passcode to pair your device to The Speaker. Enter
“0000” and press submit.
4. Playing Music via Auxiliary Connection:
• Connect your device to The Speaker via the 3.5mm Aux cable provided.
• The speaker will automatically enter into auxiliary playback mode.
• Then select the track you wish to play from your connected device.
Operation Instructions:
1
2
3
4

English
4
Troubleshooting
5. Playing Music via MicroSD Card
•
Insert a microSD card into the microSD card slot on The Speaker.
•
The speaker will automatically enter into MicroSD playback mode and start playing the first song on the
MicroSD card.
•
Use the Track Control buttons to traverse through the multiple files on the MicroSD card.
6.Controlling Music Playback (Only under Bluetooth & microSD card mode)
• Skip to the next track by pressing the “Next Track” button.
• Skip to the previous track by pressing the “Previous Track” button.
7. Volume Control
• Control volume via the paired devices or by long pressing the “Next Track” or “Previous Track” buttons
on The Speaker.
1. The Speaker does not pair with a Bluetooth device:
• Check if the Bluetooth hardware on your device supports A2DP prole which is necessary for sound
transmission over Bluetooth.
2. Unable to play music les stored on the MicroSD card:
• Check the le format of your music les.
• The Speaker only supports MP3/WMA/WAV le formats.
• We would recommend formatting the MicroSD card to FAT32 le format.

5
Spanish
Aspecto y descripción de la interfaz
1. Botón de encendido
2. Pista siguiente / Botón para subir el volumen (Vol+)
3. Botón Reproducción/Pausa
4. Pista anterior / Botón para bajar el volumen (Vol-)
1. Cargar el altavoz
• Use el cable que viene con el altavoz para cargarlo.
• Conecte un extremo del cable USB incluido al altavoz y el otro extremo a cualquier toma de
alimentación USB de 5V / 1A.
2. Apagar y encender el altavoz
• Para encender el altavoz, presione y mantenga presionado el botón de encendido hasta que la luz LED
azul comience a parpadear.
• Para apagar el altavoz,presione y mantenga presionado el botón de encendido hasta que la luz LED azul
se apague.
3. Vinculación Bluetooth
• El altavoz entra automáticamente en modo vinculación Bluetooth una vez que está encendido.
• Active la función Bluetooth en su dispositivo y selecciones el nombre del altavoz de la lista de
dispositivos disponibles.
• En algunos dispositivos Bluetooth puede ser necesario que introduzca una contraseña para vincular su
dispositivo con el altavoz. Introduzca “0000” y presione “enviar”.
4. Reproducir música a través de una conexión auxiliar:
• Conecte su dispositivo al altavoz a través del cable auxiliar de 3,5 mm que vienen con el altavoz.
• El altavoz entrará automáticamente en modo de reproducción auxiliar.
• Luego seleccione la pista que desea reproducir en su dispositivo conectado.
Instrucciones de usot
1
2
3
4

Spanish
6
Resolución de problemas
5. Reproducir música a través de una tarjeta MicroSD
•
Inserte la tarjeta MicroSD en la ranura para tarjetas MicroSD del altavoz.
•
El altavoz entrará automáticamente en modo de reproducción de tarjeta MicroSD y comenzará a
reproducir la primera canción de la tarjeta MicroSD.
•
Use los botones de control de pistas para navegar por los múltiples archivos de la tarjeta MicroSD.
6. Controlar la reproducción de música (solamente en el modo Bluetooth y tarjeta MicroSD)
• Pase a la siguiente pista presionando el botón “Pista siguiente”.
• Retroceda a la pista anterior presionando el botón “Pista anterior”.
7. Control de volumen
• Controle el volumen a través de los dispositivos vinculados o manteniendo presionados los botones
“Pista siguiente” o “Pista anterior” del altavoz.
1. El altavoz no se vincula con el dispositivo Bluetooth:
• Compruebe que el equipo Bluetooth de su dispositivo es compatible con el perl A2DP; esencial para
la transmisión de sonido por Bluetooth.
2. No puede reproducir archivos de música almacenados en la tarjeta MicroSD:
• Compruebe el formato de sus archivos de música.
• El altavoz solo es compatible con archivos de formato MP3/WMA/WAV.
• Recomendamos darle formato FAT32 a la tarjeta MicroSD.

7
French
Description de l'aspect et de l'interface :
1. Bouton de mise en marche
2. Piste suivante/ Bouton Volume+
3. Bouton Lecture/Pause
4. Piste précédente/ Bouton Volume-
1. Charger L'enceinte
• Utiliser le câble fourni pour charger l'enceinte.
• Connecter une extrémité du câble USB fourni à l'enceinte et l'autre à une prise d'alimentation USB
5V/1A.
2. Allumer/éteindre l'enceinte
• Pour allumer l'enceinte, appuyer et maintenir le bouton de mise en marche jusqu'à ce que le LED bleu
commence à clignoter.
• Pour éteindre l'enceinte, appuyer et maintenir le bouton de mise en marche jusqu'à ce que le LED bleu
s'éteigne.
3. Couplage Bluetooth
• L'enceinte entre automatiquement en mode de couplage Bluetooth, une fois mise en marche.
• Activer la fonction Bluetooth de votre périphérique et sélectionner le nom de l'enceinte dans la liste
des périphériques disponibles.
• Certains périphériques Bluetooth peuvent exiger un code pour coupler votre périphérique avec
l'enceinte. Entrer "0000" et appuyer sur Valider.
4. Écouter de la musique à partir d'une connection auxiliaire:
• Connecter votre périphérique à l'enceinte par le câble 3.5mm Aux fourni.
• L'enceinte va entrer automatiquement en mode de lecture auxiliaire.
• Sur le périphérique connecté, sélectionner la piste que vous souhaitez lire.
Mode d'emploi
1
2
3
4

French
8
Dépannage
5. Écouter de la musique à partir d'une carte MicroSD.
•
Insérer la carte microSD dans la fente pour carte microSD de l'enceinte.
•
L'enceinte va entrer automatiquement en mode de lecture MicroSD et commencer à lire le premier
morceau de la carte MicroSD.
•
Utiliser les boutons de choix de piste (Track Control) pour parcourir les différents fichiers de la carte
Micro SD.
6. Contrôler la lecture de musique (Seulement en mode Bluetooth & microSD card)
• Pour sauter vers la piste suivante, appuyer brièvement le bouton “Next Track”.
• Pour sauter vers la piste précédente, appuyer brièvement le bouton “Previous Track”.
7. Contrôle du volume
• Contrôle du volume à partir des périphériques couplés ou par un long appui sur les boutons “Next
Track” ou “Previous Track” de l'enceinte.
1. L'enceinte n'est pas couplé avec le périphérique Bluetooth:
• Vérier si le matériel Bluetooth de votre périphérique supporte le prole A2DP, nécessaire à la
transmission de son par Bluetooth.
2. Impossible de lire des chiers de musique stockés sur la carte MicroSD:
• Vérier le format de vos chiers de musique.
• L'enceinte supporte uniquement les formats MP3/WMA/WAV.
• Nous vous recommandons de formater la carte MicroSD en format FAT32.

9
German
Aussehen & Schnittstellenbeschreibung
1. Netztaste
2. Nächster Titel / Vol+ -Taste
3. Play/Pause-Taste
4. Vorheriger Titel / Vol- -Taste
1. Laden des Lautsprechers
• Verwenden Sie das mitgelieferte Kabel, um den Lautsprecher zu laden.
• Verbinden Sie das eine Ende des mitgelieferten USB-Kabels mit dem Lautsprecher und das andere mit
einer 5V/1A USB-Netzbuchse.
2. Ein-/Ausschalten des Lautsprechers
• Zum Einschalten des Lautsprechers halten Sie die Netztaste gedrückt bis die blaue LED blinkt.
• Zum Ausschalten des Lautsprechers halten Sie die Netztaste gedrückt bis die blaue LED ausgeht.
3. Bluetooth-Pairing
• Nach dem Einschalten geht der Lautsprecher automatisch in den Bluetooth-Pairingmodus.
• Schalten Sie die Bluetooth-Funktion an Ihrem Gerät ein und wählen den Lautsprechernamen aus der
List der verfügbaren Geräte aus.
• Bei einige Bluetooth-Geräten muß ein Passcode eingegeben werden, um Ihr Gerät mit dem
Lautsprecher zu koppeln. Geben Sie „0000” ein und bestätigen Sie diese.
4. Abspielenn von Musik über den Hilfsanschluss:
• Verbinden Sie Ihr Gerät mit dem Lautsprecher über das mitgelieferte 3.5mm Aux-Kabel.
• Der Lautsprecher geht jetzt automatisch in den Aux-Wiedergabemodus.
• Dann wählen Sie den Titel, den Sie von Ihrem verbundenen Gerät hören möchten.
Bedienungsanleitungt
1
2
3
4

German
10
Fehlersuche
5. Abspielen von Musik über MicroSD-Karte
•
Legen Sie eine microSD-Karte in den microSD-Kartenschlitz des Lautsprechers ein.
•
Der Lautsprecher geht jetzt automatisch in den MicroSD-Wiedergabemodus und spielt den ersten Titel
auf der MicroSD-Karte.
•
Verwenden Sie die Titelbedienungstasten, um durch die vielen Dateien auf der MicroSC-Karte zu
gehen.
6. Regeln der Musikwiedergabe (nur im Bluetooth & microSD-Kartenmodus)
• Springen Sie zum nächsten Titel durch Drücken der Taste „Nächster Titel“.
• Springen Sie zum vorherigen Titel durch Drücken der Taste „Vorheriger Titel“.
7. Lautstärkenregelung
• Regeln Sie die Lautstärke über die gekoppelten Geräte oder durch längeres Drücken der Tasten
„Nächster Titel“ oder „Vorheriger Titel“ an dem Lautsprecher.
1. Der Lautsprecher paart sich nicht mit einem Bluetooth-Gerät:
• Überprüfen Sie, ob die Bluetooth-Hardware Ihres Gerätes das A2DP-Prol unterstützt, welches für die
Tonübertragung über Bluetooth notwendig ist.
2. Es können keine Musikdateien abgespielt werden, die auf der MicroSD-Karte gespeichert sind:
• Überprüfen Sie das Dateiformat Ihrer Musikdateien.
• Der Lautsprecher unterstützt nur die Dateiformate MP3/WMA/WAV.
• Wir empfehlen die Formatierung der MicroSD-Karte auf das Dateiformat FAT32.

11
Portuguese
Aparência e descrição do interface
1. Botão de Ligar/Desligar
2. Botão de Faixa seguinte/ +Vol
3. Botão de Reprodução/Pausa
4. Botão de Faixa anterior/-Vol
1. Carregar o altifalante
• Use o cabo fornecido para carregar o altifalante.
• Ligue uma extremidade do cabo USB fornecido ao altifalante e a outra extremidade a qualquer tomada
USB 5V/1A.
2. Ligar e desligar o altifalante
• Para ligar o altifalante, pessione e mantenha premido o botão de Ligar/Desligar até que o LED Azul
comece a piscar.
• Para desligar o altifalante, pressione e mantenha premido o botão de Ligar/Desligar até que o LED azul
se apague.
3. Emparelhamento do Bluetooth
• O altifalante aciona automaticamente o Bluetooth ao ligar o modo de emparelhamento.
• Ligue a função Bluetooth no seu dispositivo e selecione o nome do altifalante na lista de dispositivos.
• Alguns dispositivos com Bluetooth podem solicitar um código para emparelhar o seu dispositivo com o
altifalante. Digite “0000” e toque em submeter.
4. Reproduzir música com a ligação auxiliar:
• Ligue o seu dispositivo ao altifalante com o cabo Aux de 3,5mm fornecido.
• O altifalante entra automaticamente em modo de reprodução com ligação auxiliar.
• A seguir, escolha a faixa que quer reproduzir a partir do dispositivo que está conectado.
Instruções de utilização
1
2
3
4

Portuguese
12
Resolução de Problemas
5. Reproduzir música com cartão MicroSD
•
Insira o cartão microSD na ranhura para cartões microSD do altifalante.
•
O altifalante entrará automaticamente em modo de reprodução do microSD e começará a reproduzir a
primeira música do cartão microSD.
•
Use os botões de controlo de faixa para percorrer os vários arquivos existentes no cartão microSD.
6. Controlar a reprodução de música (apenas em modo Bluetooth e cartão microSD)
• Salte para a faixa seguinte pressionado o botão “Faixa Seguinte”.
• Salte para a faixa anterior pressionado o botão “Faixa Anterior”.
7. Controlar o volume
• Controle o volume com os dispositivos emparelhados ou premindo os botões “Faixa Seguinte” ou
“Faixa Anterior” no altifalante.
1. O altifalante não emparelha com um dispositivo Bluetooth:
• Verifique se o hardware de Bluetooth no seu dispositivo suporta o perfil A2DP que é necessário para a
transmissão de som através de Bluetooth
2. Não é possível reproduzir ficheiros de música guardados no cartão MicroSD:
• Verifique o formato dos seus ficheiros de música.
• O altifalante apenas suporta ficheiros MP3/WMA/WAV.
• Recomendamos a formatação do cartão MicroSD para formato de arquivo FAT32.

13
Romanian
Descrierea aspectului şi interfeţei
1. Buton de alimentare
2. Butonul Piesa următoare / Vol
3. Butonul Redare/Pauză
4. Butonul Piesa anterioară / Vol
1. Încărcarea difuzorului
• Folosiţi cablul furnizat pentru a încărca difuzorul.
• Conectaţi un capăt al cablului USB furnizat la difuzor şi celălalt capăt la orice priză de alimentare USB
de 5V/1A.
2. Pornire/Oprirea difuzorului
• Pentru a porni difuzorul, menţineţi apăsat butonul de alimentare până când ledul albastru începe să
lumineze intermitent.
• Pentru a opri difuzorul, menţineţi apăsat butonul de alimentare până când ledul albastru se stinge.
3. Asocierea prin Bluetooth
• Difuzorul intră automat în modul de asociere prin Bluetooth atunci când este pornit.
• Activaţi funcţia Bluetooth de pe dispozitivul dvs. şi selectaţi numele difuzorului din lista cu dispozitive
disponibile.
• Este posibil ca anumite dispozitive Bluetooth să solicite o parolă pentru a vă asocia dispozitivul la
difuzor. Tastaţi „0000“ şi apăsaţi pe remitere.
4. Redarea de muzică folosind o conexiune auxiliară:
• Conectaţi-vă dispozitivul la difuzor cu ajutorul cablului auxiliar de 3,5 mm furnizat.
• Difuzorul va intra în mod automat în modul de redare al auxiliarului.
• Selectaţi apoi piesa pe care doriţi să o redaţi de pe dispozitivul conectat.
Instrucţiuni de operare
1
2
3
4

14
Romanian
Depanarea
5. Redarea de muzică folosind un card MicroSD
•
Introduceţi un card MicroSD în slotul MicroSD de pe difuzor.
•
Difuzorul va intra în mod automat în modul de redare MicroSD şi va începe să redea prima melodie de
pe cardul MicroSD.
•
Folosiţi butoanele de controlare a pieselor pentru a parcurge mai multe fişiere de pe cardul MicroSD.
6.Controlarea redării muzicii (doar în modul Bluetooth şi microSD)
• Săriţi la piesa următoare apăsând pe butonul „Next track“ (piesa următoare).
• Săriţi la piesa anterioară apăsând pe butonul „Previous track“ (piesa anterioară).
7. Controlarea volumului
• Controlaţi volumul cu ajutorul dispozitivelor asociate sau apăsând lung pe butoanele „Next track“ sau
„Previous track“ de pe difuzor.
1. Difuzorul nu se asociază cu un dispozitiv cu Bluetooth:
• Vericaţi dacă hardware-ul Bluetooth de pe dispozitivul dvs. este compatibil cu prolul A2DP necesar
pentru transmisia de sunete prin Bluetooth.
2. Nu se pot reda şierele cu muzică stocate pe cardul MicroSD:
• Vericaţi formatul de şier pentru şierele dvs. cu muzică.
• Difuzorul poate reda doar şiere cu format MP3/WMA/WAV.
• Vă recomandăm să formataţi cardul MicroSD în format de şier FAT32.

15
Russian
Внешний вид и интерфейс
1. Кнопка питания
2. След. Дорожка / Громкость+
3. Воспроизведение/Пауза
4. Пред. Дорожка / Громкость-
1. Зарядка Speaker
• Используйте для зарядки Speaker прилагаемый кабель.
• Подключите один конец кабеля к Speaker, а другой конец – к любому разъему USB 5V/1A.
2. Включение/выключение Speaker
• Чтобы включить Speaker, нажмите и удерживайте кнопку питания, пока синий светодиод не
начнет мигать.
• Чтобы выключить Speaker, нажмите и удерживайте кнопку питания, пока синий светодиод не
погаснет.
3. Сопряжение Bluetooth
• Speaker автоматически переходит в режим сопряжения Bluetooth при включении.
• Включите функцию Bluetooth на вашем устройстве и выберите ваш плеер в списке доступных
устройств.
• Некоторые Bluetooth-устройства могут требовать пароль для сопряжения с плеером. Введите
пароль “0000”.
4. Воспроизведение музыки с другого устройства через подключение по кабелю:
• Подключите ваше устройство к Speaker через прилагаемый 3.5mm кабель.
• Плеер автоматически перейдет в режим воспроизведения.
• Выберите композицию на подключенном устройстве, которую вы хотите прослушать.
Управление устройством
1
2
3
4

Russian
16
Решение проблем
1. Speaker не сопрягается с устройством Bluetooth:
• Убедитесь, что модуль Bluetooth на вашем устройстве поддерживает профиль A2DP, что
необходимо для передачи звука по Bluetooth.
2. Не удается воспроизвести аудиофайлы с карты MicroSD:
• Проверьте формат ваших аудиофайлов.
• Speaker поддерживает только форматы MP3/WMA/WAV.
• Мы рекомендуем форматировать вашу карту MicroSD в файловом формате FAT32.
5. Воспроизведение музыки с карты MicroSD
•
Вставьте карту microSD в слот для карт microSD.
•
Плеер автоматически перейдет в режим воспроизведения карты MicroSD и начнет проигрывать
первую композицию на карте MicroSD.
•
Используйте кнопки управления дорожками для выбора нужных аудиофайлов на карте MicroSD.
6. Управление воспроизведением (только в режиме Bluetooth и microSD)
• Переходите к следующей дорожке нажатием клавиши «След. Дорожка».
• Переходите к предыдущей дорожке нажатием клавиши «Пред. Дорожка».
7. Управление громкостью
• Управляйте громкостью через сопряженные устройства или нажатием и удерживанием кнопок
«След. Дорожка» и «Пред. Дорожка».

17
Turkish
Görünüm ve Arayüz Tanımı
1. Açma/Kapama Düğmesi
2. Sonraki Parça / Ses+ Düğmesi
3. Çal/Duraklat Düğmesi
4. Önceki Parça / Ses- Düğmesi
1. Hoparlörü Şarj Etme
• Hoparlörü şarj etmek için verilen kabloyu kullanın.
• Verilen USB Kablonun bir ucunu Hoparlöre ve diğer ucunu herhangi bir 5V/1A USB Güç Soketine takın.
2. Hoparlörü Açma/Kapama
• Hoparlörü açmak için, Mavi LED yanıp sönmeye başlayana kadar Açma/Kapama Düğmesine basın ve
basılı tutun.
• Hoparlörü kapamak için, Mavi LED sönene kadar Açma/Kapama Düğmesine basın ve basılı tutun.
3. Bluetooth Eşleme
• Hoparlör açıldığına otomatik olarak Bluetooth eşleme moduna geçer.
• Aygıtınızdaki Bluetooth fonksiyonunu seçin ve kullanılabilir aygıtlar listesinden hoparlör adını seçin.
• Bazı Bluetooth aygıtlar, aygıtı Hoparlör ile eşleme için bir şifre girmenizi gerektirebilir. “0000” girin ve
göndere basın.
4. Harici Bağlantı ile Müzik Çalmak:
• Aygıtınızı verilen 3,5 mm Harici kablo ile Hoparlöre bağlayın.
• Hoparlör otomatik olarak harici kayıttan çalma moduna geçecektir.
• Sonra bağlı aygıtınızdan çalmak istediğiniz parçayı seçin.
İşletme Talimatları
1
2
3
4

Turkish
18
Sorun Giderme
5. MicroSD Kart ile Müzik Çalmak
•
Hoparlör üzerindeki microSD kart yuvasına bir microSD kart yerleştirin.
•
Hoparlör otomatik olarak MicroSD kayıttan çalma moduna geçecek ve MicroSD karttaki ilk şarkıyı
çalmaya başlayacaktır.
•
MicroSD kart üzerindeki birden fazla dosya arasında geçiş yapmak için Parça Kontrol düğmelerini
kullanın.
6. Kayıttan Müzik Çalmayı Kontrol Etmek (Yalnızca Bluetooth ve microSD kart modunda)
• "Sonraki Parça" düğmesine basarak sonraki parçaya geçin.
• "Önceki Parça" düğmesine basarak önceki parçaya geçin.
7. Ses Kontrolü
• Sesi eşlenmiş aygıtlar aracılığıyla ya da Hoparlör üzerindeki "Sonraki Parça" ya da "Önceki Parça"
düğmelerine uzun basarak kontrol edin.
1. Hoparlör bir Bluetooth aygıt ile eşlenmiyor:
• Bluetooth donanımınızın, Bluetooth üzerinden ses aktarımı için gerekli olan A2DP prolini
destekleyip desteklemediğini kontrol edin.
2. MicroSD kart üzerinde depolanan müzik çalınamıyor:
• Müzik dosyalarınızın, dosya formatını kontrol edin.
• Hoparlör yalnızca MP3/WMA/WAV dosya formatlarını destekler.
• MicroSD kartı FAT32 dosya formatında biçimlendirmenizi tavsiye ederiz.

19
Chinese
外观和接口描述
1. 电源按钮
2. 下一首/音量+按钮
3. 播放/暂停按钮
4. 上一首/音量-按钮
1. 给扬声器充电
• 使用提供的数据线为扬声器充电。
• 将提供的USB数据线的一端连接到扬声器,另一端连接到任何5伏/1安的USB电源插座。
2. 打开/关闭扬声器
• 要打开扬声器,请按住电源按钮,直到蓝色LED指示灯开始闪烁。
• 要关闭“扬声器”,请按住电源按钮,直到蓝色LED指示灯熄灭。
3. 蓝牙配对
• 扬声器一旦打开电源,就会自动进入蓝牙配对模式
• 打开设备上的蓝牙功能,然后在可用设备列表中选择扬声器名称。
• 某些蓝牙设备可能需要您输入密码才能将设备与扬声器配对成功。输入“0000”,然后按提交。
4. 通过辅助连接播放音乐:
• 通过提供的3.5毫米辅助数据线将设备连接到扬声器
• 扬声器将自动进入辅助播放模式。
• 然后从连接的设备中选择要播放的曲目。
操作说明
1
2
3
4
Table of contents
Languages:
Other Promate Speakers manuals

Promate
Promate JOBAXL User manual

Promate
Promate streamBox-L User manual

Promate
Promate Silox User manual

Promate
Promate Pyram User manual

Promate
Promate Mulotov User manual

Promate
Promate Cyclone User manual

Promate
Promate Globo-2 User manual

Promate
Promate Hummer User manual

Promate
Promate Safari User manual

Promate
Promate wee User manual

Promate
Promate Prime User manual

Promate
Promate AuraBoom User manual

Promate
Promate bikerMate User manual

Promate
Promate Harmony User manual

Promate
Promate TimeBase-2 User manual

Promate
Promate bikeRock User manual

Promate
Promate bluRock2 User manual

Promate
Promate Sense User manual

Promate
Promate Snowy User manual

Promate
Promate Bonsai-Qi User manual