Promax BLACK WIDOW ELITE User manual

1
BLACK WIDOW ELITE
AC/DC PEAK-DETECTION CHARGER
OPERATIONS SHEET
Black Widow Elite Features:
●AC/DC Input (110V or 12V)
●Peak-Detection Circuitry with Selectable Timed Safety Cutoff
●Selectable Charge Rates from 100mA - 6A
●Charges 1 - 16 NiCD or NiMH Cells
●Built-In, Push-Button Discharger & Auto-Discharge Mode
●Digital LCD Screen Displays:
Voltage, Peak Voltage, Elapsed Time, Discharge Capacity,
Cell Type Selection & Count, Charge Current & Safe Timer
●Reverse Polarity Protection
●Internal Cooling Fan to Reduce Heat
●Easy to Set Up and Use
Product Part # 350364
Included with Your Charger:
●2-Pronged 110V AC Input Cord
●12V DC Input Cord w/Alligator Clips
●Output Cord w/Banana Plugs
Introduction:
Thank you for choosing the Promax Black Widow Elite AC/DC Peak-Detection
charger. This charger is designed to charge 1 (1.2V) to 16 (19.2V)
Nickel-Cadmium or Nickel-Metal Hydride cells ranging from 50mAH and
higher. This charger features an easy to read LCD screen that displays
battery information during the charging process. The charger also features
a one-touch discharger that can be operated in either automatic mode or
"forced" mode. An internal cooling fan is featured to keep the charger cool.
Please read through this operations sheet completely before using your
charger for the first time.
Please Read and Understand the Following Warnings:
●This charger is designed to charge 1.2V - 19.2V NiCD and NiMH battery
packs/cells ONLY. Do not attempt to charge any other type of battery, such
as gel cell, lead-acid, Lithium or Alkaline batteries.
●Never connect the AC power and the DC power input cords at the same
time and never allow the 12V DC alligator clips to touch or short out.
●When the charger is connected to an automotive battery (12V DC power
source) do not start the automobile’s engine. The engine can be running
during the charge process, but starting or turning off the engine during the
charge process can damage the charger and/or your battery pack.
●Do not allow children to use the charger without adult supervision.
●Never leave the charger connected to a power source when not in use.
●Never leave the charger unattended when the charger is in use.
●Never place the charger on a carpeted surface during use.
●Always disconnect the battery pack from the charger if the battery pack
becomes unusually warm or hot.
●Avoid using the charger in direct sunlight. Direct sunlight can cause the
charger to overheat and/or the LCD screen to be damaged.
●Always check the battery pack's polarity and condition before connecting it
to the charger.
●If using the charger to charge Tx battery packs, you must remove the
battery pack from the Tx first. Do not attempt to charge the battery pack
while still in the Tx.
●Always allow the battery pack to cool before recharging it.
Black Widow Elite Safety Features:
●If the battery pack polarity is reversed or if the battery pack has a short
circuit, the charger will shut off and the LEDs on the front of the charger will
blink rapidly. If this happens, unplug the battery pack from the charger
and double-check all wires for polarity and short circuits before reattaching
the battery pack to the charger.
●The charger features a manually selectable maximum charge time that
can be set to prevent your battery from overcharging. If the battery pack
malfunctions or misses the “peak," the timer will automatically stop the
charging process after the elapsed time you've input into the charger.
Black Widow Elite Flow Chart:
Continued On Next Page
☛☛
☛☛
☛
LCD Screen Options:
Screen options can be cycled by briefly pressing the MODE button.
Voltage: Indicates the current voltage of the battery.
Peak Voltage: Indicates the maximum voltage the battery was able to hold
during the current charge cycle.
Elapsed Time: Indicates the amount of time taken to charge the battery.
mAH Discharged: Indicates the total milliampere hours discharged from
the battery during the discharge process.
Cell Type/Cell Count: Indicates the type of cells and the cell count. The
charger can charge 1 - 16 NiMH or NiCD cells.
Charge Current: Indicates the charge rate from 100mA - 6A. The charge
rate is adjustable in 50mA increments.
Safety Timer Set: Indicates the maximum time that the charger will charge
before stopping the charge cycle. The safety timer is adjustable in 10 minute
increments from 10 minutes to 20 hours.

2
Connecting Your Black Widow Elite Charger:
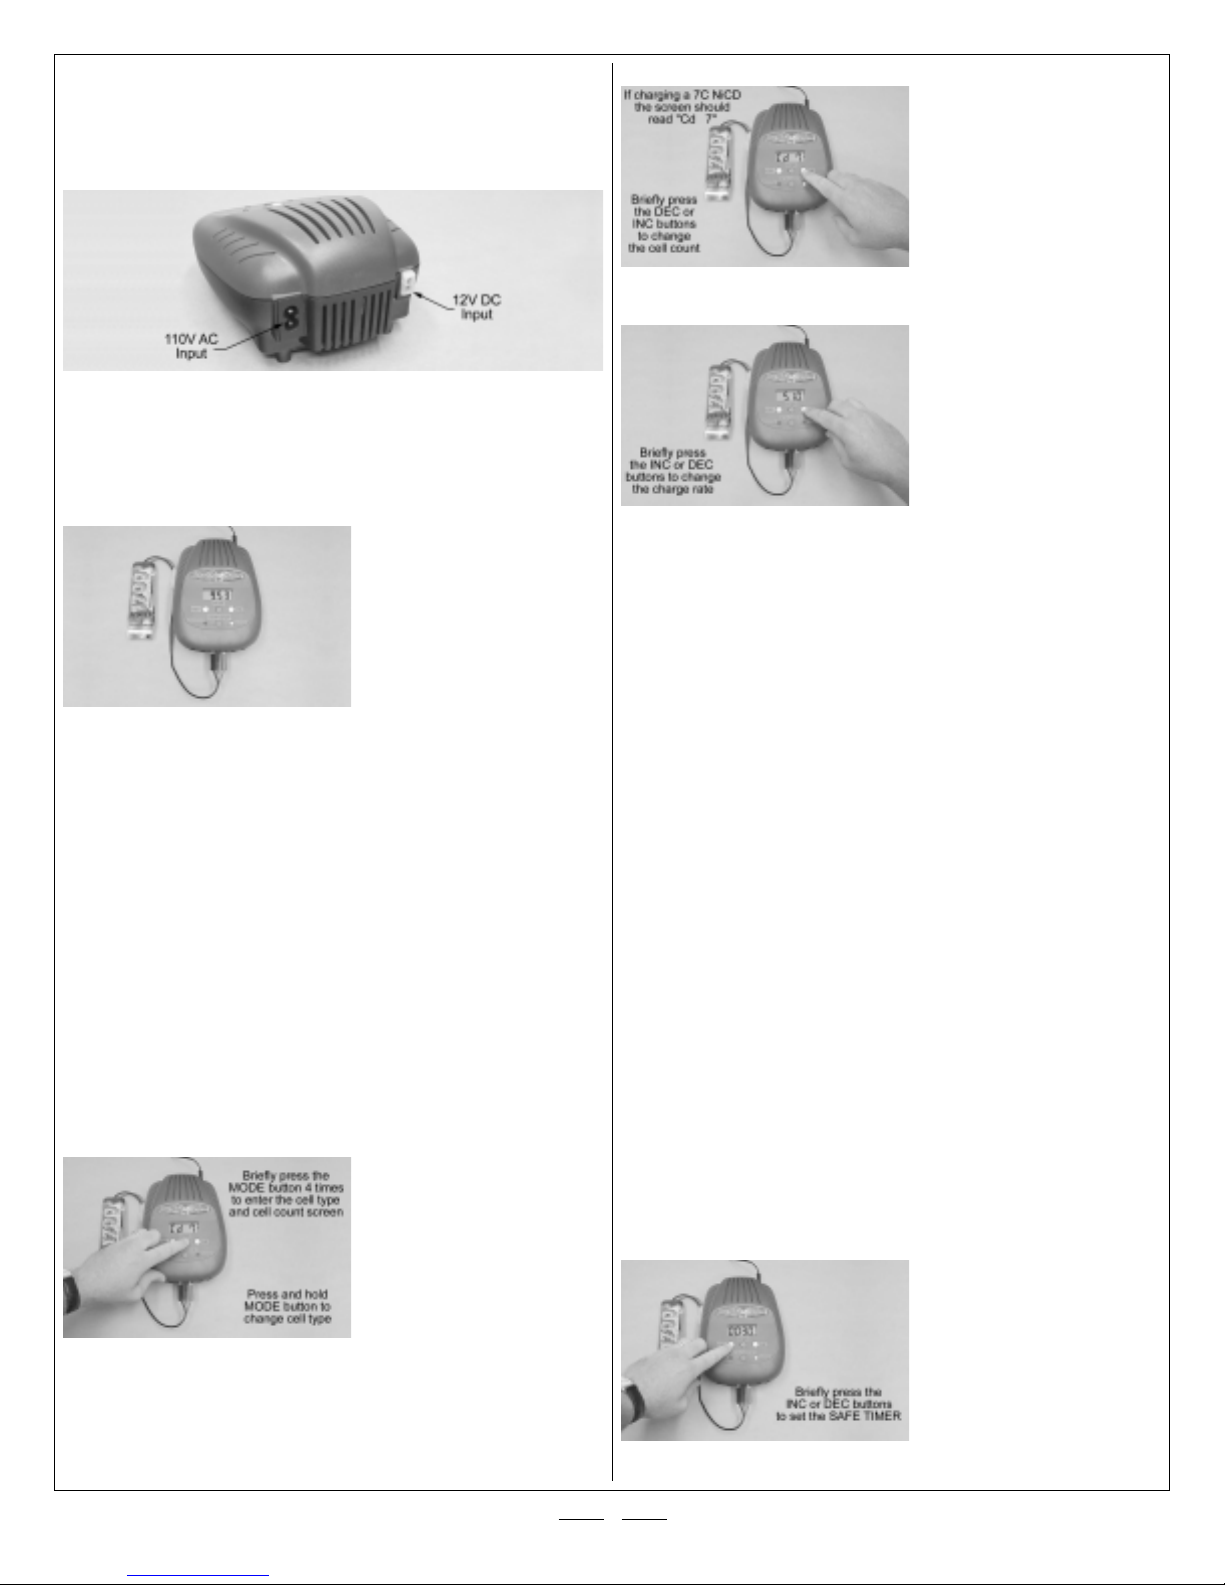
●Plug the desired input cord into the back of the charger (either 12V DC or
110V AC), then plug the input cord into the power source. The charger will
chime and the CHARGE light will begin to blink. If you're charging more
than 8 cells, you will need to connect the charger to a 12V DC power source.
WARNING Never plug the charger into a 220V power source and never
connect the charger to a 12V DC and a 110V AC power source at the same
time. Only use one desired power source at a time. If connecting the charger
to a 12V DC power source, make sure to attach the red alligator clip to the
positive terminal and the black alligator clip to the negative terminal.
●Plug the banana plugs on the output cord into the front of the charger,
making sure that the polarity is
correct (red to red and black to
black), then connect your battery
to the output cord.
IMPORTANT If the connector on
your battery is different from the
connector on the output cord, you
will need to change the connector
on the output cord. If you do, double-check that the polarity is correct when
you install your new connector.
●When you connect your battery, the CHARGE light will continue to blink and
the LCD screen will show the current voltage of the battery as indicated by the
"V" on the LCD screen. If no battery is connected, the voltage will read "0.00".
Using the Black Widow Elite Charger:
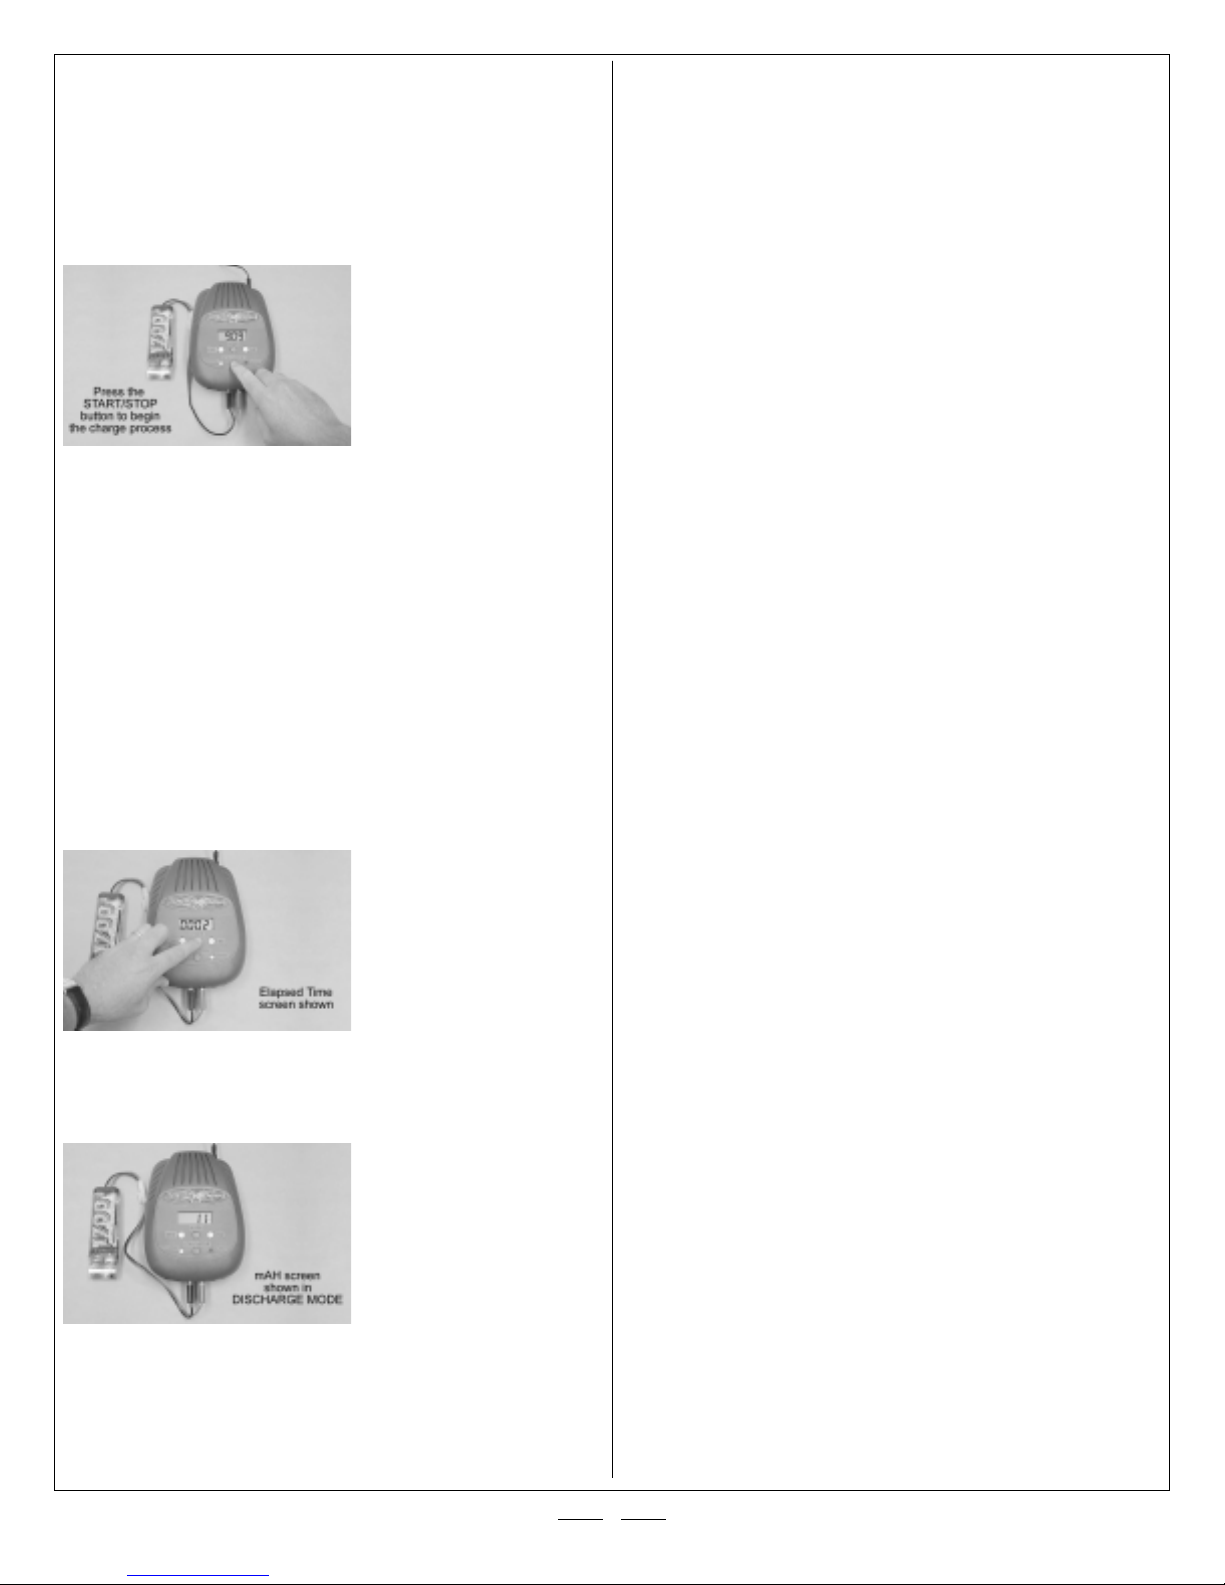
To charge your battery, you must follow the steps below:
1) Choose a Cell Type -Either NiMH or NiCD
2) Choose the Number of Cells
3) Choose a Charge Rate
4) Set the Safe Timer
5) Begin the Discharge/Charge Cycle or Force Charge w/o Discharge
IMPORTANT The charger will only charge 1-8 cells using a 110V
AC or 12V DC power source. To charge 9-16 cells, you must use a
12V DC power source only.
●To choose the cell type, from the VOLTAGE screen briefly press the MODE
button 4 times to enter the CELL
TYPE/CELL COUNT screen as
indicated by "CELLS" on the LCD
screen.
●Now, choose the cell type (either
NiMH or NiCD) by pressing and
holding the MODE button for 3
seconds. The cell type will change
as indicated by "Cd" or "H" on the LCD screen. If your battery has NiCD
cells, choose the "Cd" cell type. If your battery has NiMH cells, choose the
"H" cell type.
WARNING Never charge a NiMH battery using the NiCD cell type and never
charge a NiCD battery using the NiMH cell type. Never attempt to charge
any other type of cell, such as LiPO, gel cell, lead acid or Alkaline.
●Next, choose the number of cells by briefly pressing the INC or DEC
buttons. The cell count should be
the same as the number of cells in
your battery as indicated on the
LCD screen.
WARNING The cell count you
input into the charger MUST match
the number of cells in your battery.
If not, the battery will not charge
properly and damage to your battery and/or charger could occur.
●After selecting the cell type and cell count, briefly press the MODE button
once to enter the CHARGE
CURRENT screen, as indicated by
"Amps" on the LCD screen.
●Select the charge rate by briefly
pressing the INC or DEC buttons
until the desired charge rate is
selected as indicated on the LCD
screen. Notice that the charge rate
can be adjusted in 50mA increments from 100mA - 6A. The maximum
charge rate for NiMH cells is 5A. See the table below for recommended
charge rates:
Recommended Charge Rates
We recommend choosing a charge rate for NiMH batteries that is close to
the batteries' rated mAH capacity (e.g., charge a 2000mAH NiMH battery at
no more than 2 amps). For NiCD batteries, we recommend choosing a charge
rate that is 1-3 times the batteries' rated mAH capacity (e.g., charge a
1400mAH NiCD battery at 2-4 amps).
NiCD Charge Rates NiMH Charge Rates
100-900mAH - 100mA-900mA 100-900mAH -- 100mA-900mA
1000mAH --- 1A -3 A 1000mAH --- 1A
1200mAH --- 2A - 3A 1200mAH ---1A
1400mAH --- 2A - 4A 1400mAH ---1A
1600mAH --- 2A - 5A 1600mAH ---1A - 2A
1800mAH --- 2A - 5A 1800mAH ---1A - 2A
2000mAH --- 2A - 6A 2000mAH ---2A
2400mAH --- 3A - 6A 2400mAH ---2A
2800mAH --- 3A - 6A 2800mAH ---3A
3000mAH --- 3A - 6A 3000mAH ---3A
Sample average charge time for a 1600mAH battery charged at:
1Amp is 96 minutes
2Amps is 48 minutes
4Amps is 24 minutes
IMPORTANT Batteries may be charged at different rates depending on the
manufacturer’s suggestions. The table above is for general reference only
and errs on the side of caution.
●After setting the charge rate, briefly press the MODE button once to enter
the SAFE TIMER screen as
indicated by "SAFE TIME" on the
LCD screen.
●Set the SAFE TIMER by briefly
pressing the INC or DEC buttons
to increase or decrease the
internal timer. The SAFE TIMER
should be set slightly higher than
the estimated charge time of the battery. The charge time can be estimated
by calculating the mAH rating of the battery and the charge rate. As an
Continued On Next Page
☛☛
☛☛
☛
The maximum
charge rate for
NiMH cells
is 5A
1000mA in 1A
1600/4000=0.4x60=24 Minutes

3
example, if charging a 2000Mah battery at 4 amps, it will take approximately
30 minutes to charge, therefore, you should set the SAFE TIMER to 50
minutes. If for some reason the battery misses its "peak" the charger will
stop charging after a total of 50 minutes. This safety feature helps prevent
overcharging and damaging your battery.
●After selecting the time of the SAFE TIMER, briefly press the MODE
button once more to go back to the VOLTAGE screen.
●Press the START/STOP button to begin the charge process. If you're
charging a NiCD battery, the
charger will by default begin to
discharge the battery, hold for 20
minutes, then charge the battery.
If you're charging a NiMH battery,
by default the charger immediately
goes into charge mode without first
discharging the battery. If you
need to stop the discharge or
charge process before the cycle is complete, briefly press the START/STOP
button again or disconnect the battery from the charger.
IMPORTANT If there is a battery error (i.e., reversed polarity or internal
short) both LEDs will blink rapidly shortly after you press the START/STOP
button. If this occurs, remove the battery from the charger and check all
connections and battery integrity before attempting to charge the battery again.
●At the end of the charge process, the charger will detect when the battery
reaches its peak and stop fast charging. At this point, the charge LED will
begin to blink indicating that the charger is now in trickle mode and that the
battery is ready for use.
IMPORTANT The charge rate in trickle mode is calculated as Charge Rate/16.
As an example, if you've charged your 2000Mah NiCD battery at 4 amps, the
trickle charge rate would be 250mA.
Using the LCD Screen During the Charge Process:
●During the charge process you can briefly press the MODE button to cycle
through the LCD screen menus
and view the different parameters
of the charge process. You can
view current battery voltage, peak
voltage, total elapsed time and
mAH discharged.
Using the Discharger and Forced Charge/Discharge Modes:
●When you begin the charge process with a NiCD battery, the charger
automatically goes into DISCHARGE MODE, then after discharging the
battery, switches to HOLD MODE
for 20 minutes (counted down on
the Elapsed Timer) to allow the
battery to cool, then goes into
CHARGE MODE. This method of
discharging and charging NiCD
batteries prevents the cells from
forming a "memory" and is
therefore highly recommended
for long battery life and consistent performance. While in DISCHARGE
MODE you can view the discharge amount in mAH by briefly pressing
the MODE button until you reach "mAH" as indicated on the LCD screen.
IMPORTANT The discharger discharges at a rate of 1A and discharges
each cell down to a safe voltage of 0.9V per cell.
●If you don't want the charger to discharge your NiCD battery before
charging it, you can FORCE CHARGE the battery. To do this, press and
hold the START/STOP button. The charger will go into DISCHARGE MODE.
Keep holding the START/STOP button and the charger will switch to CHARGE
MODE after 3 seconds.
●If you would like to FORCE DISCHARGE your NiMH battery, simply press
and hold the START/STOP button for 3 seconds and the charger will go into
DISCHARGE MODE. After discharging, the charger will go into the ready
stage as indicated by the blinking CHARGE light. To charge the battery,
briefly press the START/STOP button.
IMPORTANT We suggest allowing 10 - 20 minutes for the battery to cool
before charging it after the discharge process. This will prevent the battery
from getting too hot and damaging it.
Charging Tips:
●Always unplug the charger when you are finished charging.
●Let the charger cool between uses, especially on hot or humid days.
●If the charger stops charging in a very short period of time, or if the
battery is still very cool, the battery may have already been charged or it
may have “false peaked.” If this occurs, simply press the START/STOP
button to restart the charge process.
●New batteries should be charged at the lowest recommended charge rate
for the first 3 charging cycles. This will ensure your batteries' long life and
optimal capacity.
●Always use your charger on a hard surface. Never use it while setting on
carpeted surfaces. Carpeted surfaces will block the cooling vents on the
bottom of the charger, which can cause the charger to overheat during use.
●If the battery becomes hot to the touch during the discharge or charge
process, remove it from the charger immediately.
●You can use the FORCE DISCHARGE mode to discharge and charge new
NiMH batteries. Do this 3 times as described above to get the most out of
your new batteries.
●After your battery has discharged, look at the mAH DISCHARGE screen to
check the previous charge capacity of your battery. You can use this
information to gauge the useful capacity of your battery over periods of time.
●The elapsed timer screen also works during the discharge process. Use it
to check how long a specific discharge cycle takes for a given mAH capacity.

4
Your new Promax Black Widow Elite AC/DC Peak Charger is guaranteed to be free of workmanship and component error for a period of 90 days starting
from the original time of purchase. Warranty claims must be accompanied by an itemized sales receipt that shows the purchase date.
In that Promax has no control over the final use of this product, by installing and using the product, the user accepts all liability resulting from or included
with the installation and use of this product. In no instance will the liability cost of the charger exceed the original purchase price of the charger.
FOR SERVICE AND INFORMATION WITHIN THE USA:
Global Services/Promax Customer Care
18480 Bandilier Circle
Fountain Valley, CA 92708
Phone: (714) 963-0329 Fax: (714) 964-6236
Email: service@globalhobby.net
http://globalservices.globalhobby.com
PROMAX IS EXCLUSIVELY DISTRIBUTED IN THE USA BY GLOBAL HOBBY DISTRIBUTORS
All contents copyright © 2004, Global Hobby Distributors
Version V1.0 June 2004
Troubleshooting Guide
This troubleshooting guide has been provided to help you diagnose and solve most problems that you may encounter with your Promax Black Widow Elite
AC/DC Peak-Detection charger. Most problems encountered can be solved by carefully following the problem-cause-solution sections below. If you cannot
solve the problem using this troubleshooting guide, please feel free to contact us at the address or phone number listed at the bottom of this page.
PROBLEM CAUSE SOLUTION
1) Battery does not charge A) Charger not connected to power source A) Connect charger to power source
B) Output cord not installed properly B) Install output cord and double-check polarity
C) Power source is faulty C) Check and/or change power source
D) Charger is in discharge mode D) After discharge, charger will switch to charge mode
E) Charger is faulty E) Return charger to Global Services
2) Battery false peaks A) Battery is already charged A) Discharge battery before recharging
B) Charge rate is set too high B) Lower charge rate to suit battery
C) Battery is in bad condition C) Replace battery pack with a new one
D) Charger is faulty D) Return charger to Global Services
3) Battery gets very hot A) Charge rate is set too high A) Lower charge rate to suit battery
B) Battery is in bad condition B) Replace battery pack with a new one
C) Battery connector is faulty C) Check and/or replace battery connector
4) LCD screen does not work A) Charger not connected to power source A) Connect charger to power source
B) Charger was in direct sunlight B) Keep charger out of direct sunlight
C) Charger is faulty C) Return charger to Global Services
Table of contents
Other Promax Batteries Charger manuals
Popular Batteries Charger manuals by other brands

electrify home
electrify home HomeStation EC2R040JPA10-00 Installation and operation manual

Protek RC
Protek RC Prodigy 610 instruction manual

ZAPTEC
ZAPTEC Pro installation manual

Associated
Associated 6066A Operator's manual

AEG
AEG BL18DP-LE Original instructions

Radio Shack
Radio Shack 23-226 owner's manual