PSS FRISTGARD FOLDABLE CONE Guide

CONTACT:
Call 800.662.6338 to speak with a Customer Service Representative.
HOURS:
8 AM to 5 PM (E.T.)
Monday through Friday
HINGE AND BAND REPLACEMENT INSTRUCTIONS
TM

2FirstGard Hinge and Band Replacement Instructions
BOARDWALK ASSEMBLY INSTRUCTIONS
FIRSTGARD™REPAIR KIT COMPONENTS
TABLE OF CONTENTS
PAGE
03
PAGE
11
PAGE
07
PAGE
05
NYLON PIN
REMOVAL
BAND
REPLACEMENT
HINGE COMPONENT
REPLACEMENT
NYLON PIN
REPLACEMENT
1.2.3.
1.Band - Quantity 1
2. Hinge Component (Center) - Quantity 2
3.Hinge Component (Offset) - Quantity 4
4. Nylon Pin - Quantity 1
5. Weld Nut - Quantity 1
6. 10-24 Nylon Lock Nut - Quantity 6
7.Roll Pin - Quantity 2
8. 10-24 x 5/8” Screw - Quantity 6
5.6.7.8.
4.

3FirstGard Hinge and Band Replacement Instructions
Place FirstGard (A) on table folded
STEP 1
REMOVAL
NYLON PIN
A.
PARTS NEEDED FOR NYLON PIN REMOVAL
TOOLS REQUIRED - NEEDLE-NOSE PLIERS
Part A.
FirstGard
Quantity - 1
Part B.
Weld Nut
Quantity - 1
Part C.
Nylon Pin
Quantity - 1
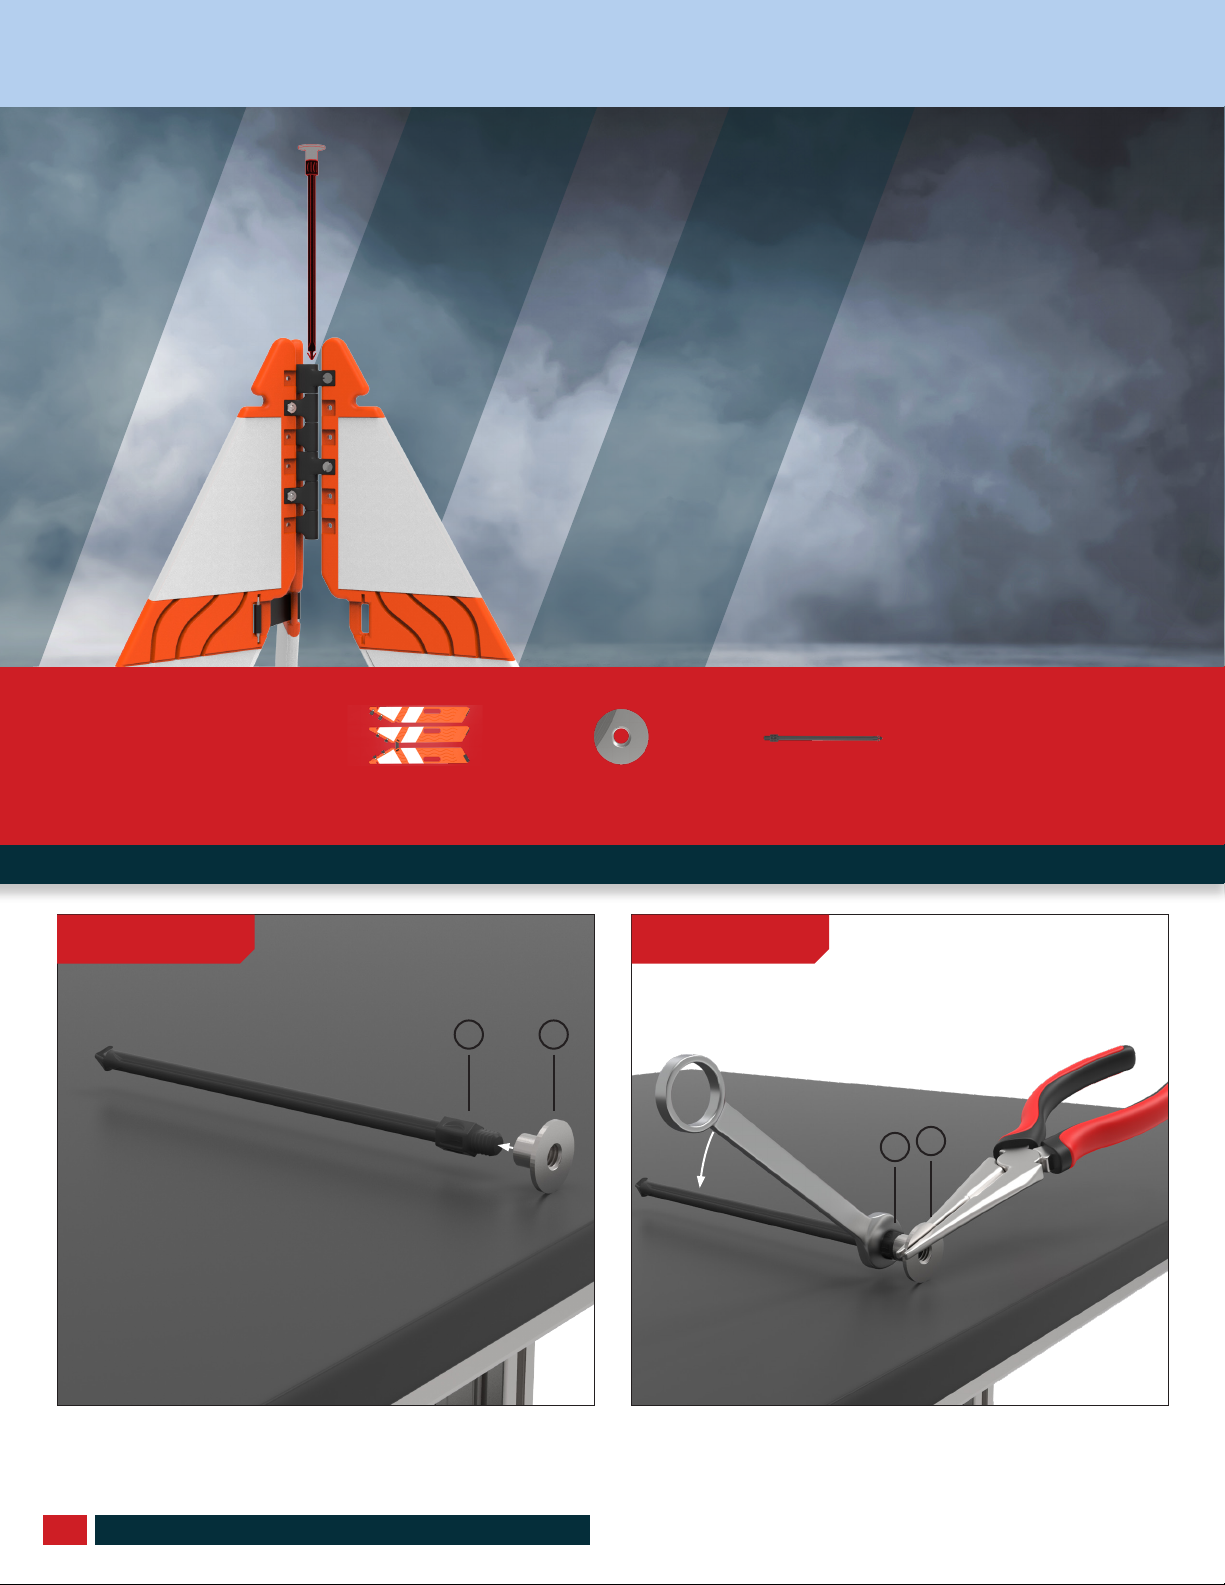
FIRSTGARD™NYLON PIN REMOVAL

FirstGard Hinge and Band Replacement Instructions 4
Using needle-nose pliers, squeeze the barbs on the nylon pin (C).
Use the weld nut (B) on the top of the nylon pin (C) to pull the pin out. If the pin is in one piece and the barbs can still function, the nylon
pin is still usable.
STEP 2
STEP 3
B.
C.
C.
C.
FIRSTGARD™NYLON PIN REMOVALFIRSTGARD™NYLON PIN REMOVAL
5FirstGard Hinge and Band Replacement Instructions
With the nylon pin (C) out, finger-tighten the weld nut (B) on top of
the nylon pin — flange side up.
Grip the flange of the weld nut (B) with pliers and using a 7/16”
wrench on the nylon pin (C), tighten an additional ¼ turn past fin-
ger-tight.
STEP 1 STEP 2
PIN REPLACEMENT
FIRSTGARD™PIN REPLACEMENT
PARTS NEEDED FOR FIRSTGARD HINGE REPLACEMENT
TOOLS REQUIRED - 7/16” WRENCH, PLIERS
Part A.
FirstGard Cone Panels
Quantity - 1
Part B.
Weld Nut
Quantity - 1
Part C.
Nylon Pin
Quantity - 1
C. B.
C. B.

FirstGard Hinge and Band Replacement Instructions 6
Align the round barrel holes on the hinge components.
Insert the nylon pin (C) into the barrel of the hinge. The weld nut (B) should be on the top of the cone and the barbs of the nylon pin should
point towards the bottom. Note: Be sure the nylon pin is going through the hinge component’s round barrel rather than the open hinge
cavities.
STEP 3
STEP 4
FIRSTGARD™PIN REPLACEMENT
C. C.
B.
Round barrel
Hinge Cavities
7FirstGard Hinge and Band Replacement Instructions
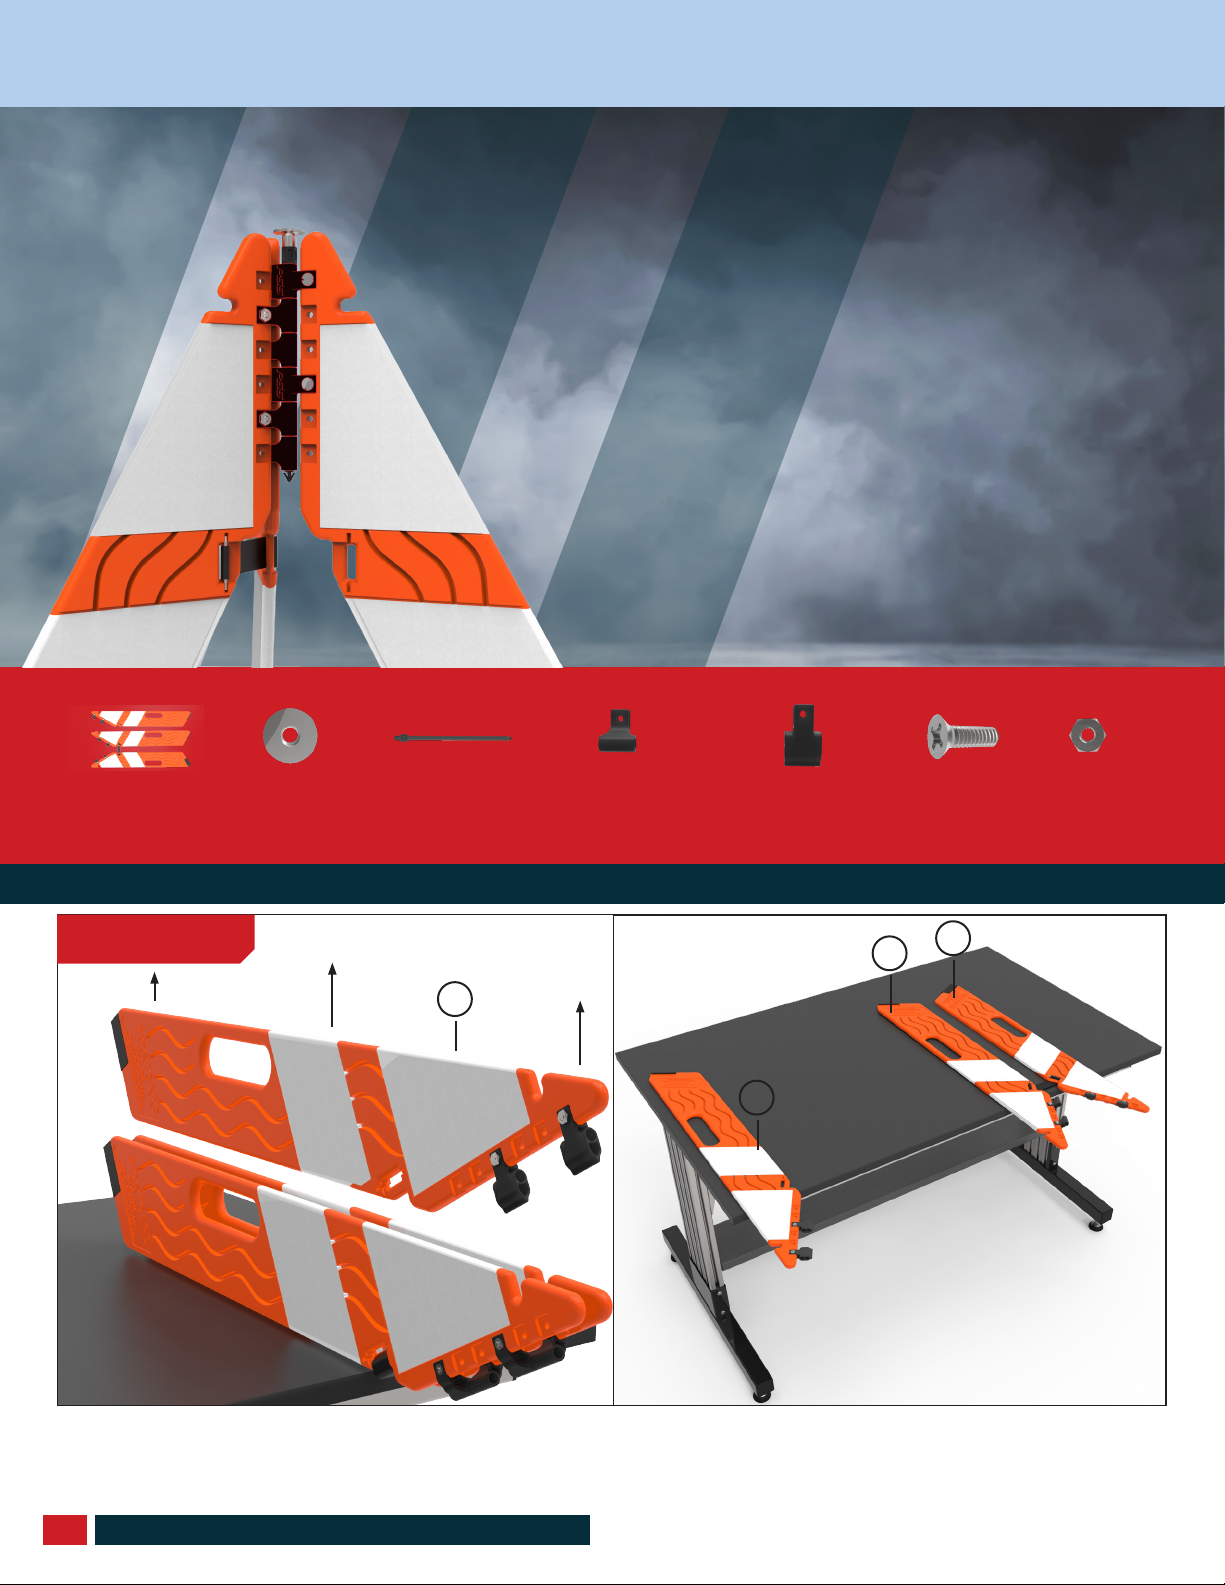
With the nylon pin removed, take out the center panel (A2) and set aside. Allow the two baned panels to lie flat on the table.
STEP 1
REPLACEMENT
HINGE COMPONENT
FIRSTGARD™HINGE REPLACEMENT
PARTS NEEDED FOR FIRSTGARD HINGE REPLACEMENT
TOOLS REQUIRED - PHILIPS-HEAD SCREWRIVER, 7/16” WRENCH, PLIERS
Part A.
FirstGard Cone Panels
Quantity - 1
Part B.
Weld Nut
Quantity - 1
Part C.
Nylon Pin
Quantity - 1
Part E.
Hinge Components
Panels A2
Quantity - As Needed
Part D.
Hinge Components
Panels A1 & A3
Quantity - As Needed
Part F.
Screw
Quantity -
As Needed
Part G.
Nut
Quantity -
As Needed
A2.
A2.
A1. A3.

FirstGard Hinge and Band Replacement Instructions 8
Assess which panel has a broken hinge component (D & E) Note:
It is crucial that the orientation and slot location of the component
matches the orientation and slot in the panel back into the same
position as this will affect the alignment of the panels.
Slide the broken hinge component (D) off.
Using a philips-head screwdriver, remove the metal screw and
nut (F and G) from the broken hinge component (D).
STEP 2
STEP 4
STEP 3
FIRSTGARD™HINGE REPLACEMENT
D. D.E.
A.
F.
G.
D.
D.
A2 A1 A3

9FirstGard Hinge and Band Replacement Instructions
FIRSTGARD™HINGE REPLACEMENT
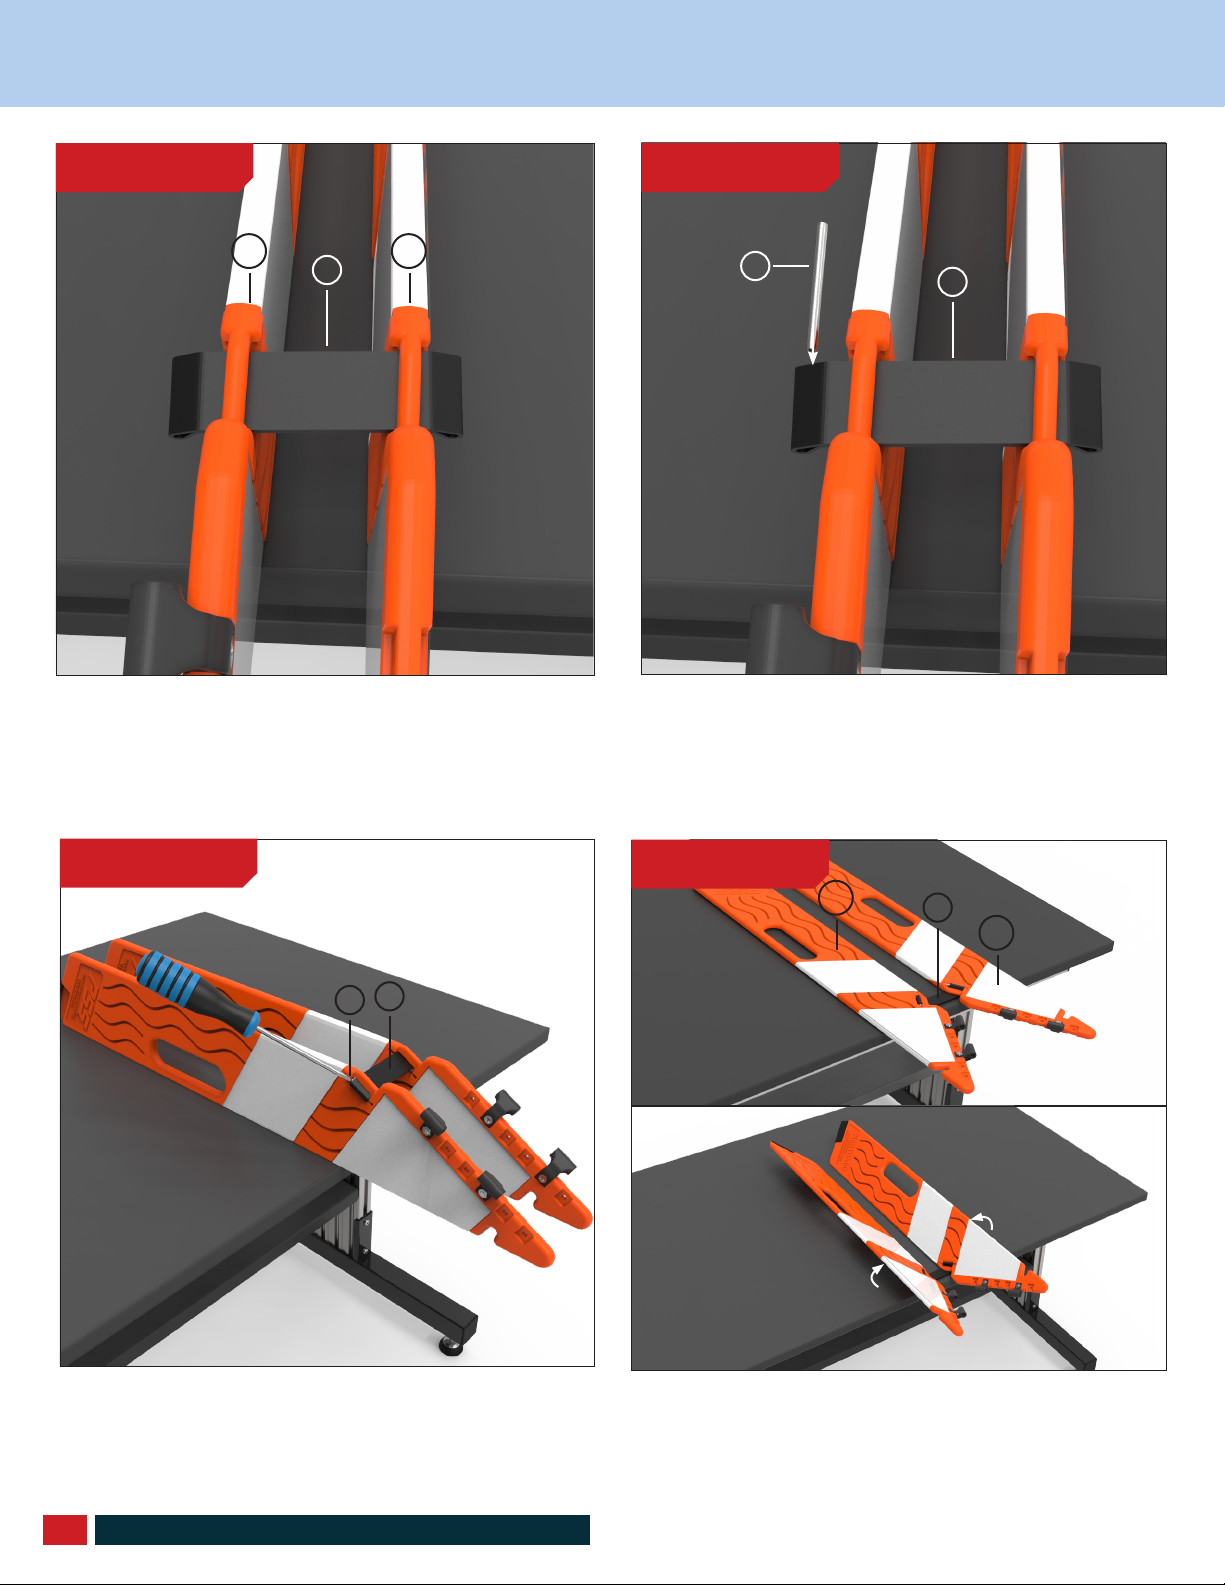
Repeat steps 3-7 for all broken hinge pieces.
STEP 7
Slide the new hinge component (D) onto the FirstGard panel (A1
or A3) in the same location and orientation it was removed.
Place a nut (G) into the recess in the hinge component (D).
Place a screw (F) into the opposite side of the hole of the
hinge component. Using a wrench and screw driver, tighten the
hardware. Note: Be sure to not overtighten hardware as it may
damage the panel and/or the hinge component.
Fold the two banded panels (A1 and A3) together leaving enough
room for the third panel (A2) between. The hinge components
should be facing inward.
STEP 5 STEP 6
STEP 8
F.
D.
G.
D.
A1. /
A3.
A3.
A1.

FirstGard Hinge and Band Replacement Instructions 10
FIRSTGARD™HINGE REPLACEMENT
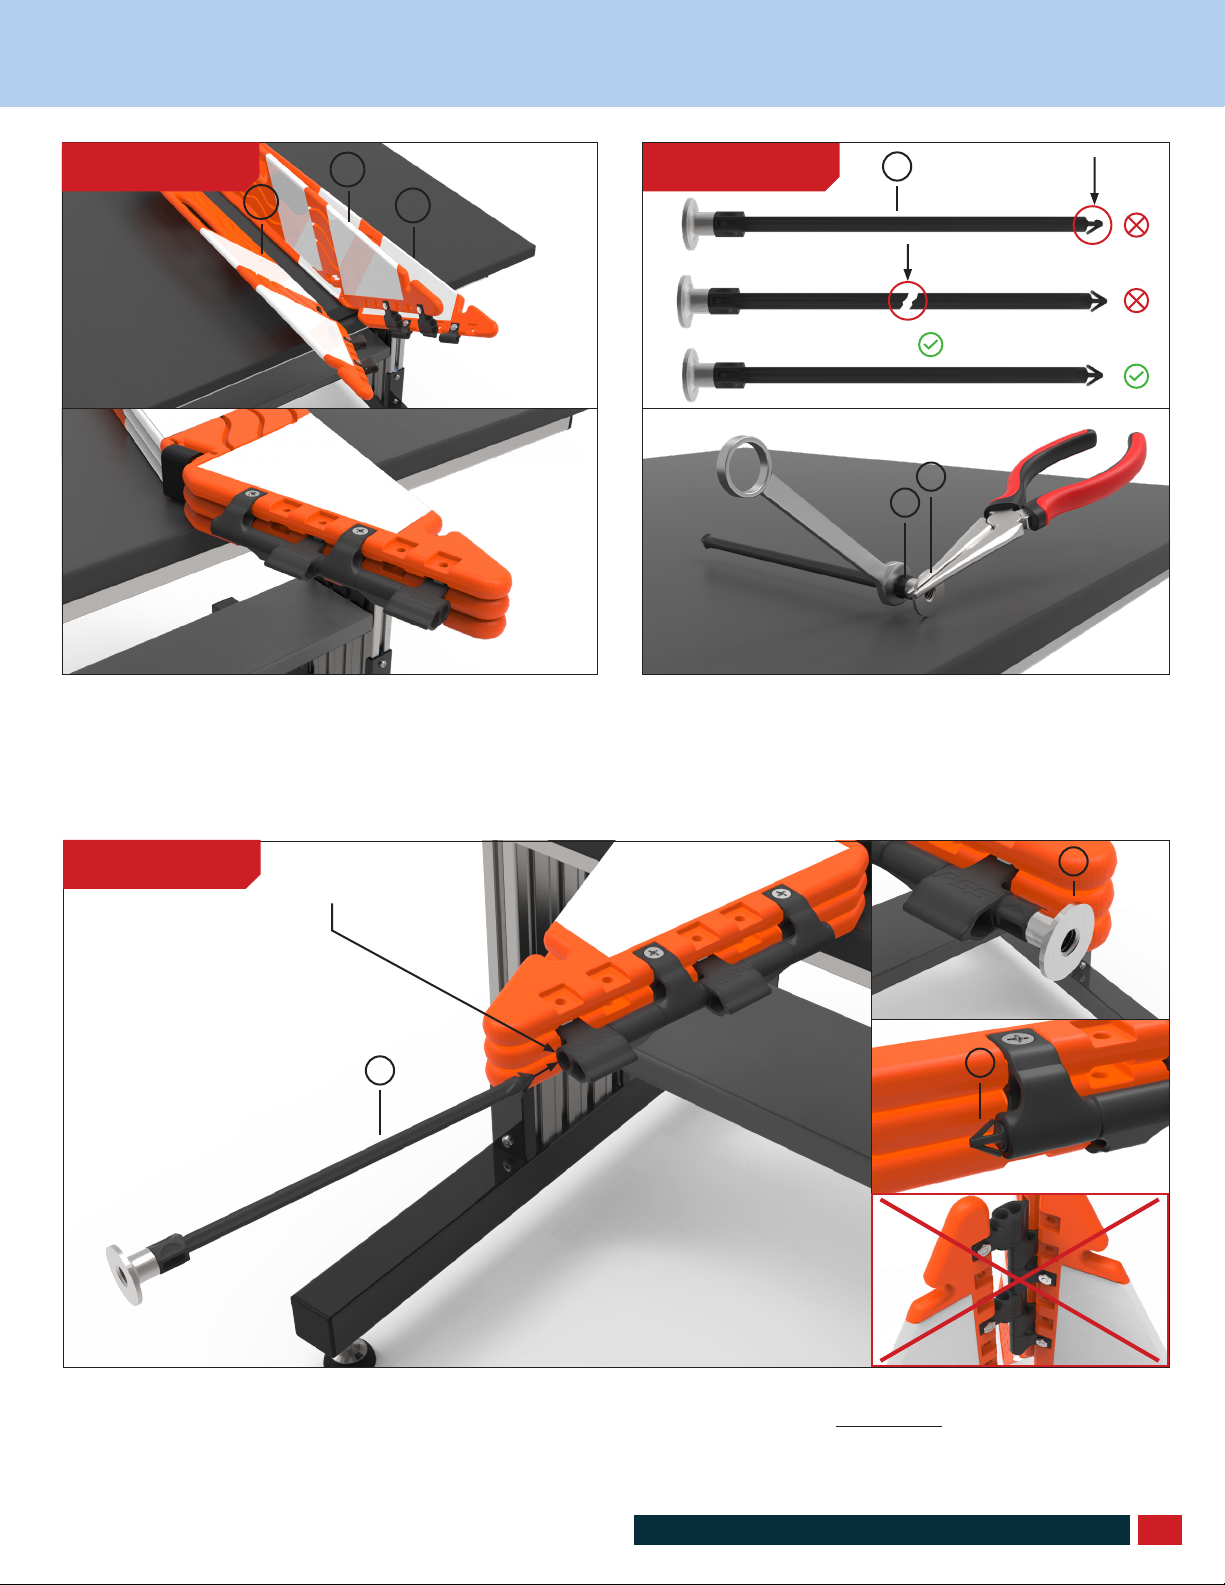
Lower the disconnected panel (A2) between the two banded
panels (A1 and A3) and close all of the panels together. Align the
round barrel on the hinge components.
Assess if the current nylon pin (C) is intact. If the barbs or pin are
not as shown, using a 7/16” wrench, finger-tighten weld nut (B) on
top of the nylon pin—flange side up. Grip the flange with pliers and
tighten it an additional ¼ turn past finger-tight.
Insert the nylon pin (C) into the barrel of the hinge. The weld nut (B) should be on the top of the cone and the barbs of the nylon pin should
point towards the bottom. Note: Be sure the nylon pin is going through the hinge component’s round barrel rather than the open hinge
cavities.
STEP 9 STEP 10
STEP 11
C. C.
B.
C.
B.
A1.
A2.
A3.
Round barrel
C. Replace due to
missing barb
Replace due to
broken pin
Usable

11 FirstGard Hinge and Band Replacement Instructions
REPLACEMENT
BAND
FIRSTGARD™BAND REPLACEMENT
PARTS NEEDED FOR FIRSTGARD HINGE REPLACEMENT
TOOLS REQUIRED - FLAT BLADE SCREWRIVER, 7/16” WRENCH, PLIERS
Part A.
FirstGard Cone Panels
Quantity - 1
Part B.
Weld Nut
Quantity - 1
Part C.
Nylon Pin
Quantity - 1
Part H.
Band
Quantity - 1
Part I.
Roll Pin
Quantity - 2
With the nylon pin removed, take out the center panel (A2) and set aside. Allow the two baned panels to lie flat on the table. Note: If your
band is missing, please skip to step 4.
STEP 1
A2.
A2.
A1. A3.

FirstGard Hinge and Band Replacement Instructions 12
Position the two banded FirstGard panels (A1 and A3) so that the
band (H) is facing upward and the hinge components are facing
away from each other.
Slide the roll pin (I) out from the loop of the band (H). Repeat step for for the other panel.
Using a small flat blade screwdriver, push the roll pin (I) through
the back of the panel. Be sure to not press on the band (H) as it
could damage the band.
STEP 2
STEP 4
STEP 3
FIRSTGARD™BAND REPLACEMENT
H.
H. I.
H.
I.
A1. A3.
13 FirstGard Hinge and Band Replacement Instructions
FIRSTGARD™BAND REPLACEMENT
Insert the roll pin (I) into the other side of the band (H). Press the
roll pin into its pocket until it clicks into place. You may need to
press the roll pin with a flat blade screwdriver to fully click it into
place. Be sure to press on the pin itself as pressing on the pin
through the band may damage the band.
STEP 7
Be sure that both roll pins are removed before this step. Hold the
FirstGard panels (A1 and A3) together with the barrels of the hing-
es pointed outward. Thread the band (H) through both slots.
Insert a roll pin (I) into one side of the band (H). Press the roll pin
into its pocket.
STEP 5 STEP 6
H.
H.
H.
I.
I. H.
Fold the two banded panels (A1 and A3) away from each other so
that they lay flat on your work serface and the band is flat. Begin
folding the two banded panels together leaving enough room
for the third panel between. The hinge components and roll pins
should be facing inward.
STEP 8
A1.
A1.
A3.
A3.
FirstGard Hinge and Band Replacement Instructions 14
FIRSTGARD™BAND REPLACEMENT
Lower the disconnected panel (A2) between the two banded
panels (A1 and A3) and close all of the panels together. Align the
round barrel on the hinge components.
Assess if the current nylon pin (C) is intact. If the barbs or pin are
not as shown, using a 7/16” wrench, finger-tighten weld nut (B) on
top of the nylon pin—flange side up. Grip the flange with pliers and
tighten it an additional ¼ turn past finger-tight.
Insert the nylon pin (C) into the barrel of the hinge. The weld nut (B) should be on the top of the cone and the barbs of the nylon pin should
point towards the bottom. Note: Be sure the nylon pin is going through the hinge component’s round barrel rather than the open hinge
cavities.
STEP 9 STEP 10
STEP 11
C. C.
B.
C.
B.
A1.
A2.
A3.
Round barrel
C. Replace due to
missing barb
Replace due to
broken pin
Usable

We are a proud member of:
PSS |2444 Baldwin Road, Cleveland, OH 44104 |800.662.6338 |PSS-Innovations.com |Copyright © 2022 |11/22
Follow us on:
CONTACT:
Call 800.662.6338 to speak with a Customer Service Representative.
HOURS:
8 AM to 5 PM (E.T.)
Monday through Friday
Other PSS Safety Equipment manuals

Popular Safety Equipment manuals by other brands

babcockdavis
babcockdavis BCGVS-EW-P Installation, operation & maintenance manual

OEZ
OEZ CS-BD-A011 Instructions for use

ABS Safety
ABS Safety UniGlide PRO manual

BosStrap
BosStrap Side Slide instructions

Federal Signal Corporation
Federal Signal Corporation QuadraFlare DOT Installation and service instructions

STRUMIN
STRUMIN LiteMESH Technical documentation


