PT W1617 User manual

OWNER'S MANUAL
WARNING: READ, UNDERSTAND AND FOLLOW ALL INSTRUCTIONS AND
WARNINGS BEFORE OPERATING THIS TOOL. FAILURE TO DO SO MAY
RESULT IN PERSONAL INJURY AND/OR PROPERTY DAMAGE AND WILL
VOID WARRANTY.
3 TON SERVICE JACK
Item Number W1617

DANGER:
Indicates an imminently hazardous situation
that, if not avoided, WILL result in death or serious injury.
WARNING:
Indicates a potentially hazardous situation that,
if not avoided, COULD result in death or serious injury.
CAUTION:
Indicates a potentially hazardous situation that,
if not avoided, MAY result in minor or moderate injury.
NOTE: Indicates important information, which if not
followed, MAY cause damage to equipment.
TOOL FEATURES
Capacity..................................................................................... 6,000 lbs.
Minimum Height............................................................................ 3-1/8 in.
Maximum Height......................................................................... 19-7/8 in.
Lift Range ................................................................................... 16-3/4 in.
SPECIFICATIONS:
6
5
4
2
Specifications are subject to change without notice.
4. Swivel Castors
5. Dual Pistons
6. Padded Handle
1. Steel Frame
2. 360° Swivel Saddel
3. Extra Wide Wheels
This instruction manual is intended for your benefit. Please read and follow the safety, installation, maintenance and troubleshooting
steps described within to ensure your safety and satisfaction. The contents of this instruction manual are based upon the latest
product information available at the time of publication. The manufacturer reserves the right to make product changes at any time
without notice.
SAFETY GUIDELINES / DEFINITIONS
WARNING: Read and understand this entire instruction manual before attempting to assemble, install, operate or maintain
this product. Failure to comply with the instructions may result in serious personal injury and/or property damage!
The following signal words are used to emphasize safety warnings that must be followed when using this product:
1
3
2

UNPACKING AND INSPECTION
After opening the carton, unpack your new product and related parts and accessories. Please
inspect it carefully for any damage that may have occurred during transit. Please check it against
the photograph on carton. If any parts are missing, please call customer service at 1-800-426-1262
between 6 a.m. and 5 p.m. Pacific time.
WARNING: DO NOT operate this product if damaged during shipment, handling or misuse.
Do not operate the product until the parts have been replaced or the fault rectified. Failure to do
so may result in serious personal injury or property damage. All damaged parts must be repaired
or replaced as needed prior to operating this product. Check to see that all nuts, bolts and fittings
are secure before putting this product into service.
If you have any questions, or require assistance with damaged or missing parts, please contact
our customer service department at 1-800-426-1262. Please have the serial number, model
number, and date of purchase available for reference when calling.
1. Study, understand and follow all instructions
before operating this device.
2. DO NOT exceed rated capacity. Overloading
can cause damage to or failure of this product.
3. Use only on hard, level surface capable of
sustaining the load. Use of jack on other than
hard level surfaces can result in jack instability
and possible loss of load.
4. Lifting device only. Immediately after lifting,
support the vehicle with appropriate means.
Ensure that no personnel pass underneath
load until load is securely supported by jack
stands.
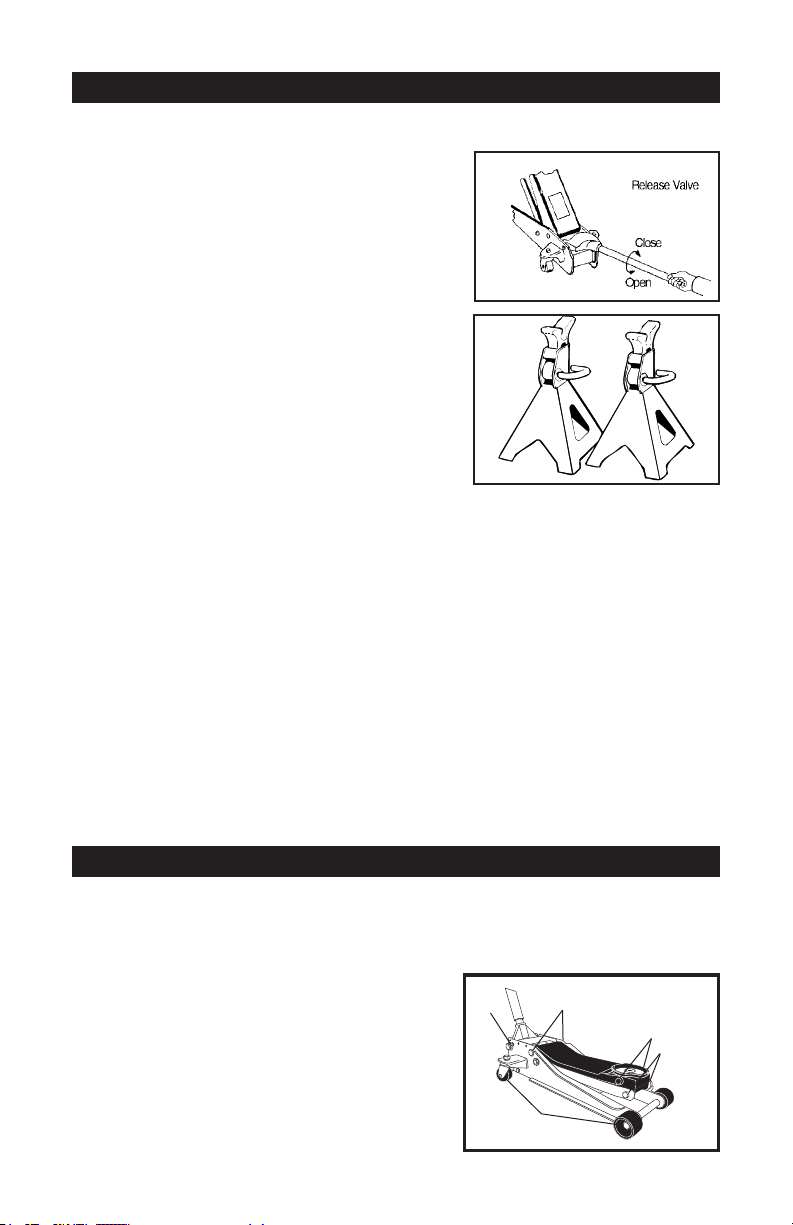
5. DO NOT adjust safety valve.
6. Wear ANSI approved safety goggles and
heavy duty work gloves during use.
7. Keep clear of load while lifting and lowering.
8. Lower load slowly.
9. DO NOT use for aircraft purposes.
10. Apply parking brake and chock tires before
lifting vehicle.
11. Lift vehicle only at vehicle manufacturer
recommended lift locations.
12. Inspect before every use; do not use if parts
are loose or damaged.
13. Do not alter this product in any way.
14. Keep your work area clean and well lit.
Cluttered work areas invite accidents.
15. Keep bystanders, children, and visitors away
while operating this product. Distractions can
cause you to lose control.
16. Stay alert. Watch what you are doing, and use
common sense when operating this product.
Do not use this product while tired or under
theinuenceofdrugs,alcoholormedication.
17. Store idle jacks out of reach of children and
other untrained persons. Jacks are dangerous
in the hands of untrained users.
18. Tool/equipment service must be performed
onlybyqualiedrepairpersonnel.Serviceor
maintenanceperformedbyunqualied
personnel could result in a risk of injury.
19. When servicing this product, use only
identical replacement parts - refer to attached,
product-specicpartslistanddiagram.Follow
instructions in the Care & Maintenance
section of this manual. Use of unauthorized
parts or failure to follow maintenance
instructions may create a risk of injury and
may void any applicable warranty.
20. Maintain labels and nameplates on this
product. These carry important information. If
unreadable or missing, contact Performance
Tool for a replacement.
21.Beforeuse,readmanufacturer’sinstruction
manual for the vehicle (or object) you will lift.
22. When lifting only one wheel, support the load
immediately with one jack stand (not included)
placed under the side of the vehicle being
lifted. Align the saddle of the jack stand
directlyunderthevehicle’sframeor
recommended lifting point.
23. When lifting the entire front end or rear end
of a vehicle, support the load immediately
with two jack stands. Align the saddles of the
jackstandsdirectlyunderthevehicle’sframe
or recommended lifting points. Also, adjust the
jack stands to the same height.
24. Do not work under the vehicle without properly
supporting the vehicle with jack stands.
25.Avoiddangerousoncomingtrafc.Usethe
Jack as far away from the roadside as possible.
26. Industrial applications must follow OSHA
requirements.
27. Do not allow anyone inside the vehicle while
using the Jack. Keep all bystanders a safe
distance away from the vehicle.
28. Do not support both ends of the vehicle at the
same time.
29. Before lowering the jack, remove all tools and
equipment from under the vehicle.
30. The warnings, precautions, and instructions
discussed in this manual cannot cover all
possible conditions and situations that
may occur. The operator must understand that
common sense and caution are factors, which
cannot be built into this product, but must be
supplied by the operator.
WARNING: This is a lifting device only. Load must be supported immediately by jack stands.
IMPORTANT SAFETY INFORMATION
3

Before using your jack:
1. Place pump handle over release valve and turn counter-
clockwise no more than two turns to open.
2.
Pump jack about 6 full strokes to ensure complete distribution
ofhydraulicuid.
(See Figure 1)
3. Repeat above steps as needed.
To raise:
1. Park vehicle on a hard level surface safely away from
oncomingtrafc.
2. Turnoffthevehicle’sengine.
3. Placethevehicle’stransmissioninPARK,ifequippedwith
an automatic, or in its lowest gear, if equipped with a
manual transmission.
4. Setthevehicle’semergencybrakeandblockthewheels
that are not being lifted.
5.
Refertovehicleowner’smanualforproperjackingprocedures
.
Liftonlyonareasofvehicleasspeciedbymanufacturer.
6. Make certain that load is centered on saddle.
7. Place pump handle over release valve and turn clockwise to close.
8. Insert handle into handle socket and pump to raise load to desired height.
9. ALWAYS support load with jack stands (See Figure 2). Place jack stands of appropriate capacity
(not included) beneath the vehicle at locations recommended by the vehicle manufacturer. DO NOT
get under the vehicle without jack stands. Jacks are not designed to maintain heavy loads for long
periods of time. DO NOT attempt to put jack stands simultaneously under both ends of vehicle or
under one side of vehicle.
NOTE: When using two jack stands, they must be at the same height.
10.
SLOWLY turn the release valve counterclockwise to lower vehicle onto jack stands and remove jack.
IMPORTANT: NEVER MOVE JACK WHEN THE HANDLE IS IN OPERATING LEVER OR THE VALVE
SLEEVE. DAMAGE TO THE PUMPING UNIT MAY OCCUR.
To lower:
1. Remove all tools, parts, etc. from under the vehicle.
2. Positionthesaddleundertheliftingpoint.TurntheHandlermlyclockwisetoclosethevalverelease
screw, and pump the upper/lower handle to raise the vehicle slightly above the saddle(s) of the jack
stands. Then, collapse and remove jack stand(s).
3. SLOWLY turn the release valve counterclockwise with the handle just enough to allow controlled
descent of the vehicle onto the ground. (Never more than two full turns).
4. Lower the jack completely. Then, store in a safe, dry location out of reach of children.
Monthly maintenance is recommended. Lubrication is critical to jacks as they support heavy loads. Any
restriction due to dirt, rust, etc. can cause either slow movement or cause extremely rapid jerks, damaging
the internal components. The following steps are designed to keep the jack maintained and operational.
1. Before each use, inspect the general condition of the jack.
Check for broken, cracked, or bent parts, loose or missing
parts, and any condition that may affect the proper
operation of the product. Any jack that appears damaged
in anyway must be removed from service. Have the
problem corrected before further use. DO NOT use
damaged equipment.
2. When jack is not in use, ram and pump piston should be in
fully down position to keep their machined surfaces free
from corrosion.
3. Keep jack clean and well lubricated at points illustrated
ingure3.
Figure 3
OPERATION
Figure 1
Figure 2
CARE AND MAINTENANCE
4
NOTICE: During shipment or handling, air in the jack can become trapped in the hydraulic system
causing the jack to malfunction.
5
3
4
12

4. Forbestresults,useonlyhydraulicuidwitharatingofSAE20forrells.Checkuidlevelwithjack
infullydownposition.Fluidlevelshouldbeuptobottomofoilllport.
7. Change the hydraulic oil at least once every three years:
a.Withthejackfullylowered,removetheoilllerplugontheside of the Housing.
b. Tip the jack to allow the old hydraulic oil to drain out of the Housing completely, and dispose of the old
hydraulic oil in accordance with local regulations.
c. Withthejackupright,completelyllthehousingwithahighquality hydraulic oil (not included) until the
oiljustbeginstorunoutoftheoilllhole.BeVERYCAREFULnottoallowdirtorforeignmatterintothe
system.
d. Then,reinstalltheoilllerplug.
e. Clean with a clean cloth using a detergent or mild solvent. Then, store the jack in a safe, dry location
with the ram and pump piston in fully down position. Keep out of reach of children and other
non-authorized people.
WARNING: Remove jack from service before making adjustments
NOTE: Problems listed above with
more than one solution may have a
combination of causes. Please be sure
that all solutions listed for each
problem have been checked to
eliminate possibility of further trouble.
Sometimes solutions may need to be
repeated for best results.
●●●
●
● ●
● ●
●
●
Power unit may be
low in fluid. With
jack on level
surface and in
down position,
remove filler plug
and add clean
hydraulic jack fluid
to level of filler.
Power unit may be
air bound. Open
the release valve a
minimum of 2 full
turns. Pump the
handle a minimum
of 20 full strokes to
purge air from the
system.
Valve may not be
closing completely.
To seat valves:
a.) Close release
valve.
b.) With jack in
fully lowered
position,
manually raise
lifting arm as
high as
possible.
c.) Open release
valve and
allow jack to
descend to
lowered
position
Will not lift load
Will not hold load
Will not lift to full height
Pump feels "spongy" under load
Handle raises under load
Handle lowers under load
Your Performance Tool® product was constructed with quality materials and workmanship and will give
you many years of trouble free use when cared for as described in the "Care & Maintenance" section
on page 4. However, as with any mechanical device, periodic adjustments are necessary to maintain
a peak level of performance. Should your jack be displaying any of the following symptoms, the simple
procedures shown below will correct the problem.
TROUBLESHOOTING
5
CARE AND MAINTENANCE

20
17
16
15
21
22
23
24
25
26
28
27
30
31
14
13
12
11
8
9
10
29
7
6
5
4
2
1
3
19
18
EXPANDED PARTS DIAGRAM
EXPANDED PARTS LIST
1 Base.................................... 2
2 Base Support Brackets....... 2
3 L-Bar Frame Legs ............... 2
4 Bin Support Brackets ......... 1
5 Vertical Support Bracket..... 4
6 Base.................................... 4
7 Base Support Brackets....... 4
8 L-Bar Frame Legs ............... 2
9 Bin Support Brackets ......... 4
10 Vertical Support Bracket..... 4
11 Base Support Brackets....... 2
12 L-Bar Frame Legs ............... 2
13 Bin Support Brackets ......... 1
14 Vertical Support Bracket..... 1
15 Bin Support Brackets ......... 1
16 Vertical Support Bracket..... 1
17 Set Screw...........................1
18 Upper Handle.....................1
19 Lower Handle.....................1
20 Handle Lock Button...........1
21 U-Joint ...............................1
22 Hydraulic Unit ....................1
23 Spring ................................2
24 Retaining Ring (M22)..........2
25 Hydraulic Unit Adaptor ......1
26 Oin (A4x55) ........................1
27 Retaining Ring (M25)..........2
28 Lift Arm Shaft.....................1
29 Cover Plate ........................1
30 Saddle................................1
31 Saddle Screw.....................1
32 Handle Bumper..................1
No. Description Qty. No. Description Qty.


1 YEAR WARRANTY
PERFORMANCE TOOL® extends only the following warranties, and only to original retail purchasers. These
warranties give specific legal rights. Except where prohibited by local law, the law of the State of Washington
governs all warranties and all exclusions and limitations of warranties and remedies. There may be other rights
which vary from state to state.
PERFORMANCE TOOL® warrants the product to be free from defects in materials and workmanship under normal
use and service. A defective product may be returned for a free replacement within 90 days from the date of
purchase, provided that product is returned to place of purchase immediately after discovery of defect. After 90
days and up to one year from date of purchase, PERFORMANCE TOOL® will replace at no charge any parts which
our examination shall disclose to be defective and under warranty. These warranties shall be valid only when a
sales receipt showing the date of purchase accompanies the defective product or defective part (s) being returned.
For part (s) after 90 days, please remit your request, postage prepaid to:
PERFORMANCE TOOL, P.O. Box 88259 Tukwila, WA 98138
These warranties exclude blades, bits, punches, dies, bulbs, fuses, hoses, and other consumables which must be
replaced under normal use and service. These warranties shall not apply to any product or part which is used for a
purpose for which it is not designed, or which has been repaired or altered in any way so as to affect adversely its
performance or reliability, nor shall these warranties apply to any product or part which has been subject to
misuse, neglect, accident or wear and tear incident to normal use and service.
PERFORMANCE TOOL® does not authorize any other person to make any warranty or to assume any liability in
connection with its products.
Except for warranties of title and the limited express warranties set forth above, PERFORMANCE TOOL® makes no
express or implied warranties of any kind with respect to its products. In particular, PERFORMANCE TOOL® makes
no implied warranty of merchantability and no implied warranty of fitness for any particular purpose, except that for
goods purchased primarily for personal, family or household use and not for commercial or business use,
PERFORMANCE TOOL® makes an implied warranty of merchantability (and, if otherwise applicable, an implied
warranty of fitness for a particular purpose), but only for the particular qualities or characteristics, and for the
duration, expressly warranted above.
The laws on limitation of implied warranties may differ from state to state, so the above limitations may not apply in
all cases.
PERFORMANCE TOOL® shall not be liable for consequential, incidental or special damages resulting from or in any
manner related to any product, or to the design, use, or any inability to use the product. The sole and exclusive
remedy for a defective product or part shall be the repair, or replacement thereof as provided above. The laws on
limitation of remedies or on consequential, incidental or special damages may vary from state to state, so the above
limitations may not apply in all cases.
© Copyright 2021 WILMAR CORPORATION, P.O. Box 88259 Tukwila, WA 98138
Table of contents
Other PT Jack manuals
Popular Jack manuals by other brands

Sealey
Sealey 1025HL.V2 instructions

SFA
SFA Platinum Series Operating instructions & parts manual

Westward
Westward 1ZKY1A Operating instructions and parts manual

Pittsburgh Automotive
Pittsburgh Automotive 69642 Owner's manual & safety instructions

Varan
Varan NEBJ-01 user manual

Mountain
Mountain MTN5555 manual