manuals.online logo
Brands
  1. Home
  2. •
  3. Brands
  4. •
  5. PT
  6. •
  7. Tools
  8. •
  9. PT W50048 User manual

PT W50048 User manual

18 VOLT CORDLESS
GREASE GUN
WARNING!
READ, UNDERSTAND AND FOLLOW ALL INSTRUCTIONS AND
WARNINGS BEFORE OPERATING THIS TOOL. FAILURE TO DO SO
MAY RESULT IN PERSONAL INJURY AND/OR PROPERTY DAMAGE AND
WILL VOID WARRANTY.
1 YEAR WARRANTY
PERFORMANCE TOOL® extends only the following warranties, and only to original retail purchasers. These
warranties give specific legal rights. Except where prohibited by local law, the law of the State of Washington
governs all warranties and all exclusions and limitations of warranties and remedies. There may be other rights
which vary from state to state.
PERFORMANCE TOOL® warrants the product to be free from defects in materials and workmanship under normal
use and service. A defective product may be returned for a free replacement within 90 days from the date of
purchase, provided that product is returned to place of purchase immediately after discovery of defect. After 90
days and up to one year from date of purchase, PERFORMANCE TOOL® will replace at no charge any parts which
our examination shall disclose to be defective and under warranty. These warranties shall be valid only when a
sales receipt showing the date of purchase accompanies the defective product or defective part (s) being returned.
For part (s) after 90 days, please remit your request, postage prepaid to:
PERFORMANCE TOOL, P.O. Box 88259 Tukwila, WA 98138
These warranties exclude blades, bits, punches, dies, bulbs, fuses, hoses, and other consumables which must be
replaced under normal use and service. These warranties shall not apply to any product or part which is used for a
purpose for which it is not designed, or which has been repaired or altered in any way so as to affect adversely its
performance or reliability, nor shall these warranties apply to any product or part which has been subject to
misuse, neglect, accident or wear and tear incident to normal use and service.
PERFORMANCE TOOL® does not authorize any other person to make any warranty or to assume any liability in
connection with its products.
Except for warranties of title and the limited express warranties set forth above, PERFORMANCE TOOL® makes no
express or implied warranties of any kind with respect to its products. In particular, PERFORMANCE TOOL® makes
no implied warranty of merchantability and no implied warranty of fitness for any particular purpose, except that for
goods purchased primarily for personal, family or household use and not for commercial or business use,
PERFORMANCE TOOL® makes an implied warranty of merchantability (and, if otherwise applicable, an implied
warranty of fitness for a particular purpose), but only for the particular qualities or characteristics, and for the
duration, expressly warranted above.
The laws on limitation of implied warranties may differ from state to state, so the above limitations may not apply in
all cases.
PERFORMANCE TOOL® shall not be liable for consequential, incidental or special damages resulting from or in any
manner related to any product, or to the design, use, or any inability to use the product. The sole and exclusive
remedy for a defective product or part shall be the repair, or replacement thereof as provided above. The laws on
limitation of remedies or on consequential, incidental or special damages may vary from state to state, so the above
limitations may not apply in all cases.
© Copyright 2019 WILMAR CORPORATION, P.O. Box 88259 Tukwila, WA 98138
OWNER'S MANUAL
Item Number W50048
This device complies with Part 15 of the FCC Rules. Operation is subject to the following two
conditions: (1) this device may not cause harmful interference, and (2) this device must accept
any interference received, including interference that may cause undesired operation.
1 2
TOOL FEATURES
Capacity:.......................................................................................... 14 oz.
Filling: ............................................................... Bulk, Suction or Cartridge
Pressure Rating:........................................................................ 7,500 PSI
Inlet size: ............................................................................ 1/8 in. NPT-27
Flex Hose: ........................................................................................ 42 in.
Battery Type: .............................................................. 1,500 mAh Ni-CAD
Charge Time:...................................................................................1 hour
Grease dispensed: .........................................................Approx. 75 g/min
Kit Weight: ...................................................................... 16.5 lbs. (7.5 kg)
CEC Title 20 compliant
TECHNICAL SPECIFICATIONS:
1. 42 in. Flex Hose
2. 1/8 in. NPT-27
3. Air Bleeder Valve
4. Strap swivels
5. Trigger
6. Handle
4
2
9
5
7. Battery Lock Button
8. Battery
9. Barrel
10. Shoulder Strap
11. Battery Charger
Technical specifications are subject to change without notice.
This instruction manual is intended for your benefit. Please read and follow the safety, installation, maintenance and troubleshooting
steps described within to ensure your safety and satisfaction. The contents of this instruction manual are based upon the latest
product information available at the time of publication. The manufacturer reserves the right to make product changes at any time
without notice.
SAFETY GUIDELINES / DEFINITIONS
WARNING: Read and understand this entire instruction manual before attempting to assemble, install, operate or maintain
this product. Failure to comply with the instructions may result in serious personal injury and/or property damage!
The following signal words are used to emphasize safety warnings that must be followed when using this product:
DANGER:
Indicates an imminently hazardous situation
that, if not avoided, WILL result in death or serious injury.
WARNING:
Indicates a potentially hazardous situation
that, if not avoided, COULD result in death or serious injury.
CAUTION:
Indicates a potentially hazardous situation
that, if not avoided, MAY result in minor or moderate injury.
NOTICE Indicates important information, which if not
followed, MAY cause damage to equipment.
8
11
15
8
3
4
7
6
10
• Keep the work area clean and well lit. Cluttered benches or dark work areas increase the
risks of accidents.
• Do not use power tools in explosive environments, e.g. in the presence of flammable liquids,
gases or dust. Power tools create sparks which may ignite the dust or fumes.
• Keep children and people away during the use of the tool. Distractions can cause you to lose
control of the tool.
• Never engage in horseplay with the tool. Respect the tool as a working implement.
• Operators and others in work area must wear safety glasses with side shields. When
operating the tool, always wear safety glasses with side shields, and make sure others in
work area wear safety glasses. Safety glasses must conform to the requirements of
American National Standards Institute, ANSI z87.1 and provide protection against flying
particles both from the front and side.
• Always wear ear and head protection. Always wear ear protection to protect your ears from
loud noise. Always wear head protection to protect your head from flying objects.
•
Use safety equipment. A dust mask, non-skid safety shoes and a hard hat must be used for the
applicable conditions. Wear a full face shield if you are producing metal filings or wood chips.
IMPORTANT SAFETY INFORMATION
WARNING. READ, UNDERSTAND AND FOLLOW ALL INSTRUCTIONS AND WARNINGS
BEFORE OPERATING THIS PRODUCT. FAILURE TO DO SO MAY
RESULT IN FIRE, ELECTRICAL
SHOCK, PERSONAL INJURY AND/OR PROPERTY DAMAGE AND WILL VOID WARRANTY.
3 4
IMPORTANT SAFETY INFORMATION
• Dress properly. Do not wear loose clothing or jewelry. Contain long hair. Keep Control the
tool, personal movement and the work environment to avoid personal injury or damage to the
tool. Stay alert, watch what you are doing and use your common sense.
• Keep articles of clothing, jewelry, hair, etc., away from moving parts to avoid entanglement.
• Do not operate any machine / tool when tired or under the influence of drugs, alcohol or
medications.
• Do not overreach when operating a tool. Proper footing and balance enables better control of
a tool in unexpected situations.
• Use clamps or other practical ways to support or secure the work piece to a stable platform.
Holding the work piece by hand or against your body is not stable and may lead to loss of
control and injury.
WARNING! The grease gun can develop high pressure, up to 8,000 PSI. Use safety glasses
and gloves for protection during operation. Keep hands clear of the exposed rubber portions of
the hose. Replace hose if there is any sign of damage or excess ware.
WARNING! Extreme pressure may cause the nozzle extension or flex hose to burst. Use only
approved hoses and follow whip instructions and warnings
• Always wear fuel and oil-resistant gloves when working with fluids.
• Do not store the tool under extreme conditions.
• Do not adapt the tool for any other purpose than what it was originally intended for.
• When operating the tool, use proper eye and hearing protection as well as protective gloves.
• To maintain complete control, firmly hold your tool with both hands.
• Never point the tool towards yourself.
• Never force the tool. Excessive pressure could bend or break the tool or accessory, resulting
in damage to the tool, your work piece or serious personal injury.
•
Do not use the battery charger in damp or wet locations. Do not use the grease gun or charger
if it has been dropped, damaged, left outdoors, or immersed in liquid. To avoid electrical shock,
do not handle the charger, its power cord plug or the grease gun with wet hands.
• Remove adjusting keys or wrenches before turning the tool on. A wrench or key that is left
attached may result in personal injury.
• Disconnect the power source supply or battery block before changing accessories or before
storing the tool. These preventive safety measures reduce the risk of accidental starting of
the tool.
• Protect yourself against electric shocks when working on electrical equipment. Avoid body
contact with grounded surfaces such as pipes, radiators, cooking stoves and refrigerators.
There is an increased chance of electrical shock if your body is grounded.
BATTERY CHARGER SAFETY INFORMATION
1. A battery operated tool with internal batteries or a separate battery pack must only be
powered by the included battery. Do not, for instance, mix different brands of tools and
batteries or use adapters to allow you to use a battery pack with a different voltage. Using
another battery pack could cause a fire.
2. Batteries must only be recharged with the included charger. A charger that may be suitable
for one type of battery could cause a fire when used with another battery.
3.Setthetool’striggerswitchtotheOFFpositionbeforeinstallingorremovingthebatterypack.
This will prevent injury due to accidental starts.
4. Do not use the battery charger in damp or wet locations.
5. Do not store battery packs in containers / spaces with loose metal objects. Battery pack
terminals could be short circuited if they come into contact with metal objects. In addition to
damaging the battery pack, you increase the risk of a fire.
NOTICE: Before using your tool for the first time, discharge the battery and then charge the
battery pack completely.
WARNING! Never burn batteries, as they can explode in a fire. Do not charge leaking batteries.
Only a qualified service technician should perform maintenance on the battery pack. Contact local
solid waste authorities for instructions on correct disposal or recycling of the battery pack.
WARNING: Do not use the tool if the trigger does not function properly. Any tool that cannot
be controlled with the ON / OFF switch is dangerous and must be repaired.
1. Use the correct tool for the job. Maximize tool performance and safety by using the tool for its
intended task.
2. Do not modify this tool or use for a purpose for which it was not designed.
3. This tool was designed for a specific function.
DO NOT:
a. Modify or alter the tool; all parts and accessories are designed with built-it safety features that
may be compromised if altered.
b. Use the tool in a way for which it was not designed.
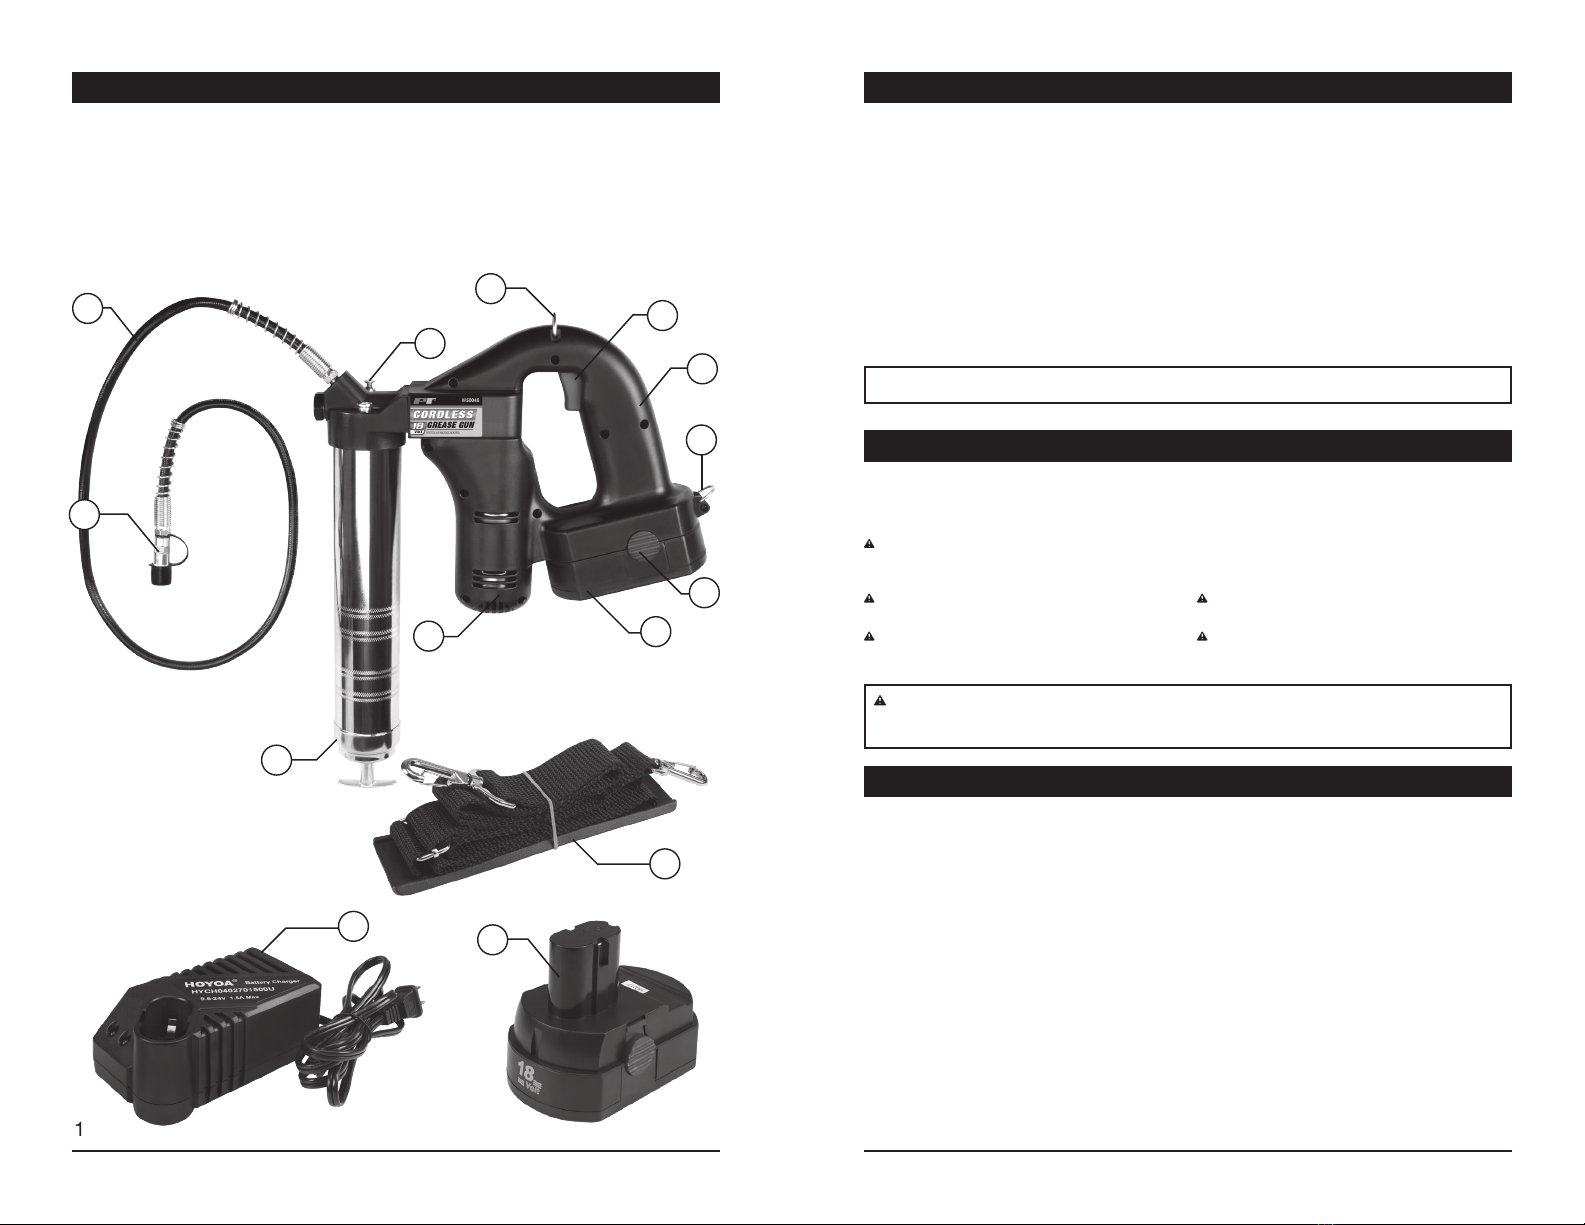
UNPACKING
1. Carefully remove the tool from the package.
2. Retain packing material until you have carefully inspected and satisfactorily installed or
operated the tool.
3. Inspect the parts carefully to make sure the tool was not damaged while shipping.
CHARGER OPERATION
1. Insert the battery pack into the charging socket of the charger. Then, plug the charger into the
nearest grounded, electrical outlet. The battery is charging when the green light is illuminated
and the red light goes out.
NOTICE:
Make sure the power circuit voltage is the same as that shown on the charger
specifications plate.
2. Before using the grease gun for the first time, be sure to discharge the new battery before
charging. All new rechargeable batteries come with 80% charge from the factory. If the
battery pack is installed in the gun, remove it by depressing the two battery release buttons
(one button on each side of the battery pack) and pull the battery pack out of the gun.
3. As a battery pack approaches the discharged state, you will notice a sharp drop in tool
performance. When the tool is unable to perform the task at hand, it is time to recharge the
battery pack. Recharging the battery pack before this condition is reached will reduce the
total work life of the pack. Discharging the pack beyond this point can damage the pack.
4. Start the charging process by plugging in the battery charger to the power source and
inserting the battery into the battery charger slot. After the charging process is complete
(approximately 1 hour), the green light will go out and the red light will illuminate. Remove the
charger from the wall outlet and disconnect the battery pack.
NOTICE:
Battery temperatures will increase during and shortly after use. Batteries may not
accept a full charge if they are charged immediately after use. Allow the battery pack to cool to
room temperature before charging for the best results.
INSTALLING GREASE CARTRIDGE
1. Depress the follower key and pull back on the follower handle. Until the follower rod is fully
extended (approximately 8 in. or 20 cm).
NOTICE: It may be necessary to loosen the grease tube assembly in order to break the vacuum seal.
2. Identify the style grease cartridge you have, paper or plastic. One end will have a replaceable
cap that exposes the grease. The other end will have a pull tab or foil seal
3. Remove the replaceable cap from the end of the grease cartridge. Insert that end into the
grease gun barrel. It should rest on the rubber plunger at the bottom of the barrel.
4. Remove the pull tab or foil from the exposed end of the cartridge.
5. Depress the follower key and push the follower rod forward into the grease tube assembly.
Purge the air from the head.
CARE AND MAINTENANCE
TO CONVERT THE GUN TO ALLOW FILLING FROM BULK CONTAINER OR FILLER PUMP
1. Unscrew the grease tube assembly cap from the grease tube assembly. Pull on the follower
handle to extract the follower and spring from the grease tube assembly.
2. Grasp the follower between your thumb and forefinger and flip the follower lip from the rear
to the front side.
NOTICE: The follower resembles a cup. When the gun is assembled for use with bulk lubricant, the
cup opens toward the pump assembly.
3. Reassemble the follower into the grease tube assembly and position with the follower handle
so that the grease tube assembly cap can be tightened onto the container tube.
TO FILL THE GUN FROM A BULK CONTAINER
1. Rotate the grease tube assembly counterclockwise to unscrew the grease tube assembly
from the gun.
2. Insert the open end of the grease tube assembly into the lubricant. Slowly pull the follower
handle back while pushing the grease tube assembly deeper into the lubricant to prevent air
pockets from being pulled into the grease tube assembly.
3. When the follower rod is fully extended (approximately 8 in. or 20 cm), the grease tube
assembly is full. Release the follower key to hold the follower rod in its extended position.
4. Screw the grease tube assembly clockwise into the gun. To release the follower rod, depress
the follower key and push the follower rod forward into the grease tube assembly. Purge the
air from the pump. See the section To Re-prime.
5. Clean any excess grease from the gun body.
TO FILL THE GUN WITH A FILLER PUMP
A bulk filler fitting (sold separately) will need to be installed in the grease gun head cap.
Replace the pipe plug in the head cap with the bulk loader fitting. Engage the follower rod
with the follower by rotating the follower handle. Insert the gun filler nipple into the fill pump
socket. Operate the filler pump to fill the container. When the follower rod groove is exposed,
the grease tube assembly is filled. The follower rod will be extended approximately 8 inches
(20 cm). Disengage the follower rod from the follower by rotating the follower handle. Push
the follower rod into the grease tube assembly.
1. Fully insert the charged battery pack into the grease gun.
2. Connect the high-pressure hose coupler to the grease fitting, and ensure that the coupler is
squarely seated on the fitting.
3. Squeeze the trigger switch to activate the grease gun. Grease should now be dispensed
through the high-pressure hose coupler and into the grease fitting.
4. When you have finished applying grease, remove the high-pressure hose coupler from the
grease fitting by pulling it sideways.
WARNING! Do not adjust the pressure relief valve. If back pressure in the high-pressure hose
exceeds the factory’s preset pressure rating, grease will be discharged through the pressure relief valve
to prevent motor overload and to limit grease pressure within the hose.
REMOVING EMPTY GREASE CARTRIDGE
1. Pull back on the follower handle until the follower rod is fully extended.
NOTICE: It may be necessary to loosen the grease barrel assembly in order to break the vacuum seal.
2. Unscrew the grease barrel assembly from the head of the grease gun.
3. Carefully pull the spent grease cartridge from the barrel and replace it with a full cartridge to
complete your project.
4. Screw the grease barrel back onto the head. Depress the follower key and push the follower
rod forward into the grease barrel assembly. Purge the air from the head.
5 6
OPERATION
TO RE-PRIME
NOTICE: If the gun loses its prime, it is usually due to air pockets in the lubricant.
1. Withdraw the follower rod from the grease barrel assembly, and firmly push the follower rod
back into the grease barrel assembly.
2. Squeeze the trigger switch in short bursts until all air pockets are expelled.
3. If step 2 fails to re-prime the gun, unscrew the grease barrel assembly 1-1/2 turns.
4. Push the follower handle into the grease barrel assembly until lubricant is released from the
grease barrel assembly at the point where it screws into the pump housing.
5. Tighten the grease barrel assembly and remove excess grease from the exterior of the gun.
OPERATION
MAINTENANCE
1. Make sure the trigger switch is in the OFF position, the battery is removed from the grease
gun, and the charger is unplugged from the electrical outlet before performing any
inspection, maintenance, or cleaning.
2. Check the general condition of the grease gun before each use. Check for misaligned or
binding moving parts, cracked or broken parts, leaking battery packs, damaged hoses, and
any other conditions that may affect the safe operation of the grease gun. If abnormal noise
or vibration occurs, have the problem corrected before further use. Do not use damaged
equipment. Replace worn parts.
3. Daily maintenance: Use a soft, dry cloth to remove all dirt, grease, and debris from the
exterior of the grease gun. Do not use solvents to clean the grease gun.
4. Use only identical replacement parts when servicing. Only use accessories that are intended
for use with this tool.
5. If repairs are required, bring your tool to an authorized service centre.
STORAGE
When storing, always remove the battery pack from the grease gun. Keep the grease gun and
its accessories in a clean, dry location and out of the reach of children.
DISPOSING OF THE TOOL
1. If your tool has become damaged beyond repair, do not throw it out. Take it to the
appropriate recycling facility.
2. Do not incinerate battery packs. Battery packs may explode when exposed to high heat.
CARE AND MAINTENANCE
TROUBLE SHOOTING
Problem
Motor does not run.
Pressure relief valve
remains open.
Gun does not dispense
grease.
Continuous loss of prime.
Plunger is binding in the
grease tube assembly.
Possible cause
- Battery discharged.
- Faulty wiring.
- Blockage in the line or
 thegreasetting.
- Grease tube is empty.
- Air in the pump.
- Air pockets.
- Worn or faulty pump piston.
Suggested solution
- Recharge the battery.
-Taketheunittoaqualied
service center.
- Check the hose and the
 greasetting.
- Remove and clean.
-Rellthegreasetube.
- Purge the air pockets
or re-prime the gun.
- Empty the grease barrel,
 rell,andre-prime.
-Taketheunittoaqualied
service center.

Other PT Tools manuals

PT W5706 User manual

PT

PT W5706 User manual

PT W2991 User manual

PT

PT W2991 User manual

PT M208 User manual

PT

PT M208 User manual

PT W2262 User manual

PT

PT W2262 User manual

PT W1650 User manual

PT

PT W1650 User manual

PT M545 User manual

PT

PT M545 User manual

PT W89100 User manual

PT

PT W89100 User manual

PT M546 User manual

PT

PT M546 User manual

PT M680 User manual

PT

PT M680 User manual

PT W89727 User manual

PT

PT W89727 User manual

PT M630 User manual

PT

PT M630 User manual

Popular Tools manuals by other brands

SAINT-GOBAIN BarbLock BLT-HHPAD Operation manual

SAINT-GOBAIN

SAINT-GOBAIN BarbLock BLT-HHPAD Operation manual

Matco Tools BPS400 instruction manual

Matco Tools

Matco Tools BPS400 instruction manual

Martor SECUNORM PROFI25 quick start guide

Martor

Martor SECUNORM PROFI25 quick start guide

Stanley MasterFix XGrip N09QI manual

Stanley

Stanley MasterFix XGrip N09QI manual

Triton ETA 300 Operating and safety instructions

Triton

Triton ETA 300 Operating and safety instructions

molex 57859-5000: 10P operating manual

molex

molex 57859-5000: 10P operating manual

Hafco PN1/2-2 Operation manual

Hafco

Hafco PN1/2-2 Operation manual

Foxwell PTS1000 manual

Foxwell

Foxwell PTS1000 manual

IMI NORGREN PGS10H Series User instructions

IMI NORGREN

IMI NORGREN PGS10H Series User instructions

BISSETT BT-CNR45 user manual

BISSETT

BISSETT BT-CNR45 user manual

Würth VIKING ARM manual

Würth

Würth VIKING ARM manual

ERGODYNE SQUIDS 3785 quick start guide

ERGODYNE

ERGODYNE SQUIDS 3785 quick start guide

Bosch SKIL 4750 operating instructions

Bosch

Bosch SKIL 4750 operating instructions

RODCRAFT 5610 Operation manual

RODCRAFT

RODCRAFT 5610 Operation manual

Balcrank 3310-030 Operation, installation, maintenance and repair guide

Balcrank

Balcrank 3310-030 Operation, installation, maintenance and repair guide

ujk technology 109294 quick start guide

ujk technology

ujk technology 109294 quick start guide

Sealey VS7004 instructions

Sealey

Sealey VS7004 instructions

molex 57147-6000 operating manual

molex

molex 57147-6000 operating manual

manuals.online logo
manuals.online logoBrands
  • About & Mission
  • Contact us
  • Privacy Policy
  • Terms and Conditions

Copyright 2025 Manuals.Online. All Rights Reserved.