PT W5706 User manual

4-IN-1 LASER PRO
MEASURING TOOL
WARNING!
READ, UNDERSTAND AND FOLLOW ALL INSTRUCTIONS AND
WARNINGS BEFORE OPERATING THIS TOOL. FAILURE TO DO SO
MAY RESULT IN PERSONAL INJURY AND/OR PROPERTY DAMAGE
AND WILL VOID WARRANTY.
DANGER!
LASER RADIATION-DO NOT STARE INTO BEAM OR VIEW DIRECTLY
WITH OPTICAL INSTRUMENTS. AVOID DIRECT EYE EXPOSURE.
THIS ITEM IS NOT FOR CHILDREN UNDER 14. MISUSE OF THE
DEVICE CAN RESULT IN PERMANENT EYE DAMAGE.
1 YEAR WARRANTY
PERFORMANCE TOOL® extends only the following warranties, and only to original retail purchasers. These
warranties give specific legal rights. Except where prohibited by local law, the law of the State of Washington
governs all warranties and all exclusions and limitations of warranties and remedies. There may be other rights
which vary from state to state.
PERFORMANCE TOOL® warrants the product to be free from defects in materials and workmanship under normal
use and service. A defective product may be returned for a free replacement within 90 days from the date of
purchase, provided that product is returned to place of purchase immediately after discovery of defect. After 90
days and up to one year from date of purchase, PERFORMANCE TOOL® will replace at no charge any parts which
our examination shall disclose to be defective and under warranty. These warranties shall be valid only when a
sales receipt showing the date of purchase accompanies the defective product or defective part (s) being returned.
For part (s) after 90 days, please remit your request, postage prepaid to:
PERFORMANCE TOOL, P.O. Box 88259 Tukwila, WA 98138
These warranties exclude blades, bits, punches, dies, bulbs, fuses, hoses, and other consumables which must be
replaced under normal use and service. These warranties shall not apply to any product or part which is used for a
purpose for which it is not designed, or which has been repaired or altered in any way so as to affect adversely its
performance or reliability, nor shall these warranties apply to any product or part which has been subject to
misuse, neglect, accident or wear and tear incident to normal use and service.
PERFORMANCE TOOL® does not authorize any other person to make any warranty or to assume any liability in
connection with its products.
Except for warranties of title and the limited express warranties set forth above, PERFORMANCE TOOL® makes no
express or implied warranties of any kind with respect to its products. In particular, PERFORMANCE TOOL® makes
no implied warranty of merchantability and no implied warranty of fitness for any particular purpose, except that for
goods purchased primarily for personal, family or household use and not for commercial or business use,
PERFORMANCE TOOL® makes an implied warranty of merchantability (and, if otherwise applicable, an implied
warranty of fitness for a particular purpose), but only for the particular qualities or characteristics, and for the
duration, expressly warranted above.
The laws on limitation of implied warranties may differ from state to state, so the above limitations may not apply in
all cases.
PERFORMANCE TOOL® shall not be liable for consequential, incidental or special damages resulting from or in any
manner related to any product, or to the design, use, or any inability to use the product. The sole and exclusive
remedy for a defective product or part shall be the repair, or replacement thereof as provided above. The laws on
limitation of remedies or on consequential, incidental or special damages may vary from state to state, so the above
limitations may not apply in all cases.
© Copyright 2020 WILMAR CORPORATION, P.O. Box 88259 Tukwila, WA 98138
OWNER'S MANUAL
Item Number W5706
TAPE MEASURE OPERATION:
1.
The measuring tape reel can be drawn out to measure lengths of up to 8 ft. (250 cm).
2. Press the tape measure lock release (6) to automatically reel in the tape.
Note:
The tape measure is auto locking and will not retract back into the reel unless the
lock release button (6) is pressed.
Note:
When reeling in the tape measure,
feed it in slowly to avoid cuts or injuries.
OPERATION INSTRUCTIONS CONT.
6
NOTE: The laser line is not self-leveling.
WARNING: Laser radiation - avoid direct eye exposure! This item is not for
children under 14. Misuse of the device can result in permanent eye damage.
Note: Class IIIA laser product, less than 3.5mW power output and accuracy to
+/-2 mm at 10 m and 25 m. Not suitable for outdoor use and laser may need a
simple adjustment to plumb level before rst use.
Handle with care and don't drop
from heights to avoid damaging the glass indicators.
1. Locate the battery compartment (3) near the power switch (2).
2. Remove securing screw with a PH0 Phillips head screw driver.
3. Open compartment and insert 3 new LR44 / AG13 button cell batteries paying
attention to polarity.
Note: Negative contact is indicated inside compartment and positive side of battery
goes towards spring.
4. Replace battery cover and turn screw until snug. Overtightening may cause
damage to door or strip screw.
1
TOOL FEATURES
Weight ............................................................................................... 8 oz.
Dimensions................................................................... 7.3 X 1.1 X 2.5 in.
Batteries ..............................................3 LR44 Alkaline batteries included
Laser.....................................................Class IIIA, >3.5mW Power output
Accuracy..........................................................+/-2 mm at 10 m and 25 m
TECHNICAL SPECIFICATIONS:
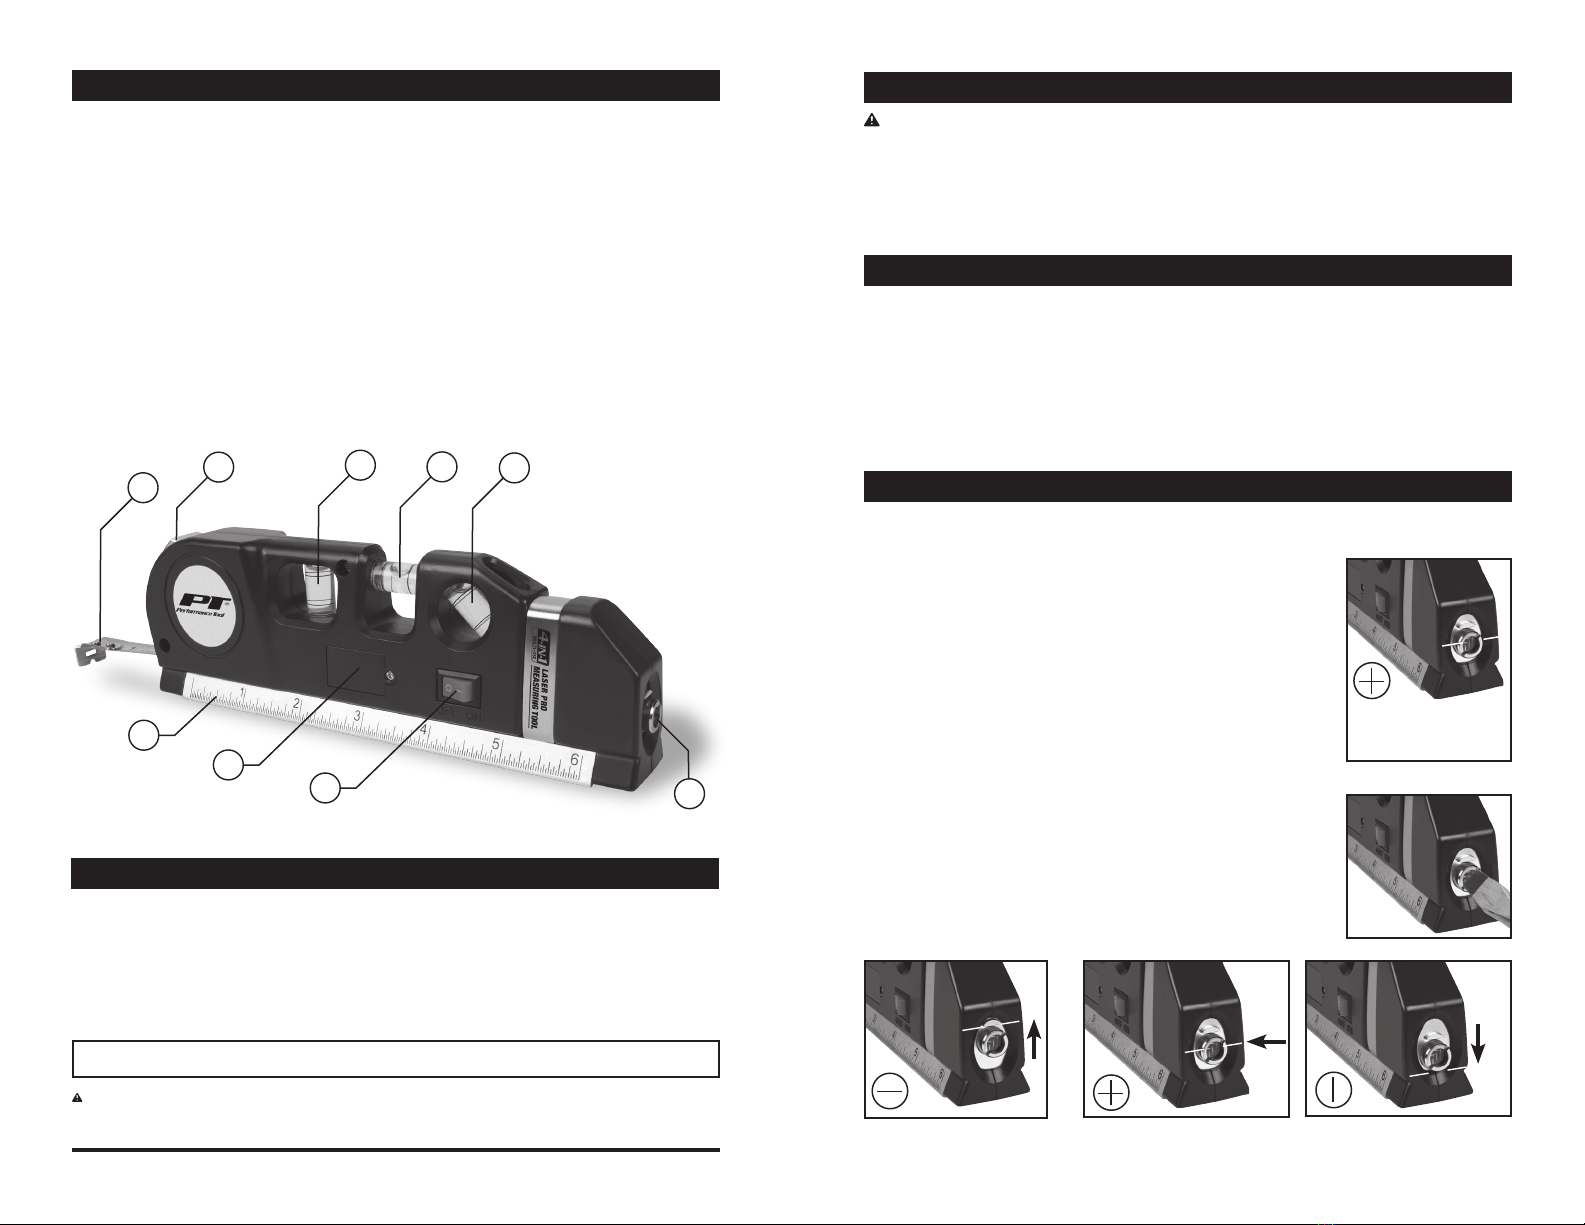
1. Laser Head
2. Laser Power Switch
3. Battery Compartment
4. SAE Ruled Straight Edge
5. 8 ft. (2.5 m) Tape Measure
6. Tape Measure Lock Release
2
5
1
7. Vertical Bubble Level
8. Horizontal Bubble Level
9. 45° Bubble Level
10. Metric Ruled Straight Edge
Technical specifications are subject to change without notice.
WARNING: Read and understand this entire instruction manual before attempting to assemble, install, operate or maintain
this product. Failure to comply with the instructions may result in serious personal injury and/or property damage!
3
4
789
Measures, levels and projects a laser line with 3 different patterns and is ideal
where a straight line or accurate measurement is needed.
Note: Class IIIA laser product, less than 3.5mW power output and accuracy to
+/-2 mm at 10 m and 25 m. Not suitable for outdoor use and laser may need a
simple adjustment to plumb level before rst use.
SAFETY PRECAUTIONS
BATTERY INSTALLATION
Move laser head to the top position
to project a horizontal line.
Move laser head to the middle
position to project a cross beam.
Move laser head to the bottom
position to project a vertical line.
OPERATION INSTRUCTIONS
LASER CALIBRATION:
1. Before putting into use verify the true accuracy of the horizontal laser line.
2. Place the 4-in-1 Laser Pro onto a level surface.
3. Adjust the laser head (1) to the cross setting (Fig. 1)
and project laser onto a wall approx. 5 - 10 ft. away.
4. Use a ruler to verify the left and right sides of the laser line
areequaldistancesfromtheoor.Thisstepveries
accuracy of the horizontal line.
5. If needed the angle of the projected laser line can be
adjusted by turning the head of the laser (1) using
a straight edge or large screwdriver (Fig 2).
Note: Be careful not to scratch or damage the laser lens
during the laser adjustment process.
LASER OPERATION:
1. Point laser towards the intended surface and away from
yourorother’seyes.
2. Turn laser power switch (2) from O to I to power “ON”.
3. Adjust Laser Head (1) to the preferred pattern by moving
the head to the top, middle or bottom position as shown below.
Note: The laser will stay on until you turn power switch (2) to
the off position.
Move the laser head to
the middle position to
project a cross beam.
Fig. 1
Fig. 2
6
Other PT Tools manuals


