Pudu BellaBot BL100 User manual

PuduTech
www.pudutech.com
Copyright © 2020 Pudu Technology Inc. All Rights Reserved.
User manual V1.2
BL100、BL110、BL101

Declaration:
Copyright © 2020 Pudu Technology Inc. All Rights Reserved.
Without the express written permission of Pudu Technology Inc., no unit or individual may
imitate, reproduce, copy or translate the contents of this manual in part or in whole, the
dissemination by any means (electronic, photocopying, recording, etc. shall not be carried
out for the purpose of making profits. Product specifications and information mentioned in
this manual are for reference only and are subject to change without notice. Unless otherwise
specified, this manual is for guidance only and does not constitute a warranty of any kind.
This device complies with part 15 of the FCC Rules. Operation is subject to the condition that
this device does not cause harmful interference (1 this device may not cause harmful
interference, and (2 this device must accept any interference received, including interference
that may cause undesired operation.
Any changes or modifications not expressly approved by the party responsible for compliance
could void the user's authority to operate the equipment.
NOTE: This equipment has been tested and found to comply with the limits for a Class B digital
device, pursuant to Part 15 of the FCC Rules. These limits are designed to provide reasonable
protection against harmful interference in a residential installation. This equipment generates,
uses and can radiate radio frequency energy and, if not installed and used in accordance with
the instructions, may cause harmful interference to radio communications. However, there is
no guarantee that interference will not occur in a particular installation.
If this equipment does cause harmful interference to radio or television reception,
which can be determined by turning the equipment off and on, the user is encouraged to try to
correct the interference by one or more of the following measures:
-- Reorient or relocate the receiving antenna.
-- Increase the separation between the equipment and receiver.
-- Connect the equipment into an outlet on a circuit different
from that to which the receiver is connected.
-- Consult the dealer or an experienced radio/TV technician for help.
To maintain compliance with FCC’s RF Exposure guidelines, This equipment should be
installed and operated with minimum distance between 20cm the radiator your body: Use only
the supplied antenna.
FCC ID: 2AXDW-BL100
The W52 and W53 band can only be used indoors.
CATALOG
Safety Instructions
Instructions for use
Environmental notes
Power and power requirements
Safety instructions
Product Composition
Exterior parts introduction
Performance parameters
Tray size and height
Product Use
Charging instructions
Charging interface
Power ON, Power OFF, Pause, Start
Mode selection
Delivery mode
Cruise mode
B-day mode
Direct delivery mode
Special mode
Alarm display
4
5-7
8-9
9-10
11
12
13-14
15
15
16-17
18-19
20-21
21-22
22-23
23-24
25-26
27
1 2

26
26
27
28
28
28
29
29
29
30
31
31
31
31
32
33
34-38
Service functions
Map settings
Voice settings
Speed settings
LED dot-matrix setting
Version upgrade
Advanced settings
Music function
Music playlist
Music import
Parking instructions
Instructions on voice interaction
Instructions on touch interaction
Product Maintenance
Troubleshooting
After-sales Service
Trays, drive wheel and auxiliary wheel
Sensors maintenance
Robot body maintenance
Handling of robot
Sign maintenance
1. DO NOT place any item with weight over the load of the tray: 10kg/tray(standard),
5kg/tray(obturated)
2. Click Finish to deliver the next task immediately, please take the food before clicking
Finish.
3. Do NOT pick up and drop the food when the robot is moving, if necessary, please click
the screen to pause the robot, and then pick and drop the food.The pause time of cruise
mode is 20s, and the pause time of other modes is 10s, after the pause, the robot will
resume walking automatically.
4. DO NOT press hard on the screen or tap the screen.
5. DO NOT pull the robot during operation.
6. DO NOT push the robot backwards while the robot is powered on.
7. If the robot enters the wrong position due to factors such as blockage, please pause the
task and push it to the correct route to continue the task.
8. In the event of a collision, please cancel the current task or pause, re-enter the task, DO
NOT artificially block the robot.
9. In the absence of special custom-made trays, it is not recommended in principle to
deliver soup with PuduBot.When using, be sure to prevent the soup from being splashed
and being scalded by the hot water.
10. Pay attention to the change of state of the robot during its travel, please avoid the
robot when it is carrying hot tableware or soup pot to prevent collision with the robot and
high temperature burns.
11. The top camera is used for precise positioning of the robot, DO NOT block it with a
cover during starting and running.
12. DO NOT tap or make other actions to the robot, otherwise it may easily cause
equipment damage.
Instructions for use
Safety Instruction
28
28
29
29
30
30
31
31
31
32
32
33
34
34
34
34
34
35
36-40
3 4

1. The robot is suitable for use in flat environments such as floors, tiles, and thin carpets, it
is not suitable for use in environments where there are steps, the slope is too large, or the
environment is too tight.
2. It is not recommended to use the robot on wet or obviously watery ground.
3. Any kind of debris such as the power cord that has been scattered on the ground may
catch or wrap the robot, be sure to remove it before use.
4. The use of this product in the case of obvious protrusions such as sills may cause the
food to sprinkle, please make sure that the height of the protrusions is within 1cm.
5. The minimum travel width of the robot should be greater than 80cm, the width of the
long pass should be greater than 1m; if the width is greater than 2m, two robots can be set
to travel side by side in opposite direction (the specific width is evaluated by the technical
staff based on the actual scenario), otherwise it will move by making the way; the
standard entrance of the kitchen should be greater than 1.2m, and less than 1.2m may
cause certain human-machine congestion.
6. The pure black (such as skirting), mirror surface (such as wall), or full transparency
(such as floor-to-ceiling glass) items within 16~22cm from the ground, it may interfere
with the robot radar reflection, causing the robot to move abnormally, and it may be
necessary to make some modifications to the site so that the radar can reflect (such as
applying stickers).
Environmental notes
Minimum pass width is 0.8m
Minimum pass width is 2m
7. The ceiling height is within the range of 2-8 meters (higher or lower may require
technical evaluation); taking the height of 3 meters as an example, it is necessary to apply
a graphic mark every 2 meters or so, there is no lighting fixture or other strong light source
in the 30cm area around the graphic mark. (Data for specific interval needs to be provided
by Technology Dept.)
8. The designed maximum climbing angle of the robot is 7.5°, but in order to prevent the
dishes from toppling, it is recommended that the slope of the dishes is within 5º; to
prevent possible risks caused by the robot slipping back and forth, avoid pausing the
robot while it is going uphill; to prevent the robot from falling accidentally on the slope,
the width of the slope should not be less than the minimum passing width of 0.80cm, and
the rollover angle should not exceed 5°
Marker
5º
5º
7.5 º
16~22cm
5 6
User Manual User Manual

9. There is a 35cm space between the two robots placed side by side at the standby point,
and a clearance of 15cm from the rear wall and 35cm from the side wall.
10. It is necessary to add fences or other blocking protection at the locations, such as
the edge of the stairs and entrance of the downhill, where there is a risk of the robot
falling.
15CM
35CM
35CM 35CM 35CM
1. 1.When the remaining power of the robot is less than 20%, please charge it in time,
long-term operation with low power may shorten the service life of the battery.
2. Before charging, please make sure that the battery of the robot is installed in the
robot,and it is forbidden to charge the robot without battery.
3. It is strictly forbidden to remove the quick detachable battery during charging.
4. It is strictly forbidden to remove the quick detachable battery when the power is on.
5. When charging is finished, please disconnect the power supply in time. Do not charge
the machine for a long time when the machine power is full.
6. If the robot is not used for a long time, please lock the robot through the key switch and
cut off the power supply to protect the battery.
7. It is necessary to use the battery and charging equipment specially provided by the
original factory. It is strictly prohibited to use non original charger to charge the robot.
8. Charge the main engine with power voltage marked on the charger nameplate.
9. The quick detachable battery can be charged only by the original charger.The battery
charging progress can be notified by the lights,the details is below:
10. Please make sure that the robot is power off before changing the battery and it is
strictly prohibited to change the battery when robot is NOT power off.
11. Please make sure the input voltage is fit for the requirement voltage, whitch may
damage the charger if not.
12. Please protect the charging line carefully and do NOT pull or twist the line.
13. Please designate a person in charge to charge the machine. Do not charge the robot or
the battery alone without being on duty.
Power and power requirements
Current battery remaining capacity
0%~10%
10%~25%
25%~50%
50%~75%
75%~90%
90%~100%
Red
Light Mode
Blue
Blue
Blue
Blue
Green
7 8
User Manual User Manual

1. DO NOT place any open flame on the tray, and DO NOT place any flammable solids,
gases or liquids.
2. It is forbidden to do cleaning and maintenance work when the machine is powered on.
3. To ensure safety, it is recommended to adjust the robot speed to medium or below, and
it is forbidden to play in front of the robot to avoid unnecessary injury.
4. Temporary tray loading adjustment is prohibited during the robot's travel, all opera-
tions should be performed after clicking the screen to make the robot pause.
5. When the robot delivers food to the designated table number area, DO NOT perform the
operation such as picking up the food before the machine body is stopped, so as to avoid
the loss of food or personal injury caused by accidental collision.
6. If the robot is going away and the screen operation is invalid, or other emergency
situations occur, please use the toe to kick the emergency switch at the charging port.
7. This product is a wheeled robot, which is limited to indoor flat environment (smooth
ground, slope less than 5 degrees, protrusions not higher than 1cm), DO NOT use it in
outdoor environments (such as open balconies) or on rugged floors (such as stairs).
8. DO NOT use it in an environment where the ambient temperature is above 50°C or
below 0°C, or if there is any liquid or viscous material on the floor.
9. Please put away all kinds of wires on the ground in the environment before use to avoid
dragging when the main unit is running. Remove sharp objects on the ground (such as
decoration waste, glass, nails, etc.) before use to avoid damage to the machine chassis.
14. Do not place the machine near flammable and explosive objects to charge.
15. The storage and charging position of the robot should be kept dry and at normal
temperature. It is strictly prohibited to place the machine and charger in the high-tem-
perature area (> 40℃), and water is strictly prohibited to enter the machine or charger.
16. It is strictly prohibited for the charger to collide with external objects and cause
damage to the charger.
17. If the charger is found damaged and the charging current is abnormal, please replace
the charger in time.
18.If you receive the robot alarm, please disconnect the charging device immediately.
10. To push or move the robot while it is moving, first tap the screen to pause it.
11. DO NOT spill any liquid into the product.
12. DO NOT place any non-transportable objects (including children, pets) on a stationary
or moving robot.
13. The robot has automatic obstacle avoidance function, but it is strictly forbidden to
block the robot suddenly during the high-speed operation, otherwise it may cause a
safety accident.
14. The blind-spot recognition area of the robot is shown below.
Safety instructions
* Our company does not assume any responsibility for all accidents caused by improper operation.
9 10
User Manual User Manual

Component description
Product Composition
Front Side
Power Switch Charging Cable E-stop Switch
Back
[1] Vision positioning
sensor
[2] Screen
[3] Depth vision sensor
[4] Lidar
[5] Power Switch
[6] Tray
[7] Drive Wheel
[8] Auxiliary Wheel
[9] E-stop Switch
[10] Charging Jack
[11] Key Switch
[12] Flash Button
[13 Ear light
Performance parameters
Model
Operating voltage
Charging time
Power input
Battery lifetime
Cruise speed
Number of trays
Tray load
Climbing slope
Screen specifications
Machine material
Battery capacity
Machine weight
Machine size
Power output
Audio power
Design life
Working temperature
Storage temperature
Operating humidity
Environmental pollution
Operating altitude
Working environment
Enclosure
Charging method
DC 23-29.4V
4.5h
13~24h
0.5~1.2m/s adjustable
3 layers
55Kg
7.5° at maximum and 5° for safe delivery of dishes
(depending on whether the dishes delivered are easy to be spilt)
10.1-inch HD color touch screen
ABS/aviation-grade aluminum alloy
21000mAh
565*537*1290(mm)
20W*2 Stereo
5 years
0~40℃
-40~65°
85%RH
Grade 3
below 2000m
Indoor environment, flat and smooth ground
IP20
Manual plugging and charging
AC 100-240V, 50/60Hz
29.4V-4A
Top
[2]
[3]
[5]
[6]
[4]
[7]
[8]
[10]
[1]
[11]
[9]
[12]
[13]
STOP
BL100、BL110、BL101
BL100/BL101: 10kg/layer BL110: 5kg/layer
11 12
User Manual

Tray size and height
Tray size:
355X453mm
Tray size:
410X500mm
Layer height between trays:
220mm
Layer height between trays:
180mm
Layer height between trays:
200mm
Layer height between trays:
200mm
Layer height between trays:
200mm
Layer height between trays:
220mm
Layer height between trays:
220mm
13 14
User Manual User Manual

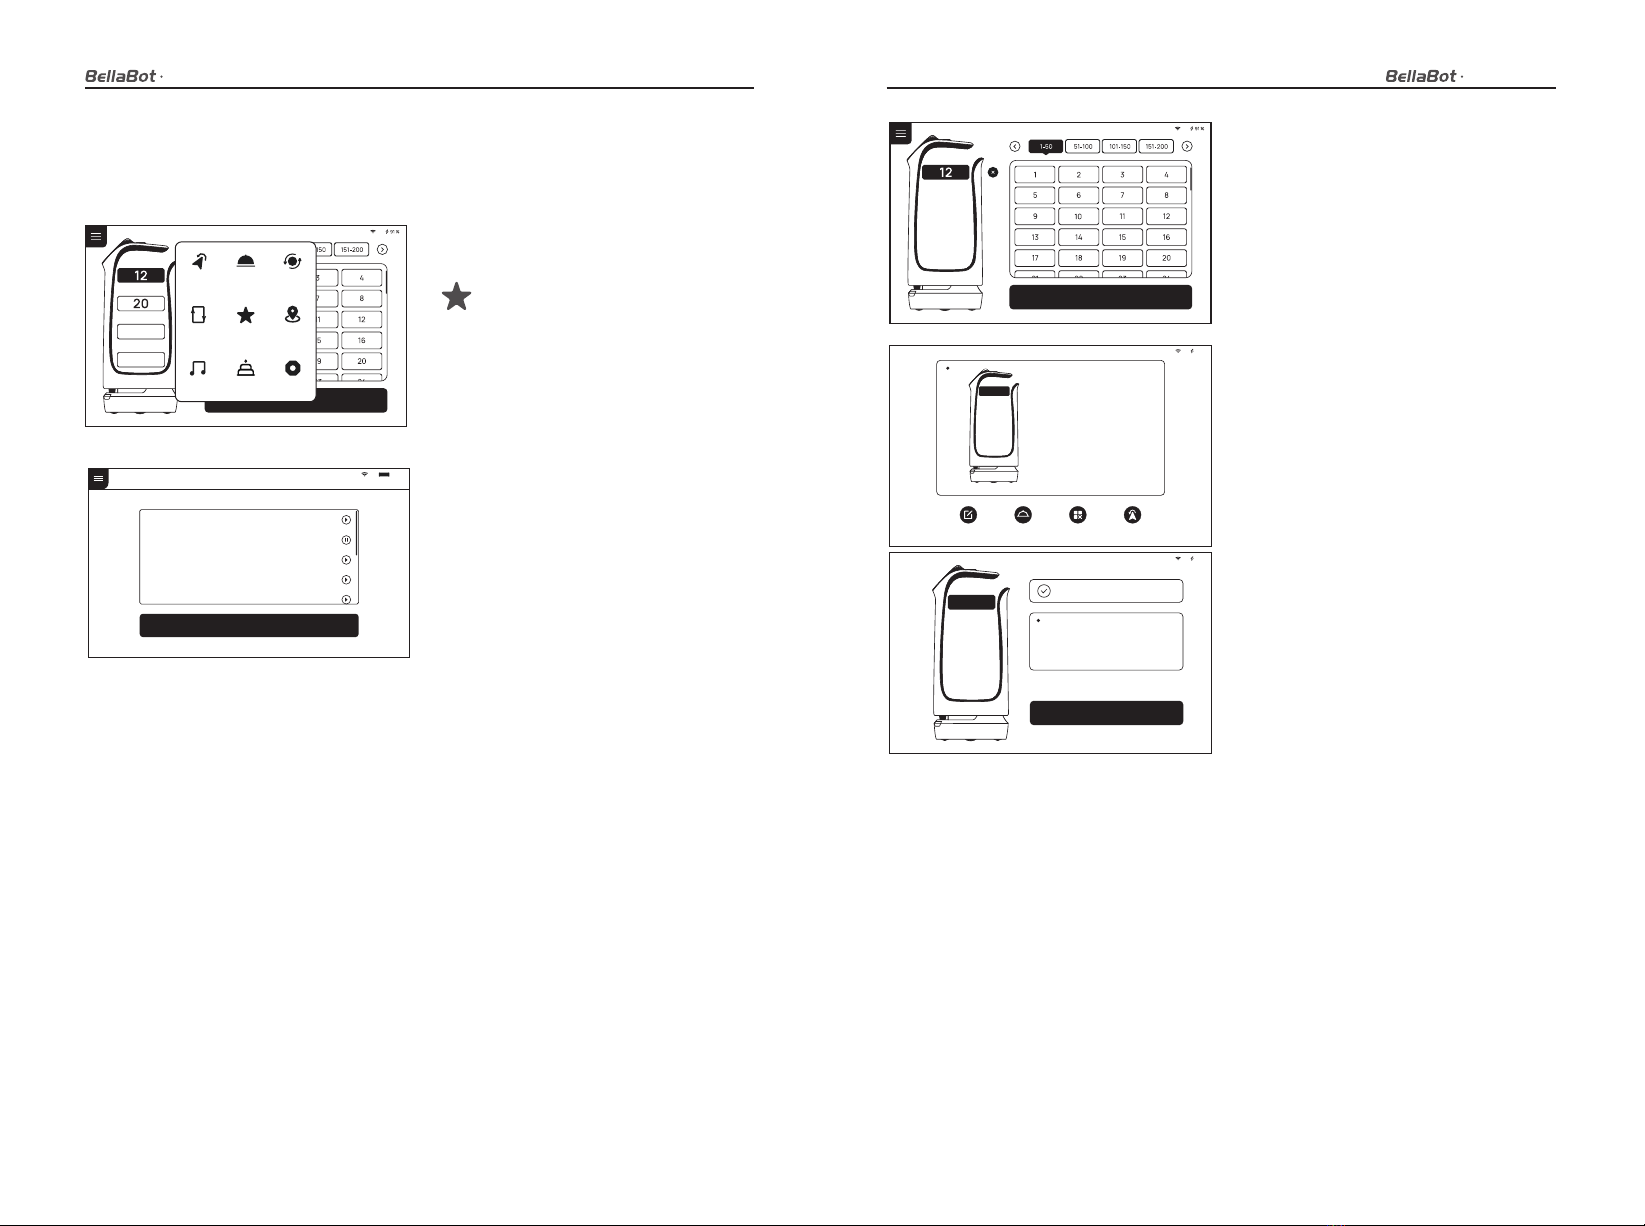
Charging mode: Connect the charging interface of the robot to the charging cable to
ensure that the charging port of the robot is connected to the charging cable, if the
connection is successful, the robot will prompt it is charging.
Power requirements:
1. In order to ensure the efficiency of the robot and battery life, please keep the robot
power at 10% or more at any time;
2. When the power is lower than 10%, the robot is in a low battery state and needs to be
charged as soon as possible;
3. When the power is lower than 2%, the battery is protected, the robot will not be able to
perform the task, and it needs to be charged before use.
The screen displays an indication that
charging is in progress, indicating that
the machine is charging.
After charging is complete, the screen
displays a reminder that the charging
container is saturated.
Move the robot directly below the visual mark
before each power-on.
Before each power-on
Press and hold the power button for 0.5 seconds,
and the bottom light strip will display blue.
Power-on
The screen enters the working mode, indicating
that the boot is successful.
starting up
Press and hold the power off button for 3 seconds,
the bottom light strip is off, and the screen is black,
indicating that the shutdown is successful.Press
and hold the OFF button for 10 seconds to achieve
a forced power-off of the robot (if the robot is not in
an abnormal state, this feature is not recommend-
ed).
Power-off
Product Use
Charging instructions
Charging interface
Power ON, Power OFF, Pause, Start
67%
Charging…
100%
Charging completed
15 16
User Manual

While the robot is running, touch the screen to
make the robot pause.
Pause
The screen enters the pause interface.
Pauseing
If it is necessary to continue running, you need to
click the screen again.In cruise mode, if there is no
other action in the pause interface, the robot will
automatically resume walking after 20s, and after
Running
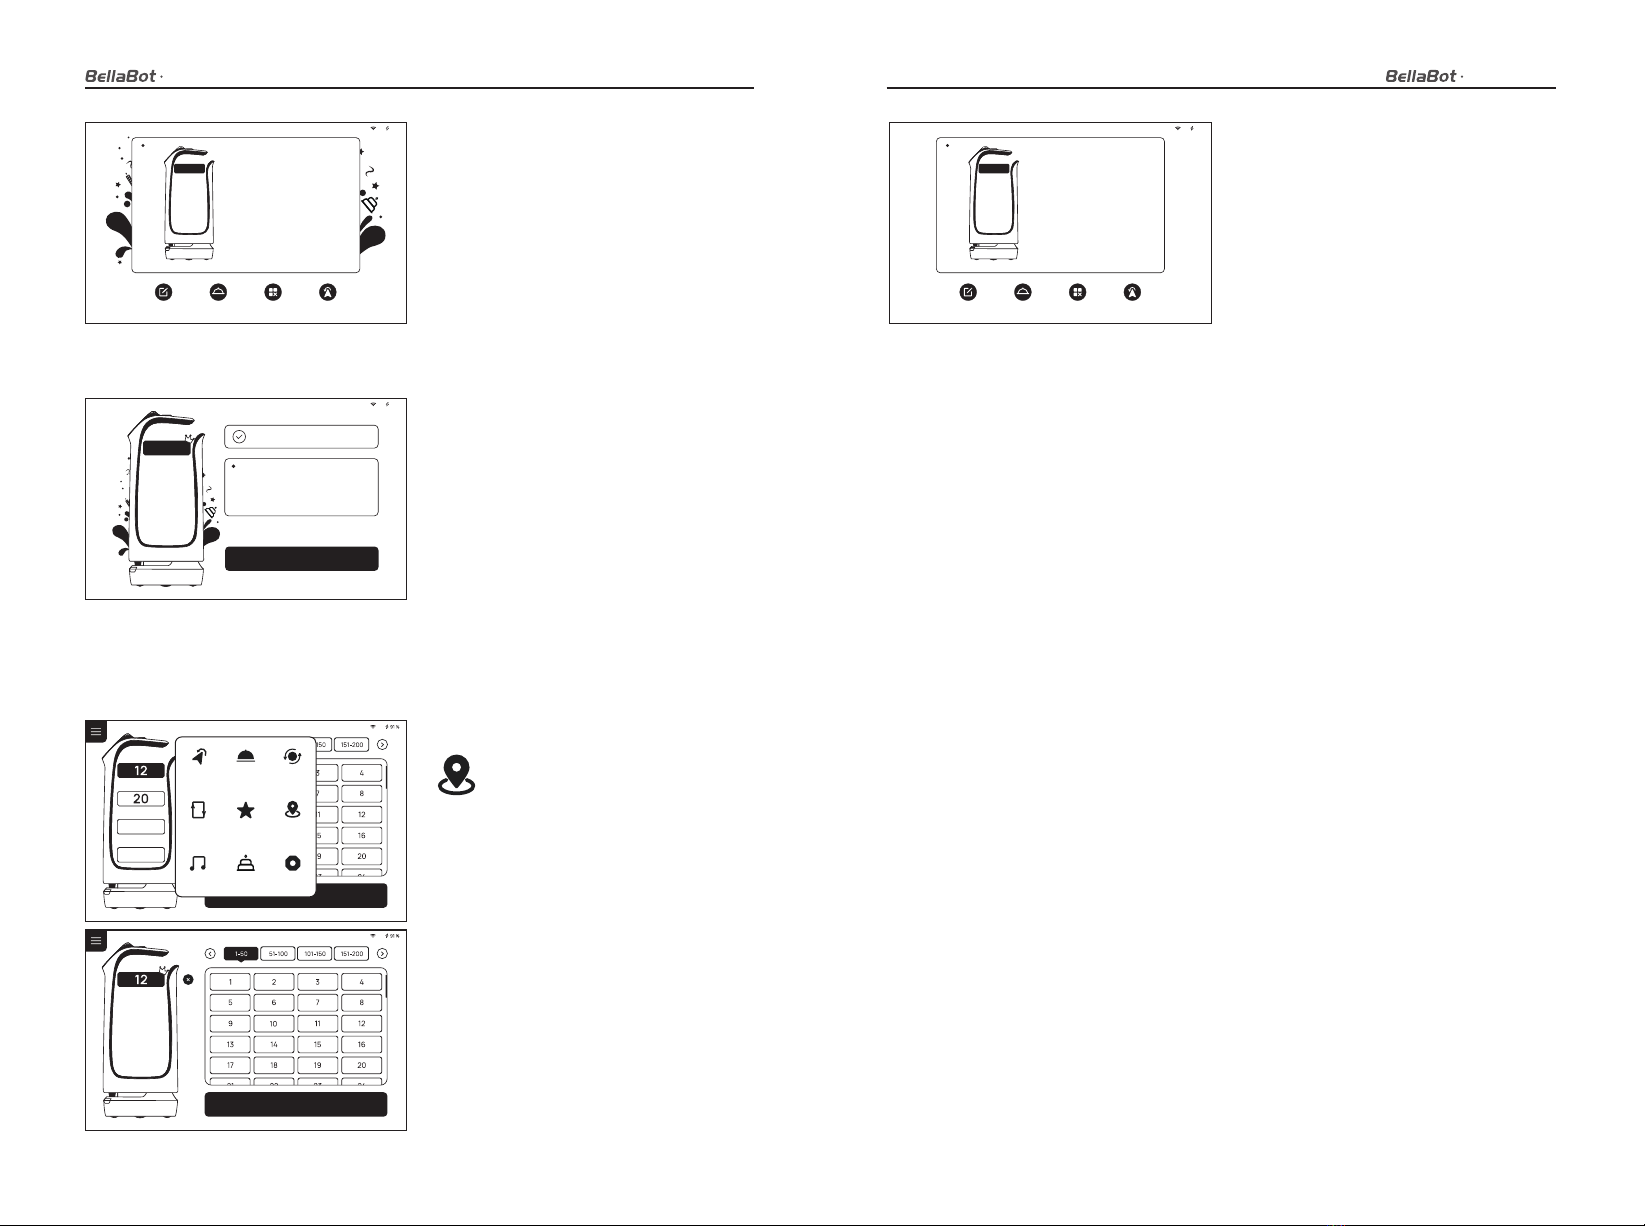
In order to be applicable in different business scenarios, the modes can be selected as
required. The robot provides six mode selections, which are food delivery mode, cruise
mode, direct delivery mode, B-day mode, special mode, and used plate collection mode.
After the robot is turned on, the mode can be selected through the menu bar.
The direct delivery mode, B-day mode, and
special mode require a purchase of license
to be available, if you need it, please
contact technical support personnel.
Mode selection
In delivery mode, the robot can be used for food delivery to multiple tables at the same
time. Place the food ordered by different customers on several trays, then enter the
corresponding table number, it can plan the best path and deliver the food. After the food
is delivered, the robot will automatically return to the pick-up position.
Food delivery mode
In cruise mode, it can carry self-service drinks, dessert, snacks, or paper towels, moving
along the customized circulation path by the waiter, and inviting customers to enjoy or
taste through voice.
Cruise mode
Pause
Click on the screen
to continue delivering
Continuedelivering in 10 seconds
91%
10
ReturnModifytask Pickup
inadvance Cancelall
12
3
Start o
Return Delivery
mode
Dish-return
mode
Cruise
mode
Music
Special
mode
Birthday mode Set up
Direct
delivery
mode
17 18
User Manual User Manual

In this mode, the robot can perform a one-way transport operation, you can set a table
number, a dishwashing room or other places as the destination, after the delivery, the
robot will automatically exit the task and will not return to the pick-up position, then you
can enter the new destination again.
Direct delivery mode
In B-day mode, the robot can provide the service of delivering birthday cakes or gifts, and
automatically play the set music during the transport.
B-day mode
after selecting this mode, the interface will prompt to select background music. This mode
is suitable for some special scenarios, such as marriage proposal and blessing, the robot
can quickly select background music in a single time.
Special mode
1
The food livery mode is a common mode, and the task delivery method is used for food
delivery to a designated location, the specific steps are as follows:
Food delivery mode
1. At the food delivery location, select the
Delivery Mode.
2. Place the food on the tray.
3. Click on the tray where the food is
located and select the destination table
number. The higher trays are automatically
selected by default, and you can select the
corresponding table number.
4. After the table number is entered, click
to start the delivery, and the robot will start
executing the task.
5. The robot quickly arrives at the designat-
ed location according to the established
trajectory. During the delivery process, you
can touch the robot screen to stop the
command, and the robot will stop for
waiting immediately, if a touch command
is not received after 10 seconds, the robot
will continue to perform the task.
6. After the robot is paused, the screen
enters this interface, you can perform
operations such as modifying the task,
bringing food in advance, canceling all
tasks, and returning.
Click to modify the delivery
table number
Click to cancel the current
delivery task
Click to cancel all delivery tasks
Click to return to the dish ready point
Pause
Click on the screen
to continue delivering
Continue delivering in 10 seconds
91 %
10
12
ReturnModify task Pick up
in advance Cancel all
Start o
Return Delivery
mode
Dish-return
mode
Cruise
mode
Music
Special
mode
Birthday mode Set up
Direct
delivery
mode
Start o
19 20
User Manual User Manual

1. At the start of food delivery, select cruise
mode.
7. At the task destination, the robot will
have a voice prompt to the guests that the
food has arrived, and the guest can tap the
screen to get the food.
8. The robot will automatically return to
the food pick-up position and wait for the
next task.
2. Select the automatic cruise route.
3. Select Start and the robot will start the
cruise task.
4. During the cruise process, you can touch
the robot screen to stop the command, and
the robot will stop for waiting immediately,
if a touch command is not received after 20
seconds, the robot will continue to perform
the task.
Cruise mode is a commonly used mode, the robot patrols in a specific environment,
covering a large area, and the specific steps are as follows:
Cruise mode
The B-day mode is used to deliver gifts and play birthday songs for birthday scenario, the
specific steps are as follows:
B-day mode
1. At the food delivery location, select the
B-day Mode.
2. Place the gift on the tray, supporting
only one destination at a time.
3. Select the table number of target
destination.
4. After the table number is entered, click
to start the delivery, and the robot will start
executing the task. The robot starts playing
the playlist set in B-day mode.
5. When picking up the food, please stand
in front of the robot or touch the robot
display screen, the robot stops running,
and the screen enters the pause page,
indicating that the robot stops running,
and the diners can pick up food at will.
6. After the food is completely picked up,
the diners only need to click again on the
robot display or pause to wait for over 20
seconds, the robot returns to the operation
mode again from the original stop.
91 %
Cruise mode
Route 1
Route 2
Route 3
Route 4
Start o
Pause
Click on the screen to continue delivering
Continue delivering in 20 seconds
91 %
Cancel return
Start o
Return Delivery
mode
Dish-return
mode
Cruise
mode
Music
Special
mode
Birthday mode Set up
Direct
delivery
mode
Start o
Return Delivery
mode
Dish-return
mode
Cruise
mode
Music
Special
mode
Birthday mode Set up
Direct
delivery
mode
91 %
12
Delivered
12
Complete!
Start o
21 22
User Manual User Manual
5. The robot quickly arrives at the designat-
ed location according to the established
trajectory. During the delivery process, you
can touch the robot screen to stop the
command, and the robot will stop for
waiting immediately, if a touch command
is not received after 5 seconds, the robot
will continue to perform the task.After the
pause, the screen enters this interface, you
can perform operations such as modifying
the task, bringing food in advance,
canceling all tasks, and returning.
4. During the motion process, you can click
the robot screen, and the robot will stop
for waiting immediately, if a touch
command is not received after 20 seconds,
the robot will continue to perform the task.
5. After reaching the destination, return to
the main interface of the direct delivery
mode, select a destination, and the robot
can proceed with the next task.
6. After reaching the task destination, click
“Finish” to return to the food pick-up
position.
In the direct delivery mode, the robot can set any table, transfer position or food delivery
position, the specific steps are as follows:
Direct delivery mode
1. Select the Direct Delivery Mode.
2. Select a destination, the direct
delivery mode only allows you to select
one destination.
3. Confirm the destination, the robot
starts execution.
Start o
Return Delivery
mode
Dish-return
mode
Cruise
mode
Music
Special
mode
Birthday mode Set up
Direct
delivery
mode
91 %
12
Delivered
12
Complete!
ReturnModify task
91 %
12
Pause
Click on the screen
to continue delivering
Continue delivering in 10 seconds
Pick up
in advance Cancel all ReturnModify task
91 %
12
Pause
Click on the screen
to continue delivering
Continue delivering in 10 seconds
Pick up
in advance Cancel all
Start o
23 24
User Manual User Manual
2. Place dishes or gifts on the tray,
supporting only one destination at a
time.
5. The robot quickly arrives at the designat-
ed location according to the established
trajectory. During the delivery process, you
can touch the robot screen to stop the
command, and the robot will stop for
waiting immediately, if a touch command
is not received after 10 seconds, the robot
will continue to perform the task.
6. After reaching the task destination, click
“Finish” to return to the food pick-up
position.
3. Select the background music used for
the service, and choose the table number
for the food delivery.
4.After the table number is entered, click to
start the delivery, the robot will start
executing the task and start playing the
playlist set for the Special Mode.
91 %
Please select music to play
Song’s name
Song’s name
Song’s name
Song’s name
Song’s name
Confirm
Special mode
91 %
12
Delivered
12
Complete!
ReturnModify task
91 %
12
Pause
Click on the screen
to continue delivering
Continue delivering in 10 seconds
Pick up
in advance Cancel all
The special mode is used for food delivery services with robot in special scenario, you can
quickly set the music played during food delivery, and the specific steps are as follows:
Special mode
1. At the food delivery location, select the
Special Mode.
Start o
Return Delivery
mode
Dish-return
mode
Cruise
mode
Music
Special
mode
Birthday mode Set up
Direct
delivery
mode
Start o
25 26
User Manual User Manual

An abnormal state of the robot or an
unexpected situation may cause
damages to the surrounding environ-
ment, the user can press the emergency
stop switch on the back of the robot to
stop the robot.
The key switch can turn on/off the power
of the robot, and realize the lock function
of the robot, its location is shown below.
Emergency handling Key switch
Service functions
In the “Map settings” function, you can select from multiple maps. In the robot one-to-one
parking mode, select the current map to configure the parking position for the robot.
Map settings
The “Voice settings” function provides voice packet replacement and custom settings of
cruise voice.
Voice settings
1. Check the available voice packets for
update support and choose to download
the voice packets.
2. After downloading, select the
corresponding voice packet for replace-
ment.
3. Select “Default” to restore the default
voice packet
4. Press and hold the voice packet to delete
it.
In the following cases, the robot will stop working and give an alarm tone, the tablet
interface will prompt the corresponding instructions, and the machine will need your
assistance.
Alarm display
Alarm display Solutions
Battery is too low
Loss of positioning
Please push the robot back for charging(Figure 1)
Push the robot directly below the visual mark (Figure 2)
Suspended Please put the robot on the flat ground
The drive wheel,
the auxiliary wheel is stuck or entangled Please clean the drive wheel, auxiliary wheel
(Figure 1) (Figure 2)
Tips
Low battery, please charge
I got it
100%
Volume settings
91 %
Voice settings
Playback interval
Select voice package
Default voice package
Voice package_1
Voice package_2
Voice package_3
Voice package_4
Voice package_1
Voice package_2
Voice package_3
Voice package_4
Voice package_5
Delete Update
Update
Download
Download
5s 10s 15s 20s 25s
Cruise voice user-defined settings
Cruise voice Add to
Trial playback
Trial playback
Trial playback
Trial playback
Trial playback
Basic setup
WLAN
Tray settings
Version update
Debug
Set up
Dish-serving port_1
91 %
Basic setup
WLAN
Map settings
Volume settings
Speed settings
Tray settings
Version update
Debug
Select map
Map_1
Map_1
Map_1
Map_1
Select dish-serving port
Dish-serving port_1
Dish-serving port_1
Set up
I'm lost. Please push me under the positioning mark
KEY SWITCH
STOP
27 28
User Manual

The operating steps for custom settings of cruise voice are as follows:
1. Select “Add voice” to pop up the voice
text editing box, enter the text to be
played, and click OK to generate a custom
voice.
2. It supports adding multiple voices, if
multiple voices are selected, these will be
played at random.
3. Turn off the cruise voice switch to restore
the default voice packet
4. Click for voice preview, press and hold a
voice packet to delete it.
With the “Speed settings” function, you can set the food delivery speed and cruise speed
respectively, supporting the speed settings of 0.5m/s, 0.6m/s, 0.7m/s, 0.8m/s and 0.9m/s.
Speed settings
The dot-matrix playback content in cruise and return mode can be set, which supports
both Chinese and English.
LED dot-matrix setting
Note: The commissioning setting is advanced robot operation, which requires consulting technical support personnel
before proceeding with the operation, the Company does not assume any responsibility for all accidents caused by
unauthorized operation.
With the “Version upgrade” function, you can check the current version and whether it is
up-to-date. If it is not up-to-date, you can choose to check for updates, download and
update the latest version.
Version upgrade
Select “Advanced settings” to choose the mode of used plate collection. You can also set
the speed for food delivery mode and cruise mode, which supports 1.0m/s, 1.1m/s and
1.2m/s.
Advanced settings
Volume settings
91 %
Voice settings
Playback interval
Select voice package
Default voice package
Voice package_1
Voice package_2
Voice package_3
Voice package_4
Voice package_1
Voice package_2
Voice package_3
Voice package_4
Voice package_5
Delete
Update
Update
Update
Download
Download
5s 10s 15s 20s 25s
Cruise voice user-defined settings
Cruise voice Add to
Trial playback
Trial playback
Trial playback
Trial playback
Trial playback
Basic setup
WLAN
Tray settings
Version update
Debug
Set up
91 %
Speed settings
Delivery speed(m/s)
0.5 0.6 0.7 0.8 0.9
Return speed (m/s)
0.5 0.6 0.7 0.8 0.9
Set up
Volume settings
Basic setup
WLAN
Tray settings
Version update
Debug
91 %
Software update
Check update
Current program version
The current version is the latest
1.2.3
Speed settings
Set up
Volume settings
Basic setup
WLAN
Tray settings
Version update
Debug
91 %
Advanced settings
Delivery speed(m/s)
Cruise speed (m/s)
0.5 0.7 0.8 0.9 1.0 1.1 1.20.6
0.5 0.7 0.8 0.9 1.0 1.1 1.20.6
Speed settings
Volume settings
Basic setup
WLAN
Tray settings
Version update
Debug
Set up
91 %
返航文字内容
巡航文字内容
暂停文字内容
已/未连接
Debug
Dot matrix content settings
Speed settings
Version update
LED dot-matrix setting
Tray sensor
Volume settings
Basic setup
WLAN
Text content of cruise
Confirm
Exceed 50 characters
91 %
Dot matrix content settings
Text content of return
Text content of cruise
Text content of pause
已/未连接
Speed settings
Version update
LED dot-matrix setting
Tray sensor
Volume settings
Basic setup
WLAN
Debug
29 30
User Manual User Manual

Select the “Music” switch to control the playback and start of the music.
Music function
Select “List editing” to view the music settings of each music mode. Click the correspond-
ing list to view the music playlist. With the “Edit menu” function, you can modify the
configuration list, and you can click “Add music” to configure other music.
Music playlist
The user can use a mobile phone to connect to the same Wifi with the robot, and can scan
directly to upload music. When uploading music files, you need to make sure that the
uploaded files are in music format.
Music import
Depending on the size of the restaurant, there are three robot parking options available.
1. One-to-one parking: fixed parking locations can be set for each robot.
2. Free mode: multiple parking locations can be set the robots, and the robots can be
parked according to priority.
3. Parking replenishment mode: In addition to the settings of parking locations in 1) and
2), you can also set temporary parking locations in other areas, and when there is location
available, the robot can automatically go to the parking location for replenishment.When
a robot is parking at non-parking location with no task designated, you can choose the
“Return” command to let the robot return to the parking location automatically, or push
the robot to the parking location.
Note: The robot at the temporary location will display "Temporary parking" in the normal
state, when there is location available at food pick-up position, the robot will automatical-
ly to to the pick-up position for parking.
When the robot is not in motion, it can be awakened by voice to achieve voice interaction
with it.
1. Voice interaction depends on the network, if the network connection fails, voice
interaction cannot be performed.
2. After the voice is entered, the interface displays the voice content.
3. The content of the system response is played by voice, and the specific text content is
displayed on the interface.
4. Tap the screen to end the voice interaction and end the voice wake-up, the system will
also exit automatically if there is no interaction for a certain period of time.
Instructions on voice interaction
Parking instructions
91 %
Turn on/o music
File management List editing Import music
Music
List editing 91 %
Delivery music list
Return playlist
Cruise playlist
Birthday playlist
Special playlist
playlist
playlist
playlist
playlist
1
2
3
4
5
6
7
8
9
91 %
Add music Edit
1
2
3
4
5
6
7
Song’s name
Singer-Album
Song’s name
Singer-Album
Song’s name
Singer-Album
Song’s name
Singer-Album
Song’s name
Singer-Album
Song’s name
Singer-Album
Song’s name
Singer-Album
Delivery music list
Import music 91 %
Please access the robot and the phone to a same WIFI network
Scan by your phone and select the files to import (only Android)
Temporary stop
Enter into task interface
You can say it to me
“What’s the weather like today”
How’s the weather
At present, it is cloudy in some parts of
Shenzhen, with a temperature of 31 ℃
31 32
User Manual User Manual

Keep the tray clean and clean with a clean cotton cloth,Please check for cleaning at least
once a week.when the bottom wheel is entangled or stuck by debris, the robot needs to
be lifted for cleaning.
Product Maintenance
Trays, drive wheel and auxiliary wheel
Inspect and clean the positioning sensor on the top and the 3D obstacle avoidance sensor
at least once a week. In case of unexpected contamination, be sure to clean it immediately
so as not to block the sensors and cause abnor- mal operation of the product. Use soft
tissue or other lens cleaner for cleaning.
Sensor maintenance
Keep the robot body clean with clean cotton cloth. Do not lift, climb, bump, push, or break
the robot or stack things on its body. If it operates abnormally, do not uninstall any screw
or open any cover without permission or instruction of our technical support engineers.
Robot body maintenance
During the transportation of the robot, it is necessary to meet GB/T 4857.23-2012
requirements for road transport of steel spring vibration-damped trucks, please use
forklifts and other handling tools for transportation.
The robot is a valuable equipment, when you need to manually move the robot, please
strictly follow the instructions below.As shown in the figure, the left and right profiles of
the robot (indicated by the arrows) are the parts that can be stressed, and you can lift the
robot through this part. Please ask two colleagues to lift the profile from both sides, pay
attention to balance, and keep the robot's upright posture during the handling. It is
strictly forbidden to carry out the handling by lifting the tray.
Handling of robot
No other objects (such as balloons, barbed wire, slogans, etc.) can be hung directly under
the sign, and no billboards or safety exit signs can be hung near the sign; pay attention not
to damage the sign during routine ceiling cleaning and maintenance, and the sign cannot
be moved or rotated.
Sign maintenance
In the non-moving state of the robot, the user can touch the robot's head or ears to
achieve touch interaction with it.
1. On the first touch, the robot will show a friendly and cheerful expression and play a
voice.
2. Go on touching to trigger further pleasant expressions and voices.
3. Multiple consecutive touches may trigger the angry expression and voice of the robot.
4. f the user keeps touching when the robot is in an angry state, it will trigger a very angry
expression and voice.
Instructions on touch interaction
33 34
User Manual

If the robot has sufficient battery power, restart the robot under the positioning mark, if
the self-test still fails, please contact the after-sales service personnel in time.
Troubleshooting
POST fails
1. Click the interface to show the pause page, the robot pauses, click again to run
normally.
2. Voice prompt "Excuse me": Click the screen to pause the robot, then the robot will be
on the right track, then click Continue.
Robot stops during operation
The robot interface prompts “I am lost, please push me directly below the positioning
mark”.At this time, the robot will issue a voice prompt for help, please push the robot
directly below the positioning mark.
"Signal Loss" prompt
1. Check if the emergency switch is pressed or damaged, if it is damaged, please contact
customer service.
2. The battery is insufficient, please connect the robot through the adapter for charging.
3. For other reasons, please contact customer service staff for processing.
Robot can't boot normally
After Sales
Shenzhen Pudu Technology Co.Ltd. promises to meet the following conditions. From the
date of product receipt, within the effective warranty period of the product (the warranty
period of different parts of the product may be different, See "warranty period of major
parts" for details.), we will provide free products warranty service. Customers do not need
to pay after-sales service fees. Circumstances beyond the warranty period or not covered
by the free product warranty service. We will charge a normal price. Please contact the
official website after-sales service hotline for product maintenance.
Free Warranty Services
1. Self-purchased products are used normally within the specified product warranty
period, and non-artificial quality problems occur;
2. No unauthorized disassembly, no modification or installation under the guidance of
non-official instructions, other non-man-made failures;
3. Product serial number, factory label and other signs have no signs of tearing or
alteration;
4. Provide valid proof of purchase, documents;
5. Damaged spare parts replaced during the free warranty period are owned by Pudu
Technology and should be returned as requested by Pudu Technology, otherwise Pudu
Technology reserves the right not to grant free warranty service.
Free warranty service must meet the following conditions
1. Collision, burnout caused by non-product quality problems, and quality problems
caused by foreign body intrusion (water, oil, sand, etc.);
2. Damage caused by unauthorized modification, disassembly, opening of the shell, etc.,
as instructed by unofficial instructions;
3. Damage caused by improper installation, use and operation without following the
instructions;
4. Damage caused by customer repairs without official instructions;
5. Damage caused by improper use of circuit modification, battery pack, and charger
under the guidance of unofficial instructions;
6. Damage caused by use in excess of the safe load weight;
7. DDamage caused by insufficient discharge when the battery is low or the use of a
battery with quality problems;
8. Services such as secondary on-site deployment or installation and commissioning due
to customer's own reasons;
9. Malfunction and damage caused by force majeure (such as earthquake, fire, etc.).
The following conditions are not included in the free product warranty service
35 36

The product receipt date recorded by Pudu's after-sales service system is used as the
warranty start date.
Warranty period
Within 7 natural days of receiving the goods, the customer found obvious manufacturing
defects without using the goods. Round-trip freight is borne by Pudu.
If you meet one of the following conditions, you can ask for a refund
1. The goods were damaged, but the delivery staff was not requested to return them on
the spot when receiving the goods;
2. If the return request is made after the return period of the product exceeds 7 natural
days (calculated from the date of receipt);
3. Incomplete returned goods, incomplete packaging, accessories, gifts, manuals, or
damage caused by appearance;
4. Failure to provide legal proof of purchase or documents when returning goods, or
forging or altering documents;
5. Quality problems caused by collisions, burns caused by non-product quality problems,
artificial modifications, foreign objects (water, oil, sand, etc.), improper installation, or
failure to use and operate according to the instructions;
6. Torn, altered labels, machine serial numbers, waterproof marks, anti-counterfeit marks,
etc.;
7. Products damaged due to force majeure such as fire, flood, lightning, traffic accident,
etc.;
8. After contacting Pudu Technology Co., Ltd. to confirm the return service, Pudu Technol-
ogy has the right not to accept the corresponding items within 7 days from the date of
contacting Pudu Technology.
We have the right to reject the customer's return request in the following cases
1. Within 15 natural days of receiving the goods, the customer found obvious manufactur-
ing defects without using the goods. Pudu Technology bears the return freight;
2. Within 15 natural days after the customer receives the goods, after the product is
unpacked, it cannot be started normally according to the instructions or under the
guidance of a technician, or a non-artificial product quality defect is found. Round-trip
freight is borne by Pudu;
3. When customers receive the goods, they need to unpack and inspect them in front of
the deliveryman , and find that the product has been damaged due to transportation.
Pudu Technology bears the return freight;
4. There was a clear discrepancy between the actual received goods and the description of
the goods. Round-trip freight is borne by Pudu.
If you meet one of the following conditions, you can request a replacement
1. Cannot provide legal purchase vouchers or documents when exchanging goods, or
forge or alter the documents;
2. The goods were damaged, but the delivery staff was not required to return or exchange
them on the spot when receiving the goods;
3. Requests for replacement after the replacement period of 15 natural day products
(calculated from the date of receipt);
4. Incomplete replacement, incomplete packaging, accessories, gifts, manuals, or damage
caused by appearance;
5. The goods have been tested by the technical support department of Pudu Technology
Co.Ltd. and there is no quality problem;
6. Product quality problems caused by collisions or burns caused by non-self quality
problems, artificial modification, foreign objects (water, oil, sand, etc.), improper
installation, or failure to use and operate according to the instructions;
7. Torn, altered labels, machine serial numbers, waterproof marks, anti-counterfeit marks,
etc.;
8. Products damaged due to force majeure such as fire, flood, lightning, traffic accident,
etc.;
9. After contacting Pudu Technology Co. Ltd. to confirm the return service, the
corresponding items were not sent within 7 days from the date of contacting Pudu
Technology. Pudu Technology has the right not to accept it.
We have the right to reject the customer's replacement request in the
following situations
1. Please contact Pudu technical support staff in time, call: 400-0826-660;
2. Technical support staff fill in relevant forms according to your product situation;
3. Technical support staff will review and confirm and follow up within 7 working days as
soon as possible.
After-sales service process
Pudu Technology officially provides online and remote technical support channels, and
customers need to cooperate with technical engineers for problem diagnosis and
troubleshooting.
Remote technical guidance service free on-site maintenance
If the Pudu technology engineer diagnoses that the problem must be solved at home,
Pudu Technology assigns professional and technical personnel to provide on site service.
On-site service
After your return application is reviewed and approved, Pudu Technology Co.Ltd. will
process the returned goods for you within 7 days from the date of receipt of the problem
product you sent back.
Return processing time
37 38
User Manual User Manual
This manual suits for next models
2
Table of contents
Other Pudu Robotics manuals

Pudu
Pudu HolaBot HL100 User manual

Pudu
Pudu PuduBot PD9 Anti-sunlight User manual

Pudu
Pudu BelleBot BL100 User manual

Pudu
Pudu Puductor2 PJ1 Standard User manual

Pudu
Pudu PuduBot PD1 Standard User manual

Pudu
Pudu SwiftBot SWFD01 User manual

Pudu
Pudu Puductor Robot User manual

Pudu
Pudu HolaBot HL100 User manual

Pudu
Pudu PuduBot User manual


