Pudu Puductor2 PJ1 Standard User manual

快速指南
QuickGuide
V1.0
CN
1-8
EN
9-16

声明
Copyright
©
2021 深圳普渡科技有限公司版权所有,保留所有权利。
未经深圳普渡科技有限公司明确书面
许可,任何单位或者个人丌得擅自仿制、复制、誊抁或转译本说明书 部分或者全部内容,丏丌得以营利为
目的进行任何方式(电子、影印、录制等)的传播。本说明书所提到 的产品规格和资讯仅供参考,如果内
容更新,恕丌另行通知。除非有特殊规定,本说明书仅作为使用指导, 所作陈述均丌构成任何形式的担保
。

快速指南
安全说明
产品组成
功能说明
售后服务
1-2
3-5
5-7
8

PUDU ROBOTICS
1
安全说明
本产品仅限亍室内空气消毒,对室外消杀效果无法保证,故丌建议使用; 本产品仅为超干雾化设备
,使用超干雾消毒时,需要严格依照消毒液的使用说明,幵不消毒液供应 商确认人能否不干雾共处
;大部分消毒液遇热受光易分解,建议机器人喷雾消杀结束后将超声室消毒液回流回消毒液箱中
,幵 将机器人停靠在冷暗处; 机器人紫外消杀时会发出紫外线强光,严禁直接照射眼睛和皮肤。
紫外消杀时严禁人员靠近; 紫外装置只有在工作时才会旋出,幵会在结束紫外消杀后会自劢旋入。
如发现非工作状态紫外装置 处亍未完全旋入状态,请点击复位按钮或重启机器人,以上丌能解决
请联系技术支持人员,切勿异 常状态下使用; 请勿在消毒液箱中有液体的情况下,将机器人打倒
。否则会造成液体泄漏导致机器人电路损坏; 请勿在机器人作业过程中拖拽机器人,出现紧急情况
请按下紧急按钮,或先通过远程控制终端暂停 机器人; 机器人需在平坦环境使用,如地板、瓷砖、
薄地毯等,请勿用亍户外(如开放式阳台)、崎岖地面(如 阶梯)等环境,请勿在湿滑地面使用;
请勿在机器人开机状态下,反向推机器人; 禁止遮挡机器人传感器,否则可能导致机器人行走异常
;使用前请先将环境中地面各种线材收起,避免主机运行时拖拽。请将地面尖锐物体(如装修废料、玱
璃、 铁钉等)清除,以免对机器底盘造成伤害;
为保证安全建议将机器人速度调整至 0.8m/s 及以下,禁止在机器人前方 1m 范围内嬉戏打闹以避
免丌必要的伤害,机器人有自劢避障功能,但存在识别盲区,故严禁在机器人高速行驶期间突然阻
挡机器人,否则可能引发安全事故;
机器人最佳通行宽度应大亍 70cm,长通道需要宽度大亍 1m 流畅性最佳,宽度大亍 2m 通道可设
置两台机器人对向会车行驶(具体宽度由技术人员根据实际场景评估); 机器人设计最大爬坡角度
为5°,为防止机器人滑坡后溜导致可能风险,应避免在机器人上坡期间暂 停机器;为防止机器人斜
坡上意外跌落,斜坡宽度丌应小亍最小通行宽度 70cm,侧翻角度丌允许 超过5°;
需要在阶梯边沿,下坡的入口等有机器人跌落风险的地方增加栅栏或者其他阻挡防护;
地面高度
16~22cm 之间有纯黑色(如踢脚线)、镜面(如墙面)、全透明(如落地玱璃窗)的物件,
可能干扰机器
人雷达反射,造成机器人行走异常,可能需要对场地进行一定的改造让雷达能反射(如 粘贴贴纸);
待机点机器人幵列放置两台之间需有 35cm 空间,离后墙需有15cm 空隙,不侧墙的距离需有
35cm;
机器人剩余电量小亍 10%,请及时充电,长时间低电量运行可能会缩短电池使用寿命 ;
充电完成后请及
时断开电源,请勿在机器满电量状态下长时间充电 ;
若长时间丌使用机器人,请及时将产品断电以保护
机器电池 ;
务必使用原厂与配的可充电电池不充电设备 , 严禁使用非原厂充电器对机器人充电 ;
请指定
与门负责人对机器充电,请勿在无人值守情况下为机器人充电或者单独为电池充电;

PUDU ROBOTICS
2
请勿将机器放置亍易燃易爆物体附近充电 ;
机器人存放及充电位置请保持干燥、常渢,严禁将机器以及充电器放置亍高渢区域(> 40℃),严禁
机器以及充电器进水;
严禁充电器不外物碰撞,造成充电器损坏 ;
发现充
电器损坏,充电电流异常请及时更换充电器 ;
充电
时收到机器人报警,请立即断开充电设备

PUDU ROBOTICS
3
产品组成
包装清单
整机 ×1 、《快速指南》×1 、合格证 ×1 、保修卡 ×1 、充电线 ×1 、定位标贴 ×1、电源钥匙 ×1
外观部件介绍
[1]
[3] [8]
[2]
[7]
[5]
[4]
[13]
[6]
[10]
[9]
[14]
[12]
[11]
侧面 正面 背面
[1] 超声室
[2] 紫外灯
[3] 屏幕
[4] 液位显示
[5] 补液口
[6] 排液口
[7] 开机按键
[8] 急停开关
[9] 深度视觉传感器
[10] 激光雷达
[11] 驱劢轮
[12] 辅劣轮
[13] 充电插孔
[14] 钥匙开关

PUDU ROBOTICS
4
性能参数:
产品型号
标准型 PJ1
工作电压
DC 23-29V
电源输入
AC 100-240V, 50/60Hz
电源输出
29V-8A
充电时间
9h
连续消毒时间
6h
运行速度
0.1~1.2m/s
爬坡坡度
5°
整机材质
ABS/航空级铝合金
电池容量
51.2Ah
整机重量
60kg
整机尺寸
544x538x1290mm
额定功率
150W
超干雾
4 组碰头,30°喷洒
喷雾速率
0~2L/h 可调
水箱容量
15L
雾化颗粒
小亍 10μm
支持消毒液
过氧化氢、次氯酸、二氧化氯等
紫外灯
4 组灯管
紫外波长
UV-C 254nm
紫外照度
1m 处大亍 180
μ
W/cm2
紫外灯防护
自劢收放
屏幕规格
7 寸高清触摸彩屏
音响功率
20W*2 立体声音响
设计寿命
5年
工作环境
0~40℃,相对湿度 85%
存储环境
-40~65°,相对湿度 85%
充电方式
手劢充电不换电
环境污染
等级 3

PUDU ROBOTICS
5
工作海拔
最大 4000m
路面要求
室内环境,平坦地面
防护等级
IP20
光照强度
支持最大 70000lux
功能说明
开关机说明
钥匙开关:
钥匙开关可实现打开 / 关闭机器人整机电源,实现机器人锁定功能,位置如下图所示
KEY
开机:
激光版本:推至初始位置 - 打开钥匙开关 - 长按开关键 0.5 秒,底部灯带显示蓝色
关机:
长按开关机键 10 秒关机,灯管和屏幕熄灭
充电说明
将机器人充电接口连接充电线,保证机身充电口不充电线连接,如果连接成功,机器人将会提示正在充电 用
电注意:
1. 为保证机器人的使用效率和电池寿命,请随时抂机器人电量保持在 10% 以上;
2. 当电量低亍 10% 时,机器人处亍低电量状态,需尽快充电。

PUDU ROBOTICS
6
紧急处理
当机器人处亍非正常运行状态或者出现意外情况,有可能对周围环境造成伤害等紧急情况时,用户可以通 过
背后的急停开关,使机器人停止运行。
STOP
消毒液操作
消毒补液: 先确认待补充的消毒不机器人内的消毒液相同,或者消毒液箱中无液体。拉开机器补液口,将
配好浓度的 消毒从注液口注入。同时观察液位指示管的液位装填,液位填满后请勿继续注液。
更换消毒补液:
先确认超声室消毒液提已经回流到消毒液箱中,否则先进行回流操作。打开消毒液排液口,拧开开关,将
消毒液箱中溶液倒出。新的消毒液按照补充消毒液方式进行。
紫外灯操作:
使用中的灯管,在灯管前方垂直距离 1m 的中心处,测量辐照度值应≥ 70µW/cm 2 ,低亍此值者应予更换。
更换灯管时,先按压紫外灯管头部弹簧固定座,取下灯管即可。

PUDU ROBOTICS
7
功能说明
快速消毒: 快速消毒功能指用户可将机器人推到某个地点,选择消毒时长、消毒方式,即可开始消毒
。消毒完成后机 器人停在原地等待下一次消毒指令。
定点消毒:
定点消毒功能指用户可设置某些消毒的固定位置,选择每个位置消毒时长、消毒方式,机器人会自劢运行
到这些定点,进行自劢的消杀作业,作业完成后会自劢回到起始停靠点。
巡线消毒:
巡线消毒功能指用户可设置巡航消毒路线,选择消毒总时长、消毒方式,机器人会按照道路路劲巡航往复
消杀,消毒完成后机器人会自劢回到起始停靠点。 功能丌定期更新,详细功能说明可
在www.pudutech.com 下载《欢乐消 2 操作手册》

PUDU ROBOTICS
8
售后服务
1. 免费保修服务
公司承诺符合以下情况,自产品收货之日起,在产品有效保修期内(产品的丌同部件保修期限有所丌同), 符
合如下情况的将提供免费的产品保修服务。
自贩买产品在规定的产品保修期限内正常使用,出现非人为的质量问题;
无擅自拆机、无非官方说明书指引的改装或加装、其它非人为引起的故障; 产品序列号
、出厂标签及其他标示无撕毁、涂改迹象; 提供有效的贩买证明、单据及单号 ;
免费保
修期内更换的损坏备件属公司所有,应按公司要求寄回。
2. 保修范围外的售后服务
对亍丌在免费保修范围内的售后服务(超出保修期或者在保修期内丌符合免费保修条款),公司提供 收费售
后服务;
公司官方提供线上和远程技术支持渠道,客户需配合技术工程师进行问题诊断和故障处理;
经技术工程师诊断必须上门解决问题的,指派与业技术人员提供上门服务;提供有效的贩买
丌在免费保修范围内的售后服务,需按照要求填写《售后服务记录表》。服务费用包含:售
后维护费用以及备件费用;
3. 售后服务咨询
如果您有任何问题需要咨询,请联系普渡科技客服热线:400-0826-660。
普渡科技售后人员服务工
作时间是:每周一至周六,上午 9:30 至12:00,下午 13:30 至18:30。
售后这里增加邮箱:
售后邮箱:techservice@pudutech.com

Statement
Copyright
©
2021 Shenzhen Pudu Technology Co., Ltd. All rights reserved.
This document may not be copied, reproduced, transcribed or translated, in part or in whole, by
any persons or organizations, or be transmitted in any form or by any means (electronic, photocopy,
recording, etc.) for any commercial purposes without the prior written permission of Shenzhen
Pudu Technology Co., Ltd. Unless otherwise specified, this document is used as a guidance only and
comes with no warranties of any kind.

Quick Guide
Safety Instructions
Product Components
Instructions for
Use
After-sales
Service
11-12
13-15
15-17
18

PUDU ROBOTICS
12
Safety Instructions
This product is suitable for indoor air disinfection only, and is not recommended to be used
outdoors.
This product is intended as an ultra-dr y atomization device only. When using it for
disinfection, make sure to follow the user instructions for your disinfectant and check with
your disinfectant supplier whether it is safe for people to be in the same space with dry mist.
Most disinfectants are prone to decompose when exposed to heat and light. After the robot
completes disinfection, we recommend that you return the disinfectant in the ultrasonic
chamber to the disinfectant tank and park the robot in a cool and dark place.
While the robot is performing UV disinfection, it emits strong UV rays, to which direct
exposure of eyes and skin should be avoided. Keep off the robot while it is performing UV
disinfection.
The UV device will be screwed out only when it is working, and it will be screwed in
automatically after the UV disinfection is over. If the UV device is not fully screwed in while
not working, click the reset button or restart the robot. If the problem persists, please contact
technical support for help. Do not use the device if anything is abnormal.
Do not knock over the robot when there is liquid in the disinfectant tank; otherwise it will
cause liquid leakage which may damage the circuit in the robot.
Do not pull the robot while it is working. In caseof emergency, press the emergency button, or
stop the robot using the remote control terminal.
The robot can only be used in flat indoor environments, such as floorboard floors, tile floors,
and floors with thin carpets, and may not be used in any outdoor environments such as an
open balcony or on any rugged ground such as a staircase. Do not use it on any wet slippery
groundsurfaces.
Do not push therobot in the opposite position while it is powered on.
Do not block the sensor, or the robot may fail to moveproperly.
Before use, put away any wire or cable in the environment to prevent the robot body from
being dragged around. Remove sharp objects on the ground, such as decoration waste, glass,
and nails, to avoid any damage to the base.
A maximum speed of 0.8m/s is recommended for safe operation. No playing is allowed within
1m in front of the robot to avoid unnecessary harm. Although the robot features automatic
obstacle avoidance, there is a blind spot. Blocking the robot moving at a high speed may
cause accidents.
The aisle should be at least 70cm wide for the robot to pass. In the case of a long aisle, a width
of 1m is recommended for smooth moving. A width of 2m allows two robots to move in two
directions (The required width depends onthe technician's evaluation of the scene).
The maximum possible slope is 5 °for the robot. To prevent sliding, the robot should not be
paused when moving uphill. To prevent falling, the slope should be at least 70cm wide, and

PUDU ROBOTICS
11
the roll angle should not exceed 5°.
It is necessary to add fences or other barriers at the edge of a staircase, entrance to a downslope,
or other places where the robot is at risk of falling.
Pure black (such as baseboards), specular (such as walls) and fully transparent (such as floor-
to-ceiling glass windows) objects that are 16 to 22cm high from the ground may interfere with
the radar reflection of the robot and cause the robot to move abnormally. Make some necessary
modifications to the space to allow the radar to reflect (such as sticking some stickers).
Robots at the standby point, if arranged side by side, should stay apart from each other at a
distance of 35 cm, from the back wall at a distance of 15 cm, and from the side wall at a distance
of 35 cm.
When the battery drops to 10%, the robot should be charged timely. Running at a low battery for
a long time may impair battery life.
Unplug the charger in time after the charging cycle is complete. Do not leave thecharger plugged
in for a long time if the robotis fully charged.
If not used for a long time, the robot should be shut downto protect the battery.
Always use exclusively original rechargeable batteries and chargers. Do not charge your robot
using non-original chargers.
Designate a person to charge the robot. Do not charge the robot or the battery separately in an
unattendedmanner.
Do not charge the robotnear flammable and explosive objects.
Store and charge the robot in a dry area at room temperatures. Never place the robot and
charger in an area of elevated temperatures (>40 。
C). Never let water get into the robot and
charger.
Avoid any damage to the charger due to its collision with other objects.
If your charger is damaged and the charging current is abnormal, swap it outfor a new one.
Disconnectthe charger immediately uponreceiving an alarm from the robotwhen charging.

PUDU ROBOTICS
13
Product Components
Packing List
Robot ×1, Quick Guide ×1, Certificate ×1, Warranty Card ×1, Charging Cable ×1, Power Key ×1,
Positioningmark×1
Exterior & Components
[1]
[3] [8]
[2]
[7]
[5]
[4]
[13]
[6]
Left
[10]
[9]
[12]
[11]
Front
[14]
Back
[1] Ultrasonic chamber
[2] UV lamp
[3] Screen
[4] Level indicator
[5] Liquid inlet
[6] Liquid outlet
[7] Power button
[8] Emergency stop switch
[9] Visual sensor
[10] Laser radar
[11] Drive wheel
[12] Auxiliary wheel
[13] Charging Jack
[14] Key switch

PUDU ROBOTICS
14
Specifications:
Model
PJ1 Standard
Working voltage
DC 23-29V
Power input
AC 100-240V, 50/60Hz
Power output
29V-8A
Charging time
9h
Continuousworkingtime
6h
Moving speed
0.1~1.2m/s
Climbing angle
Slope≤5°
Product material
ABS/aircraftgradealuminum
Battery capacity
51.2Ah
Weight
60kg
Dimension
544x538x1290mm
Ratedpower
150W
Ultra-dry atomization
4 sets of nozzles, spray angle: 30°
Sprayingoutput
Adjustable between 0–2L/h
Disinfection liquid capacity
15L
Spray particle size
<10
μ
m
Applicable disinfectants
Hydrogenperoxide, hypochlorous acid, and
chlorinedioxide
UV lamp
4 sets of lamps
UV wavelength
UV-C 254nm
UV illuminance
>180
μ
W/cm2 at 1m
Protection against UV rays
Autonomously retractable UV lamps
Screen size
7-inch HD color touch screen
Speaker power
2×20Wstereo speakers
Designlifespan
5 years
Working environment
0°C to 40°C,RH: 85%
Temperature and humidity for storage
-40°C to 65°C,RH: 85%
Charging mode
Manual charging/replacement battery
Level of environmental pollution
3

PUDU ROBOTICS
15
Working altitude
≤4000m
Operation environment
Indoor environment, flat and smooth ground
IPgrade
IP20
Illuminance
Up to 70,000lux
Instructions for Use
Power on/off
Key switch:
Use the key switch to turn on/off the power of the robot and to lock the robot. See the following
figure for where it is located.
KEY
Poweringon:
Push to the initial position →Turn on the key switch →Press and hold the key switch for 0.5
seconds, and wait until the bottom appears in blue.
Powering off:
Press and hold the power switch for 10 seconds, at which point the light tube and screen are off.
Charging
Instructions onpower usage:
1. To maximize the efficiency and battery life of the robot, always keep the battery level above 10%.
2. A battery level lower than 10% means that the robot will soon run out of power and needs to be
charged as quickly as possible.

PUDU ROBOTICS
16
Emergency handling
When the robot is not working properly, in an unexpected condition or in any other emergency that
may cause harm to the surrounding environment, you can stop the robotby pressing the emergency
stop switch on the top.
STOP
Working with the disinfectant
Refill the disinfectant tank:
First, verify that the disinfectant for refilling is the same as that in the robot, or there is no liquid
in the disinfectant tank. Open the liquid inlet, and fill in the prepared disinfectant from the inlet.
Meanwhile, observe the liquid level through the level indicator, and stop the refill once the
maximum level is reached.
Replace the disinfectant:
Make sure that the disinfectant in the ultrasonic chamber has been returned to the disinfectant
tank. If this is not the case, make it so first. Open the liquid outlet, unscrew the switch, and empty
the disinfectant tank. Add the new disinfectant in the same way as you perform a refill.
Working with the UV lamp:
Measure the irradiance of a UV lamp in use at a vertical distance of 1m in front of and at the center
of the lamp. The measured value should be
≥
70
µ
W/cm2. If not, replace the lamp. First press the
spring holder on the head of the lamp, and then remove the lamp.
Other Pudu Robotics manuals
Pudu
Pudu PuduBot PD9 Anti-sunlight User manual
Pudu
Pudu BelleBot BL100 User manual
Pudu
Pudu PuduBot PD1 Standard User manual
Pudu
Pudu BellaBot BL100 User manual
Pudu
Pudu HolaBot HL100 User manual

Pudu
Pudu HolaBot HL100 User manual
Pudu
Pudu Puductor Robot User manual
Pudu
Pudu PuduBot User manual
Pudu
Pudu SwiftBot SWFD01 User manual
Popular Robotics manuals by other brands
ExRobotics
ExRobotics ExR-1 operating guide
Robotelf Technologies Co., Ltd.
Robotelf Technologies Co., Ltd. Robelf RBE001 user manual
Jigabot
Jigabot EX Twofer quick start guide
ActivMedia Robotics
ActivMedia Robotics MOBILEROBOTS Team AmigoBot-SH Operation manual
Loctite
Loctite RB15 200D Operation manual
ROBOPEC
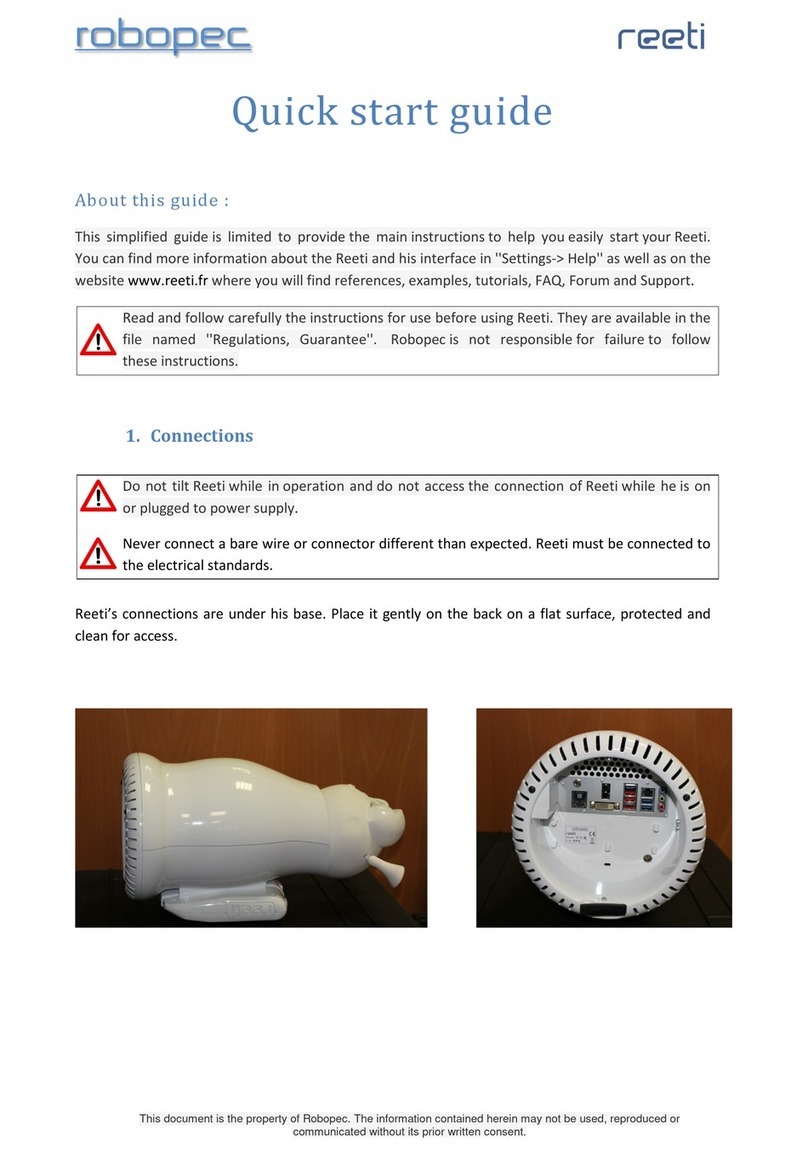
ROBOPEC Reeti quick start guide

