Pullman Steam Works SC388L User manual
Instruction Manual for STEAM WORKS SC388L
Please read this manual before operating steamer
1 lmportant Safety Regulations
1.1
Forthe
Power Supply
ForSpecial
Groups of People
For Operation of
the Appliance
'Pl€6e ensure rhat the voraSe shown on the nrinS pare matches
thar or four socker prior to connecting the st*m .eaner to /ouf
. Only conn€ct rhe appliance ro a propery eanhed socker
. The appiances plug must ft into rh€ socker. The pug may not be
moiified in an/ way. Do not use adaptors wrh appiances that have
a p.ot*tjve €adh, Unmodili€d p ugs and +propr ate so.kets rcduce
the risk ofan el€dr c shock
. we recommend that the appl ance only be ope€.ed froh a socket
Protec.ed by a fesidua current circuit-breaker. Ple6e consur an
e e.$ic inecesary.
. Nev€r louch the plLewith wet hands.
. Am}{ disconnect the applirce from the malns by remoyng the
mains plug from the socke. Never pllloi the cablel
'A hury connection cdbl€ may ony be rep aced by a Gbl€ with
identical .onnecton va ues. Send the app iance to th€ poin! of
. Ensure that the connedion hues match those ofthe $eam clean€r
if using an *tension c$l€. Ask a spec alisr deaer if nece$ar/.
. Ensure lhat the abe aoes not becohe a t.ippifg herd. lt may
norbe knked, pinched or run over.
'TaG e{reme care if us ng the appliance in the presence ofchid.en
. Neve. €ave the steam cleanef unaft€nded pancllarly il children or
handi.apped pe^ons are n the sme room.
. The appiance mLst be stored out ofthe reach ofchidrei.
. Do not alow children ro pay with tle packagng hateriah (platric
flm).
. Check the appliance, .ab e and acc€ssories r€gular / for damage.
Do nor oDe?.e. d. e"o"ppi ceo. ad-d8ca .-e.ro itu.
'Never ain the peop e, anmas or p ants tisk
of ynldind! Do not alm the steam ceafer ar ee.t.ca synems
or wrng, elements or oven intero6.
. Do not operale the app ance withou! rup€rysion. Pease alwa/s
switch the applance ofl and femove the mains pLg rrom the
socct if eav f8 ihe work area
. The appliafce k fiited with a th€mos€t and a themai cLcoui d
protect on aga nst overheating.
. Acc€ssoies become hot during us€ alow rhem to coot down

I lmportant Safety Regulations
the tank crp during us€. The 6nk 6 under
. erDola -em., o-b.rteao, o-c-a 4) d.rngope?01
' Never imn€re rhe appiance ln wat€f or other ltqutds
' Keep the appllance aMy fron nin ana moklure The xpptjan.e ir not
suibb e ior outdoor use.
. Do not usc lhe 5eam€f to . ean sw mm ng poo whercwateri5 presenr
ofwhero t s in dnect coniac with warer.
. Do not opeEre the rppiancewthourwater if rhe 6nk Alwala rop
!p wnh water in goon rme.
. Empq the waterilnkwhen rhe applance s not in ure.
. Never lil rh€ iank with anlthing oth€f rhan @ter. Nev€f pu!
addrv€s Guch r pefum€ s6n rcmovef of pfoduct5 Lo,,utrtrs
a cohol) n the ster * they ma/ damag€ rhe applance or make tr
. Aways rcmove rh€ fraifs pug from the sock€t and atow th€
aPPiince to coo down competely before toppnS up with water
'Do noi ov€ri I rhe t!n<. Do not excecd the meimum presc.ben
liLlinglcvel Peaseusethemeas!.n8 jugandfunnel n.udedwitn
. Ensure rhat th€ water 6nk\ cosure.ap has been scfewen down
. Ony.arry the app iance by rhc hand e.
. Do not touch any hot af€as on the appian.€. li s normal lof lhe
i€am cean€rto hear up duringopeEtion.
. Do nor use the Steam Wodc to treat an/ lEms ol clorhingthat arc stl
be ng worn on the body.
. A lfte water ma/ drip out of th€ nozzle from tim€ to rime. This is
competeiy normal and it is m€fely.onde.sation.
. The force and her of rhe st€am ma/ have xn adveBe enea cn
sohe matefias. AlMys check whdher a surla.e is suibble fo.
treathent with rhe seamer by cafryng ou! a te* befor€hafd on a
. Aley5 ncud€ ti€se opehtng nsructions if pssng the s€am
c eane on b x rh rd Panf
1.4
For Maintenance
and Cleaning
. Use onl/ the ofiginal accessor ies rhat are pan of the scop€ ot
. To avoid risks. never .an} out repaln youfscll Consu[ an
authorsed Seryice C€mre for rhis and have the appiaice,epdnec
b/ luaifed skil€d sbff using origna spare patu.
. Aways sw tch the applance of, remove the mains p ug ann a ow
th€ st€am cleaner to coo down betore c eaning or man6 n ng r
2 lntrcduction
Thank Youl
2.2
Unpacking the
Appliance
2.3
lnclusions
Congratularions on your purchase ofthe Pullman Steam Works.
Your n€w steam ceaner ls a v€ry versatile appliance for many dltrerent
cleaning |asks. On y with the he p of h gh-temperature sream is lt
possible Lo renrove stubborn din !uickly and withour trace irom lmooth
surfaces. e.g. lvallani foortiies, work su aces. cooking ltensil!, windov/s
and nrlrrors and at the same time to kil harmful bacteria. Thls is the
environrnenlally acceptable way to remove baked on food, mould,
grease, soap scum, solid and loose dift completey withou! chemical
solvents. The steam iron supp ed is sutable Ior steam ironing a types of
Thank you once again for purchasing the P!llman Steam Works SC388L.
We hope /ou wlll enjoy using it.
Unpack the steam cleaner and all the accessofles. Check the contents
for completeness. lfpossible, keep fie box and inner pacl€ging so that
the appliance may be prolected durinS transpon or if returned in the
evenr of a warmnty claim. Please dispose pfoperly of any packaging
material no longer feq!ired. Please contac! your dealer immediately if
yo! notlce any tnnspon damage whilst unpacking. The appliance
mus! not be operated under any circumstances if it has sus6ined
Warningl Ensure tharthe packaging materials (plastic film)do not
get into the hands ofch ldrei. Danger ofsuffocationl
The fo lowing pans are included 1n the scope ofsupply:
2 l'leas!ring jug
3 Steam gun wth s|eam hose and srear. connector
4 Professional steam iron lnc !ding associated hose with steam
5 Accessory adaptor
7 Jet noz e attachment
8 Nylon brush
9 l4etal brush
l0 2-in-l attachment (steam attachment)
l2 2-in-l attachment (\/indoy/ attachment)
l3 Large clean ng cloth
15 3 Extension tubes
| 6 Steam cleaner with mains p ug and connectioi cable
Openting nstrlctions (not shown)

2lntroduction
2.4 lllustration of Steam Cleaner and Accessoies t
\7
\1

3 Starting Up
Assembling the
3,1,1
Steam Hose
The steam hose with steam 8un must be connected to the app iance
and the desired accessory must be attached before the steamer
can be used. The Steam Works has an accessories compaftment
that holses the detail nozzle, both brush nozzles, the jet nozze
and the 2-i.- l nozzle. Open the accessories companment by pulling
the yelow ocking handl€ upwards and iftlng the transparent
cover of the accesso.ies companment off towards the front (Figs. 2
and 3).
Remove the required steam accessory and repace rhe cover. S ide the
nose of the cover into the recess above the steam socket and press i!
down firmly at rhe back lntilrh€ cover cllcks into pace.
Flrst of al connect the steam hose to the steam socket on the fronr of
the Steam Works. To do this, flip the black cover flap down and push
the connector ofthe steam hose li|mly into rhe sream socker unti
it clicks jnto pace (Fig.4).
To remove the srcam hose, press in borh reease
and left hrnd sides oI rhe slear ronnecro- r-d p.l
socker (Fi8. s).
6

3 Starting Up
3.1.2
Extension Tubes
3.1.3
Floor Nozzle
Assemble the extension hoses ifthe s|eam cleaner is to be used to cear
floors or difllcult to reach afeas. To do $is, prsh rhe open end ofa tube
onto the steam gun. Push it onto the steam gun lnti the release
bltlon ofthe steam gun click into place (Fi& 6). Add one, two or all
three extension tubes as required.
Press in the appropriate release buttor and pull the tubes apaft with
a downward movement to rak€ the extension tube off again (Fig. 4.
Attach the floor nozzle to Lhe end of the exrension r!be. Ensure
that the nozzle clicks imo place on assembly (Fig. 8). The floor noz e
is idea for cleaning washable wall and lloor coverings. lt may be
used with or without the ceaning coth. However, we recommend
using the cloth to protect covednSs ln the case of sensitlve surfaces
such as v/ood of linoleum. Place the fioor nozle on the cleaning cloth
and secure the overhanging materia under the cleaninS coth clips
on the left and right. Press on the inner sides of rhe yellow hoder.
fien open the clips and the cleaning cloth can be secured in place
(Fis. 9).
NATE:
fot packaging reasans.
Assenble the cannector
^ ,6r
(a{
Iv
dt
,.V To take the Jloor nozle off again, press in the appropriate release
button (see Fig. 7) and pull the nozle off with a downwa.d movement

3 Starting Up
3.1.4
Accessory
Adaplor
3. t.5
Detail Nozzle
3.1.6
Jet Nozzle
The steam cleaner has a range ofyery varied attachment nozles |o ena-
ble the most effecdve and thorough cleaning ofdifferent surfaces. Firer
assemble the accessorrr/ adaDtor so that these attachments can be
connected to th€ steam hose- The accessory adapter can be attached
directly to both the steam gun and rhe end of one or more extension
Ensure that the adaptor is lirmly
pushed on until it click! into place
(Fis. l0).
Press in the approprlate release
button and pull apart wjth a
downward movement to take the
The detail nozzle may be used on its own for cleaning or may aso be
fitted with one ofthe brush nozles, the iet nozle or the 2-in-l nozz-
l€. This detail nozzle is attached using the bayonet principle. Push the
nozzle onto the accessory adaptor and give it a firm quarterturn in the
directjon ofthe arrow stamped on the nozle (Fig- | l).
Reverse the sequence to take the detail nozle off aSain: wvist the noz-
le a quafter of a turn in the opposite direcrion to the arrow and pull it
off with a downward movement.
Simply push the jet nozle firmly
onto the detail nozzle to anach it
(Fis. l2). This nozzle makes it
possible to clean hard to reach
places such as corners, joinLs and
toiets with ease. The jet nozle
may be remoYed by pul in8 it off
with a downward movement.
K2"
Fig. 12
,
3 Starting Up
3.1.7
Brush Nozzles
3.1.8
2-in-1 Nozzle
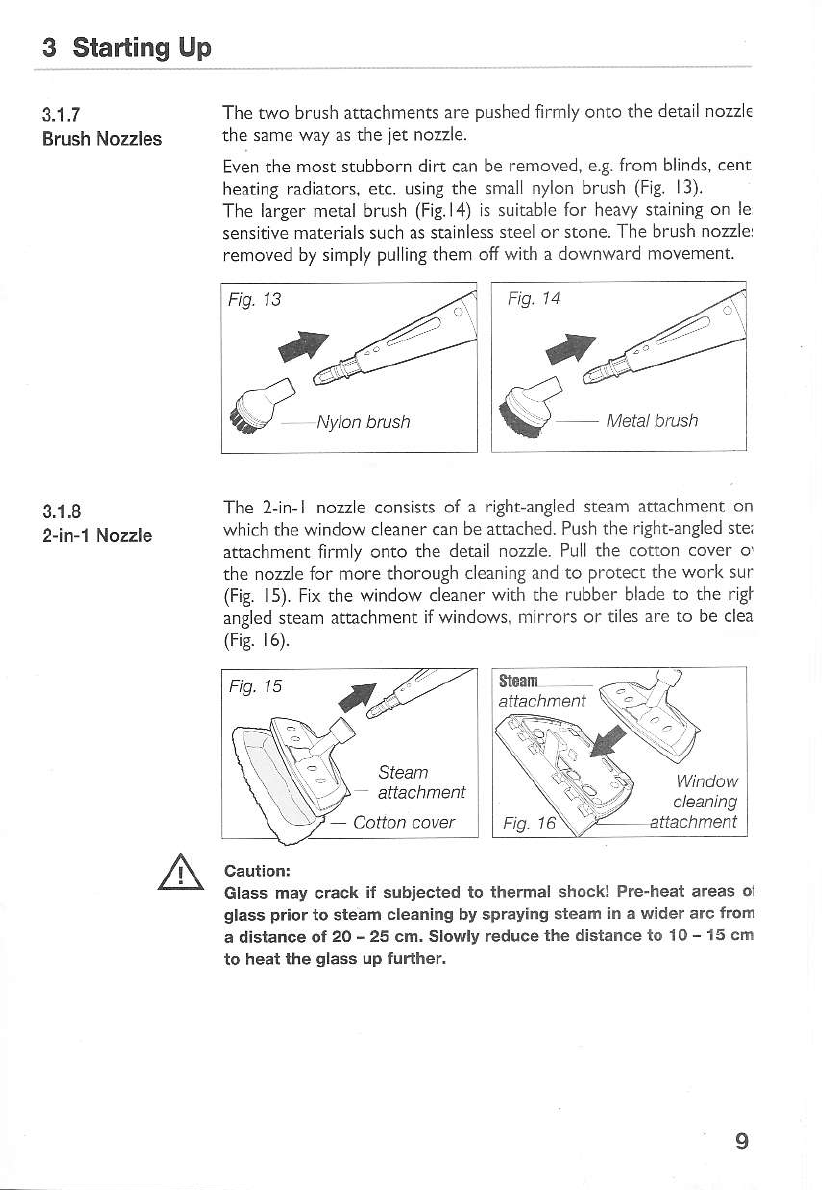
The two brush attachments are pushed firmly onto the detail nozz€
the same wa/ as rhe jet nozzle.
Even the most stlbborn dirc can be removed, e.g. from blinds, cent
heating radiators. etc. using the smal nylon brush (Flg. l3).
The larger metal brush (Fig.l4) is stir2ble for heary sta ning on le
senstve materiah such as stainless steelor stone. The brush nozle
removed by simply pul ing thern ofi with a downward moYement.
The 2'jn-l noze consists of a rjghranged steam artachment on
which the window ceaner can be attached. Push the righranSled ster
attachment firmy onto the detail nozle. Pulthe cotron cover oi
the nozle for more thorough cleaning and to protect the work suf
(Fig. l5). Fix the windo\/ cleaner with the rubber blade to the riSt
angled steanr attachment if windows, nrlrrors or tiles a.e .o be clea
(Fis. l5).
Glass may c.ack if subjected to ihermal shock! Pre-heat 6.eas ol
glass priorto stean cleaning by spEying steam in a wider arc rron
a distance of 20 - 25 cm. slowly redlce rh€ distance to l0 - 15 cm
to heat the glass up furthei
o
3 Starting Up
3.1.9
Professional
Steam lron
3.2
Filling the Water
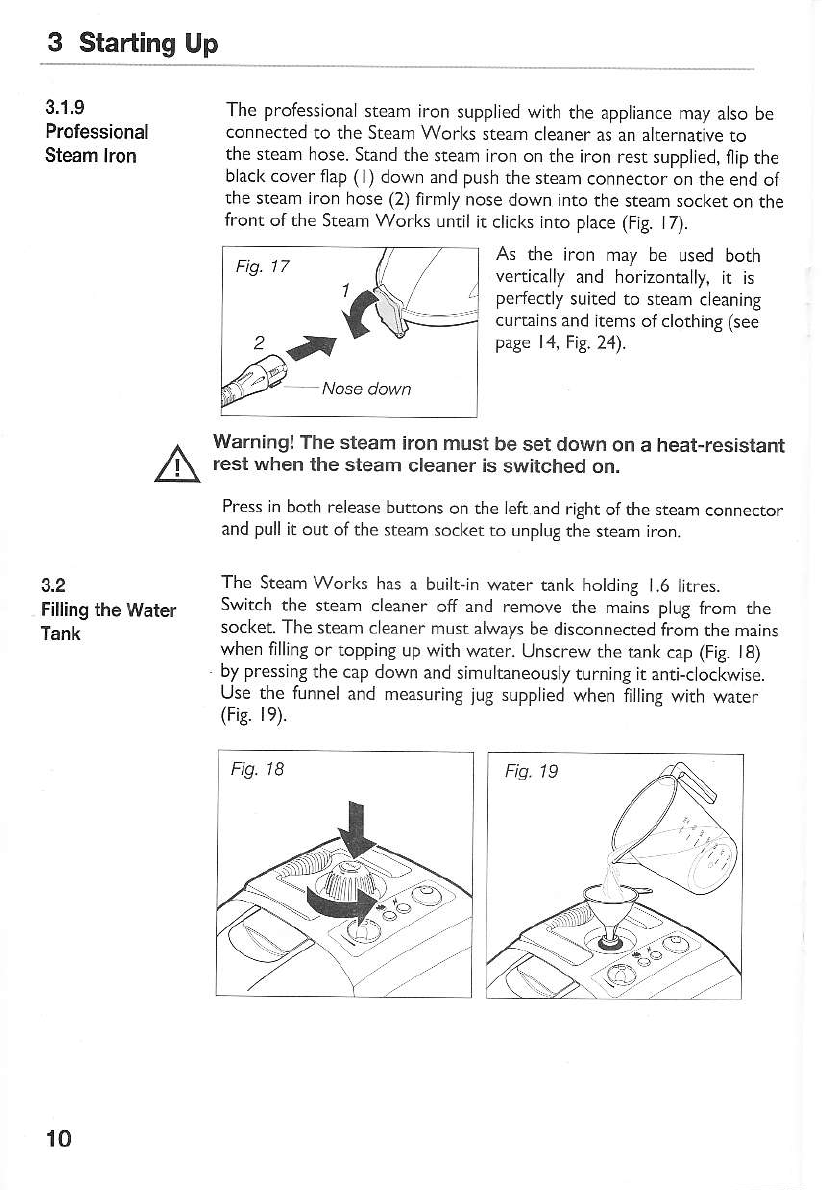
The professional steam iron suppiied with the apptianc€ may atso be
connected to the S|eam Works sream cleaner as an atternative to
the steam hose. Stand the steanr iron on the iron resr supplied, fip the
black cover iap (l) down and push the steam connector on the end of
the steam iroi hose (2) firmly nose down into the steam socket on the
front of the Stearn Works until it clicks into p ace (Fi8. J 7).
As the iron may be lsed both
venicaly and horizontally, it is
perfecdy suited to steam ceaning
curt2ins and items ofclothing (see
pale t4, Fis 24).
Warning! The steam iron must be set down on a heat-resislant
rest when the steam cleaner is switched on.
Press in both release butrons on the left and right ot the steam connector
and pull it out ofthe steam socket to unplug the steam iron.
The Steam Works has a built-in water tank holding 1.6 tjtres.
Switch the steam cleaner otr and remove the mains plug from the
socket. The steam cleanef musr always be disconnecred from the mains
when fillin8 of ropping up with Mter. Unscrew the tank cap (Fi& t8)
by pressing the cap down and simultaneously turninS it anti-ctockwise.
Use the funnel and measuring jug suppJied when Jitting with water
(Fi& le).
10

3 Starting Up
Only fi | with pure mter without additives of any kind, e.g. perfume,
cleanlng agents, alcohol. as they could darnage the machine and make
it dangerous !o use. k is advisable to use distilled water to prevent lime-
scale deposits if your water is very hard (over 2.5 mmoli I or 2l 'dH).
Otherwise boil the water first to extend the appliance\ seryice hfe.
Caution:
Do not exceed the maximum quantity ol 1.6 litres when filling
the tank!
Scre\/ the tank cap firmly back on by turning it clockwise under
Tip:
The heating up time will be shortened iI warm water is used
when filling.
11

4 Operating the Appliance
4.1
Connection to
Mains Supply
Plug the steam cleaner's mains pluS
(Fis. 20) and switch the appliance on
(Fis. 2l).
into a propery installed socket
by pressing the On/Off switch
4.2
Using the
Steam Cleaner
NATE:
/r\
l_i_-\
The green openting piot lamp and the orange heating pilot amp
(Fig.2l) ight up. The operating pilot lamp lights up as soon as the
Steam Works has been plugged ;n and switched on. The heating
pilot lamp indicates that the steam cleaner is currently heating up. The
oPefating temperature is reached after approx. | | minutes and the
orange heatlng Pilot lamp Soes out- The app iance is now ready for use.
Warning:
Never aim the steam outlet ol the steam gun at people,
animals, plants or electrical systems (e.9. oven or wiring).
There is a risk of scalding or electric shock!
Release the locking device (ch ld proof dev.e) by pushing the yeiow
triangular pin on the dght-hand slde of the steam gun i. bwards the
left (Fig. 22). Hot steam now escapes if the steam button is operated.
First of al hold the steam gun over an old cloth to absorb any initial
spray water. Operate the steam button undl the steam is emitted
eYenly. Ceaning can now begin.
Caution:
Always test the steam cleaner first on inconspicuous
or non visible areas of the surfaces or fabrics to be
cleaned to check theirtolerance to hot steam.
- Steam may resu t in bleach ng of painted/varnished wood.
- Steam may discolour shiny plastics.
- Acrylic. velver and inen react very sensitively to the temperature of
- Do not use the steam cleaner on Dralon fib.es without first having
carried out a sukability test on a concealed a.ea
For understandable reasons, the rnanufacturer cannot be held respon-
sible for damage to objects, n-iatedals, people, animak or plants thar
occurs due to unsuitable use o{ hot steam or due to improper use ofrhe
appliance. lf unsure ofan item\ suitabiiry do not use on fiat ltem.

4 Operating the Appliance
NOTE:
Ihe SC388L is
apptiance swttches atf
reaching a tenperature
overheating. Switch atf,
nains immediately by
The appliance nay be
opemted agatn alter a
Do nor aim the steam outet ar one point for too ong- Loosen the din
by moving the steam jet backwafds and forwards. The llow rate ofthe
steam ernitted can be regu ated by turnlngthe steam controler and can
be adjusted to the level of din. Turn the steam contro lef clockwise
for less steam, and alrti-clocl(wise for more steam (Fig. 23).
Do not tip or tih the appliance by more rhan 45" during us€ aid
ensure that the appliance always sta.ds on a firm base. One fu ltank is
enough for a mdimum of 50 minutes use. Do not ieave the machine
unsupervised whlkt switched on and if necessary use the chidProof
lock to secure rhe steam sv/itch. To do this, press the triangllar ye low
pin on the left-hand side ofthe steam gun in to the rlght.
Warning:
The housing and accessories become hot during operation!
Allow the appliance to cool down before changing lhe
accessories. Never open the lank cap whilst the steam
cleaner is switched on as the tank is under pressure!
tjse an ironing board that k suitable for use with a steam iron. Steam
rons have a grid- ike restthara lows steanr to circuiate. The steam iron
may be used to iron all types of hbrlcs. Set the requlred ironinS tem-
peratLrre on the temperature controller below the handle ofthe iron.
Caution:
Always pay attention to inlormation found on the fabrics
to be ironed.
4.3
Ope.ating the
Professional
Steam lron
NOTE:
ion stand supplied or
stand the iran uptight.
-4\-
13
4 Operating the Appliance
The pilot amp on the handle ofthe iron lights up and indicates that
the sole plate ofthe iron is heating up. The pilot light goes out when
the set ironing temperature has been reached. The iron is nov/ ready {or
use. The heating swjtches back on ifthe temperarure ofthe iron drops
duri.8 use. Thus the iron mainrainsthe coffect temperatu re during the
entire ironing process.
Tip: As the iron heats up more quickly lhan it cools down,
it is practical to sort the washing beforehand and start with
the fabrics that require the lowest temperature.
Gene|ally speakinS, steam operation is suitable for all irems ofclothins
and househoJd hbrics. Please read the label ofyour garment carcfully
and ifunsure, do not proceed to use steam funcdon.
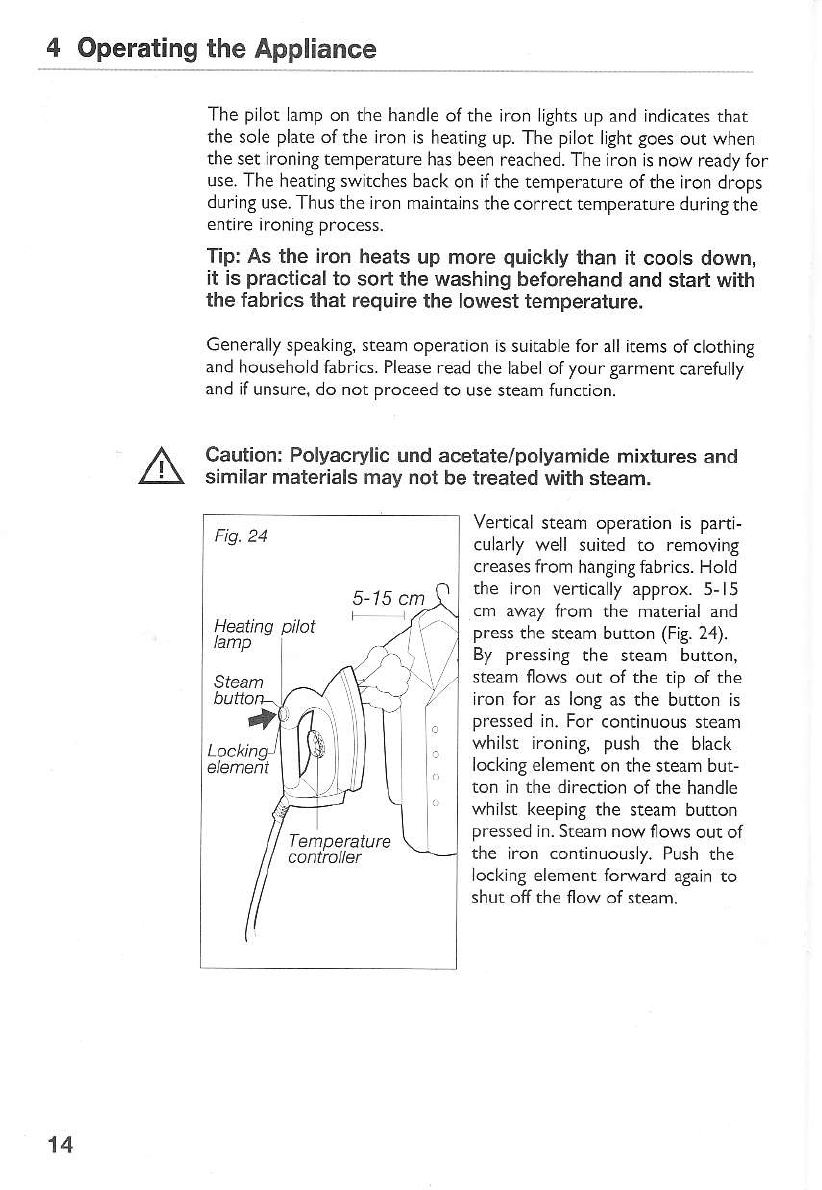
Caution: Polyacrylic und acetate/polyamide mixtures and
similar materials may not be treated with steam.
Vertical stearn opeEtion is pani-
cularly well suited to remoying
creases from hanging hbrics. Hold
the iron venically approx. 5-15
cm away frcm the material and
press the ste:m button (Fig. 24).
By pressing the steam button,
steam flows out of the tip of the
iron for as long as the button is
pressed in. For continuous steam
whikt ironinS, push the black
locking element on the steam but-
ton in the direction of the handle
whjkt keeping the stearn button
pressed in. Steam noy/ llows outo{
the iron continuously. Push the
ockinS element forward again to
shut off the flow of steam.
14
Fig.24
5-15 cm
4 Operating the Appliance
4.4
Topping Up with
4.5
Ending Operation
and Storage
The tank musr be rcpped up if the s|eam flow emitred stans to
Sv/itch offrhe steam cleaner by pressing the On/Otrswirch. The green
operatinS pilor iamp goes off Press the steam bufton on the steam gun
to release the remaining pressure and then lock the gun. Remove the
mains plugfrom rhe socketand allowthe app iance to cooidown. Take
care; the water in the rank is stlll hot evei afrer 5 mjnutesl Open th€
rznk cap by pressing it down and rning it anri,clockwise stowty.
Warning: Hot steam may escape on opening! There is a
risk of burns from the cap thread and the tank!
Top up with wate. using the measuring jug and funnet Gee page t0
''FlllinS the Water Tank') then carefully cose the tank cap agatn.
The s|eam c eaner can now be plugged in again and switched on.
The Steam Works is ready for use as soon as the heating pitot lamp
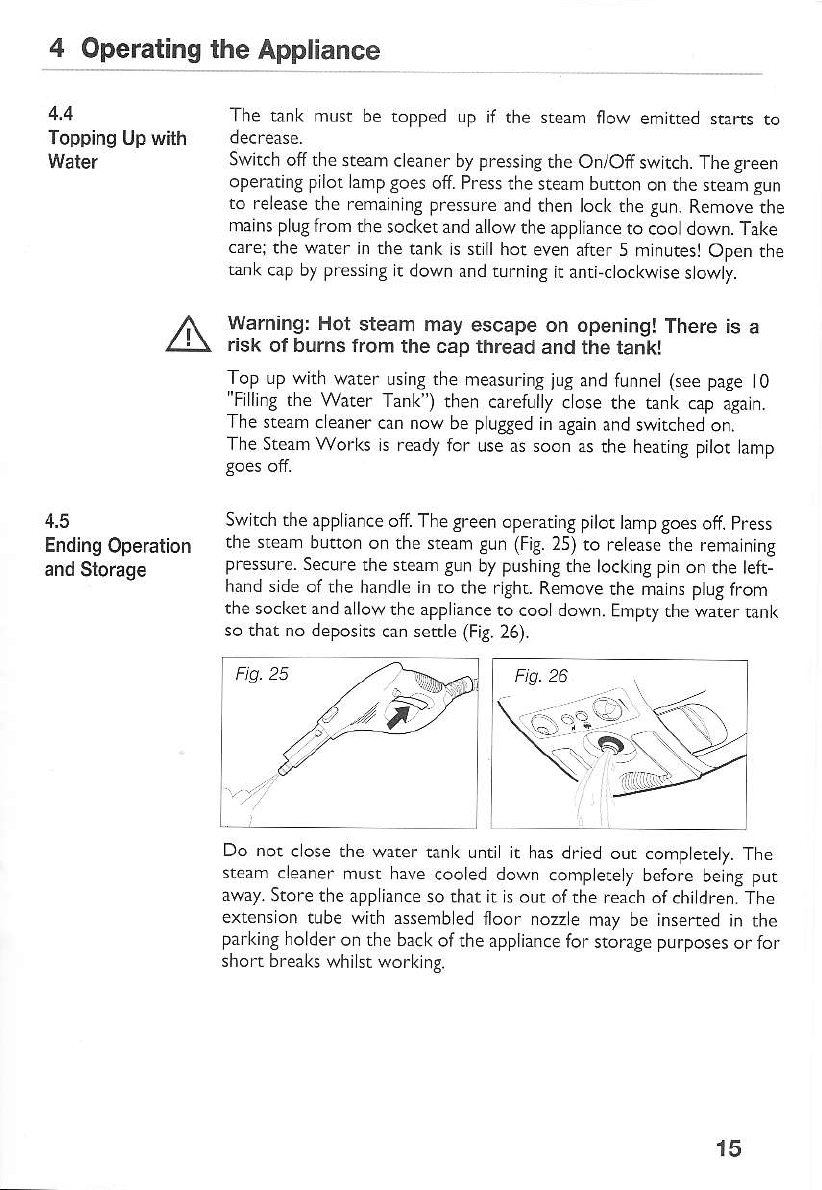
Switch the app iance off Thegreen operating pilot lanrpgoes off. press
the s|eam butlon on the steam gun (Fig.25) to release rhe remaining
pressure. Secure rhe steam gun by pushing the locking p n o. the tefr-
hand slde of the handle in to the righ|' Remove the matns ptug from
the sockerand a lowthe appiiance to cooldown. Empty the watertank
so that no deposlts can settle (Fig. 26).
Do not close the water tan( unti it has dfied our cornpletety. Th€
steam cl€aner mu$ haye cooled down comptetely before beinS pur
away. Store the app ianc€ so that ir is out ofthe reach of chi dren. The
extension tube wirh assembed floor nozze ma/ be insened in the
parking holder on rhe back ofthe appliance for storag€ purposes or for
shorl breaks whist workjnS.
15

5 General
5.1
Cleaning Warning:
Always ensure before cleaning or maintaining the steam
cleaner that it is switchecl off and unplugged from the mains.
Only clean lhe applance by wiping over the houslng with a sliShtly
moistened cloth. Do not lse any cleaning agents! abrasives or acohol
since they may danraSe the housing.
We recommend thar the tank be rinsed out after 5 filling opentions ar
the atest if the water in your area is hard. Information regarding local
warer hardness may be obrained from your water or utiliry company.
We recommend fi ling the water tank with warer and giving it a good
shake .o clean jt. This wi I loosen any lime-sca e that has been deposited
on.he bortom ofthe steam c eaner.
Then pour olt the water and a low the tank .o dr] out completely
The water tank should be treated with limescale remover app.ox. every
6 months to proong the steam cleaner's life.
Follow the directions adding rhe llmescale remoyer to I lirre of warm
water (50'C) and fillthe warerr2nkwith it. A low the solutioi to work
for approx. 30 minutes and |hen polr away the water whh rhe dis-
solved so ids. R€peat this proces if necessary and then rinse out lhe
Disposal After End of Useful Life:
lf the appliances useful life has come to an end, paftlcu a.ly if mal-
functions have afsen, the worn out app iance should be reide.ed un-
usable by removiiS the plug from the socket and cuaing otrrhe power
cable. Please dispose of fie appliance properly through your pubic
waste authority. Conrac. your loca waste disposa seryice or the bulky
and Maintenance
16
5 General
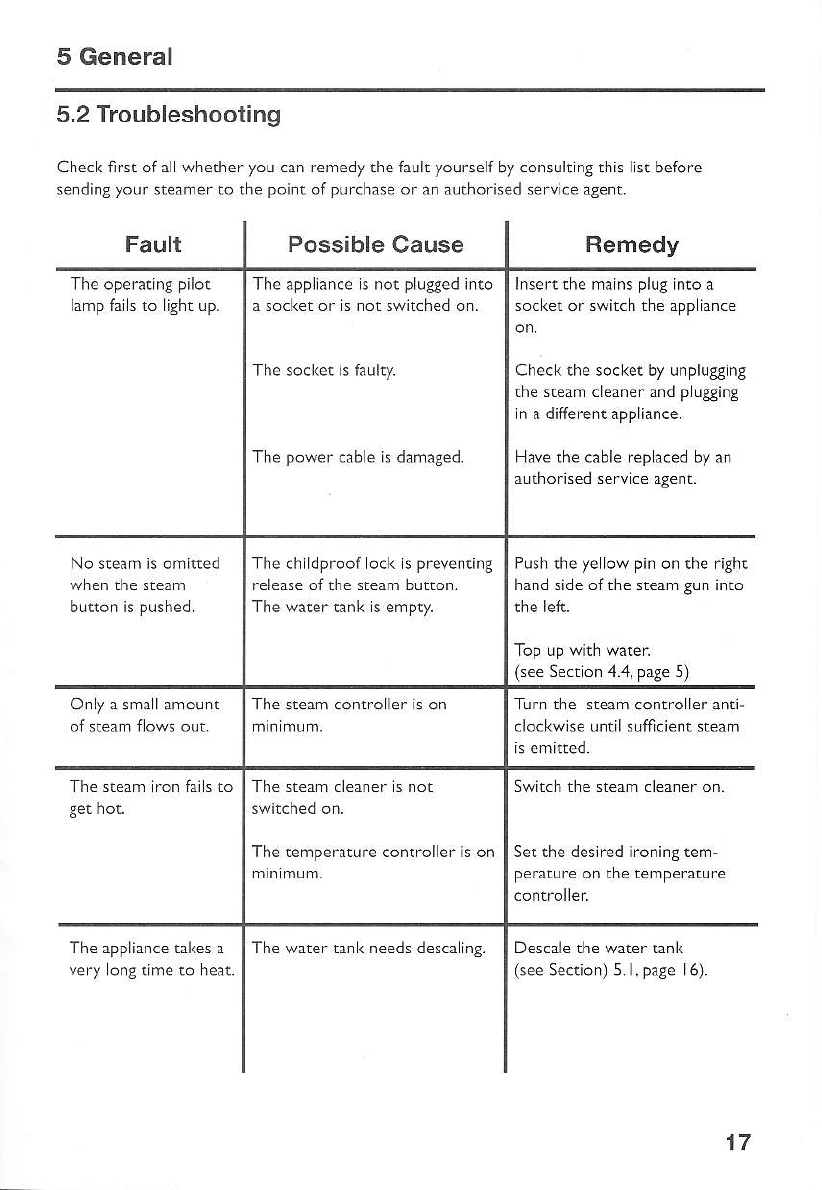
5.2 Troubleshooting
Checkfiretofa whethe. /ou can remed/ the lault youreell by consult ng lhis st befofe
'er dirS/o tr qe.r e o L1-poirIo'pJc\d eor 11d' L1oi.edse. - d8er'.
Fault Possible Cause Remedy
The appllance s not plugged ifto
a socket or is fot switched on.
The power cab e is damaged.
Insert lhe mains pllg into a
socket or switch the app ian.e
Check rhe socker by unpllgg ng
.he steam cleanef and p uging
n a diflereft appliance.
Have lhe cable repaced by an
autho.ced service atent.
The childproof ock is preveiting
release ofthe $eam butron.
The waler ank s empty.
Push the ye ow pin or the ri8h.
hand side ofthe $eam gLn into
Gee sed on 4.4, pate s)
The steam conlfo ler is on Turn lhe sream conlfo ler anti-
dockwhe uitil suff cieit neah
The steam .on fais to The st€am.leaner s not
The lemperature conroller is on
Swit.h the seam deaie. on.
Set the desired ironirg tem'
Perarur€ on the temPem.ufe
very org lime io heat. Th€ water tar< needs desca ins. Descal€ the water bnk
(see Section) s. i, pase l6)
17

5 General
5.4 Technical Data
Type of appliance
Power consumptlon
Permissible pr€ssure
Volume of water tank
Steam availability
Heatlng time
Steam .learer with profe$lonal hon
Sream Wo.ks SC388L
220-240VAC soHz.
2150 - 2350w (iron:850W Steamer:1500W
l.,1ax.3.5 Bar
5 Bar
f1d.50 minues per fulltank
Approx I I mirutes - le$ f horwarer is used to filltank
Max.408/mir.
30 dB(A) durins rse
Appliance 305 x 397x23s mm (WxLxH)
App ance wirhout accessories ,1.5K9.
'18

THIS (;UARANTEE APPI,TIS I\ALIS|RALIA AND NE\Y ZtrAI,AN'D ONI,Y
Your ne\\'Pullman Stcam Clcaner-. which has been fully tested, inspcctcd
and adjusted. carrics in thc case of domestic users, a I year parts and
labour Guarantee against defects and in the case ofcommercial uscrs the
pedod is 90 days. Brushcs, Pads and Seals, unless actually dclccrive io
manufacture arc not subject to this guarantee since their lcngth of life
depends upon usagc and care given. Any Innsponation costs involved
in the repair of the appliance or dre replacenenl of a defective part shall
be bome by the claimant. This guaraltee conmences from thc datc of
purchase of the cleancr.
w]]en ploperly uscd and carcd tbr, yoru ne$ steaDer will rcndcr cxcellent
service. and thercforc, the pulchaser should carefully read thc Instmctiotr
book. as rnisuse or failurc to fbllo\\'the inslrLrctions makes thc Guanntee
void. Il also becomcs void if the pr-oduct is used on an electric voltage
other'than that shown on thc Rating Plate. We are unable to acccpt
rcsponsibility unclcr this guarantee 1br danage lron repaif work can-ied
oul b) other than authoris].d Ser-\'ice RetaileA or Centrcs, u fron the
use oI other than acnuinc parts. In the evenl ol ser-!ice of advicc being
needed, please contact your retaller.
The benefits confcrrcd bv this Cuara tee are ii adi:lition to all othcr riehts
and femedies in respcct oi the product \\,lich the consumcf has uncler the
Tmde Practices Act anll olher Stete aDd Te itory la\\'s.
Keep this Gutrantee and youl leceipt as proof of purchasc
E.H.A Ptr l.td. (ACN 007 539 577)
Locked ltag 120 Silycr$ater D.C.1811 NSW
19

SteamWorks
Table of contents
Other Pullman Vacuum Cleaner manuals

Pullman
Pullman CB80 User manual

Pullman
Pullman PV500 User manual

Pullman
Pullman S20 User manual

Pullman
Pullman PV 14 User manual

Pullman
Pullman WD60LSSO User manual

Pullman
Pullman COMMANDER 900 User manual

Pullman
Pullman WD20LSSO User manual

Pullman
Pullman LITHIUM 950 User manual

Pullman
Pullman PULL10LD User manual

Pullman
Pullman A-031b User manual


Popular Vacuum Cleaner manuals by other brands


Mafell
Mafell S 35 HEPA Translation of the original operating instructions

Shark
Shark Navigator NV42 owner's guide

iRobot
iRobot SCOOBA - owner's manual

Gardner Denver
Gardner Denver WELCH 2511 owner's manual

Vacmaster
Vacmaster PROFESSIONAL VJE1412SW 0201 Operator's manual

Dustcontrol
Dustcontrol DC 2900c Mobile instructions