Pullman WD60LSSO User manual

60L WET & DRY
VACUUM
WITH OUTRIGGER
2300W TWIN MOTORS WD60LSSO
IDEAL FOR:
Warehouses
Gymnasiums & Schools
Airports
Community Centres

Always switch off the cleaner and remove the plug from the mains power supply before cleaning your
appliance, when not in use or attempting any maintenance task. The cleaner must only be connected
to an AC power supply at the voltage shown on the rating label. This cleaner should only be used for
its intended purpose as described in this instruction manual.
1. This appliance is not intended for use by
persons (including children) with reduced
physical, sensory or mental capabilities
or lack of experience and knowledge,
unless they have been given supervision or
instruction concerning use of the appliance
by a person responsible for their safety.
2. Children should be supervised to ensure that
they do not play with the appliance.
3. To prevent electrical shock, do not immerse
the appliance, power cord or power plug into
water or other liquids.
4. To prevent electrical shock, do not use the
vacuum cleaner outdoors.
5. Always check the power cord before use,
the power cord and the plug should be in a
good condition and must not be damaged.
If the power supply cord is damaged
or defective, it must be replaced by the
manufacturer, its service agent or similarly
qualified persons in order to avoid a hazard.
6. Do not unplug by pulling on the power cord.
To unplug, grasp the plug not the power
cord. Use only Australian and New Zealand
electrical safety approved extension cords.
7. Do not pull or carry the appliance by the
power cable, use the power cable as a
handle or pull the power cable around
shaft edges or corners. Avoid running the
appliance over the power cable.
8. Ensure the appliance is switched off
before unplugging.
9. Do not handle or operate the appliance
with wet hands and follow electrical safety
precautions at all times.
10. Extreme caution should be exercised when
using the appliance on stairs.
11. Do not attempt to change the attachments
while the appliance is plugged in to mains
power supply. Switch off and remove
plug from mains power supply. Use only
manufacturer’s recommended accessories.
12. Do not operate the vacuum cleaner too
close to the heaters, radiators and other
hot surfaces.
13. Do not use the appliance to pick up
flammable items or combustible liquids
(i.e. petrol, hot ashes cigarettes, matches,
explosive materials or anything burning) or
use in areas where such substances and
items may be present.
14. Do not use the appliance to pick up toxic
materials (i.e. chlorine bleach, ammonia).
15. Ensure the appliance is disconnected from
the main power supply before connecting
the hose to the unit.
16. Do not operate or use the appliance without
dust bag and/or filters in place while dry
vacuum cleaning.
17. Before vacuuming, remove any large or shaft
objects from the floor or cleaning surface in
order to prevent damage to the filter.
SAFETY PRECAUTIONS AND WARNING:
IMPORTANT
WHEN USING YOUR VACUUM CLEANER, BASIC PRECAUTIONS SHOULD ALWAYS
BE OBSERVED, INCLUDING THE FOLLOWINGS;
2

18. If the air inlet, floor head or the telescopic
tube is blocked, switch off the cleaner
straight away and remove from the main
power. First clear the blocked object before
attempting to start the cleaner vacuum again.
19. Do not leave the appliance unattended when
it is connected to a mains power socket.
20. Before carry out any maintenance service
or cleaning the filters, always switch off the
vacuum cleaner and disconnect the plug
from power supply.
21. Keep ends of the hose, telescopic tube
and other openings away from your face
and body.
22. Do not use the vacuum cleaner if it is
damaged or breaks down. Check the
electrical regularly for defects. If connection
cables, electrical hoses, electrical contacts
and electric tubes are damaged, have them
replace immediately.
23. Never clean the vacuum cleaner or any of
the electrical parts, especially the electrical
connections with water or liquid cleaners.
24. Never attempt to make any modifications
electrically to the vacuum cleaner.
25. Always store the appliance indoors in a cool
and dry place.
26. Damage caused by improper use or by not
observing the instructions in this manual will
void warranty.
BEFORE YOU BEGIN
1. Do not operate the vacuum cleaner too close to heaters, radiators, and other
hot surfaces.
2. Before inserting the plug into the wall, make sure your hand is dry.
3. Before turning on the vacuum cleaner, remove any large or sharp objects from
the floor or cleaning surface in order to prevent damage to the filter.
4. When you want to pull the plug from the wall, do not use the power cable, gently
pull the plug from the power socket.
5. If the hose inlet, combination floor tool or telescopic tube are blocked, you should
switch off the cleaner straight away and remove from mains power. First clear the
blocked substance before attempting to start the vacuum cleaner again.
This machine is equipped with a cable restraint, cord and plug. In the event that either of these
parts get damaged, it must be repaired by a qualified technician.
3
PULLMAN 60L WET & DRY VACUUM WITH OUTRIGGER WD60LSSO
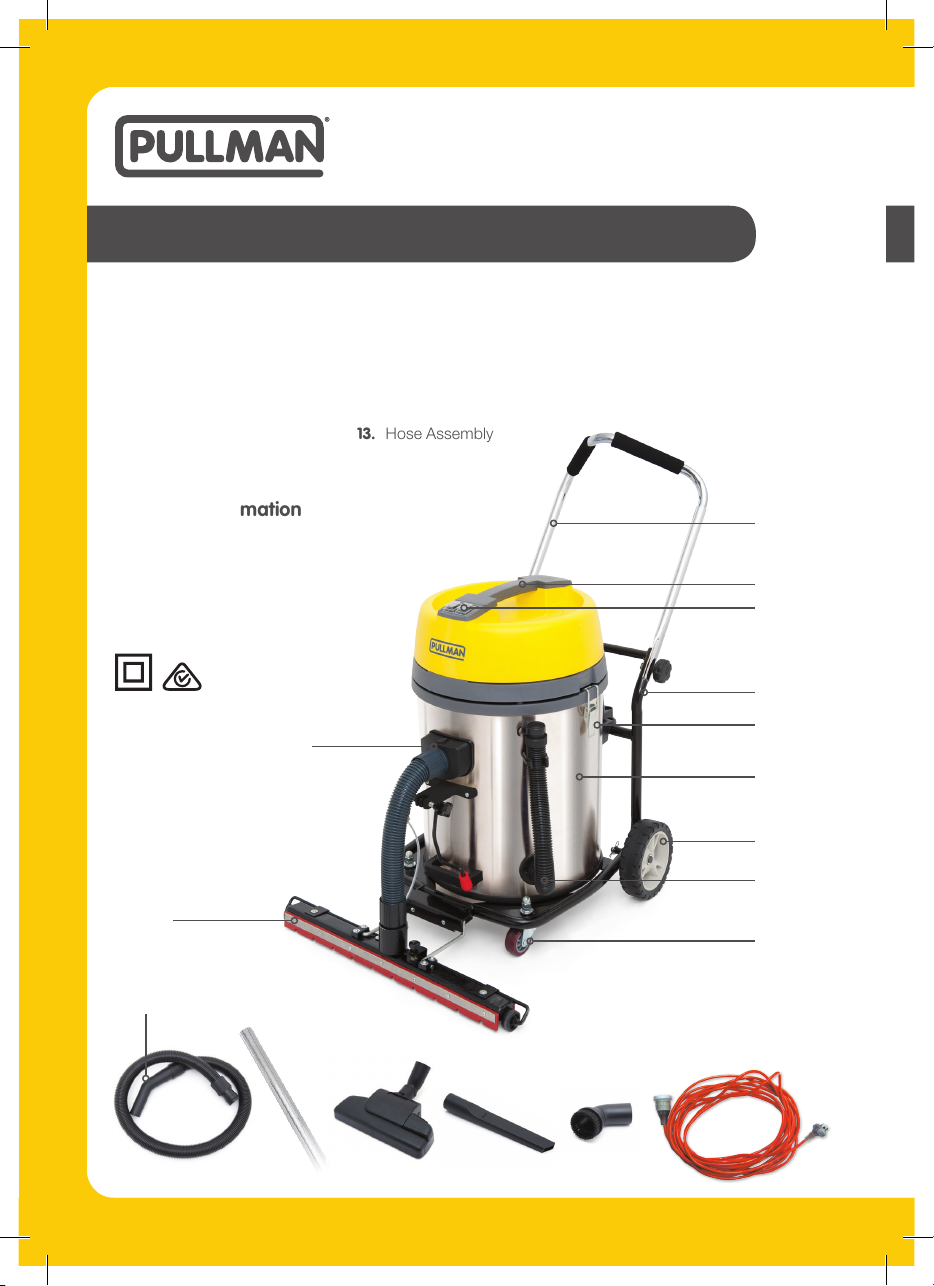
KNOW YOUR PRODUCT
1. On/Off Switch
2. Handrail (telescopic)
3. Tank
4. Outrigger Attachment
5. Handle
6. Connection Latches
7. Rear Wheel
8. Small Castor Wheel
9. Trolley
10. Hose Inlet
11. Drain Pipe
12. Power Cord & Cable
Restraint (not shown)
13. Hose Assembly
14. 2 Piece Chrome Tube
15. Combination Floor Tool
16. Crevice Tool
17. Dusting Brush
18. Extension Cable (10m)
Technical Information
Model: WD60LSSO
240V ~ 50HZ
2300W MAX
2000W NOM
Noise Level: 82dBa
13. 14. 15. 16. 17. 18.
1.
3.
11.
9.
6.
8.
7.
2.
5.
4.
10.
5.
4
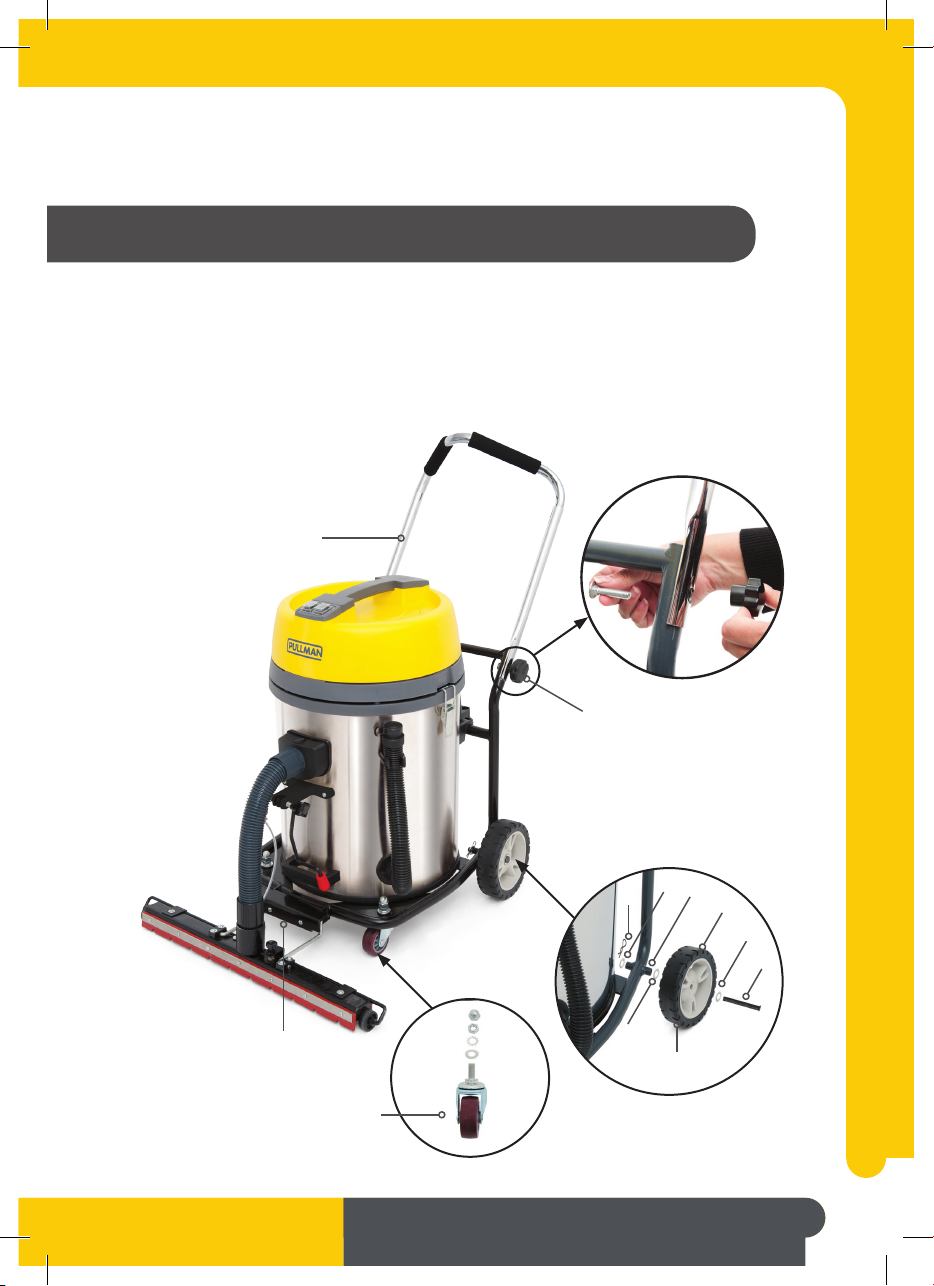
ASSEMBLY
1. Disconnect latches on side of machine and remove the canister lid. Remove all
accessories from inside the tank. Replace the canister lid (with the power cord facing the
opposite direction of the hose inlet) and connect the latches.
a. Pin
b. Washer
c. Wheel
d. Washer
e. Trolley
f. Washer
g. Clamp
Rear wheel
a
b
c
e
d
f
g
Handrail
tube
Bottom
frame
Small castor wheel
Star grip
knob (M8)
5
PULLMAN 60L WET & DRY VACUUM WITH OUTRIGGER WD60LSSO

ASSEMBLY (CONTINUED)
Rear Wheels
1. Assemble the rear wheels in accordance with the diagram above. Follow steps “a” through to “g”.
Small Castor Wheels
1. Insert small castor wheels into the holes located at the base of the trolley frame.
2. Assemble gasket and lock nut accordingly (use of a spanner is required).
Handrail
1. Insert handrail into the frame of the trolley.
2. Assemble bolt and screw star grip knob (M8) according.
3. The handrail is telescopic and can be adjusted in accordance with user height. There are
3 different height options.
- Choose the handrail height required.
- Push down on the locking pins on the handrail (both left and right sides) and slide the handrail
up or down.
- Ensure locking pins are engaged into the locking holes on each side of the handrail.
4. For storage, the handrail can also be folded down over the lid of the cleaner.
6
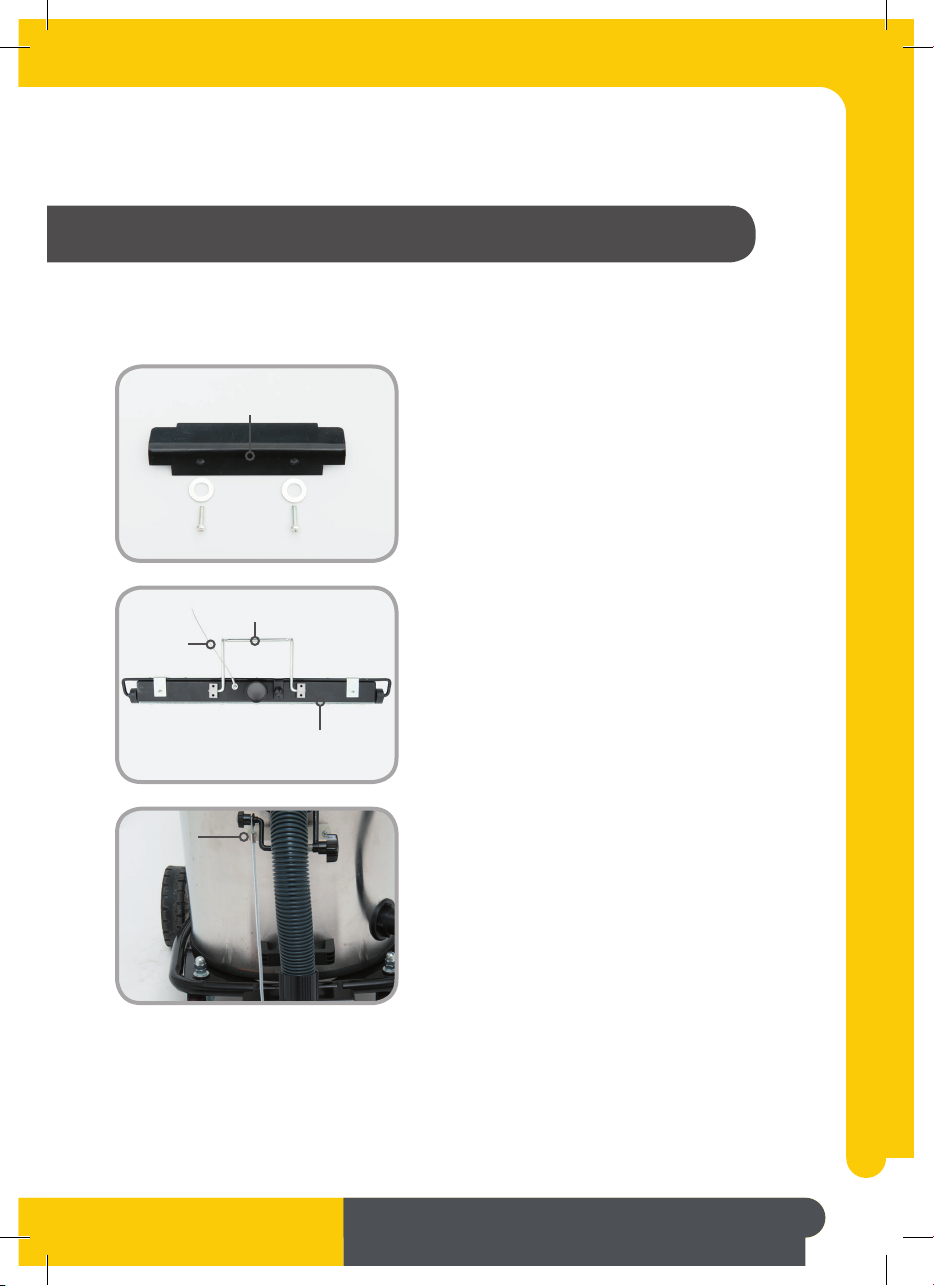
ASSEMBLY (CONTINUED)
1. Put the outrigger assembly into the grove at the
bottom frame on the trolley.
2. Put the setting plate over the bending pole and
secure with screw and spacer provided.
3. Place the wire rope set onto the bending axle on
the machine. Secure with star grip knob (M6).
Setting Plate
(screws/spacer)
Bending Pole
Outrigger Tool
Wire
Rope Set
Wire
Rope Set
Outrigger
The Outrigger component should already be assembled when removed from the packaging box.
7
PULLMAN 60L WET & DRY VACUUM WITH OUTRIGGER WD60LSSO

ASSEMBLY (CONTINUED)
Assembling the Hose and other Floor Tools
Please follow the below instructions if using this machine with the hose assembly and other floor tools.
3. Connect the tube to the combination floor tool
or wet pick up floor tool.
4. Insert the hose connector into the hose inlet
on the machine.
1. Connect the 2-piece metal tube together.
2. Connect the handle on the hose to the tube.
8
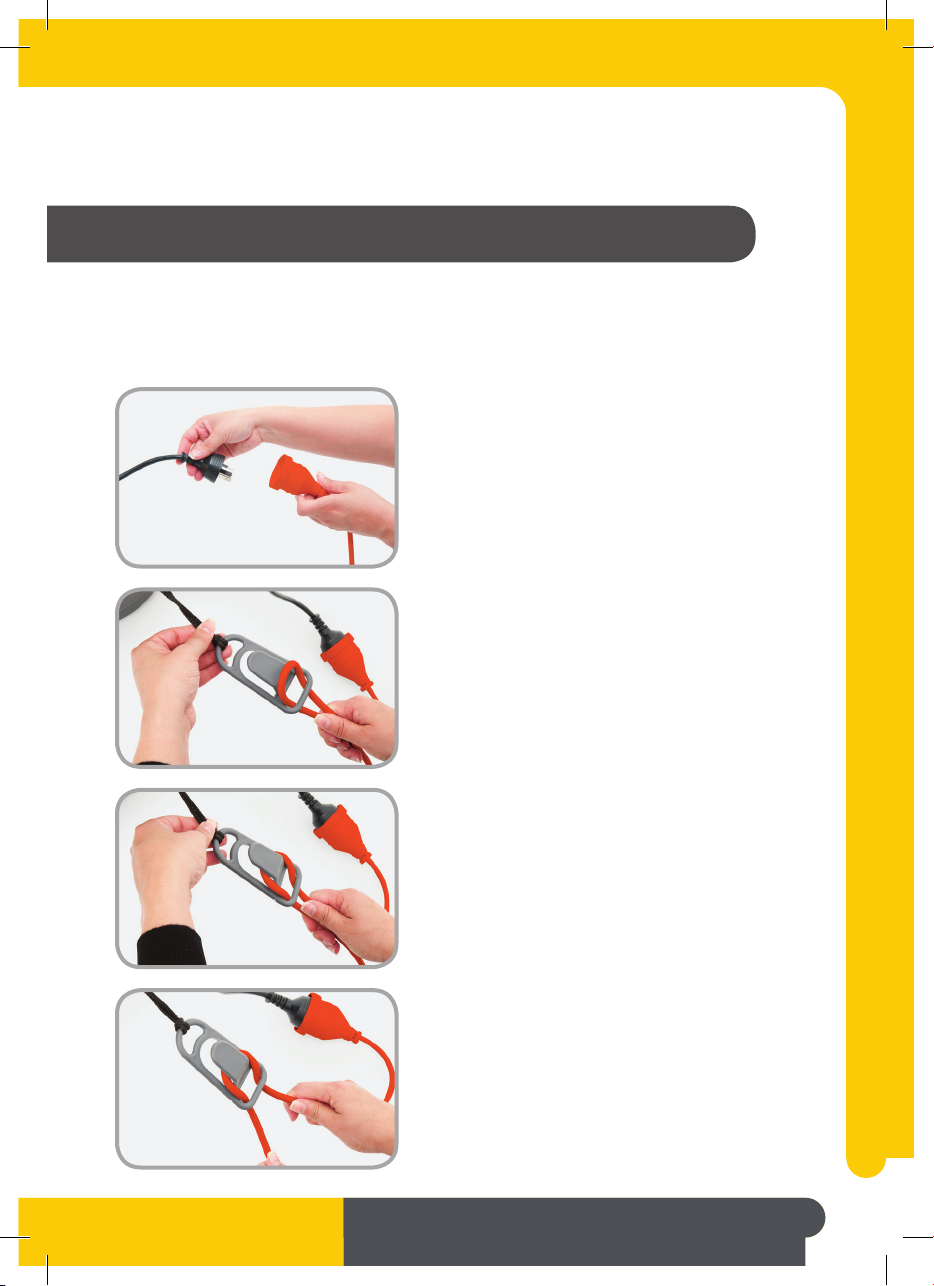
Cable Restraint
IMPORTANT – ENSURE EXTENSION CORD IS FITTED TO THE RESTRAINT CORRECTLY
AND THAT THE RESTRAINT IS FITTED TO THE TROLLEY PROPERLY.
ASSEMBLY (CONTINUED)
1. Connect extension cord to the cable on
the machine. Make a loop at 40cm on the
extension cord.
2. Feed loop up through cable restraint opening.
3. Place extension cord over top of hook.
Pull down on cord to lock on hook.
4. Pull down on the extension cord firmly to
ensure it does not slip.
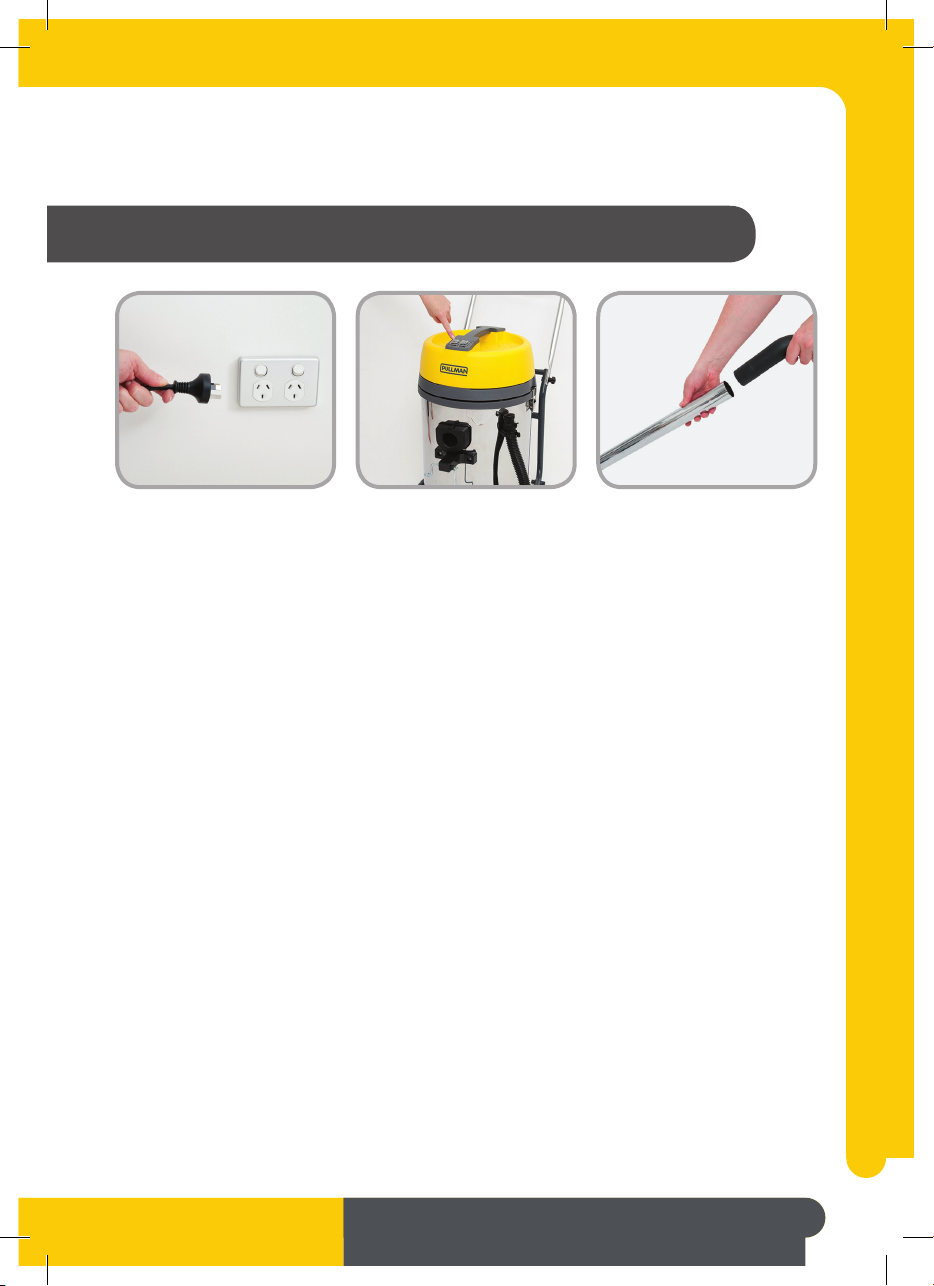
IMPORTANT! When turning the On/Off Switches
please do so one at a time. Both switches
are protected with a water-proof cover. If the
waterproof cover has been broken, please contact
your nearest Pullman agent for repair/service.
9
PULLMAN 60L WET & DRY VACUUM WITH OUTRIGGER WD60LSSO
ACCESSORIES
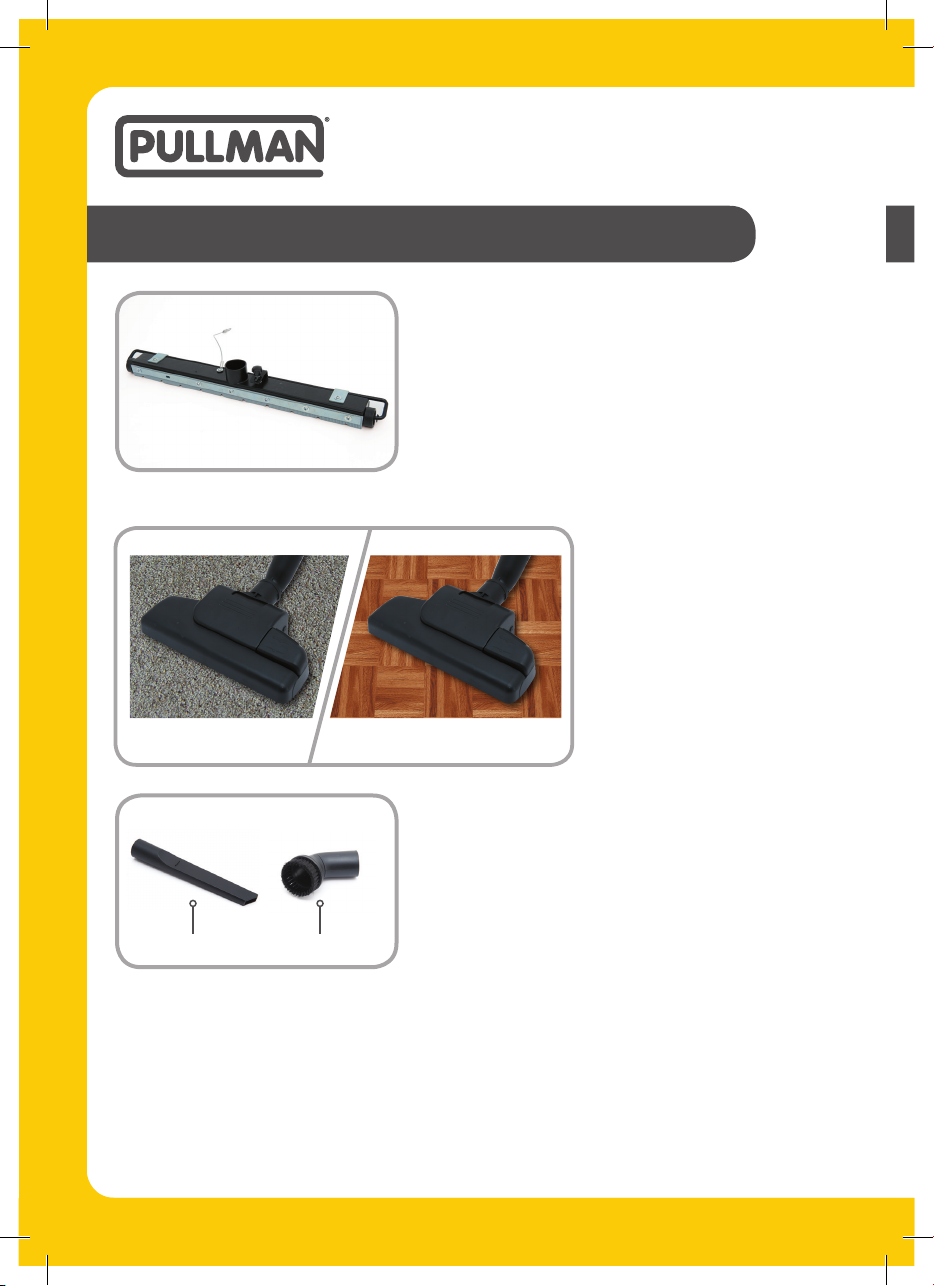
Outrigger Assembly
Crevice Tool Dusting Brush
Carpet Hard Floors
The combination floor tool is
ideal for cleaning on carpets
and hard floors.
Fitting the dusting brush and crevice tool
To fit the accessories to the tube, gently insert the
tube into the top of the dusting brush or crevice tool.
Dusting Brush – ideal for cleaning furniture, curtains
and upholstery
Crevice Tool – ideal for cleaning in tight spaces
Outrigger
The Outrigger Tool is ideal for use on hard floors
(i.e. concrete, laminate, tiles, timber, marble etc.).
This tool can be used for both wet & dry pick up.
10
OPERATION
Dry Vacuum Cleaning
1. Ensure the HEPA filter and cloth bag is always fitted before the cleaner is used.
2. Once the tank is full we recommend the tank to be emptied and cleaned out.
3. The cloth bag also needs to be cleaned accordingly.
Wet Vacuum Cleaning
1. Ensure the HEPA filter is fitted and the cloth bag is removed before the cleaner is used.
2. Unplug the cleaner from the mains power supply, empty the tank by using the drainpipe.
Avoid leaving dust or dirty water in the tank.
3. Wipe the machine inside and out from time to time, using only luke warm water. Before use always
examine the power cable for cuts and/or damage.
4. Wet pick up accessories should be washed periodically.
11
PULLMAN 60L WET & DRY VACUUM WITH OUTRIGGER WD60LSSO
MAINTENANCE
ATTENTION: DISCONNECT FROM MAINS POWER SUPPLY BEFORE DOING ANY
MAINTENANCE WORK. IF PROPER CARE IS TAKEN TO MAINTAIN YOUR CLEANER,
MOTOR MAINTENANCE IS UNNECESSARY. HOWEVER WE RECOMMEND THAT
YOUR CLEANER IS SERVICED ONCE A YEAR.
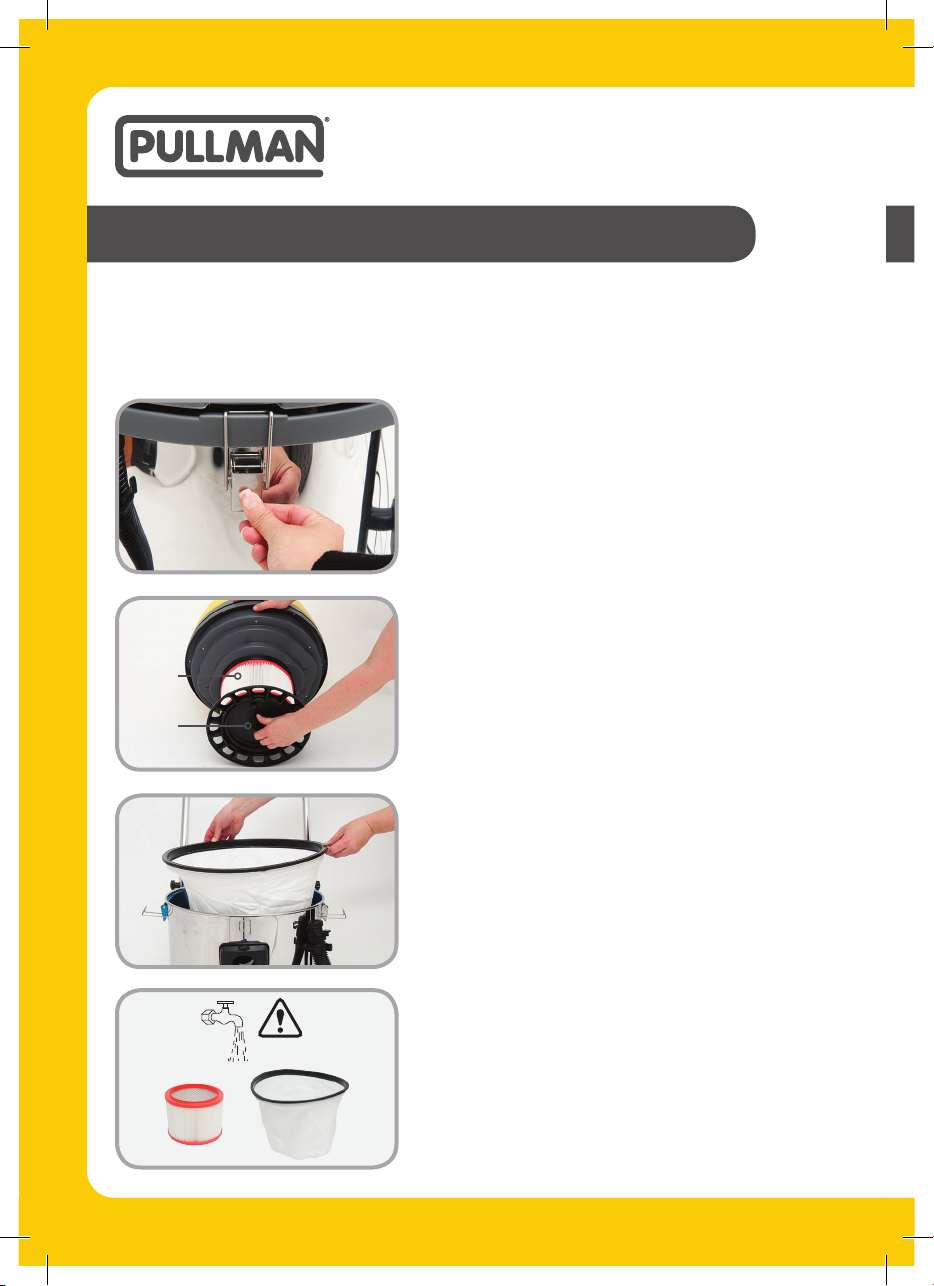
1. Release the locking latches to remove the
canister lid.
3. Remove the cloth bag.
4. Wash and clean the HEPA filter and bag carefully
using luke warm water.
2. Unlock the locking knob and remove the
HEPA filter.
HEPA
Filter
Locking
Knob
40°C
max
12
MAINTENANCE (CONTINUED)
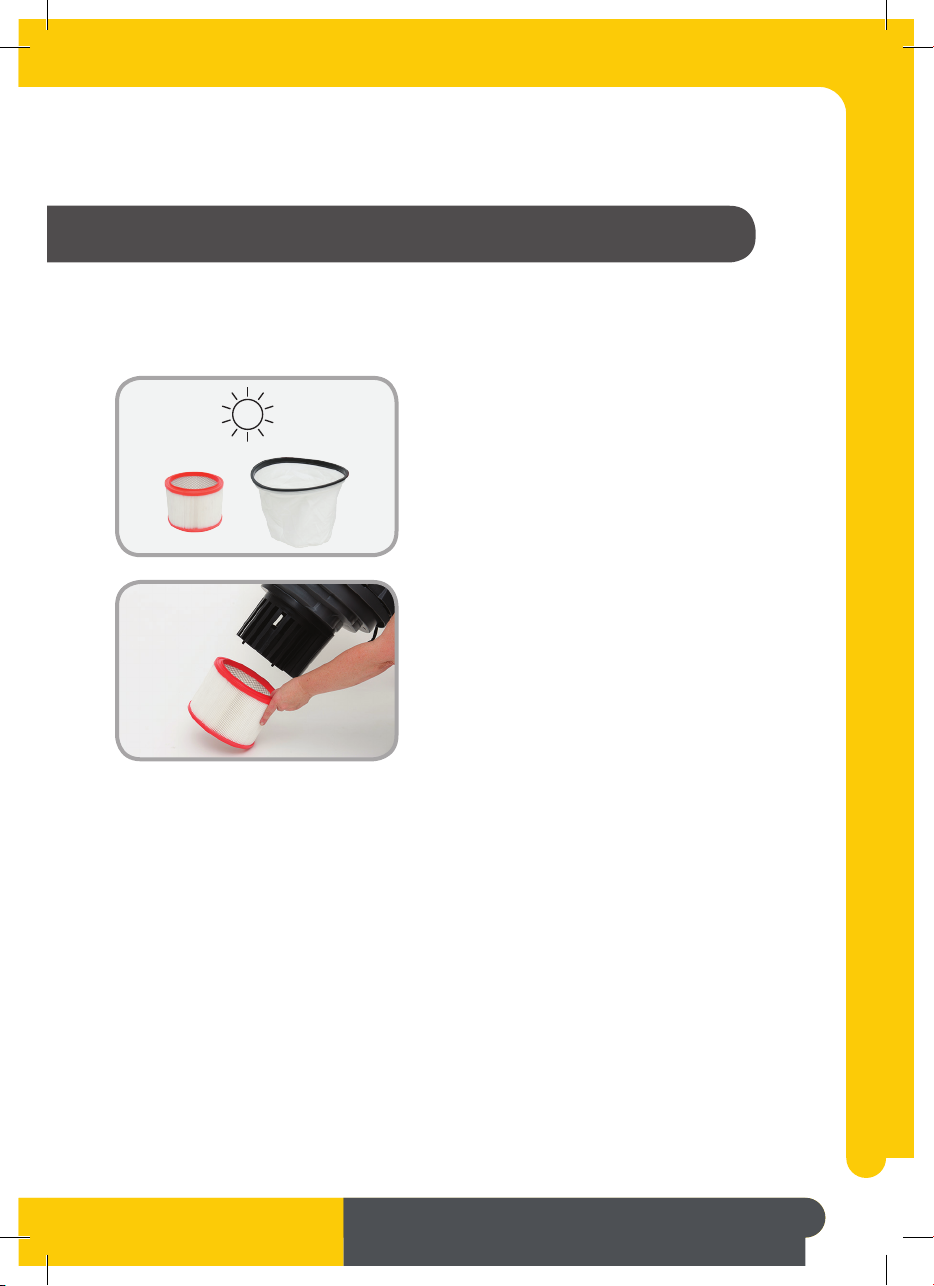
5. Dry by airing for at least 24 hours.
IF PROPER CARE IS TAKEN TO MAINTAIN YOUR CLEANER, MOTOR MAINTENANCE
IS UNNECESSARY. HOWEVER WE RECOMMEND THAT YOUR CLEANER IS SERVICED
ONCE A YEAR.
6. Re-fit the HEPA filter and cloth bag into the machine.
24hr
13
PULLMAN 60L WET & DRY VACUUM WITH OUTRIGGER WD60LSSO
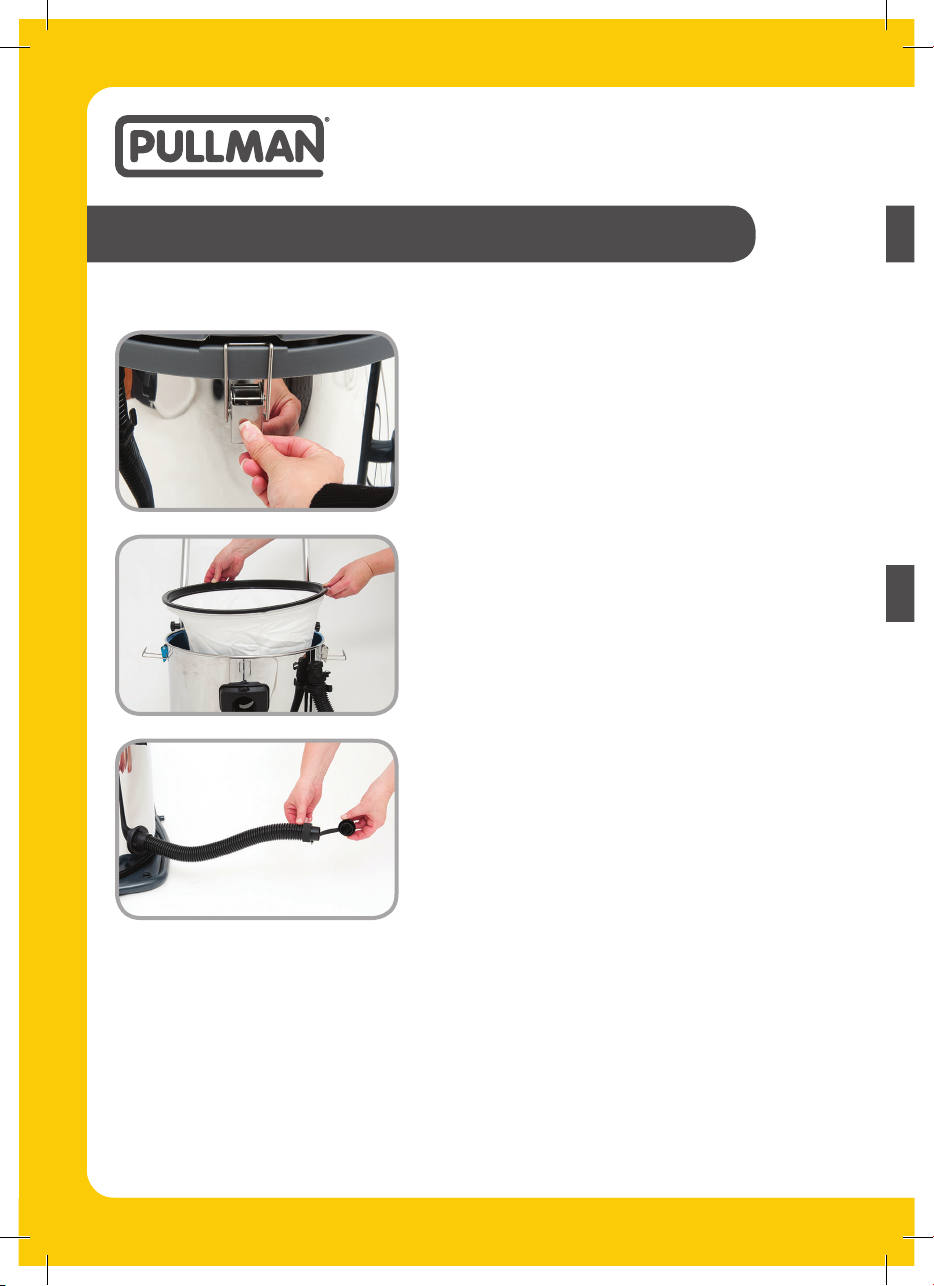
MAINTENANCE (CONTINUED)
Cleaning the Tank
1. Release the locking clip to unlock the barrel
from the base.
2. Remove the cloth bag and clean thoroughly.
3. Empty the tank and clean the inside
of it thoroughly, use luke warm water only.
4. Use the drainpipe to drain water out of the tank.
14

TROUBLESHOOTING
CUSTOMER CARE
TROUBLE POSSIBLE CAUSE REMEDY
Suction weakens or
cleaner runs hot
Clogged filter Brush dirt from filter. If condition
continues, change filter.
Air leak Check all fittings for tight fit (floor tool,
hoses, etc.). Check that tank cover is
sealed properly.
Obstruction in hose
or floor tool
Check floor tool, hose, etc. for
obstructions, and remove if present.
Misting in the exhaust air Saturated filter Remove saturated filter and the
filter mesh.
PRODUCT NUMBER PRODUCT DESCRIPTION
33151805 Stainless Steel Tank 60L
33500399 Small Castor Wheels
33500398 Rear Wheels
31151793 Outrigger Tool Complete
31151794 Squeegee Replacement
31151797 Handle Assembly 60L
33200836 On/Off Switch
31110223 Combination Floor Tool 40mm
31110225 Hard Floor Squeegee Tool 40mm
31110226 Hard Floor Tool 40mm
31220455 Hose Assembly 40mm
31300563 2-Piece Chrome Tube 40mm
31130091 Dusting Brush 40mm
31120106 Crevice Tool 40mm
32200829 HEPA Filter
32440319 Cloth Filter Bag
33151779 Pipe, drain assembly
15
PULLMAN 60L WET & DRY VACUUM WITH OUTRIGGER WD60LSSO
V1 0913
Your Pullman cleaner has a
one year parts and labour
warranty against product
defects and failures when
the product is used in
accordance with the terms
and conditions of this
warranty statement.
The cleaner must be operated in accordance with
these instructions. This cleaner is not designed for
the collection of vitreous building material including
particle board, construction products and similar
products such as wood/fibres, cement, fillers,
fibre glass etc or excessive or frequent sand. The
infrequent pick-up of these materials in these
circumstances may be harmful to your cleaner and
may void the manufacturer’s warranty.
Accessories and consumables including dust bags
and filters, unless defective in manufacture, are not
subject to this warranty. In order to prolong the life
of accessories and consumables, regular care and
maintenance is recommended.
When properly used and cared for, your cleaner
will render excellent service; refer to the instruction
manual for further details, as misuse or failure to
follow the instructions makes this warranty void.
In the event of service or advice being needed,
please contact International Cleaning Solutions Pty
Ltd, ACN 119 462 798, Level 1, Building 2 Brandon
Business Park, 530 Springvale Rd, Glen Waverley,
VIC 3150. Customer Care: 1800 815 270.
The decision to repair or replace the cleaner is at the
sole discretion of International Cleaning Solutions
Pty Ltd. If International Cleaning Solutions Pty Ltd
decide to repair or replace the cleaner, it will do so
at its own cost.
International Cleaning Solutions Pty Ltd is unable
to accept responsibility under this warranty for
any repair work not carried out by an authorised
International Cleaning Solutions Service Agent or
from the use of non-genuine parts. If any part is
no longer available or manufactured, International
Cleaning Solutions will replace it with a genuine
functional replacement part. This warranty does
not apply to the cost of replacing any parts of the
product due to normal wear and tear, alterations,
improper installation, physical abuse, misuse or
accidental damage. Any transportation costs
involved in the repair of defective parts shall be
borne by the claimant.
If proof of purchase cannot be provided at the time
of a warranty claim or service, any work carried
out on the cleaner is chargeable. The repair or
replacement of the cleaner under this warranty
does not extend the original period of warranty.
The benefits conferred by this warranty are
in addition to all other rights and remedies in
respect of the product as outlined under the
Competition and Consumer Act and other State
and Territory laws.
“Our goods come with guarantees that cannot
be excluded in the Australian Consumer Law.
You are entitled to a replacement or refund for a
major failure and for compensation for any other
reasonably foreseeable loss or damage. You are
also entitled to have the goods repaired or replaced
if the goods fail to be of acceptable quality and the
failure does not amount to a major failure.”
Conditions of warranty
Table of contents
Other Pullman Vacuum Cleaner manuals

Pullman
Pullman PC4.0 User manual

Pullman
Pullman CB60 User manual

Pullman
Pullman LITHIUM 950 User manual

Pullman
Pullman PV 14 User manual

Pullman
Pullman WD20LSSO User manual

Pullman
Pullman CB80 User manual

Pullman
Pullman COMMANDER 900 User manual

Pullman
Pullman PV500 User manual

Pullman
Pullman WD30BV1 User manual

Pullman
Pullman PULL10LD User manual


