Pulmic PEGASUS 35 User manual

Active la garantía / Activate the warranty
Activer la garantie / Ative a garantia
Attivare la garanzia / Aktywuj gwarancję
Активируйте гарантию /
Manual de uso - Pág. 02
Pulverizador Eléctrico
User’s manual - Page 10
Electric Sprayer
Manuel d’utilisation - Page 18
Pulvérisateur Électrique
Manual de usuário - Pag. 26
Pulverizador Elétrico
Manuale d’uso - Pag. 34
Spruzzatore elettrico
Instrukcja obsługi - Str. 42
Opryskiwacz elektryczny
Инструкцию по эксплуатации - Стр. 50
Электрический опрыскиватель
- 63
www.gruposanz.es/activacion-garantia
ES
EN
fr
PT
IT
PL
RS
AR
PULMIC PEGASUS 35
Pag./PAGE
64-71
Despiece / Spare parts / Pièces détachées / Peças sobressalentes
Pezzi di ricambio / Spis części / Список деталей /

www.gruposanz.eswww.gruposanz.es
EN
— 10 — — 11 —
PULMIC PEGASUS 35 PULMIC PEGASUS 35
1. INTRODUCTION AND USES
Read this manual carefully before starting to use the sprayer and pay special
attention to the maintenance recommendations, as well as their use for
correct operation and useful life.
The company reserves the rights to changes the composition of the product
without prior notice as well as its technical characteristics. No claims can be
derived from the data and illustrations in this manual. The original manual
is written in Spanish, so it will prevail over the rest, in case of conflict or
contradictions between other languages.
This sprayer is specially designed for use with phytosanitary products such
as fungicides, insecticides or herbicides (pH scale min. 5 - 14 max.). It can
be used both for gardening and small farms. In no case should it be used
to spray flammable or industrial products such as solvents, alkalis or acids.
2. COMPOSITION AND START-UP
Before starting work, you must finish charging the battery (during storage
it may have lost some of its charge). To do this, the battery must be
disconnected from the sprayer.
Plug the charger into the mains and connect it to the battery until it is fully
charged. When the charge level is full, the battery LEDs will stop flashing
and stay on.
The sprayer’s operating temperature range is 1 ° to 40 °C.
To start working with PULMIC PEGASUS 35, press the 3S button and a green
light will turn on; the sprayer will start at speed 1 (low pressure), suitable for
herbicide treatments. Pressing a second time the indicator light will change
to orange light, corresponding to speed 2 (medium pressure), suitable
for herbicide and insecticide treatments. Pressing for the third time, the
indicator light will turn red, speed 3 (suitable for insecticidal and fungicidal
treatments). Pressing for the fourth time, the indicator light will turn o: the
equipment will stop and remain disconnected, ready to be used again when
required.
DO NOT FORGET TO DISCONNECT THE SPRAYER WHEN
FINISHING WORK.
Watch the product commissioning video through the following
link or QR:
www.tiny.cc/peg35-02-en
3. SAFETY RULES
1. Use appropriate protective equipment to avoid contact of plant
protection products with any part of the body.
2. Read the instructions contained in the product labels, use the appropriate
preparation and mixing utensils, after preparation wash your hands and
face, to avoid ingesting the product, do not eat, drink or smoke during
handling. Always respect the prescriptions and doses indicated on the
product labels.
3. Properly remove empty or leftover containers.
4. Do not spray on people, animals, or electrical installations. Avoid drifting
to neighboring fields and crops, as well as to sources, rivers and ponds.
Do not use against the wind.
5. Do not use flammable or combustion-promoting materials.
6. Do not use liquids with temperatures higher than 40 °C.
4. EU DECLARATION OF CONFORMITY
In compliance with the provisions of the Machinery Directive (2006/42/CEE)
and Industry Law 21/1992, the manufacturer declares that this equipment
has been designed and tested in such a way that it complies with the Health
and Hygiene regulations that apply to it and are enforceable. Harmonized
technical standards ISO 19932-1: 2013; ISO 4254-6: 2009; ISO 16119-1: 2013;
IEC 62133-2:2017; UNE-EN 60745-1:2007; Directive 2009/127/EC; RoHS.
All materials and components have passed the corresponding quality tests
to be assembled and put into service safely.
In Valencia, January 2023.

www.gruposanz.eswww.gruposanz.es
EN
— 12 — — 13 —
PULMIC PEGASUS 35 PULMIC PEGASUS 35
5. CLEANING AND MAINTENANCE
TANK AND PIPES
Clean the instrument and its pipes after each use, with clean water. Empty
the tank complete. Never leave the sprayer phytosanitary products stored in
the tank, pipes or pump.
FILTERS
This machine has the following filters:
• Filling mouth filter (Ref. 1447).
• Suction filter (Ref. 14062). It is located in the lower part of the tank and
can be removed for cleaning. After cleaning, it should be reassembled in
its housing in the same way and original position.
• Impulsion filter (Ref. 1453). Find in the handle of the sprayer lance.
The correct maintenance of the filters is the best guarantee for the proper
functioning of your sprayer. Clean these filters periodically (every workday)
and replace them if damage.
NOZZLES
The electric sprayer is supplied with quality nozzles. The performance of
this equipment may be reduced if a nozzle with excessive wear or a non
recommended nozzle are used. Replace the nozzle when it present signs
of deterioration.
RECHARGE AND BATTERY MAINTENANCE
The battery is a very sensitive subjected to wear. To
lengthen its life is important to read the charging and
maintenance recommendations.
To recharge the batteries, extract the battery from
its housing by pressing the release lever and moving
the battery (Ref. 13943) outwards (see fig. 1). Then,
connect the charger (Ref. 13980) to the mains through
its mains connection 100/240 V AC.
Next, you must connect the 21 V DC plug to the
battery socket, located on the back side. Then, the
green battery LED will start to blink, indicating that
the recharging process has begun.
On the battery, the indicator light has the following meaning:
The approximate time for recharging is 4-5 hours (depending on the level of
discharge of the battery). After final charging, remove the connector from
battery housing and then remove the battery charger (Ref. 13980) from the
mains plug.
IT IS RECOMMENDED TO RECHARGE THE BATTERY AFTER EACH
WORKING DAY
Never recharge the battery with extreme temperatures, the charging
temperature range is 0° to 40 °C. It is recommended before starting the
recharge wait a while until the battery gets cool. It is normal for the charger
to warm up slightly during charging.
For extended periods of inactivity, you should remove the battery from the
sprayer and store at half load in a dry and stable temperature (ideal range of
5° to 15 °C), it is also advisable to monitor the state of charge at least once
every six months and whether to proceed with timely recharge depending
on future use.
When replacing the battery, have an original spare part and insert it into
accommodation as instructed. Use only the charger supplied with this
equipment, connected to a power socket AC standard (100/240 V, 50-60 Hz).
CONNECT THE CHARGER ONLY IN INDOORS. IN DRY PLACES &
AWAY FROM CHILDRENS. DO NOT USE THE CHARGER IN EXPLOSIVE
ENVIRONMENTS. DO NOT LEAVE THE SPRAYER IN OUT DOORS. &
WITH TEMPERATURES BELOW ZERO.
DO NOT OPEN THE BATTERY OR KEEP NEAR ANY HEAT SOURCES.
LEAVE WASTED BATTERIES IN AN AUTHORIZED PLACE.
LEDs ON 1 2 3 4 5
CHARGE LEVEL Less than 20% 21% - 40% 41 - 60% 61% - 80% 81% - 100%
EXPLOSION RISK
Figure 1
www.gruposanz.eswww.gruposanz.es
EN
— 14 — — 15 —
PULMIC PEGASUS 35 PULMIC PEGASUS 35
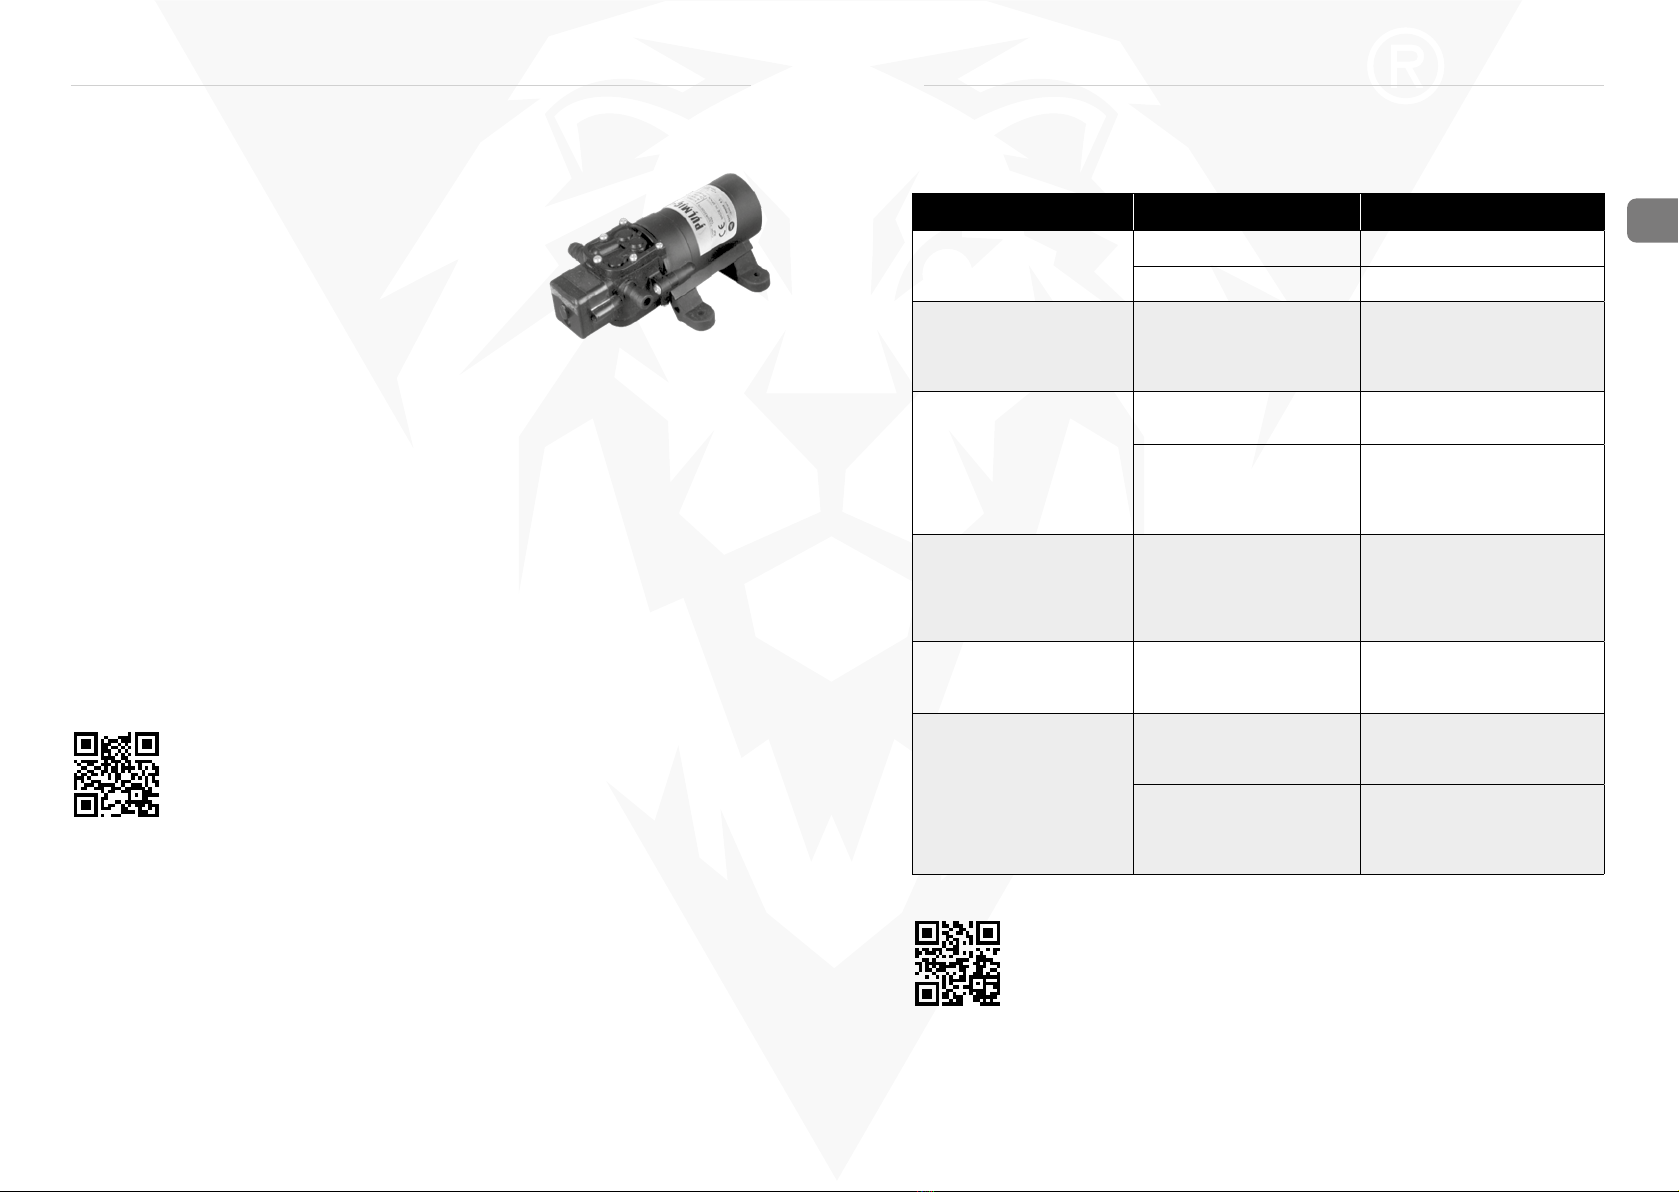
MOTOR & PUMP
The motor, the pump and the pressure switch
are sensitive items subject to wear, they are
integrated into a single module and need
preventive maintenance to extend their useful life.
To keep the pump head in proper operating
condition after each application, run the sprayer
with clean water in open circuit for a few minutes.
Never let the pump with phytosanitaries inside over 8 hours, these products
may precipitate or agglutinate causing clogging and malfunction thereof.
Furthermore, if such products contain significant concentrations of organic
solvents or solvents will damage the internal elements thereof.
Do not use any corrosive acid, and if you do so by accident, immediately
clean the tank and clean the circuit with clean water in open circuit circulating
it for some time.
To preserve the motor, do not immerse the sprayer in any type of liquid and
protect it from moisture as much as possible. This motor is a DC brushed
motor, its wear and useful life will depend exclusively on the aforementioned,
the ambient temperature and the average working pressure.
Watch the product maintenance video through the following link
or QR:
www.tiny.cc/peg35-05-en
6. PROBLEMS AND SOLUTIONS
Watch the videos of the main repairs through the
following link or QR:
www.tiny.cc/peg35-06-en
PROBLEM POSSIBLE CAUSE SOLUTION
Sprayer doesn’t turn on.
Battery is not charged. Recharge battery.
Loose wire. Ask for technical support.
Leaks from tank area.
Hose(s) have a loose
connection with the
pump or tank.
Remove screws and plastic
covering to expose pump.
Check for loosen clamps
on both hoses.
Leaks from lance or
nozzle areas.
Loosen or damaged
seals.
Check all the seals. Tighten
or replace if neccesary.
Ball valve inside the
handle is worn or some
dirty prevents proper
closing.
Ask for technical support.
Clogged pump / hose /
gun / wand / nozzle.
Tank / pump / hose /
gun / nozzle(s) hasn’t
been properly rinsed
with cleaning solution or
water after use.
Rinse sprayer thoroughly
with warm, soapy water
after each use.
Broken parts. Wear or breakage of
parts.
Replace with proper spare
parts. Or ask for technical
support.
The pump works
continuously and does
not stop when spraying
stops.
Defective or poorly
adjusted pump pressure
switch.
Ask for technical support.
The filters are dirty, or
the nozzle is clogged.
An unsuitable nozzle is
being used.
Clean filters and pipes,
as well as the nozzle. Or
replace the nozzle with one
suitable for this sprayer.

www.gruposanz.eswww.gruposanz.es
EN
— 16 — — 17 —
PULMIC PEGASUS 35 PULMIC PEGASUS 35
7. WARRANTY
This product has a 2-year warranty from the user’s purchase (Minimum
indicated by Spanish law) of the product, except in countries where specific
warranty conditions apply. If in doubt you can ask your dealer. The battery
will have a 1-year warranty.
No warranty will be applied for any of the following causes:
• Do not read the instruction manual carefully.
• Wear from conventional use (Including batteries).
• Use of work tools not allowed.
• Use of force, improper handling, or accident.
• Use of non-original or unsuitable spare parts.
• Use of products not allowed.
• Omission of necessary maintenance work.
Any type of guarantee must be dealt with by an authorized dealer, always
together with the purchase invoice or ticket specifying the date of purchase of
the product and with its serial number (photo of the serial number). Warranty
services do not extend the warranty period or establish new warranty terms. It
is also recommended to register the machine through the following link for a
correct use of the guarantee. The data of the guarantee must be of the own end
user and not those of the seller.
Activate the warranty through our website:
www.gruposanz.es/en/warranty-activation
Where to find the serial number?
1) In the box
2) In the sprayer (inside the battery box).
8. TECHNICAL SPECIFICATIONS
TECHNICAL SPECIFICATIONS
Autonomy 4-7 h *
Max. Pressure 4 bar
(58 psi)
Spraying distance 9 m
(30 ft)
Tank capacity 35 L
(9 gal)
Battery useful life 1000 cycles
Pump life 1000 h
Battery Type LI-ION
Battery voltage 18 V
Battery capacity 2600 mAh
Battery charging time 4-5 h
Caudal máximo 2,27 L/min
(0,6 gpm)
Charger 21 V / 1 Ah
* Average autonomy calculated considering 2 minutes working and 1 minute stopped.
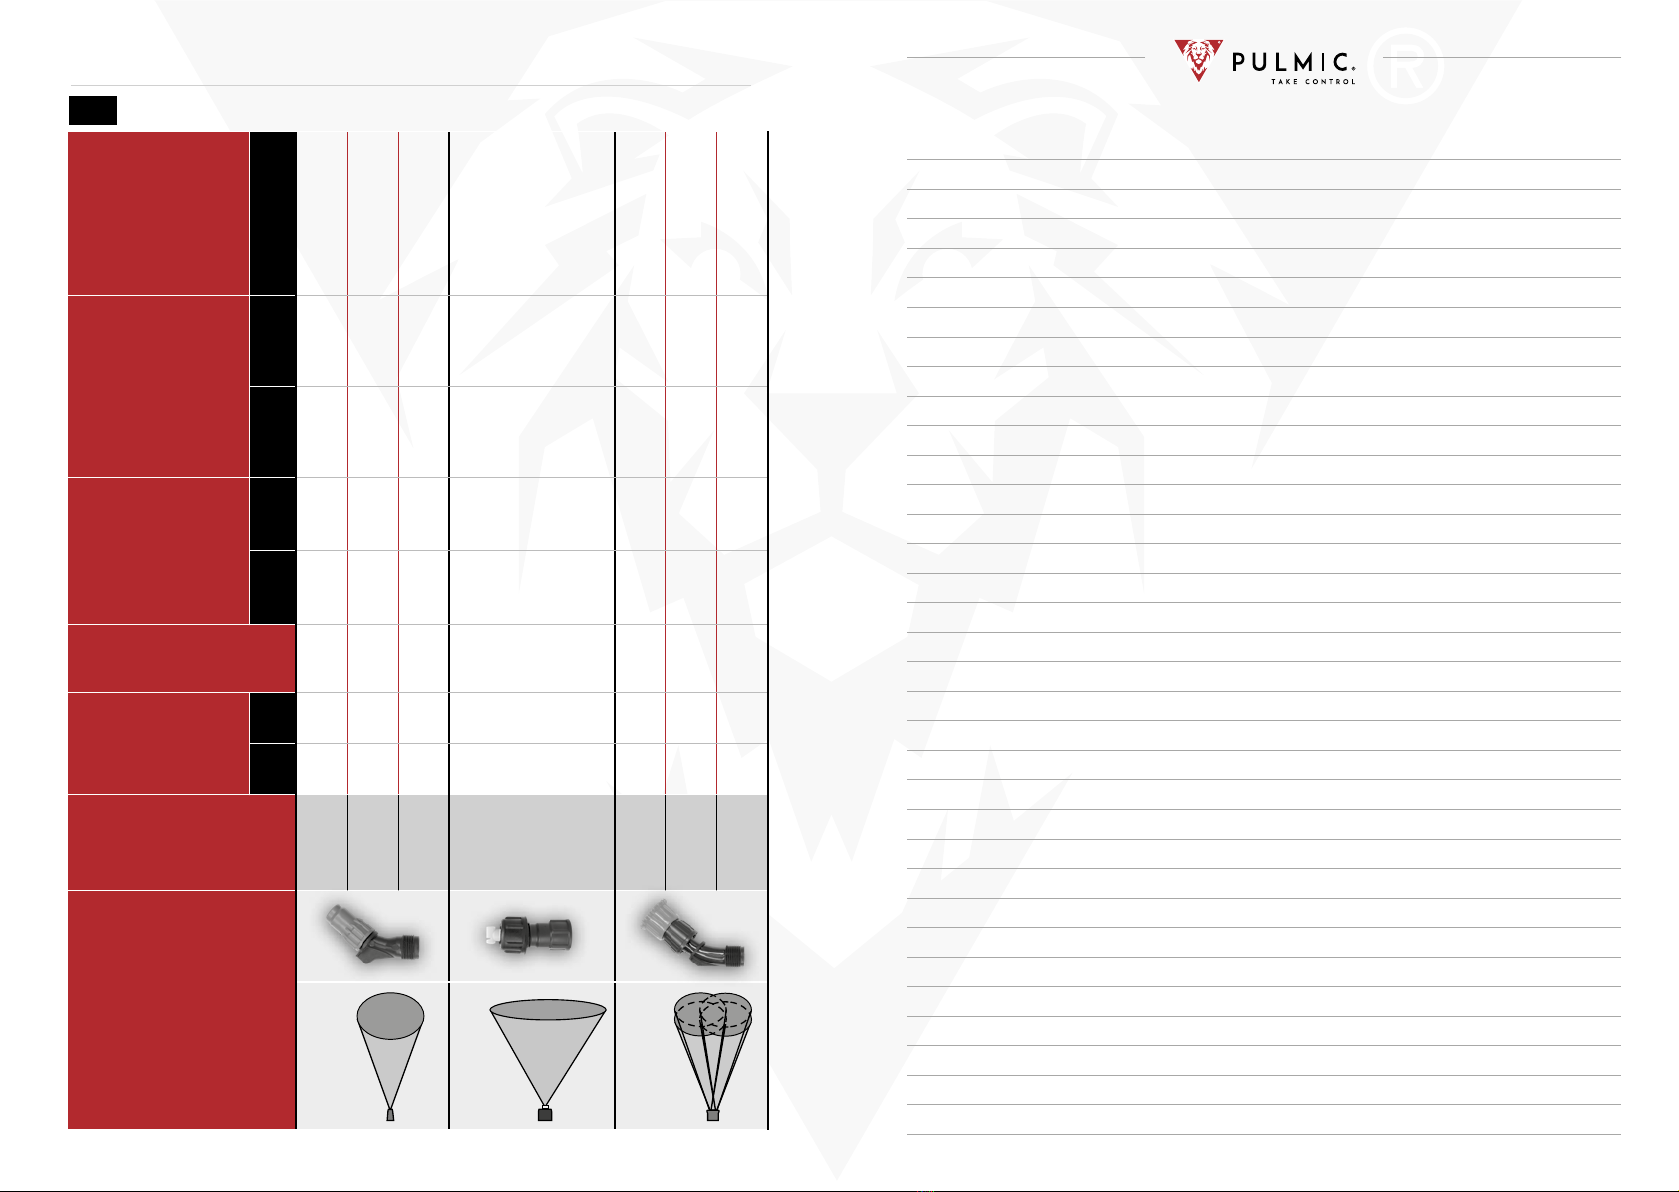
ANNEX: NOZZLES
Refer to the nozzle table and choose the most suitable option for the type of
application: 4 jets nozzle, red adjustable nozzle, yellow G.A. herbicide nozzle.
ESTIMATED VALUES AT A TEMPERATURE OF 20°C.
ANNEX Page 72
I
PULMIC PEGASUS 35 www.gruposanz.es
— 72 —
Boquilla
Nozzle
Buse
Bico
Ugello
Dysza
Сопло
Velocidad
Speed
Vitesse
Velocidade
Velocità
Prędkość
Скорость
Presión
Pressure
Pression
Pressão
Pressione
Ciśnienie
Давление
Ángulo
Angle
Angle
Ângulo
Angolo
Kąt
Угол
Caudal
Flow
Débit
Fluxo
Flusso
Przepływ
Поток
Capacidad/batería
Capacity/battery
Capacité/batterie
Capacidade/bateria
Capacità/batteria
pojemność/baterię
Емкость/аккумулятор
Autonomía total
Total autonomy
Autonomie totale
Autonomia total
Autonomia totale
Całkowita autonomia
Полная автономия
bar
Бар
psi
Пси
L/min
л/мин
gpm
гал/мин
L
л
gal
гал
min.
Мин.
Ref. 15293 12 30 80° 0,68 0,18 173 45,7 370
23 45 80° 0,85 0,22 144 38 240
34 58 80° 0,95 0,25 136 35,9 185
Ref. 9036
12,5 36 135° 0,7 0,18 182 48 370
Ref. 8740 11 14 80° 0,95 0,25 286 75,5 430
22 29 80° 1,25 0,33 200 52,8 235
33 43 80° 1,4 0,37 198 52,3 200
ANEXO / ANNEX / ANNEXE / ANEXO / ANNESSO / ZAŁĄCZNIK / ПРИЛОЖЕНИЕ /I


IMPORTANTE / IMPORTANT / IMPORTANT / IMPORTANTE
IMPORTANTE / ISTOTNE / ВАЖНО /
Cargar la batería cada 6 meses
Charge the battery every 6
Chargez la batterie tous les 6 mois
Carregue a bateria a cada 6 meses
Caricare la batteria ogni 6 mesi
Ładuj baterię co 6 miesięcy
заряжайте аккумулятор каждые 6 месяцев
6
pulmic gruposanz
Valencia - SPAIN
www.gruposanz.es - info@gruposanz.es
Table of contents
Other Pulmic Paint Sprayer manuals

Pulmic
Pulmic ANIMAL POWER 15 User manual

Pulmic
Pulmic RAPTOR 12 User manual

Pulmic
Pulmic RAPTOR 16 ADVANCE User manual

Pulmic
Pulmic 15+ VITON User manual

Pulmic
Pulmic PEGASUS 75 User manual

Pulmic
Pulmic INDUSTRIAL 35 User manual

Pulmic
Pulmic INDUSTRIAL 35 User manual

Pulmic
Pulmic RAPTOR 7 User manual

Pulmic
Pulmic PEGASUS 15 User manual

Pulmic
Pulmic Taurus AIR+ User manual


Popular Paint Sprayer manuals by other brands


Campbell Hausfeld
Campbell Hausfeld HousePainter EZ5000 Series Operating instructions and parts manual

Ozito
Ozito SGP-5000 instruction manual

MBW
MBW BMS74 Operator's safety and service manual

Birchmeier
Birchmeier REC 15 PZ1 operating manual

DeWalt
DeWalt DWMT70779 instruction manual

Eastwood
Eastwood Concours PRO instructions


