Pulmic Taurus AIR+ User manual
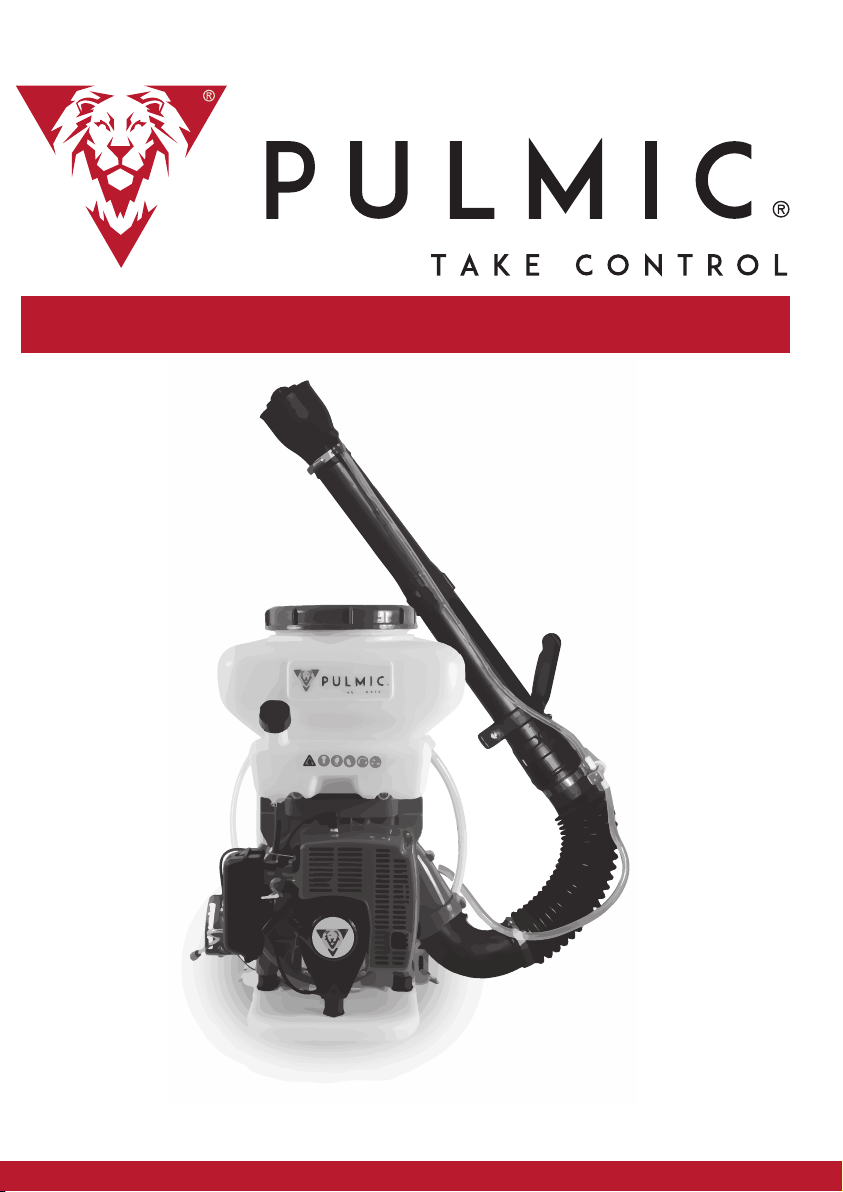
ATOMIZER / ATOMIZADOR / ATOMISATEUR
PULMIC TAURUS AIR+
USER´S MANUAL
MANUAL DE USUARIO
MANUEL D’INSTRUCTIONS

© Pulmic y TAURUS AIR+ son marcas registradas de Grupo Sanz. Todos los derechos reservados.
Grupo Sanz se reserva el derecho de realizar modificaciones técnicas sin previo aviso.
© Pulmic and TAURUS AIR+ are trademarks Sanz Group. All right reserved.
Sanz Group can make technical modifications without previous warning.
© Pulmic et TAURUS AIR+ sont des marques enregistrées de Groupe Sanz. Tous les droits
réservés.
Groupe Sanz ont réservé le droit d’eectuer des modifications techniques sans préavis.

WARNING TO USERS
* The engine must use mixed fuel. The ratio between gasoline
and oil is determinedby the instruction, the gasoline is NO.90
and the oil should be two-stroke oil forgasoline engine (It is
strictly prohibited to use the other kind of oil).* The engine
should run at low speed for 3-5 minutes after start and before
stop. It isstrictly prohibited that the engine runs at high speed
without load in order to avoid thedamage of the engine parts
and the harm of body .It is algo prohibited to stop theengine
suddenly at high speed.* To prevent fire the engine must stop
and be far away from tire sourceswhen adding fuel. Smoking
is strictly prohibited!.
CONTENTS
-3-
Main Uses (4)
Main Features (4)
Assembly for Varieties of Operating (5)
Operating Method (6)
Spraying/dusting (9)
Safety (10)
Trouble Shooting (11)
Maintenance and Long Term Storage (13)
Attachments: figures

MAIN USES
Knapsack power sprayer-duster is portable, flexible and high
ecient equipment forplant protection. It is suitable for use in
prevention of plant disease and controllingpests in large plan-
tation and crop fields where cotton, wheat, paddy, fruit trees,
teatrees etc, are planted. It can also be used for applying
herbicides, sanitation andepidemic and prevention, spreading
granular fertilizer and granular, etc. This machinecan also be
suit for use in mountain area, hilly land and odd pieces of land.
1.The main parts of the machine are all of plastics, so the machi-
ne is ilightweight, corrosion-resistant and carried on the back
for operating iscomfortable.
2.The construction design ofthe machine is unique. The parts
that have hadcontact with chemicals are all made of reinforced
plastics or stainless steelthus anti-corrosion, long fire in use.
3.The dimensions of the mouth on the chemical tank is big, thus
to fill thechemicals in bags can be directly poured into the hole.
4.The dimension of the lower part of the frame is bigger and the
center ofgravity of the machine is low, so the stability ofthis
machine is good.
5.Recoil starting engine is adopted, so it is easy for operation.
There areprotective structures for the high temperature com-
ponents and it is safe foruse.
6.The rotating structure is used in the connection between
hose and fancasing. It is easy for operating. The hose has long
life in use.
MAIN FEATURES
-4-
-05-
ASAS
ASAS
AS SEMBLSEMBL
SEMBLSEMBL
SEMBLY FOR VY FOR V
Y FOR VY FOR V
Y FOR V ARIETIES OF OPERARIETIES OF OPER
ARIETIES OF OPERARIETIES OF OPER
ARIETIES OF OPERAA
AA
ATINGTING
TINGTING
TING
ASSEMBLY FOR VARIETIES OF OPERATING
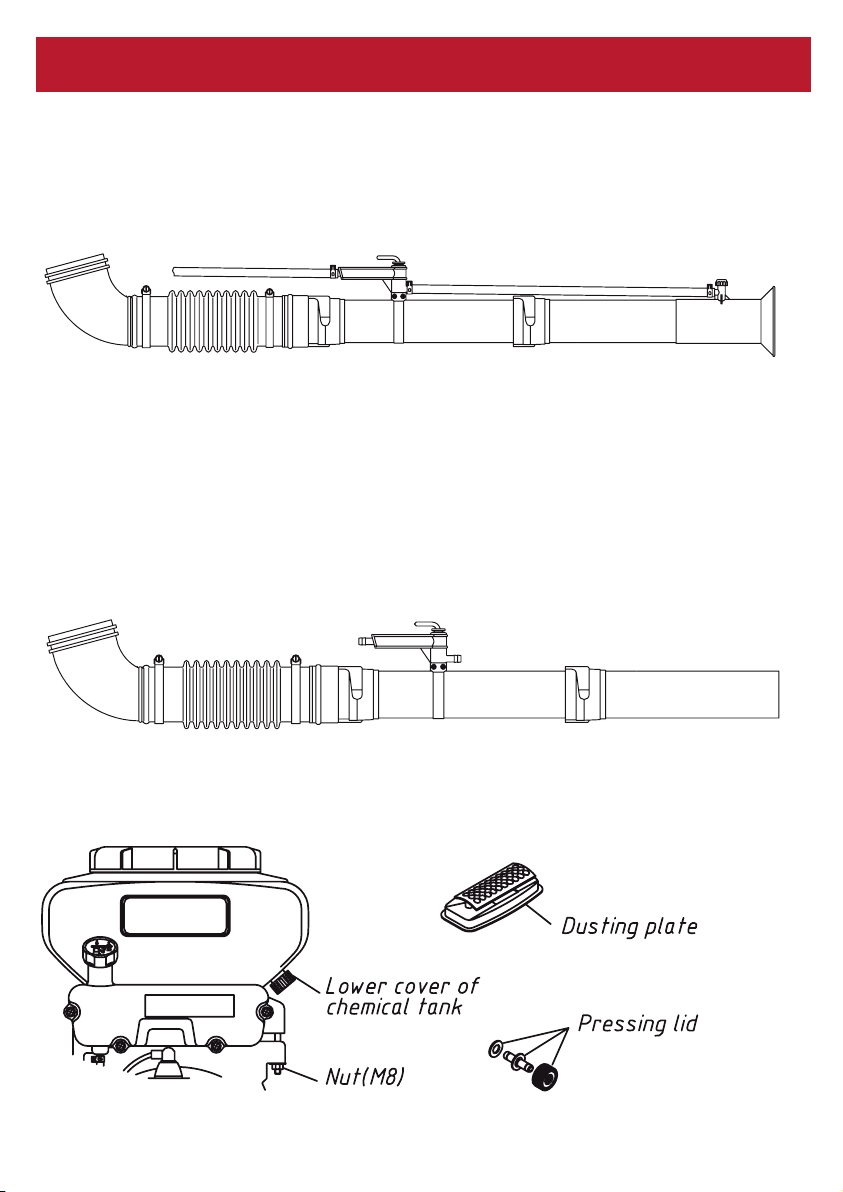
1. Assembly for spraying
As shown in Fig.1, connect spraying pipe to the machine.
2. Assembly for dusting
(1)Remove the two wing nuts fixed on the chemical tank and take
down the tank.Change spraying lid plate and the pressing lid for
dusting lid plate and the lowercover of chemical tank, then assem-
ble chemical tank and screw down wing nuts, asshown in Fig.2
(2) As shown in Fig.3, connect dusting pipe to the machine. 2
Figure 1
Figure 2
Figure 3

Y FOR VY FOR V
Y FOR VY FOR V
Y FOR V ARIETIES OF OPERARIETIES OF OPER
ARIETIES OF OPERARIETIES OF OPER
ARIETIES OF OPER
OPERATING METHOD
3. Anti-electrostatic installation
Dusting or spreading granular chemicals may caused the electrosta-
tics, that is relatedto the factors, such as the kinds of chemicals, air
temperature, air wet etc. In order toprevent anti-electrostatics,
please use the attachment-insurance chain. The airbecomes dryer,
the electrostatic is more bitterly, in particular with use the longmem-
branous tube for dusting and granules spreading may cause fue
electrostatics.Please to pay attention especial.Note:1-Loosen the
screw first, and insert the conductive wire then tighten the
screw.2-Loosen the clamping ring, and insert the conductive
wire.3-Make the insurance chain to touch to the ground.lnsert one
end of the insurance chain into jet pipe and connect fue end to
thewire, let the chain vibrate free and touch the ground. Then fix the
chain andthe wire on bent pipe with screw.
1-Checking
(1) Checking whether the spark plug and all the connection are tighte-
ned.
(2) Checking whether the cooling air channel is clogged. If so, the
enginewill be over heated.
(3) Checking whether the air filter is dirty. If so, the dirt will reduce the
amountof air drawn in. So the engine doesn ‘t run well and waste fuel.
(4) Check whether the gap of the sparking plug is 0.6—0.7mm.
(5) Pull the starter 2 or 3 times, check whether it rotates normally.
2-Fueling
(1) The fuel for this machine is a mixture of gasoline No 70 or No 90
and 2-stroke oil. The ratio between them is determined by the oil
instruction.incorrect gasoline, oil and míxture may damage fue engine.
(2) Never fuel fue engine when it is hot or running.
(3) When fuel. never take away the straíner.
-06-

3. Fill the chemical tank
(1) For spraying, turn othe switch first then fill the tank.
(2) The dust should be discharged in a short while because the engine’ss-
hake will make the dust agglomerative and solid. Thus the chemical
can’tbe discharged easily.
(3) Tíghten the tank lid to avoid the leakage of chemical.Note: Clean the
dust spilled on the tank opening before puf on the lid, otherwise thelid
can’t be tightened.
4. Starting cold engine
(1) Turn on the switch.
(2) Put the fuel throttle handle to the middle ofthe graduator.
(3) Open the choke fully.
(4) Pull the starter handle and have it return slowly, do not leave the hand-
leto retum freely to avoid damaging the starter.
(5) Close the choke and pull starter handle until engine fires.
(6) Open the choke and if necessary, restart the engine.
(7) Let the engine run at a low speed for 2-3 minutes, to warm up before
use.Put the fuel throttle handle to the working position when you spray or
dust.
5. Starting warm engine (Fig.4)
(1) Leave the choke fully open.
(2) If the engine is draw in too much fuel, leave the fuel
throttle fu11yclose,pull the starter 5-6 times.
Then start the engine as above.
Figure 4
-7-
-08-
Figure 5
6. Stopping engine
(1) Spraying over, turn o the chemical switch first then put fuel
stopingswitch until the engine stops. (Fig.5)
(2) Dusting over, put the dusting rod on the lowest positions and the
enginestops.(3) Having finished working. Turn o the fuel switch. Pay
attention!Note: While the engine is running, the hose must be moun-
ted to the machine,otherwise cooling sir will be reduced and this can
damage the engine.

SPRAYING / DUSTING
1. Spraying
Tuming the switch. you can change the rate of spraying. and see Fig.6.
2. Dusting
Change fue three holes on the rocketshaft and the dusting rod’s position, so
the rateof dusting can be adjusted. (Fig.7)
Figure 6
Figure 7
-09-

1. Protective clothing (Fig.8)
(1) Wear flanged cap.
(2) Wear dirt/fog-proof glasses.
(3) Wear gauze mask.
(4) Wear long gloves.
(5) Wear coat guarding against poisons.
(6) Wear boots.
2. Following personnel can not use
the machine
(1) Mental patients.
(2) Drunk.
(3) Under age or old person. Fig.8
(4) Person with no knowledge of the machine.
(5) Dog-tired person or patient and others who can not operate the
machinenormally.
(6) Person who have just exercised strenuously or slept not enough.
(7) Women giving the breast to baby or being pregnant.
3. Avert fire
(1) Do not fire or smoke nearby the machine.
(2) Never refuel the machine when it is hot or running.
(3) Never pour fuel on the machine. If you do, clean them o, then
tighten the fueltank lid, and move at least 10 feet away from the fuel
container before starting themachine.
4. Starting engine
(1) Put the dust gate handle to the lowest position before starting the
engine,otherwise chemicals will be jetted when starting engine.
(2) It is prohibited to stand in front nozzle. Even though dust Bate is
closed,residual dust in pipe will be blown out. (Fig.9)
SAFETY
Figure 8
Figure 9
-10-

-11-
Y FOR VY FOR V
Y FOR VY FOR V
Y FOR V ARIETIES OF OPERARIETIES OF OPER
ARIETIES OF OPERARIETIES OF OPER
ARIETIES OF OPER
TROUBLE SHOOTING
5. Misting/Dusting
(1) It is fine to carry out operation during cool weather with little wind. For
example, inthe early moming or in the late aftemoon, this can reduce the
evaporation and drift ofchemicals and improve the protecting eect.
(2) Operator should move windward.
(3) If your mouth or eres are spattered with chemicals, wash them with
clean waterand then go to see a doctor
(4) If the operator has a headache or dizziness, stop working at once and
go to seea doctor in time.
(5) For the operator’s safety, misting/dusting must be carried out strictly
according tothe instnlction ofthe chemicals and agricultural requirements.
1. Engine fairs to start or hard to start.
Firstly check whether the plug sparks. Take the plug down and have the
sidepoleof it touching the cylinder, and pull the starter to watch whether
sparks appear.While pulling the starter be careful of not touching the plug,
otherwise an electricchock will happen.Troubleshooting is shown in the
following table.
TROUBLE CAUSE REMEDY
No
Flash
Spark plug
tiyrDtewseloP.1
2.Covered with carbon Clean the carbon
3.The insulation damaged Replace
4.Spark gap incorrect Adjust 0.6 〜0.7mm
ecalpeRdenrubselopehT.5
Magneto
1.The wrap of wire damaged. Remedy or replace
ecalpeRdabliocfonoitalusnI.2
3.The wire of coil broken. Replace
4.The electronic ring unit defective Replace
Normal
Compression ratio and
fueling well
1.Too much fuel in cylinder Drain
ecalpeRleufnitridroretaW.2
Fueling well but
compression ratio bad.
1.Cylinder and piston ring wore or tore Replace them
tinethgiTesoolgulpehT.2
Carburetor not fueling
leuFknatnileufoN.1
naelCdeggolcezuagreteliF.2
3.The air hole of the tank clogged Clean

-12-
YDEMERESUACELBUORT
The compression ratio is
fine
1. The filter plate clogged Clean
2.Air passes through the
connection of carburetor
Tighten
3.Engine overheat Stop the engine and cool it
efiRleufniretaW.4 ll with fresh fuel
5.The carbon clogs mu er Clean
Engine overheats
1.Mixed gas (fuel) thin Adjust the carburetor.
2.Cylinder covered with carbon Clean
3.Oil bad Use 2-T engine oil and adjust the
mix ration.
4.No connection with hose Correctly assemble the machine
Engine noisy or knocking
ecalpeRdableuF.1
naelCrednilycninobraC.2
3.The running parts wore and
tore.
Check and replace
(3)Engine stops while running
YDEMERESUACELBUORT
Engine stops suddenly
1.The lead wire of plug loose Replace firmly
2.Piston bitten Change or remedy
3.Plug covered with carbon Clean plug
4.Fuel used up Fill the fuel tank
The engine stops slowly
1.Carburetter clogged Clean
2.The air hole in the tank clogged Clean
3.Water in fuel Refill with fresh fuel
(4)Engine hard to stop
YDEMERESUACELBUORT
Throttle handle put to the
lowest position, the engine still
runs .
The throttle cord is short or
piston of carburetter blocked.
Adjust the cord or remedy the
carburetter.

-13-
(5)Dusting
YDEMERESUACELBUORT
No dust discharge or discharge
intermittently
1.The dust gate can not be
opened.
Adjust the pull rod of the dust
gate
2.The tank lid not tightened Tighten the tank lid
3.The dust or granule mix with
foreign body. Clean it
4.The dust or granule lumped. Break the lump
tiyrDelunargrotsudteW.5
6.The granules is too big Change the granules
The dust gate not work properly
1.The dust gate can’t closed Clean it
2.The dust gate clogged by
foreign matter Tighten it
Leakage of dust
1.the clamp plate of the
chemical tank bottom loosened Tight it
2.The sealing gasket of the
dusting lid damaged Change it with new one
3.The O-sealing ring of the
elbow damaged Change it with new one
The discharge rate out of
control
The control device of dust gate
not work properly Remedy it
(6)Spraying
YDEMERESUACELBUORT
No spray mixture jet or jet
intermittently
1.Nozzle switch or control valve
clogged Clean
2.Liquid lead pipe clogged. Clean it
3.No pressure or the pressure
is lower
Tighten the tank lid and screw
down the two wing nuts.
Spray mixture leakage
1.The spraying lid plate fitted
incorrect Refi
t it
2.Every threaded joint loosened Screw down it
MAINTENANCE AND LONG TIME STORAGE
1. Spraying units
(1)Clean out any residual spray mixture or dust in fue chemical tank
and allother parts after operation.(2)Clean the dust gate and
chemical tank inside and outside after dustirtg. (3)Loosen the
chemical tank lid while fue machine free.(4)Let fue machine ron at
a low speed 2-3 minutes after cleaning.
-14-
2. Fuel system maintenance.
(1)Water or dirt in fuel is one of fue main causes of fue engine trou-
ble. cleanfue fuel system regularly.
(2)Residual fuel remaining in fue fuel tank and carburetor for long
time will guroand clog fue fuel system.
3. Air filter and pingo
(1)Clean the filter after every day operation. Dirt adhering to sponge
reduce theengine power.
(2)Dry filter before reinstalling.
(3)Clean stains or carbon o the spark plug and adjust spark gap to
0.6-0.7mm. See FIG 10
4. Long time storage.
(1) Clean the machine and apply antirust oil to metal parts.
(2) Remove the spark plug and pour 15-20g of 2-stroke engine oil
into the cylinderthrough the spark plug pole. Pull the starter handle
4-5 times to distribute the oilinside the engine. Pull the handle slowly
until the piston reaches the top of its traveland leave it there, then
install the spark plug.
(3) Remove the chemical tank, clean the dust gate and inside and
outside of chemicaltank, then install the tank and leave the lid loose.
(4) Remove spray units and clean them Store by them.
(5) Discharge fuel in the tank and carburettor entirely.
(6) Cover the machine with plastic dustcoat and store it in a dry and
clean place.
-15-
ADVERTENCIAS DE USO
• El motor funciona con combustible de mezcla. La relación
entre gasolinay aceite viene determinada por las característi-
cas del aceite, la gasolinadebe ser de 70 ó 90 octanos y el
aceite el adecuado para motores degasolina de 2 tiempos
(queda prohibido el uso de cualquier otro tipo deaceites).• El
motor debe funcionar a bajas revoluciones durante 3-5 minu-
tos,tanto al arrancarlo como al pararlo. No forzar el motor a
alta velocidadsin carga, así evitaremos producir daños en
partes del motor o de sucuerpo. No detener el motor a alta
velocidad de repente,• Para evitar que se incendie, el motor
debe estar apagado y fueradel alcance de fuentes calientes
cuando repostamos. ¡Fumar está prohibido!
CONTENIDOS
61.gaPsosuselapicnirP-
61.gaPsacitsíretcaracselapicnirP-
81.gaPovitarepoodotéM-
12.gaPoerovlopseynóicazirevluP-
22.gaPdadirugeS-
32.gaPsenoiculosysamelborP-
52.gaPotneiminetnaM-
- Anexos: figuras

PRINCIPALES USOS
El atomizador PULMIC TAURUS AIR+ es portátil, flexible y un equi-
poaltamente eficaz para la protección de plantas. Su uso es adecu-
adopara prevenir enfermedades en plantas y controlar plagas en
grandesplantaciones y cultivos hortícolas, como son algodón,
trigo, arrozal,frutales, etc. También puede ser utilizado para aplicar
herbicidas(saneamiento de epidemias y prevención), fertilizantes
granulados ycualquier producto químicos granulados. Esta máqui-
na también puedeser usada en áreas montañosas.
1-Las principales partes de la máquina están todas fabricadas
enplástico, por lo que la hacen muy ligera, resistente a la corro-
sión yconfortable de llevar en la espalda del operador.
2-El diseño es único. Las partes en contacto con productos
químicosson de plástico reforzado o de acero inoxidable, es
decir, tienenpropiedades anticorrosivas y de larga duración.
3-Las dimensiones de la boca del tanque son grandes, por lo
tanto el llenado es fácil. Los productos químicos pueden ser
vertidosdirectamente al interior.
4-Las dimensiones de la parte inferior del armazón son grandes
loque desplaza el centro de gravedad de la máquina hacia bajo,
y de ahíque la estabilidad de la máquina sea tan buena.
5-El movimiento de retroceso del motor está adoptado (es
eladecuado), para facilitar su operatividad. Hay estructuras de
protecciónpara los componentes que alcanzan altas tempera-
turas y para conseguiruna alta seguridad en su uso.
6-Se usa una estructura rotativa en la conexión entre la man-
guera yla cubierta del ventilador, lo que hace fácil su operativi-
dad. La mangueratiene una vida útil larga.
PRINCIPALES CARACTERISTICAS
-16-

-17-
ASAS
ASAS
AS SEMBLSEMBL
SEMBLSEMBL
SEMBLY FOR VY FOR V
Y FOR VY FOR V
Y FOR V ARIETIES OF OPERARIETIES OF OPER
ARIETIES OF OPERARIETIES OF OPER
ARIETIES OF OPERAA
AA
ATINGTING
TINGTING
TING
ENSAMBLAJE DE PIEZAS Y CONDICIONES DE USO
1- Montaje para el pulverizador
-Como se muestra en la figura 1, conectar el tubo del pulveri-
zadorcon la maquina.
2- Montaje para la aplicación de polvo
(1)Cambiar los dos tornillos que fijan el tanque y retirarlo. Cambiar
elplato de pulverización por el de espolvoreo y el tapón del
tanque. Fijar el tanque y atornillar como muestra la figura 2:
(2) Luego conectar la tubería de espolvoreo a la maquina comomuestra la
fig. 3
Figure 1
Figure 2
Figure 3
Pletina de polvo
Tapón de presión
Tuerca M(8)
Tapon deposito

-18-
3- Instalación anti-electrostática-
La utilización de polvo o gránulos puede causar la presencia deatracción
electrostática, producida por diferentes factores, como el tipode
producto, la temperatura del aire, humedad, etc. Para prevenir estose-
fectos electrostáticos, usar el accesorio de cadena de seguridad.Cuando
el aire es caliente, la atracción electrostática es muy importante,en parti-
cular cuando se usa tubo membranoso para espolvoreo ogránulos. La
atracción electrostática sucede a menudo, por lo que hayque prestarle
especial atención.Nota:1-Suelte el tornillo primero e inserte el alambre
conductor entonces,vuelva a apretar el tornillo.2-Suelte la arandela e
inserte el alambre conductor.3-Trate que la cadena de seguridad toque
tierra.La cadena de seguridad se inserta en la tubería de aplicación. No
impedirla vibración libre ni movimiento en cualquier dirección. Conectar
el otro extremo en el conducto metálico, mediante los tornillos.
1- Revisar
- Revisar si se ha aflojado la bujía.- Revisar la abertura del aire, si está
bloqueada y evitar el sobre-calentamiento durante la rotación.- Revisar
si el filtro del aire está sucio y así evitaremos una malaaplicación y un
sobregasto de gasolina causado por la calidad del aireentrante.- Revisar
si la separación entre los electrodos de la bujía es 0.6-0.7mm.- Tirar del
stárter 2-3 veces y ver si el motor sigue funcionandocorrectamente.
2- Adición de combustible.
- La adición de gasolina debe realizarse con el motor parado.- La gasoli-
na debe ser de 70 ó 90 octanos, y el aceite el adecuado paramotores de
gasolina de 2 tiempos. La mala calidad de la gasolina influiráen el rendi-
miento del motor y lo irá deteriorando hasta destruirlo.-Mientras adicio-
namos gasolina, el filtro del depósito no debe quitarsepara evitar intro-
ducir en el tanque partículas extrañas y suciedad.
METODO OPERATIVO

-19-
3 - Adición de productos químicos.
(1) En pulverización, mientras adicionamos productos químicos, elinte-
rruptor debe estar cerrado.
(2) En aplicación en polvo, la válvula de polvo y nivel de fuel debenestar
en la posición más baja, de no ser así la máquina perderáproducto. Los
productos químicos en polvo pueden convertirsefácilmente en formas
duras (piedras), por lo que no debenpermanecer en el tanque por mucho
tiempo.
(3) Mientras pulverizamos, la tapa del tanque debe estar bienapretada.-
Nota: Después de adicionar producto en polvo, limpiar el tornillode la tapa
del tanque y posteriormente cerrar la tapa fuertemente.
4 - Arranque en frío
Seguir las siguientes instrucciones
(1) Poner en «ON» el interruptor de combustible
(2) Poner la palanca de combustible en la posición de arranque.
(3) Poner el estrangulador en la posición de lleno.
(4) Tirar del starter durante un período breve de tiempo y retornarlo a
susitio lentamente. No dejar que la palanca retorne libremente para
evitardaños al starter.
(5) Cerrar el estrangulador, tirar del stárter hasta que arranque el motor.
(6) Después de encendido, abrir el estrangulador completamente.
(7) Dejar el motor en marcha a baja velocidad durante 2-3 minutosantes
de empezar la aplicación de pulverización o en espolvoreo.
5 - Arranque en caliente.
(1) Dejar el estrangulador totalmente abierto.
(2) Si en el motor entra muy rápidamente gasolina, dejar la palancade
combustible casi cerrada. Tirar del stárter 5-6 veces, luego poner el motor
al 50% de su rendimiento.

-20-
Figure 4
Figure 5
6 - Parado del motor
a) En la pulverización, apagar primero el interruptor de productosquí-
micos, luego parar el motor.
b) En aplicación de polvo, poner la palanca de combustible y de
polvoen la posición de cerrado.
c) Después de terminar el trabajo, cerrar la palanca de combustiblepa-
ra evitar dificultades al arrancar la siguiente vez.
Nota: Mientras la máquina está en marcha, la manguera debe estar-
montada en la máquina, de otra manera el aire frío será reducido y
elmotor puede ser dañado.
Valvula aceite
Interruptor de parada
Paro
Marcha
Table of contents
Languages:
Other Pulmic Paint Sprayer manuals

Pulmic
Pulmic INDUSTRIAL 35 User manual

Pulmic
Pulmic RAPTOR 16 ADVANCE User manual

Pulmic
Pulmic PEGASUS 35 User manual

Pulmic
Pulmic INDUSTRIAL 35 User manual

Pulmic
Pulmic INDUSTRIAL 35 User manual

Pulmic
Pulmic PEGASUS 75 User manual

Pulmic
Pulmic RAPTOR 7 User manual

Pulmic
Pulmic 15+ VITON User manual

Pulmic
Pulmic RAPTOR 12 User manual

Pulmic
Pulmic PEGASUS 35 User manual


