Pulsar PulsarSafeEar User manual

PulsarSafeEar
Safe and Sound

Suitableforbothnoisyandquiet
environments:
The PulsarSafeEar is perfect for use in factories, workshops,
pubs and nightclubs to warn when noise levels become too
high and indicate when hearing protection must be worn.
In environments where the wearing of hearing protection
(PPE) may not be required at all times, the PulsarSafeEar will
inform employees when PPE is required and also when it can
be removed safely.
PulsarSafeEar can also be used in quiet locations such as
schools, hospitals and libraries to indicate when noise levels
must be kept down. By setting the PulsarSafeEar to trigger at
a lower level ensures that noise levels in quiet environments
stay within acceptable levels.
Installation&Use
Installation of the PulsarSafeEar is very simple. Select the
trigger level and connect the power supply to the unit. When
the noise level measured by the microphone reaches this
level, the sign will illuminate and show the warning.
The unit can also be set to keep the warning illuminated
for up to 30 seconds after the level has fallen back below
the trigger level. This removes the sudden on-off indication
that traditional noise warning signs often produce. The
PulsarSafeEar eliminates confusion as to when hearing
protection (PPE) should be worn.
The sound level chosen for the trigger point can be set using
the simple level selection at the back of the unit.
RemoteDisplayUnits
The PulsarSafeEar is also available as a Remote Display Unit
which is controlled by a Master PulsarSafeEar Unit. A simple
cable from the Master to up to 3 remote units can be daisy-
chained together so that an area of up to 30 metres can be
covered.
Record&StorewithPulsarSafeEarData
LoggingSoftware
The PulsarSafeEar can be upgraded to become a data logging
unit by adding the PulsarSafeEar Data Logger and USB
Software. The Data Logger simply plugs into the PulsarSafeEar
and can record noise levels over long periods of time. The
Data Logger can be programmed to start recording at a
specic time and date and run, for example, over an 8 hour
shift.
When the Data Logger is plugged into a PC the software will
display a graph of the recorded noise levels and allow the
data to be printed, exported and annotated for reference.
See it before you hear it
Master Unit
Remote Display Unit Remote Display Unit Remote Display Unit

Setting up your PulsarSafeEar system
1. Check contents
x1
PulsarSafeEar
x2 x2
Wall mounting
screws & wallplugs
2. Trigger Level & delay
3. Set Trigger Level
156mm
5. Wall mounting. Use the template provided
below to position the unit on the wall
Masterguidesetupinstructions
x1
5m Power
Extension Cable
Power Supply
with UK, US & EU plugs
x1
Microphone
When setting the trigger level,remember that this is the level at the microphone.
Adjust the level to take account of any distance between the microphone
and noise source.
Brightness
Level
0-9
Add ‘800’ to the dB level to disable the 30 second turn-off delay.
Examples:
Trigger Level = 0 8 5 = 85dB(A) 30 second turn-off delay
Trigger Level = 8 8 5 = 85dB(A) no turn-off delay
Trigger Level = 0 4 5 = 45dB(A) 30 second delay
Trigger Level = 8 4 5 = 45dB(A) no turn-off delay
Trigger Level = 1 0 0 = 100dB(A) 30 second turn-off delay
Trigger Level = 9 0 0 = 100dB(A) no turn-off delay
Trigger Level Settings
Minimum : 40dB
Maximum: 120dB
Microphone
Data Logger
(Optional)
Power In
Power Out
to Remote
Display
4. Connect Microphone & Power
6. Connect Microphone & Power
7. USB Data Logger
ab
Install the PulsarSafeEar Software Connect the PulsarSafeEar DL Data Logger to the PC and run the
PulsarSafeEar Software. Configure & start the Data Logger.
An extension cable can be used with the PulsarSafeEar to allow the microphone to be positioned remotely.
This requires an optional preamplifier, microphone capsule and extension cable.

Setting up your PulsarSafeEar system
MasterUnitsetupinstructions
8. USB Data Logger
RemoteDisplayUnitsetupinstructions
1. Check contents 2. Connect cable between Remote and Master Unit
Power in from
Master Unit
Power in from
Master Unit
Power out to next
Remote Display Unit
3. Option: connect additional Remote Units
Power in from
Master Unit
Power in from
Master Unit
Power out to next
Remote Display Unit
Power out to next
Remote Display Unit
4. Wall mounting. Use the template provided
below to position the unit on the wall
Contact us for more information
Call: 01723 518011
email us at: sales@pulsarinstruments.com
Please visit our website: www.pulsarinstruments.com
Follow the conversation @PulsarMeters
or join us at: www.linkedin.com/company/pulsar-instruments-plc
cd
Remove the Data Logger from the PulsarSafeEar and connect
to the software. Download the recorded data
Remove the Data Logger from the PC when
download is complete*
Remove the Data Logger from the PC
Remove the protective cover from the PulsarSafeEar
Connect the Data Logger to the PulsarSafeEar
*The Data Logger should be removed from the PC when not in use to prevent the battery from being discharged.
Take care when connecting the Data Logger to a USB port on the PC. Ensure that the Data Logger does not fall out of the socket or
become loose in the socket. For troubleshooting & help, please visit the PulsarSafeEar Website at www.pulsarinstruments.com/safeear
156mm
x1
PulsarSafeEar
x2 x2
Wall mounting
screws & wallplugs
x1
5m Power
Extension Cable

Key features
• Lightsupwhenapre-setnoise
levelisexceeded
• Quickandsimpletoinstall
• Triggerlevelfrom40dB(A)to
114dB(A)
• Suitableforbothquietandnoisy
environments
• Adjustable,highintensitywhite
LEDtechnologyforhighvisual
impactandalongoperatinglife
• 4standarddesignstocoverall
applications
PulsarSafeEarisalsoavailablewitharange
ofothergraphicsandtextwhichallowsit
tobeusedinenvironmentswherethereis
aneedtowarnorindicateexcessivesound
levels.
Customdesignoptionsareavailable.
PleasecontactPulsarInstrumentsplcfor
details.
Call:01723518011
emailusat:[email protected]
orvisitourwebsite:www.pulsarinstruments.com/safeear

OrderingInformation
The Master Unit and Remote Display Unit are available with a selection of
standard designs which are listed below.
Custom design options are available. Please contact Pulsar Instruments plc for
details of these custom design options.
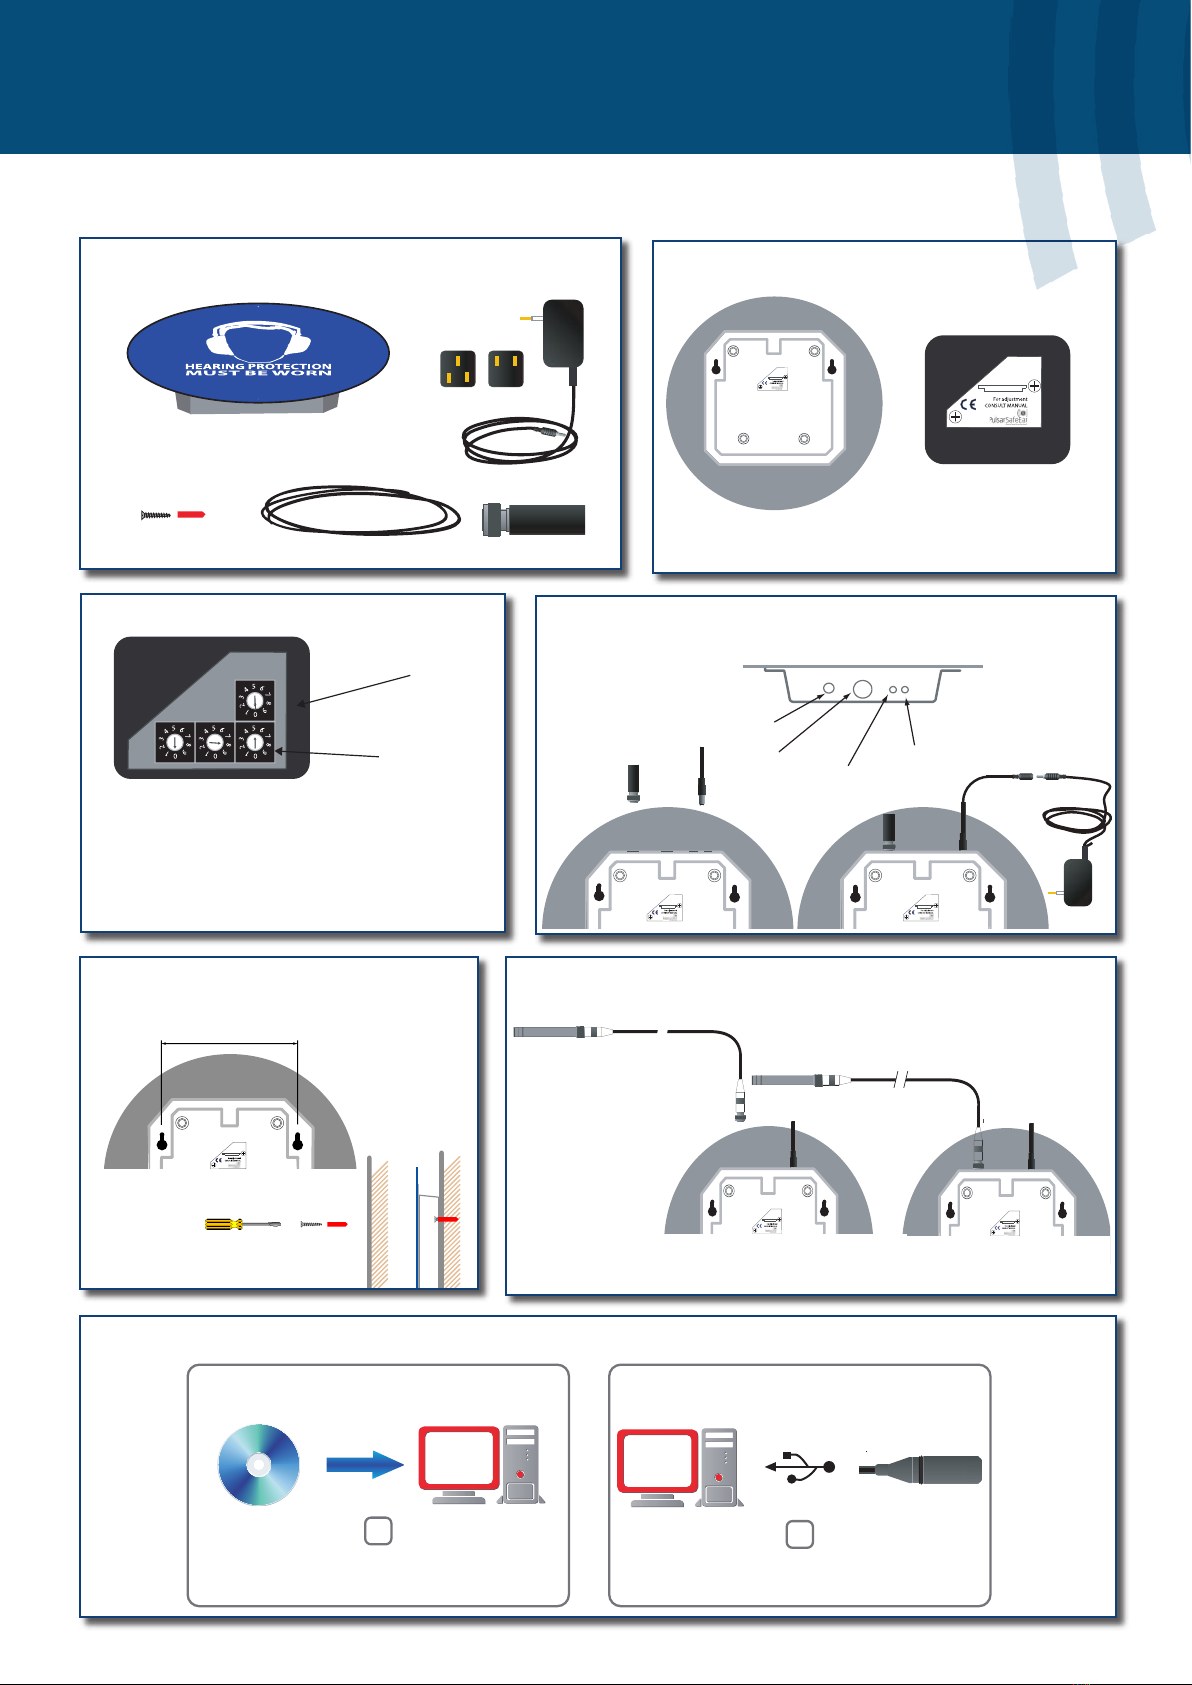
PulsarSafeEar Master Unit with microphone & mains power supply
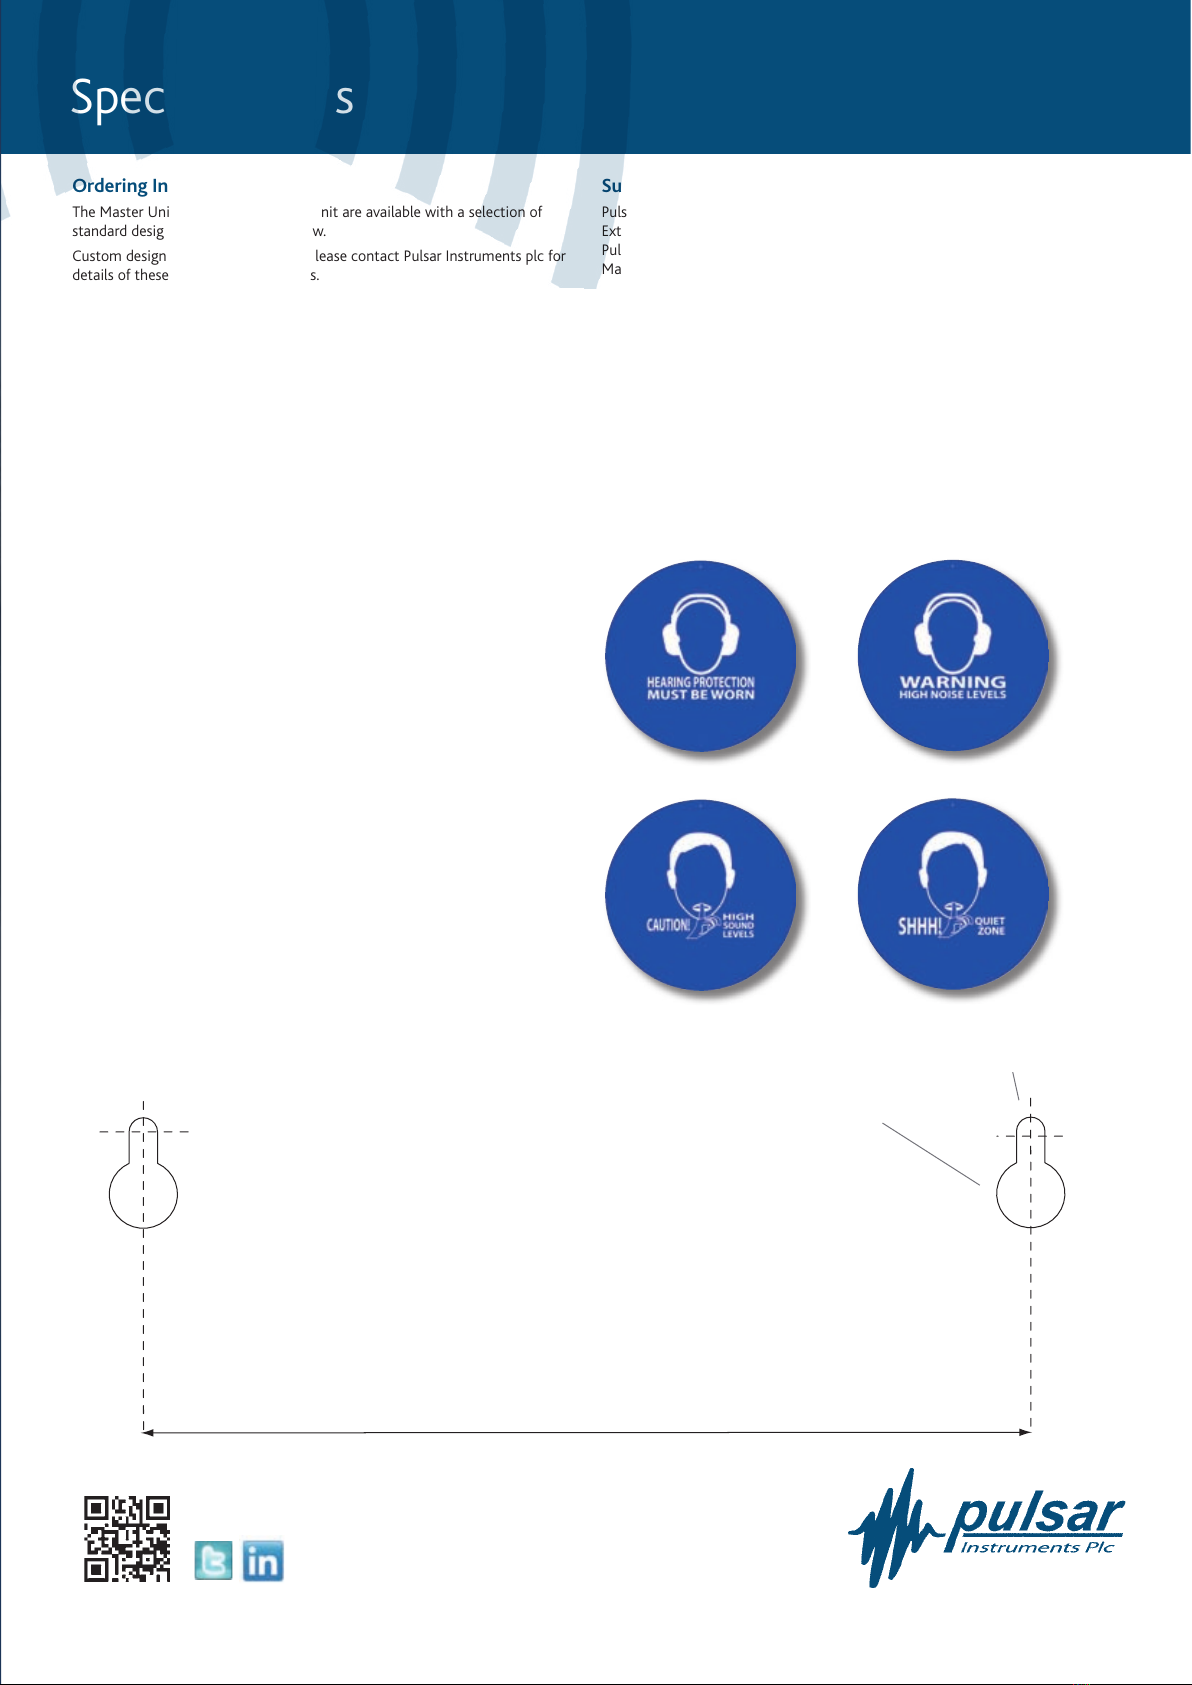
SafeEarM/A with “Hearing Protection Must Be Worn”
SafeEarM/B with “Warning High Noise Levels”
SafeEarM/C with “Caution! High Sound Levels”
SafeEarM/D with “SHH! Quiet Zone”
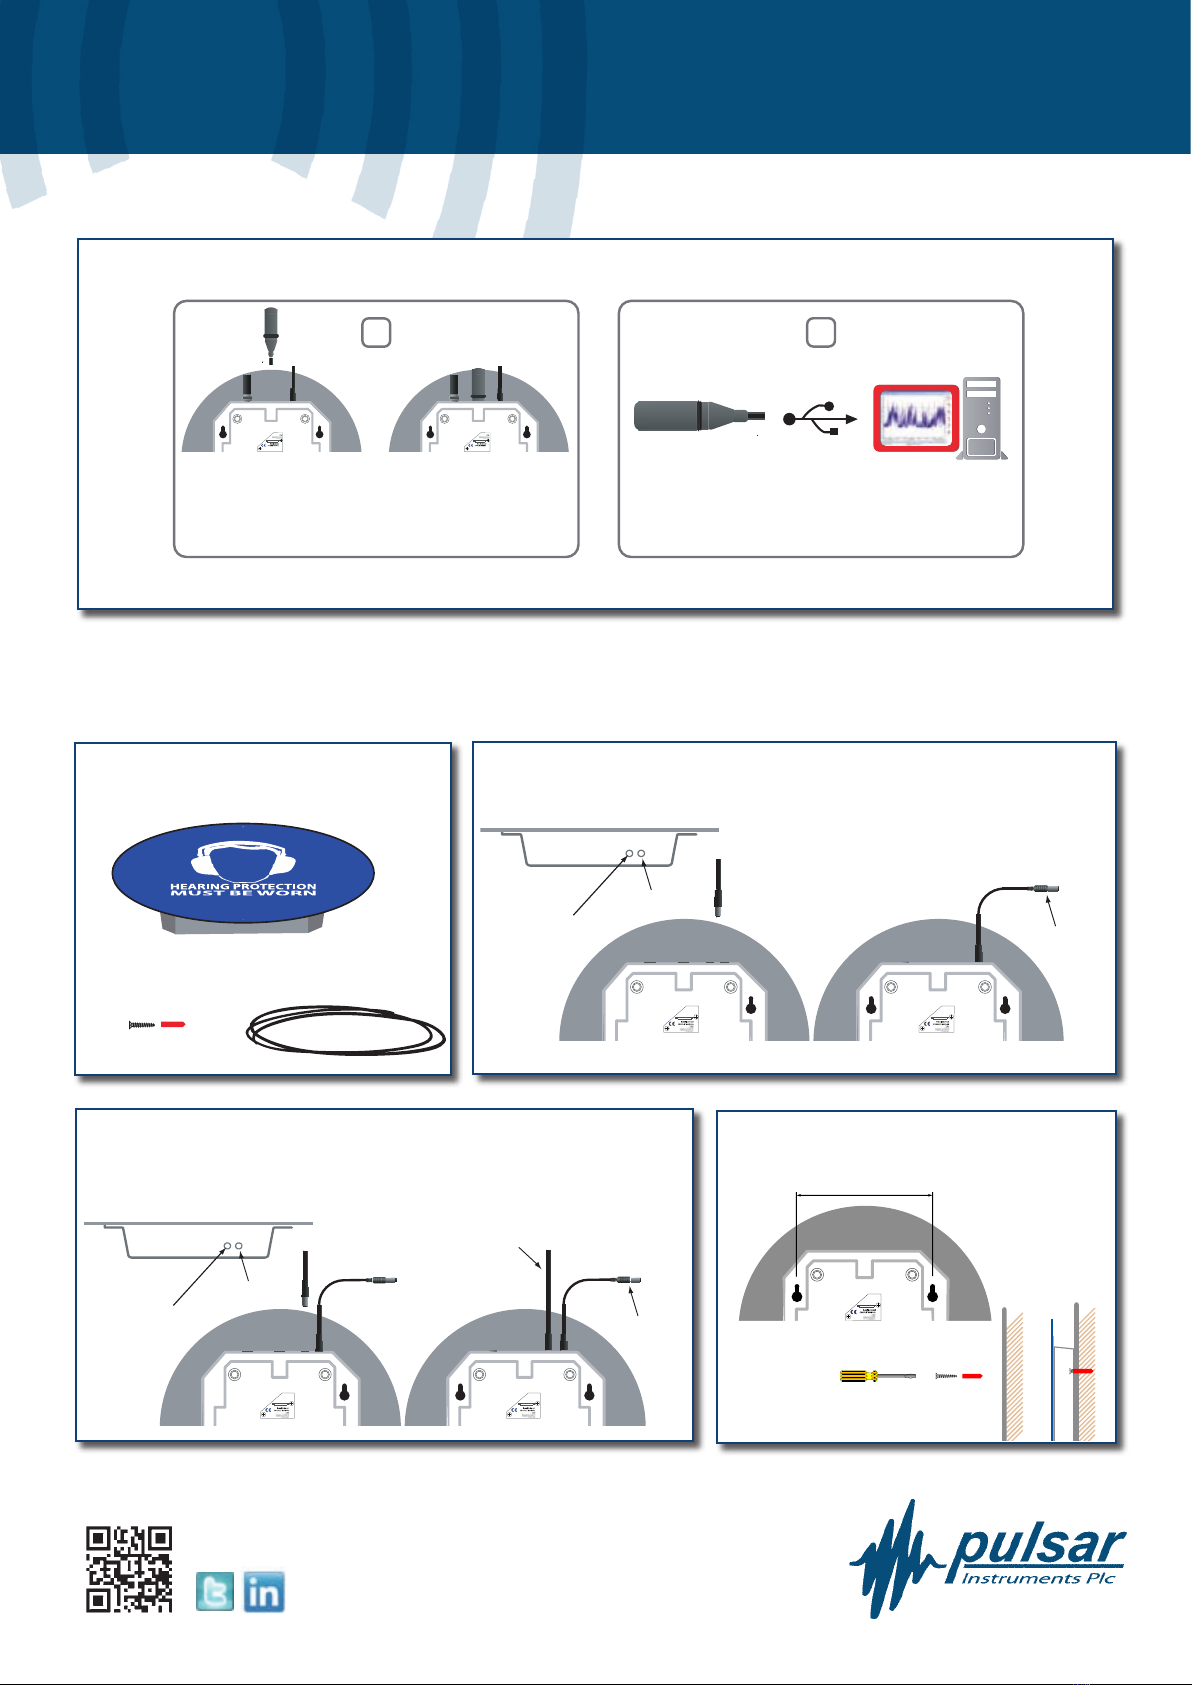
PulsarSafeEarRemoteDisplayUnitwith10minter-connectioncableto
PulsarSafeEarMasterUnit
SafeEarR/A with “Hearing Protection Must Be Worn”
SafeEarR/B with “Warning High Noise Levels”
SafeEarR/C with “Caution! High Sound Levels”
SafeEarR/D with “SHH! Quiet Zone”
Specications
• Application Noise activated warning sign
• Trigger Level 40dB(A) to 114dB(A)
• Suitable for both quiet & noisy environments
• Microphone PU112
• Frequency Weighting ‘ A’ Weighting to IEC 61672-1:2002
• Time Weighting Slow to IEC 61672-1:2002
• Visual Indication High intensity white LED with four standard designs
• User selectable brightness levels
• Display delay time None or 30 seconds
• External Power 2.1mm Power Jack, 12v DC via PUL200 Mains Power Supply
• Output Control for Remote Display Units via standard 2.1mm Power
Connector
• Up to three Remote Display Units can be powered from a Master Unit
• Dimensions 12”diameter, 2”depth
• Weight 1.3lbs (0.6kg)
• Mounting 2 x Keyhole mounting slots
• Data Logging USB Data Logger with 32,000 Samples of LAS
• (Slow ‘A’ Weighted Sound Level)
• User Selectable 1 second (9 hours), 10 seconds (3.7 days),
• 1 minute (22 days) sampling
SuppliedAccessories
PulsarSafeEar Master Unit PU200 Mains Power Supply & PU206 5m Power
Extension Cable
PulsarSafeEar Remote Display Unit PU207 10m Inter-connection cable to
Master Unit
PulsarSafeEar DL Data Logger USB Data Logger & Software CD
OptionalAccessories
PUL207 10m Inter-Connection Cable for PulsarSafeEar Units
PUL202 2m Microphone Extension Cable for PulsarSafeEar Master
Unit for use with PUL200C & PM222
PUL205 5m Microphone Extension Cable for PulsarSafeEar Master
Unit for use with PUL200C & PM222
PUL210 10m Microphone Extension Cable for PulsarSafeEar Master
Unit for use with PUL200C & PM222
PUL200C Mains Power Supply
PUL200C Preamplier
PM222 Microphone Capsule
Pulsar Instruments Plc The Evron Centre John Street Filey North Yorkshire YO14 9DW Tel: +44 1723 518011 Fax: +44 1723 518043
Specications
Version 1 Version 2
Version 3 Version 4
Contact us for more information
Call: 01723 518011
email us at: sales@pulsarinstruments.com
Please visit our website: www.pulsarinstruments.com
Follow the conversation @PulsarMeters
or join us at: www.linkedin.com/company/pulsar-instruments-plc
*./ff
156mm
12mm
5mm
Positioning template for wall mount
Table of contents
Other Pulsar Safety Equipment manuals