Pulsar VK63 User manual

CAL. VK63, VK73
CHRONOGRAPH
ENGLISH
TIME/CALENDAR
CHRONOGRAPH
lHour and minute hands with small second and 24-hour hands
lDate displayed in numerals
lMeasures up to 60 minutes in 1/5 second increments.
Calibre of two hands with 1/5 second chronograph hand,
small second, small chronograph minute, and small 24-hour
indicators, and date window

English
English
32 a: Normal position c: Second click
a b c
b: First click
DISPLAY AND CROWN/BUTTONS
CROWN
B
CHRONOGRAPH
minute hand
Small second
hand
A
Minute hand
CHRONOGRAPH
1/5-second hand
Hour hand
24-hour hand
Date
a: Normal position c: Second click
a b c
b: First click
CROWN
B
CHRONOGRAPH
minute hand
Small second
hand
A
Minute hand
CHRONOGRAPH
1/5-second hand
Hour hand
24-hour hand
Date
[VK63] [VK73]

English
English
54
SCREW DOWN CROWN
[for models with screw down crown]
Locking the crown
1Turn Crown counterclockwise until you no
longer feel the threads turning.
2Crown can be pulled out.
1Push Crown back in to normal position.
2Turn Crown clockwise while pressing it
lightly until tight.
Unlocking the crown
TIME/CALENDAR SETTING
12 3
4
5
1 Pull out to rst click, and turn clockwise until the previous day’s date
appears.
2 PullouttosecondclickwhenSmallsecondhandisatthe12o’clock
position.
3Turn clockwise until the desired date appears.
4Turn to set Hour and Minute hands.
5Push back in to normal position in accordance with a time signal.
CROWN

English
English
76
CHRONOGRAPH
CHRONOGRAPH
minute hand
CHRONOGRAPH
1/5-second hand AStart / Stop / Restart
BReset
l The chronograph can measure up to 60 minutes in 1/5 second increments.
lAfter60minutes,thechronographwillstopcounting.
l Beforeusingthechronograph,besuretocheckthatthecrownissetatthe
normal position and that the CHRONOGRAPH hands are reset to the “0”
position.
Standard measurement
START
s
A
STOP
s
B
RESET
Accumulated elapsed time measurement
A
START
s
A
STOP
s
A
s
RESTART STOP
s
B
RESET
A
A
* If the CHRONOGRAPH hands are incorrectly positioned, follow the procedure
below to reset the hands to the "0" position.
START
s
A
STOP
s
B
RESET
A

English
English
98
1 Use the stopwatch to determine
how many seconds it takes to go 1
km or 1 mile.
2 Locate the second marker on the
main dial that corresponds to the
measured seconds, and the ta-
chymeter scale it indicates gives
theaveragespeedperhour.
TACHYMETER
[for models with tachymeter scale on the dial]
To measure the hourly average speed of a vehicle
“90”(tachymeterscalegure)x
1(kmormile)=90 km/h or mph
Tachymeter
scale: “90”
Tachymeter scale can be used only when the time required is less than 60 seconds.
Ex. 2: If the measuring distance is extended to 2 km or miles or shortened
to 0.5 km or miles and CHRONOGRAPH second hand indicates “90”
CHRONOGRAPH
second hand:
40 seconds
s
Ex. 1 Ex. 1
To measure the hourly rate of operation
1 Use the stopwatch to measure the
time required to complete 1 job.
2Locate the second marker on the
main dial that corresponds to the
measured seconds, and the ta-
chymeter scale it indicates gives
theaveragenumberofjobsaccom-
plished per hour.
s
“180”(tachymeterscalegure)x
1job=180 jobs/hour
CHRONOGRAPH
second hand:
20 seconds
Tachymeter
scale : “180”
Ex. 2: If 15 jobs are completed in 20 seconds:
“180”(tachymeterscalegure)x15jobs=2700jobs/hour
on tachymeter scale:
“90”(tachymeterscalegure)x2(kmormile)=180km/hormph
“90”(tachymeterscalegure)x0.5(kmormile)=45km/hormph

English
English
1110
NOTES ON OPERATING THE WATCH
TIME SETTING
lIt is necessary to adjust the date on the first day after a 30-day month and February.
lDo not set the date between 9:00 p.m. and 3:00 a.m, as this will cause a malfunc-
tion.
CALENDAR SETTING
lIf the crown is pulled out to the second click while the chronograph is counting, the
CHRONOGRAPH hands will continue to move. This is not a malfunction.
[24-HOUR SETTING]
lThe 24-hour hand moves correspondingly with the hour hand.
lWhen setting the hour hand, check that the 24-hour hand is correctly set.
lWhen setting the minute hand, first advance it 4 to 5 minute ahead of the desired
time and then turn it back to the exact minute.
CHRONOGRAPH
lRestart and stop of the chronograph can be repeated as many times as necessary
by pressing button A.
lWhile the chronograph is counting, if the button B (reset) is pressed, the
chronograph will continue counting.

English
English
1312
BATTERY CHANGE
Battery life : Approx. 3 years
Battery : SEIKO SR936SW
3
Years
lIf the chronograph is used for more than 60 minutes a day, the battery life may
be less than the specified period.
lAs the battery is inserted at the factory to check the function and performance
of the watch, its actual life once in your possession may be less than the speci-
fied period.
lWhen the battery expires, be sure to replace it as soon as possible to prevent
any malfunction.
lWe recommend that you contact an AUTHORIZED PULSAR DEALER for battery
replacement.
lNecessary procedure after battery change
BPress and hold for 2 seconds
and then release it.
s
CROWN
Pull out to second click.
CROWN
s
Afterthebatteryisreplacedwithanewone,orincaseanyofthehands
shouldmoveimproperly,followtheprocedurebelowtoresetthehandsto
the “0” position.
Push back in to normal
position.
B
* The small second hand
will move in two-second
intervals for ten seconds.
* It is not necesarry to set the CHRONOGRAPH hands after the battery is
replaced with a new one.

English
English
1514
WARNING
lDo not remove the battery from the watch.
lIf it is necessary to take out the battery, keep it out of the reach of
children. If a child swallows it, consult a doctor immediately.
lNever short-circuit, tamper with or heat the battery, and never
expose it to re. The battery may burst, become very hot or catch
re.
CAUTION
l The battery is not rechargeable. Never attempt to recharge it, as this
may cause battery leakage or damage to the battery.
TO PRESERVE THE QUALITY OF YOUR WATCH
WATER RESISTANCE
lNon-water resistant
lWater resistance (5 bar)*
If “WATER RESISTANT 5 BAR”
is inscribed on the case back,
your watch is designed and
manu-factured to withstand up to
5barandissuitableforswimming,yachtingand
taking a shower.
If“WATERRESISTANT10BAR”,
“WATER RESISTANT 15 BAR” or
“WATER RESISTANT 20 BAR” is
inscribed on the case back, your
l
Water resistance (10 bar/15 bar/20
bar)*
watch is designed and manufactured to withstand
up to 10 bar/15 bar/20 bar and is suitable for taking
a bath, shallow diving, but not for scuba diving.
WerecommendthatyouwearaPULSARDiver’s
watchforscubadiving.
If “WATER RESISTANT” is not
inscribed on the case back, your
watch is not water resistant, and
care should be taken not to get
If “WATER RESISTANT” is inscribed
on the case back, your watch is
designed and manufactured to
withstandupto3bar,suchasacci
lWater resistance (3 bar)
dentalcontactwithsplashesofwaterorrain,butit
isnotdesignedforswimmingordiving.
itwetas watermaydamagethemovement.If
the watch becomes wet, we suggest that you
haveitcheckedbyanAUTHORIZED PULSAR
DEALER or SERVICE CENTER.

English
English
1716
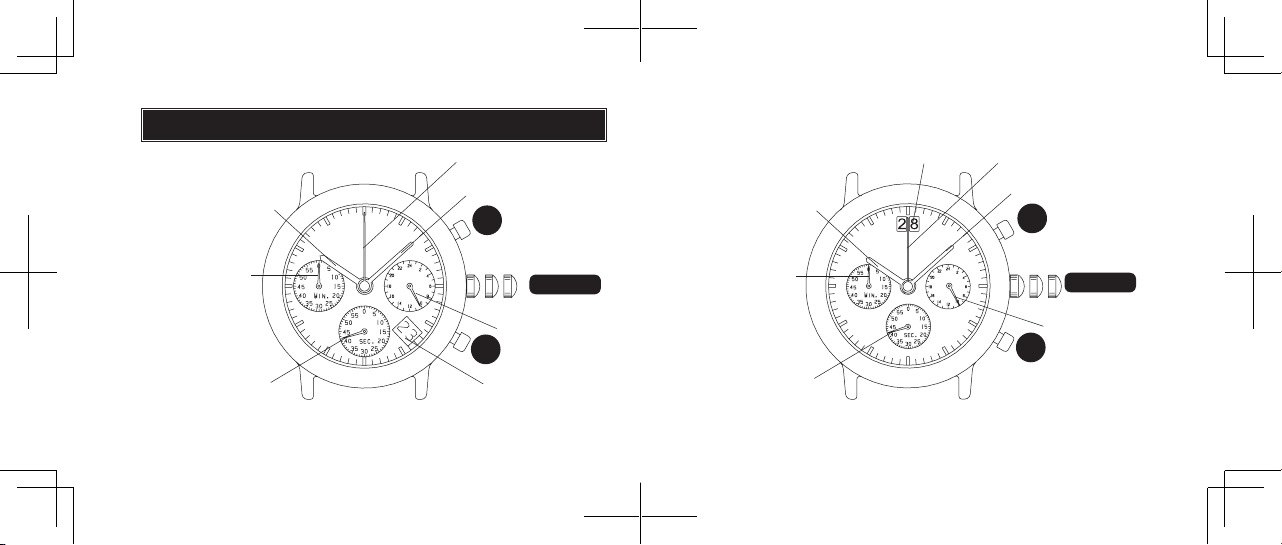
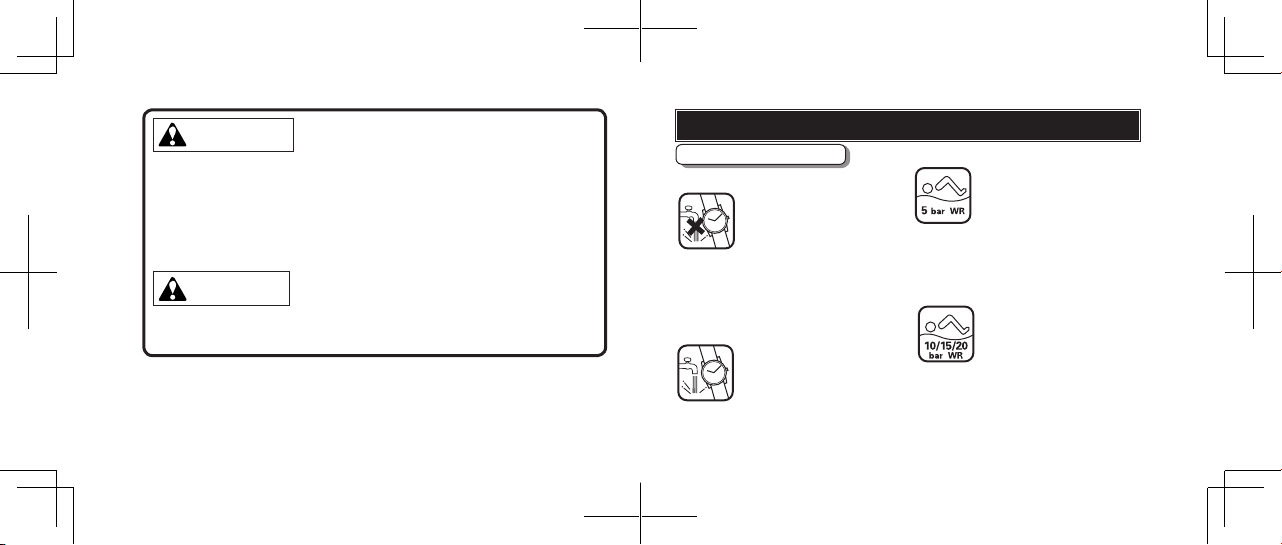
* Before using the water resistance 5, 10, 15 or 20 bar watch in water, be sure the
crown is pushed in completely.
Do not operate the crown when the watch is wet or in water. If used in sea water,
rinse the watch in fresh water and dry it completely.
* When taking a shower with the water resistance 5 bar watch, or taking a bath with
the water resistance 10, 15 or 20 bar watch, be sure to observe the following:
•Do not operate the crown when the watch is wet with soapy water or shampoo.
•If the watch is left in warm water, a slight time loss or gain may be caused. This
condition, however, will be corrected when the watch returns to normal tem-
perature.
NOTE:
Pressure in bar is a test pressure and should not be considered as cor-
responding to actual diving depth since swimming movement tends to
increase the pressure at a given depth. Care should also be taken on div-
ing into water.
Temperaturesover50°C(122°F)may
Your watch works with
stable accuracy within a
temperature range of 5°C
and 35°C (41° F and 95°
F).
TEMPERATURES
cause battery leakage or shorten the
batterylife. Donotleaveyourwatch
inverylowtemperaturesbelow –5°C
(+23°F)foralongtimesincethecold
may cause a slight time loss or gain.
However, the above conditions will
be corrected when the watch returns
to normal temperature.
CARE OF CASE AND BRACELET
To prevent possible rusting
of the case and bracelet
caused by dust, moisture
and perspiration, wipe them
periodically with a soft dry
cloth.
Lightactivitieswillnotaffect
your watch, but be careful
not to drop your watch or hit
it against hard surfaces, as
this may cause damage.
SHOCKS & VIBRATION
Becarefulnottoexposethe
watch to solvents, mercury,
cosmetic spray, detergents,
adhesivesorpaints.Other-
wise,thecase,bracelet,etc.
may become discolored,
deteriorated or damaged.
CHEMICALS
Yourwatchwillbeadverse-
ly affected by strong mag-
netism. Keep it away from
close contact with magnetic
objects.
MAGNETISM
It is recommended that the
watch be checked once
every 2 to 3 years. Have
your watch checked by an
AUTHORIZED PULSAR
PERIODIC CHECK
DEALER or SERVICE CENTER to en-
sure that the case, crown, buttons, gas-
ket and crystal seal remain intact.
PRECAUTION REGARDING
CASE BACK PROTECTIVE FILM
If your watch has a protec-
tive film and/or a sticker on
the case back, be sure to
peel them off before using
your watch.
Other manuals for VK63
1
This manual suits for next models
1
Table of contents
Other Pulsar Watch manuals