Pulsar W864 User manual

CAL. W864
DIGITAL QUARTZ
ENGLISH
lFull-panel dot-matrix liquid crystal panel
lTime/calendar
lStopwatch with data function
lCountdown timer
lRegular alarm
lWorld time
lIlluminating light (EL panel)

2 3
English
English
MODE CHANGE
B
AD
C
E
With each pressing, the mode in the digital display changes
in the following order:
ALARM
TIME/CALENDAR
(TIME) STOPWATCH
(CHRONO)
TIMER
WORLD TIME
lSelection of a desired mode can be made by pressing button A.
A A
A
A
A
A
DATA
A
ILLUMINATING LIGHT (EL PANEL)
DPress to turn on the EL light.
The display panel is evenly illuminated for 3 seconds.
In the TIme mode, press to turn the key sound on or off.
C
Key sound mark
KEY SOUND SETTING
C

4 5
English
English
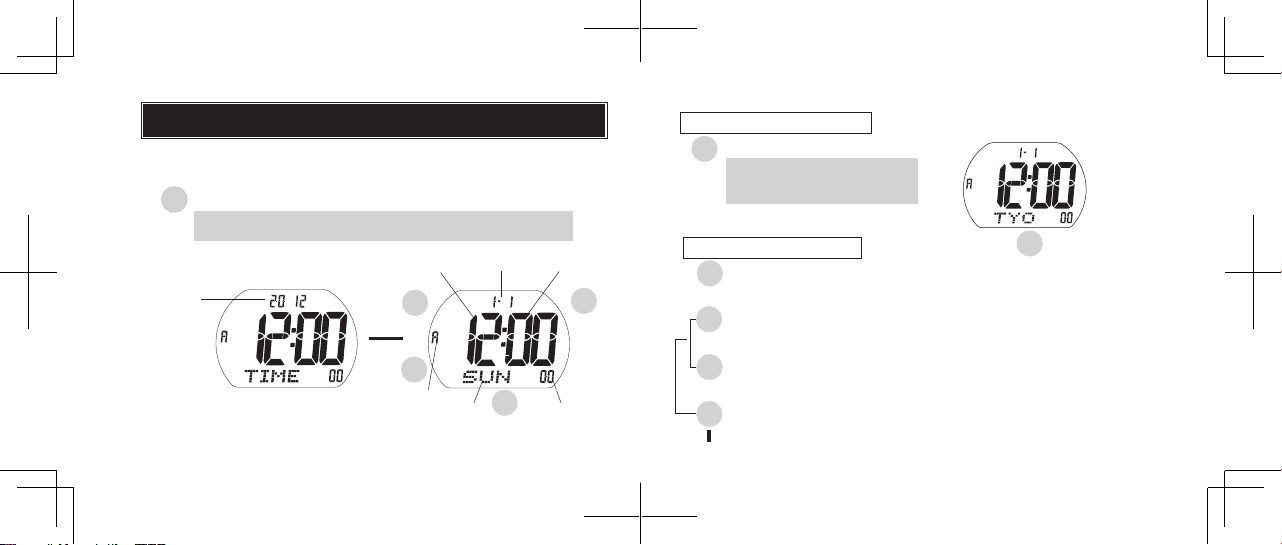
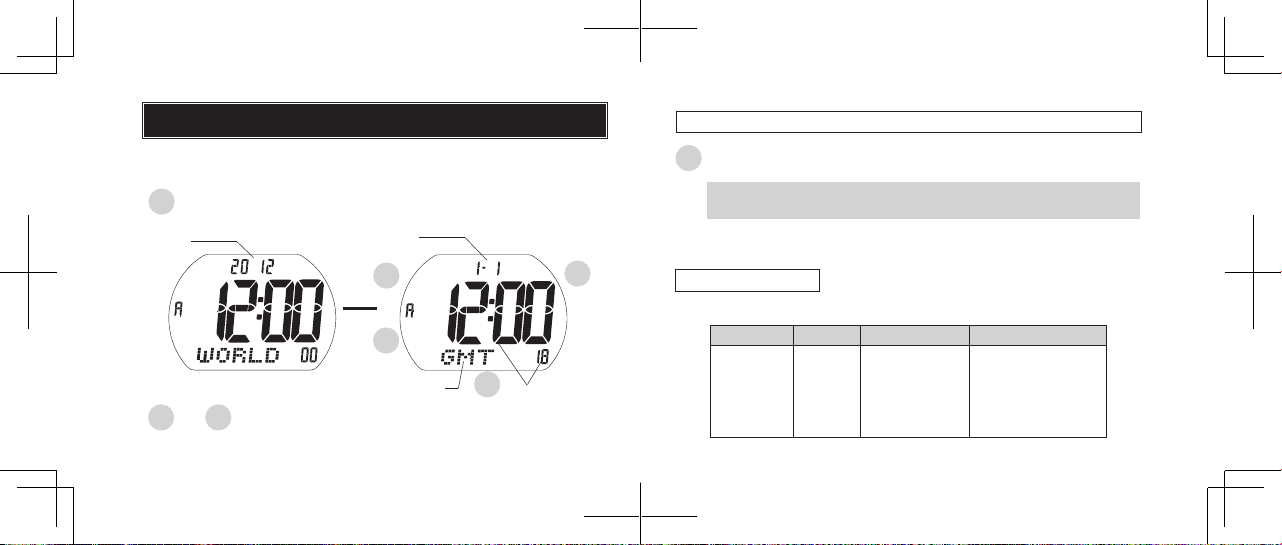
TIME/CALENDAR MODE (TIME)
TIME/CALENDAR SETTING
Press and hold for 2 seconds to show TIME/CALENDAR
SETTING display.
B
s
lOnce the time/calendar of your area is set in the TIME/CALENDAR
mode, the times of the 44 cities in the WORLD TIME mode will be set
automatically.
Press until the watch enters TIME/CALENDAR mode.
B
A
C
Minute
Calendar
Year
Day of the
week
A
Hour
Second
AM/PM mark
s
“TIME” is shown, and the watch enters the TIME/CALENDAR
display in 2 seconds.
E
Press to show the city mark.
E
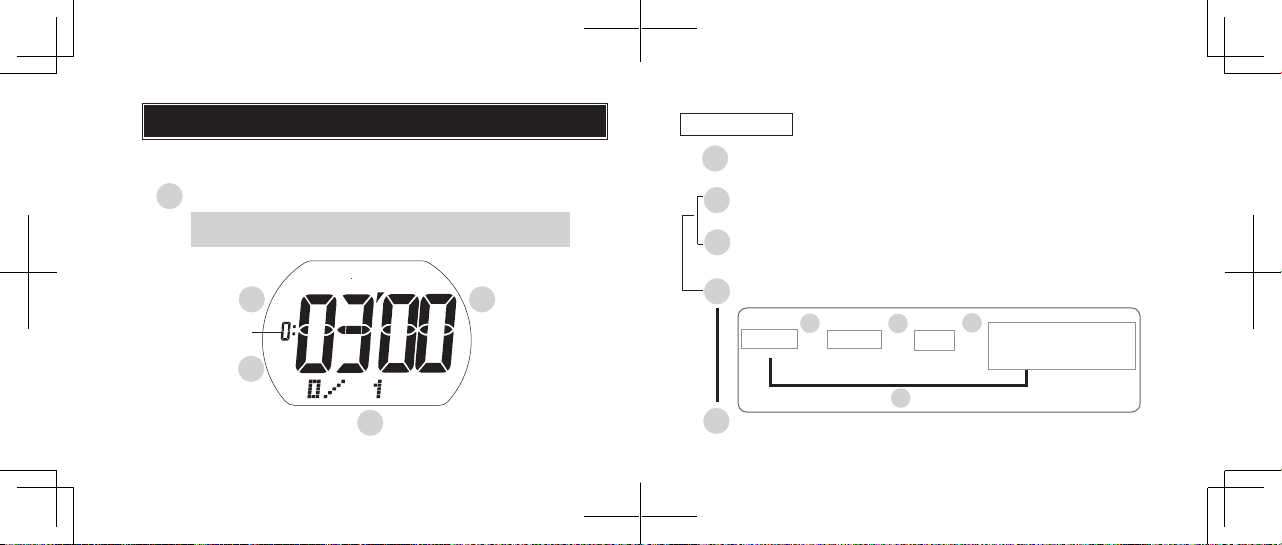
Set the ashing item or digits (forward or increasing).
Set the ashing item or digits (backward or decreasing).
C
E
or
The city mark currently set is
shown instead of the day of the
week for 2 seconds.
SHOWING THE CITY MARK
Press to select the item to be adjusted.
A
s
s
E

6 7
English
English
SEQUENCE OF THE ITEM SETTINGS
City mark Daylight Savig
Time Second Minute Hour
Day
Month
Calendar format
Select either "Date-Month” format or “Month-Date” format.
Year
12-/24-hour
indication
Calendar
format
Contrast level
adjustment
BReturn to TIME/CALENDAR mode.
s
STOPWATCH MODE (CHRONO)
lThe stopwatch measures up to 9 hours, 59 minutes and 59.99 seconds
in 1/100 second increments.
lUp to 100 sets of lap/split times can be recorded.
Press until the watch enters STOPWATCH mode.
Start /
Stop /
Restart
C
Measure lap & split time / Reset
A
“CHRONO” is shown, and the watch enters the STOPWATCH
display in 2 seconds.
E

8 9
English
English
C
STOPWATCH OPERATION
Press to start the stopwatch.
E
Press to take a lap time.
Lap number
Lap time
LAP/SPLIT 1
ELAP/SPLIT 2
CPress to stop the stopwatch.
s
s
s
Split time
s
EPress to reset the stopwatch.
BC
A
DATA MODE
APress until the watch enters DATA mode.
Press to view the contents of the selected data.
CE
or
s
Total time Lap and Split
times with Lap
number
Best lap
time Average
lap time
C
When the best lap time is displayed, "BEST" and "L-**" (the lap number of the
best lap time) are alternately displayed.
CC
EEE
“DATA” is shown, and the
watch enters the DATA display
in 2 seconds.
E

10 11
English
English
TIMER MODE
lThe timer can be set from 10 seconds up to 9 hours, 59 minutes
and 59 seconds in one-second increments.
Press to show TIMER mode.
BC
A
Set time
A
TIMER SETTING
BPress for 2 seconds to show TIMER SETTING display.
s
Set the ashing digits. (Increasing digits)
Set the ashing digits. (Decreasing digits)
C
E
or
s
BReturn to TIMER mode.
APress to select the digits to be adjusted.
A
Second Minute Hour THE NUMBER OF TIMES
THE COUNTDOWN IS
TO BE REPEATED
A
s
s
A
s
s
A
s
“TIMER” is shown, and the watch enters the TIMER display in 2
seconds.
s
E

12 13
English
English
TIMER OPERATION
When the set time is up, a warning sound beeps for 3 seconds. To stop it
manually, press any of the buttons.
CStart / Stop / Restart
Set time
ALARM MODE
lThe alarm can be set to ring once a day at a designated time.
Press until the watch enters ALARM mode.
BC
A
E
A
“ALARM” is shown, and the watch enters the ALARM display in
2 seconds.
Reset
E

14 15
English
English
ALARM TIME SETTING
B
s
Press for 2 seconds to show ALARM SETTING display.
s
BReturn to ALARM mode.
“ON” and the alarm marks appear and the alarm is automatically
engaged.
Set the ashing digits. (Increasing digits)
Set the ashing digits. (Decreasing digits)
C
E
or
s
APress to select the digits to be adjusted (hour/minute).
ALARM ENGAGEMENT/DISENGAGEMENT
With each pressing, the alarm is engaged and disengaged
alternately.
C
At the designated time, the alarm rings for 20 seconds. To stop it
manually, press any of the buttons.
C
Alarm mark
“ON” mark
Set alarm time
s

16 17
English
English
WORLD TIME MODE
lThe time of 44 cities in different time zones throughout the world can
be displayed.
Cor Press to select the desired city.
E
Press to show WORLD TIME mode.
BC
A
Current time of
selected city
City mark
Year
A
E
s
Calendar
If the daylight saving time is effective in the selected city, press to
show the daylight saving time.
B
With each press of button B, the standard time and daylight saving time of
the city are alternatively shown.
GMT = Greenwich Mean Time
0
0
0
+ 1
+ 1
G M T
L I S
L O N
P A R
R O M
Greenwich
Lisbon*
London*
Paris*
Rome*
TIME DIFFERENCES
(As of November 2014)
United Kingdom
Portugal
United Kingdom
France
Italy
CHANGEOVER BETWEEN STANDARD TIME AND DAYLIGHT SAVING TIME
Country nameCity mark City name
GMT± (hours)

18 19
English
English
+ 1
+ 2
+ 2
+ 3
+ 3
+ 3
+ 3.5
+ 4
+ 4.5
+ 5
+ 5.5
+ 6
+ 6.5
+ 7
+ 7
+ 8
B E R
A T H
C A I
M O W
J E D
B G W
T H R
D X B
K B L
K H I
D E L
D A C
R G N
B K K
J K T
S I N
Berlin*
Athens*
Cairo
Moscow
Jeddah
Baghdad
Tehran*
Dubai
Kabul
Karachi
Delhi
Dhaka
Yangon
Bangkok
Jakarta
Singapore
Germany
Greece
Egypt
Russia
Saudi Arabia
Iraq
Iran
United Arab Emirates
Afghanistan
Pakistan
India
Bangladesh
Myanmar
Thailand
Indonesia
Singapore
GMT ± (hours) Country name
+ 8
+ 8
+ 9
+ 9
+ 9.5
+ 10
+ 10
+ 10
+ 11
+ 12
- 10
- 9
- 8
- 8
- 7
- 6
H K G
B J S
S E L
T Y O
A D L
G U M
S Y D
O O L
N O U
W L G
H N L
A N C
Y V R
L A X
D E N
C H I
Hong Kong
Beijing
Seoul
Tokyo
Adelaide*
Guam
Sydney*
Gold Coast
Noumea
Wellington*
Honolulu
Anchorage*
Vancouver*
Los Angeles*
Denver*
Chicago*
City mark City name
China
China
Republic of Korea
Japan
Australia
U.S.A.
Australia
Australia
New Caledonia
New Zealand
U.S.A.
U.S.A.
Canada
U.S.A.
U.S.A.
U.S.A.
GMT± (hours) Country name
City mark City name

20 21
English
English
NOTES ON USING THE WATCH
TIME/CALENDAR MODE
lThe alarm sound can be heard by pressing and holding buttons C and E at the
same time.
[TIME/CALENDAR SETTING]
lThe calendar automatically adjusts for odd and even months including February of
leap years from 2012 to 2061.
lOnce the year, month and date have been set, the day of the week is automati-
cally set.
lSetting the seconds:
• With the second digits flashing, press button C or E in accordance with a time
signal. The second digits are reset to “00”.
• When the seconds count any number from “30” to “59” and button C or E is
pressed, one minute is added and the seconds are reset to “00”.
lThe flashing digits except the seconds and 12-/24-hour indication move quickly if
button C or E is kept pressed.
lIf the watch is left untouched with the digits flashing, it will automatically return to
the TIME/CALENDAR mode in 2 to 3 minutes.
lNote on unusual display:
While setting the time/calendar, all the segments of the display will light up if both
buttons C and E are pressed at the same time. This is not a malfunction. Press
button B twice to return to the TIME/CALENDAR mode, and then set the time/
calendar again.
GMT ± (hours) Country name
- 5
- 5
- 5
- 4
- 3
- 3
- 1
N Y C
Y M Q
B O S
S C L
B U E
R I O
P D L
New York*
Montreal*
Boston*
Santiago*
Buenos Aires
Rio de Janeiro*
Azores Is.*
City mark City name
U.S.A.
Canada
U.S.A.
Chile
Argentina
Brazil
Azores Islands
lThe cities marked with “*” use daylight saving time (summer time).
Notice on change of Santiago time zone
Santiago had previously been in a time zone that was 4 hours behind GMT. However,
since 2015, Santiago has shifted to a time zone that is 3 hours behind GMT.

22 23
English
English
STOPWATCH MODE
lAfter 9 hours, 59 minutes and 59.99 seconds have been measured, the stopwatch
stops. Press button E to reset the stopwatch.
lRestart and stop of the stopwatch can be repeated by pressing button C.
lMeasurement of the lap time and split time can be repeated by pressing button E.
lThe lap time and split time measured remain displayed for 7 seconds together
with the flashing lap number. Then, the display automatically returns to the mea-
surement in progress.
lEven if the digits are reset to “00” in the stopwatch measurement, stored data is
not erased and can be recalled unless a new measurement is started.
lEven if the STOPWATCH mode is changed to another while the measurement is
in progress, it continues counting properly. After using the stopwatch function,
be sure to stop the stopwatch to avoid unnecessary battery usage.
DATA mode
lIf no measurement is made, “ - - - - ” mark will be displayed when button A is
pressed to show the DATA display.
TIMER MODE
[TIMER SETTING]
lThe flashing digits move quickly if button C or E is kept pressed.
lIf the watch is left untouched with the digits flashing, it will automatically return to
the TIMER mode in 2 to 3 minutes.
ALARM MODE
[ALARM TIME SETTING]
lThe flashing digits move quickly if button C or E is kept pressed.
lIf the watch is left untouched with the digits flashing, it will automatically return to
the ALARM mode in 2 to 3 minutes.
lWhen the time function is displayed in the 24-hour indication, the alarm is also
displayed in the 24-hour indication.
[ALARM ENGAGEMENT/DISENGAGEMENT]
lWhen the alarm is engaged, the alarm mark is displayed.
WORLD TIME MODE
lThe time differences and use of daylight saving time may change in some areas or
countries.
ILLUMINATING LIGHT (EL panel)
lThe EL panel (electroluminescent panel) loses its luminance as the battery voltage
gets lowered. Also, its luminance level decreases gradually with use.
lThe luminance level of EL may decrease if it is left in low temperature.
lIf the watch is exposed to low temperatures while the battery is nearing the end
of its life, the EL illumination time may become shorter than normal. This shorter
EL illumination will allow the watch to maintain timekeeping functionality prior to
battery replacement.
[TIMER OPERATION]
lRestart and stop of the timer can be repeated by pressing button C.

24 25
English
English
BATTERY CHANGE
Battery life : Approx. 3 years
Battery : CR2016
lThe battery life may be less than 3 years if the alarm sounds more than 20 seconds
a day.
l
As the battery is inserted at the factory to check the function
s
and performance of
the watch, its actual life once in your possession may be less than the specified
period.
lWhen the battery expires, be sure to replace it as soon as possible to prevent any
malfunction.
lWe recommend that you contact an AUTHORIZED PULSAR DEALER for battery
replacement.
lBattery life indicator
When the battery voltage becomes low, the battery mark starts ashing on the dis-
play. In such a case, have the battery replaced with a new one as soon as possible.
3
Years
lNecessary procedure after battery change
After the battery is replaced with a new one or if an abnormal display (broken digits,
Press and hold buttons A, B, C and D at the same time for 2 to 3 seconds. The
display will become blank. When the buttons are released, time/calendar display
will appear and “SUN 12:00’00” 2012 1-1” will be displayed.
lBefore using the watch, set the time/calendar and alarm.
WARNING
lDo not remove the battery from the watch.
lIf it is necessary to take out the battery, keep it out of the reach of children.
If a child swallows it, consult a doctor immediately.
lNever short-circuit, tamper with or heat the battery, and never expose it to
re. The battery may burst, become very hot or catch re.
CAUTION
lThe battery is not rechargeable. Never attempt to recharge it, as this may
cause battery leakage or damage to the battery.
etc.) appears, follow the procedure below to reset the IC.

26 27
English
English
TO PRESERVE THE QUALITY OF YOUR WATCH
WATER RESISTANCE
lNon-water resistant
lWater resistance (5 bar)*
If “WATER RESISTANT 5 BAR” is
inscribed on the case back, your
watch is designed and manu-
factured to withstand up to 5 bar
5 bar WR
and is suitable for swimming, yachting and taking a
shower.
If “WATER RESISTANT 10 BAR”,
“WATER RESISTANT 15 BAR” or
“WATER RESISTANT 20 BAR” is
inscribed on the case back, your
10/15/20
bar WR
l
Water resistance (10 bar/15 bar/20 bar)*
watch is designed and manufactured to withstand
up to 10 bar/15 bar/20 bar and is suitable for taking
a bath, shallow diving, but not for scuba diving. We
recommend that you wear a PULSAR Diver’s watch
for scuba diving.
If “WATER RESISTANT” is not
inscribed on the case back, your
watch is not water resistant, and
care should be taken not to get
If “WATER RESISTANT” is inscribed
on the case back, your watch is
designed and manufactured to
withstand up to 3 bar, such as acci-
lWater resistance (3 bar)
dental contact with splashes of water or rain, but it
is not designed for swimming or diving.
it wet as water may damage the movement. If
the watch becomes wet, we suggest that you
have it checked by an AUTHORIZED PULSAR
DEALER or SERVICE CENTER.
3bar WR NS
MAGNETISM
CARE OF CASE AND BRACELET
Your watch will not be
affected by magnetism.
To prevent possible
rusting of the case
and bracelet caused
by dust, moisture and
perspiration, wipe them
periodically with a soft
dry cloth.
* Before using the water resistance 5, 10, 15 or 20 bar watch in water, be sure the
crown is pushed in completely.
Do not operate the crown when the watch is wet or in water. If used in sea water,
rinse the watch in fresh water and dry it completely.
* When taking a shower with the water resistance 5 bar watch, or taking a bath with
the water resistance 10, 15 or 20 bar watch, be sure to observe the following:
• Do not operate the crown when the watch is wet.
• If the watch is left in warm water, a slight time loss or gain may be caused.
This condition, however, will be corrected when the watch returns to normal
temperature.
NOTE:
Pressure in bar is a test pressure and should not be considered as correspond-
ing to actual diving depth since swimming movement tends to increase the
pressure at a given depth. Care should also be taken on diving into water.

28 29
English
English
Light activities will not
affect your watch, but be
careful not to drop your
watch or hit it against
hard surfaces, as this
may cause damage.
Be careful not to expose
the watch to solvents,
mercury, cosmetic spray,
detergents, adhesives or
paints. Otherwise, the
case, bracelet, etc. may become dis-
colored, deteriorated or damaged.
SHOCKS & VIBRATION
CHEMICALS
Operational temperature
range: Between -5°C
(+23°F) and 50°C
(122°F)
TEMPERATURES
+50°C
5°C
+40°C
0°C
Display temperature range:
Between 0°C (+32°F) and
40°C (+104°F)
Functional temperature
range of alarm and LED
light: Between 5°C
(+41°F)
and 50°C
(+122°F)
It is recommended that
the watch be checked
once every 2 to 3
years. Have your watch
checked by an AUTHOR-
IZED PULSAR DEALER or SER-
VICE CENTER to ensure that the
case, buttons, gasket and crystal
seal remain intact.
2 - 3
Years
PERIODIC CHECK
If your watch has a
protective film and/or a
sticker on the case back,
be sure to peel them off
before using your watch.
PRECAUTION REGARDING
CASE BACK PROTECTIVE FILM
The IC (Integrated
Circuit) used in
your watch will be
affected by static
electricity which may
disturb the display. Keep the
watch away from close contact
with objects such as TV screens
which emit strong static electric-
ity.
STATIC ELECTRICITY
Table of contents
Other Pulsar Watch manuals