PVG R 25X-TC series User manual

R 25x-TC*
3
2
6
5
4
>
u
1
:
=
y
FIN
MANUEL D'UTILI ATION
GEBRAUCH ANWEI UNG
BRUG ANVI NING
IN TRUCCIONE DE U O
KÄYTTÖOHJE
OPERATING MANUAL
I TRUZIONI D’U O
BRUK ANVI NING
GEBRUIK AANWIJZING
IN TRUKCJI OB ?UGI
BRUK ANVI NING
NAVODILA ZA UPORABO
2
14
26
38
50
62
74
86
98
110
122
134

Dear Sir, Madam,
Congratulations on your purchase of this heater. You have purchased a quality
product, which will serve you for many years to come. This, of course, provided
you use the heater correctly. Please read these Directions for Use first, to ensure
the maximum lifetime for your heater.
This appliance comes with a 24-month manufacturer’s warranty on all defects in
material or workmanship.
We wish you much warmth and comfort from your heater.
Yours sincerely,
PVG Holding b.v.
Customer Service Department
1 READ THE DIRECTIONS FOR USE FIRST.
2 IN CASE OF ANY DOUBT, CONTACT YOUR DEALER.
3 BEFORE YOU START READING, FOLD OUT THE LAST PAGE.
4
62

GENERAL DIRECTIONS FOR USE
Below you will fin the main steps to be taken for
using your heater. For more etails, please refer to
the MANUAL (pages 65 ff.).
•As a fire precaution, the tank must be filled
either when the heater has been switched off or
in another room than the room where the heater
is installed.
•Always ensure that the tank is closed properly
after filling it at a safe distance from all sources
of heat and open flames (see chapter B).
•Store all fuel containers with their original caps
and seals in a cool and dark place.
•Fuel ages. Use new fuel at the start of every
heating season.
•The use of Zibro Extra, Zibro ristal or Zibro Bio
as a heating fuel assures you that you have a
good quality fuel.
•Before changing brands and/or types of fuel
make sure that the mobile heater first
completely empties all of the remaining fuel
inside the heater.
MAIN C MP NENTS
FF - button
Knurled wick
adjustment knob
Ignition button
Combustion
chamber
Combustion
chamber handle
Fuel indicator
Grill
Lid for removable
tank
Removable tank
Fuel gauge
removable tank
Ignition coil
Battery holder
Remove all packaging materials (refer to Section A, Fig. A).
Fill the removable tank and wait 30 minutes before you
ignite the heater (refer to Section B, Fig. G).
Insert the batteries into the battery holder
(refer to Section A, Fig. F).
Check whether the combustion chamber is fully upright
(refer to Section A, Fig. E).
Ignite the heater by turning the knurled wick adjustment
knob as far to the right as possible and then gently push the
ignition button (refer to Section C, Fig. K an L).
After igniting the heater it will take 10 to 15 minutes before
you can check if the heater burns well (refer to Section D).
Switch off the heater (refer to Section E).
1
2
3
4
5
6
7
4
63

WHAT YOU NEED TO KNOW IN ADVANCE
ALWAYS MAKE SURE THAT THERE IS SUFFICIENT VENTILATI N
Read this user manual carefully before using the appliance and keep it for future
reference. Install this device only when it complies with local/national legislation,
ordinances and standards. This product is intended to be used as a heater in resi-
dential houses and is only suitable for use in dry locations, in normal household
conditions, indoors in living room, kitchen and garage.
Regardless of the model, you must always make sure that the heater is used in a
room large enough to enable the heater to be used safely without extra ventila-
tion. If the room is smaller than required, you must always open a door or window
slightly (ensuring an opening of approx. 2.5 cm). It is important that every room
where the heater is used has sufficient air intake and efficient air outflow (both
openings must have a minimum cross section of 50 cm2). No modifications to the
safety system are allowed, as that will invalidate the guarantee that the air probe
will work properly. Consult your dealer in case of doubt.
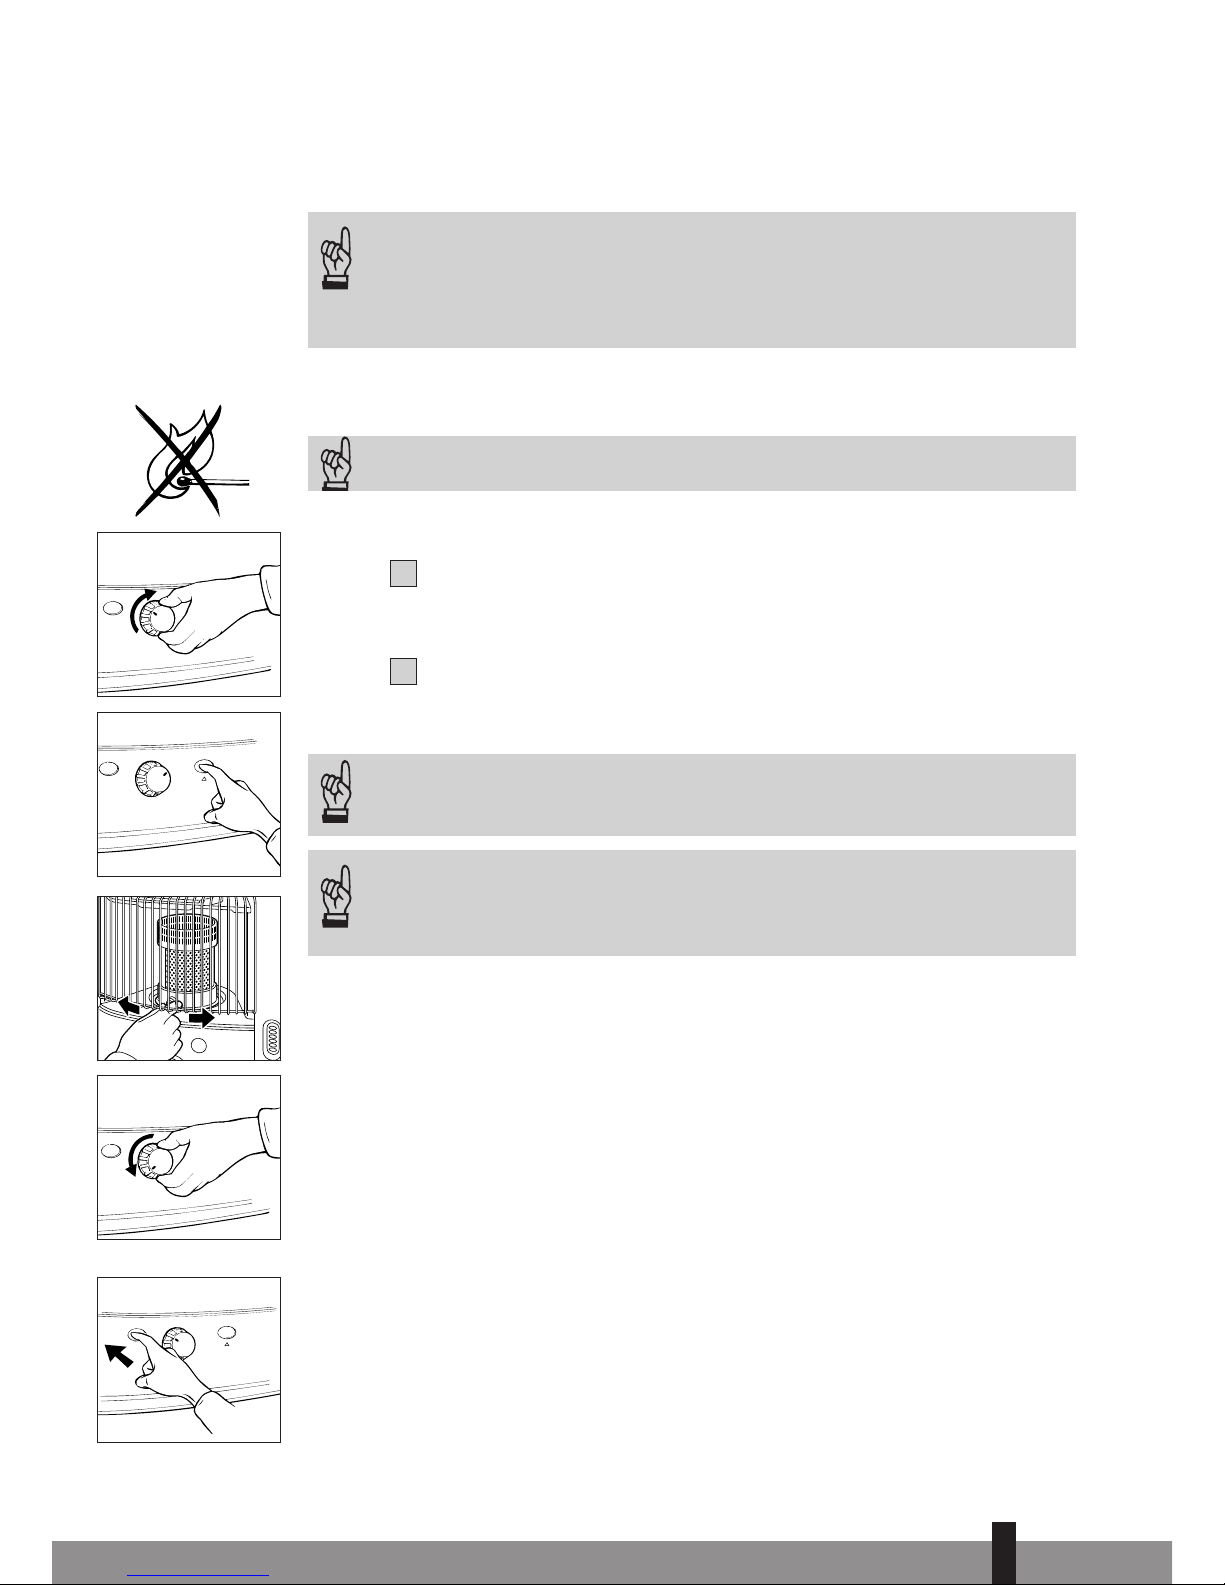
SAFETY SYSTEM
When you have turned on the heater, if the room temperature is relatively low (19
to 20°C) it may automatically switch off. The cause of this is build-up of heat in the
heater. This is a logical consequence of the safety mechanism. This will not occur
when using the heater at lower ambient temperatures.
SAFE T P
The heater is supplied with a safe top. This application decreases the temperature
of the top plate. In this way, the risk of harmful accidents at accidentally touching
the top plate is considerably decreased. However, be aware that the top plate still
becomes hot.
Avoid any contact with the top plate and grille.
Especially for France: Your heater was designed to operate exclusively on fuel for
liquid fuel-operated mobile heaters in accordance with the Decrees of 08-01-1998
and 18-07-2002. The use of other fuels is forbidden. Ask your dealer or check our
website for the addresses of our retailers. The liquid fuel-operated mobile heater
is intended as an extra heater, and not as a continuous source of heat.
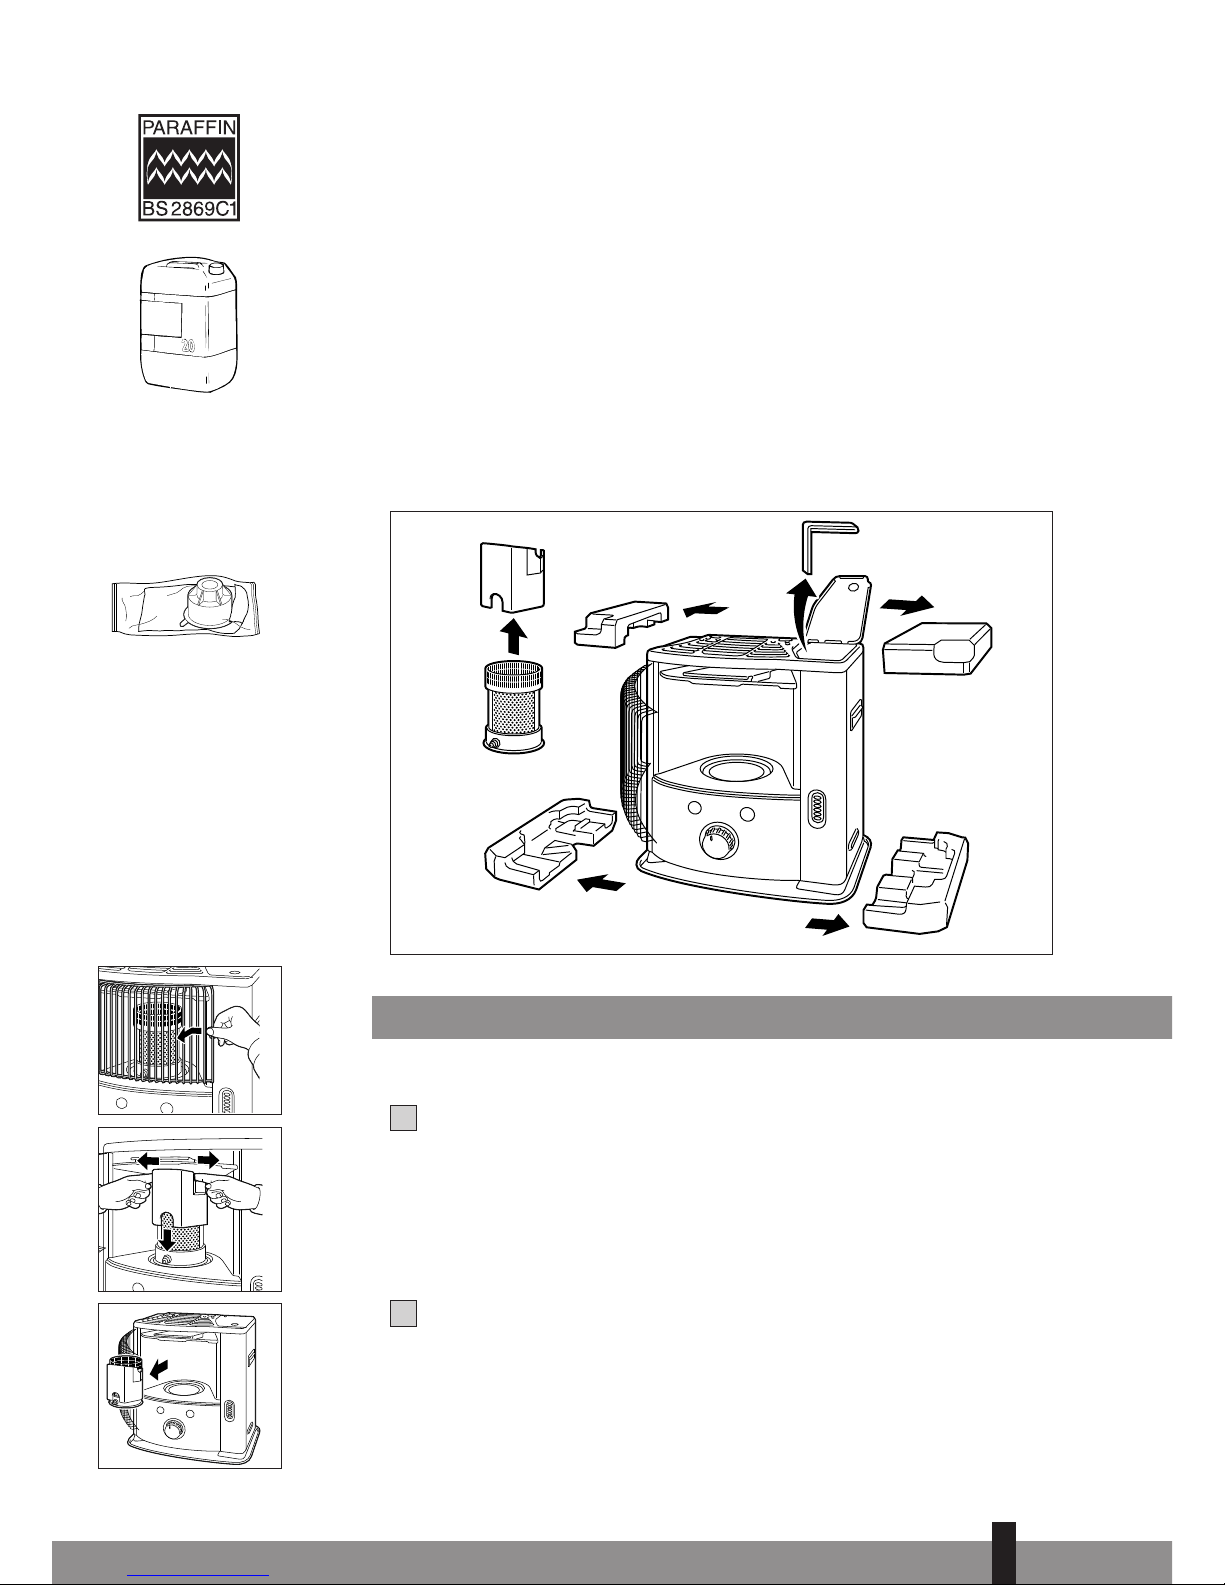
Especially for United Kingdom: Only use Class C1 paraffin fuel in accordance with
BS2869; Part 2, or equivalent.
The user must comply with the following instructions for proper use:
DO NOT
- use the liquid fuel-operated mobile heater in caravans, boats, and vehicle cab-
ins;
- use the liquid fuel-operated mobile heater in insufficiently ventilated rooms
(consult the table of properties for the minimum dimensions of the room to
be heated), underground rooms and / or at a height of over 1500 metres;
- modify the heater safety features.
The use of this type of heating in public rooms is subject to prior regulatory per-
mission. Obtain proper information on this in advance.
4
64

This transportation cap
is pac ed separately in
the box. Only this cap
ensures trouble-free
transportation of the
heater after use.
Store it well!
4
65
Only the use of the
correct fuel will ensure
safe, efficient, and
comfortable use of your
heater.
B
C
D
THE RIGHT FUEL
Your heater has been designed for use with high-quality water-free pure paraffin
oil, such as Zibro Extra or Zibro ristal. Only fuels of this kind will ensure clean and
proper burning. Lower quality fuel may result in:
excessive tar deposits on the glass fibre wick
incomplete burning
reduced heater lifetime
smoke and/or smells
deposits on the grid or mantle
Using the right fuel is therefore essential for safe, efficient, and comfortable use
of your heater.
Damage and/or malfunctions of the heater due to the use of other than high qual-
ity water-free pure paraffin oil is not covered by the warranty.
Always refer to your local dealer for the right fuel for your heater.
MANUAL
AINSTALLING THE HEATER
Carefully remove your heater from the box and check the contents.
In addition to the heater you also need to have:
a transportation cap
these directions for use
eep the box and the packaging materials (Fig. A) for storage and/or
transportation.
Remove the other packaging materials:
Release the right side of the grill from the two slots by pulling the right
side of the grill to the left and then pull it forward (Fig. B).
Pull both ends of the packaging to the rear and at the same time slightly
downwards (see Fig. C).
Remove the combustion chamber from the heater and remove the
packaging underneath (see Fig. D).
A
1
2

Put the combustion chamber back into its place. The combustion chamber
is positioned correctly when it can be smoothly moved a little to the left
and to the right by its handle (Fig. F). Close the grill: Slightly lift it to
reposition it in its slot.
Open the lid of the removable tank and remove the piece of cardboard.
If the left side of the grill has been removed, first insert the flattened upper left
end of the grill into the upper left slot and then insert the other flattened end
into the lower left slot (Fig. E).
Fill the removable tank as indicated in Section B.
Insert the batteries into their holder at the back of the heater (Fig. G).
Ensure that the positive and negative poles match the + and - marks indicated
on the battery housing.
The floor should be firm and completely level.
Reposition the heater, when it is
not level. Do not correct the situation by placing books or other goods under the
heater.
Please refer to the separate instructions in the carton box for fixing of
the heater.
Your heater is now ready for use.
BFILLING FUEL
Fill the removable tank in a suitable place since there can always be some spillage.
Follow the procedure below:
Make sure that the heater is switched off.
Open the upper lid and lift the removable tank out of the heater (Fig. H).
Note: Some drops may leak from the tank. Put down the removable tank (cap
pointing upwards, handle on floor and screw off the fuel cap.
Fill the removable tank using a fuel pump (refer to fuel pump operation
instructions.) Make sure that it is in a higher position than the removable tank
(Fig. I). Insert the ribbed hose into the opening of the removable tank.
Check the removable tank fuel gauge while filling the tank (Fig. J). Stop filling
once the gauge indicates that the tank is full. Never overfill the tank,
especially not when the fuel is very cold (fuel expands when it heats up).
Let the remaining fuel in the pump flow back into the jerry can and carefully
remove the pump. Carefully screw the fuel cap back on the tank. Clean off
any spilled fuel.
Check whether the fuel cap is straight and tightened properly. Reinstall the
removable tank in the heater (cap down). Close the lid.
6
5
4
3
2
5
4
3
6
1
4
66
J
I
empty full
H
F
G
E

CIGNITING THE HEATER
A new heater may give off some smells for a short while, when it is used for the
first time. You should therefore provide extra ventilation or ignite the heater
out-
side the living room.
When you use the heater for the first time, first put the filled removable tank into
place, and then wait approximately 30 minutes before you ignite the heater. This
allows the glass fibre wick to soak up the fuel. Follow the same procedure when you
have completely burnt up all fuel from the tank, and after the glass fibre wick has
been replaced.
Before igniting the heater, always check the fuel indicator to see whether the
removable tank needs filling up.
Always ignite the heater with the ignition coil . Never use matches or a
cigarette lighter.
Follow the procedure below:
Turn the knurled wick adjustment knob clockwise to its stop (Fig. ). If you
apply more pressure you may turn it slightly further; however, it will automatically
return to the startposition.
Push in the ignition button (Fig. L), but do not apply too much force.
Release the ignition button as soon as a flame is visible in the combustion
chamber .
If the heater has been used only a few times and the wick adjustment knob is not
locked, first turn the wick adjustment knob (Fig. M) completely left, before putting
the wick in the highest position for ignition (Section C).
After having ignited the heater, always check whether the combustion
chamber is level, by sliding it slightly to the left and the right by its handle
(Fig. F). This should be a smooth movement. If the combustion chamber is not
level, this will cause smoke and soot to develop.
DBURNING F THE HEATER
After you have ignited the heater, it will take 10 to 15 minutes before you can check
whether the heater is burning well. Too high a flame may cause smoke and soot,
whereas too low a flame causes smells. The page opposite the folding page shows
the minimum and maximum permissible burning heights of the flame (Fig. Q). The
flame can be slightly adjusted with the knurled wick adjustment knob (Fig. M).
Burning that is too low may be caused by:
insufficient fuel (fill the tank)
poor fuel quality (contact your dealer)
insufficient ventilation (put window or door ajar)
wastage of the wick (contact your dealer or replace the wick,
refer to section L
ESWITCHING FF THE HEATER
Push the OFF-button . The flame will extinguish after a little while (Fig. N).
1
2
4
67
K
L
F
M
N

FMALFUNCTI N, CAUSES AND S LUTI NS
If any malfunctioning cannot be solved from the directions below, please contact
your dealer.
THE HEATER D ES N T IGNITE
The batteries are not positioned correctly in the holder.
Check (Fig. G).
There is not enough power left in the batteries for the ignition.
Replace (Fig. G).
You have run out of fuel from the tank or the wick has been replaced.
After having refille an replace the removable tank, wait for 30 minutes
before igniting the heater.
You are pushing the ignition button with too much force.
Push it in less forcefully (Section C).
The ignition coil is defective.
Contact your ealer.
IRREGULAR FLAME AND/ R S T AND/ R SMELLS
The combustion chamber has not been positioned correctly.
Use the han le to put it level, until you can easily sli e it slightly to the left
an to the right an the chamber is level.
You are using fuel which is past its ‘use by’ date.
Start every heating season with fresh fuel.
You are using the incorrect type of fuel.
Refer to THE RIGHT FUEL (See Section ’What you nee to know in a vance’).
Dust has gathered in the lower part of the heater.
Contact your ealer.
The wick height is not correct.
Contact your ealer.
THE HEATER SL WLY EXTINGUISHES
The removable tank is empty.
See Section B.
The lower reservoir is contaminated by moist.
Contact your ealer.
The wick has hardened on the upper side.
Burn the heater until all fuel is use (Section G). Use the right fuel.
You are using fuel which is past its ‘use by’ date.
Start every heating season with fresh fuel.
THE HEATER REMAINS BURNING L W
Wick position too low.
Contact your ealer.
Before you refilled the tank, the heater had burnt up almost all the fuel.
After having refille an replace the removable tank, wait for 30 minutes
before igniting the heater.
You are using the incorrect type of fuel.
Refer to THE RIGHT FUEL (See Section ’What you nee to know in a vance’).
The room is insufficiently ventilated.
Leave a win ow or a oor wi e open for a while.
THE HEATER IS BURNING T HIGH
You are using an incorrect, too volatile type of fuel.
Refer to THE RIGHT FUEL (See Section ’What you nee to know in a vance’).
Wick position too high.
Contact your ealer.
4
68
G

GMAINTENANCE
Your heater needs hardly any maintenance. It is, however, important that you
remove dust and stains in time with a damp cloth, because otherwise these may
cause stains that are hard to remove. Under normal conditions, only three
components are subject to wear:
1. THE BATTERIES
You may replace the batteries yourself. Do not dispose of old batteries along with
the other domestic waste. Follow the locally applicable regulations regarding the
disposal of domestic chemical waste.
2. THE IGNITI N C IL
The ignition coil will have a longer life, if you ignite the heater in the correct
manner. Replace the batteries in time and take care not to push in the ignition
button with too much force. If the filament is broken, the ignition coil must be
replaced.
3. THE WICK
To extend the glass fibre wick life, you must occasionally let the heater burn until
the tank is completely emptied and the heater extinguishes by itself. Do this when
you notice that the flame is weakening. The burn-out will cause some smells, so it
is recommended that you take the heater outside of the living room.
Do not remove any heater components yourself. Always contact your dealer for
repairs.
Let the heater cool down first, before you start any maintenance or service work.
HST RAGE (END F THE HEATING SEAS N)
We recommend that you burn up all the fuel in the fuel tank at the end of the heating
season and store the heater properly. Follow the procedure on the next page:
Ignite the heater outside the living room and let it burn until all fuel is used.
Let the heater cool down.
Clean the heater with a damp cloth and then dry it with a dry cloth.
Remove the batteries from the holder and store them in a dry place.
Clean the fuel filter (refer to section G).
Store the heater in a dust-free place, if possible in its original packaging. Unused fuel
cannot be used for the next heating season. If there is still some fuel left, do not
throw it awa , but dispose of it in accordance with the local regulations for the dis-
posal of domestic chemical waste. Alwa s start the new heating season with fresh
fuel. When ou start re-using the heater, follow the instructions again (starting from
Section A and as specified).
6
5
4
3
2
1
4
69
bro en ignition coil

ITRANSP RTATI N
Take the following measures to avoid fuel leakage during the transportation of
the heater:
Let the heater cool down.
Remove the removable tank from the heater and remove the fuel filter
(Fig. O). Some drops may leak from the filter; keep a cloth at hand. Store the
fuel filter and the removable tank outside the heater.
Place the transportation cap into the position of the fuel filter (Fig. P). Press it
tight. The transportation cap will, as much as possible, prevent oil leakage
from the heater during transport.
Always move the heater in an upright position.
Make the fixed tank empty with a fuel pump before transportation or in case
of wrong or dirty fuel. First remove the fuel filter and then insert the fuel
pump into the empty fixed tank. Follow the same procedure if the fuel tank
contains water.
JSPECIFICATI NS
Ignition electrical Dimensions (mm) width 422
Fuel paraffin
(including base plate)
depth 281
Capacity (kW)*2.2 height 446
Suitable space (m3)** 35-80 Accessories: transportation cap
Fuel consumption (l/hr)*0.229 Required batteries
2x R20kG, MN 1300
Fuel consumption (g/hr)*183 1.5V, size D
Burning time per tank (hr)*
17.5 Wick type F
Capacity removable tank (litres) 4.0
Weight (kg) 7.5
* At maximum setting
** Specified values are indicative
KWARRANTY PR VISI NS
Your heater comes with a 24-month warranty starting on the date of purchase.
Within this period all defects in material or workmanship will be repaired without
any charge. The following provisions shall apply regarding this warranty:
We expressly dismiss all other claims for damages, including consequential
damages.
Any repairs or replacements of components within the term of warranty will
not result in an extension of the term of warranty.
The warranty will no longer apply, when the heater has been modified,
non-original parts have been used, or when it is repaired by third parties.
The warranty will not apply to parts that are subject to normal wear, such as
the batteries, the ignition coil, the wick and the manual fuel pump.
The warranty will only apply, when you present the original, dated proof of
purchase, provided no changes have been made to it.
5
5
4
3
2
1
4
3
2
1
4
70
Transportation cap
P
O

The warranty will not apply to damages caused by actions not in compliance
with the Directions for Use, neglect, and the use of an incorrect type of fuel,
or fuel past its use-by date. The use of incorrect fuel can even be dangerous*.
Transportation costs and the risks involved during the transportation of the
heater or heater components will always be the responsibility of the
purchaser.
In order to avoid unnecessary costs, we recommend that you always read the
’Directions for Use’ carefully first. In case they offer no solution, please take the
heater to your dealer for repair.
* Highly inflammable substances may induce uncontrollable burning, causing flames to break out. Should this
happen, never try to move the heater, but always switch off the heater immediately (refer to Section E). In cases
of emergency you may use a fire extinguisher, but only a type B extinguisher: a carbon dioxide or powder
extinguisher.
11 TIPS F R SAFE USE
1Children should be supervised to ensure that they do not play with the
appliance.
2Do not move the heater when it is burning or still hot. Do not refill nor
service the heater when it is burning or still hot.
3Position the front of the heater at a minimum distance of 1.5 metres
from walls, curtains, and furniture.
4Do not use the heater in dusty rooms or in very draughty places. In
both cases you will not have optimum burning.
5Switch off the heater, before you go to sleep.
6Store and move fuel only in suitable tanks and jerrycans.
7Make sure that the fuel is not exposed to heat or extreme temperature
changes. Always store the fuel in a cool, dry and dark place (sunlight
will affect the quality).
8Never use the heater in places where harmful gasses or fumes may be
present (e.g. exhaust gasses or paint fumes).
9Be aware that the grid of the heater becomes hot. If the appliance is
covered there is a risk of fire.
10 Always make sure that there is sufficient ventilation.
11 This appliance is not intended for use by persons (including children)
with reduced physical, sensory or mental capabilities, or lack of
experience and knowledge, unless they have been given supervision or
instruction concerning use of the appliance by a person responsible for
their safety.
6
7
4
71
100 cm
150 cm
50 cm
50 cm50 cm
20 cm
50 cm

REPLACEMENT OF THE WICK
LENSURE THAT THE HEATER IS FF AND C MPLETELY
CL BEF RE STARTING T REPLACE THE WICK.
Open the lid and remove the removable tank.
Remove the batteries from the battery holder.
Open the front grill. Remove the combustion chamber
from the heater. Close the grill.
Pull the knurled wick adjustment knob off the heater.
Unscrew the three cabinet screws on the back and sides
of the heater (3). Pull the cabinet forward slightly, and
then remove it from the base plate.
Unscrew the four wing nuts from the wick holder.
Lift the wick holder chassis up until the wick is visible.
Place the burner bed next to the heater. (Ensure that
the wiring does not become disconnected).
Remove the screw on the stem holding the bracket and
remove the bracket.
Turn right the stem to the end and remove the wick
sleeve (with wick).
Turn the wick sleeve counterclockwise and lift the wick
sleeve up. Remove it from the primary air tube.
Squeeze the wick to loosen the three wick pins and
remove the wick from the wick sleeve. Ensure that you
are wearing gloves and that you have a container in
which to put the old wick.
10
9
8
1
2
3
4
5
6
7
11
4
72
21
4
10
11
8b
8a
7
3
5a 5b
6
9

4
73
Install the wick to the wick sleeve according to the
allowed direction engraved on the wick sleeve.
Install the wick sleeve (with wick) to the primary air
tube. And then turn the wick sleeve clockwise to set in
the handle arm.
Install the bracket. Then tighten the screw which is
holding the stem.
Put the wick holder chassis back into position.
Screw the four wing nuts hand tight.
Place the knurled wick adjustment knob on the wick
mechanism. Turn the knob as far to the right as possi-
ble. Press the tip-over switch. Check that the wick can
be lowered completely. Repeat this check a number of
times. If the wick cannot be lowered completely it has
not been placed correctly. If this is the case, repeat the
procedure from No. 12. Pull the knurled wick adjust-
ment knob off the heater.
Put the cabinet back into position and tighten the three
screws. Put the knurled wick adjustment knob back into
position. Now put the combustion chamber back into
position. Check that it is level by sliding it slightly to the
left and the right by its handle. Close the grill.
Put the filled removable tank into position. Put the bat-
teries into the battery holder (ensure that the positive
and negative poles match the + and – marks indicated
on the battery housing). Wait 30 minutes after replac-
ing the tank and batteries before using the heater.
12
13
14
15
16
17
18
19
12b
17b
12a
13b
14b
18b
100 cm
150 cm
50 cm50 cm
20 cm
50 cm
19b
17a
13a
14a
15 16
18a
18c
100 cm
150 cm
50 cm50 cm
20 cm
50 cm
19a

Q
✗
1-3 cm.
✓✗

*R 25x-TC:
Heator R 251 TC
Stover R 252 TC
Tectro R 253 TC
Toyoheater R 254 TC
Toyoset R 255 TC
Toyostove R 256 TC
Webber R 257 TC
Royalheater R 258 TC
Sous réserve de modification
Ändrungen vorbehalten
Ændringer forbeholdes
Nos reservamos el derecho de
hacer modificaciones
Subject to modifications
Sogetti a modifiche
Wijzigingen voorbehouden
3
2
6
5
4
>
1
쐃 쐇 쐋
쐏
쐆
쐄
쐅
쐂
쐉
쐈
쐊
쐎

PVG Traff c avg©110510 man_R25xTC
Printed in Japan
7963000903
Rev. 7/11
Other manuals for R 25X-TC series
1
Table of contents
Other PVG Electric Heater manuals
Popular Electric Heater manuals by other brands

EUROM
EUROM Radiator Eco 1500 Instruction booklet

EHC
EHC DSR solaris Series Installation & operating instructions

Heatscope
Heatscope MHS-SM1600BK.100 Original installation and instruction manual

Airchaud Diffusion
Airchaud Diffusion Haverland HL WI7S/C Instruction and installation manual

TESY
TESY CN 04 050 MIS F Operation and storage manual

Bromic Heating
Bromic Heating ECLIPSE SMART-HEAT ELECTRIC 3400W installation instructions