Qdos 2-in-1 Anti-Tip TV Straps User manual

2-in-1 Anti-Tip
TV Straps
Easy 3-Step Installation Guide
Before removing the adhesive protective liner, do a dry run and test each step
to make sure the installation will work. The SecureHold adhesive is meant to be
used once only and cannot be repositioned if done incorrectly.
Important:
Qdos wants to keep your children safe and for that we need you to do your part by
carefully reading and following the instructions below.
For installation videos and FAQs go to: QdosSafety.com
Parts List:
Wall
Bracket
Cover for
Wall Bracket
Top Cam
Lock
Bottom
Cam Lock
Furniture
Cam Lock
Furniture
Mounting Plate
TV
Mounting
Plate
Strap Hinge
Pin
4x SecureHooks™
6x 1.5"
(35 mm)
Optional
Screws
4 mm5 mm
6 mm
TV Mounting Bolts Wall Hardware
8 mm

Step 1 - Attaching Straps to the TV
Pull the furniture out from the wall. Release all the Cam
Locks and extend the straps to the maximum length.
Locate the upper VESA mounting holes on the back of the
TV and select the correct bolt size to fit the holes. Attach
both TV Mounting Plates.
There are two options for attaching the Wall Brackets.(2A)
The Zero-Screw option into hollow drywall using the
SecureHooks™ or (2B) with screws into a stud. For
installation into any other wall material, use only the
appropriate hardware for that material. Consult a
professional baby proofer, a handyman or hardware
storefor advice.
ILine up the straps
as straight as
possible from the
TV while securing
the Wall Bracket,
while making sure
it’s positioned within
the “safe zone.” Now
mark the location 12” down from the top edge of the
furniture. Next peel the protective liner from the adhesive*
and position the first Wall Bracket in the desired location
with the strap pointing upwards.
nsert the point of one of the SecureHooks™ in the upper
right hole in the Wall Bracket. While turning the Secure-
Hook™ from side to side, apply pressure until it penetrates
the drywall. Continue to feed the SecureHook™ all the way
in and then turn until it locks into the Catch in the Wall
Bracket. Put a second SecureHook™ through the lower left
hole in the Wall Bracket and push through the drywall. This
SecureHook™ will turn in the opposite direction and then
lock into the Catch in the Wall Bracket.
Repeat for second Wall Bracket and then attach the Covers
over the Wall Brackets while holding straps up.
Step 2 - Positioning and attaching
the Wall Brackets
2A -Insert SecureHooks™ into hollow drywall
Use a stud finder to locate the studs in the wall behind the
TV and mark the inside edges of the studs at the height
of the furniture. The “safe zone” for the SecureHooks™ to
rotate properly is 3.5” from each stud as seen in the
drawing.
Lock
SecureHook™
under catch
2A

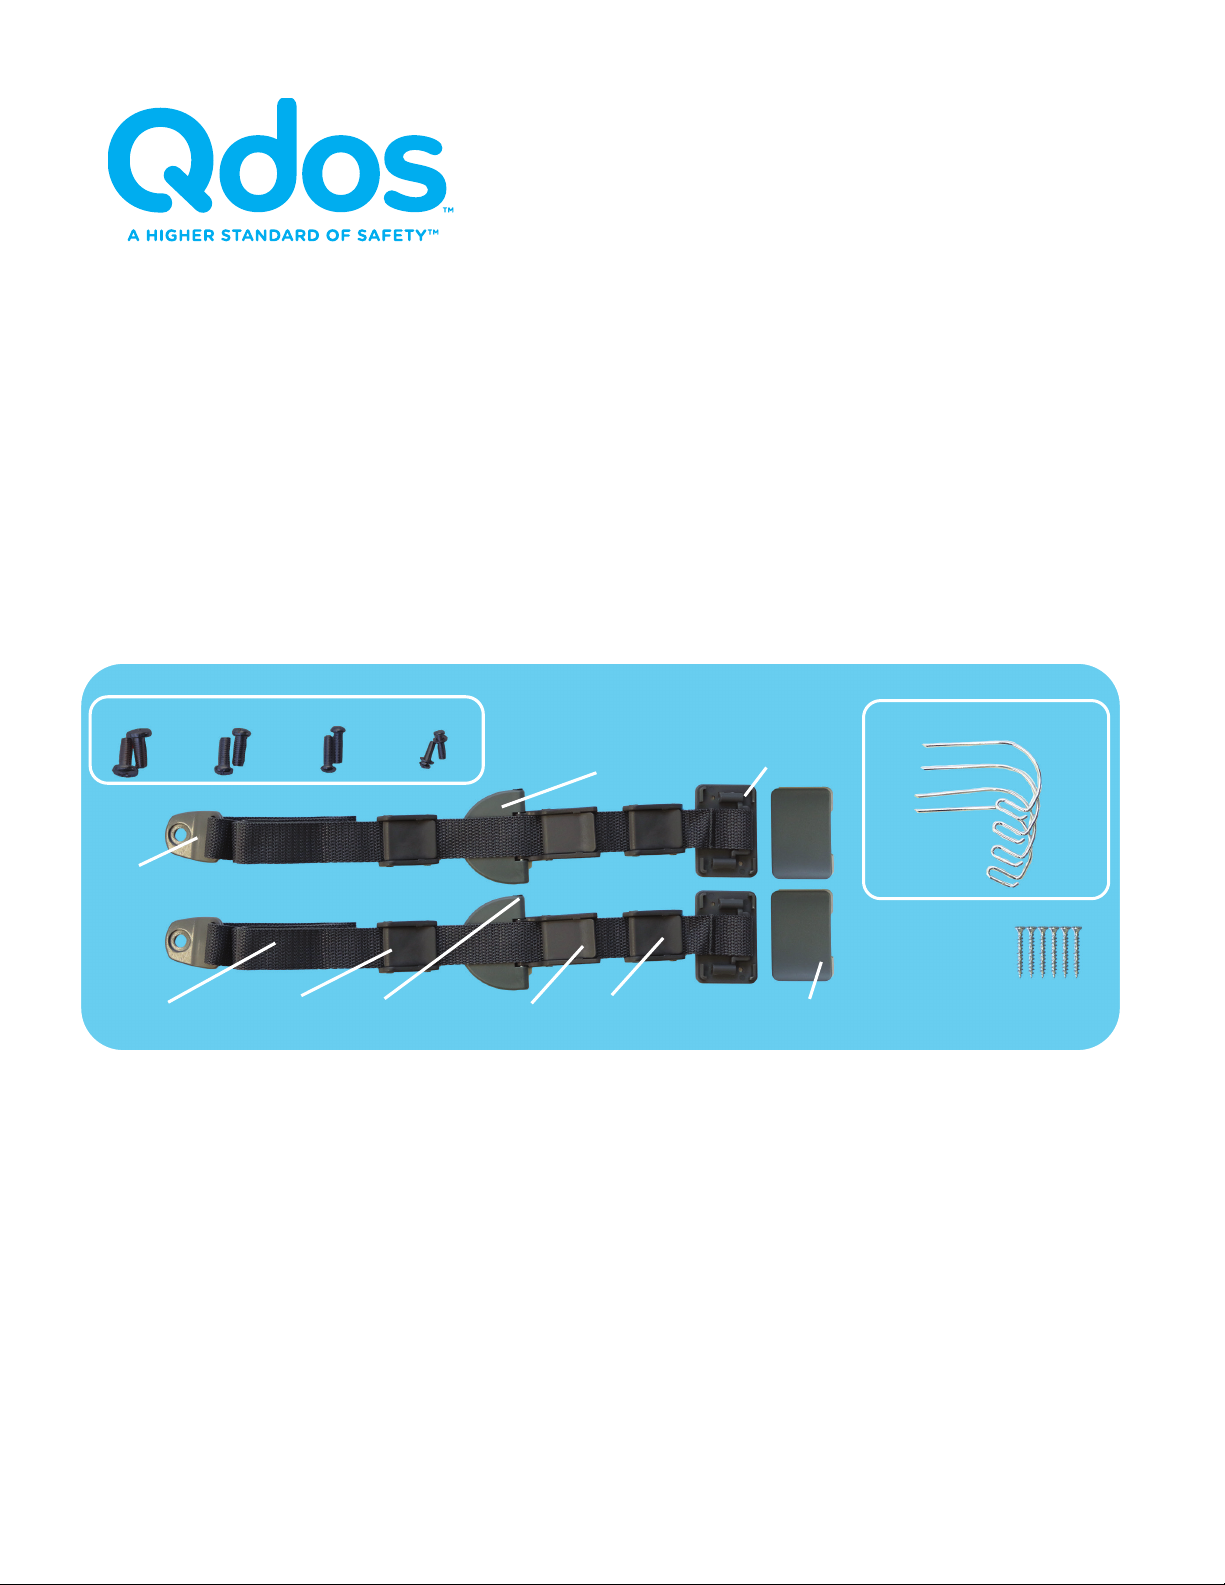
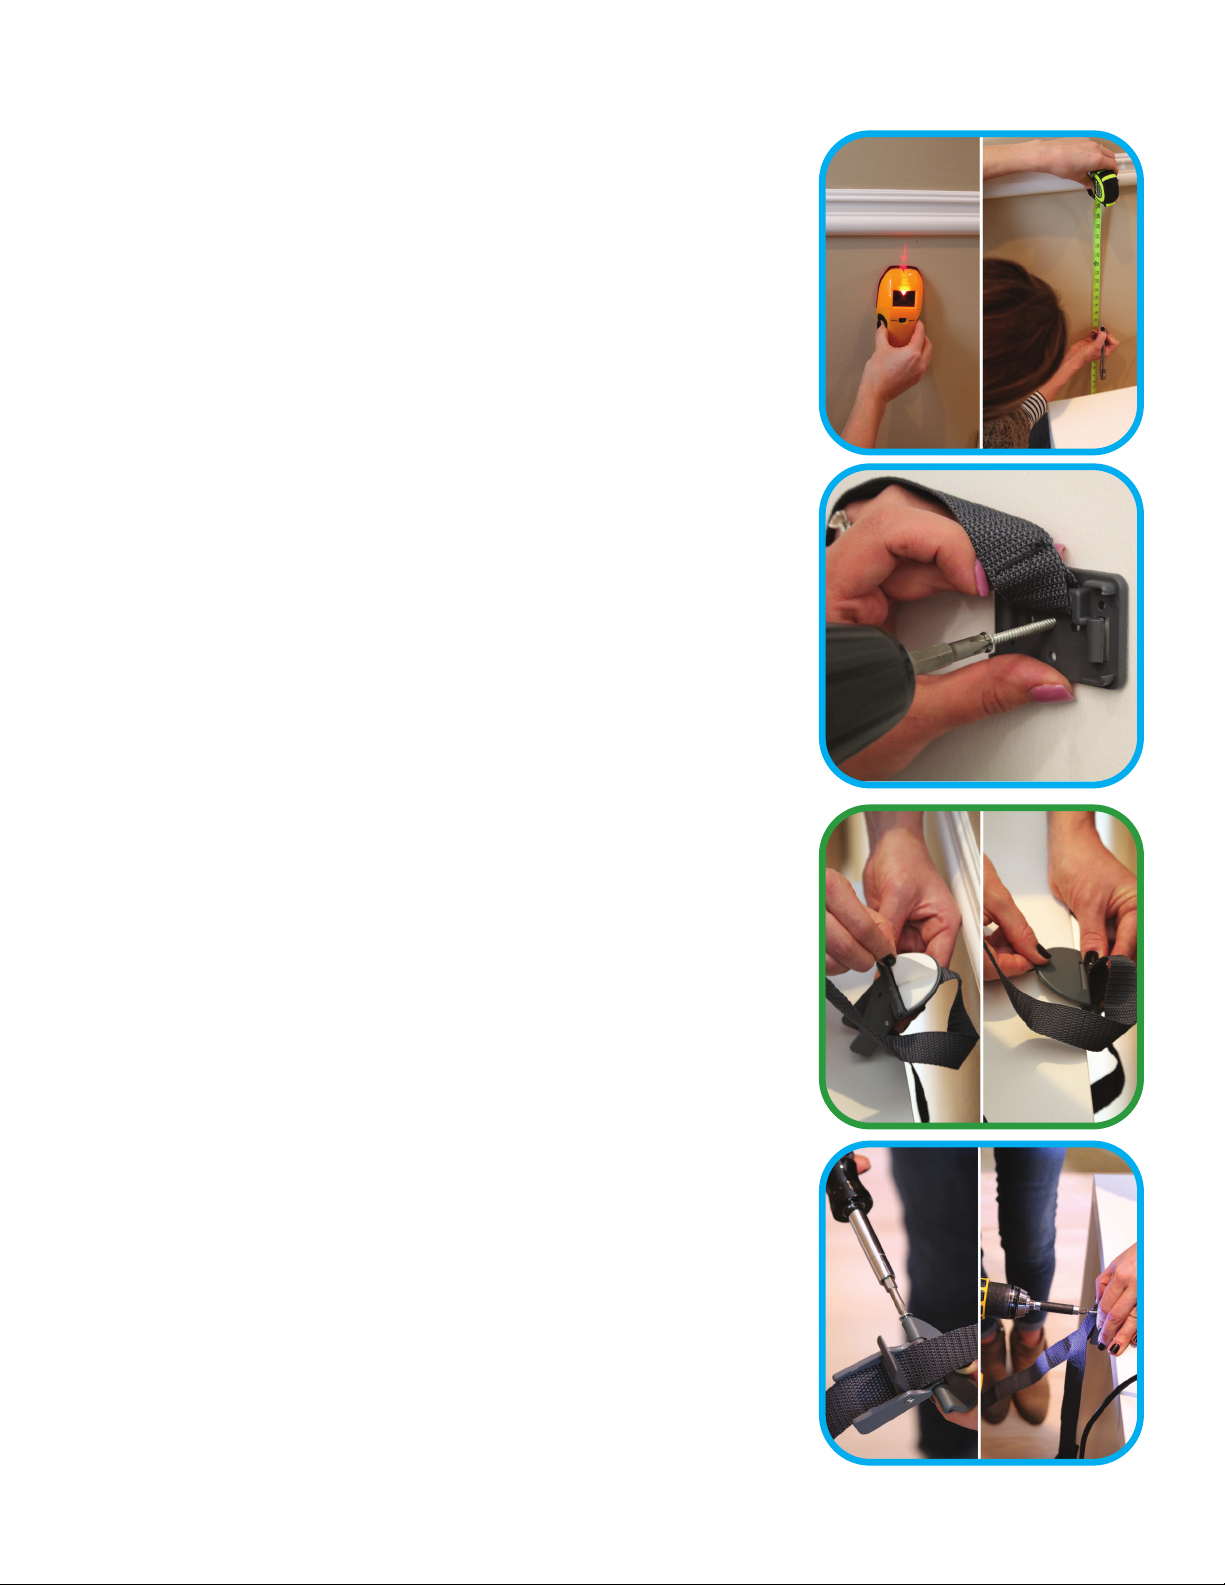
2B - Screw into Stud Behind Drywall
Locate the studs by using a stud finder. Carefully mark the
center locations of each stud at the top of the furniture.
Line up the straps as straight as possible from the TV with
the closest stud. Now mark that location 12” down from
the top of the furniture. Double check one more time
with studfinder to insure correct location. Next peel the
protective liner from the adhesive* and position the Wall
Brackets in the marked locations with the straps pointing
upwards.
Using the included 1.5” screws, attach each Wall Bracket
using the two screw holes in the center. Once screwed in
attach the Covers over the Wall Brackets while holding
straps up.
*IMPORTANT: The adhesive only helps to hold the Wall
Bracket during installation. The Wall Bracket MUST be at-
tached with the SecureHooks™ or screws for safety!
Step 3 - Attaching to the Furniture
There are two options to attach the 2 in 1 Anti-Tip TV
Straps to the furniture. (3A) On top of the furniture with
the Zero-Screw Adhesive Furniture Plate or (3B) Screw
the Cam Lock into the back of your furniture.
3A - Adhesive Furniture Plate
Line up the first Furniture Plate so it’s positioned in line
between the TV mounting and the Wall Bracket. Remove
protective Liner and while holding the Cam Lock against
the back of the furniture, fold the Furniture Plate down un-
til it sticks. Press on it for 30 seconds for good adhesion.
Do the same for the second strap on the other side.
Note: The adhesive needs to set for 24 hours for maximum
adhesion.
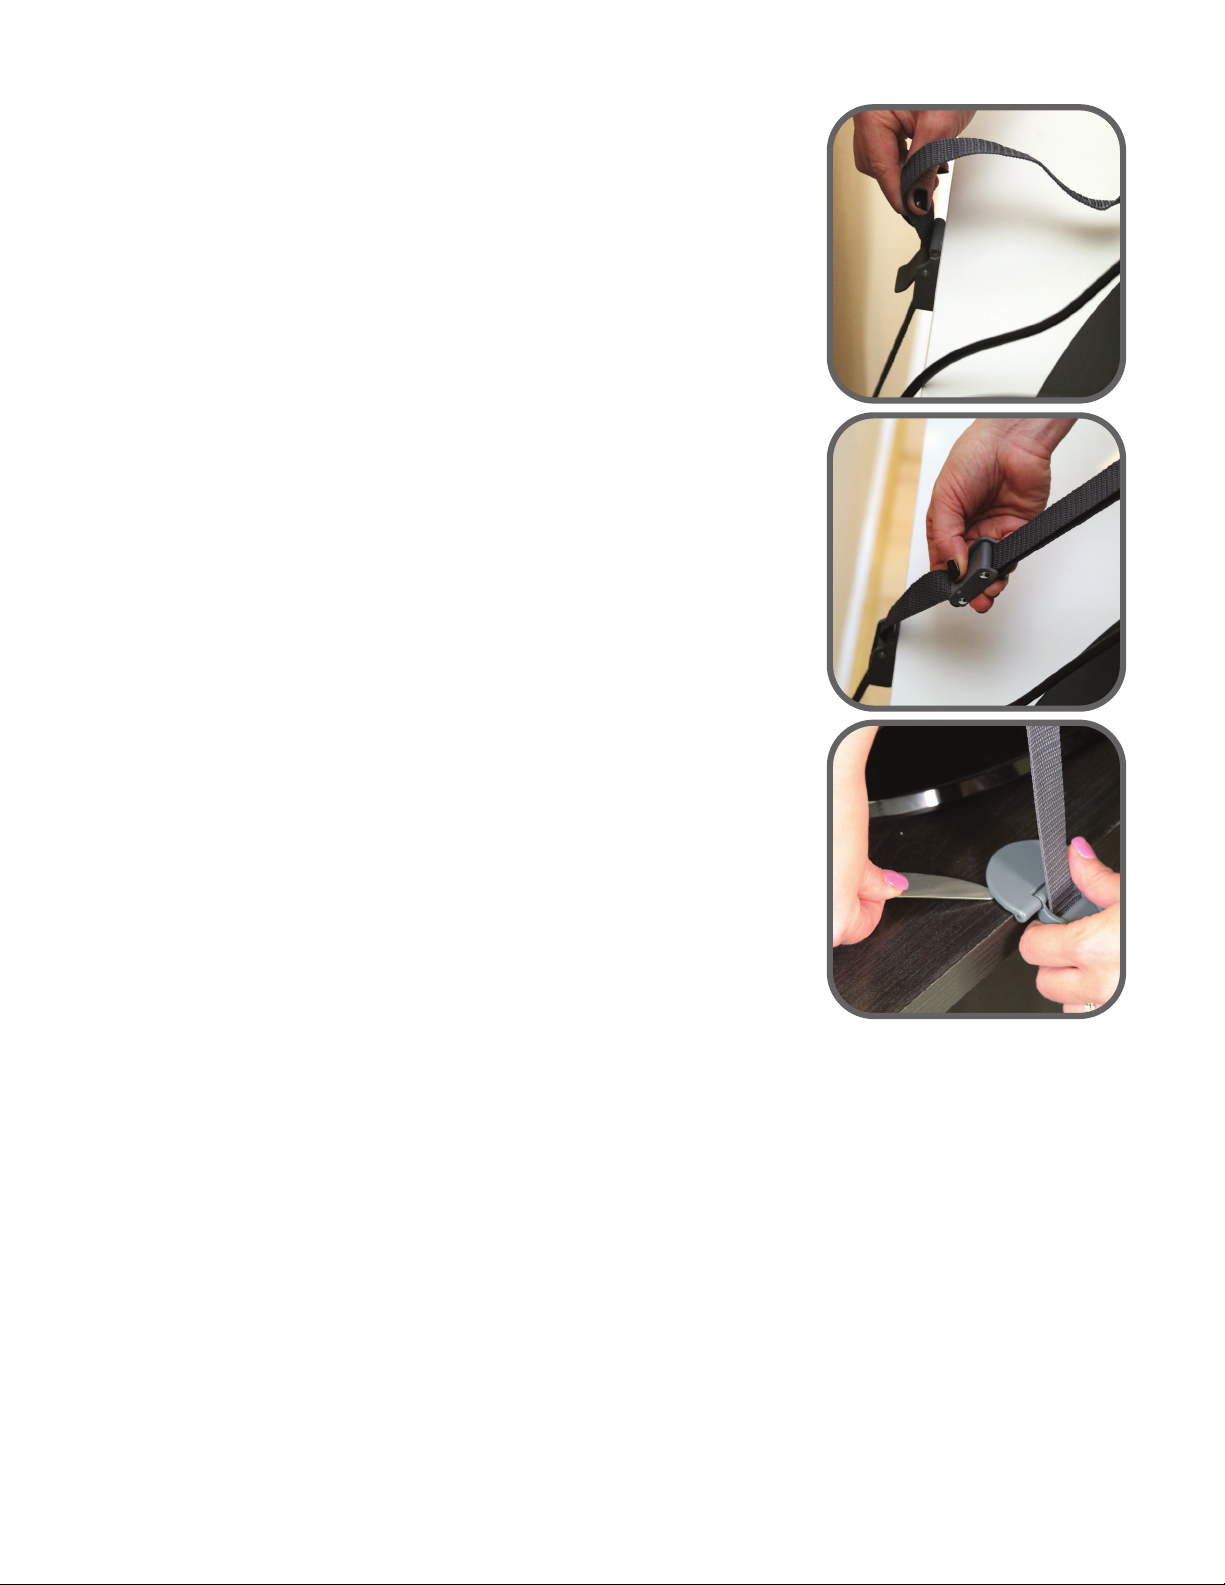
3B - Screw into the back of the Furniture
When attaching with screws to the back of the furniture,
the Furniture Plate can be removed by unscrewing the
hinge pin and pulling it out. Line up the Cam Lock so it’s
positioned in line between the TV mounting and the Wall
Bracket. Mark the hole locations and drill pilot holes using
a 3/32” drill bit. Be careful not to damage the top of your
furniture. Attach the Cam Locks with included 1.5” screws.
3A
2B
3B

Step 4 - Taking slack out of strap
Slide Bottom Cam Lock buckles upwards toward the furni-
ture Cam Locks to take some slack out of the straps. Final-
ly, Push furniture back towards wall and pull upwards on
the straps through the Furniture Cam Lock and lock both
Furniture Cam Locks.
Slide Top Cam Locks down to take remaining slack out of
the straps and push the Top Cam Locks closed.
Note: Only remove the slack, DO NOT TIGHTEN!
Cleaning Behind Furniture
In order to move the furniture out for cleaning, open up all
three Cam Locks to create slack in the straps.
Permanent Removal
When permanently removing the 2 in 1 Anti-Tip TV Straps,
open Cam Locks and release the straps all the way. Re-
move bolts from the TV and remove SecureHooks™ or
screws from the Wall Brackets. Use a rounded knife and
carefully lift under the front edge of the Furniture Plate
until the foam tape breaks being careful not to damage
your furniture surface. For remaining tape residue, use a
finger to simply rub it away. If any residue still remains,
use a cleaner that will not damage the surface you are re-
moving the residue from.
4
Table of contents
Other Qdos Home Safety Product manuals
Popular Home Safety Product manuals by other brands

Innohome
Innohome SGK510 Stove Guard guide for user

Sonic Alert
Sonic Alert HomeAware HA360SA user guide

Heath Zenith
Heath Zenith DualBrite Motion Sensor Light Control... owner's manual

Wieland
Wieland SNO 4083KM Instruction

Autotether
Autotether Wireless Lanyard Standard System owner's manual

First Alert
First Alert EL52-2 Product specifications