Qdos Auto-Close SafeGate User manual

USER GUIDE
Auto-Close SafeGate Pressure Mount
IMPORTANT: Qdos wants to keep your children safe
and for that we need you to do your part by carefully
reading and following the instructions below. Please read
through the instructions before starting the installation.
For installation videos and FAQ go to: QdosSafety.com
Min
Opening
29.3"
(74.5 cm)
Max Opening
with 2 extensions
(included)
36.8" (93.5 cm)
Max Opening
with 6 extensions
47.8" (121.5 cm)
Height
29.9"
(76 cm)

2
IMPORTANT!
PLEASE READ AND FOLLOW THESE INSTRUCTIONS
CAREFULLY AND KEEP FOR FUTURE REFERENCE
When installed between two strong and rigid surfaces
and according to these instructions, this gate has been
tested to meet or exceed the following Safety Standards,
US- ASTM F-1004, Canada- SOR/90-39, and European-
EN 1930.
WARNING
• Children have died or been seriously injured
when gates are not securely installed.
• ALWAYS install and use gates as directed using all
required parts.
• You MUST install wall cups to keep gate in place.
Without wall cups, child can push out and escape.
• STOP using when a child can climb over or
dislodge the gate.
• Use only with the locking mechanism securely
engaged.
• NEVER use to keep child away from pool.
• Intended for use with children from 6 months up
to 24 months of age.
• This product will not necessarily prevent all
accidents. NEVER leave child unattended.
• Regularly check all hardware and do not use if any
part of gate is broken or missing.
• NEVER step or climb over the gate, always open
to pass through.
• For residential use only.
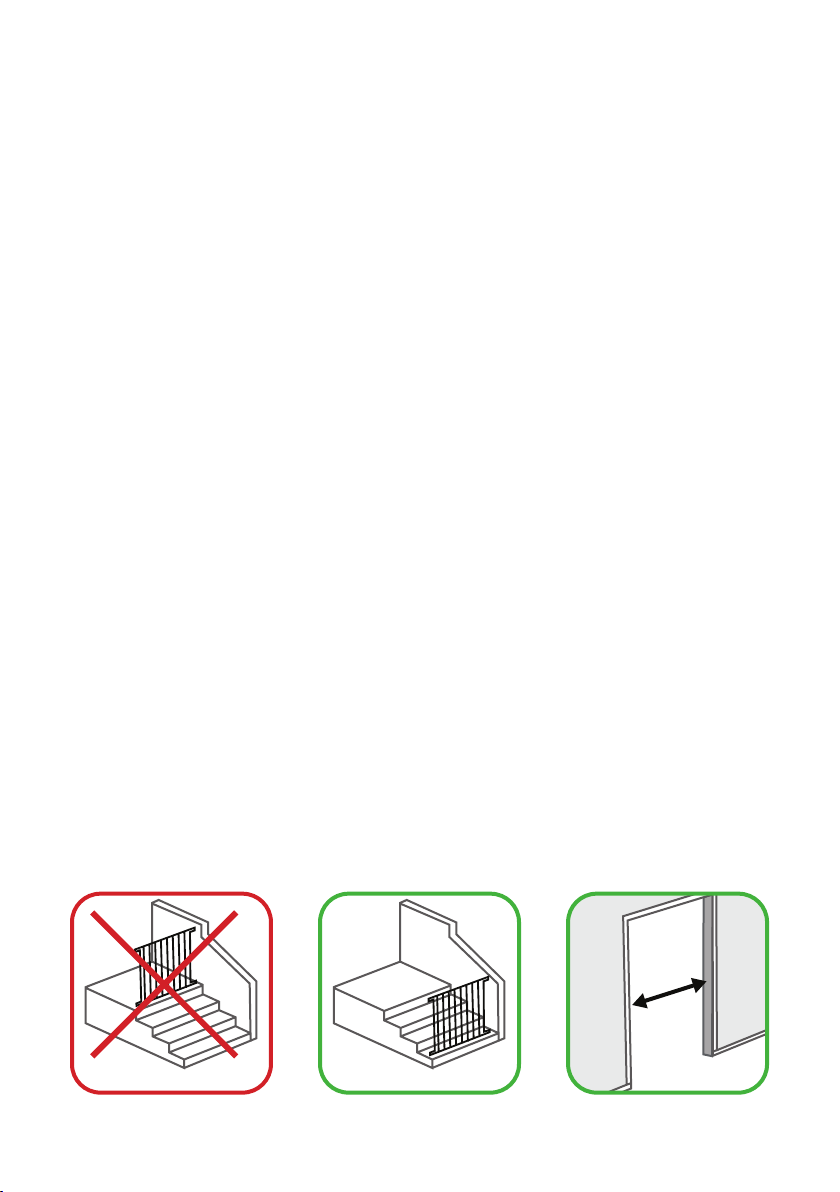
• NEVER use this gate at top of stairs as the bottom
cross bar creates a tripping hazard.
• Fits openings 29.9-37.8” (76-96 cm).
• Never leave the gate unlocked/open as older
children may play with the gate and get injured or
damage the gate.
!

3
HELP?
To help you install your gate quickly and easily, please go
to qdossafety.com for installation videos and FAQ’s to help
you succeed. You may also contact our customer service at
MAINTENANCE AND CLEANING
Check the gate regularly to ensure all the hardware and
mountings are tightened. Clean using a mild soap and
wipe with a damp cloth.
WARRANTY
Your Qdos product is warranted to be free from
manufacturing defects in material or workmanship for
a period of 1 year from date of purchase, when used
under normal conditions and in compliance with these
instructions. Qdos will either repair, or at its option
replace, free of charge, any parts necessary to correct
any defect in material or workmanship during the
warranty period.
USE LOCATIONS
This gate is only intended to be used in doorways, at
the bottom of stairs or as a room divider when installed
between two strong and rigid surfaces. NEVER USE ANY
PRESSURE MOUNTED GATE AT TOP OF STAIRS! The
bottom cross bar creates a TRIPPING HAZARDS!
Top of stairs Bottom of stairs Inside Opening/
doorway

4
OPENING SIZE AND EXTENSIONS
The following table helps explain extensions needed
depending on the inside width of the opening.
*Each SafeGate Extension Kit contains two extensions,
one for each side
IMPORTANT:
Maximum 3 extensions allowed on each side for a total of
6 extensions!
Opening
Size
Extensions
Required
Included Accessory
Needed
Extension
Placement
29.3-31.3"
(74.5-79.5 cm) None Basic
Gate - None
31.3-34.1"
(79.5-86.5 cm)
Gate + 1
extension Included - 1 on one side
34.1-36.8"
(86.5-93.5
cm)
Gate + 2
extensions Included - 1 on each side
36.8-39.65"
(93.5-100.5 cm)
Gate + 3
extensions -
One
Extension
Kit*
2 on one side
and 1 on the
other
39.6-42.3"
(100.5-107.5 cm)
Gate + 4
extensions -
One
Extension
Kit*
2 on both sides
42.3-45.1"
(107.5-114.5 cm)
Gate + 5
extensions -
Two
Extension
Kits*
3 on one side
and 2 on the
other
45.1-47.8"
(114.5-121.5 cm)
Gate + 6
extensions -
Two
Extension
Kits*
3 on both sides

5
WALL CUPS AND SCREWS
We fully understand that nobody wants to create
damage to or make holes in their walls. At Qdos we do
our best to minimize the impact of the gate installation,
but at the same time our main priority, and we sincerely
hope that you share this priority, is to protect your
children.
OUR GATES MUST BE USED WITH THE ADHESIVE
WALL CUPS PROPERLY INSTALLED. Our Spindle heads
are made out of plastic which does not provide friction
against a wall or door frame to hold the gate in place.
INSTALLATION USING ONLY THE ADHESIVE ON
THE WALL CUPS IS ONLY RECOMMENDED FOR THE
FOLLOWING SITUATIONS:
• On painted door frames
• On painted wood framed openings
IN THE FOLLOWING SITUATIONS THE ADHESIVE WALL
CUPS MUST ALSO BE INSTALLED USING THE INCLUDED
SCREWS:
• Painted and smooth drywall
• On wall paper
• On uneven surfaces
• On surfaces with flaking paint
• On oiled wood surfaces
• ANYTIME YOU ARE UNSURE
All gates will make some kind of mark after being used
and anybody saying the opposite is simply not telling the
truth. Our adhesive is removable and should only leave
minor marks on the wall if removed according to the
instructions. If screws have been used it’s very easy to
repair the screw holes with wood or drywall putty. Your
children’s safety is worth it! Remember that after a few
years with young children it’s probably time for a fresh
coat of paint anyway.

6
PARTS LIST:
2x Top Spindle Housing
1x Bottom Spindle Housing
with AccuInstall Indicator™
2x Top Spindles
with hand wheel
2 x Bottom Spindles
with nuts
2x QRF Spindles™ with nuts
(for use if installing
over quarter round)

7
1x Auto-Close Gate,
held together with cable tie
1x Magnetic Installation
Level with Marking Tool
2x Gate Extensions
1x One-Way
Stop and screw
2x 3M Adhesive Wall Cups
2x WhiteAdhesive Wall Cups
4x Wood screws
1x Installation Wrench

8
INSTALLATION
General
This gate may only be installed at the bottom of stairs
or in openings and doorways that are strong and rigid,
while also having a smooth and clean mounting surface.
NEVER use this gate at top of stairs as the bottom cross bar
creates a tripping hazard due to the inherent trip hazard.
For challenging installation situations and surfaces, one
or more of the following Qdos installation accessories
might be necessary to use for a secure installation.
Qods Y-Spindles –
If installing directly on round stair
banisters or spindles.For use on
banisters up to 3" (75 mm) in diameter.
Never mount gate higher than the first
step.
Qdos Universal Baseboard Kit –
If installing where a baseboard is
present. Fits over baseboards 7/8"
(22 mm) thick and 7" (18 cm) tall.
Qdos Universal Stair Mounting Kit –
If installing on stair banisters or in
between spindles, use Qdos Universal
Stair Mounting Kit that wraps
around square banister posts up to
4" and round banisters up to 5" in
circumference, as well, as between
stair spindles. No screws required so
no damage to your staircase.

9
IMPORTANT:
The gate ships with a cable tie holding it together. Please
keep this cable tie in place until after Step 10 to make
installation a lot easier!
Step 1
Measure the opening to determine if extensions are
needed, please see OPENING SIZE and EXTENSION
requirements on page 4.
If no extensions are needed continue to Step 2.
If extensions are needed, please go to page 14 about how
to add the extensions before installing the gate in the
opening.
The maximum width of
47.8" (121.5 cm) uses the
maximum allowed numbers
of extensions - 6.
Step 2
Before inserting the dierent spindles,
make sure the handwheel or nut is
screwed all the way out towards the
spindle head.
30 - 48”
(76 - 122 cm)
29.3"-47.8"
(74.5-121.5 cm)

10
Step 3
Insert the Bottom Spindle Housing with the AccuInstall
Indicator™ into the bottom bar on the locking side of the
gate. Repeat the same for the Bottom Spindle Housing
without the pressure indicator on the hinge side of the
gate.
Insert the Top Spindle Housings into the top of the gate.
Step 4
Slide the Bottom Spindles with nuts (or QRF Spindles™
with nuts if you have quarter round molding present) into
the Bottom Spindle Housings.
Slide the Top Spindles with hand wheels into the Top
Spindle Housings. Note: If using Extensions, insert
extensions into the gate (with Spindle Housings inserted in
the gate) as needed for proper fit, and put the Spindles into
the last extensions (see Page 15).
TOP TOP

11
Step 5
HINT – It is easier to complete the
following steps if you have a helper,
one holding the gate in place while the
other installs the gate.
Center gate in the opening with the
Bottom Bar with Glow Strip against the
floor and make sure gaps on each side
of the gate are even on both sides and not too wide. Use
the Installation Level to measure the gap between the
gate frame, or extension, to the door frame or wall. If the
Level fits horizontally, the gap is too wide and another
extension needs to be added (see page 15).
Attach Installation Level (magnetic) to the hinge side of
the gate to keep it vertical during the installation. This
is critical as otherwise the Auto-Close door might not
operate properly.
Step 6
Attach the Wall Cups to the spindle heads simply by
pushing them on. Use the 3M Adhesive Walls Cups for
the TOP spindles and use the White Adhesive Wall Cups
for the BOTTOM spindles. Remove the protective liner
from the Wall Cup adhesive.
OR OR
BOTTOM BOTTOM

12
Step 7
IMPORTANT:
During this step it’s critical to keep the gate vertical with
the help of the Installation Level in order to insure that
the Auto-Close door will operate properly.
Extend the spindles
outward until each Wall Cup
sticks to the surface (if you
are using QRF Spindles™
over a quarter round, make
sure the QRF Spindle™ head
is pointing upward inside
the Wall Cup). Push spindles
back into gate (leaving Wall
Cups sticking to wall) and
temporarily remove the
gate.
We strongly recommend
attaching Wall Cups
with the included Wall Cup screws. If screwing into a
drywall, carefully screw them all the way in without over-
tightening. The adhesive holds the Wall Cup to the wall
and the function of the screw is to prevent sideways
movement. Surfaces that are not acceptable for adhesive
only are painted drywall, wallpaper, uneven surfaces,
surfaces with flaking paint, or oily surfaces. If you are
uncertain, it’s always better to be safe rather than sorry,
so we strongly recommend that you use the Wall Cup
screws.
Step 8
Reposition the gate centered in the opening and then by
hand start tightening lightly the hand wheels on the Top

13
Spindles and nuts on the Bottom
Spindles until the spindle heads
nest inside the Wall Cups.
Next using the Installation
Wrench, tighten the nuts on
the bottom spindles. Alternate
between the sides
until the red area
inside the AccuInstall
Indicator™ disappears.
This means the
bottom of the gate is
securely installed.
Step 9
While alternating between the sides,
turn the Hand Wheels until firm tension
is achieved. You can now cut o the
cable tie that has been holding the
gate together. Use the Hand Wheels
to adjust the tension so the distance
between the handle and the gate is
1/8" (3 mm). Use the Marking Tool
handle attached to the Level to
measure the gap.
Step 10
To open the Auto-Close door, pull back
on the Locking Latch and at the same
time lift gate to swing open. The handle
on the door has the At-A-Glance Lock
Indicator™ to indicate if the door is
locked or not. Green means that the
door is locked. Red indicates the door
is not locked and needs to be secured.
1/8 in.
3mm

14
Step 11
If you want the gate to open in only one direction, you
will need to add the One-Way Stop. Slide the One-Way
Stop onto the lower bar turned in a way so it blocks
opening the door in the desired direction.
Once positioned, line it up with the hole in the lower bar
and insert the screw to hold it in place.
Step 12
Check that the Auto-Close door
automatically closes by itself and the
At-A-Glance Lock Indicator™ turns
green. If the One-Way Stop is not being
used, check to make sure the door
closes and locks in both directions. If
the gate does not close and lock with
the Indicator turning green, fine tune the gap between the
handle and the gate, by using the handle on the Marking
Tool to measure this gap. This gap should be about an
1/8" (3 mm).
INSTALLATION OF EXTENSIONS
When Extensions are used, first insert the Top Spindle
Housings and Bottom Spindle Housings into the gate
itself (Step 3). Insert Extension/s into the Spindle
Housings and push until all the way in both at the top
and bottom.
1/8 in.
3mm

15
Each Extension comes with
Spindle Housing already inserted,
so the Spindles can be inserted
directly into the last Extension
on each side. When adding
multiple extensions, make sure
to add them on every other side
of the gate, unless there is only
one Extension used. Example – If
using 1, put it on the hinge side; if
using 3, put two on the hinge side
and 1 on the locking side, etc.
Now go to Step 2 for instructions
how to install the complete gate.
GATE OPERATION
AND 90° STAY OPEN
FEATURE
To open the gate slide back the
locking latch, then at the same
time lift the gate and open the
door. After passing through
the gate, simply let go of the door and it will automatically
swing back to the closed position.
If Auto-Close door is opened to 90°, it will remain in this
open position. Simply push on it to automatically close
again.
REMOVAL OF ADHESIVE WALL CUPS
Remove screws, if they have been used. Use a string of
dental floss to carefully “saw” through the foam until the
wall cup comes o. For remaining tape residue, use a finger
to simply rub it away. If screws have been used it’s very
easy to repair the screw holes with wood or drywall putty.
12

Distributed by Regal Lager, Inc.
Kennesaw, GA 30144 USA
1-800-593-5522 • www.QdosSafety.com
©2021 Qdos All rights reserved.
Qdos is a trademark of Regal Lager, Inc.
Made in China 0 7/2 1
Table of contents
Popular Safety Equipment manuals by other brands

Singing rock
Singing rock DIGGER LIGHT quick start guide

Alemlube
Alemlube BR50010D Owner technical manual

CTM LYNG
CTM LYNG MICROSAFE mKomfy Hybrid 400R installation instructions

FrontLine
FrontLine ST12AH instruction manual

ISC
ISC D2 General Instructions for Use

3S
3S SL-R60S Operation and maintenance manual

Tractel
Tractel EN Series Operating and maintenance instructions

3M
3M 4990IPT instructions

ASO Safety Solutions
ASO Safety Solutions SENTIR EDGE KS4 Assembly instructions

Climbing Technology
Climbing Technology HOOK REST manual

Stahl
Stahl Ex e operating instructions

Compass
Compass STCCS 53 quick start guide