manuals.online logo
Brands
  1. Home
  2. •
  3. Brands
  4. •
  5. QNAP
  6. •
  7. Server
  8. •
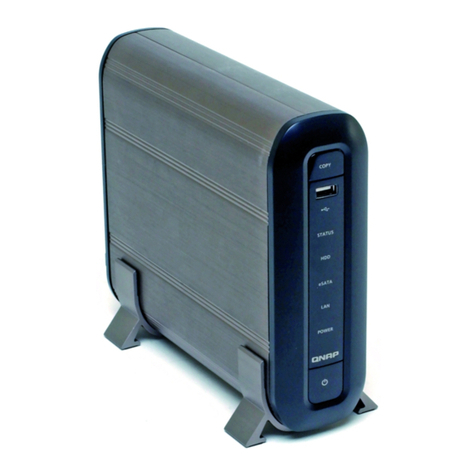
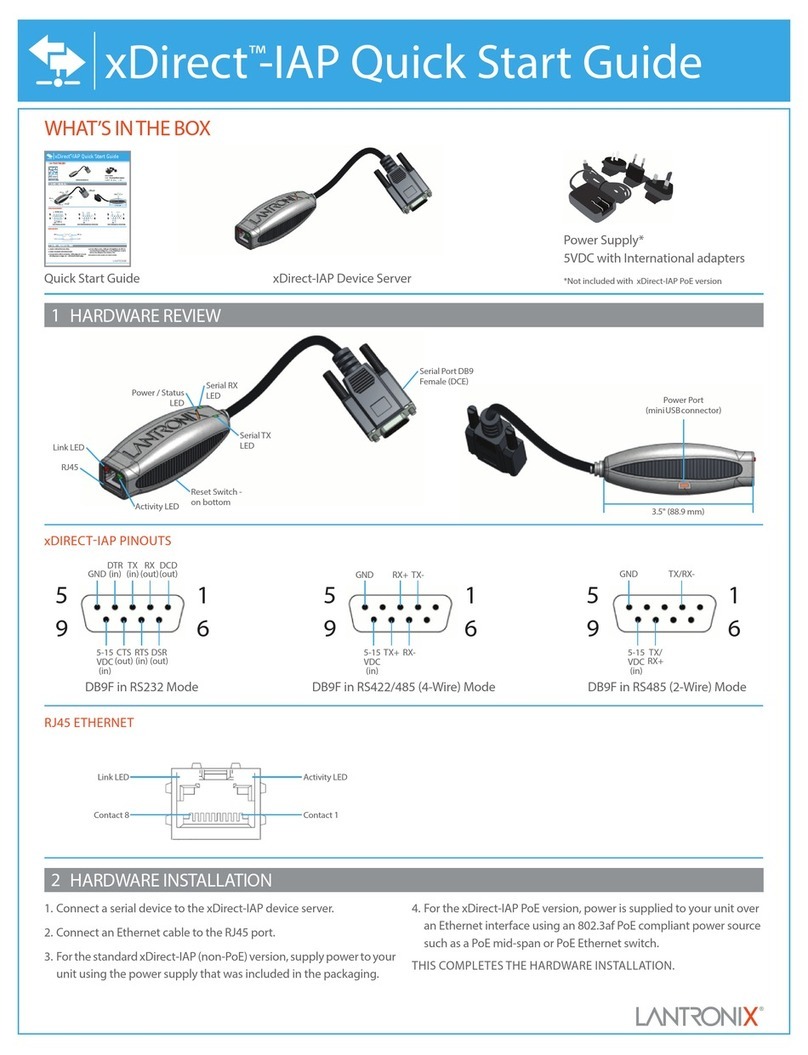
  9. QNAP WS-411U User manual

QNAP WS-411U User manual

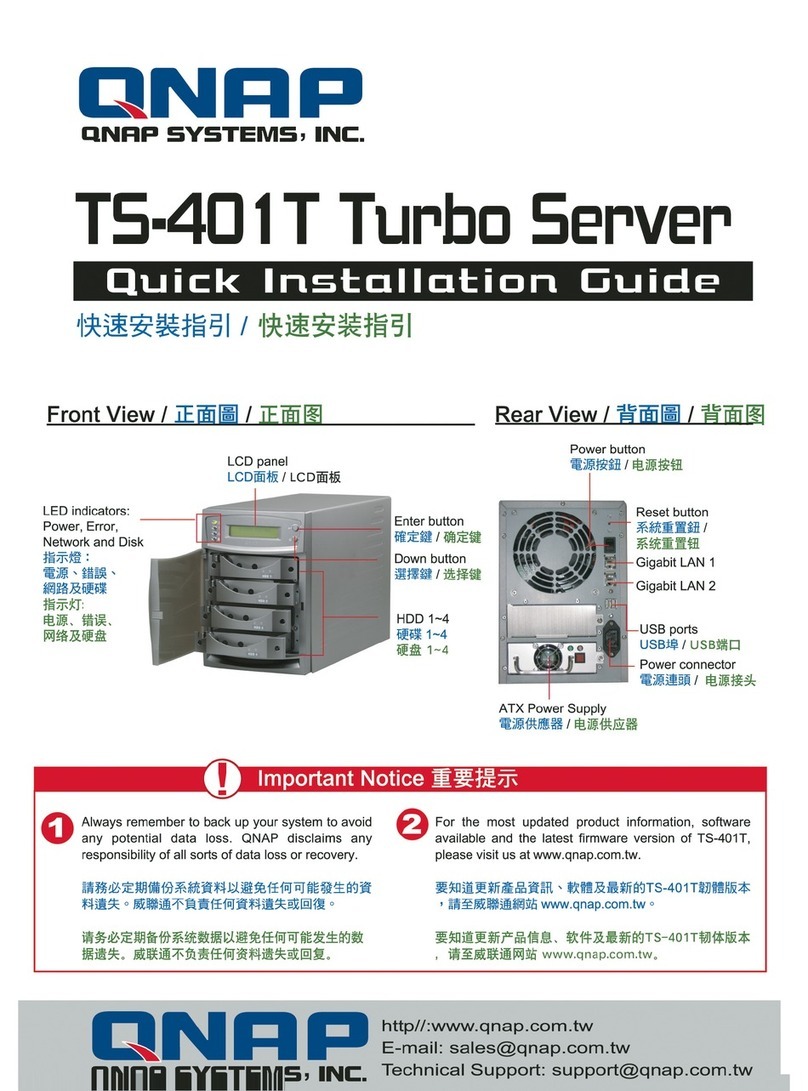
LED indicators: Power, Error, Network and Disk
指示燈:電源、錯誤、網路及硬碟
指示灯:电源、错误、网络及硬盘
LCD panel
LCD面板 / LCD面板 Enter button
確定鍵 / 确定键
Down button
選擇鍵 / 选择键
Gigabit LAN 1 Gigabit LAN 2
Power button
電源按鈕 / 电源按钮
USB ports
USB埠 / USB端口
SCSI tape drive connector
SCSI 磁帶機接頭 /
SCSI 磁带机接头
Power connector
電源接頭 / 电源接头
ATX Power Supply
電源供應器 / 电源供应器
Important Notice 重要提示
Quick Installation Guide
WS-411U Turbo ServerWS-411U Turbo Server
快速安裝指引 /快速安装指引
Always remember to back up your system to avoid
any potential data loss. QNAP disclaims any
responsibility of all sorts of data loss or recovery.
請務必定期備份系統資料以避免任何可能發生的資
料遺失。威聯通不負責任何資料遺失或回復。
请务必定期备份系统数据以避免任何可能发生的数
据遗失。威联通不负责任何资料遗失或回复。
For the most updated product information and software
available, please visit us at www.qnap.com.tw.
要知道更新產品資訊及軟體,請至威聯通網站
www.qnap.com.tw
要知道更新产品信息及软件,请至威联通网站:
www.qnap.com.tw。
Rear View / 背面圖 / 背面图
Power cord
電源線
电源线
DVD: Installation DVD & Recovery DVD
(user manual and software inclusive)
DVD光碟:
安裝DVD及復原DVD(含手冊及軟體)
DVD光盘:
安装DVD及复原DVD(含手册及软件)
Quick Installation Guide
快速安裝指引
快速安装指引
Ethernet cable x 2
網路纜線 x 2
网络缆线 x 2
Flat head screws x 16
平頭螺絲 x 16
平头螺丝 x 16
Please prepare the following items and follow the steps below to install hard disk to WS-411U.
You can skip these steps if you have purchased WS-411U package with hard disks installed already.
請準備以下項目並按照以下步驟安裝WS-411U的硬碟。如已購買含硬碟之WS-411U,可略過此步驟。
请准备以下项目并按照以下步骤安装WS-411U的硬盘。如已购买含硬盘之WS-411U,可略过此步骤。
HDD tray x 4
(included in WS-411U)
硬碟抽取盒 x 4
硬盘抽取盒 x 4
3.5" SATA hard disk
(optional)
3.5" SATA硬碟(可另購)
3.5" SATA硬盘(可另购)
Flat head screws
平頭螺絲 (含)
平头螺丝 (含)
Screw driver
(not included)
螺絲起子(不含)
螺丝起子(不含)
WS-411U
Push the side locks in the front of WS-411U and then pull forwards to open
the front panel.
按WS-411U前方兩側的卡榫,向前拉打開WS-411U的前蓋。
按WS-411U前方两侧的卡榫,向前拉打开WS-411U的前盖。
Open front panel.
打開前蓋。
打开前盖。
Take out the disk tray.
拔出硬碟盒
拔出硬盘盒
Tray front
硬碟盒前方
硬盘盒前方
Insert the
disk tray
插入抽取盒
插入抽取盒
Close the front panel
閤上前蓋 / 合上前盖
Unlock the disk tray with hard disk lock and take out the hard disk tray.
使用硬碟鎖打開硬碟抽取盒的鎖,然後拔出硬碟盒。
使用硬盘锁打开硬盘抽取盒的锁,然后拔出硬盘盒。
Turn over the disk tray. Make sure the disk holes match the holes at the base
of the tray. Fasten the disk with four flat head screws.
反轉抽取盒,確定硬碟的鎖孔對準抽取盒底部的螺絲孔,再使用四顆平頭螺絲
鎖緊硬碟。
反转抽取盒,确定硬盘的锁孔对准抽取盒底部的螺丝孔,再使用四颗平头螺丝
锁紧硬盘。
Insert the hard disk tray to WS-411U. Then lock the tray with the hard disk lock.
(You should install 4 disks)
將硬碟抽取盒放回WS-411U,然後用硬碟鎖鎖好抽取盒。
(您必須安裝四個硬碟)
将硬盘抽取盒放回WS-411U,然后用硬盘锁锁好抽取盒。
(您必须安装四个硬盘)
http//:www.qnap.com.tw
E-mail: [email protected]
Technical Support: [email protected]
Place a hard disk in a hard disk tray.
將硬碟放於硬碟抽取盒內。
将硬盘放于硬盘抽取盒内。
WS-411U
1.
Attach brackets (a) to both sides
of WS-411U in the front.
在WS-411U二側前端鎖上金屬固定
片(a)。
在WS-411U二侧前端锁上金属固定
片(a)。
1.
Lock the brackets (b) to WS-411U.
Then attach and fasten z-shape brackets (c).
在二側後端鎖上金屬固定片(b),然後再鎖上z
型金屬固定片(c)。
在二侧后端锁上金属固定片(b),然后再锁上z
型金属固定片(c)。
2.
Push WS-411U into the rack.
將WS-411U放入機架中。
将WS-411U放入机架中。
3.
Fasten the screws to fix the position
of WS-411U.
用螺絲固定WS-411U在機架上的位置。
用螺丝固定WS-411U在机架上的位置。
4.
2.
3.
4.
5.
When finished, close the front panel of WS-411U. Note that all disks
should be inserted in order from right to left. (HDD1~HDD4).
完成後,請閤上WS-411U前蓋。注意所有硬碟必須由右至左以HDD1至HDD4順
序安裝。
完成后,请合上WS-411U前盖。注意所有硬盘必须由右至左以HDD1至HDD4顺
序安装。
6.
1. 2. 3.
6.5. Round head
screws x 35
圓頭螺絲 x 35
圆头螺丝 x 35
Round head screws
圓頭螺絲(含)
圆头螺丝(含)
7. Mount kit (6 pieces)
金屬固定片 x 6
金属固定片 x 6
8. Hard disk lock
硬碟鎖
硬盘锁
9.
4.
Install Hard Disk
/ 安裝硬碟 / 安装硬盘
Install Rackmount Kit
/ 安裝機架套件 /
安装机架套件
Please follow the steps below to install WS-411U.
請依照以下步驟安裝WS-411U。
请依照以下步骤安装WS-411U。
Turn on the server.
開啟系統。
开启系统。
Connect Gigabit port LAN 1 or LAN 2 to a switch / hub / router by a network cable.
使用網路纜線連接的 LAN 1或 LAN 2 至交換器。
使用网络缆线连接的 LAN 1或 LAN 2 至交换器。
4.
6.
Connect the power cord to power supply.
連接電源線至電源。
连接电源线至电源。
1.
Connect USB CD/DVD device to USB port for external expansion.
連接USB CD/DVD設備至USB埠作外部擴充應用。
连接USB CD/DVD设备至USB埠作外部扩充应用。
2.
5.
3.
QNAP disclaims any responsibility for product damage, malfunction or data loss due to misuse or improper
installation of hard disks in any occasions for any reasons.
威聯通不負責任何情況、原因下錯誤安裝或使用硬碟所導致的產品損壞與不正常運作下的資料損失。
威联通不负责任何情况、原因下错误安装或使用硬盘所导致的产品损坏与不正常运作下的数据损失。
Note / 注意:
2 3 4
Check Package Contents / 檢查包裝內容 / 检查包装内容
1
2
3
Install WS-411U
/ 安裝WS-411U /
安装
WS-411U
4
To use WS-411U, please follow the step-by-step guide in this Quick Installation Guide.
使用WS-411U前,請根據快速安裝指引說明安裝及設定系統。
使用WS-411U前,请根据快速安装指引说明安装及设定系统。
R
R
Mount kit
金屬固定片(含)
金属固定片(含)
Hard disk lock
硬碟鎖
硬盘锁
HDD4
HDD3
HDD2
HDD1
a
b
c
Base
Front
Front View / 正面圖 / 正面图
Unlock
開鎖 / 开锁
Connect to monitor.
連接螢幕。
连接屏幕。
Connect LVD interface tape drive to the SCSI connector
for tape back up service.
連接LVD介面磁帶機至SCSI接頭以啟用磁帶備份服務。
连接LVD接口磁带机至SCSI接头以启用磁带备份服务。
VGA port
VGA埠 / VGA端口
Check System Status
/
檢查系統狀態
/ 检查系统状态
5
LED: Power 電源/电源
LED: Error 錯誤/错误
LED: Network 網路/网络
LED: Hard disk 硬碟/硬盘
Server name
系統名稱/系统名称
IP address
IP位址/IP地址
Down button
選擇鍵/选择键
Enter button
確定鍵/确定键
1
2
3
4
5
WS-411U
10.8.10.49
   
   
WS-411U provides a user-friendly LCD panel for you to easily check the system status and basic system information.
When WS-411U is turned on, check the following items to make sure system status is normal.
1. Power LED will glow in yellow when WS-411U is turned on.
2. Network LED will blink in yellow when LAN 1 or LAN 2 is connected to the network.
3. Hard disk LED will blink in yellow when the server is checking disks or there is access to disk.
4. System information is displayed on LCD panel when WS-411U has connected to the network and finished
disk checking.
WS-411U提供簡單易用的LCD面板,方便您輕鬆地檢查系統狀態及基本系統資訊。開啟WS-411U後,請檢查以下項目以確
定系統狀態正常。
1.開啟電源後,電源指示燈 恆亮黃色。
2.LAN 1或LAN 2連接至網路時,網路指示燈 閃爍黃色。
3.系統檢查硬碟或存取硬碟資料時,硬碟指示燈 閃爍黃色。
4.WS-411U成功連接至網路及完成硬碟檢查時,系統資訊 會顯示在LCD面板上。
WS-411U提供简单易用的LCD面板,方便您轻松地检查系统状态及基本系统资讯。开启WS-411U后,请检查以下项目以确定
系统状态正常。
1.开启电源后,电源指示灯 恒亮黄色。
2.LAN 1或LAN 2连接至网络时,网络指示灯 闪烁黄色。
3.系统检查硬盘或存取硬盘资料时,硬盘指示灯 闪烁黄色。
4.WS-411U成功连接至网络及完成硬盘检查时,系统资讯 会显示在LCD面板上。












1.
Install Software
/ 設定軟體 / 安装软件
Online Support: www.qnap.com.tw
E-mail: [email protected]
MSN: [email protected]
SKYPE: qnapskype
65 7 8
Technical Support
/
技術支援
/ 技术支持
For any technical enquiries, please refer to the user manual. QNAP also
provides dedicated Online Support and customer service via instant
messenger.
如有任何技術上問題,請參考本產品之使用手冊。威聯通亦提供貼心的線
上支援及即時通客戶服務。
如有任何技术上问题,请参考本产品之使用手册。威联通亦提供贴心的在
线支持及实时通客户服务。
8
6
所需工具:
一個USB鍵盤、一個USB滑鼠及一個USB DVD ROM。
步驟:
a.連接USB DVD ROM及USB鍵盤至WS-411U,插入「安裝DVD」至USB
DVD ROM。
b.安裝四顆硬碟*至WS-411U並開啟系統,WS-411U會從DVD裝置開機。
所需工具:
一个USB键盘、一个USB鼠标及一个USB DVD ROM。
步骤:
a.连接USB DVD ROM及USB键盘至WS-411U,插入「安装DVD」至USB
DVD ROM。
b.安装四颗硬盘*至WS-411U并开启系统,WS-411U会从DVD装置开机。
Tools needed: a USB keyboard, a USB mouse, and a USB DVD ROM
Steps:
a. Connect the USB DVD ROM and the USB keyboard to WS-411U. Insert the “Installation DVD” to the USB DVD ROM.
b. Install 4 hard disks* to WS-411U and turn on the system. WS-411U will boot up from the DVD device.
2.
3.
4.
5.
6.
1. 2.
3. 4.
1.
2. 5.
3.
4.
Start to install:
a. The whole process is well set. User only needs to input “y” for all questions.
b. It will take a few minutes to finish the software setup. When setup completes, press the power button for a few
seconds to shut down WS-411U. Replace the USB DVD-ROM with a USB mouse to boot the system from hard disk.
A total of 4 hard disks must be installed in WS-411U at the same time. If the number of hard disks is changed,
system installation will fail.
WS-411U上必須同時安裝四顆硬碟,如更改硬碟數目,將無法進行系統安裝。
WS-411U上必须同时安装四颗硬盘,如更改硬盘数目,将无法进行系统安装。
開始安裝:
a. 安裝過程已設定好,使用者只需在每一問題按鍵盤的「y」鍵。
b. 軟體設定需時數分鐘,設定完成後,請按電源鍵數秒關閉WS-411U,然
後移除USB DVD ROM,連接USB滑鼠至WS-411U,以便從硬碟開啟系統。
开始安装:
a. 安装过程已设定好,使用者只需在每一问题按键盘的「y」键。
b. 软件设定需时数分钟,设定完成后,请按电源键数秒关闭WS-411U,然
后移除USB DVD ROM,连接USB鼠标至WS-411U,以便从硬盘开启系统。
It is normal that a Linux logo is shown when running the Installation DVD (as shown above).
安裝DVD啟動時出現Linux圖示(如上圖所示),此為正常現象。
安装DVD启动时出现Linux图示(如上图所示),此为正常现象。
When the system shows serial number blank of Windows Storage Server 2003 R2:
a. Input the serial number provided by QNAP. User can find the serial number in the inner side of the LCD panel of WS-411U.
b. Default login name/ password: Administrator/ admin
當系統出現Windows Storage Server 2003 R2序號輸入欄位時:
a. 輸入威聯通提供的序號,使用者可在WS-411U的LCD面板內找到序號。
b. 預設使用者名稱/密碼:Administrator/ admin
当系统出现Windows Storage Server 2003 R2序号输入字段时:
a. 输入威联通提供的序号,使用者可在WS-411U的LCD面板内找到序号。
b. 预设使用者名称/密码:Administrator/ admin
After system installation completes, the operation system will be mirrored automatically. Please wait for a few
minutes until the mirroring process finishes.
系統安裝完成後,作業系統會自動製作鏡射硬碟群組,請稍待數分鐘。
系统安装完成后,操作系统会自动制作镜射硬盘群组,请稍待数分钟。
After entering the serial number, the system will restart to
build RAID 5 & RAID 1 automatically.
a.The RAID 5 configuration is set for data storage.
b.The RAID 1 configuration is set for operation system
mirroring.
輸入序號後,系統會重新啟動並自動建立RAID 5及RAID 1硬碟
群組。
a.RAID 5用作資料儲存。
b.RAID 1用作作業系統鏡射。
输入序号后,系统会重新启动并自动建立RAID 5及RAID 1硬盘
群组。
a.RAID 5用作数据储存。
b.RAID 1用作操作系统镜射。
10GB
disk space
10GB
disk space
10GB
disk space
10GB
disk space
OS 1 OS 2 Free space Free space
DISK 1 DISK 2 DISK 3 DISK 4
RAID 1 disk configuration
for OS mirroring
RAID 5 disk configuration
QNAP has provided anti-virus software “Trend Micro Server Protect”
The path is C://ServerProtect NT/Setup.exe. Please execute the Setup.exe, and enter the 60-day trial version serial number:
SPTM-9994-8850-5153-9543
威聯通提供防毒軟體「Trend Micro Server Protect」
防毒軟體路徑為C://ServerProtect NT/Setup.exe,請執行Setup.exe並輸入60天試用期的序號:
SPTM-9994-8850-5153-9543
威联通提供防毒软件「Trend Micro Server Protect」
防毒软件路径为C://ServerProtect NT/Setup.exe,请执行Setup.exe并输入60天试用期的序号:
SPTM-9994-8850-5153-9543
WS-411U Operation Notice
/
WS-411U
操作注意事項
7
Access Network Share on WS-411U
/
連接WS-411U的網路磁碟/连接WS-411U的网络磁盘
User can add/remove additional Windows components on their own:
To use the additional functions of WSS 2003 R2, user can decide to add/remove the default settings. The path is “Start”
→“Control Panel” → “Add/Remove Components”.
使用者可自行新增或移除Windows元件:
要使用WSS 2003 R2的附加功能,使用者可新增或移除預設設定,路徑為「Start」→「Control Panel」→
「Add/Remove Components」。
使用者可自行新增或移除Windows组件:
要使用WSS 2003 R2的附加功能,使用者可新增或移除预设设定,路径为「Start」→「Control Panel」→
「Add/Remove Components」。
Redundant operation system:
WS-411U has default redundant operation system separated in Disk 1 and Disk 2. If either Disk 1 or Disk 2 is damaged,
the operation system will continue to run properly. User simply has to remove the failed disk and replace it with a new
one.
備援作業系統:
WS-411U的預設備援作業系統分別建於Disk 1及Disk 2。若Disk 1或Disk 2其中一顆硬碟毀損,作業系統會仍正常運作。
使用者只需直接移除失效的硬碟並安裝新硬碟便可。
备援操作系统:
WS-411U的预设备援操作系统分别建于Disk 1及Disk 2。若Disk 1或Disk 2其中一颗硬盘毁损,操作系统会仍正常运作。
使用者只需直接移除失效的硬盘并安装新硬盘便可。
When a new hard disk is installed, you must configure the disk configurations again for proper operation. Please follow the
steps below (refer to steps 4 & 5 on page 6):
1. Insert the new hard disk to the disk tray. On “Disk Management” page, right click the new hard disk and select “Convert
to dynamic disk”.
2. Remove the RAID 1 disk configuration where WSS operation system was saved to.
3. Configure the new disk as RAID 1 for WSS operation system.
4. Rebuild RAID 5 configuration for data storage.
安裝新硬碟時,需要重新設定硬碟組態,方能正常運作。請依照以下步驟設定(請參考第6頁步驟4 & 5):
1. 將新硬碟放入空缺的硬碟槽,在「磁碟管理」介面,在新磁碟上按右鍵選擇「Convert to dynamic disk」。
2. 移除WSS作業系統所在的硬碟中的 RAID 1 磁碟設定。
3. 重新選擇WSS作業系統槽 RAID 1設定,使之對應到新的硬碟空間上。
4. 重建資料磁碟空間 RAID 5設定。
安装新硬盘时,需要重新设定硬盘组态,方能正常运作。请依照以下步骤设定(请参考第6页步骤4 & 5):
1. 将新硬盘放入空缺的硬盘槽,在「磁盘管理」接口,在新磁盘上按右键选择「Convert to dynamic disk」。
2. 移除WSS操作系统所在的硬盘中的 RAID 1 磁盘设定。
3. 重新选择WSS操作系统槽 RAID 1设定,使之对应到新的硬盘空间上。
4. 重建数据磁盘空间 RAID 5设定。
Difference between Installation DVD and Recovery DVD
The Installation DVD is used for first-time setup. It will format the disks to build a new environment. The Recovery DVD is
used for recovering operation system only. The recovery process will not lead to any data loss and user’s storage data
will be reserved.
「安裝DVD」及「復原DVD」的分別
安裝DVD用於第一次安裝,目的是格式化硬碟建立新的環境。復原DVD只供系統回復操作,進行回復不會造成資料損毀,並
會保留使用者的儲存資料。
「安装DVD」及「复原DVD」的分别
安装DVD用于第一次安装,目的是格式化硬盘建立新的环境。复原DVD只供系统回复操作,进行回复不会造成数据损毁,并
会保留使用者的储存数据。
The Recovery DVD only works while the disk configuration is at RAID 5 (default) or RAID 1. If user changes the disk
configuration setting to RAID 0, the recovery process will fail.
復原DVD只能在RAID 5(預設)及RAID 1硬碟組態下才能使用,如使用者更改硬碟組態至RAID 0,將無法進行回復。
复原DVD只能在RAID 5(预设)及RAID 1硬盘组态下才能使用,如使用者更改硬盘组态至RAID 0,将无法进行回复。
Most Convenient Backup Software NetBak Replicator:
WS-411U provides embedded backup software “NetBak Replicator” in the installation/recovery DVD. It supports backup
and restore functions that user can save their data easily. Please refer the user manual in the product DVD for further
details.
最方便好用的備份軟體-NetBak Replicator:
WS-411U的安裝及復原光碟內提供強大的備份軟體「NetBak Replicator」,讓使用者可輕易地備份及回復資料,詳細資料
請參考產品DVD內的使用手冊。
最方便好用的备份软件-NetBak Replicator:
WS-411U的安装及复原光盘内提供强大的备份软件「NetBak Replicator」,让使用者可轻易地备份及回复数据,详细数据
请参考产品DVD内的使用手册。
User can change the disk configuration preset by system
Follow the steps in Windows®:
“Start”→ “Administrative Tools”→ “Computer Management”→
“Disk Management”→ “Add/Del Disk Configuration”.
使用者可更改系統預設的硬碟組態
請在Windows® 依照以下步驟操作:
「Start」→「Administrative Tools」→「Computer Management」→
「Disk Management」→「Add/Del Disk Configuration」。
使用者可更改系统预设的硬盘组态
请在Windows® 依照以下步骤操作:
「Start」→「Administrative Tools」→「Computer Management」→
「Disk Management」→「Add/Del Disk Configuration」。
Self status monitoring and warning mechanism:
WS-411U embedded monitoring program will send alert messages to user upon any exceptional status like one
power failure, system fan failure, CPU fan failure, or system overheat. The system will show an alert message on the
LCD monitor, make a beep sound, and send an e-mail* to administrators.
自我狀態監察及警告機制:
WS-411U內建監察程式,當有任何異常情況發生時(如電源中斷、系統風扇或CPU風扇不正常運作或系統過熱),系統會立
即自動傳送警告訊息給使用者。此外,系統會在LCD面板顯示警告訊息、發出聲音提示及發出警告電子郵件*給管理者。
自我状态监察及警告机制:
WS-411U内建监察程序,当有任何异常情况发生时(如电源中断、系统风扇或CPU风扇不正常运作或系统过热),系统会立
即自动传送警告讯息给使用者。此外,系统会在LCD面板显示警告讯息、发出声音提示及发出警告电子邮件*给管理者。
System alert e-mail shortcut is created on the Desktop and in the Start menu. User can choose the custom level of
alert email.
系統警告電郵捷徑建於桌面及開始目錄,使用者可以自訂警告電郵層級。
系统警告电邮快捷方式建于桌面及开始目录,使用者可以自订警告电邮层级。
WS-411U
Monitor
DVD-ROM
Mouse
Keyboard
Note / 注意:
Note / 注意:
Note / 注意:
Note / 注意:
Note / 注意:
Note / 注意:
Run Quick Install Wizard to find WS-411U on your
network. Select WS-411U and click Map Drive.
執行快速安裝精靈尋找WS-411U。
执行快速安装精灵寻找WS-411U。
Select a network share and click Map Network Drive.
選擇網路磁碟並按快速精靈上的磁碟機。
选择网络磁盘并按快速精灵上的网络硬盘。
Select a drive letter for the connection and
click Finish.
選擇磁碟機代號並按完成。
选择磁盘驱动器代号并按完成。
Enter user name and password to access
WS-411U.
輸入使用者名稱及密碼連接WS-411U。
输入使用者名称及密码连接WS-411U。
WSS serial number
1.
Install Software
/ 設定軟體 / 安装软件
Online Support: www.qnap.com.tw
E-mail: [email protected]
MSN: [email protected]
SKYPE: qnapskype
65 7 8
Technical Support
/
技術支援
/ 技术支持
For any technical enquiries, please refer to the user manual. QNAP also
provides dedicated Online Support and customer service via instant
messenger.
如有任何技術上問題,請參考本產品之使用手冊。威聯通亦提供貼心的線
上支援及即時通客戶服務。
如有任何技术上问题,请参考本产品之使用手册。威联通亦提供贴心的在
线支持及实时通客户服务。
8
6
所需工具:
一個USB鍵盤、一個USB滑鼠及一個USB DVD ROM。
步驟:
a.連接USB DVD ROM及USB鍵盤至WS-411U,插入「安裝DVD」至USB
DVD ROM。
b.安裝四顆硬碟*至WS-411U並開啟系統,WS-411U會從DVD裝置開機。
所需工具:
一个USB键盘、一个USB鼠标及一个USB DVD ROM。
步骤:
a.连接USB DVD ROM及USB键盘至WS-411U,插入「安装DVD」至USB
DVD ROM。
b.安装四颗硬盘*至WS-411U并开启系统,WS-411U会从DVD装置开机。
Tools needed: a USB keyboard, a USB mouse, and a USB DVD ROM
Steps:
a. Connect the USB DVD ROM and the USB keyboard to WS-411U. Insert the “Installation DVD” to the USB DVD ROM.
b. Install 4 hard disks* to WS-411U and turn on the system. WS-411U will boot up from the DVD device.
2.
3.
4.
5.
6.
1. 2.
3. 4.
1.
2. 5.
3.
4.
Start to install:
a. The whole process is well set. User only needs to input “y” for all questions.
b. It will take a few minutes to finish the software setup. When setup completes, press the power button for a few
seconds to shut down WS-411U. Replace the USB DVD-ROM with a USB mouse to boot the system from hard disk.
A total of 4 hard disks must be installed in WS-411U at the same time. If the number of hard disks is changed,
system installation will fail.
WS-411U上必須同時安裝四顆硬碟,如更改硬碟數目,將無法進行系統安裝。
WS-411U上必须同时安装四颗硬盘,如更改硬盘数目,将无法进行系统安装。
開始安裝:
a. 安裝過程已設定好,使用者只需在每一問題按鍵盤的「y」鍵。
b. 軟體設定需時數分鐘,設定完成後,請按電源鍵數秒關閉WS-411U,然
後移除USB DVD ROM,連接USB滑鼠至WS-411U,以便從硬碟開啟系統。
开始安装:
a. 安装过程已设定好,使用者只需在每一问题按键盘的「y」键。
b. 软件设定需时数分钟,设定完成后,请按电源键数秒关闭WS-411U,然
后移除USB DVD ROM,连接USB鼠标至WS-411U,以便从硬盘开启系统。
It is normal that a Linux logo is shown when running the Installation DVD (as shown above).
安裝DVD啟動時出現Linux圖示(如上圖所示),此為正常現象。
安装DVD启动时出现Linux图示(如上图所示),此为正常现象。
When the system shows serial number blank of Windows Storage Server 2003 R2:
a. Input the serial number provided by QNAP. User can find the serial number in the inner side of the LCD panel of WS-411U.
b. Default login name/ password: Administrator/ admin
當系統出現Windows Storage Server 2003 R2序號輸入欄位時:
a. 輸入威聯通提供的序號,使用者可在WS-411U的LCD面板內找到序號。
b. 預設使用者名稱/密碼:Administrator/ admin
当系统出现Windows Storage Server 2003 R2序号输入字段时:
a. 输入威联通提供的序号,使用者可在WS-411U的LCD面板内找到序号。
b. 预设使用者名称/密码:Administrator/ admin
After system installation completes, the operation system will be mirrored automatically. Please wait for a few
minutes until the mirroring process finishes.
系統安裝完成後,作業系統會自動製作鏡射硬碟群組,請稍待數分鐘。
系统安装完成后,操作系统会自动制作镜射硬盘群组,请稍待数分钟。
After entering the serial number, the system will restart to
build RAID 5 & RAID 1 automatically.
a.The RAID 5 configuration is set for data storage.
b.The RAID 1 configuration is set for operation system
mirroring.
輸入序號後,系統會重新啟動並自動建立RAID 5及RAID 1硬碟
群組。
a.RAID 5用作資料儲存。
b.RAID 1用作作業系統鏡射。
输入序号后,系统会重新启动并自动建立RAID 5及RAID 1硬盘
群组。
a.RAID 5用作数据储存。
b.RAID 1用作操作系统镜射。
10GB
disk space
10GB
disk space
10GB
disk space
10GB
disk space
OS 1 OS 2 Free space Free space
DISK 1 DISK 2 DISK 3 DISK 4
RAID 1 disk configuration
for OS mirroring
RAID 5 disk configuration
QNAP has provided anti-virus software “Trend Micro Server Protect”
The path is C://ServerProtect NT/Setup.exe. Please execute the Setup.exe, and enter the 60-day trial version serial number:
SPTM-9994-8850-5153-9543
威聯通提供防毒軟體「Trend Micro Server Protect」
防毒軟體路徑為C://ServerProtect NT/Setup.exe,請執行Setup.exe並輸入60天試用期的序號:
SPTM-9994-8850-5153-9543
威联通提供防毒软件「Trend Micro Server Protect」
防毒软件路径为C://ServerProtect NT/Setup.exe,请执行Setup.exe并输入60天试用期的序号:
SPTM-9994-8850-5153-9543
WS-411U Operation Notice
/
WS-411U
操作注意事項
7
Access Network Share on WS-411U
/
連接WS-411U的網路磁碟/连接WS-411U的网络磁盘
User can add/remove additional Windows components on their own:
To use the additional functions of WSS 2003 R2, user can decide to add/remove the default settings. The path is “Start”
→“Control Panel” → “Add/Remove Components”.
使用者可自行新增或移除Windows元件:
要使用WSS 2003 R2的附加功能,使用者可新增或移除預設設定,路徑為「Start」→「Control Panel」→
「Add/Remove Components」。
使用者可自行新增或移除Windows组件:
要使用WSS 2003 R2的附加功能,使用者可新增或移除预设设定,路径为「Start」→「Control Panel」→
「Add/Remove Components」。
Redundant operation system:
WS-411U has default redundant operation system separated in Disk 1 and Disk 2. If either Disk 1 or Disk 2 is damaged,
the operation system will continue to run properly. User simply has to remove the failed disk and replace it with a new
one.
備援作業系統:
WS-411U的預設備援作業系統分別建於Disk 1及Disk 2。若Disk 1或Disk 2其中一顆硬碟毀損,作業系統會仍正常運作。
使用者只需直接移除失效的硬碟並安裝新硬碟便可。
备援操作系统:
WS-411U的预设备援操作系统分别建于Disk 1及Disk 2。若Disk 1或Disk 2其中一颗硬盘毁损,操作系统会仍正常运作。
使用者只需直接移除失效的硬盘并安装新硬盘便可。
When a new hard disk is installed, you must configure the disk configurations again for proper operation. Please follow the
steps below (refer to steps 4 & 5 on page 6):
1. Insert the new hard disk to the disk tray. On “Disk Management” page, right click the new hard disk and select “Convert
to dynamic disk”.
2. Remove the RAID 1 disk configuration where WSS operation system was saved to.
3. Configure the new disk as RAID 1 for WSS operation system.
4. Rebuild RAID 5 configuration for data storage.
安裝新硬碟時,需要重新設定硬碟組態,方能正常運作。請依照以下步驟設定(請參考第6頁步驟4 & 5):
1. 將新硬碟放入空缺的硬碟槽,在「磁碟管理」介面,在新磁碟上按右鍵選擇「Convert to dynamic disk」。
2. 移除WSS作業系統所在的硬碟中的 RAID 1 磁碟設定。
3. 重新選擇WSS作業系統槽 RAID 1設定,使之對應到新的硬碟空間上。
4. 重建資料磁碟空間 RAID 5設定。
安装新硬盘时,需要重新设定硬盘组态,方能正常运作。请依照以下步骤设定(请参考第6页步骤4 & 5):
1. 将新硬盘放入空缺的硬盘槽,在「磁盘管理」接口,在新磁盘上按右键选择「Convert to dynamic disk」。
2. 移除WSS操作系统所在的硬盘中的 RAID 1 磁盘设定。
3. 重新选择WSS操作系统槽 RAID 1设定,使之对应到新的硬盘空间上。
4. 重建数据磁盘空间 RAID 5设定。
Difference between Installation DVD and Recovery DVD
The Installation DVD is used for first-time setup. It will format the disks to build a new environment. The Recovery DVD is
used for recovering operation system only. The recovery process will not lead to any data loss and user’s storage data
will be reserved.
「安裝DVD」及「復原DVD」的分別
安裝DVD用於第一次安裝,目的是格式化硬碟建立新的環境。復原DVD只供系統回復操作,進行回復不會造成資料損毀,並
會保留使用者的儲存資料。
「安装DVD」及「复原DVD」的分别
安装DVD用于第一次安装,目的是格式化硬盘建立新的环境。复原DVD只供系统回复操作,进行回复不会造成数据损毁,并
会保留使用者的储存数据。
The Recovery DVD only works while the disk configuration is at RAID 5 (default) or RAID 1. If user changes the disk
configuration setting to RAID 0, the recovery process will fail.
復原DVD只能在RAID 5(預設)及RAID 1硬碟組態下才能使用,如使用者更改硬碟組態至RAID 0,將無法進行回復。
复原DVD只能在RAID 5(预设)及RAID 1硬盘组态下才能使用,如使用者更改硬盘组态至RAID 0,将无法进行回复。
Most Convenient Backup Software NetBak Replicator:
WS-411U provides embedded backup software “NetBak Replicator” in the installation/recovery DVD. It supports backup
and restore functions that user can save their data easily. Please refer the user manual in the product DVD for further
details.
最方便好用的備份軟體-NetBak Replicator:
WS-411U的安裝及復原光碟內提供強大的備份軟體「NetBak Replicator」,讓使用者可輕易地備份及回復資料,詳細資料
請參考產品DVD內的使用手冊。
最方便好用的备份软件-NetBak Replicator:
WS-411U的安装及复原光盘内提供强大的备份软件「NetBak Replicator」,让使用者可轻易地备份及回复数据,详细数据
请参考产品DVD内的使用手册。
User can change the disk configuration preset by system
Follow the steps in Windows®:
“Start”→ “Administrative Tools”→ “Computer Management”→
“Disk Management”→ “Add/Del Disk Configuration”.
使用者可更改系統預設的硬碟組態
請在Windows® 依照以下步驟操作:
「Start」→「Administrative Tools」→「Computer Management」→
「Disk Management」→「Add/Del Disk Configuration」。
使用者可更改系统预设的硬盘组态
请在Windows® 依照以下步骤操作:
「Start」→「Administrative Tools」→「Computer Management」→
「Disk Management」→「Add/Del Disk Configuration」。
Self status monitoring and warning mechanism:
WS-411U embedded monitoring program will send alert messages to user upon any exceptional status like one
power failure, system fan failure, CPU fan failure, or system overheat. The system will show an alert message on the
LCD monitor, make a beep sound, and send an e-mail* to administrators.
自我狀態監察及警告機制:
WS-411U內建監察程式,當有任何異常情況發生時(如電源中斷、系統風扇或CPU風扇不正常運作或系統過熱),系統會立
即自動傳送警告訊息給使用者。此外,系統會在LCD面板顯示警告訊息、發出聲音提示及發出警告電子郵件*給管理者。
自我状态监察及警告机制:
WS-411U内建监察程序,当有任何异常情况发生时(如电源中断、系统风扇或CPU风扇不正常运作或系统过热),系统会立
即自动传送警告讯息给使用者。此外,系统会在LCD面板显示警告讯息、发出声音提示及发出警告电子邮件*给管理者。
System alert e-mail shortcut is created on the Desktop and in the Start menu. User can choose the custom level of
alert email.
系統警告電郵捷徑建於桌面及開始目錄,使用者可以自訂警告電郵層級。
系统警告电邮快捷方式建于桌面及开始目录,使用者可以自订警告电邮层级。
WS-411U
Monitor
DVD-ROM
Mouse
Keyboard
Note / 注意:
Note / 注意:
Note / 注意:
Note / 注意:
Note / 注意:
Note / 注意:
Run Quick Install Wizard to find WS-411U on your
network. Select WS-411U and click Map Drive.
執行快速安裝精靈尋找WS-411U。
执行快速安装精灵寻找WS-411U。
Select a network share and click Map Network Drive.
選擇網路磁碟並按快速精靈上的磁碟機。
选择网络磁盘并按快速精灵上的网络硬盘。
Select a drive letter for the connection and
click Finish.
選擇磁碟機代號並按完成。
选择磁盘驱动器代号并按完成。
Enter user name and password to access
WS-411U.
輸入使用者名稱及密碼連接WS-411U。
输入使用者名称及密码连接WS-411U。
WSS serial number

Other QNAP Server manuals

QNAP TS-101 Turbo Station User manual

QNAP

QNAP TS-101 Turbo Station User manual

QNAP Disk On-line Server NAS-2100 User manual

QNAP

QNAP Disk On-line Server NAS-2100 User manual

QNAP TVS-72XU Series User manual

QNAP

QNAP TVS-72XU Series User manual

QNAP TS-53E Series User manual

QNAP

QNAP TS-53E Series User manual

QNAP VioGate-340 User manual

QNAP

QNAP VioGate-340 User manual

QNAP SS-439 Pro User manual

QNAP

QNAP SS-439 Pro User manual

QNAP Turbo NAS TS-219P User manual

QNAP

QNAP Turbo NAS TS-219P User manual

QNAP VioStor CMS User manual

QNAP

QNAP VioStor CMS User manual

QNAP TS-i410X User manual

QNAP

QNAP TS-i410X User manual

QNAP TVS-882BRT3 User manual

QNAP

QNAP TVS-882BRT3 User manual

QNAP TS-401T Turbo Server User manual

QNAP

QNAP TS-401T Turbo Server User manual

QNAP TBS-464 User manual

QNAP

QNAP TBS-464 User manual

QNAP QBoat Sunny User manual

QNAP

QNAP QBoat Sunny User manual

QNAP TS 77 Series User manual

QNAP

QNAP TS 77 Series User manual

QNAP TS-31P3 Series User manual

QNAP

QNAP TS-31P3 Series User manual

QNAP TS-h1283XU-RP-E2236-32G User manual

QNAP

QNAP TS-h1283XU-RP-E2236-32G User manual

QNAP TS-h 90FU Series User manual

QNAP

QNAP TS-h 90FU Series User manual

Popular Server manuals by other brands

GeoVision GV-VS04H user manual

GeoVision

GeoVision GV-VS04H user manual

IBM Power System System E950 manual

IBM

IBM Power System System E950 manual

Supermicro A+ Server AS -2115GT-HNTF user manual

Supermicro

Supermicro A+ Server AS -2115GT-HNTF user manual

Moxa Technologies NPort IA5150 series Quick installation guide

Moxa Technologies

Moxa Technologies NPort IA5150 series Quick installation guide

Sun Microsystems Ultra Enterprise 450 Upgrade guide

Sun Microsystems

Sun Microsystems Ultra Enterprise 450 Upgrade guide

IBM System x3250 M4 Product guide

IBM

IBM System x3250 M4 Product guide

Avocent TS100 supplementary guide

Avocent

Avocent TS100 supplementary guide

Supermicro SuperServer 6011D Hardware install guide

Supermicro

Supermicro SuperServer 6011D Hardware install guide

Lenovo ThinkServer TD100 Guide d'installation

Lenovo

Lenovo ThinkServer TD100 Guide d'installation

Hypertec CIARA ORION HF310-G4 user manual

Hypertec

Hypertec CIARA ORION HF310-G4 user manual

Cisco UCS C480 M5 Installation and service guide

Cisco

Cisco UCS C480 M5 Installation and service guide

HP Cluster Platform Hardware Kits v2010 installation guide

HP

HP Cluster Platform Hardware Kits v2010 installation guide

Supermicro SUPERSERVER 6025B-3 user manual

Supermicro

Supermicro SUPERSERVER 6025B-3 user manual

HP ProLiant SL4545 G7 Maintenance and service guide

HP

HP ProLiant SL4545 G7 Maintenance and service guide

HP ProLiant DL360 G9 RAID Configuration

HP

HP ProLiant DL360 G9 RAID Configuration

VBrick Systems ETHERNETV 4410-0118-0009 Admin guide

VBrick Systems

VBrick Systems ETHERNETV 4410-0118-0009 Admin guide

IBM SC34-6814-04 Customization guide

IBM

IBM SC34-6814-04 Customization guide

Eelectron IN00B02WEB installation manual

Eelectron

Eelectron IN00B02WEB installation manual

manuals.online logo
manuals.online logoBrands
  • About & Mission
  • Contact us
  • Privacy Policy
  • Terms and Conditions

Copyright 2025 Manuals.Online. All Rights Reserved.