manuals.online logo
Brands
  1. Home
  2. •
  3. Brands
  4. •
  5. Quadra-Fire
  6. •
  7. Fireplace Accessories
  8. •
  9. Quadra-Fire LOGS-QFI30 User manual

Quadra-Fire LOGS-QFI30 User manual

Other Quadra-Fire Fireplace Accessories manuals

Quadra-Fire LOGS-291 User manual

Quadra-Fire

Quadra-Fire LOGS-291 User manual

Quadra-Fire OUTFITTER-I User manual

Quadra-Fire

Quadra-Fire OUTFITTER-I User manual

Quadra-Fire 41I-ACC-BK User manual

Quadra-Fire

Quadra-Fire 41I-ACC-BK User manual

Quadra-Fire LOGS-QFI30FB User manual

Quadra-Fire

Quadra-Fire LOGS-QFI30FB User manual

Quadra-Fire LOGS-QFI35 User manual

Quadra-Fire

Quadra-Fire LOGS-QFI35 User manual

Quadra-Fire CASTILE-MBK-C User manual

Quadra-Fire

Quadra-Fire CASTILE-MBK-C User manual

Quadra-Fire EXPEDITION-I User manual

Quadra-Fire

Quadra-Fire EXPEDITION-I User manual
Quadra-Fire QFI30FB User manual

Quadra-Fire

Quadra-Fire QFI30FB User manual

Quadra-Fire LOGS-QFI35FB User manual

Quadra-Fire

Quadra-Fire LOGS-QFI35FB User manual

Popular Fireplace Accessories manuals by other brands

Valor L2 1700K quick start guide

Valor

Valor L2 1700K quick start guide

Exodraft Xzense manual

Exodraft

Exodraft Xzense manual

Whalen Ruso MNFP62BF23-6 manual

Whalen

Whalen Ruso MNFP62BF23-6 manual

Woodstock Soapstone Fireview 201 manual

Woodstock Soapstone

Woodstock Soapstone Fireview 201 manual

EdilKamin SERBATOIO 250 Installation, use and maintenance

EdilKamin

EdilKamin SERBATOIO 250 Installation, use and maintenance

Bronpi KIT-1 instructions

Bronpi

Bronpi KIT-1 instructions

Town & Country Fireplaces 22150051 instructions

Town & Country Fireplaces

Town & Country Fireplaces 22150051 instructions

Travis Industries 33 DVI installation instructions
Travis Industries

Travis Industries 33 DVI installation instructions

Lopi Hearthview 864 user manual

Lopi

Lopi Hearthview 864 user manual

Lennox Hearth Products LENNOX MPE-33R installation instructions

Lennox Hearth Products

Lennox Hearth Products LENNOX MPE-33R installation instructions

Dimplex DFP6776C install guide

Dimplex

Dimplex DFP6776C install guide

Napoleon W175-0689 instruction manual

Napoleon

Napoleon W175-0689 instruction manual

Travis Industries 95400424 installation instructions

Travis Industries

Travis Industries 95400424 installation instructions

Osburn ZERO CLEARANCE KIT installation instructions

Osburn

Osburn ZERO CLEARANCE KIT installation instructions

Majestic QUARTZPLA36IN installation instructions

Majestic

Majestic QUARTZPLA36IN installation instructions

Napoleon DBPO36 installation instructions

Napoleon

Napoleon DBPO36 installation instructions

Dimplex SMP-130-E install guide

Dimplex

Dimplex SMP-130-E install guide

Empire Comfort Systems LS50TINF installation instructions

Empire Comfort Systems

Empire Comfort Systems LS50TINF installation instructions

manuals.online logo
manuals.online logoBrands
  • About & Mission
  • Contact us
  • Privacy Policy
  • Terms and Conditions

Copyright 2025 Manuals.Online. All Rights Reserved.

1
Quadra-Fire • LOGS-QFI30 Log Instructions • 2227-935 Rev. B • 7/11
Log Set Assembly: LOGS-QFI30
Models: QFI30, QFI30-C LOG PLACEMENT INSTRUCTIONS
CAUTION: Logs are fragile, handle with care. Installbackrefractorybyplacingitagainstthebackofthefirebox. SeeFigure
3. The back refractory must be held in the upright position until the side refractory is installed. Install the left side refractory
as shown in Figure 4. Bend the refractory tab down as shown in Figure 5. Repeat this step for the right refractory panel.
Figure 2. Refractory and Logs Installed Figure 3. Install Back Refractory
Figure 4. Install Side Refractory Figure 5. Bend Refractory Tab
SRV2227-702
SRV2227-702
SRV2227-703
SRV2227-703
SRV2227-705
SRV2227-705
SRV2227-704
SRV2227-704
SRV2227-706
SRV2227-706
SRV2227-701
SRV2227-701
Figure 1. Reference Points for Log Placement
LEFT GRATE
LEFT GRATE
TINE
TINE
RIGHT GRATE TINE
RIGHT GRATE TINE
PILOT
PILOT
ASSEMBLY
ASSEMBLY
LOG PIN
LOG PIN
LOG SUPPORT
LOG SUPPORT
Quadra-Fire • LOGS-QFI30 Log Instructions • 2227-935 Rev. B • 7/112
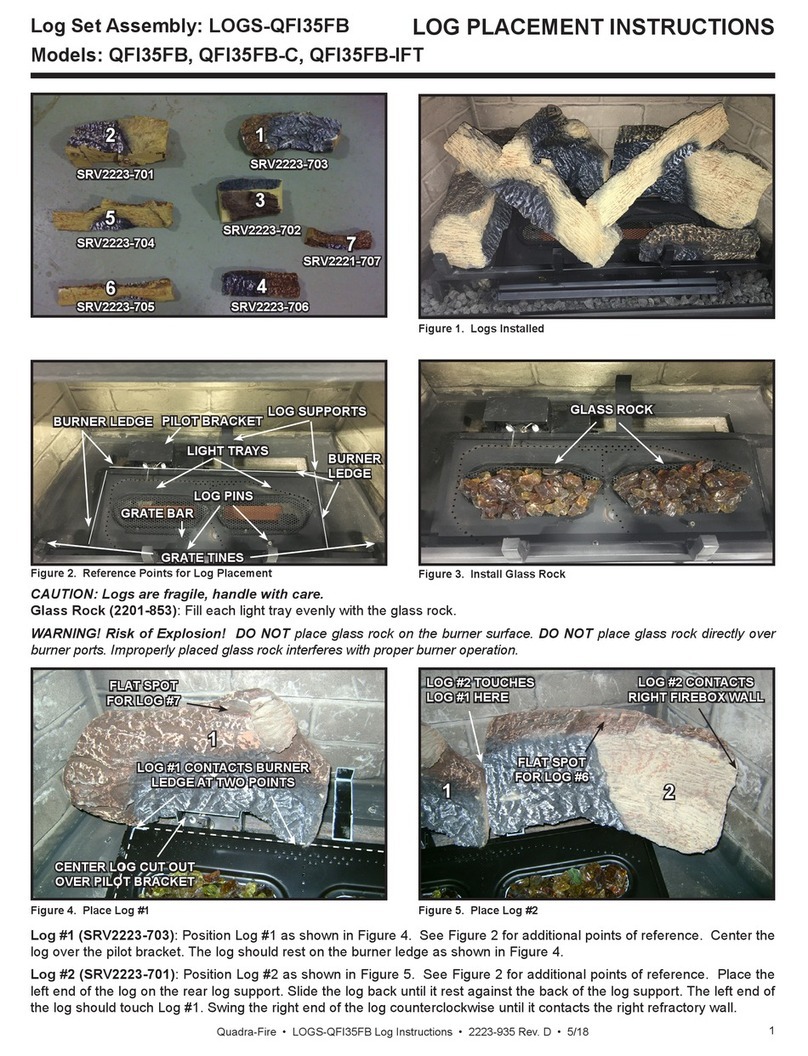
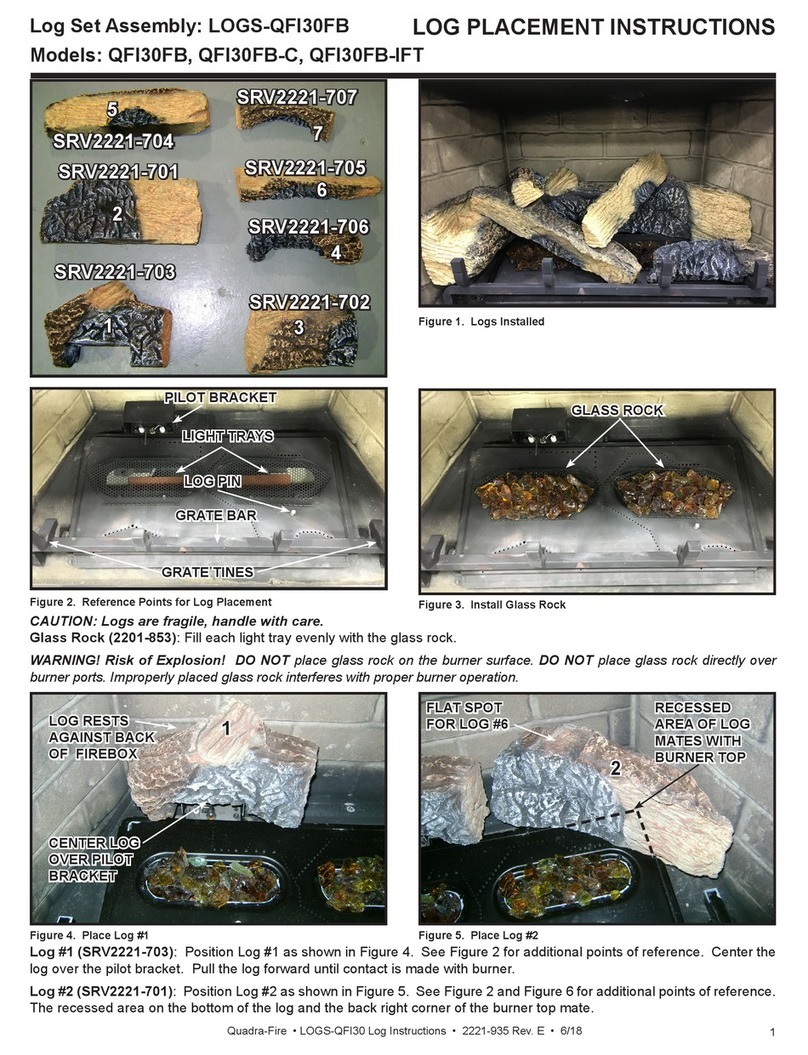
Log #2 (SRV2227-702): Rest left end of log on the flat spot of Log 1. See Figure 6 and Figure 8. The left end of the log
should touch the left refractory panel. The right end rests on the burner. Push the right end back, until it touches the edge
of the log support.
Log #3 (SRV2227-701): Mate the notch with the right grate tine as shown in Fig 9. The back of the log should rest on the
log support as shown. Rotate the back end of the log clockwise until it contacts the right refractory panel.
Figure 8. Place Log #2
LOG CONTACTS REFRACTORY
LOG RESTS ON BURNER
LOG RESTS ON BURNER
LOG CONTACTS
LOG CONTACTS
LOG SUPPORT
LOG SUPPORT
Figure 9. Log #3
LOG RESTS ON
LOG RESTS ON
REFRACTORY SUPPORT
REFRACTORY SUPPORT
LOG GROOVE
LOG GROOVE
(FOR LOG #6)
(FOR LOG #6)
NOTCH MATES WITH
NOTCH MATES WITH
RIGHT GRATE TINE
RIGHT GRATE TINE
Figure 10. Log #4 Figure 11. Log #4
LOG PIN
LOG PIN
MATES
MATES
WITH SLOT
WITH SLOT
LOG GROOVE
LOG GROOVE
(FOR LOG #6)
(FOR LOG #6)
NOTCH
NOTCH
MATE NOTCH
MATE NOTCH
WITH GRATE BAR
WITH GRATE BAR
2
2
3
3
4
4
Figure 6. Placement of Log #1
Log #1 (SRV2227-703): Mate the notch located on the bottom of the log, with the left grate tine. See Figure 7. Bend the
tab located to the left of the pilot assembly into the vertical position. Rotate the back end of log clockwise until it contacts
the log tab as shown in Figure 6.
FLAT SPOT FOR LOG #5
NOTCH
NOTCH
FLAT SPOT FOR LOG #2
NOTCH MATES WITH LEFT
GRATE TINE
GRATE TINE
Figure 7. Location of Notch on Log #1
LOG CORNER ALIGNS
LOG CORNER ALIGNS
WITH LOG TAB
WITH LOG TAB
1
1
3
Quadra-Fire • LOGS-QFI30 Log Instructions • 2227-935 Rev. B • 7/11
Log #4 (SRV2227-705): Mate the slot on the bottom of the log, shown in Figure 12, with the log pin located on the burner
surface. The notch on the right end of the log should mate with the grate bar. See Figure 11.
Log #5 (SRV2227-706): Place the left end of the log on the flat spot of log as shown in Figure 6. The right end of log should
rest on the burner and touches the grate bar as shown in Figure 13.
SLOT
SLOT
LOG END
LOG END
CONTACTS
CONTACTS
GRATE BAR
GRATE BAR
LOG END
LOG END
RESTS ON
RESTS ON
FLAT SPOT
FLAT SPOT
Log #6 (SRV2227-704): Rest the left end of Log #6 on the burner. Mate the notch on the left end of log with the grate bar.
The log should rest on both log grooves as illustrated in Figure 9 and Figure 10.
Figure 12. Log #4 Figure 13. Log #5
Figure 14. Place Log #6
MATE
MATE
NOTCH WITH
NOTCH WITH
GRATE BAR
GRATE BAR
LOG
LOG
GROOVES
GROOVES
5
5
6
6