Quantum NDX Series User manual
www.quantum.com
NDX NAS 1U Rack
Quantum NDX NAS 1U Rack
Installation Guide
This installation guide provides basic installation and configuration
instructions for the NDX NAS 1U Rack.
This instruction uses the following conventions:
Note: Notes emphasize important information related to the main topic.
Caution: Cautions indicate potential hazards to equipment and are
included to prevent damage to equipment.
WARNING: Warnings indicate potential hazards to personal safety and
are included to prevent injury.
Contents
Preparing for Setup................................2
Precautions.............................................2
Rail Kit Contents.....................................3
Rack Installation.....................................2
Rack Mounting Instructions...............7
Identifying the Sections of the Rack
Rails ....................................................7
Installing the Inner Rails on the NDX
1U NAS Server ....................................8
Installing the Outer Rails on the Rack8
Installing the NDX 1U NAS Server into
a Rack ...............................................11
Installing the NDX 1U NAS Server into
a Telco Rack ......................................12
Removing Server from the Rack.......12

2 Preparing for Setup
NDX NAS 1U Rack Installation Guide
Preparing for Setup
The rail kit (CSE-PT52L) ships in a box that should include the following:
• Two sets of rail assemblies
• Six rail mounting brackets
• Mounting screws—needed to install the system into most standard racks
Note: To install the rails, you will need a Phillips screwdriver.
Due to the variability in rack types, you may need to use the mounting hardware that
came with your rack or you may need to contact your rack vendor to procure additional
mounting hardware.
Read this section in its entirety before you begin the installation procedure outlined in
the sections that follow.
Precautions
Review the following precautions prior to setup.
Caution: Slide/rail mounted equipment is not to be used as a shelf or work space.
Rack Precautions • Ensure that the leveling jacks on the bottom of the rack are fully extended to the
floor with the full weight of the rack resting on them.
• In a single rack installation, stabilizers should be attached to the rack.
• In multiple rack installations, the racks should be coupled together.
• Always make sure the rack is stable before extending a component from the rack.
• Extend only one component at a time - extending two or more simultaneously may
cause the rack to become unstable.
General Precautions • Determine the placement of each component in the rack before you install the rails.
• Install the heaviest server components on the bottom of the rack first, and then
work up.
• Use a regulating uninterruptible power supply (UPS) to protect the servers and
switches from power surges, voltage spikes and to keep your system operating in
case of a power failure.

Rail Kit Contents 3
NDX NAS 1U Rack
• Always keep the rack's front door and all panels and components closed when not
servicing to maintain proper cooling.
• Disconnect all power cords before servicing.
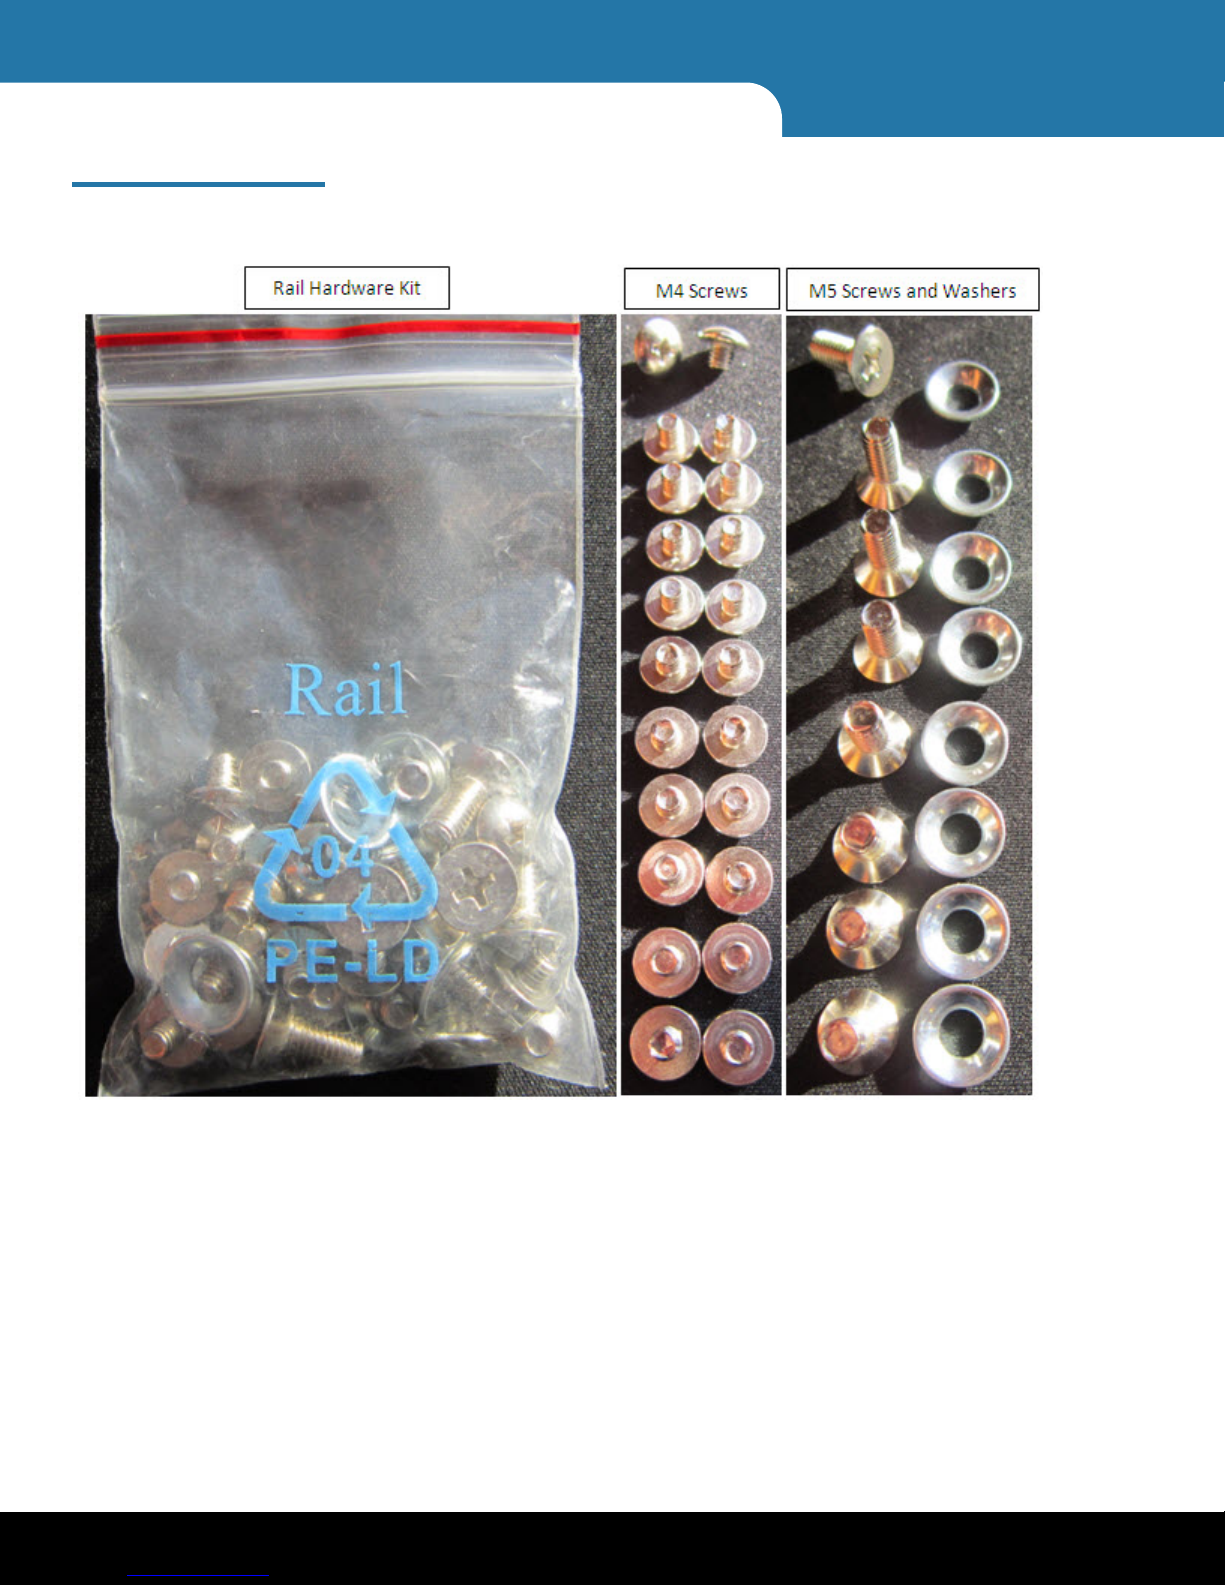
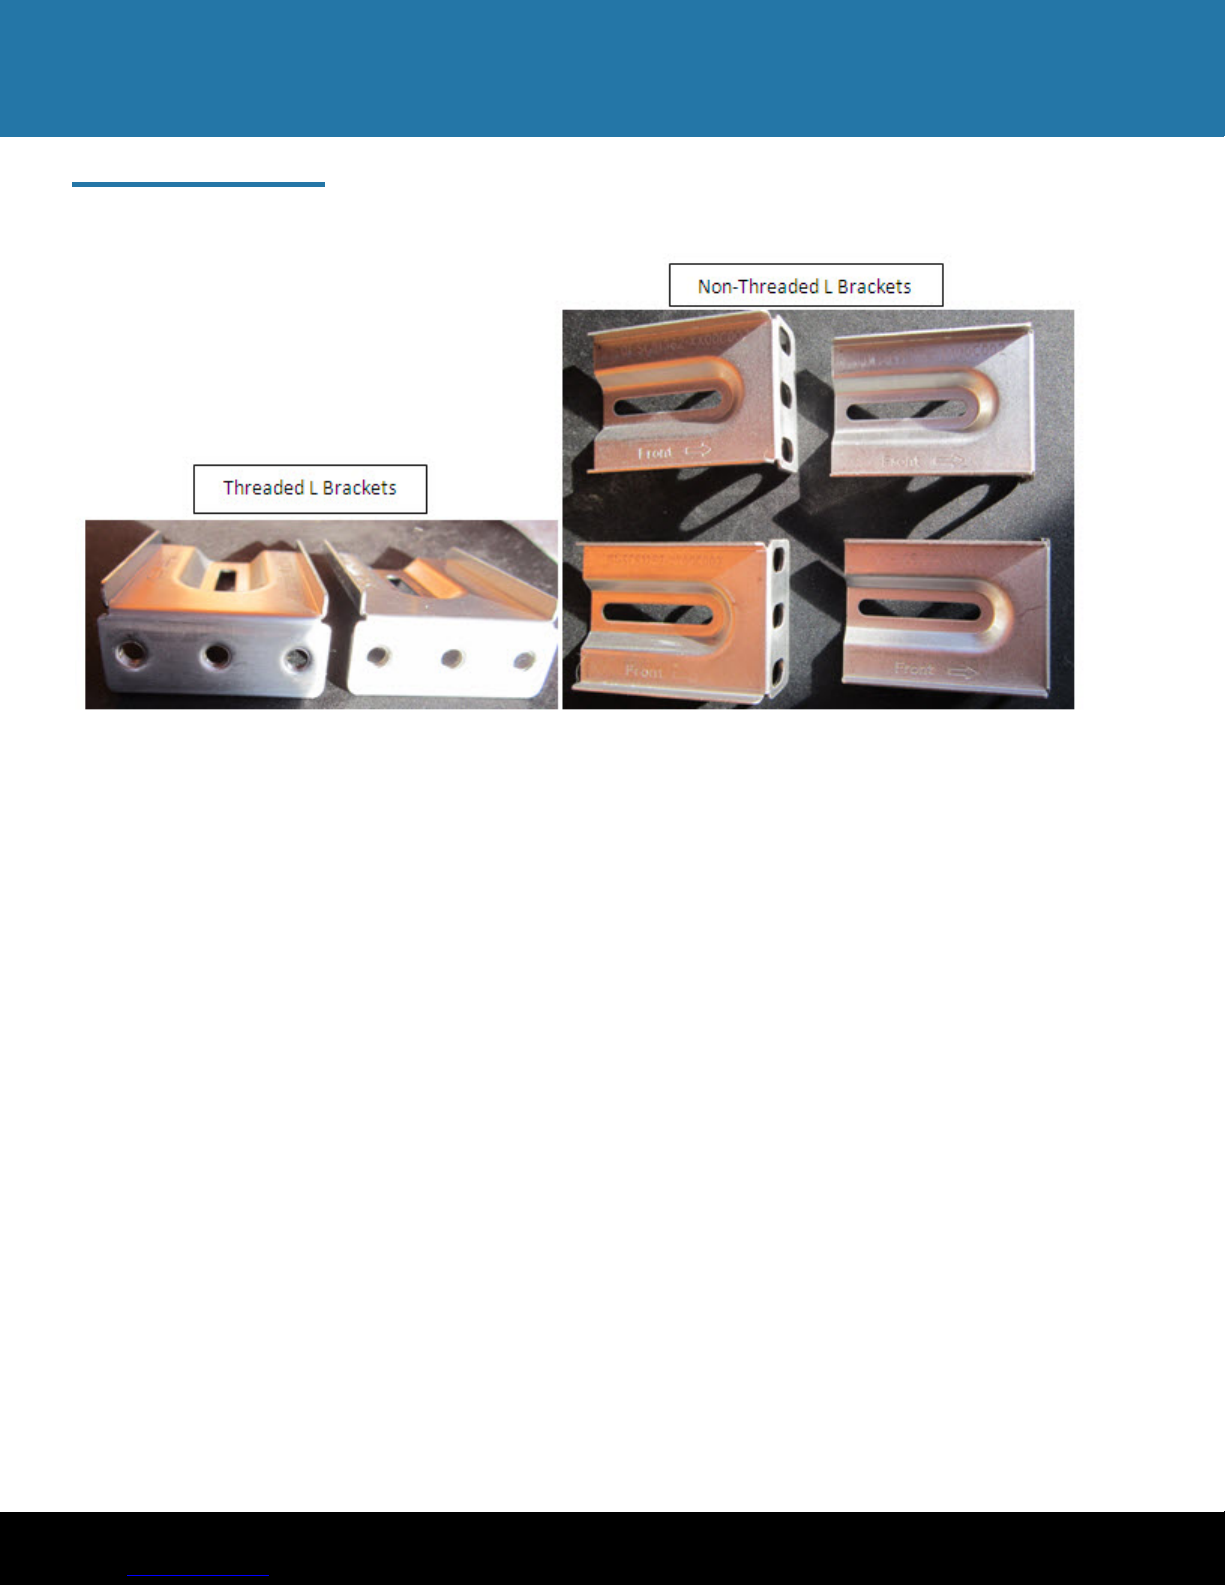
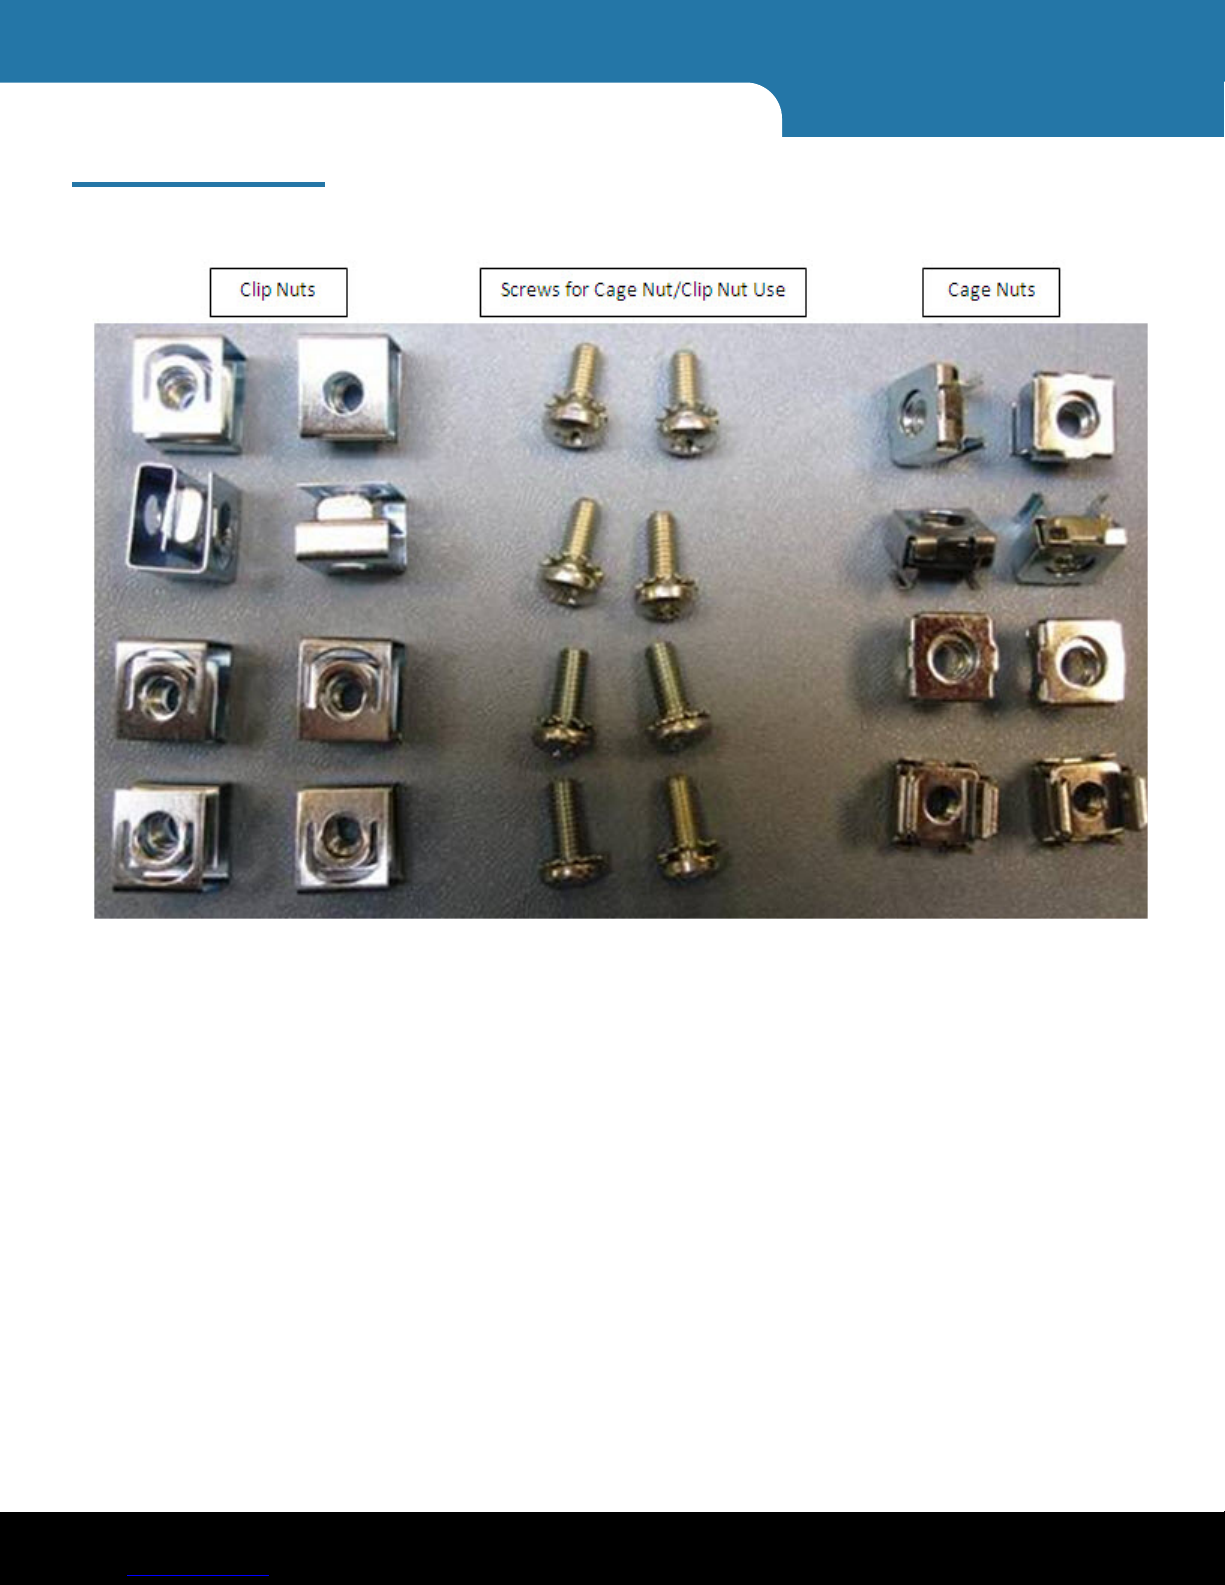
Rail Kit Contents
The following pictures depict the contents of the rail kit, including rails, screws,
brackets, and nuts.
Figure 1 Rails
4 Rail Kit Contents
NDX NAS 1U Rack Installation Guide
Figure 2 Screws
Rail Kit Contents 5
NDX NAS 1U Rack
Figure 3 Brackets
6 Rail Kit Contents
NDX NAS 1U Rack Installation Guide
Figure 4 Nuts
Rack Installation 7
NDX NAS 1U Rack
Rack Installation
Rack Mounting
Instructions
This section provides information on installing the NDX NAS 1U server into a rack with
the CSE-PT52L rail kit. There are a variety of rack units on the market, which may mean
the assembly procedure will differ slightly. You should also refer to the installation
instructions that came with the rack unit you are using.
Note: This rail will fit a rack between 26" and 33.5" deep.
Identifying the Sections
of the Rack Rails
The CSE-PT52L rail kit package includes two rack rail assemblies in the rack mounting kit.
Each assembly consists of two sections: a fixed inner rail that secures directly to the side
of the NDX 1U NAS server, and a fixed outer rail that secures directly to the rack itself.
Figure 5 Rack Rail Sections

8 Rack Installation
NDX NAS 1U Rack Installation Guide
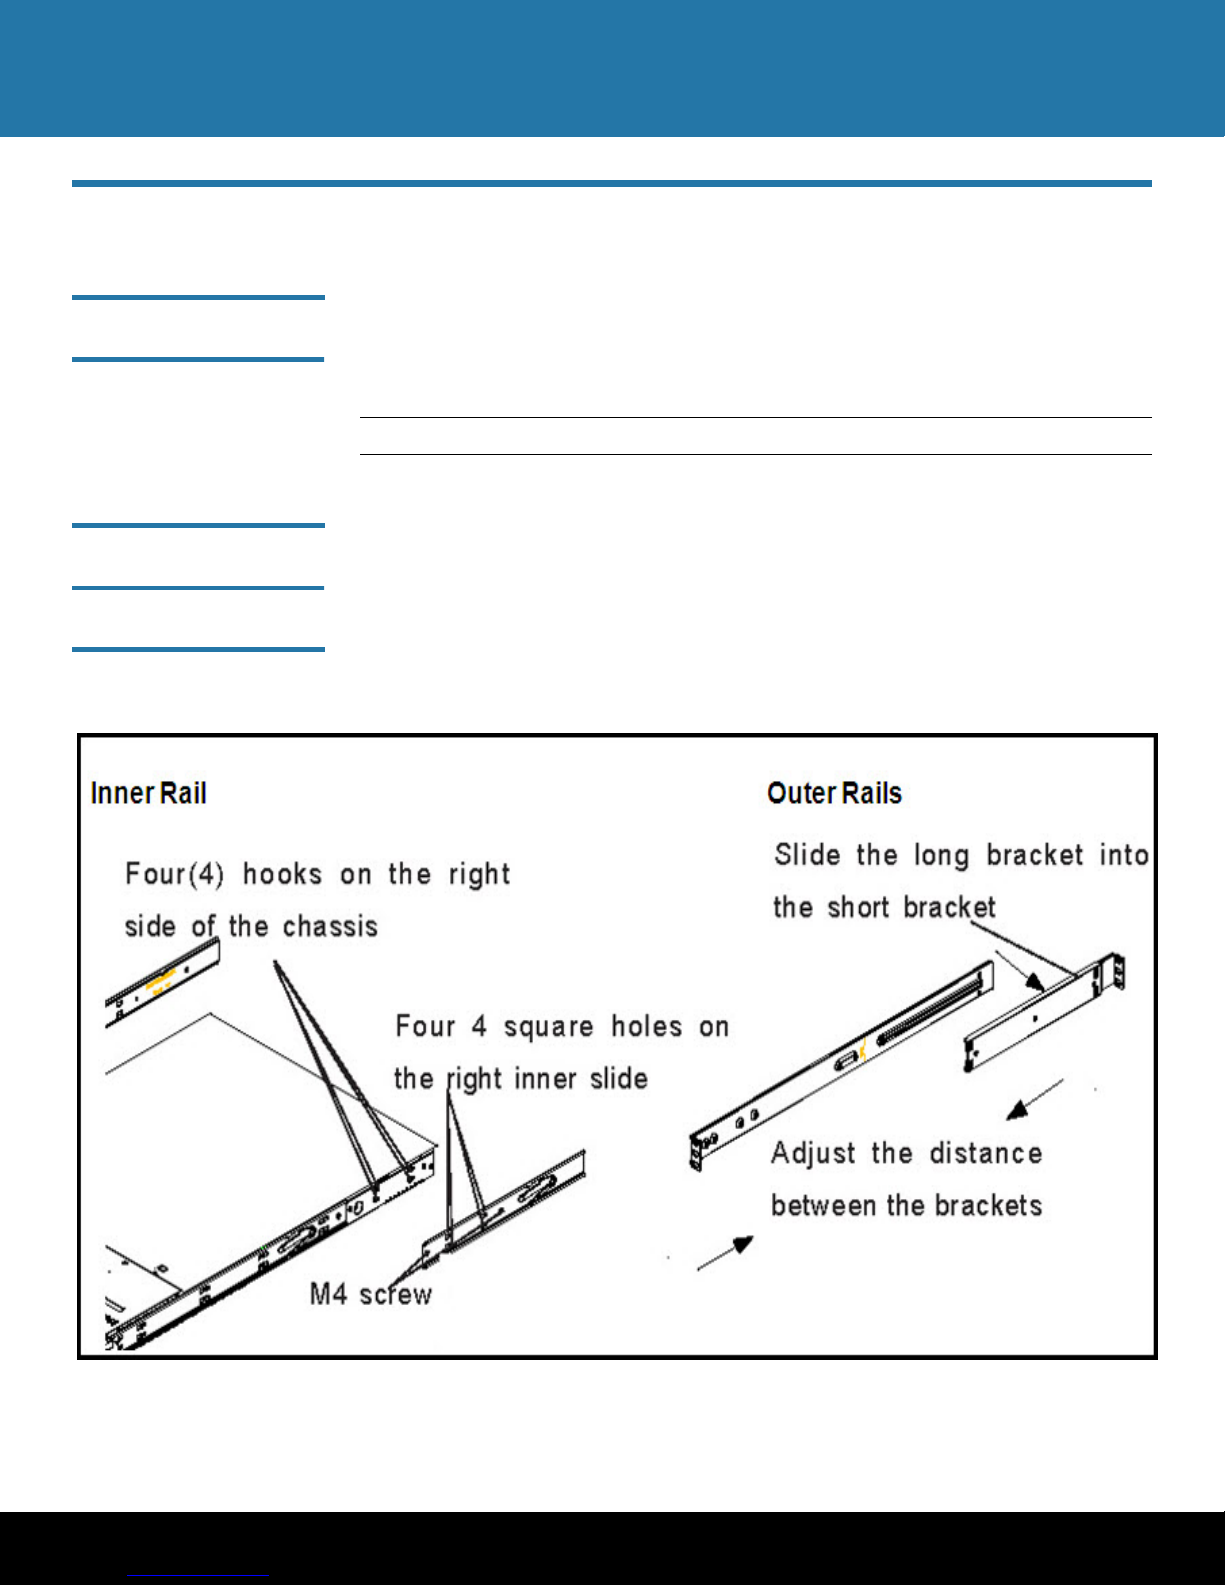
Installing the Inner Rails
on the NDX 1U NAS
Server
1Place one of the inner rails on one side of the NDX 1U NAS server aligning the hooks
on the side of the NDX 1U NAS server with the mounting holes in the rail. Make sure
the inner rail faces outward, as illustrated.
Note: The front inner rail is pre-installed on the NDX 1U NAS server.
2Slide the inner rail forward so that the rail fits securely into the 4 hooks on the side
of the NDX NAS 1U Rack server.
3Secure the inner rail to the NDX NAS 1U Rack server with one screw as illustrated in
Figure 6.
4Repeat steps 1-2 for the remaining inner rail.
Figure 6 Inner Rail Installation
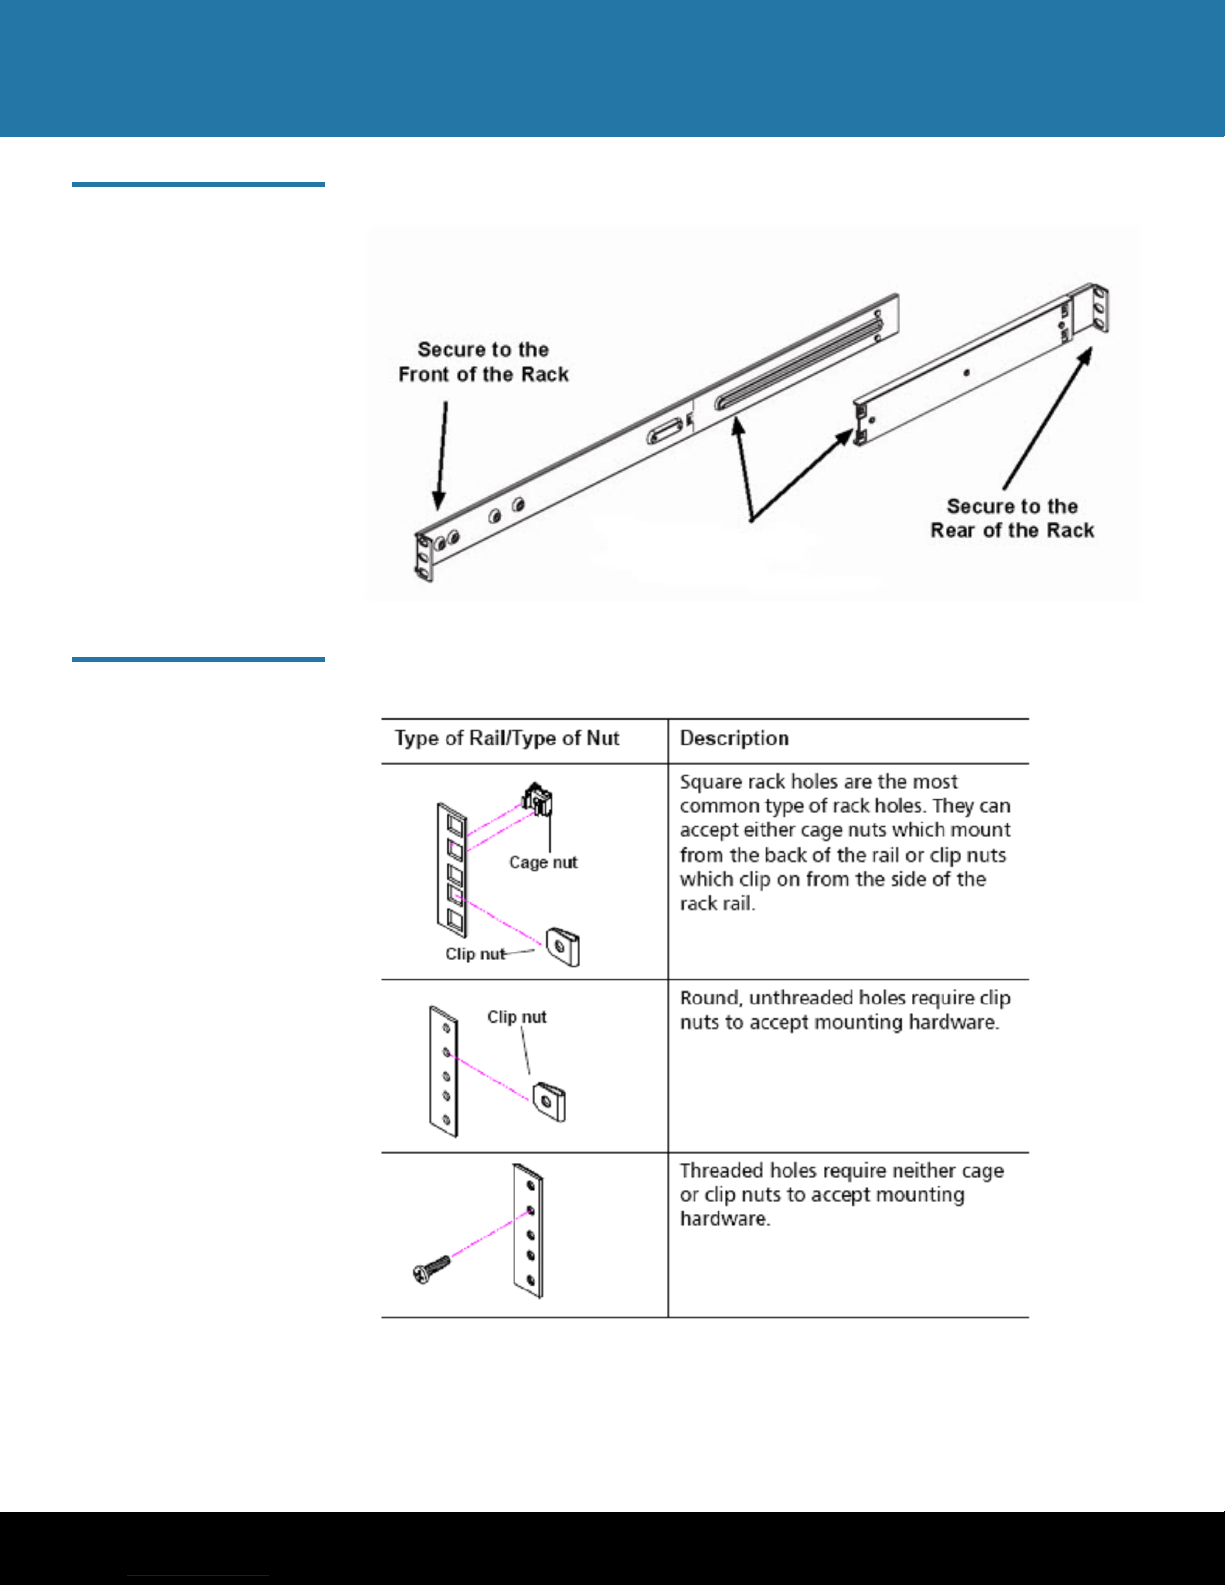
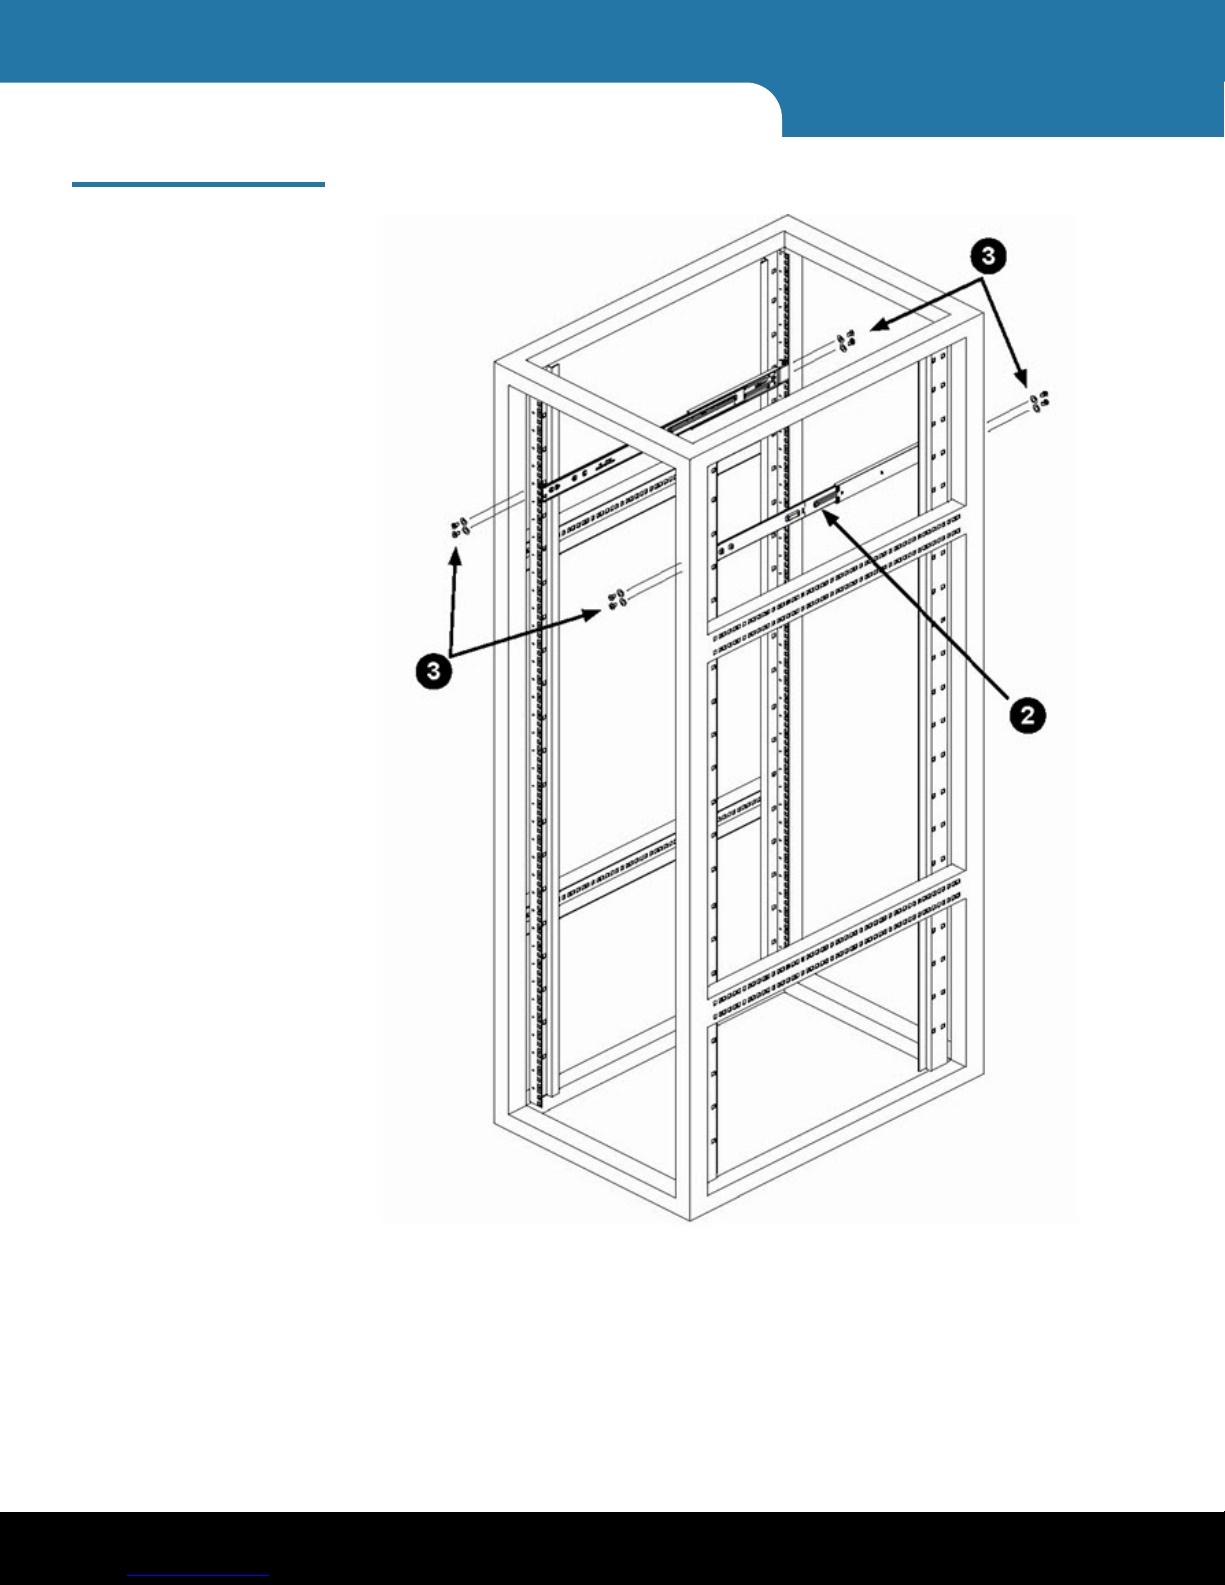
Installing the Outer
Rails on the Rack
1Attach the shorter outer rail to the outside of the longer outer rail. You must seat
the pin on the rear outer rail with the slide opening in front outer rail. Also, both
bracket ends must face the same direction.
2Adjust both the shorter and longer brackets to the proper length so that the rail fits
snugly into the rack.
3Secure the long rail to the front side of the rack with two M5 screws, top and
bottom holes and the short rail to the rear side of the rack with two M5 screws.
4If the rack does not have threaded holes, install a clip nut or a cage nut in the back
side of the rail and use the cage nut/clip nut screws to secure the unit into the rack
(see Figure 7 below)
5Repeat steps 1-4 for the remaining outer rail.
Rack Installation 9
NDX NAS 1U Rack
Figure 7 Outer Rail Installation
Table 1 Type of Rail Nuts
10 Rack Installation
NDX NAS 1U Rack Installation Guide
Figure 8 Outer Rail Installation
Diagram
Other manuals for NDX Series
4
Table of contents
Other Quantum Server manuals

Quantum
Quantum Snap! Server 4000 User manual

Quantum
Quantum NDX Series User manual

Quantum
Quantum NDX Series User manual

Quantum
Quantum DXi6900 User manual

Quantum
Quantum NDX Series User manual

Quantum
Quantum StorNext M660 User manual

Quantum
Quantum StorNext M440 User manual

Quantum
Quantum NDX Series User manual

Quantum
Quantum Scalar i6000 User manual


