Quell Q9080 User manual

Manual
Model Q9080
lonisation smoke alarms are designed to detect invisible particles
(associated with fast flaming fires). Home fires develop in different ways
and are often unpredictable. For maximum protection against fast
flaming fires and slow smouldering fires, both ionisation and
photoelectric alarms should be installed.
P/N 130622
0980-7204-03
Ionisation
Smoke Alarm with Hush
and Emergency Safety Light
0980-7204-03(130622)_V1:_ 2011.12.1 10:05

1
IMPORTANT! READ ALL INSTRUCTIONS BEFORE INSTALLATION AND KEEP
THIS MANUAL NEAR THE ALARM FOR FUTURE REFERENCE
INTRODUCTION..................................................................................................1
INSTALLATION................................................................................................2-8
OPERATION........................................................................................................9
MAINTENANCE............................................................................................10-11
FIRE SAFETY................................................................................................12-14
WARRANTY & CONTACT DETAILS............................................................15-16
This smoke alarm uses an extremely small amount of radioactive element in the
ionisation chamber (see warning on page 15). Do not try to repair the smoke
alarm yourself. Refer to the instructions in the warranty section.
Contents
INTRODUCTION
Models Q9080
If you have any questions about the operation or installation of your alarm,
please call 1800 654 435. Image 1C will help you determine the correct
location of safety products that will help make your home a safer place.
WARNING: BATTERY DOOR WILL NOT CLOSE UNLESS BATTERY IS
PRESENT. REMOVAL OF BATTERY WILL RENDER THE SMOKE ALARM
INOPERATIVE.
Manufactured in China for:
Chubb Fire & Security Pty Ltd
149-155 Milton Street
,
Ashfield NSW 2131 Australia
Telephone: 1800 654 435
Website www.quell.com.au
0980-7204-03(130622)_V1:_ 2011.12.1 10:05

2
RECOMMENDED LOCATIONS
• Install the first alarm in the immediate area of the bedrooms. Try to protect
the exit path as the bedrooms are usually farthest from the exit. If more than
one sleeping area exists, install additional alarms in each sleeping area
(Image 1A).
• Install additional alarms to protect any stairway as stairways act like
chimneys for smoke and heat.
• Install at least one alarm on every floor level (Image 1B).
• Install an alarm in every bedroom where a smoker sleeps.
• Install an alarm in every room where large electrical appliances are
operated (i.e. portable heaters or humidifiers).
• Install an alarm in every room where someone sleeps with the door closed.
The closed door may prevent the alarm from waking the sleeper.
• Smoke, heat and combustion products rise to the ceiling and spread
horizontally. Mounting the smoke alarm on the ceiling in the centre of the
room places it closest to all points in the room. Ceiling mounting is
preferred in ordinary residential construction.
• For mobile home installation, select locations carefully to avoid thermal
barriers that may form at the ceiling. For more details, see MOBILE HOME
INSTALLATION on page 4.
• When mounting an alarm on the ceiling, locate it at a minimum of 30cm
(12") from the side wall and 2 feet (61cm) from any inside corner (Image 2A).
• When mounting the alarm on the wall, use an interior wall with the top edge
of the alarm at a minimum of 10cm (4") and a maximum of 30cm (12'') below
the ceiling, and at least 2 feet (61cm) from any inside corner (Image 2A).
• Put smoke alarms at both ends of a bedroom hallway or large room if the
hallway or room is more than 9.1m (30 feet) long. Refer to Images 2A and
2B
Installation
0980-7204-03(130622)_V1:_ 2011.12.1 10:06

3
BEDROOM KITCHEN
LIVING ROOM
BEDROOM
BEDROOM
BEDROOM
Smoke Alarms for Minimum Protection
Smoke Alarms for Additional Protection
Ionization Type Smoke Alarms with
“Hush” Control or Photoelectric Type
Installation
BEDROOM
BASEMENT
KITCHEN
HALL BEDROOM
LIVING
ROOM
IMAGE 1A IMAGE 1B
SINGLE FLOOR PLAN MULTIPLE FLOOR PLAN
• Install smoke alarms on sloped, peaked or cathedral
ceilings between 500 and 1500mm from the highest point
of the ceiling. Smoke alarms in rooms with ceiling slopes
greater than 1 m in 8 m horizontally should be located on
the high side of the room (See Image 2B).
IMAGE 1C
BEDROOM
FAMILY ROOM
WORKSHOPBASEMENT
KITCHEN
HALL
GARAGE
MASTER
BEDROOM
FIRE
EXTINGUISHERS
SMOKE
ALARMS
FIRE BLANKET
TOTAL HOME PROTECTION
0980-7204-03(130622)_V1:_ 2011.12.1 10:06

4
MOBILE HOME INSTALLATION
Mobile homes built in the past five to seven years have been designed to be
energy efficient. Install smoke alarms as recommended above (refer to
RECOMMENDED LOCATIONS and Image 2A).
In mobile homes that are not well insulated compared to present standards,
extreme heat or cold can be transferred from the outside to the inside through
poorly insulated walls and roof. This may create a thermal barrier which can
prevent the smoke from reaching an alarm mounted on the ceiling. In such
units, install the smoke alarm on an inside wall with the top edge of the alarm at
a minimum of 10cm (4") and a maximum of 30cm (12") below the ceiling (see
Image 2A).
If you are not sure about the insulation in your mobile home, or if you notice that
the outer walls and ceiling are either hot or cold, install the alarm on an inside
wall. For minimum protection, install at least one alarm close to the bedrooms.
For additional protection, see SINGLE FLOOR PLAN in Image 1A.
WARNING: TEST YOUR SMOKE ALARM OPERATION AFTER CARAVAN OR
MOBILE HOME VEHICLE HAS BEEN IN STORAGE, BEFORE EACH TRIP
AND AT LEAST ONCE A WEEK DURING USE.
Installation
0980-7204-03(130622)_V1:_ 2011.12.1 10:06

5
Locations to Avoid
•Do not install within 0.9 m (3 ft) of the following: The door to a
kitchen, or a bathroom that contains a tub or shower, forced air
supply ducts used for heating or cooling, ceiling or whole house
ventilating fans, or other high air-flow areas.
• Do not place the alarm where curtains or other objects will block the
sensor. Smoke must be able to reach the sensor to accurately
detect conditions.
• Install at least 30cm (12 in) away from fluorescent lights as
electronic noise may cause nuisance alarms.
• Keep out of insect infested areas. Avoid excessively dusty, dirty or
greasy areas. Dust particles may cause nuisance alarms or failure
to alarm.
• Extreme temperatures may effect the sensitivity of the alarm. Do not
install in areas where the temperature is colder than 5°C or hotter
than 45°C, such as garages and unfinished attics.
• Do not install in areas where the relative humidity (RH) is greater
than 85%. Very humid areas, with moisture or steam, can cause
nuisance alarms.
• Avoid placing smoke alarms in kitchen areas. Normal cooking may
cause nuisance alarms. If a kitchen alarm is desired, it should have
an alarm silencer feature or be a photoelectric type.
• Do not place in the garage. Particles of combustion are present
when you start your automobile.
• Smoke alarms are not to be used with detector guards unless the
combination (alarm and guard) has been evaluated and found
suitable for that purpose.
• In dead air spaces such as the peak of an “A” frame ceiling. “Dead
Air” at the top may prevent smoke from reaching the alarm in time
to provide early warning. Refer to images 2A and 2B.
Installation
0980-7204-03(130622)_V1:_ 2011.12.1 10:06

6
Installation
IMAGE 2A
IMAGE 2B
CEILING
30 cm (12 in)
MINIMUM
10 cm (4 in)
MINIMUM
30 cm (12 in)
MAXIMUM
SIDE WALL
BEST
PLACEMENT
ACCEPTABLE
PLACEMENT
DO NOT INSTALL
DEAD AIR
NOT IN
THIS AREA
ANYWHERE IN THIS
AREA
NOT IN
THIS AREA
ANYWHERE IN THIS
AREA
PEAK CEILING
SLOPED CEILING
500mm
1000mm
1000mm
500mm
Smoke alarm should
be located between
500mm and 1500mm
of the highest point.
DEAD AIR
DEAD AIR
DO NOT INSTALL
DO NOT INSTALL
0980-7204-03(130622)_V1:_ 2011.12.1 10:06

7
FIGURE 3
When mounting
in a hallway, the
“A” line should
be parallel with
the hallway.
When wall mounting,
the “A” line should
be horizontal and
the “UP FOR WALL
MOUNTING” arrow
must be pointing up.
AA
Alignment Marks
Install Remove
FIGURE 2
FIGURE 1
FIGURE 4
Mounting
CAUTION: THIS UNIT IS SEALED. THE COVER IS NOT REMOVABLE!
1. Remove the mounting plate from the back of the alarm by holding the
mounting plate and twisting the alarm clockwise in the direction indicated
by the “OFF” arrow on the alarm cover.
2. To ensure aesthetic alignment of the alarm with the hallway or wall, the “A” line
on the mounting plate must be parallel with the hallway when ceiling mounting
or horizontal when wall mounting.
3. After selecting the proper smoke alarm location as described previously,
attach the mounting plate to the ceiling as shown in Figure 1. For wall
mounting see Figure 2. Place mounting plate on the wall. Be sure the “UP
FOR WALL MOUNTING” text and arrow are facing up. Use the screws and
anchors provided to secure the mounting plate.
Installation
4. Battery installation instructions are provided on the inside of the battery
door. To ensure proper installation of the smoke alarm battery, follow the
instructions.
5. When installing the battery, press the battery reminder finger down into the
battery compartment and install the battery (see Figure 3).
6. Corresponding alignment marks are provided on the edge of the trim plate
and the alarm. After installing the mounting plate, place the alarm on the
mounting plate with the alignment marks lined up. Twist the alarm
anti-clockwise in the direction indicated by the “ON” arrow on the alarm
cover (see Figure 4) until it locks in place.
0980-7204-03(130622)_V1:_ 2011.12.1 10:06

8
7. USING TAMPER RESIST LOCKING
PIN: To make your smoke alarm
somewhat tamper resistant, a
locking pin has been provided in
the bag with the screws and
anchors. Using this pin will deter
children and others from removing
the alarm from the mounting plate.
To use the pin, insert it into the hole
in the side of the alarm after the
alarm has been installed on the
mounting plate (see Figure 5).
NOTE: THE TAMPER RESIST PIN WILL HAVE TO BE REMOVED IN ORDER
TO CHANGE THE BATTERY. USE LONG NOSE PLIERS TO PULL THE PIN
OUT OF THE HOLE. IT IS NOW POSSIBLE TO REMOVE THE ALARM FROM
THE MOUNTING PLATE.
8. After installation, test your alarm by depressing and holding down the test
button for several seconds. This should sound the alarm.
Installation
FIGURE 5
Tamper Resist Locking Pin
0980-7204-03(130622)_V1:_ 2011.12.1 10:06

9
OPERATION
The smoke alarm is operating once a fresh battery is installed and testing is
complete. When products of combustion are sensed, the unit sounds a loud
85db pulsating alarm until the air is cleared.
HUSH CONTROL: The “HUSH” feature has the capability of temporarily
desensitising the alarm circuit for approximately 8 minutes. This feature is to be
used only when a known alarm condition, such as smoke from cooking,
activates the alarm. The smoke alarm is desensitised by pushing the “HUSH”
button on the smoke alarm cover. If the smoke is not too dense, the alarm will
silence immediately and the Red LED will flash every 10 seconds for
approximately 8 minutes. This indicates that the alarm is in a temporarily
desensitised condition. The smoke alarm will automatically reset after
approximately 8 minutes and sound the alarm if particles of combustion are still
present. The “HUSH” feature can be used repeatedly until the air has been
cleared of the condition causing the alarm.
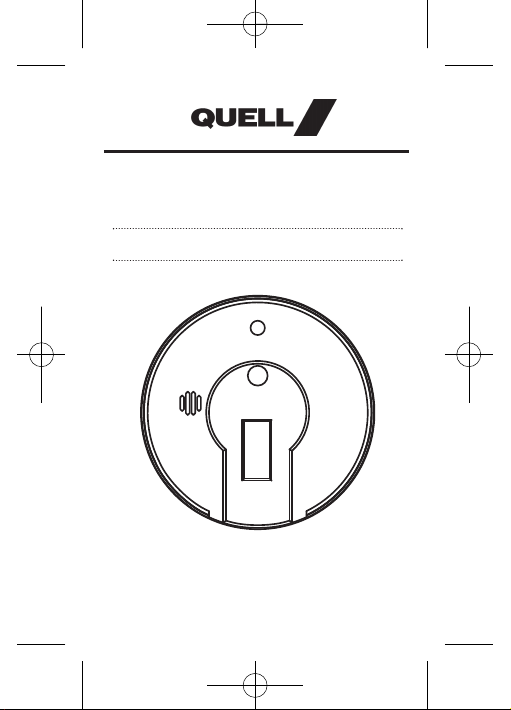
FLASHING LED LIGHT: This smoke alarm is equipped with a flashing red
indicator light. The light is located under the test button and will flash every 40
seconds to indicate that the smoke alarm is receiving power.
SAFETY LIGHT: The model Q9080 has a Safety Light feature. When the smoke
alarm ionisation chamber senses smoke, the 85db horn will sound and the
Safety Light will flash until the sensing chamber is cleared of smoke particles.
TESTING: Test by pushing the test button on the cover and holding it down for
a minimum of 5 seconds. This will sound the alarm if the electronic circuitry,
horn and battery are working. If no alarm sounds, the unit has defective batteries
or other failure.
TEST THE ALARM WEEKLY TO ENSURE PROPER OPERATION. Erratic or low
sound coming from your alarm may indicate a defective alarm (See Warranty
section).
NOTE: WEEKLY TESTING IS REQUIRED.
NUISANCE ALARMS
Smoke alarms are designed to minimise nuisance alarms. Combustion particles
from cooking may set off the alarm if the alarm is located close to the cooking
area. Large quantities of combustible particles are generated from spills or when
grilling/frying. Using the fan on a cooker hood which vents to the outside (non-
recirculating type) will also help remove these combustible products from the
kitchen.
If the alarm sounds, check for fires first. If a fire is discovered, get out and call
the fire brigade. If no fire is present, check to see if one of the reasons listed in
“Locations to Avoid” may have caused the alarm.
Models Q9080 are equipped with a “HUSH” button that is useful near a kitchen
or other areas prone to nuisance alarms.
OPERATION
0980-7204-03(130622)_V1:_ 2011.12.1 10:06

10
BATTERY REPLACEMENT
If tamper resist pin has been used, refer to TAMPER RESIST LOCKING PIN in
the installation section under "mounting" for removal instructions. To replace the
battery, remove the alarm from the mounting plate by rotating the alarm
clockwise in the direction of the “OFF” arrow on the cover (See Installation
Section, Figure 4).
The Model Q9080 Smoke Alarm is powered by a 9V carbon zinc battery
(alkaline battery may also be used). A fresh battery should last for one year
under normal operating conditions. This alarm has a low battery monitor circuit
which will cause the alarm to “chirp” approximately every 40 seconds for a
minimum of seven (7) days when the battery gets low. Replace the battery when
this condition occurs.
USE ONLY THE FOLLOWING 9 VOLT BATTERIES FOR SMOKE ALARM
REPLACEMENT:
Carbon Zinc Type: EVEREADY 1222
GOLD PEAK 1604S
Alkaline Type: ENERGIZER 522, DURACELL MN1604, MX1604
GOLD PEAK 1604A
Lithium Type: ULTRALIFE U9VL-J
These batteries can be purchased at your local retailer.
The safety light portion is powered by one (1) 9V alkaline battery. Under normal
(standby) conditions, the battery should last at least one year and provide 15
minutes of pulsating light when the alarm sounds.
NOTE: REGULAR TESTING IS RECOMMENDED. IF THE SAFETY LIGHT
APPEARS DIM DURING REGULAR TESTING, REPLACE BOTH BATTERIES
IMMEDIATELY.
USE ONLY THE FOLLOWING 9 VOLT ALKALINE BATTERIES FOR SAFETY
LIGHT REPLACEMENT - Eveready 522, Duracell MN1604, MX1604 or Gold
Peak 1604A.
WARNING! USE ONLY THE BATTERIES SPECIFIED. USE OF DIFFERENT
BATTERIES MAY HAVE A DETRIMENTAL EFFECT ON THE SMOKE ALARM
OR THE SAFETY LIGHT
LAMP REPLACEMENT: The Safety Light has a 6.3 volt 250mA fuse type lamp
(average life of 50 hours). If the Safety Light does not operate with a fresh
alkaline battery, replace the lamp. To replace the lamp, remove the alarm from
the mounting bracket by rotating the alarm clockwise in the direction of the
“OFF” arrow on the cover. If the tamper-resist locking pin has been used, refer
to "installation" section for removal instructions.
Open the battery door and remove both batteries from the unit. Grip the lamp
holder handle with your thumb and finger (see Figure 6) and pull out the lamp
holder assembly (see Figure 7). Slide the old lamp out of the lamp holder and
replace it with a new lamp (see Figure 8).
Reinstall the lamp holder. It will snap easily into the base. Put working batteries
back in the alarm and remount the alarm on its mounting bracket.
Maintenance
0980-7204-03(130622)_V1:_ 2011.12.1 10:06

11
REPLACE WITH THE CORRECT LAMP TYPE: Vanco #FTB 6 is available at most
radio/tv repair parts stores.
CAUTION! USE SPECIFIED LAMP ONLY. USE OF A DIFFERENT LAMP MAY
HAVE A DETRIMENTAL EFFECT ON THE SMOKE ALARM OR THE SAFETY
LIGHT OPERATION.
CLEANING YOUR ALARM
To clean your alarm, remove it from the mounting bracket as outlined in previous
sections. You can clean the interior of your alarm (sensing chamber) by using
your vacuum cleaner hose and vacuuming through the openings around the
perimeter of the alarm. The outside of the alarm can be wiped with a damp cloth.
(Do not use a wet cloth to avoid water entering the unit). After cleaning, reinstall
your alarm. Test your alarm by using the test button. If cleaning does not restore
the alarm to normal operation, the alarm should be replaced. Do not paint the
unit. Paint will seal the vents and interfere with the sensor's ability to detect
smoke. Never attempt to disassemble the unit or clean inside. This action will
void your warranty.
REPLACING THE ALARM
It is recommended this alarm be replaced ten years from the date of
manufacture. This date has been provided on the product label which is located
on the back of the alarm.
Maintenance
FIGURE 6 FIGURE 7 FIGURE 8
LAMP INSERTION TO BASE
Base Base
Lamp Holder
Lamp
Lamp Holder
LAMP INSERTION TO LAMP
HOLDER
0980-7204-03(130622)_V1:_ 2011.12.1 10:06

12
WARNING: PLEASE READ CAREFULLY AND THOROUGHLY
Australian Standard AS 1670.6 states the purpose of installing smoke alarms is
to provide early warning of a potentially life threatening condition and provide
the maximum possible exit time.
Smoke alarms are devices that can provide early warning of possible fires at a
reasonable cost; however, alarms have sensing limitations. Ionisation type
alarms offer a broad range of fire sensing capabilities but are better at detecting
fast flaming fires than slow smouldering fires. Photoelectric alarms sense
smouldering fires better than flaming fires. Home fires develop in different ways
and are often unpredictable. Neither type of alarm (photoelectric or ionisation)
is always best, and a given alarm may not always provide warning of a fire.
• A battery powered detector must have a battery of the specified type, in good
condition and installed properly.
• Mains powered alarms without battery backup will not operate if the mains
powered power has been cut off, such as by an electrical fire or an open fuse.
• Smoke alarms must be tested regularly to make sure the batteries and the
alarm circuits are in good operating condition.
• Smoke alarms cannot provide an alarm if smoke does not reach the alarm.
Therefore, smoke alarms may not sense fires starting in chimneys, walls, on
roofs, on the other side of a closed door or on a different floor.
• If the alarm is located outside the bedroom or on a different floor, it may not
wake up a sound sleeper.
• The use of alcohol or drugs may also impair one’s ability to hear the smoke
alarm. For maximum protection, a smoke alarm should be installed in each
sleeping area on every level of a home.
• Although smoke alarms can help save lives by providing an early warning of
a fire, they are not a substitute for an insurance policy. Home owners and
tenants should have adequate insurance to protect their lives and property.
Fire Safety
0980-7204-03(130622)_V1:_ 2011.12.1 10:06

DEVELOP AND PRACTICE A PLAN OF ESCAPE
• Install and maintain fire extinguishers on every level of the home and in the
kitchen, basement and garage. Know how to use a fire extinguisher prior to
an emergency.
• Make a floor plan indicating all doors and windows and at least two (2)
escape routes from each room. Second storey windows may need an
escape ladder.
• Have a family meeting and discuss your escape plan, showing everyone
what to do in case of fire.
• Determine a place outside your home where you all can meet if a fire occurs.
• Familiarise everyone with the sound of the Smoke Alarm and train them to
leave your home when they hear it.
• Practice a fire drill at least every six months. Practice allows you to test your
plan before an emergency. You may not be able to reach your children. It is
important they know what to do.
WHAT TO DO WHEN THE ALARM SOUNDS:
• Alert small children in the home
• Leave immediately by your escape plan. Every second counts, so don't
waste time getting dressed or picking up valuables.
• In leaving, don't open any inside door without first feeling its surface. If hot,
or you see smoke seeping through cracks, don't open that door! Instead
use your alternative exit.
• If the inside of the door is cool, place your shoulder against it, open it
slightly and be ready to slam it shut if heat and smoke rush in.
• Stay close to the floor if the air is smoky. Breathe shallowly through a cloth,
wet if possible.
• Once outside, go to your selected meeting place and make sure everyone
is there.
• Call the fire brigade from your neighbour's home - not from yours!
• Don't return to your home until the fire officials say that it is all right to do so.
There are situations where a smoke alarm may not be effective to protect
against fire.
For instance:
a) smoking in bed.
b) leaving children home alone.
c) cleaning with flammable liquids, such as petrol or any solvents.
13
Fire Safety
0980-7204-03(130622)_V1:_ 2011.12.1 10:06

Fire Safety
Additional Information
Smoke Detection - Where required by applicable laws, codes,
or standards for the specified occupancy, approved single and
multiple-station smoke alarms shall be installed as follows: (1)
In all sleeping rooms with the exception: Smoke alarms shall
not be required in sleeping rooms in existing one and two-
family dwelling units. (2) Outside of each separate sleeping
area, in immediate vicinity of the sleeping rooms. (3) On each
level of the dwelling unit, including basements exception: In
existing one and two-family dwelling units, approved smoke
alarms powered by batteries are permitted.
Smoke Detection - Are more smoke alarms desirable? The
required number of smoke alarms might not provide reliable
early warning protection for those areas separated by a door
from the areas protected by the required smoke alarms. For
this reason, it is recommended that the householder consider
the use of additional smoke alarms for those areas for
increased protection.
The additional areas include the basement, bedrooms, dining
room, furnace room, utility room, and hallways not protected by
the required smoke alarms. The installation of the smoke
alarms in the kitchen, attic (finished or unfinished), or garage is
normally not recommended, as these locations occasionally
experience conditions that can result in nuisance alarms.
Notify your local fire brigade and insurance company of your
smoke alarm installation.
14
0980-7204-03(130622)_V1:_ 2011.12.1 10:06

15
Warranty & Contact Details
TEN YEAR LIMITED WARRANTY
Warranty
Chubb warrants to the original consumer purchaser that each new smoke
alarm will be free from defects in materials and workmanship under normal
use for a period of 10 years from the date of purchase.
Chubb agrees to repair or replace (at our discretion) any defective smoke
alarm upon presentation of the proof of purchase. The benefits to the
consumer given by this warranty are in addition to other rights and
remedies of the consumer under the Australian Consumer Law and other
applicable laws relating to the product.
Our goods come with guarantees that cannot be excluded under the
Australian Consumer Law. You are entitled to a replacement or refund for a
major failure and compensation for any other reasonably foreseeable loss
or damage. You are also entitled to have the goods repaired or replaced if
the goods fail to be of acceptable quality and the failure does not amount
to a major failure.
Exclusions
Subject to non-excludable laws, this warranty does not cover:
• normal wear and tear to the product or parts
• batteries or other consumables included with this product (excluding
sealed non replaceable battery models)
• damage to the product caused by accidents, misuse, abuse, lack of
reasonable care, tampering or repair by a person not authorised by
Chubb
• any product that has not been installed, operated or maintained in
accordance with the manual or operating instructions provided with the
product
• any damage caused by improper power input or improper cable
connection
• any indirect, special or consequential loss or damage of any kind
To make a claim
If a defect in the product appears within the time frame stated, you are
entitled to submit a warranty claim by returning your product to the
address shown below. Please contact Chubb on telephone number:
1800 654 435 (opening hours: Mon - Fri 9:00AM to 5:00PM AEST).
When returning the product, please ensure it is properly packaged so that
no damage occurs during transit. Any postage and packaging expenses
required to return the product to Chubb will be at your cost.
Please provide the original or a copy of the proof of purchase. Also,
please make sure you have included an explanation of the problem.
If Chubb elects to repair the product, please note that goods presented for
repair may be replaced by refurbished goods of the same type rather than
being repaired. Refurbished parts may be used to repair the goods.
0980-7204-03(130622)_V1:_ 2011.12.1 10:06

16
WARNING: Radioactive material Americium 241 1.0 microcuries. Do not
tamper with sealed source. When this alarm is no longer required, it's
recommended that the preferred method of disposal for small numbers of
Smoke Alarms is to include them in the domestic rubbish.
AS 3786 Lic 1377
SAI Global
A UTC Fire & Security Company
Warranty & Contact Details
This warranty is provided by:
Chubb Fire & Security Pty Ltd ACN 000 067 541
149-155 Milton Street, Ashfield NSW 2131 Australia
Telephone: 1800 654 435
Website: www.quell.com.au
Chubb New Zealand Limited
3 Fisher Crescent, Mt Wellington, Auckland, New Zealand
Telephone: 09 270 7288
Website: www.quell.co.nz
0980-7204-03(130622)_V1:_ 2011.12.1 10:06
Table of contents
Other Quell Smoke Alarm manuals
Popular Smoke Alarm manuals by other brands

VESDA
VESDA LaserPLUS VLP-000 installation manual

Wiseup
Wiseup DVR-0031-1080P user guide

Silent Alert
Silent Alert UM3A-2212-EU-PSU quick start guide

olympia electronics
olympia electronics BS-655/A manual

Knightsbridge
Knightsbridge DT004 Installation & maintenance manual

System Sensor
System Sensor FAAST LT Control guide