Quell Simline QSP10 User manual

Smoke Alarm
Manual
Model QSP10
Product Code 138626
2
Slimline Photoelectric
Photoelectric smoke alarms are designed to detect visible particles
(associated with slow smouldering fires). Home fires develop in different
ways and are often unpredictable. For maximum protection against fast
flaming fires and slow smouldering fires, both ionisation and photoelectric
alarms should be installed.
Copyright © 2020 carrier. All rights reserved.
Chubb Fire and Security Pty Ltd is part of the Carrier Global Corporation (NYSE: CARR)
group of companies.
Quell®is a registered trademark of Chubb Fire & Security Pty Ltd

Introduction . . . . . . . . . . . . . . . . . . . . . . . . . 1
Installation . . . . . . . . . . . . . . . . . . . . . . . . . . 2–8
Operation . . . . . . . . . . . . . . . . . . . . . . . . . . . 9–13
Maintenance . . . . . . . . . . . . . . . . . . . . . . . . . 15
Fire Safety . . . . . . . . . . . . . . . . . . . . . . . . . . 16-17
Good Safety Habits . . . . . . . . . . . . . . . . . . . 18
Warranty & Contact Details . . . . . . . . . . . . 19-20
Contents
Introduction
Model QSP10
If you have any questions about the operation or installation
of your alarm, please call 1800 654435.
Figures 1A to 2B will help you determine the correct location
of safety products.
IMPORTANT! Read all instructions before installation and keep
this manual near the alarm for future reference.
1
Manufactured in China for:
Chubb Fire & Security Pty Ltd
Building F Unit 1B
3-29 Birnie Ave, Lidcombe NSW, 2141
Australia
Telephone : 1800 654 435
Website: www.quell.com.au
2
Troubleshooting . . . . . . . . . . . . . . . . . . . . 14
Product Specifications:
·Power Supply:DC 3V
·Battery Spec.:CR123A
·Battery Lifetime :10 years
·Alarm Sensitivity:0.100-0.160 dB/m
·Alarm Volume:≥ 85dB(A) @ 3m
·Operating Temperature:0 °C to 40 °C
·Ambient Humidity:≤ 93%
·Date of Replacement :See product label
·Individual Alarm Indicator :Yes
·Alarm Silence Facility :Yes | Hush time: 10 minutes
·Low Battery Warning :Yes
·Accommodation Vehicles :Yes

2
2
·Mounting location :Ceiling or wall
·Sound Pattern:ISO8201(BI 0.5s-pause 0.5s-BI 0.5s-pause
0.5s-BI 0.5s-pause 1.5s, with the RED LED flashing, repeat this
alarm pattern)
·Comply with:AS3786:2014
Warnings:
·To prevent injury, this apparatus must be securely attached
to the ceiling/wall in accordance with the installation
instructions.
·Batteries should not be exposed to excessive heat such as
sunshine, fire or the like.
·Do not paint or cover the smoke alarm.
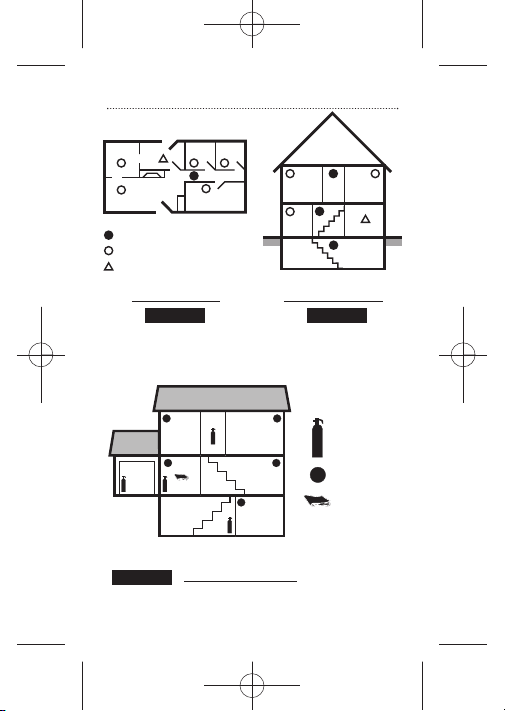
Installation Instructions
By law at least one smoke alarm must be installed on
each level of your home ( Figure 1B).
Recommended Locations
•In every room where someone sleeps with the door
closed. The closed door may prevent an alarm located
outside from waking the sleeper.
•In the immediate area of bedrooms and the exit path
from all sleeping areas (Figure 1A).
•In stairways, as stairways act like chimneys for smoke
and heat.
•In any room where large electrical appliances are
operated (e.g., portable heaters or humidifiers).
•If a hallway or room is more than 9.1m long put alarms
at both ends.
•For maximum household protection see Figure 1C.
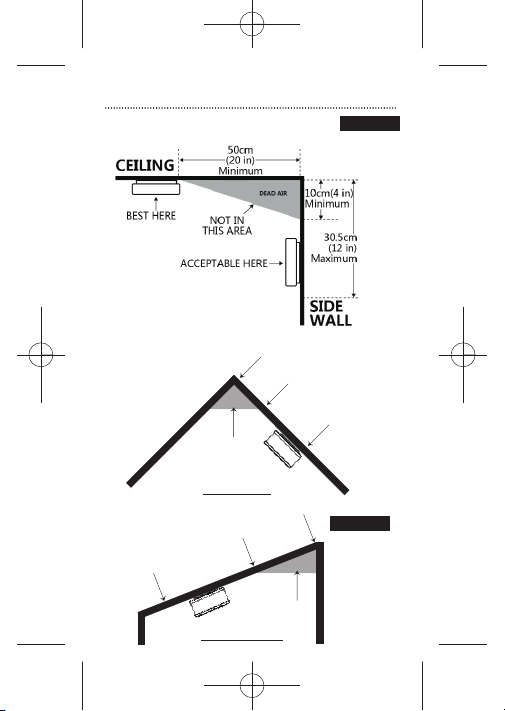
Things to Consider:
For Ceiling Mounting:
Smoke from a fire will rise to the ceiling and spread
horizontally. Mounting the smoke alarm in the centre of
the ceiling places it closest to all points in the room.
•When mounting an alarm on the ceiling, locate it at a
minimum of 50cm from the side wall (Figure 2A).
Refer to your local state and federal laws or contact your local fire
brigade to determine the minimum installation requirements.

3
•For sloped, peaked or cathedral ceilings the alarm
should be placed between 500mm and 1000mm from
the highest point of the ceiling (Figure 2B).
•Smoke alarms in rooms with ceiling slopes greater than
1m in 8m horizontally, should be located on the high
side of the room (Figure 2B).
2
For Wall Mounting:
When mounting the alarm on the wall,use an interior
wall with the top edge of the alarm at a minimum of 10cm
and mixinum of 30cm below the ceiling(Figure 2A).

4
Installation
DINING
ROOM
LIVING
ROOM
Smoke Alarms for Minimum Protection
Ionisation Type Smoke Alarm with Alarm
Silencer (Hush®) or Photoelectric Type
Smoke Alarms for Additional Protection
KITCHEN BEDROOM
BEDROOM
BEDROOM
LIVING
ROOM KITCHEN
BEDROOMBEDROOM HALL
BASEMENT
FIGURE 1A
FIGURE 1C
FIGURE 1B
SINGLE FLOOR PLAN MULTIPLE FLOOR PLAN
BEDROOM
FAMILY ROOM
WORKSHOPBASEMENT
KITCHEN
HALL
GARAGE
MASTER
BEDROOM
FIRE
EXTINGUISHERS
SMOKE
ALARMS
FIRE BLANKET
TOTAL HOME PROTECTION
2

5
Installation
Figure 2A
2
Figure 2B
NOT IN
THIS AREA
ANYWHERE IN THIS
AREA
NOT IN
THIS AREA
ANYWHERE IN THIS
AREA
PEAK CEILING
SLOPED CEILING
500mm
1000mm
1000mm
500mm
DEAD AIR
DEAD AIR
DO NOT INSTALL
DO NOT INSTALL

6
Installation
Do Not Install Smoke Alarm Devices In The Following Places:
1. In the garage. Products of combustion are present when
you start your automobile.
2. Less than 20" (50cm) from the peak of an “A” frame
type ceiling. (See figure 2A)
3. In an area where the temperature may fall below 0℃or
rise above 40℃, such as garages and unfinished attics.
4. In dusty areas. Dust particles may cause nuisance alarm
or failure to alarm.
5. In very humid areas (greater than 93%R.H.). Moisture or
steam can cause nuisance alarms.
6. In insect-infested areas.
7. Smoke alarms should not be installed within 3 foot (0.9m)
of the following: the door to a kitchen, the door to a
bathroom containing a tub or shower, forced air supply
ducts used for heating or cooling, ceiling or whole house
ventilating fans, or other high air flow areas.
8. Kitchens. Normal cooking may cause nuisance alarms. If
a kitchen alarm is desired, it should have an alarm silence
feature or be a photoelectric type.
9. Near fluorescent lights. Electronic “noise” may cause
nuisance alarms.
N.B. - Smoke alarms are not to be used with detector
guards unless the combination (alarm and guard) has
been evaluated and found suitable for that purpose.
2

7
·Place the mounting plate on the desired installation
Iocation and mark where the holes should be drilled.
·Drill two holes with adiameter of 5 millimetres.
·Push the plastic plugs into the holes.
·Remove the fixing plug from the mountingplate (if
necessary, use a screw driver for this).
·Insert the screws into the mounting plate, and tighten
them firmly into the plugs.
·Place the smoke alarm on the mounting bracket and
secure it by turning it clockwise.
·Test the correct operation of your smoke alarm by
pressing the test button. If no sound is generated, the
smoke alarm is not functioning properly and should not
beused!
WARNING:
To prevent injury, this unit must be securely attached to
the ceiling in accordance with the installation instructions.
Installation
2

8
Installation
2

9
Operation
2
Product function description:
Function Indication Description
Standby
status
The red LED flashes
every 40 seconds.
The unit is working.
Low battery
warning
The unit chirps with
red LED flashing every
40 seconds.
The battery is under
low battery status,
please replace the
smoke alarm device.
Fault
warning
The unit chirps between
the red LED two times
flashing.
The unit is faulty, get
help from the
section:
“Trouble Shooting”.
Self-test
fault warning
The red LED flashes
twice every 40 seconds.
The buzzer fault or
buzzer detection
circuit fault.
Test function The red LED flashes
once every second with
alarm sounding until
the TEST button is
released.
lTest by pressing the
TEST button on the
smoke alarm at least
3 seconds.
The alarm will sound
if all electronic
circuitry, horn and
battery are working
properly.
If no alarm sounds,
refer to
“Trouble Shooting”
.
l
l

Weekly
self-test
The unit chirps weekly. Self-test instead of
testing weekly by
manual. Recommend
testing the alarm
semiannually by
pressing the TEST
button.
Silence
function
The Red LED flashes
every 8 seconds.
l
This smoke alarm has
a built-in silence
feature.
If cooking or other
non-hazardous
sources cause the
alarm to sound,
it can be temporarily
silenced by pressing
the test button.
The alarm enters
silence mode for
10 minutes.
After the 10 minute
dormant period, the
smoke alarm will
resume normal
operation.
Fire alarm The Red LED flashes
every second, with
alarm sounds.
Generate alarm
sounds when fire
happening.
Product function description:
Function Indication Description
l
l
l
10
2
Operation

11
Operation
2
No disturbing The Red LED flashes
every 40 seconds.
The unit will stop
nuisance warning
about 10 hours under
low battery or fault
mode when the HUSH
button is pressed.
Product function description:
Function Indication Description
CAUTION:
l
Before using the silence function, identify the source of the
smoke and make sure a safe condition existing. After 10
minute silence, the unit will resume to normal operation.
l
DO NOT use an open flame to test your alarm, you could
damage the alarm or ignite combustible materials and result
in a fire.
lIf the alarm sound, and it is not being tested, it means the unit
detected smoke. THE SOUND OF THE ALARM REQUIRES YOUR
IMMEDIATE ATTENTION AND ACTION.
Night mode
This smoke alarm has an automatic night mode. In dark rooms,
the led the led signal will be dimmed to prevent disturbance of
the night's sleep.
Alarm Tamper-Resist Feature
l A tamper resist feature has been provided. To activate
this feature you must break out the tamper-resist blocks on the
mounting plate.
l Using this feature will deter children and others from
removing the alarm from the mounting plate.

12
2
Operation

13
Operation
2
Disassembling Instructions 1
To disassemble the smoke alarm, take a screw driver and
push it into the mounting hole. Then, turn the smoke alarm
counterclockwise to remove it from the mounting bracket.
No tools required, Turn the alarm body counterclockwise
and take out the alarm body from the bracket.
Disassembling Instructions 2
Activation
To activate the alarm, install the alarm on the mounting
bracket
•The alarm will make a “beep” sound, indicating that
the product is activated successfully.
Firmly press the test button for at least 3 seconds. The
alarm will sound 3 short beeps-1.5 seconds pause, then
repeat it until release the button. The alarm may sound
for up to a few seconds after releasing the test button,
indicating that the product can be used normally.
•

Trouble shooting:
Problem
14
2
Cause and Remedy
The red LED does not
flash very 40s
•Make sure the product is
activated
Smoke alarm does not
sound when tested
•Make sure the product is
activated
•Clean the smoke alarm.
Low battery warning •The battery is under low battery
status, please replace the smoke
alarm device.
Fault warning •Clean the smoke alarm.
Self-test fault warning •Press the TEST button at least 15s,
then release.
False alarm •Press the TEST button to silence it.
•Clean smoke alarm device.
•Move the smoke alarm device to
new location.
The alarm sounds
different from it is used to
•Ensure that the battery is not
low voltage.
•Clean smoke alarm.
•If the unit is out of warranty, please replace with another
new alarm.

15
In addition to weekly testing, the alarm requires periodic
cleaning to remove dust, dirt, and debris.
Clean the alarm at least once a month to remove dust, dirt, or
debris.
Use a vacuum cleaner with the soft brush, vacuum all sides
and covers of smoke alarm device.
This alarm has a low battery monitor which will cause the alarm
to “chirp” approx every 40 seconds and the red LED flash once
at the same time for a minimum of thirty days when the battery
gets low.
If there is a defective battery or other failures, you can refer to
“Trouble shooting” for solution, if there are still failures during
warranty, you can return to your retailer.
WARNING:The battery is sealed in cover and not replaceable.
Please replace another new alarm if the low battery chirp occurs.
IMPORTANT:Do not attempt to remove the cover to clean inside.
This will affect warranty.
Maintenance
2

16
WARNING: Please read carefully and thoroughly.
•Australian Standard AS 1670.6 states the purpose of
installing smoke alarms is to provide early warning of a
potentially life threatening condition and provide the
maximum possible exit time.
•Smoke alarms have sensing limitations. Ionisation
sensing alarms may detect invisible fire particles
(associated with fast flaming fires) sooner than
photoelectric alarms. Photoelectric sensing alarms may
detect visible fire particles (associated with slow
smoldering fires) sooner than ionisation alarms. Home
fires develop in different ways and are often
unpredictable. For maximum protection, both
ionisation and photoelectric alarms should be
installed.
•A battery powered alarm must have a battery of the
specified type, in good condition and installed properly.
•AC powered alarms (without battery backup) will not
operate if the AC power has been cut off, such as by
an electrical fire or an open fuse.
•Smoke alarms must be tested regularly to make sure
the batteries and the alarm circuits are in good
operating condition.
•Smoke alarms cannot provide an alarm if smoke does
not reach the alarm. Therefore, smoke alarms may not
sense fires starting in chimneys, walls, on roofs, on the
other side of a closed door or on a different floor.
•If the alarm is located outside the bedroom or on a
different floor, it may not wake up a sound sleeper.
•The use of alcohol or drugs may also impair one’s
ability to hear the smoke alarm. For maximum
protection, a smoke alarm should be installed in each
sleeping area on every level of a home.
•Although smoke alarms can help save lives by
providing an early warning of a fire, they are not a
substitute for an insurance policy. Home owners,
landlords and tenants should have adequate insurance
to protect their lives and property.
IMPORTANT: This alarm is not intended to alert hearing
impaired individuals.
Fire Safety
2

17
Additional Information
Smoke Detection - Where required by applicable laws, codes, or
standards for the specified occupancy, approved single and
multiple-station smoke alarms shall be installed as follows:
•In all sleeping rooms with the exception: Smoke alarms shall
not be required in sleeping rooms in existing one and
two-family dwelling units.
•Outside of each separate sleeping area, in immediate vicinity
of the sleeping rooms.
•On each level of the dwelling unit, including basements
exception: In existing one and two-family dwelling units,
approved smoke alarms powered by batteries are permitted.
Smoke Detection
Are more smoke alarms desirable? The required number of
smoke alarms might not provide reliable early warning
protection for those areas separated by a door from the areas
protected by the required smoke alarms. For this reason, it is
recommended that the householder consider the use of
additional smoke alarms for those areas for increased
protection.
The additional areas include the basement, bedrooms, dining
room, furnace room, utility room, and hallways not protected by
the required smoke alarms.
Fire Safety
2

18
Good Safety Habits
Develop and practice a plan of escape:
•Install and maintain Fire extinguishers on every level of the home and in the kitchen,
basement and garage. Know how to use a fire extinguisher prior to an emergency.
•Current studies have shown smoke alarms may not awaken all sleeping individuals, and that
it is the responsibility of individuals in the household that are capable of assisting others to
provide assistance to those who may not be awakened by the alarm sound, or to those who
may be incapable of safely evacuating the area unassisted.
•Make a floor plan indicating all doors and windows and at least two escape routes from each
room. Second storey windows may need a rope or chain ladder.
•Have a family meetingand discuss your escape plan, showing everyone what to do in case of a fire.
•Determine a place outside your home where you can meet if a fire occurs.
•Familiarise everyone with the sound of the alarm and train them to leave your home when they
hear it.
•Practice a fire drill at least every six months, including fire drills at night. Ensure that small
children hear the alarm and wake when it sounds. They must wake up in order to execute the
escape plan. Practice allows all occupants to test your plan before an emergency. You may not
be able to reach your children. It is important they know what to do.
What to do when the Alarm Sounds
•Alert small children in the home.
•Leave immediately by your escape plan. Every second counts, so don’t waste time getting
dressed or picking up valuables.
•In leaving, don’t open any inside door without first feeling its surface. If hot, or you see
smoke seeping through cracks, don’t open that door! Instead use your alternative exit.
•If the inside of the door is cool, place your shoulder against it, open it slightly and be ready to
slam it shut if heat and smoke rush in.
•Stay close to the floor if the air is smoky.Breathe shallowly through a cloth, wet if possible.
•Once outside, go to your selected meeting place and make sure everyone is there.
•Call the fire brigade on 000 (AUS) or 111 (NZ) from your neighbour's home or a phone box -
not from yours!
•Don’t return to your home until the fire officials say that it is all right to do so.
•There are situations where a smoke alarm may not be effective to protect against fire.
For instance:
a) smoking in bed
b) leaving children unsupervised.
c) cleaning with flammable liquids, such as gasoline
d) fires where the victim is intimate with a flaming initiated fire; for example, when a person's
clothes catch fire while cooking.
e) incendiary fires where the fire grows so rapidly that an occupant's egress is blocked even
with properly located detectors.
Detach and display next to your Consumer Unit/Fuse Box.
Chubb Fire & Security Pty Limited
ABN 47 000 067 541
Building F Unit 1B, 3-29 Birnie Ave, Lidcombe NSW, 2141 Australia
www.quell.com.au
Installation Date:
Alarm Model(s):
Installer/Landlord:
Tel:
2

WARRANTY & CONTACT DETAILS
19
FIVE YEAR LIMITED WARRANTY
Warranty
Quell warrants to the original consumer purchaser that each new
smoke alarm will be free from defects in materials and
workmanship under normal use for a period of 5years from the
date of purchase. To the extent permitted by law, Quell agrees to
repair or replace (at our discretion) any defective product on
presentation of the proof of purchase.
Australia warranty claims:
Where the goods are offered for sale in Australia, the benefits to the
consumer given by this warranty are in addition to other rights and
remedies of the consumer under the Australian Consumer Law and
other applicable laws relating to the goods. Our goods come with
guarantees that cannot be excluded under the Australian
Consumer Law. You are entitled to a replacement or refund for a
major failure and compensation for any other reasonably
foreseeable loss or damage. You are also entitled to have the
goods repaired or replaced if the goods fail to be of acceptable
quality and the failure does not amount to a major failure.
Exclusions
Subject to non-excludable laws, this warranty does not cover:
•normal wear and tear to the product or parts
•batteries or other consumables included with this product
(excluding sealed non replaceable battery models)
•damage to the product caused by accidents, misuse, abuse, lack of
reasonable care, tampering or repair by a person not authorised by
Quell
•any product that has not been installed, operated or maintained in
accordance with the manual or operating instructions provided with
the product
•any damage caused by improper power input or improper cable
connection
·any indirect or special loss or damage of any kind
2
To make a claim
If a defect in the product appears within the time frame stated, you are
entitled to submit a warranty claim by returning your product to the
address shown below. Please contact Quell on the telephone
numbers provided below, Monday to Friday during 9.00AM -
5.00PM. When returning the product, please ensure it is properly
packaged so that no damage occurs during transit. Any postage
and packaging expenses required to return the product to Quell
will be at your cost.
Table of contents
Other Quell Smoke Alarm manuals