Quik n’ Crispy GF - II User manual

©2004 QNC, Inc. 0404 Operator’s Manual
MODEL GF – II
OPERATOR’S MANUAL
Covering Quik n’ Crispy
Part Numbers:
600000
600005
600010
600015
600020
600025

©2006 QNC, Inc. 0106 Operator’s Manual 1
Table of Contents
Introduction / Packing List ……………………………………. 2
Installation Instructions………………………………………… 3
Installation Procedures…………………………………………. 5
Positioning the Separation Wall………………………………... 7
Initial Operation – Mechanical Control Models………………. 9
Operation Instructions – Mechanical Control Models………... 10
Initial Operation – Electronic Control Models………………… 12
Operation Instructions – Electronic Control Models…………. 13
Reprogramming the Electronic Controller……………………. 15
Cooking Procedures…………………………………………….. 17
Cleaning Procedures……………………………………………. 20
Product Registration and Service……………………………… 24
Appendix – Wiring Diagrams………………………………….. 25
GFII-120V Mechanical Controls………………………………. 26
GFII-240V Mechanical Controls………………………………... 27
GFII-120V Electronic Controls…………………………………. 28
GFII-240V Electronic Controls…………………………………. 29

©2006 QNC, Inc. 0106 Operator’s Manual 2
INTRODUCTION/PACKING LIST
INTRODUCTION
Marketed since 1990, the Quik n' Crispy® Greaseless Fryer is the result of years of
research, development, and refinement. By using the principles of forced hot air
and radiant heat, the Quik n' Crispy can quickly cook and brown a number of
"oven ready" convenience foods. This easy-to-use countertop greaseless fryer
safely and efficiently eliminates the health concerns, expense, and operating
difficulties inherent with hot oil cooking processes.
PACKING LIST
Included in the Quik n' Crispy packing carton are the following items:
1 Quik n' Crispy Greaseless Fryer
1 Cooking Basket Assembly
1 Cooking Basket Bracket, Handle & Mounting Screws
1 Drip Tray
1 Separation Wall Panel
1 Removable Front Panel
1 Splash Guard for Cooking Chamber Ceiling
4 Adjustable Legs
1 Operator's Manual
1 Product Registration Form

©2006 QNC, Inc. 0106 Operator’s Manual 3
INSTALLATION INSTRUCTIONS
Before the installation of your Quik n' Crispy, a suitable position in your retail
location should be selected. Points to consider when selecting a location are:
1. Accessibility by store employees
2. Proximity to customers
3. Proximity to refrigerator and freezer equipment
4. Proximity to other retail points of sale to take advantage of cross
merchandising opportunities
5. Sight line of customer (to enhance customer perception of "fresh"
preparation).
The Quik n' Crispy should be mounted on a sturdy food service appropriate table.
Stainless steel is the preferable material. Allow for a certain amount of workspace
near the Quik n' Crispy so that operators will not have to work in a confined
location. We recommend a minimum of 1" of space between the rear, sides and
top of the Quik n' Crispy, and the walls, ceiling or other structural surfaces of your
facility.
In addition to suitable locations, accommodation must be made for the necessary
electrical hookups. The Quik n’ Crispy is available with either mechanical or
electronic (programmable) controls. Both mechanical control models and
electronic control models are available in configurations to meet various electrical
requirements. Please note the following electrical specifications:
Electronic or Mechanical Control Models:
Part Number
MC EC Voltage, Hz Watts Amps Plug Type
600000 600015 120v, 60 Hz, Single Phase Only 1740 14.5 NEMA #5-15P
600005 600020 120v, 60 Hz, Single Phase Only 2200 18.3 NEMA #5-20P
600010 600025 208v, 60 Hz, Single Phase Only
240v, 60 Hz, Single Phase Only 4326
5760 20.8
24.0 NEMA #14-30P
4-wire grounding

©2006 QNC, Inc. 0106 Operator’s Manual 4
The 120 volt, 18.3 amp units (part nos. 600005 and 600020) require an individual
branch circuit. Please insure that the Quik n’ Crispy is installed on an electrical
circuit conforming to the specifications above and that this circuit has been
installed and certified by a licensed electrician. When ordering parts or accessories
for your Quik n’ Crispy, please specify voltage or part number.

©2006 QNC, Inc. 0106 Operator’s Manual 5
INSTALLATION PROCEDURES
1. The Quik n’ Crispy weighs approximately 55 lb. The use of a second person
is advised for portions of this installation.
2. Open the shipping carton and fold back the shipping carton flaps. With the
flaps folded back, rotate the carton upside down on the floor.
3. Lift the carton leaving the Quik n' Crispy and the corrugated packing set in
place on the floor.
4. Remove the corrugated packing set from around the Quik n' Crispy.
5. Remove the plastic bag from the Quik n’ Crispy then remove the yellow tape
from the front of the Cooking Basket. Pull out the Cooking Basket assembly
and remove the zip lock bag from underneath the Cooking Basket.
6. Remove the Cooking Basket handle; handle bracket, mounting screws, and
adjustable legs from the Operators Manual zip lock bag.
7. Using your fingers, screw the 4 adjustable legs into the bottom of the fryer.
8. Lift the fryer into position on the designated counter. Again, we recommend
a minimum of 1-inch clearance from any adjacent walls or equipment.
9. Adjust the legs to balance the fryer on the designated counter.
10. Attach the Cooking Basket handle bracket to the Cooking Basket. A #2
Phillips head screwdriver and a 5/16" wrench are recommended to insure
proper mounting. Please check the other four screws and acorn nuts on the
cooking basket assembly and retighten if necessary. They may have
loosened while in transit to your facility.
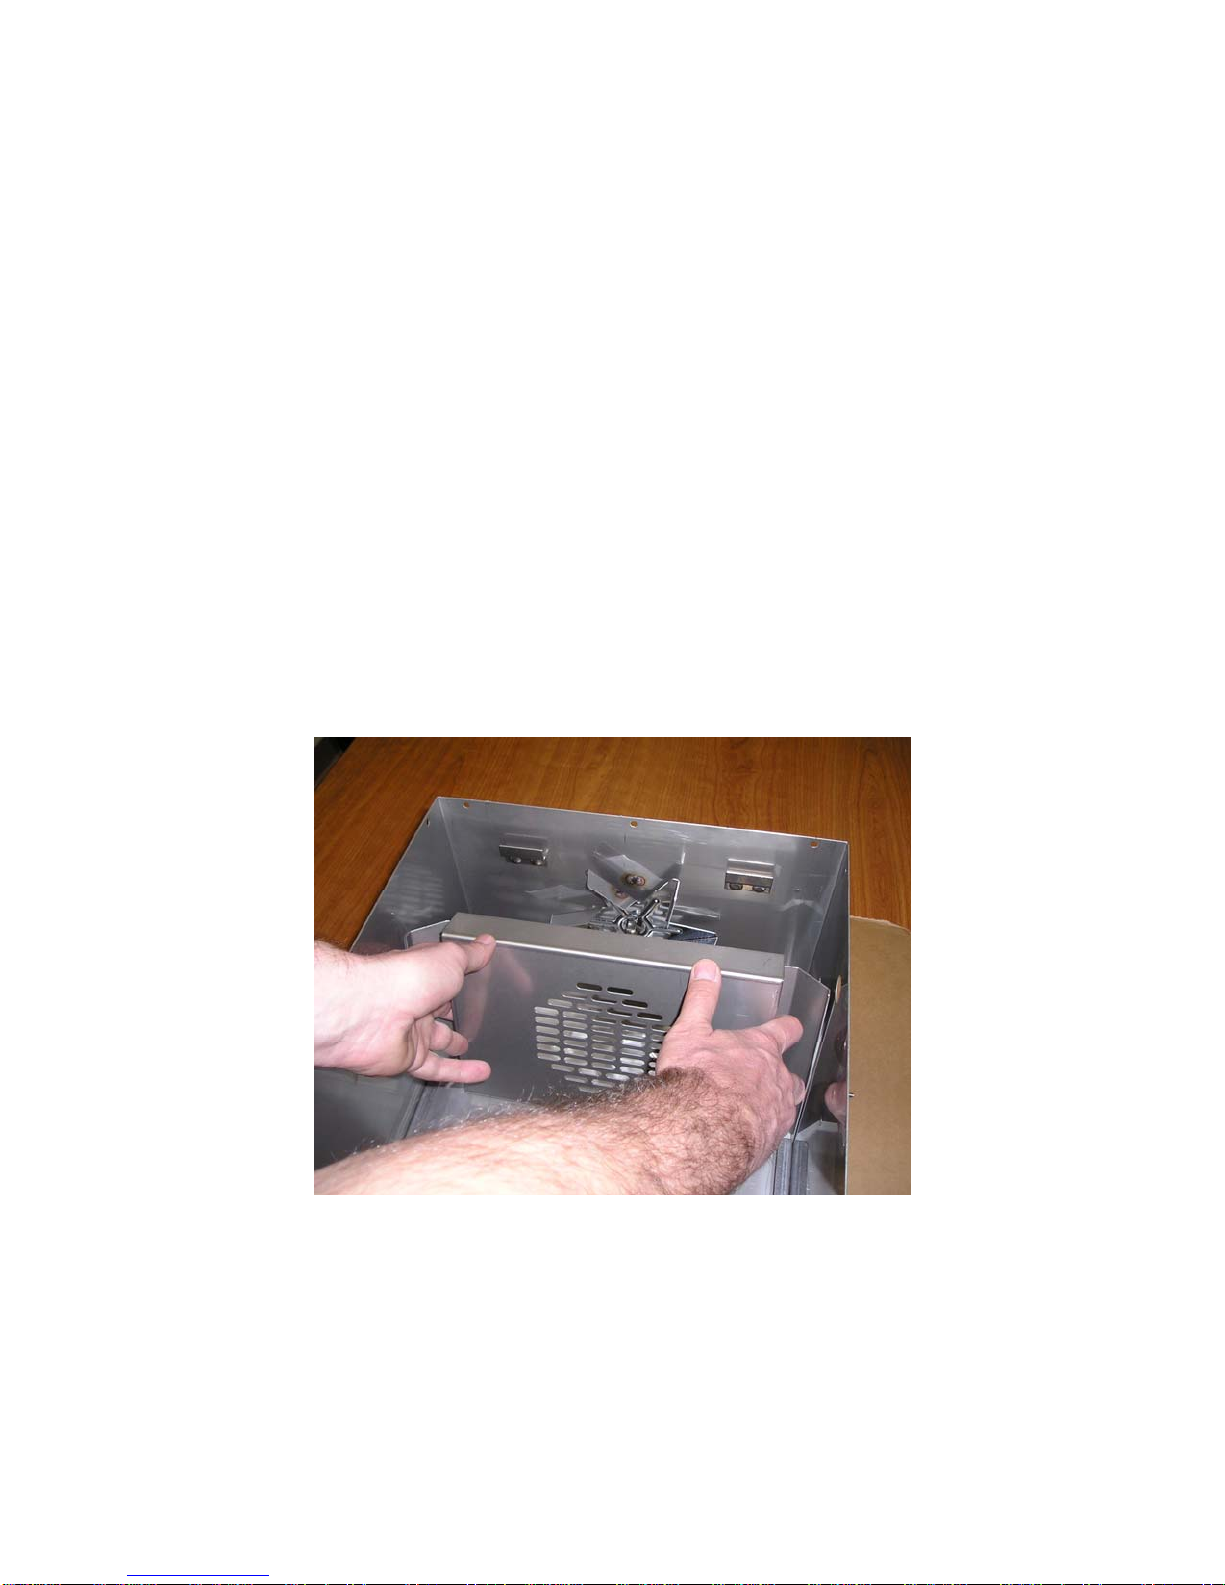
11. Inspect the Separation Wall panel and look to see that it is mounted
properly. Because this can prove to be confusing, we have included a
separate installation procedure on pages 7 and 8. Please turn to page 7 at
this time and remove and install the Separation Wall panel.
12. Once the Separation Wall panel is installed, place the Drip Tray onto the
bottom drawer guides, angle it upward to a 45° angle to clear the stop and
slide it in. This tray should slide in freely.
13. Place the Cooking Basket onto the Drip Tray. The two parts should now
slide in and out of the Quik n’ Crispy in unison.

©2006 QNC, Inc. 0106 Operator’s Manual 6
14. At this point, be sure that the On/Off Switch for the Quik n' Crispy is in
the center “Off” Position. Plug in your Quik n' Crispy.

©2006 QNC, Inc. 0106 Operator’s Manual 7
POSITIONING THE SEPARATION WALL AND SPLASHGUARD
WARNING!
Before proceeding, make sure the Quik n' Crispy power switch is in the “OFF”
position (this is the center position of the On/Off Switch) and that the fan blower is
stationary and that the cooking chamber and heating element are not hot!
1. Lift the Removable Front Panel (RFP) that is located directly above the
Cooking Basket by applying slight upward pressure. It should slide out at an
upward angle.
2. Pull the Splashguard out of the top of the cooking chamber. This is a
formed piece of stainless steel that is located between the heating element
and the ceiling of the inner chamber. When inserted into the cooking
chamber, the surface of the splashguard should be in contact with the ceiling
of the chamber. The splashguard should be removed daily for cleaning with
the other removable items located in the inner chamber.
Separation Wall Cutaway View
3. The Separation Wall was positioned properly in the rear of the inner
chamber of your Quik n’ Crispy prior to shipping. It is held in place by
gravity with two inverted “U” channels that are formed on the back of the
Separation Wall, mating with two “U” channel tabs that are located on either
side of the fan (See picture above) on the rear wall of the cooking chamber.
The Separation Wall can often come off the tabs that hold it in place during
shipping. Please check and confirm that it is installed properly by removing
and replacing the Separation Wall at this time. The photo above illustrates

©2006 QNC, Inc. 0106 Operator’s Manual 8
how the separation wall is installed. It was taken with the top off of the Quik
n’ Crispy in order to clearly show the installation. It is not necessary to
remove the top to accomplish this procedure.
4. Place your hands on each side of the Separation Wall and lift it straight up to
the ceiling of the chamber to clear the mounting tabs. Pull the Separation
Wall towards you until it makes contact with the Heating Element. Now
pull the bottom of the Separation Wall out first and angle it out of the inner
chamber with the bottom of the Separation Wall coming out of the inner
chamber first.
5. Reverse the process and reinstall the Separation Wall by grasping it by the
sides with both hands and insert it into the front opening of the Quik n'
Crispy, entering the front opening just above the top set of Drip Tray guides.
Insert the wall straight back into the Quik n' Crispy until you touch the rear
wall of the cooking chamber keeping the Separation Wall parallel to the
floor of the Quik n' Crispy.
6. Angle the top portion of the Separation Wall upward towards the ceiling of
the inner chamber until it comes in contact with the ceiling. Slide the
Separation Wall further back into the inner chamber so that it comes in
contact with the rear wall of the inner chamber. Now lower the Separation
Wall so that the two tabs of the Separation Wall catch onto the tabs on the
top right and left sides of the rear wall of the cooking chamber. The
Separation Wall should now be hanging upright, with the bottom of the
Separation Wall approximately .25" up off the floor of the cooking chamber.
7. Slide the Splashguard back into the top of the inner chamber. Please note
that the surface of the splashguard should be closest to the ceiling of the
inner chamber.
8. Place the Removable Front Panel back onto the front of the Quik n’ Crispy.
It will slide down at an angle onto the four pins that are located on the front
of the unit.

©2006 QNC, Inc. 0106 Operator’s Manual 9
THE INITIAL OPERATION OF YOUR QUIK N' CRISPY®
WITH MECHANICAL CONTROLS
The first operating cycle after installation should be a confirmation of the Quik n’
Crispy's proper working order. To do this, we recommend that you turn the
On/Off switch to the "Timer On" position. If the Quik n’ Crispy is operating
properly, you should be able to hear the fan circulating air. If you are uncertain
that it is working properly, partially slide out the cooking basket and look into the
fryer. The fan should be turning at a high rate of speed.
Turn the timer clockwise to the 15 minute setting. If, in the operation of the Quik
n' Crispy®, you set the timer for a setting higher then desired, just turn the timer
knob back in the other direction. This will not damage the timer.
Set the thermostat to 400°F. If the fryer is operating properly, you should be able
to hear the fan circulating air and feel heat emanating from the fryer. If you are
uncertain that they are working properly, partially slide out the cooking basket and
look into the fryer. The fan should be turning at a high rate of speed and the
heating element should be glowing.
If the thermostat is working properly, a clicking sound will be heard. This is the
normal on and off cycling of the heating element as it maintains a constant internal
temperature. Also, do not be concerned with any unusual odors during this initial
cooking cycle. As with most commercial cooking equipment, a "factory" odor
(somewhat oily) is emitted until burn-off occurs.
DO NOT PLACE YOUR HANDS OR A METAL OBJECT INTO THE FRYER
WHILE THE UNIT IS OPERATING. This fryer operates at a high voltage and can
result in severe electrical shock to the user if caution is not exercised.

©2006 QNC, Inc. 0106 Operator’s Manual 10
OPERATION INSTRUCTIONS FOR QUIK N' CRISPY®
WITH MECHANICAL CONTROLS
The operation of the Mechanical Controls Quik n' Crispy® Greaseless Fryer is
quite simple, requiring the adjustment of only two controls: the thermostat and the
timer. Please use the following operating procedures:
1. Set the Switch to either the "Switch On", or "Timer On" position. In
the "Switch On" position the Quik n' Crispy will operate continuously.
The timer will operate and buzz at the end of the cooking cycle, but the
Quik n' Crispy will not turn off. The timer will buzz until it is manually
turned to the "Off" position. The advantage to operating the Quik n'
Crispy in this position is to insure that the Quik n' Crispy is always at
cooking temperature and does not require reheating prior to preparing the
next order of food.
In the "Timer On" position, the Quik n' Crispy is turned off and on by
the timer. When the timer reaches the end of the cycle, power to the
Quik n’ Crispy is disengaged. The timer will buzz until it is manually
turned to the "Off" position. The advantage to operating the Quik n'
Crispy in this position is to insure that the Quik n' Crispy turns off when
the cooking cycle is completed, providing additional time for the operator
to remove the food from the cooking basket. If the Quik n' Crispy
continues to operate after the cooking cycle is completed, an order of
cheese sticks can be overcooked in just 20 to 30 additional seconds.
With the Quik n' Crispy turning off at the end of the cycle, the operator
has additional time to remove the food from the cooking basket without it
being overcooked.
2. Turn the timer in a clockwise direction anywhere from 1 to 15 minutes.
The left light should illuminate and the fan should start operating.
3. Set the thermostat for the recommended cooking temperature for the food
product that you wish to prepare. A range of 375-425°F is standard for
oven ready convenience food products. (Please see page 17 for more
information on the cooking procedures.) The heating element will
engage if the timer has been turned on and the thermostat is set at a
temperature other than the "Off" position. The right light should
illuminate indicating that there is current being sent to the heating
element. The heating element will stay on constantly until the desired
temperature is reached. At this time, the right light will not be
illuminated.

©2006 QNC, Inc. 0106 Operator’s Manual 11
The heating element and the right light will then cycle on and off as the
thermostat engages and disengages the heating element to maintain a
constant temperature.
4. Set the timer for the recommended cooking time of the product. When
the timer bell rings, check the product and, either remove the food if it is
ready, or reset the timer for the desired additional cooking time.
5. When the timer is on, the fan operates continuously. The heating element
is only engaged when both the timer is on and the thermostat is at a
setting other than "0". Therefore, the thermostat cannot be considered an
"ON/OFF" switch. Setting the thermostat to a temperature other than "0"
will not turn on the fryer.
6.When you have finished using the Quik n' Crispy® Greaseless Fryer for
the shift or day, we recommend that you place the power switch to the
"Switch On" position, turn the thermostat to "0", and partially open the
cooking basket to admit cool outside air. This will accelerate the cooling
of the unit prior to cleaning, and will also increase the life cycle of the
heating element by not exposing it to high temperatures without air
running across it.

©2006 QNC, Inc. 0106 Operator’s Manual 12
THE INITIAL OPERATION OF YOUR QUIK N' CRISPY®
WITH ELECTRONIC CONTROLS
The first operating cycle of the Quik n’ Crispy after installation should be a
confirmation of the Quik n’ Crispy 's proper working order. To do this, we
recommend that you depress the switch to the right "POWER ON" position. If the
fryer is operating properly the controller should show the word “IdLE.
Next, press any of the 6 menu buttons. Both the cooking chamber blower located
inside the cooking chamber, and the cooling blower located within the electrical
compartment should engage; and the Quik n’ Crispy will start to preheat. The
display will first indicate "PrE-HEAt" and will then display the temperature of
the Quik n’ Crispy in 5°F increments. When it gets to within 20°F of the
temperature setting for the menu you activated, it will show "rEAdY". In
addition, the small light above menu buttons 1 and 2 will illuminate whenever the
heating element is engaged. This light should stay on until the cooking chamber
reaches the temperature set point and will then cycle off and on as the controller
maintains the internal temperature setting. Also, do not be concerned with any
unusual odors during this initial cooking cycle. As with most commercial cooking
equipment, a "factory" odor (somewhat oily) is emitted until burn-off occurs.
DO NOT PLACE YOUR HANDS OR A METAL OBJECT INTO THE FRYER
WHILE THE UNIT IS OPERATING. This fryer operates at a high voltage and can
result in severe electrical shock to the user if caution is not exercised.

©2006 QNC, Inc. 0106 Operator’s Manual 13
OPERATION INSTRUCTIONS FOR QUIK N' CRISPY®
WITH ELECTRONIC CONTROLS
To operate the Quik n’ Crispy, depress the switch to the right "POWER ON"
position. The controller display should show the word “IdLE”. The front label
shows 6 menu selection buttons, Menu 1 to Menu 6. The preprogrammed cooking
times and temperatures are summarized in the following table:
Temperature Temperature
Menu Time
208/240 Volt (600025) 120 Volt (600015/600020)
1 1:00 Minute Preheat 380°F
Cook 400°F Preheat 400°F
Cook 420°F
2 7:00 Minutes Preheat 350°F
Cook 370°F Preheat 360°F
Cook 390°F
3 8:00 Minutes Preheat 350°F
Cook 370°F Preheat 360°F
Cook 390°F
4 4:00 Minutes Preheat 380°F
Cook 400°F Preheat 400°F
Cook 420°F
5 5:00 Minutes Preheat 380°F
Cook 400°F Preheat 400°F
Cook 420°F
6 6:00 Minutes Preheat 380°F
Cook 400°F Preheat 400°F
Cook 420°F
To start a menu, push one of the six menu buttons. The Quik n’ Crispy will start to
heat, and after first displaying "pre heat" it will then display the temperature of the
interior chamber in 5°F increments. When the temperature reaches 20°F of the
programmed temperature, it will show "rEAdY". The heating element will
continue to be engaged until the interior chamber temperature reaches the preset
cooking temperature. Now push the same menu button and it will start counting
down from the menu time to zero. If you wish to "PAUSE" the countdown timer
hit the same menu button once. If you wish to clear the menu, depress the same
menu button for 5 seconds, and the display will revert back to “IdLE”. . When the
controller reaches zero, the buzzer will sound for up to 20 seconds with 3 short
beeps followed by 1 second off, until the 20 seconds have expired, or until you
depress the selected menu button again.
If you wish to keep the interior chamber at the preset cooking temperature
after preparing and removing an order from the Quik n' Crispy, we suggest
that you depress one of the 6 menu buttons to reheat the Quik n’ Crispy to the
"rEAdY" mode.

©2006 QNC, Inc. 0106 Operator’s Manual 14
If you do not keep a menu active, the interior chamber will start to cool down.
This will require you to preheat the Quik n’ Crispy again before you can prepare
your next order. We suggest that you depress the menu button that you are most
likely to use next. If you need to change to a different menu when you prepare the
next order clear the program on one that was depressed by holding it in for 5
seconds and than depress the desired menu button.
When you push a menu button and start running a menu program, the small red
light indicator light on the menu button selected will illuminate. It will indicate
one of the following:
Slow flash - Preheating Rapid flash - Ready
Solid light - Cooking Rapid flash - Done
No light - No menu selected
When you have finished using the Quik n' Crispy for the shift or day, we
recommend that you pull out the Cooking Basket to admit cool outside air and to
place the On/Off switch to the left position “Fan Only” to activate the fan blowers.
This will accelerate the cooling of the unit prior to cleaning, and will also increase
the life cycle of the heating element by not exposing it to high temperatures
without air running across it.

©2006 QNC, Inc. 0106 Operator’s Manual 15
REPROGRAMMING THE MENU TEMPERATURE AND / OR TIME
SETTINGS
To adjust pre-programmed settings for any or all of the menus you must do the
following procedure.
Step 1. Push the On/Off Switch to the right "Power On" position. The digital
display should illuminate and display “IdLE”.
Step 2. Simultaneously press buttons 3 and 6 until "M 1" (Menu 1) appears on
the display. The controller is now ready to be reprogrammed. If Menu 3 or Menu
6 commences, and displays "PrE-HEAt", this is because the buttons were not
pushed simultaneously. Continue to depress both menu buttons until the program
is canceled and you enter into the programming mode.
Step 3. To select the menu that you wish to reprogram, and to move from Menu 1
to Menu 2, to Menu 3, and so on, press button 3, the "Up" key. To move down
the list of menus press button 6, the "Down" key.
Step 4. To change the settings for a specific menu, move up or down to the menu
that you wish to modify. With the appropriate menu displayed, press button 1, the
"Edit" key. The menu selected will now flash back and forth between "StPt 1"
(temperature set point) and the temperature programmed for the selected menu.
The controller is now ready to be reprogrammed.
Step 5. If you wish to change the individual menu cooking times, and not the
cooking temperatures, please skip to Step 6. If you wish to change the cooking
temperature for this menu selection, press button 1, the Edit Key again. The
temperature programmed for that menu will illuminate continuously. Then use
buttons 3 and 6 to move up or down to the desired new temperature. When you are
at the desired temperature, press button 2, the "Enter" key once. This will enter
into memory the new temperature that you selected.
Step 6. If you desire to change the cooking time for the selected menu at this
time, then follow the directions up to Step 4. With the display flashing back and
forth between "StPt 1" and the temperature programmed for the selected menu,
press button 6, the "Down" key, once. The digital display flash will now
intermittently flash between "tinE 1" (Time 1) and the time that is programmed
for that menu.

©2006 QNC, Inc. 0106 Operator’s Manual 16
Step 7. To change the cooking time for a menu selection press button 1, the Edit
key. The time programmed for this menu will display continuously. Now using
buttons 3 and 6, move up or down to the desired time. When you have reached the
desired time press button 2, the Enter Key. The new cooking time is now entered
into memory for the selected menu. Since the cooking fan blower and the cooling
fan blower are activated by the controller, it is important keep the "FAn 1" setting
to “On”. If you inadvertently change this setting to “Off”, neither of the blowers
will engage when a menu is started.
In addition, we recommend that you use only one time and one temperature setting
for each menu. The controller has four submenus within each menu program.
These submenus run consecutively, one after the other. If you inadvertently
enter a time other than “0” into "tinE 2" (Time 2), "tinE 3" (Time 3) or "tinE
4" (Time 4), the menu will add these times to the times already entered into "tinE
1" (Time 1).
After you have changed all of the Menu programs that you wish to change, press
button 2, the "Enter key" a second time and it will bring you back to the “IdLE”
display and you are ready to use your Quik n' Crispy with your new menu settings.

©2006 QNC, Inc. 0106 Operator’s Manual 17
COOKING PROCEDURES
The Quik n' Crispy can fry, grill, and bake a wide array of frozen, oven ready
products available through normal food service distribution and wholesale clubs.
To prepare "fried" menu items in the Quik n’ Crispy, you must prepare foods
that have OVEN preparation directions listed on the package. As an example,
egg rolls, corn dogs, beer battered or tempura battered vegetables and battered
cheese sticks are typically fryable or bakeable. Seasoned or coated french fries or
potato wedges are fryable or bakeable. These types of products will come out of
the Quik n' Crispy crisp on the outside and moist on the inside as if they were fried.
If you wish to prepare a non-battered, non-coated, or non-seasoned menu item, it
must be a bakeable version. To prepare shoestring or crinkle cut french fries, or
skin-on potato wedges, you must use a bakeable version. If you try to prepare
menu items in the Quik n' Crispy that do not have baking directions listed on the
package, they will typically be soggy and limp, and will not change in color from
a pale white to a golden brown. If this happens with a menu item that you are
testing, contact your food distributor and have them send you the correct version of
the menu item that you wish to prepare. If your food distributor sales person is
not sure of the menu items that can be prepared in the Quik n’ Crispy, have them
review the 35 page menu found with this Operator’s Manual or have them either
contact your Quik n’ Crispy distributor or contact QNC, Inc.
To prepare breaded items such as chicken nuggets and chicken strips you
need to use either a pre-cooked or a fully cooked product. Pre-cooked means
that the product has been partially cooked, is pre-browned on the outside, and the
interior of the product is raw. Fully cooked means that the product is cooked on
both the outside and the interior. You cannot prepare ready-to-cook items that
have a white breading on the outside. They will cook, but they will not turn golden
brown in the Quik n' Crispy.
To grill foods in the Quik n' Crispy, you should use pre-cooked or fully
cooked meat, poultry, or fish products. As an example, hot dogs and some
sausages are fully cooked products and could be consumed cold right from the
package. These items will grill in the Quik n' Crispy with a char broiled
appearance. To prepare grilled chicken breasts or hamburgers, you should use
fully cooked products. They will come out of the Quik n' Crispy sizzling on the
outside and tender and juicy on the inside.

©2006 QNC, Inc. 0106 Operator’s Manual 18
You can also bake frozen pizzas or prepare freshly made pizzas using a par-baked
crust in the Quik n' Crispy. Prepare hot sandwiches open faced in just 60 to 90
seconds. To bake cookies, pastries, or muffins you may need to lower the
temperature setting to 350° and use a muffin tin, a small sheet pan, or foil.
Please note the following general cooking procedures:
1. Always spray the Cooking Basket and Drip Tray with an aerosol
vegetable shortening prior to the first cooking cycle of the day, or the
first cooking cycle since cleaning. Do not spray non-stick aerosol
directly into the fryer, or while the fryer is operating. Wipe any excess
oil from the Drip Tray with an absorbent paper towel or bar towel. To
help reduce any drag between the Drip Tray and Tray Guides, pull the
Drip Tray as far back as possible, and rub the towel with the excess oil on
the underside of each side of the Drip Tray.
2. Remove the product you wish to cook from the freezer or refrigerator.
Note: Please be aware that similar product will vary in cooking time
depending on its internal temperature at the time of cooking. In other
words, frozen fried chicken will take longer to cook than the same fried
chicken that has been thawed in the refrigerator.
3. If this is the first cooking cycle of the day the Quik n' Crispy needs to be
warmed to the preprogrammed cooking temperature. Please follow this
table as a guide to warm-up times and normal operating temperatures.
Voltage Quik n’ Crispy
Part No. Warm-Up
Time Normal
Operating
Temperature
120 volt 600000/600005/600015/600020 6 to 9
Minutes 390° to 420°
208/240
volt 600010/600025 2 to 3
Minutes 370° to 400°
Cooking at a temperature higher than these above can cause the Quik n'
Crispy to smoke. If smoke is emitted from the Quik n' Crispy, either
clean the Cooking Basket and Drip Tray and/or lower the temperature
setting.
4. Slide the Cooking Basket and Drip Tray approximately 2/3 of the way
out of the Quik n’ Crispy. The Drip Tray will act as a crumb catcher
while placing the food product into the Cooking Basket.

©2006 QNC, Inc. 0106 Operator’s Manual 19
Placing Items in Cooking Basket
5. Arrange the product to be cooked in a single layer in the Cooking Basket.
Avoid stacking the product to be cooked. An even single layer of
product will cook more evenly than products placed into the Cooking
Basket in a stacked or clumped arrangement.
6. Select a Menu time to approximately 70% of the food manufacturer's
suggested convection oven cooking times. As an example, if the
suggested convection oven cooking time is 10 minutes, this item should
take approximately 7 minutes in the Quik n' Crispy. If you have a Quik n’
Crispy with mechanical controls, set the timer for 7 minutes. When the
timer bell rings, check the product and, either remove the food if it is
ready, or reset the timer for the desired additional cooking time. If you
are using a Quik n’ Crispy with electronic controls, Menu button 2,
which was programmed at the factory to 7 minutes, could be used,
providing you have not re-programmed it. Review the enclosed menu for
suggested cooking times for various menu items. Please be aware that
variations in the cooking times will occur depending on the internal
temperature of the food product, variances in voltages, and the quantity
of food being cooked at one time. We suggest that you experiment with
cooking times and temperatures and record the results for future
reference. This testing will prevent under-cooking or burning of food
products.
Other manuals for GF - II
2
Table of contents
Other Quik n’ Crispy Fryer manuals
Popular Fryer manuals by other brands

MPM
MPM MFR-06 user manual

Lotus
Lotus BS-1EM Instructions for the installation and use

Henny Penny
Henny Penny F5 quick reference

Frymaster
Frymaster SR42 Series, SR52 Series, SR62 Installation, operation and maintenance

DeLonghi
DeLonghi D406DZ Owner's instruction

cecotec
cecotec CECOFRY BOMBASTIK 6000 FULL instruction manual

Rommelsbacher
Rommelsbacher FRP 2135/E instruction manual

Emeril Lagasse
Emeril Lagasse FRENCH DOOR AIRFRYER 360 quick start guide

Frymaster
Frymaster BIH14 Series Operator's manual

Philips
Philips HD925 Series user manual

STARFRIT
STARFRIT 024606 Instructions for use and care

Bestron
Bestron AF370CO instruction manual