Racelogic LabSat 3 User manual

LabSat 3 Wideband User Manual
•01 - LabSat3W Introduction
•02 - LabSat3W Components
•03 - LabSat3W Media
•04 - LabSat3W Menu layout
•05 - LabSat3W Record and Replay operations in detail
•06 - LabSat3W SSD File Layout
•07 - LabSat3W Battery
•08 - LabSat3W xternal reference clock input
•09 - LabSat3W Digital Channels
•10 - LabSat3W CAN Bus
•11 - LabSat3W RS232
•12 - LabSat3W Digital In/Out
•13 - LabSat3W xternal Synchronisation
•14 - LabSat3W WiFi Dongle
•15 - LabSat3W Remote control
•16 - LabSat3W Converting LabSat scenarios
•17 - LabSat3W SatGen Software
•18 - LabSat3W Troubleshooting
•19 - LabSat3W Technical Properties
•LabSat3W C Declaration of Conformity
•LabSat3W PIN OUTS
•LabSat3W Replacement parts and optional accessories
•LabSat3W RoHS Declaration
•LabSat3W Technical Specificiation
•LabSat3W Upgrading Firmware
Powered by
1

01 - LabSat3W Introduction
LabSat 3 Wideband is an RF signal record and replay system with 3 independently tuneable wideband channels. This
allows capture and replay of most GNSS signals and even a few non-GNSS signals. The three RF channels all share a
common sample rate which can be adjusted from 10 - 60 MHz.
Quantisation of I and Q signals is selectable from 1, 2 or 3 bits per signal. Depending on the combination of channel
bandwidth and quantisation, LabSat 3 Wideband will adjust the number of available RF channels to keep the record data
bandwidth within a rate that ensures continuous file transfer.
Because wideband recording allows capture of multiple GNSS frequencies within each RF channel, the procedure for
configuring LabSat 3 Wideband involves selecting the frequency bands most suitable for capture of the required GNSS
signals. LabSat helps by displaying only the frequencies for GNSS bands appropriate for the selected bandwidth.
Despite its simplicity, LabSat 3 Wideband supports a number of powerful features for use in industries such as
automotive, sports and aerospace including three RF channels for multiple constellation testing, dual CAN Bus
recording, inertial sensor logging and battery powered operation.
Powered by
https://racelogic.support/
03LabSat_GPS_Simulators/
LabSat_3_Wideband/
LabSat_3_Wideband_User_Manual/
2

Additional features:-
• Available for all global navigation satellite systems (GNSS). i.e GPS, GLONASS, BeiDou & Galileo.
• Additional systems include QZSS, IRNSS, SBAS and Commercial differential services.
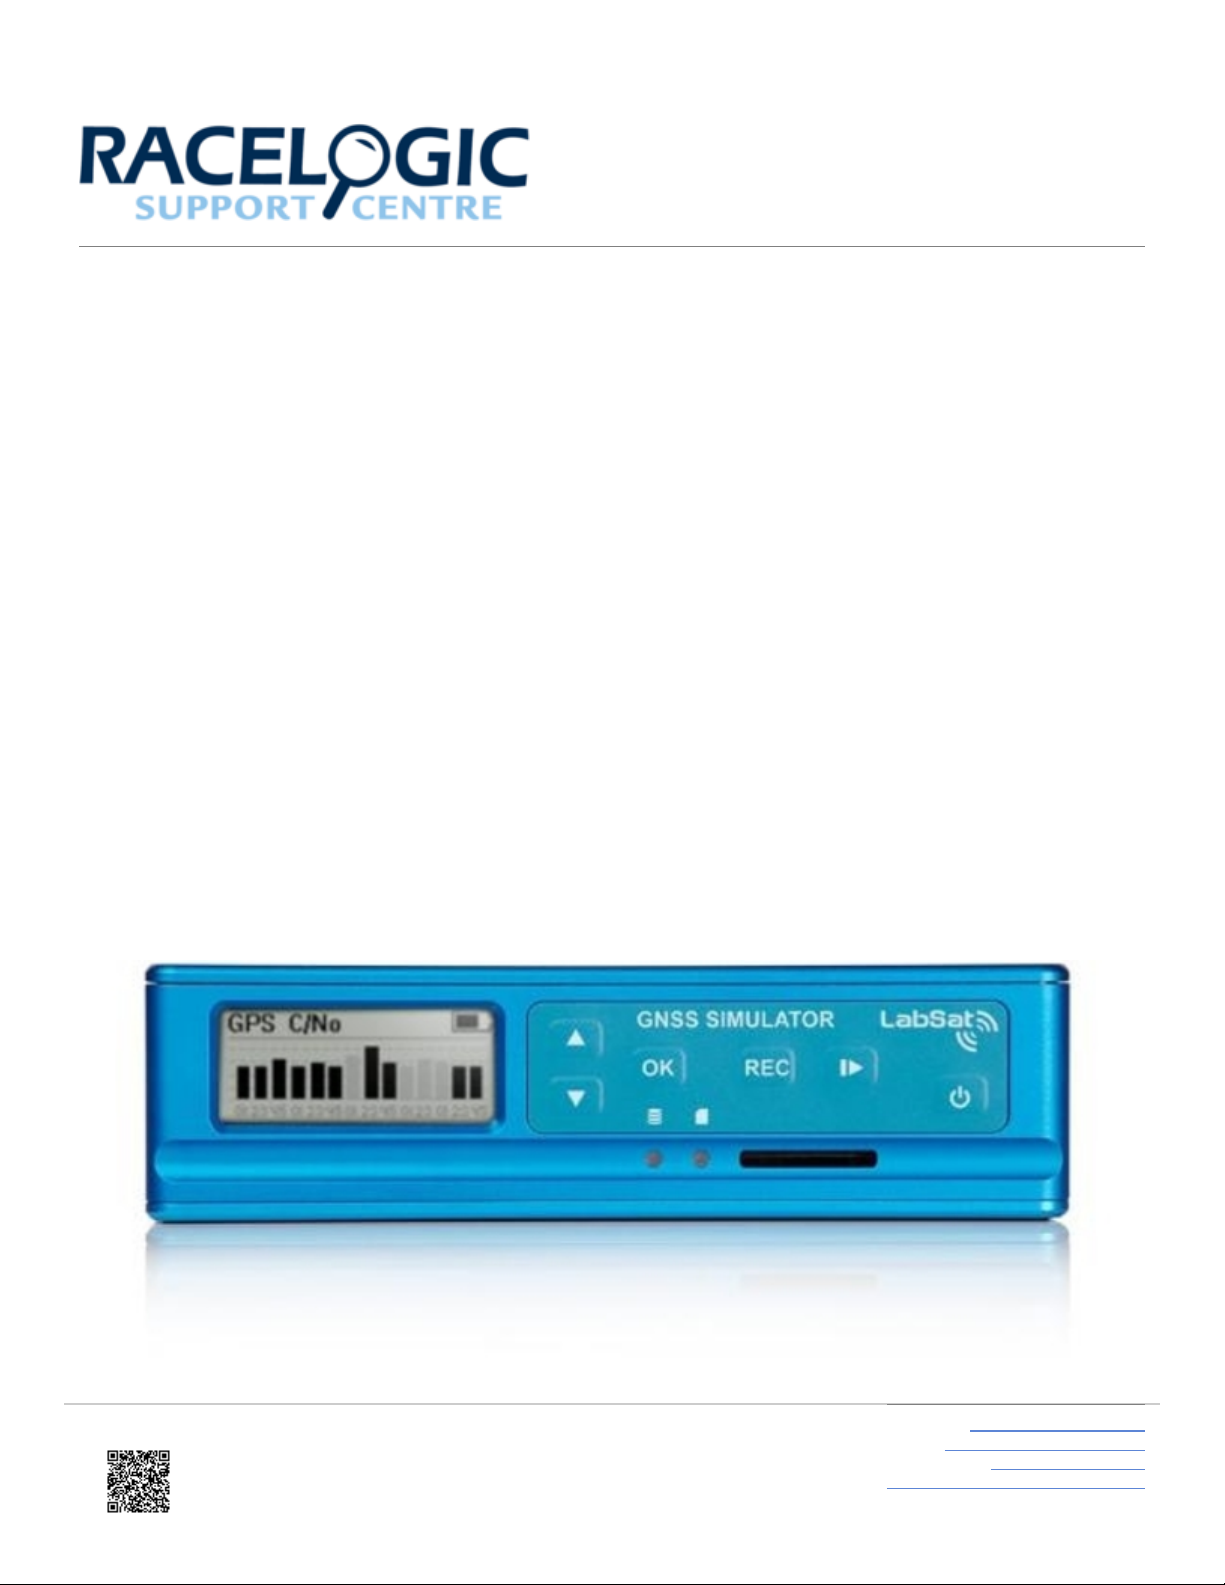
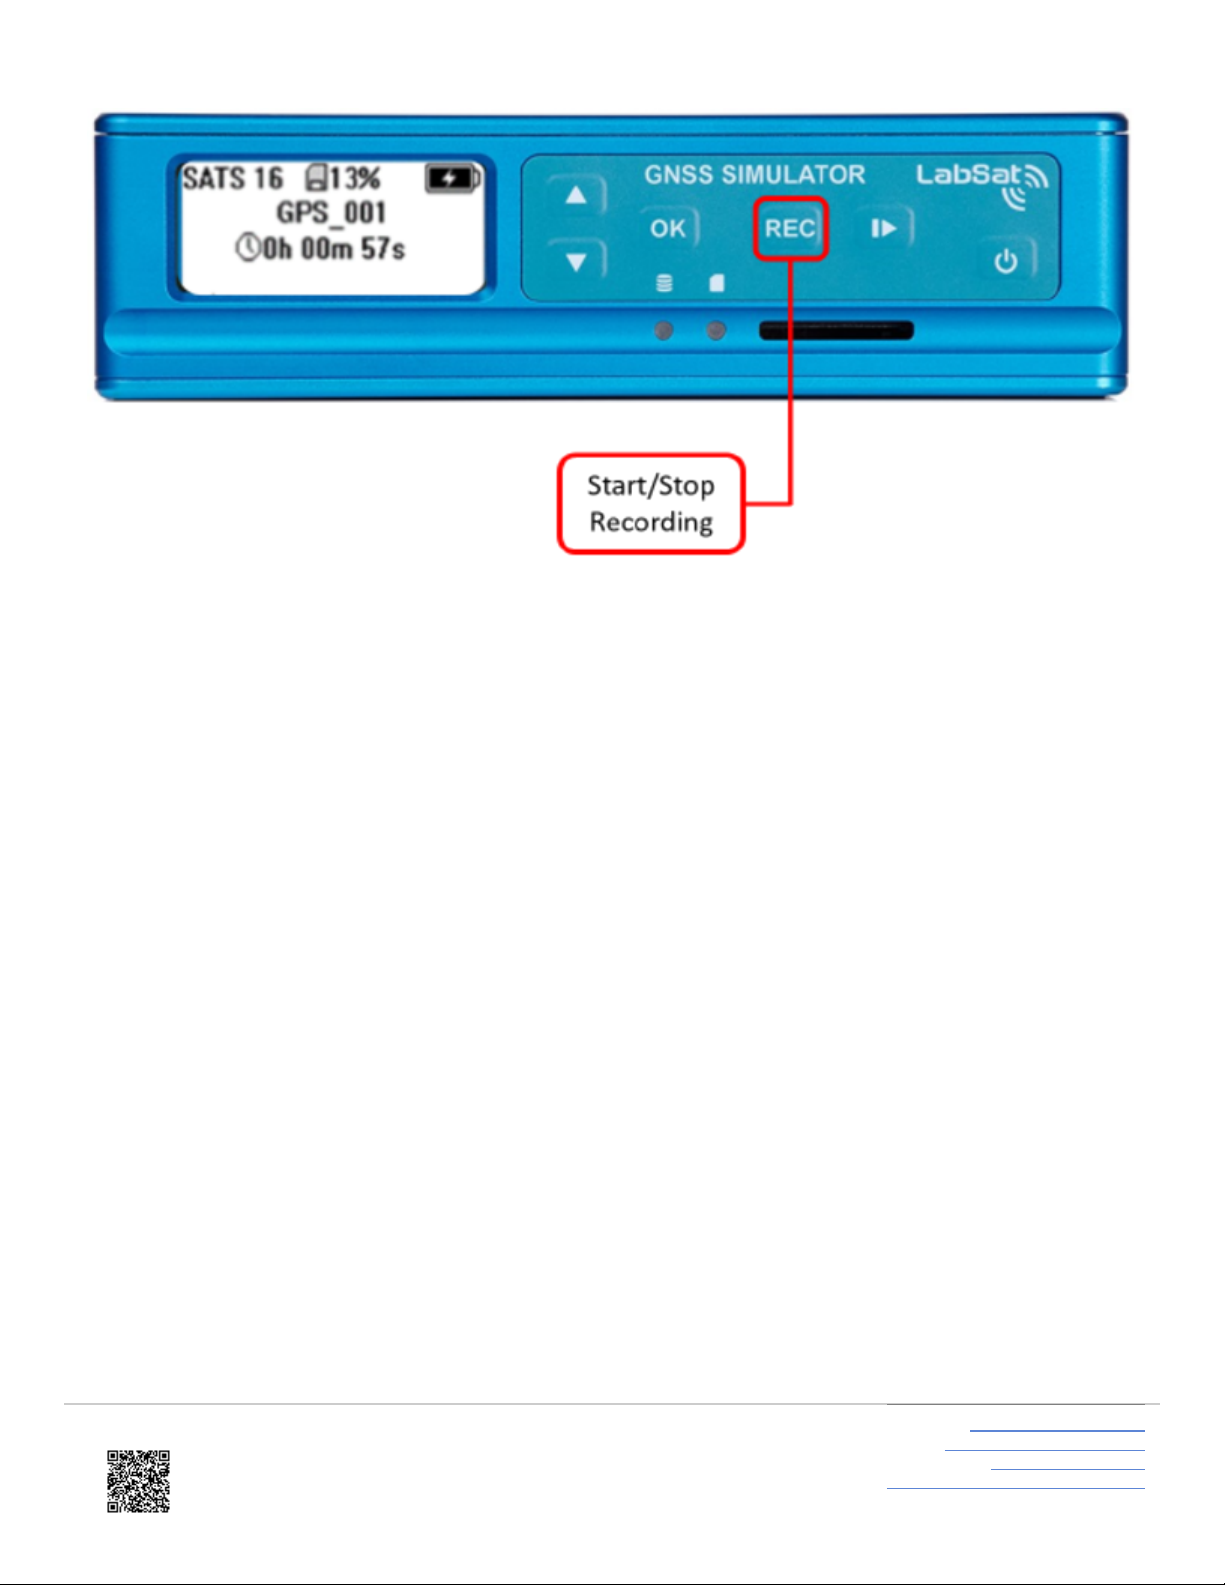
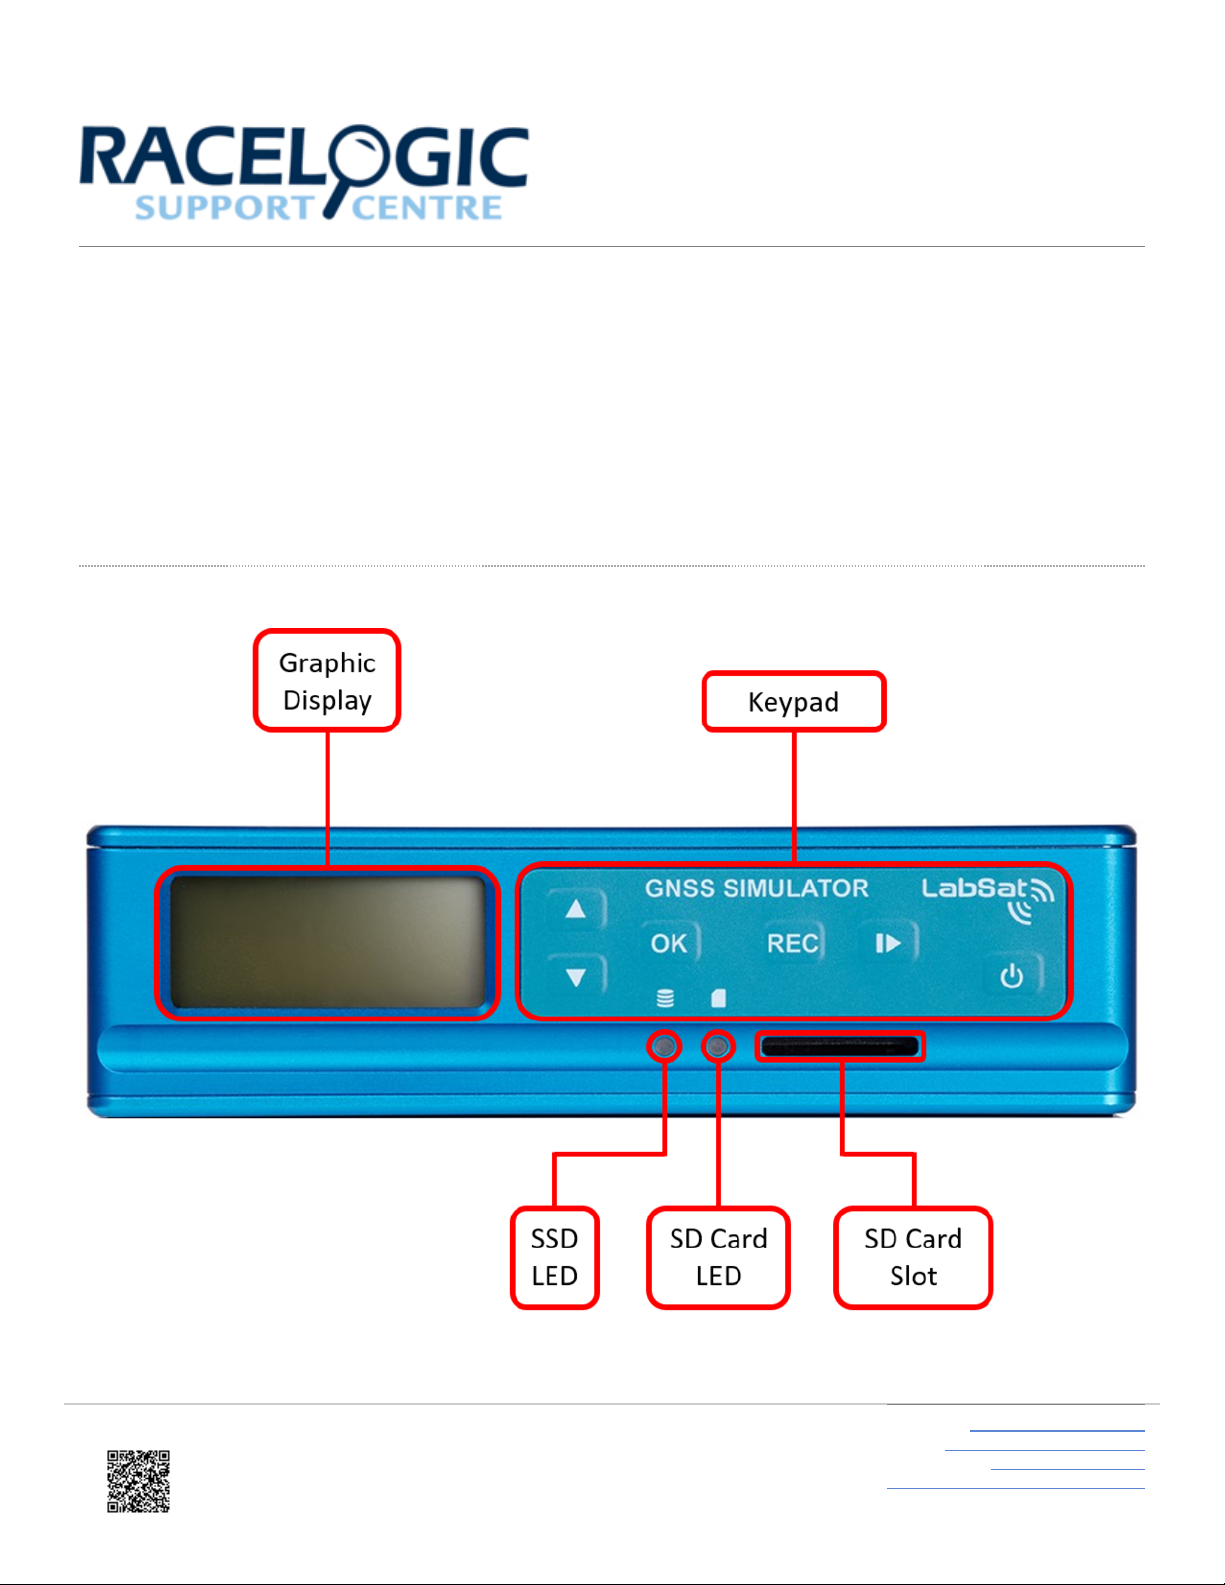
• Simple to use one touch recording.
• Record or replay using internal SSD.
• RS232, Digital & Dual CAN interface.
• Remote control over thernet.
• xternal 10 MHz Reference input.
• Selectable TCXO/OCXO.
• O M version available for system integrators
• Digital input for event marking or 1PPS recording.
• Adjustable attenuation (+20 to -69 dB).
• On-board GNSS receiver for monitoring RF during record and replay (L1 only).
Product description:-
Version Description
RLLS03W-RP Three channel record & replay system with CAN Bus /
RS232 / Digital IO
RLLS03W-P Three channel replay only system with CAN Bus /
RS232 / Digital IO
How does it work?
GNSS stands for Global Navigation Satellite Systems and is a general term that covers satellite positioning
constellations belonging to different countries around the world. These include, among others, the United States ‘GPS’,
the Russian ‘GLONASS’ and the Chinese ‘BeiDou’ systems. LabSat 3 Wideband is capable of recording and replaying
the raw radio signals that are transmitted by the various constellations of satellites. LabSat receives the signal from an
antenna just like a standard GNSS receiver but instead of processing each of the received signals to calculate a position
fix, LabSat 3 Wideband samples and stores the antenna signal at very high speed.
When recorded RF signal is replayed by LabSat 3 Wideband into a standard GNSS receiver, such as a portable
navigation system, the receiver will accept the signal as live, including all the velocity, delays and multipath effects.
This makes LabSat 3 Wideband invaluable for recording dynamic scenarios such as driving through a city in a vehicle.
The benefits of using a recorded test signal are consistency and reliability. For example, if testing of a product involves
Powered by
https://racelogic.support/
03LabSat_GPS_Simulators/
LabSat_3_Wideband/
LabSat_3_Wideband_User_Manual/
3

going for a drive each time the receiver firmware is updated, the satellite positions and atmospheric conditions will all be
different for every drive. If the drive is recorded once with LabSat 3 Wideband, the recorded signal can be replayed over
and over on the bench saving hours of drive time and with the knowledge that conditions will be the same for each reply.
Registration
Racelogic recommend that all LabSat devices are registered immediately on receipt. Please go to www.labsat.co.uk/
register and fill in all the details requested. If you register your LabSat within its first year warranty, you will
automatically receive an additional year's warranty.
Registering your LabSat will enable you to easily communicate with our support team. Any firmware / software updates
will be available on the LabSat website. Updates are more robust and easier to use, and later firmware releases offer
bug fixes as well as added features and improvements to the original specification of the product. Your details will be
available to our Support Team, in case you need any assistance in the future.
Replay xample
xample of Replay using the internal SSD with preloaded scenario.
Briefly press the power button to power up LabSat 3 Wideband. Connect from the RF output on the rear of LabSat 3
Wideband to your GPS system antenna input. Use the 'UP/DOWN' arrows to select a file. Press the 'PLAY' button to
start replay.
Powered by
https://racelogic.support/
03LabSat_GPS_Simulators/
LabSat_3_Wideband/
LabSat_3_Wideband_User_Manual/
4

LabSat 3 Wideband contains an on board GNSS receiver that allows monitoring of the RF signals during record or
replay. To show a live histogram of satellite signal levels detected by the on board receiver, press the 'OK' button during
replay. Press the 'OK' button again to return to the replay status display. During replay, pressing the 'PLAY' button will
halt replay and return to the file list.
Record xample
xample of Recording your own file to the internal SSD card.
To record a new file, connect the LabSat 3 Wideband antenna to the RF input on the rear of the LabSat. nsure that the
antenna has a clear view of the sky, press the 'REC' button to start recording. Press the 'REC' button again to stop
recording. While recording, if the SSD becomes full, recording will stop automatically. During recording, pressing
the 'OK' button will switch the display to show a live histogram view of the satellite levels being received by the on-board
GNSS monitor. Pressing the 'OK' button again will return to the record status display.
Powered by
https://racelogic.support/
03LabSat_GPS_Simulators/
LabSat_3_Wideband/
LabSat_3_Wideband_User_Manual/
5

During recording, while using battery power, the GNSS monitor display will automatically revert to the record display
after a short period to conserve battery power. This power save feature can be switched off but it is recommended to be
left active for maximum battery life.
Powered by
https://racelogic.support/
03LabSat_GPS_Simulators/
LabSat_3_Wideband/
LabSat_3_Wideband_User_Manual/
6

02 - LabSat3W Components
LabSat 3 Wideband has been designed to be portable and simple to use allowing virtually anyone to gather field test
signals without in depth training. Recording GNSS signals is as simple as positioning the antenna and pressing one
button. The sunlight-readable graphic display gives instant feedback of record status and can show live histogram data
to verify satellites in view during recording. Back at the Lab, recorded signals can be replayed at the push of a button for
repeatable, reliable testing.
LabSat 3 Wideband Front
Powered by
https://racelogic.support/
03LabSat_GPS_Simulators/
LabSat_3_Wideband/
LabSat_3_Wideband_User_Manual/
7

Name Type Description
PWR 2 pin L MO 8 - 30 V DC Power Supply input
HOST USB USB ‘A’ Connection of USB Storage devices
and WiFi Dongle
USB USB ‘B’ NM A data output
TH RN T RJ45 Remote access and control
XPANSION 36 Way MDR 1PPS, Digital I/O, CAN, RS232
R F SMA 10 MHz Reference Clock
Input/Output
RF OUT SMA Output RF signal
RF IN SMA Input RF signal (RP variants only)
Powered by
https://racelogic.support/
03LabSat_GPS_Simulators/
LabSat_3_Wideband/
LabSat_3_Wideband_User_Manual/
9

03 - LabSat3W Media
LabSat 3 Wideband file formats
LabSat 3 Wideband uses a Linux XT4 formatted drive for data storage. Recorded data consists of two separate files
with the same name but with different extensions. The RF signal data is stored with the extension '.LS3W' and is a raw
binary file. The configuration used to record and replay the RF data is stored in the '.ini' file. When copying files to or
from the Labsat 3 Wideband SSD, both the '.LS3W' and '.ini' files must be copied together.
LabSat 3 Wideband SD Card
The 4 GB SD card included with the LabSat 3 Wideband system is used for firmware upgrades and includes the
following:
• SatGen simulation software video
• LabSat 3 Wideband demonstration files description
• Quick Start pdf
LabSat 3 Wideband 1 TB Solid State Drive (SSD)
The LabSat 3 Wideband 1 TB SSD includes the following:
• LabSat 3 Wideband sample files:
◦ 1 x UK dynamic file - 20 mins
◦ 3 x UK static files - 20 mins each
◦ 1 x Korea static file - 20 mins
◦ 1 x India static file - 20 mins
LabSat 3 Wideband SSD Access
The 1 TB Solid State Drive is removable. To gain access to the LabSat 3 Wideband internal SSD the systems lid must
be removed. To remove the systems lid, the locking pin at the rear must be depressed while the lid is push back towards
the catch. The SSD can then be removed by gently lifting the attached tag.
Powered by
https://racelogic.support/
03LabSat_GPS_Simulators/
LabSat_3_Wideband/
LabSat_3_Wideband_User_Manual/
10

The system must be powered down while the SSD is being removed or reinserted.
The system lid can be reattached by positioning the locating lugs with the mounting holes and the LabSat logo facing
forward. The lid will automatically lock by pressing down and sliding forward.
Note: Due to the high sustained data rates required for wideband recording, not all SSD devices are compatible with
LabSat 3 Wideband. Only drives supplied by Racelogic are supported.
LabSat 3 Wideband SSD Format
To format an SSD with LabSat 3 Wideband, the user should select the following options:
MENU >File >Format SDD >Yes, as shown below.
Note: Firmware version 1.0.414 and higher support formatting SSDs from other settings to Linux EXT4.
Powered by
https://racelogic.support/
03LabSat_GPS_Simulators/
LabSat_3_Wideband/
LabSat_3_Wideband_User_Manual/
11

LabSat 3 Wideband File Transfer
To connect LabSat 3 Wideband to a PC, connect an thernet cable between the system and the PC. nsure that a
static IP address or DHCP is set within the LAN menu, enter the ‘About’ menu to view the allocated IP address. Open a
file explorer window on the PC and enter \\ followed by the IP address. See example below.
Files can also be copied from the LabSat 3 Wideband internal SSD via SD or USB media. The user can do this by
following the steps below.
1. Connect/insert SD or USB media
2. Highlight the file requiring transfer
3. Press 'OK' and then 'OK' again to enter the 'File' menu
4. Select 'Copy' and choose the media location
Note: Any SD card used for file transfer must be in exFAT format. USB media being connected can be in any Linux
format that supports files larger than 4GB, alternatively exFAT formatting can also be used.
Powered by
https://racelogic.support/
03LabSat_GPS_Simulators/
LabSat_3_Wideband/
LabSat_3_Wideband_User_Manual/
12

04 - LabSat3W Menu layout
LabSat 3 Wideband features a multi constellation GNSS receiver which can be used to monitor L1 band GNSS signals
in either the incoming RF signal during recording or the outgoing RF signal during replay. The USB device connector on
the rear of LabSat 3 Wideband functions as a virtual serial connection and will output NM A data from the GNSS
monitor at 115,200 baud when record or replay is active.
In addition to this, pressing the 'OK' button during record or replay will switch the display to show satellite tracking levels
for GPS L1, GLONASS L1, Beidou B1 and Galileo 1 satellites. Pressing the up or down arrows in this display will swap
between constellations. It is important to note that when switching between constellations on the LCD display, the
configuration of the GNSS monitor, and therefore the NM A data content, will change.
The primary aim of the GNSS monitor during recording is to give indication that an L1 band GNSS antenna is connected
and working. It is important to understand that the monitor is listening directly to the RF input and so the presence of
valid satellites indicated by the monitor does not have any link with the user configured constellation frequencies being
recorded. Therefore it is up to the user to check that these are correctly configured. If the antenna used does not support
L1 GNSS signals, then the GNSS monitor will not show any satellite tracking information.
During replay, the GNSS monitor will listen into the RF output signal. If the replayed signal contains valid L1 GNSS
signals then these will be reported by the monitor.
Powered by
https://racelogic.support/
03LabSat_GPS_Simulators/
LabSat_3_Wideband/
LabSat_3_Wideband_User_Manual/
13

Main ‘File Display’ screen button functions
Move up/Down through list of files or menu options.
Begin replay of the currently highlighted file.
Start recording to a new file using the current settings.
File number will be incremented.
Press OK to select option.
Press for 3 seconds to power down LabSat.
Powered by
https://racelogic.support/
03LabSat_GPS_Simulators/
LabSat_3_Wideband/
LabSat_3_Wideband_User_Manual/
14

Top Level Menu Functions
File
•Info – Display file info for selected file.
•Protect – Write protect current file to avoid accidental deletion.
•Copy – Copy selected file to SD/USB media.
•Delete – Delete selected file, Yes/No.
•Format – rase and Format internal SSD, Yes/No.
Constellation
Allows configuration of recorded frequency bands. Within the constellation options are signal bit-depth (quantisation)
and bandwidth settings. Depending on the combination of bit depth and bandwidth, the number of configurable RF
channels will be automatically adjusted to maintain the maximum available disk (SSD) bandwidth.
•Quan/Bandwidth – Adjust both quantisation (bit depth) and recorded signal bandwidth. Changing bandwidth will
clear the RF channel settings requiring new RF channel selection by the user.
•RF Channel 1/2/3 – Configure the centre frequency for each available RF channel. Only frequencies containing
valid GNSS signals for the selected bandwidth will be shown. In addition to this, once a frequency has been
selected on one channel, the same frequency cannot be used on another channel.
•Load Custom Profile – Allows the user to select a profile that has been previous saved via the Web Server.
Play Options
Allows control over how LabSat will replay a file.
•Loop – Selected file will replay continuously.
◦Pause – Define a pause duration between loops.
•From – Specify a time in the scenario to replay from.
•For – Specify how long the scenario will replay for.
Record Options
Allows control over how LabSat will record a file.
•For – Specify how long the LabSat will record for.
Powered by
https://racelogic.support/
03LabSat_GPS_Simulators/
LabSat_3_Wideband/
LabSat_3_Wideband_User_Manual/
15

Setup
Most user configurable device settings are accesses from the S TUP menu.
•CLK REF
◦OCXO – Configure clock to OCXO (Oven Controlled Oscillator).
◦TCXO – Configure clock to TCXO (Temperature Controlled Oscillator).
◦External 10 MHz – Configure clock to 10 MHz external signal.
◦REF OUT – Output a 10 MHz reference signal for use by other systems (available when OCXO or TCXO is
selected).
•Digital
◦CH1 to CH4
▪CAN1 – Record CAN Bus channel 1.
▪CAN2 – Record CAN Bus channel 2.
▪1PPS – Record 1PPS signal from internal GNSS monitor (disable power save).
▪RS232 – Record RS232 signal.
▪DIGI 1 – Record state of DIGI input signal.
▪DIGI 2 – Record state of DIGI input signal.
•Ext Sync – When enabled allows the user to synchronize record or replay using a switch on the DIGI2 expansion
pin.
•CAN
◦Log File – When selected the CAN data will be logged into a separate .txt file.
◦Replay Log File – When selected if a .txt file is available for the scenario it will be replayed.
◦CAN1 – Set the desired baud rate.
◦CAN2 – Set the desired baud rate.
◦Silent Record – Determines whether or not the LabSat sends an acknowledge pulse during recording (both
channels).
•RS232
◦Log File – When selected the serial data will be logged into a separate .ser file.
◦Replay Log File – When selected if a .ser file is available for the scenario it will be replayed.
◦Port Settings
▪Baud – Set the desired baud rate.
▪Databits – Set the desired databit.
▪Stopbits – Set the desired stopbit.
▪Parity – Set the desired parity.
•LAN
◦Static IP – nable/Disable Static IP.
◦IP – Set the IP address assigned to LabSat 3 Wideband (available when Static IP is selected).
◦Mask – Set the Subnet mask assigned to LabSat 3 (available when Static IP is selected).
Powered by
https://racelogic.support/
03LabSat_GPS_Simulators/
LabSat_3_Wideband/
LabSat_3_Wideband_User_Manual/
16

◦GW – Set the default gateway for the network (available when Static IP is selected).
•Display – Adjust display contrast and backlight brightness.
•Power Save – When selected, will power down display backlight and internal monitor during recording.
•Disable Beep – When selected the keypad sound will be disabled.
•Time – Configure internal clock using UTC time from internal GNSS monitor or set manually.
•Export Config – A settings.txt file containing the LabSat's current settings will be placed in the root of the SSD.
About – Contains information specific to the LabSat, e.g. serial number and firmware version.
Exit – Return to file list.
Powered by
https://racelogic.support/
03LabSat_GPS_Simulators/
LabSat_3_Wideband/
LabSat_3_Wideband_User_Manual/
17

05 - LabSat3W Record and Replay operations in detail
Replay operation
LabSat 3 Wideband uses SSD memory for storage and playback of GNSS data.
The 1 TB Solid State Drive (SSD) supplied contains a selection of pre-recorded scenarios. These scenarios can easily
be deleted if extra space is required.
The RF OUT connector is a 50 Ω output which can be connected directly to the antenna input of the GNSS receiver
being tested. The RF OUT connector is internally DC blocked with a 470 Ω DC load to protect the RF output stage but
does provide a small resistive load to mimic an antenna load. When a file is selected for replay, the LabSat will configure
constellation frequencies and digital channels automatically before starting replay.
During replay, pressing 'OK' will show a live histogram of satellite levels detected by the internal GNSS receiver. The
internal receiver currently supports GPS, GLONASS, BeiDou & Galileo constellations. When the satellite levels are
displayed, the 'UP/DOWN' keys switch between the constellation groups. Please note that when switching between
modes, the internal receiver will take some time to re-acquire satellite signal levels. In the case of GLONASS signals for
example, it may take over a minute to show the satellite signal information.
LabSat 3 Wideband features 90 dB of attenuation control over the nominal signal output. This is adjustable in 1 dB
steps. During replay, Pressing the 'DOWN' arrow will increase attenuation resulting in a lowering of the RF power
output. This reduction of output power is indicated by the negative dB value. Pressing the 'UP' arrow will decrease
attenuation resulting in a high RF output level.
Powered by
https://racelogic.support/
03LabSat_GPS_Simulators/
LabSat_3_Wideband/
LabSat_3_Wideband_User_Manual/
18

Record operation
LabSat 3 Wideband uses an internal SSD (Solid State Drive) memory for storage and playback of GNSS data. This is
formatted in an XT4 linux format.
LabSat 3 Wideband is supplied with a magnetic mounting GNSS antenna. The antenna is an active device with
approximately 28 dB of gain. The LabSat provides a 3.3 V DC bias for antenna power on the centre pin of the RF IN
connector. It is also possible to use third party antennas providing they are compatible with the 3.3 V bias.
If connecting LabSat to an antenna which requires a higher bias voltage (e.g. 12 V), the antenna bias must be supplied
by the user and an appropriate DC block (such as DCB from https://www.gpsnetworking.com/product-categories/
attenuators-dc-blocks) must be inserted at the LabSat 3 Wideband RF IN connector to avoid damage to the LabSat. A
Bias-T could also be used which would allow you to both inject the 12 V for the antenna and block it from the LabSat in
one part.
Powered by
https://racelogic.support/
03LabSat_GPS_Simulators/
LabSat_3_Wideband/
LabSat_3_Wideband_User_Manual/
19

There are a number of GNSS systems currently in operation or in a test phase. LabSat 3 Wideband provides
preselected frequencies to cover various GNSS signal recording requirements. The frequencies listed and the number of
available channels depend on the required signal resolution and bandwidth. For example, it is possible to record 3
separate RF channels of 56 MHz each using 1 bit quantisation but if 3 bit quantisation is required at 56 MHz bandwidth,
only one RF channel will be available. Steps to configure Labsat 3 Wideband are as follows.
• Quantization selection of 1, 2 or 3 bit. 1 bit means 1 bit I & 1bit Q, which can be described as 2 bit.
• Bandwidth selection of 10, 30 or 56 MHz.
• Channel frequency allocation. Frequencies available depend on bandwidth selected.
The table below describes the selection of quantization, bandwidth and channel frequency allocation:
Set Frequency (MHz)
10 MHz Bandwidth
10.23 MSPS
30 MHz Bandwidth
30.69 MSPS
56 MHz Bandwidth
58 MSPS
11602 GLONASS L1 CA GLONASS L1 CA,
P-
21580 - -
GPS L1 CA P(Y),
L1c, M
Galileo 1 B,C
CBOC
QZSS L1 CA, L1c
TMBOC
WAAS, GNOS,
MSAS, GAGAN,
SAIF
GLONASS L1 CA,
P
B1
31575.42 GPS L1 CA, L1c
BOC(1,1)
GPS L1 CA P(Y),
L1c, M
GPS L1 CA P(Y),
L1c, M
Powered by
https://racelogic.support/
03LabSat_GPS_Simulators/
LabSat_3_Wideband/
LabSat_3_Wideband_User_Manual/
20
Other manuals for LabSat 3
2
Table of contents
Other Racelogic Test Equipment manuals