Radarsign TC-1000 User manual

1 of 16 TC-1000 Radar Speed Sign Installation Manual MN0018 v21.01
TC-1000 Radar Speed Sign
Installation Manual
(October 2020)
© 2005-2021 Radarsign, LLC
All Rights Reserved

2 of 16 TC-1000 Radar Speed Sign Installation Manual MN0018 v21.01
THIS PAGE LEFT BLANK

3 of 16 TC-1000 Radar Speed Sign Installation Manual MN0018 v21.01
Table of Contents
Safety Warnings pg. 4
Best Practices for Radar Speed Sign Installation pg. 5-6
Pole and Mounting Options
Selecting a Pole Type/ Sample Mounting Systems pg. 7
Sample Pole Mounting Options pg. 7
Installing and Positioning the Radar Speed Sign
Step 1: Pole Installation pg. 8
Step 2: Mounting the Pole onto the Base pg. 8
Step 3: Mounting the Radar Speed Sign to the Pole pg. 8-9
Step 4: Mounting the Solar Panel to the Pole pg. 10-11
Making the Power Connections
Solar Power Connections for the TC-1000S pg. 12-13
A/C Power Connections for the TC-1000A pg. 14
Final Touches pg. 15
Radar Speed Sign Settings pg. 15
Customer Resource Center pg. 15
Radarsign Warranty pg. 16
Radarsign, LLC reserves the right to change the specifications without notice.
Contact our sales department for special applications and configurations.
© 2005-2020 Radarsign, LLC
Customer Support:Call 678-965-4814 or 678-520-5152 or email customerserv[email protected]
Shipping Address: 1220 Kennestone Circle, Suite 130 Marietta, GA 30066
Sales Information: Call 678-965-4814 or 678-520-5152 or email sales@radarsign.com
RMA Instructions: Please make sure to fill out and submit an RMA Request form with all returns.

4 of 16 TC-1000 Radar Speed Sign Installation Manual MN0018 v21.01
SAFETY WARNINGS
Warning indicates a potentially hazardous situation which if not avoided will result in
death or serious injury, and/or property damage.
ELECTRICAL SAFETY
To reduce the risk associated with electric shock resulting from contacting high voltage AC:
Turn power OFF before connecting wiring from our AC powered radar signs to the AC source.
To reduce the risk of electric shock related injury resulting from hazardous AC voltage:
Portions or this equipment derive power from sources that have high voltage levels. These must be serviced by
qualified personnel who have previous training or certification to safely work on high voltage equipment. Consult
a qualified electrician.
BATTERY SAFETY
Battery acid may cause skin irritation and eye injury. To reduce the risk of burns or other acid related injury resulting
from handling lead-acid batteries:
Wear gloves, goggles, and an apron when handling batteries
Beware of cracked battery cases
Handle batteries with care
Batteries may produce explosive gas under some conditions. This gas may be ignited by a spark or flame as you
work near the battery. To reduce this risk of explosion:
Disconnect the battery
Work in a well-ventilated area
Avoid the use of devices that create sparks or use open flames
Use appropriate personal safety clothing and equipment
To reduce the risk of burns or other acid-related injury resulting from exploding batteries:
Always use the recommended charging systems with this product.
To reduce the risk associated with contamination of water supplies resulting from improper disposal of batteries
containing lead and acid:
Please dispose of batteries in accordance with all local government laws and regulations.
An accidental short circuit may instantly heat conductive jewelry, tools, and surrounding objects to skin-searing
temperatures. To reduce this risk when working around batteries:
Keep tools, jewelry and other conductive objects away from the battery terminals.
RADAR SAFETY
This product uses devices that radiate RF energy in the course of normal operation. Radar RF energy can be harm-
ful to the eyes. To reduce exposure to the risk of RF energy:
Do not stare into the radar antenna.
Keep a minimum safe distance of 8 inches (20 cm) from the display face.
PERSONAL SAFETY
To reduce the risk of impact hazards resulting from falls, accident with passing vehicle, and/or from use of unstable
equipment:
Use appropriate work zone traffic control procedures, methods and equipment.
Strain or back injury may result from lifting equipment improperly. To reduce the risk of strain or back injury:
Use proper lifting techniques and have adequate help when lifting.
To avoid the possibility of injury due to falling or unstable equipment:
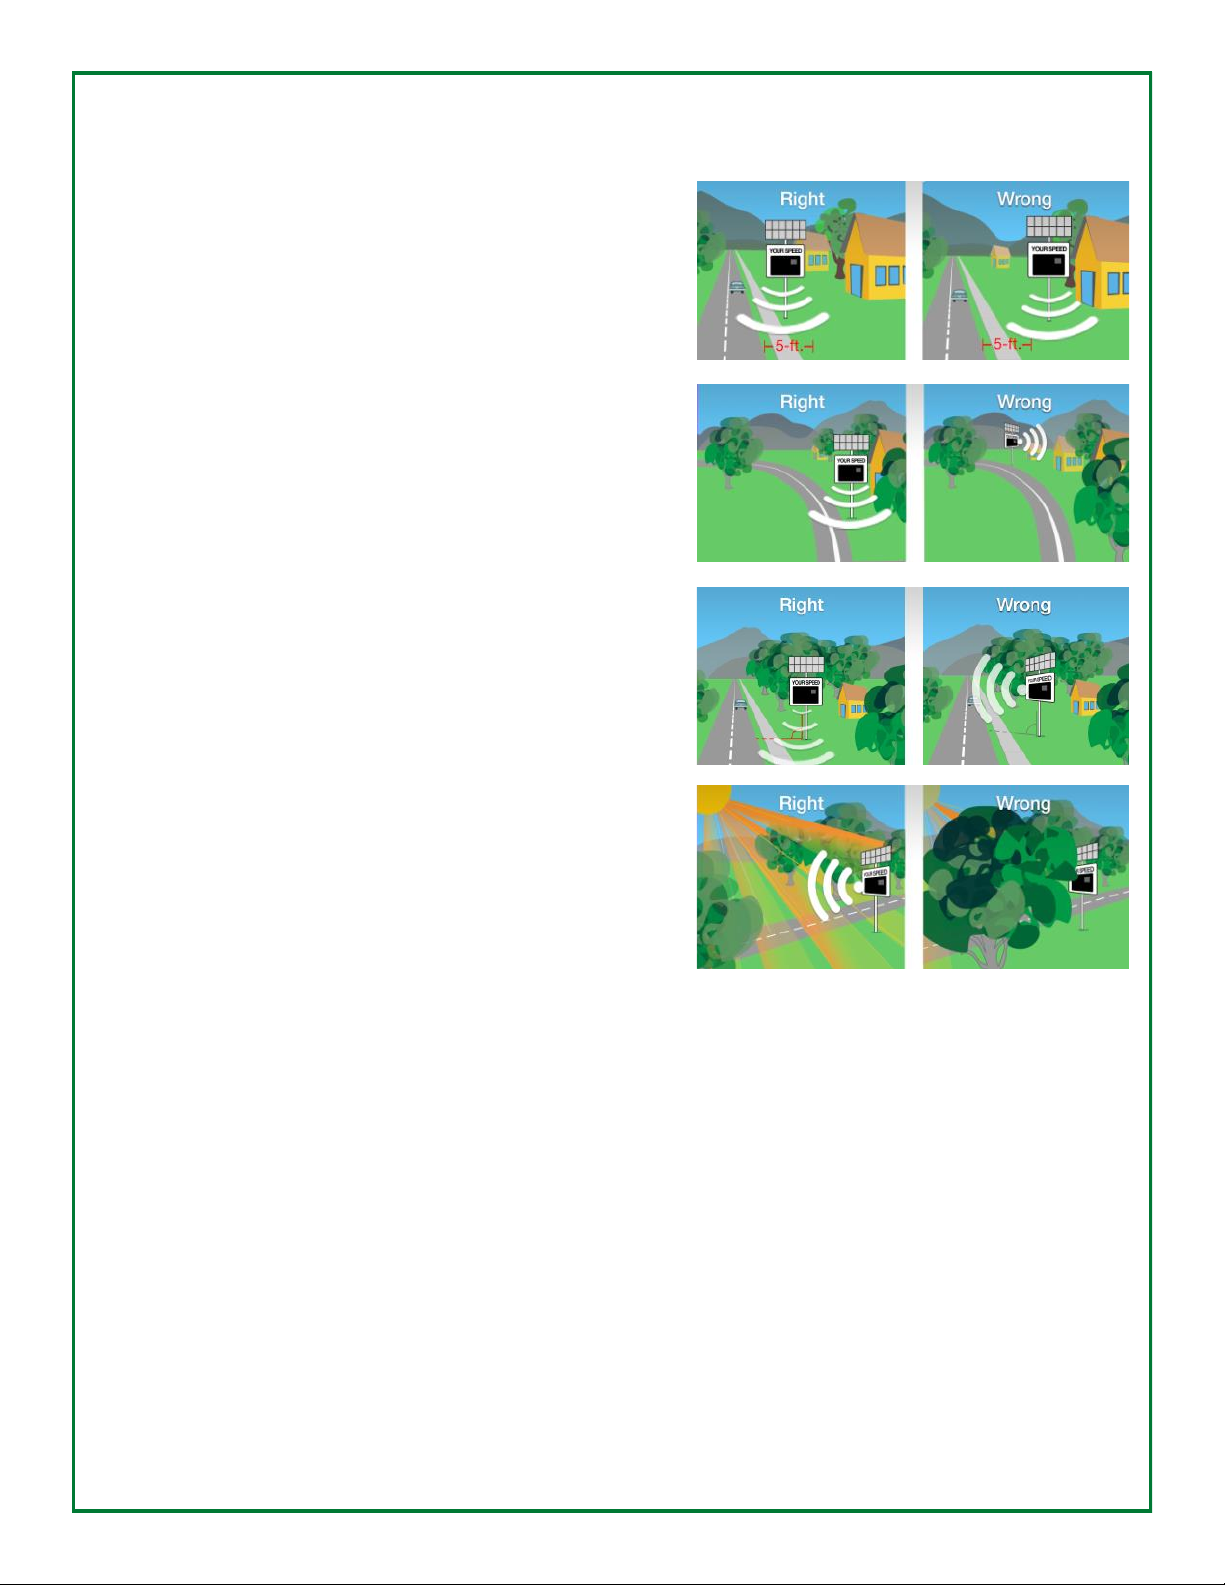
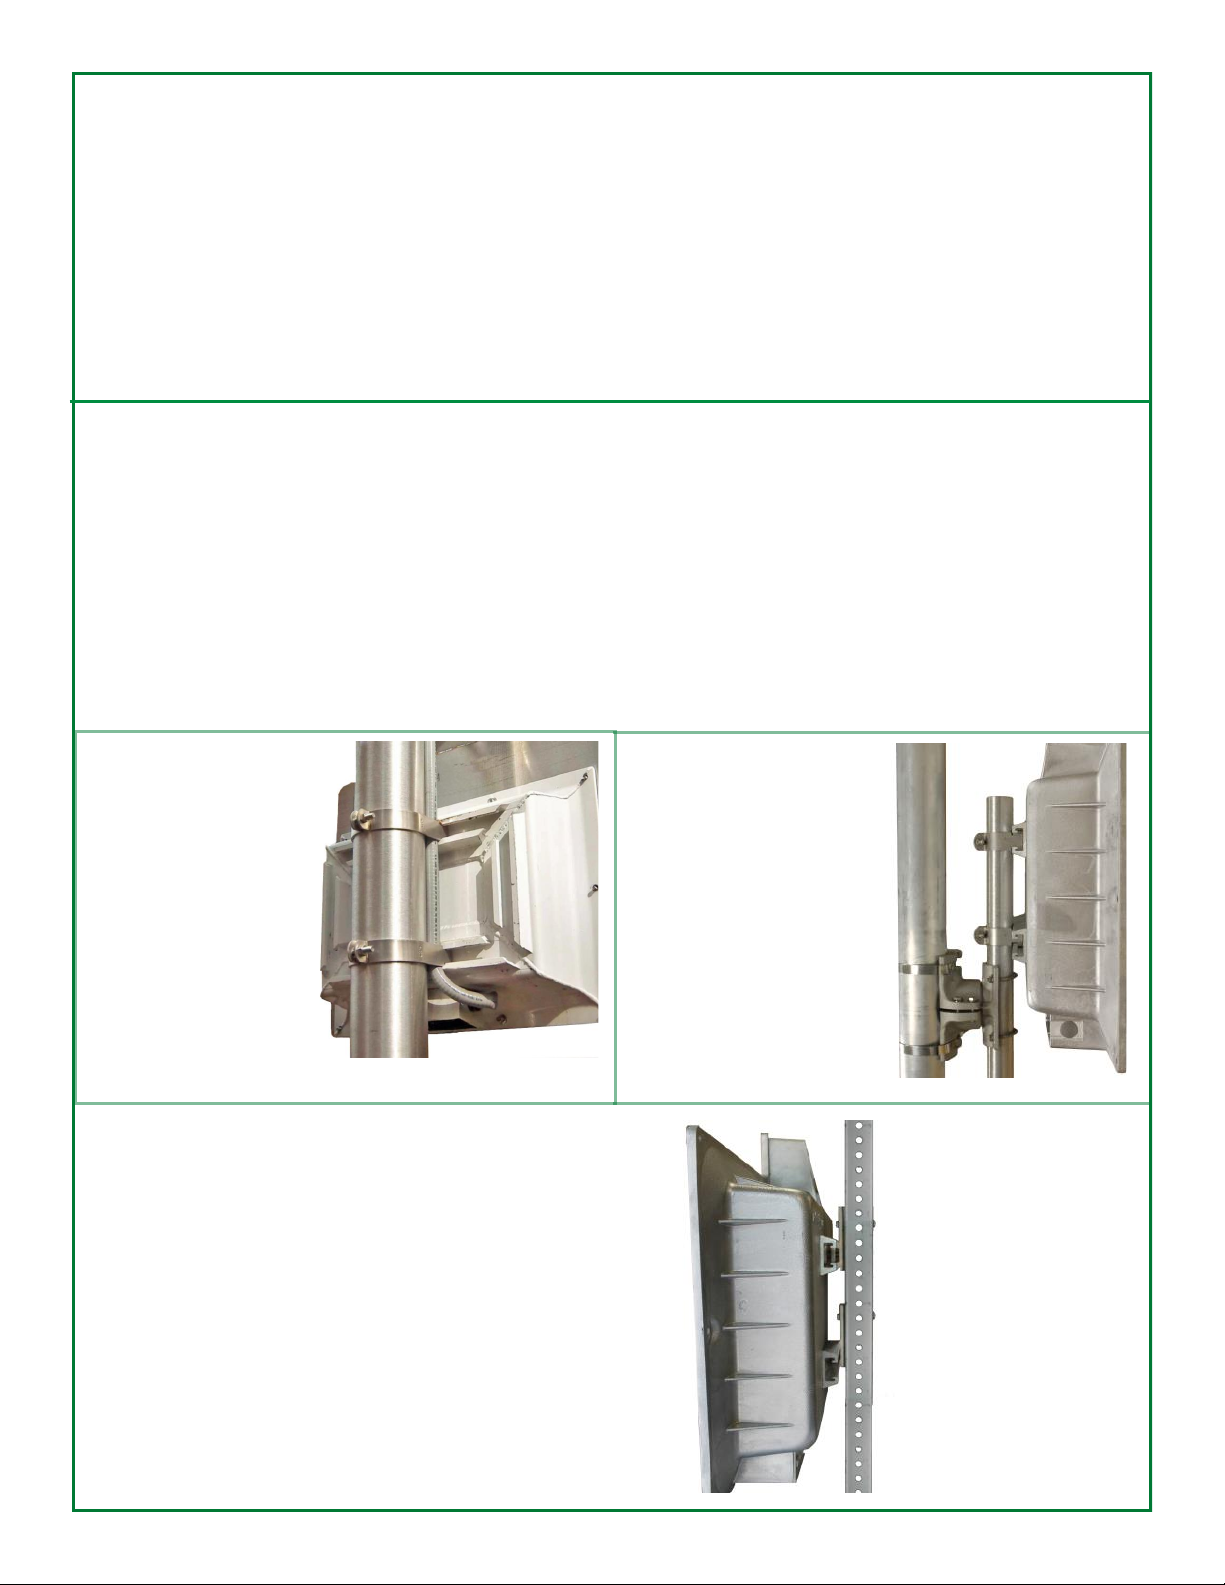
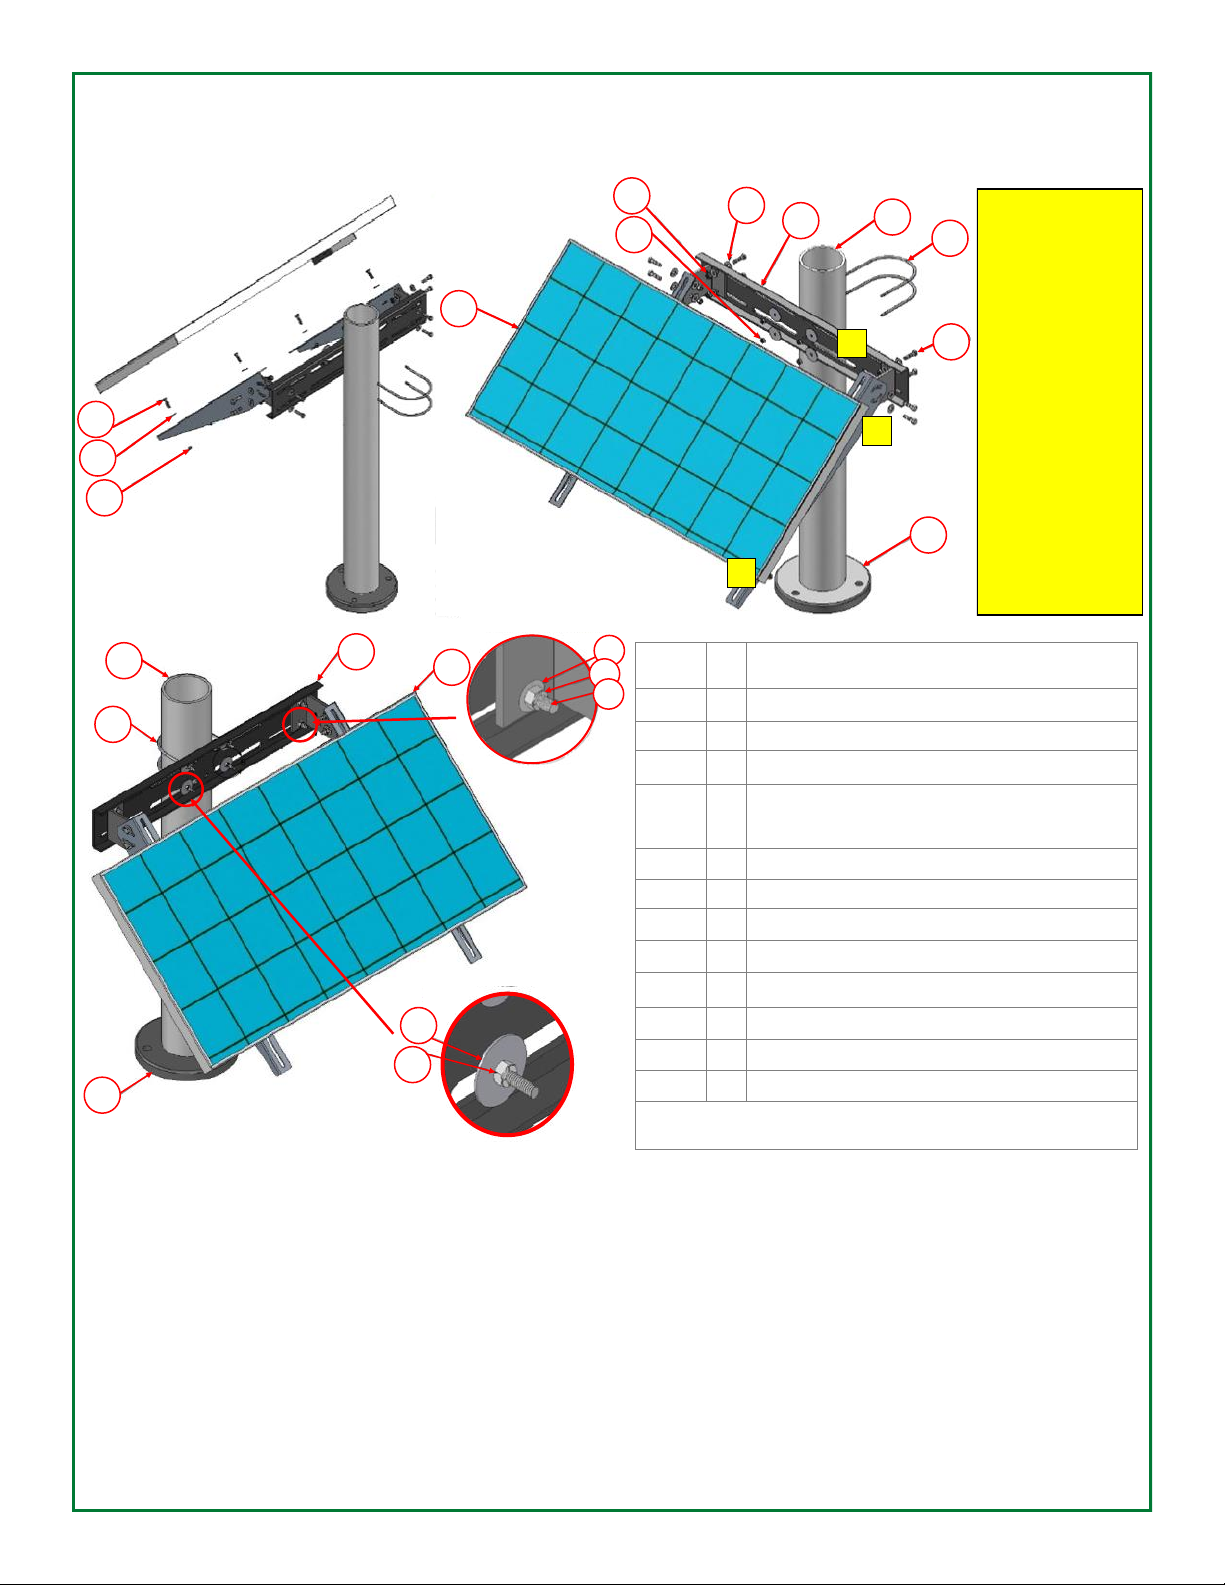
Be certain the radar speed sign is mounted to an appropriately rated pole or equivalent mounting surface.
Use appropriately rated mounting hardware.

5 of 16 TC-1000 Radar Speed Sign Installation Manual MN0018 v21.01
Best Practices for Radar Speed Sign Installation
Our signs are designed to be water resistant when vertically installed and mounted properly on an approved pole or
mounting surface.
• Prior to installation the sign should be stored inside in a cool, dry place.
• Do not store the sign outside.
• Do not store the sign in a horizontal position. Storing the radar speed sign horizontally outside where it is exposed
to the weather voids the warranty.
• Do not leave the sign in a truck bed or laying on the ground.
• Do not drop the sign.
• Do not leave the sign in storage for months. The batteries will naturally discharge and will damage the batteries.
• Do not leave the battery jumpers connected for more than 24 hours without having the solar panel connected.

6 of 16 TC-1000 Radar Speed Sign Installation Manual MN0018 v21.01
Best Practices for Radar Speed Sign Installation (cont’d)
These guidelines and recommendations provide the best practices for radar speed sign installation to
assure successful, accurate and effective traffic calming.
• The radar speed sign should be installed no more than 5 feet
from the road curb. At more than 6 feet from the road, the sign
will take the eyes of the driver an unsafe distance from the
roadway, and will result in displayed speeds that are LOWER
than the actual speed
• Do not install the radar speed sign in a curve or after a curve.
The sign should be installed in the straightaway of the road. A
radar speed signal cannot “curve” with the road, and will not
display speeds with enough time for drivers to see the alert and
adjust their speed.
• The sign should be positioned perpendicular to the road with
the radar pointing directly at the curb, not at the center of the
road, for maximum vehicle detection. Signs rotated toward the
center of the road will not perform as well.
• Do not install a solar powered radar speed sign under a tree.
Summer leaves on the tree could impact solar recharging. Make
sure the solar panel is installed facing as close to South as
possible. (solar models only)
• The radar speed sign should be installed on the same side of the street as oncoming traffic. If installed on the
wrong side of the road, the angle of the sign could result in poor detection of the on-coming traffic, and also result
in the sign displaying speeds of vehicles travelling in the opposite direction.
• The radar speed sign should be installed 7-10 feet off the ground. Do not install the radar speed sign lower than
4 feet off the ground. Doing so will result in much of the radar speed signal being absorbed by the road, reducing
your detection range.
• Prior to the radar speed sign installation, look for any obstructions (telephone poles, large tree limbs, other
signage, etc.) that might interfere with proper operation of the sign.
• Installing the sign on the same side of the street as parallel parking of vehicles could affect the radar performance
of the radar speed sign. The radar speed sign should be installed high enough off the ground to detect oncoming
traffic over the parked vehicles.
• If the radar speed sign is installed more than 12 feet above the roadway the sign should not be tilted more than
3°- 4° downward to detect vehicles. Doing so will result in a greatly reduced length of time vehicles will be detect-
ed, and will display speeds that are LOWER than actual speed. (the cosign effect).

7 of 16 TC-1000 Radar Speed Sign Installation Manual MN0018 v21.01
Pole and Mounting Options
Selecting a Pole Type
The TC-1000 radar speed signs can be mounted on the following size and style poles. The pole length should be a
minimum of 11 feet above the surface of the ground. When using a solar sign, the ideal length is 12 feet to 14 feet
above the ground.
• Round pole, 2.375", 3", 3.5", 4", or 4.5" outside diameter
• U channel or hat channel poles: recommend 2 poles per sign for TC-1000 models
• Any 2.5" or larger square metal pole or any 4" or larger square wooden pole is recommended
• Round poles with a 5" diameter or larger can use Radarsign’s oversize pole mounting Astro bracket for poles
up to 17" in diameter. There is a separate charge for this bracket.
Sample Pole Mounting Options
Due to the extremes of weather and terrain conditions that might exist, Radarsign does not recommend any specific
pole or hardware* for installation of our signs. It is the responsibility of the user to install the necessary pole size to
provide adequate support for the sign. Please note that the solar models will need the larger, stronger poles as
there is nearly 4 square feet of surface on the sign itself, plus an additional 4 square feet of surface for the solar
panel.
A 24" x 30" regulatory speed limit sign adds another 5 square feet of surface. A breakaway base should anchor
the pole you select. There are several manufacturers of this type of system, and most city, county, and state DOT
agencies require this type of pole for ANY sign mounted on a street right-of-way.
* The hardware sizes shown are what Radarsign has available.
Unistrut Stainless
Steel Bracket
Mounting Set
For use in mounting
radar speed signs on a
round supported pole
in the following sizes:
3.5 OD", 4" OD,
4½" OD, 6" OD, 8" OD
NOTE: The minimum
pole size recommended
for the TC-1000 is 3.5” OD.
SS Astro Bracket
Mounting Set
For use in mounting radar
speed signs on large
diameter and oversized
poles (6"-17" OD).
SS Flat Bracket Mounting Set
For use in mounting radar speed signs
on pole/post with pre-drilled holes or
pole/post that can be drilled.
For use with square metal poles, wood
posts, U-channel, or with banding for
large round poles.
Allows for adjustment of radar speed
sign to the alignment of holes on the
pole/post.

8 of 16 TC-1000 Radar Speed Sign Installation Manual MN0018 v21.01
Installing and Positioning the Radar Speed Sign
Once you have selected your pole, position the bottom of the sign at a height 7 to 10 feet
from the ground. Seven feet is a minimum for most city and county regulations for street signs.
This will produce the most accurate readings from the radar in detecting on-coming vehicles.
The sign and pole should always be placed on the same side of the road as on-coming traffic.
Step 1: Pole Installation
Install the pole per manufacturer instructions.
Step 2: Mounting the Pole* onto the Base
(*4.5” round aluminum, purchased from Radarsign)
• Place pole base on cement pad, aligned with bolts.
• Use level to ensure pole base is level.
• Add washers underneath base to level out if needed.
• Attach pole cap to pole.
• With two people, carefully screw pole into base.
• Using pole grip, continue to tighten pole into base (usually 2-4 full rotations).
• Optional pole grip available from Home Depot for about $25.
Step 3A: Mounting the Radar Speed Sign to a Round Pole
• DO NOT attach the YOUR SPEED faceplate to the radar speed
sign until it is mounted on the pole. It will be much easier to mount
the radar unit without the faceplate attached.
• Mark pole with pencil or tape at the minimum height level for
bottom of sign, usually 7 feet or 7.5 feet above street level. With
two people, attach the radar speed sign to the pole. This should be
done at the 2-4 foot level first, or you may want to set the sign on
top of a 4-foot or 6-foot ladder to help make the bracket mounting
easier.
• Slide the Unistrut pipe clamps into strut slots on the back of the
housing. One person should hold the sign while the second person
slides the brackets into the strut slots on the rear of the sign and
around the pole.
• Loosely tighten clamps around the pole. Slide the housing to the
desired height on the pole.
• Adjust the left/right direction of the sign on the pole, testing against
oncoming vehicles in order to determine the optimum position prior
to tightening the sign to the pole. This will be especially true on
roads that are not relatively flat or straight.
Strut Slots
7 ft.– 10 ft.
Bell Box
Nuts & Bolts

9 of 16 TC-1000 Radar Speed Sign Installation Manual MN0018 v21.01
Installing and Positioning the Radar Speed Sign
Step 3A: Mounting the Radar Speed Sign a Round Pole (cont’d)
• Loosely add nuts to bolts. Use 5/16" x 1.5" carriage bolt to secure sign to
pole. Use standard nut to tighten on pole.
• Slide the radar speed sign up the pole to desired level (bottom of sign should
be 7 to 10 feet above the ground), and tighten nuts to hold the sign in place.
• Note for solar models: Do not tighten mounting nuts on the clamps until
solar mounting has been installed and the conduit to solar panel has been
run underneath he clamps/brackets on the pole.
• Rotate entire sign slightly left or right to obtain the most accurate radar
readings of on-coming traffic. The best direction is usually directly down the curb of the road.
Step 3B: Mounting the Radar Speed Sign to a Square Pole or Post (bolted method)
• DO NOT attach the YOUR SPEED faceplate to the radar speed sign until it is mounted on the pole. It will be
much easier to mount the radar unit without the faceplate attached.
• Mark pole with pencil or tape at the minimum height level for bottom of sign, usually 7 feet or 7.5 feet above street
level. With two people, attach the radar speed sign to the pole. This should be done at the 2-4 foot level first, or
you may want to set the sign on top of a 4-foot or 6-foot ladder to help make the bracket mounting easier.
• Install the flat brackets on the back of the sign housing. The bracket can be positioned either above or below the
housing. When installing the flat brackets on the back of the sign housing, the bracket can be positioned either
above or below the housing.
Sign mounted on
U-channel pole with
flat bracket
Bracket mounted
above sign housing
Flat bracket
installed on sign
housing
Sign mounted on
2x2 pole with flat
bracket

10 of 16 TC-1000 Radar Speed Sign Installation Manual MN0018 v21.01
Installing and Positioning the Radar Speed Sign (cont’d)
Step 4: Solar Models: Mounting the Solar Panel to the Pole
• The adjustable solar panel mounting bracket shown is mounted to a 4 1/2" OD round pole. The bracket will
accommodate U-bolts as small as 2 1/2 OD, however a 4 1/2" OD is recommended due to wind resistance on the
solar panel.
• The bracket can also be bolted to a flat mounting surface using the two 3/8 inch bolt holes in the center of the
main bracket.
• Brackets have pre-drilled slots for mounting on 3½" - 4½" diameter poles. If you wish to attach to smaller or larger
poles, use the slots provided on the bracket mount and use the appropriate size banding clamps.
• Radarsign provides two banding clamps that will fit 3½" - 4½" diameter poles. For larger or smaller poles,
customer must provide clamps.
(Radarsign sells an Astro-Bracket that will mount signs to poles that are large diameter poles up to 17" OD.)
Item # Qty Description
11Base Plate*
21Pedestal Pole*
31Solar Panel*
42U-bolt, 1/4"
NOTE: The 2 U-bolts included are for a 4.5” OD pole.
Any other size used will be customer supplied.
58Hex nut
61Adjustable solar bracket
78Hex bolt
88Hex nyloc nut
916 Washer, 5/16 x 3/4" diameter flat
10 4Hex head bolt, 1/4" x 3/4"
11 8Flat washer, 1/4"
12 4Fender washer, 1/4" x 1 1/2"
*Not included in Adjustable Solar Panel Mounting
Bracket Set
9
8
5
12
1
4
263
7
11
10
5
3
5
8
1
6
92
4
7
A
B
C
A.
Install the solar
panel to the
support arms.
B:
Attach the support
arms to the angle
support.
C:
Attach the solar
panel with the sup-
port arms and an-
gle bracket to the
main support.

11 of 16 TC-1000 Radar Speed Sign Installation Manual MN0018 v21.01
Installing and Positioning the Radar Speed Sign
• With provided banding clamps, attach mounting bracket with solar panel to pole.
• Slide bracket up pole to desired position with solar panel facing as close to south as possible and secure to pole.
The solar panel should be positioned to face south at a 45° angle.
• Tighten all nuts on mounting bracket and solar panel.
• Solar panel should be washed with a mild dish detergent and soft cloth every 6 months for optimal
performance.
Large solar panel bracket
mounted on pole
Solar panel
at 45° angle facing
SOUTH

12 of 16 TC-1000 Radar Speed Sign Installation Manual MN0018 v21.01
Making the Power Connections
Solar Power Connections for the TC-1000S (Stand alone signs only)
If a radar sign/beacon combo has been purchased, please refer to the Radar Sign/Beacon Installation Manual.
1) Slide power wires through conduit connector on the radar sign bell box. (1)
2) Twist conduit into junction box connector until secure. (2)
3) DO NOT CONNECT WIRING TO SIGN UNTIL STEP 7
4) Make conduit as straight as possible
5) Run the conduit inside the sign clamps/brackets
up the pole to the solar panel (a). It is important to
secure the conduit to reduce vandalism opportunity.
6) Bend conduit at 90° angle 2"- 3" from the junction
box connector (b).
Run conduit
INSIDE the
sign clamp
brackets
1
2
a
b

13 of 16 TC-1000 Radar Speed Sign Installation Manual MN0018 v21.01
Making the Power Connections
7) Connect the solar wiring 2 prong male and female pins (from step 1) to power up the sign.
8) Watch LEDs run through a quick test. (15-20 seconds). Testing is complete when the blue blinking light changes
from solid to blinking. The sign should be operational at this point with factory settings.
9) If the sign does not power up or operate at this point, disconnect and check your solar connections in the
solar panel junction box. They are most likely reversed.
10) Connect the batteries with the 4 prong male and female pins. If you do not do this, your sign will
operate only during the daytime using solar energy!
To Check Solar Panel Connection
1) Disconnect 4-prong loop connector (a)
2) Keep the 2-wire connector from the solar panel
connected. (b)
3) If the sign works, the wiring is correct. If not, re-open the
solar panel junction box located on the solar panel and
check to see if the wiring insulation has been pushed in
too far and is preventing contact with the copper strand.
If there is good contact with the wiring then you may
have the wires reversed.
Solar power
connector
(2-prong)
Power wires run through solar power
conduit connector and connect to
solar power connector
Battery charging
connector (4-prong)
Run through
connector )
(a) Disconnect
Battery charging connector
(4-prong)
a
a
(b) Keep connected
Solar power connector
(2-prong)
b

14 of 16 TC-1000 Radar Speed Sign Installation Manual MN0018 v21.01
Making the Power Connections (cont’d)
A/C Power Connections for the TC-1000A
The signs will accept direct connection to a power supply between 100v and 240v. Higher voltage supplies will
require a customer supplied step-down transformer. Branch circuits should have a 5 amp circuit breaker installed for
protection and power cycle convenience
1) Locate the open outlet box at bottom of radar speed sign
2) Feed incoming AC power wires through conduit connection
3) Connect the exposed black, black, and green wires as shown below in Photo 1A or 1B
4) Either of the two black wires can connect to the LINE or NEUTRAL incoming wires
When wiring is complete and has been inspected, cycle the AC power on and observe the sign display. The sign will
flash its serial number and code version, and resume normal operation as indicated by blinking of the blue LED in the
center of the display.
Photo 1A – Red, Black, Green
Photo 1B – Black, White, Copper

15 of 16 TC-1000 Radar Speed Sign Installation Manual MN0018 v21.01
Final Touches
• With nuts provided, attach the YOUR SPEED faceplate to the radar speed sign. DO NOT over-tighten.
• For best results, it is highly recommended that you add a regulatory speed limit sign on the pole above or below
your radar speed sign. The speed limit sign and extender brackets are available from Radarsign®.
Radar Speed Sign Settings:
The factory settings of the radar speed sign are probably not the same as you would like to have for your installation.
The factory settings are: Min Speed: 20
Max Speed: 55
Speed Limit: 30
Using a Wi-Fi browser set up sign with correct time and date; then set initial parameters for sign operation.
(See Operation Manual available in the Customer Resource Center )
Customer Resource Center
Radarsign software downloads, installation manuals, operation manuals, troubleshooting/repair/upgrade information
and forms, product sheets, spec sheets, and more can be found on our website.
Just go to the Contact Us section https://www.radarsign.com/contact-us/
Click on Customer Resource Center https://www.radarsign.com/customer-resource-center/
Password: safety
For additional assistance:
Email: customers[email protected]
Phone: 678-965-4814 and ask for technical support.

16 of 16 TC-1000 Radar Speed Sign Installation Manual MN0018 v21.01
Limited Warranty Agreement
Radarsign, LLC warrants this product against defects in materials and workmanship to the original (end user) purchaser
for a period of two (2) years from the date of shipment; This warranty is limited to the repair or replacement of the
product.
• Warranty is only valid if the product is installed, operated, and maintained according to the manufacturer’s
instructions and recommendations.
• Replacement parts are covered by the unexpired warranty of the parts they replace.
• Claims made under this warranty will be honored only if Radarsign, LLC is notified of a failure within the warranty
period, reasonable information requested by Radarsign is provided, and Radarsign is allowed to verify the cause of
the failure.
• To obtain warranty service, the purchaser must first call Radarsign, LLC for an RMA number; then return the product
to Radarsign, LLC for repair or replacement.
• Purchaser shall prepay shipping charges for products returned to Radarsign, LLC.
• Radarsign, LLC will pay for return of the products to purchaser located within North America. Purchasers from a
country outside or North America shall pay all shipping charges, duties, and taxes for products returned to Radar-
sign, LLC for warranty or after warranty repair.
• Radarsign, LLC makes no other warranty of any kind with regard to this product. Radarsign, LLC shall not be liable
for errors contained herein or for incidental or consequential damages in connection with the furnishing, perfor-
mance, or use of this product.
• Within ninety (90) days of receipt should the product fail for any reason other than damage due to customer
negligence, acts of God or vandalism, Radarsign will bear shipping costs for depot service both to and from the
repair facility for products sold with a United States shipping address. After 90 days, the customer is responsible for
inbound shipping. Radarsign will pay for return shipping to the customer for the entire warranty period if customer is
located within North America. Customers from a country outside or North America shall pay all shipping charges,
duties, and taxes for products returned to Radarsign, LLC for warranty or after warranty repair.
• Radarsign, LLC warrants that this product is new. Radarsign, LLC makes no other warranty, either expressed
or implied, with respect to this product. Radarsign, LLC specifically disclaims the implied warranties of
merchantability and fitness for a particular purpose.
• Some states or provinces do not allow limitations on how long an implied warranty lasts, so the above limitation
or exclusion may not apply to you.
• The remedies provided herein are customer’s sole and exclusive remedies. In no event shall Radarsign, LLC
be liable for any lost profits, direct, indirect, special, incidental or consequential damages, whether based on contract,
tort or any other legal theory.
This warranty does not cover damage from:
• Accidents, malicious abuse, theft, vandalism, impact with a foreign object or acts of God
• Unauthorized modification of the product
• Failure of customer to follow Radarsign’s published site selection, installation, transport and/or storage instructions
in the Installation Manual for your sign model. The Installation Manual is available in the Customer Resource Center*
(https://www.radarsign.com/customer-resource-center/). Password: safety
• Customer’s removal or relocation of the sign
• Electrical work external to the unit, virus/hacker activity, and external computer errors
• Improper solar panel installation or improper use of battery charging equipment
This warranty is limited to a repair or replacement of the product. To obtain warranty service, the purchaser must first
call Radarsign, LLC for an RMA number, then return the product to Radarsign, LLC for repair or replacement.
Radarsign, LLC provides the following warranty for its traffic calming systems
whether sold directly by Radarsign or by an authorized Radarsign distributor.
Table of contents
Popular Safety Equipment manuals by other brands

SKYLUX
SKYLUX Cintralux 1200 Joule Mounting instructions

Leatt
Leatt DBX 2.0 manual

Dräger
Dräger Interlock 5000 Instructions for use

Sundstrom
Sundstrom SR 905 operating instructions

Powerfix Profi
Powerfix Profi HG01477A-1 Operation and safety notes

Tractel
Tractel stopfor B Operating and maintenance instructions