manuals.online logo
Brands
  1. Home
  2. •
  3. Brands
  4. •
  5. Radius
  6. •
  7. Indoor Furnishing
  8. •
  9. Radius MISS MONEYPENNY User manual

Radius MISS MONEYPENNY User manual

1
3
4
5
2
thank you for choosing a product from radius
design.
you can find further products at:
www.radius-design.com
danke, dass sie sich für ein produkt von radius
design entschieden haben.
weitere produkte finden sie unter:
www.radius-design.com
ENGLISH
DEUTSCH
congratulations on the purchase of your
MISS MONEYPENNY.
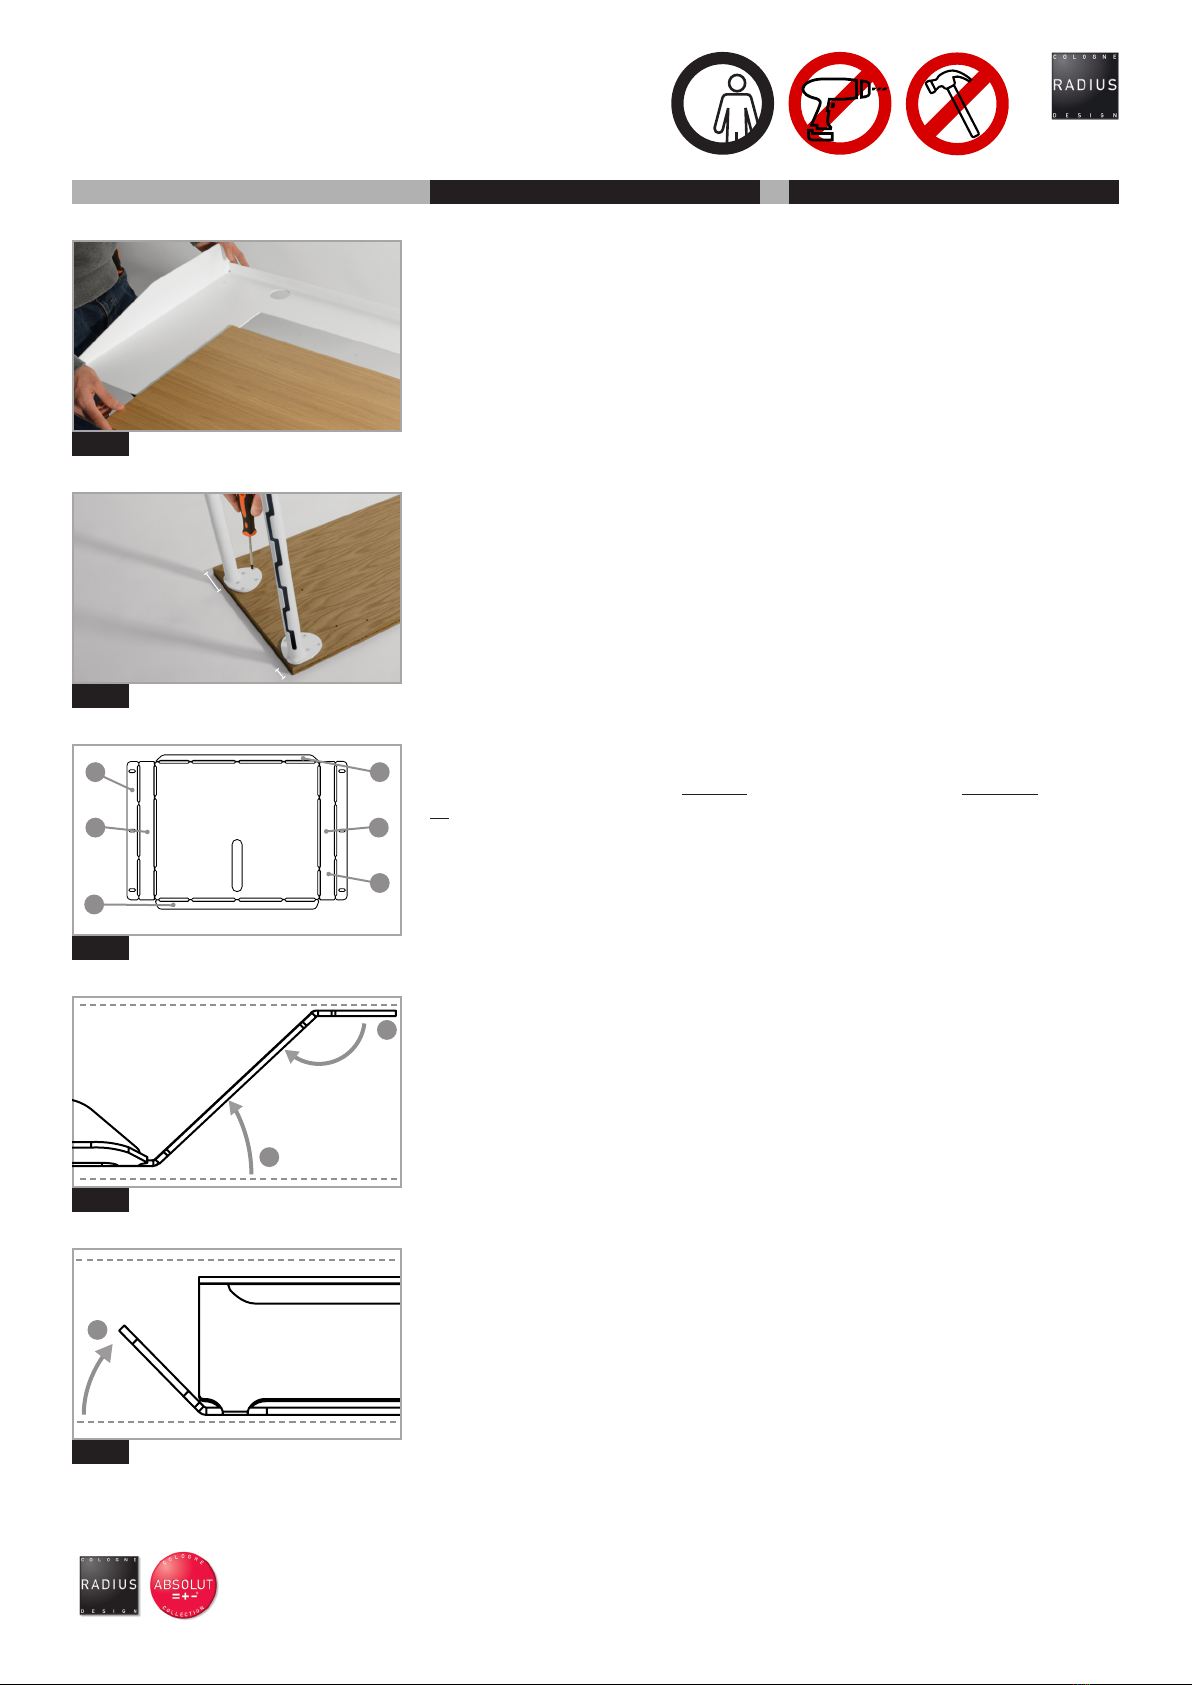
first, remove the wooden table plate from
the storage area to mount the legs.
place the wooden table top on the floor
with the holes facing upwards. now hand
tighten the legs. make sure that the legs
point to the corners. the two legs with
the cable channel belong to the outer
position of the tabletop. the two solid
legs are placed at the inner position.
if you did not order a LAPTOPHOLDER,
please continue with POINT 10.
please bent the LAPTOPHOLDER first
prior to mounting it to the table.
start with the side panels A and B, which
must be bent in two different directions.
turn side panel A by 45° inwards. then,
turn side panel B by 45° outwards. you
can use this drawing to check the ben-
ding angle.
bent now the side panel C by 45°
inwards. in figure 3 you see which side
must face front- and backwards (use the
long hole for orientation). you can use
this drawing to check the bending angle.
herzlichen glückwunsch zum kauf ihrer
MISS MONEYPENNY.
ziehen sie zunächst die tischplatte aus
der ablagefläche um die beine zu mon-
tieren.
legen sie die holztischplatte mit den
löchern nach oben auf den boden.
schrauben sie jetzt die tischbeine hand-
fest an. achten sie darauf, dass die
beine in die ecken zeigen. die zwei beine
mit dem kabelkanal kommen an die
äußere, die zwei beine ohne kanal wer-
den an die innere position gesetzt.
falls sie keinen LAPTOPHOLDER
bestellt haben, fahren sie mit PUNKT
10 fort.
um den LAPTOPHOLDER an den tisch
montieren zu können, muss dieser
zunächst passend gebogen werden.
beginnen sie mit den seitenwangen
A und B, die in zwei unterschiedliche
richtungen gebogen werden. biegen sie
die seitenwange A um 45° nach innen.
anschließend biegen sie die seitenwan-
ge B um 45° nach außen. um ihre bie-
gungen zu überprüfen, können sie den
laptop holder an die zeichung halten.
biegen sie jetzt die hintere seitenwand
C ebenfalls um 45° nach innen. welches
der hintere und der vordere teil ist, kön-
nen sie abbildung 3 entnehmen (orien-
tieren sie sich hierbei am langloch). um
ihre biegungen zu überprüfen, können
sie den laptop holder an die zeichung
halten.
MISS MONEYPENNY
Innere Position
inner position
Äußere Position
outer position
2x
1/4
B
A
D
VORNE/FRONT
C
A
B
45°
45°
A
B
C
45°
10
9
8
7
6
thank you for choosing a product from radius
design.
you can find further products at:
www.radius-design.com
danke, dass sie sich für ein produkt von radius
design entschieden haben.
weitere produkte finden sie unter:
www.radius-design.com
ENGLISHDEUTSCH
MISS MONEYPENNY 2x
2/4
nun biegen sie die wange D am vorde-
ren ende des LAPTHOLDERS um 10°
nach innen. welches der hintere und der
vordere teil ist, können sie abbildung 1
entnehmen (orientieren sie sich hierbei
am langloch). um ihre biegungen zu
überprüfen, können sie den laptop hol-
der an die zeichung halten.
der LAPTOPHOLDER ist jetzt bereit zur
montage und sollte der abbildung 5
entsprechen.
auf der unterseite der holzplatte finden
sie 6 bohrungen für die montage. achten
sie auf vorder- und rückseite des LAP
TOPHOLDERS. das langloch sollte nach
vorne ausgrichtet sein. (siehe abbildung
8).
montieren sie jetzt mit hilfe der mitgelie-
ferten euroschrauben und einem schrau-
benzieher den LAPTOPHOLDER und
ziehen sie die schrauben handfest an.
jetzt kann die tischplatte mit den mon-
tierten beinen aufgestellt werden.
schieben sie die ablagefläche in die
tischplatte. achten sie darauf, dass die
rückseite der abdeckung auf der seite
der beine mit kabelführung liegt.
D
10°
VORNE/FRONT
HINTEN/BACK
14
25
36
VORNE/FRONT
bend now side panel D by 10° inwards.
in figure 3 you see which side must face
front- and backwards (use the long hole
for orientation). you can use this drawing
to check the bending angle.
the LAPTOPHOLDER is now ready for
mounting and should correspond to
figure 5.
on the bottom side of the wood panel
you will find 6 mounting holes. pay
attention to the front and back of the
LAPTOPHOLDER. the long hole must
face forward. (see figure 8).
mount the LAPTOPHOLDER with the help
of the supplied screws and a screwdriver
and tighten the screws by hand.
now set up the table with the moun-
ted legs. slide the storage area in the
wooden table plate. make sure that the
back of the cover is on the side of the
legs with the cabling.
x6
10mm
13
15
14
12
11
thank you for choosing a product from radius
design.
you can find further products at:
www.radius-design.com
danke, dass sie sich für ein produkt von radius
design entschieden haben.
weitere produkte finden sie unter:
www.radius-design.com
ENGLISHDEUTSCH
MISS MONEYPENNY 2x
3/4
montieren sie jetzt die befestigungsla-
schen an der unterseite der tischplatte
und ablagefläche. verwenden sie dafür
die zwei euroschrauben. dabei werden
die laschen mit passenden kunststoff-
nieten an der ablagefläche befestigt.
das langbohrloch dient dazu, die abla-
gefläche genau auf die höhe der vorder-
seite montieren zu können. achten sie
darauf das die ablagefläche bündig zur
zierleiste ausgerichtet ist und drehen
sie die schraube an der holzplatte fest.
nun können sie die kabelverdeckung
mit den beiliegenden kunststoffnieten
befestigen. (je nach menge der kabel
können sie bei der montage zwischen 3
positionen wählen.)
bevor sie die abdeckung auf den tisch
setzen, können sie alle notwendigen
kabel hinter die kabelverdeckung legen.
hier ist genug platz um mehrfachsteck-
dosen zu verstauen.
das kabel kann anschließend durch ein
loch in der ablagefläche in die kabel-
führung des tischbeines gelegt werden
und mit den stopfen fixiert werden.
now mount the fastening tabs on the
underneath the wooden table top and
storage space. the flaps are secured with
an appropriate plastic rivet on the sto-
rage area.
the long hole serves to mount the sto-
rage area exactly to the height of the
front. make sure that the storage area
is aligned with the trim strip and tighten
the screw on the wooden plate.
now attach the cable concealment with
the supplied plastic rivets. (depending
on the amount of cable, you can choose
during installation between 3 positions.)
before you put the cable duct on the
table, you can put all the necessary cable
behind the cable concealment. it offers
plenty of room to stow multiple plug
sockets.
the cable can then be passed through a
hole in the support surface in the cable
channel of the table leg, and fixed with
the stopper.
x2
10mm
ENGLISHDEUTSCH
thank you for choosing a product from radius
design.
you can find further products at:
www.radius-design.com
danke, dass sie sich für ein produkt von radius
design entschieden haben.
weitere produkte finden sie unter:
www.radius-design.com
17
18
19
16
falls sie keine LEUCHTE bestellt haben
fahren sie mit PUNKT 18 fort.
legen sie die abdeckung auf den boden.
das kabel lässt sich durch die öffnungen
legen und verstauen.
stecken sie die leuchte durch eines der
löcher und fixieren sie diese mithil-
fe der unterleg-, distanzscheibe und
schraube.
nun können sie die abdeckung vollstän-
dig aufsetzten.
MISS MONEYPENNY
PRODUCT VIDEO MISS MONEYPENNY:
http://www.youtube.com/watch?v=45c-KYuOvK4
2x
4/4
if you did not order a LAMP, please con-
tinue with POINT 18.
put the cover in front of you on the floor.
the cable from the desk lamp can be
easily and stowed through the openings.
place the desk lamp through one of the
above designated holes and fix them
using the washer, the spacer and the
screw.
now you can place the cover.
DISTANZSCHEIBE
/SPACER
UNTERLEGSCHEIBE
/WASHER

Other Radius Indoor Furnishing manuals

Radius 724 User manual

Radius

Radius 724 User manual

Radius KABELLARASA 1100 a User manual

Radius

Radius KABELLARASA 1100 a User manual

Radius STEHVERSION 1150a User manual

Radius

Radius STEHVERSION 1150a User manual

Radius ABSOLUT BOOKSBAUM 1 STAND User manual

Radius

Radius ABSOLUT BOOKSBAUM 1 STAND User manual

Radius 739 User manual

Radius

Radius 739 User manual

Radius 726 User manual

Radius

Radius 726 User manual

Radius BOOKSBAUM MAGAZIN STAND User manual

Radius

Radius BOOKSBAUM MAGAZIN STAND User manual

Radius 738 User manual

Radius

Radius 738 User manual

Radius BOOKSBAUM II User manual

Radius

Radius BOOKSBAUM II User manual

Radius BOOKSBAUM I User manual

Radius

Radius BOOKSBAUM I User manual

Radius 718 User manual

Radius

Radius 718 User manual

Radius BOOKSBAUM 2 724 User manual

Radius

Radius BOOKSBAUM 2 724 User manual

Radius BOOKSBAUM MAGAZIN User manual

Radius

Radius BOOKSBAUM MAGAZIN User manual

Radius BOOKSBAUM 738 User manual

Radius

Radius BOOKSBAUM 738 User manual

Radius MUSE User manual

Radius

Radius MUSE User manual

Radius MUSE User manual

Radius

Radius MUSE User manual

Radius CD-SBAUM STAND User manual

Radius

Radius CD-SBAUM STAND User manual

Radius BOOKSBAUM 1 720 User manual

Radius

Radius BOOKSBAUM 1 720 User manual

Radius BOOKSBAUM STAND User manual

Radius

Radius BOOKSBAUM STAND User manual

Radius 700 User manual

Radius

Radius 700 User manual

Radius CD-Baum User manual

Radius

Radius CD-Baum User manual

Radius MU User manual

Radius

Radius MU User manual

Popular Indoor Furnishing manuals by other brands

Furinno 15020 Assembly instruction

Furinno

Furinno 15020 Assembly instruction

Core Products Corona CR932 Instruction leaflet

Core Products

Core Products Corona CR932 Instruction leaflet

Costway HW67596 user manual

Costway

Costway HW67596 user manual

Techni Mobili RTA-3528 Assembly instructions

Techni Mobili

Techni Mobili RTA-3528 Assembly instructions

Core Products CRV907 Instruction leaflet

Core Products

Core Products CRV907 Instruction leaflet

Wilding Wallbeds Side Mount Instruction booklet

Wilding Wallbeds

Wilding Wallbeds Side Mount Instruction booklet

GoodHome 3663602643265 manual

GoodHome

GoodHome 3663602643265 manual

Keter CORFU Assembly instructions

Keter

Keter CORFU Assembly instructions

Pedrali Gliss 950 instructions

Pedrali

Pedrali Gliss 950 instructions

Karla Dubois Manhattan Assembly instructions

Karla Dubois

Karla Dubois Manhattan Assembly instructions

DTY Outdoor living OF-1007 quick start guide

DTY

DTY Outdoor living OF-1007 quick start guide

Teknik 5158097 manual

Teknik

Teknik 5158097 manual

IKEA BESTA manual

IKEA

IKEA BESTA manual

Southern Enterprises CK481200TX Assembly instructions

Southern Enterprises

Southern Enterprises CK481200TX Assembly instructions

Rockler Blum GRP2281 1 instructions

Rockler

Rockler Blum GRP2281 1 instructions

ATHY CM-DK6848 Assembly instructions

ATHY

ATHY CM-DK6848 Assembly instructions

Coaster California 223651KW B1 Assembly instructions

Coaster

Coaster California 223651KW B1 Assembly instructions

Furinno Pasir 11208 Assembly instruction

Furinno

Furinno Pasir 11208 Assembly instruction

manuals.online logo
manuals.online logoBrands
  • About & Mission
  • Contact us
  • Privacy Policy
  • Terms and Conditions

Copyright 2025 Manuals.Online. All Rights Reserved.