Rainin Pipetman Ultra U-2 User manual

Pipetman®Ultra
continuously adjustable
digital microliter pipettes
8 pipettes for
volume ranges from
0.1 µL to 10 mL
U-2
U-10
U-20
U-100
U-200
U-1000
U-5000
U-10ML
Pipetman Ultra U-200 shown

Contents
Description........................................................................1
Autoclaving ......................................................................2
Operating Ranges ..............................................................2
Switching On ....................................................................2
Volume indicator - LCD window ..........................................2
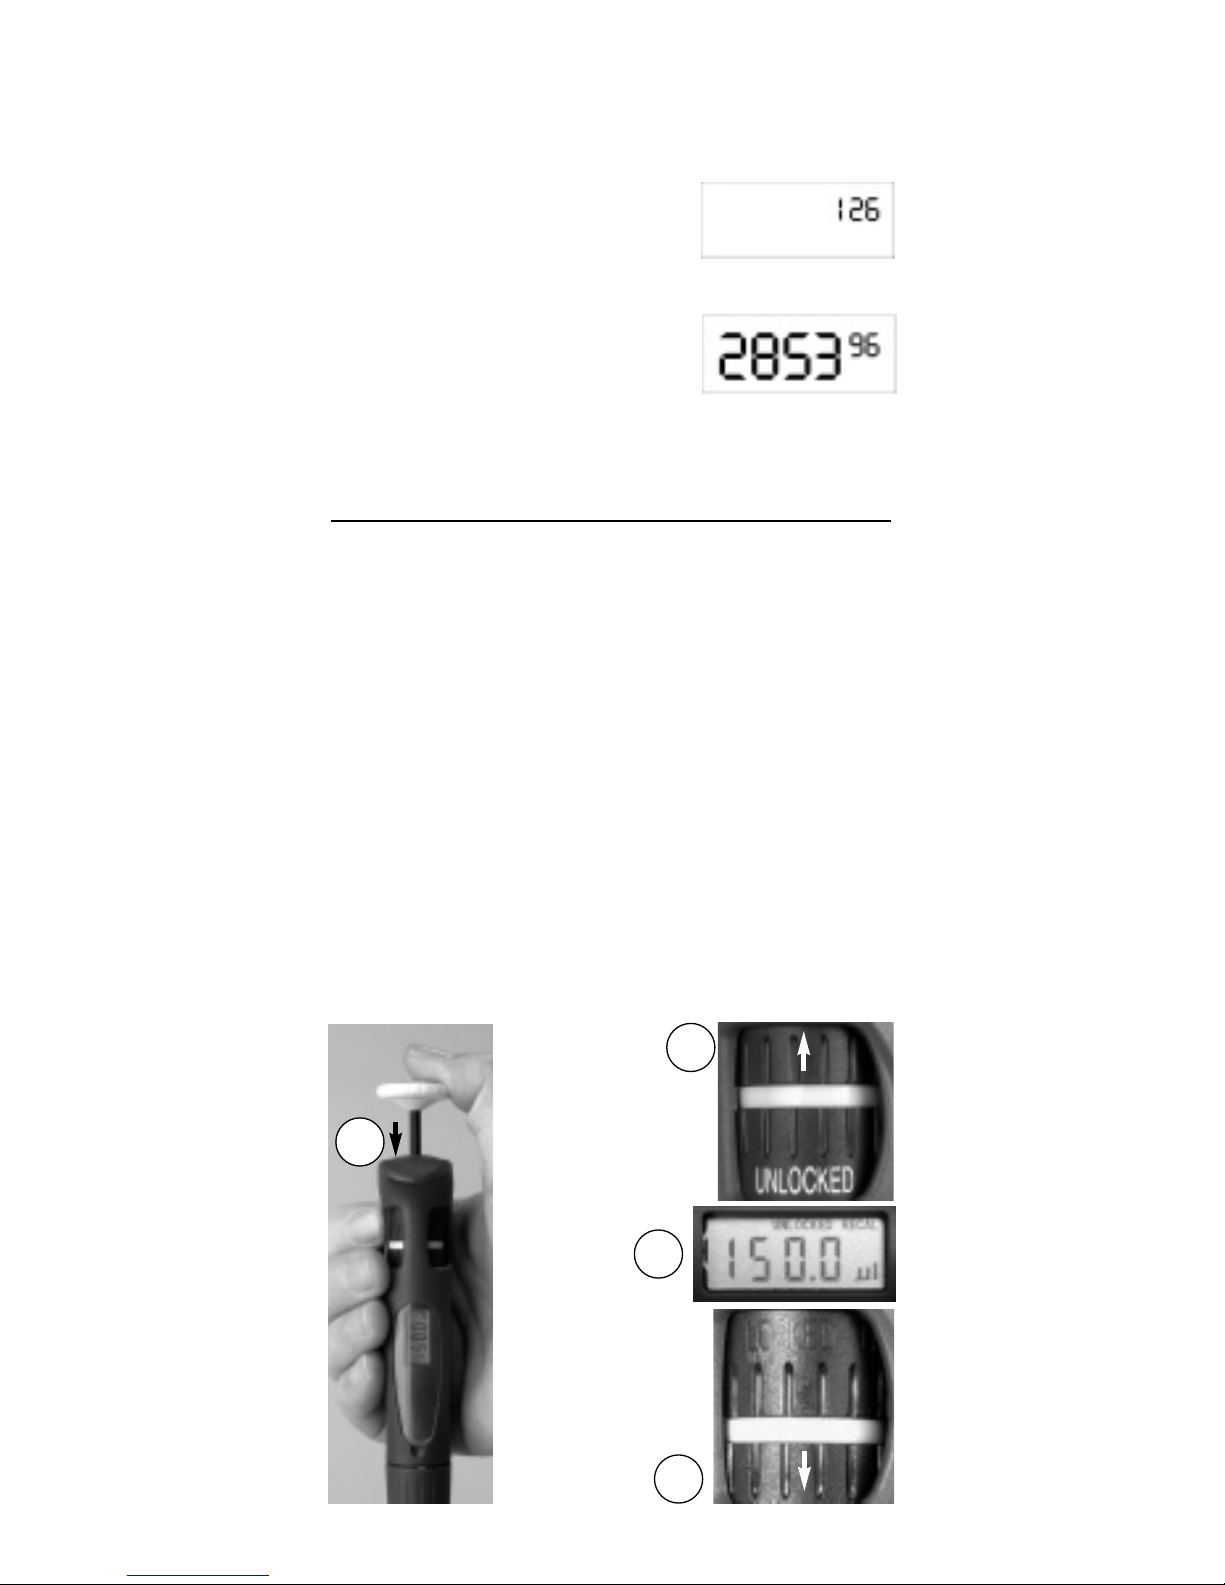
Setting the Volume ............................................................3
Tip Selection......................................................................4
Pipetting ..........................................................................4
Tip Immersion Depth ..........................................................5
Pipetting Guidelines & Precautions ......................................6
Reverse Mode Pipetting ......................................................6
Pipetting Liquids of Varying Density......................................7
Temperature Considerations ................................................7
Acids and Corrosives..........................................................7
Personalizing your Pipette ..................................................8
Name Tag Label ................................................................8
TIp-Ejector Extension ..........................................................9
Troubleshooting ..............................................................10
Error Messages................................................................11
Maintenance ..................................................................11
Cleaning and Decontamination..........................................16
Leak Test ........................................................................18
Recalibration ..................................................................18
Service, Calibration and Repair..........................................20
GLP Features ..................................................................20
Specifications ..................................................................21
Replacement Parts ..........................................................22
Pipetman Ultra Features
Parallax-free electronic display for easy volume setting
Flashing indicators if volume set is out of range
Ergonomic design, maximum comfort for left or right-handed use
Light, balanced, low ejection force
Simple to maintain and calibrate
GLP cycle counters
Parts Check List
The following items should be included.
Pipetman Ultra User's Guide
Calibration Tool Tube of lubricant (except U-2 & U-10)
Name-tags (5 different colors)
Certificate of conformity (including bar-code sticker).
If any item is missing, call 800-543-4030
Technical Assistance: 800-543-4030
Call this toll free number for technical consultation and product
information for Pipetman, RAININ pipettes, and disposable tips.
Pipetman and Microman are trademarks of Gilson Inc. U.S. and national patents pending.
Rainin is the U.S. distributor of Pipetman products.
Copyright 2003, Rainin Instrument, LLC.
Prices and specifications are subject to change without notice.

1
Description
APush-button for switching on, setting the volume, aspirat-
ing, and dispensing. (Button is color coded with the vol-
ume range printed on the top.)
BThumbwheel, to set and lock the volume.
CTip-ejector button, can be positioned for left or right-handed
operation.
DLiquid Crystal Display (LCD) window for volume-setting
and status indicators.
EIdentity-tag window (see GLP features).
FShaft Coupling for upper part of removable shaft (contains
piston) .
GTip-ejector stroke adjustment-wheel.
H,J Upper (H) and lower (J) parts of shaft, both removable for
cleaning and/or autoclaving.
KTip ejector.
A
H
J
B
D
E
F
G
K
C

2
Autoclaving
The upper and lower parts of the shaft, and the tip ejector (also
the tip ejector extensions for Pipetman Ultra models U-2 & U-10),
are autoclavable: 121°C, 1 bar, 15–20 minutes.
Operating Ranges
Model Range Color Code
U-2 0.1 - 2 µL Orange
U-10 0.5 - 10 µL Red
U-20 2 - 20 µL Clear yellow
U-100 10 - 100 µL Peach
U-200 20 - 200 µL Yellow
U-1000 100 - 1000 µL Blue
U-5000 500 - 5000 µL Purple
U-10ML 1 - 10 mL Clear blue
Switching On
Press the push-button to the first stop to switch on the pipette. The
information displayed in the LCD window depends on the status
of the pipette and the volume currently set (see below).
Pipetman Ultra turns itself off after 3 min of inactivity - just
press the push-button (or unlock) to reactivate the pipette.
Volume Indicator - LCD Window
What you normally see ...
1) Volume setting.
2) Units (mL or µL).
3) Volume status (LOCKED or UNLOCKED).
What could appear ...
4) Calibration status: ‘RECAL’ this means that your pipette has
been recalibrated.
5) Battery status: failing - ‘LOW BATT’ here, or failed - ‘BATT’ in
place of volume setting. (The battery is factory installed. It
has a lifetime of four years under normal use.)
☛
534
12

6) Cycle counters: You will see the counters at the right-hand
side of an otherwise blank screen.
a) Since the last volume setting - holding down the push-
button for 7 seconds displays
this information (maximum
199); for example 126 cycles.
b) Since the pipette was made - holding down the push-
button for 10 seconds displays
this information (maximum
999999); in this example
285396 cycles.
7) Refer to "Troubleshooting" for possible error messages.
Setting the Volume
1) Switch on: press the push-button to the first stop. LCD shows
the volume currently set.
2) Unlock: push the thumbwheel upwards. LCD shows
UNLOCKED (also visible on the thumbwheel).
3) Rotate the thumbwheel or the push-button to set volume
(clockwise to decrease, counterclockwise to increase).
-when decreasing the volume, reach the required setting
slowly, making sure not to overshoot the mark.
- when increasing the volume, pass the required value by
1/3 of a turn, then decrease the volume slowly, making
sure not to overshoot the mark.
4) Lock the volume: push the thumbwheel downwards. LCD
shows LOCKED.
You are strongly advised to lock the volume,to avoid
accidentally changing the setting when pipetting.
3
1
2
3
4
☛

4
■To reduce battery consumption, lock the volume before storing
Pipetman Ultra.
■The units indicator flashes if you set a volume below 90% of
the minimum recommended range of the pipette. You can dis-
pense an aspirated volume below the minimum recommend-
ed, but the specifications cannot be guaranteed.
■The volume indicator flashes if you try to set a volume above
the maximum permitted range; you cannot pipette a volume
that is greater than the maximum permitted range.
Tip Selection
■Tips must seal properly on the shaft to assure an air-tight seal
and avoid leaks or poor accuracy.
■Tips must be soft and flexible so that the shaft is not scratched
or worn prematurely.
■Tips must be free from microscopic flash and particulates.
Flash gives poor precision and accuracy.
■The tip orifice must be the correct size, and orifice size and
geometry must be consistent from tip to tip. Otherwise, accura-
cy and precision will be affected.
■Interior and exterior surfaces must be clear, smooth, and
hydrophobic to avoid retention of liquid. Too much retention
results in poor accuracy and reproducibility.
Specified performance is guaranteed only when RAININ dispos-
able tips are used as recommended. RAININ cannot accept
responsibility for poor performance resulting from the use of tips
by other manufacturers. Tips are intended for single use only.
RAININ tips are molded from premium-grade virgin polypropylene
plastic. Samples from each lot of tips are inspected micro-
scopically to ensure that every lot meets RAININ’s high standards.
Use RAININ aerosol-resistant tips to avoid any sample-to-sam-
ple, sample-to-pipette, or sample-to-operator contamination.
Pipetting
1) Mount a tip: Push the shaft into a new RAININ tip using a
slight twisting motion to ensure a firm and airtight seal.
2) Pre-rinse the tip: Some liquids (e.g. protein-containing
solutions and organic solvents) can leave a film of liquid on
the inside wall of the tip; pre-rinse the tip to minimize any
errors that may be related to this phenomenon. Pre-rinsing
consists of aspirating the first volume of liquid and then dis-
pensing it back into the same vessel (or to waste).
Subsequent pipetted volumes will have levels of accuracy
and precision within specifications.

5
3) Aspirate. Press the push-button to the first stop (this corre-
sponds to the set volume of liquid).
Hold the pipette vertically and immerse the tip in the liquid
(see table for immersion depth).
Release the push-button slowly and
smoothly (to top position) to aspirate the
set volume of liquid.
Wait at least one second (time depends
on model, see table), then withdraw the
pipette-tip from the liquid.
You may wipe any droplets away from the outside of the tip
using a medical wipe, however if you do so take care to
avoid touching the tip’s orifice.
4) Dispense. Place the end of the tip against the inside wall of
the recipient vessel, at an angle no more than 20°.
Press the push-button slowly and
smoothly to the first stop.
Wait for at least one second then press
the push-button to the second stop to
expel any residual liquid from the tip.
Keep the push-button pressed fully down
and (while removing the pipette) draw the
tip along the inside surface of the vessel.
Release the push-button, smoothly.
5) Eject the tip. Press firmly on the tip ejec-
tor button.
Tip Immersion Depth
The recommended tip insertion depth and wait time for each
Pipetman Ultra model is shown in the table below.
Model Volume Range Immersion Depth Wait Time
U-2 0.1 - 2 µL 1 - 2 mm 1 sec
U-10 0.5 - 10 µL 1 - 2 mm 1 sec
U-20 2 - 20 µL 2 - 3 mm 1 sec
U-100 10 - 100 µL 2 - 3 mm 1 sec
U-200 20 - 200 µL 2 - 4 mm 1 sec
U-1000 100 - 1000 µL 2 - 4 mm 2 - 3 sec
U-5000 500 - 5000 µL 3 - 6 mm 4 - 5 sec
U-10ML 1 mL - 10 mL 6 -10 mm 4 - 5 sec
Tip immersion depth is important. If exceeded, the
volume measured will be inaccurate, possibly out of specifica-
tion. Tip angle is also important. Hold the pipette vertically, or
within 20 degrees of vertical.
TOP POSITION
FIRST STOP
SECOND STOP

6
Pipetting Guidelines & Precautions
Consistency in all aspects of pipetting procedure will significantly
contribute to optimum reproducibility. Use a:
- Smooth, slow and consistent pickup / dispense.
- Consistent speed and smoothness when you press and release
the pushbutton.
- Consistent pushbutton pressure at the first stop.
- Consistent immersion depth (see table on previous page).
- Minimal angle (< 20° from vertical).
Prevent liquids from being drawn into the Pipetman Ultra shaft by
taking the following precautions:
- Use RAININ aerosol-resistant tips, with an internal filter which
acts as a barrier to aerosols and liquids.
- Never invert or lay Pipetman Ultra down if liquid is in the tip.
- Pipette slowly, holding Pipetman Ultra < 20° from vertical.
General guidelines:
- Use a new RAININ disposable tip for each sample.
- Pre-rinse each new tip with the sample to be pipetted.
- Do not pipette samples with temperatures above 70°C or below
4°C. Extreme temperatures can affect accuracy and precision.
Pipetman Ultra is a precision instrument and should be treated
with the level of care appropriate for laboratory instrumentation.
After use, store Pipetman Ultra in a clean, safe place: it is recom-
mended to use pipette stands, Cat. Nos. GR-2 or GR-3.
Reverse Mode Pipetting
In reverse mode pipetting; the operating sequence is reversed:
1. Mount a disposable tip on the pipette shaft.
2. Press the pushbutton fully to the second stop.
3. Immerse the tip in liquid and return the plunger slowly to the
full up position. Wait a moment for the liquid column to reach
equilibrium in the tip.
4. Wipe any excess liquid from the outside of the tip without
touching the orifice.
5. To dispense, rest the end of the tip against the vessel wall
and press the plunger to the first stop. Hold this position a
few seconds, or long enough for the liquid column to reach
equilibrium again.

6. Remove the tip from the receiving vessel without blowing out
the remaining liquid.
7. Return excess sample in the tip to the original sample con-
tainer, if desired. Discard the used tip.
Pipetting Liquids of Varying Density
Pipetman Ultra lets you compensate for solutions of density much
different from water, by setting the volume slightly higher or lower
than that required. The compensation amount must be deter-
mined empirically.
E.g., if pipetting 10 µL of CsCl solution, you determine that the
volume delivered is actually 8.5 µL (≥5 samples). Try changing
the volume setting to 11.8 µL and repeat the measurements. If the
volumes delivered are still not close enough to 10 µL, make
another slight volume adjustment until the measurements are as
desired.
Very dense liquids may not be suitable for air displacement pipet-
ting. Use Microman® positive displacement pipettes instead.
For volatile solvents you should saturate the air-cushion of your
pipette by aspirating and dispensing the solvent repeatedly
before aspirating the sample.
Temperature Considerations
Warm or cold liquids can be measured with good precision by
using a consistent pipetting rhythm. This will help minimize any
differences in heating or cooling effects within the pipette. Use a
new tip each time for best accuracy and precision when measur-
ing samples with temperatures greatly different from ambient, and
do not pre-rinse. You will get best results if there is no delay
between picking up the sample and dispensing it.
Acids and Corrosives
After pipetting concentrated acids or highly corrosive solutions
you should disassemble Pipetman Ultra and inspect and clean (if
necessary) the piston, shaft, seals and o-rings.
Be sure to read “Removing the Piston” on page 13 before disas-
sembling the Pipetman Ultra.
Extensive contact with corrosive fumes may corrode the piston.
This will result in premature seal wear and may require refinishing
or replacement of the piston. Exposure of internal components to
corrosive fumes can be reduced by using aerosol-resistant tips.
These tips have an internal filter which acts as an aerosol barrier.
7

8
Personalizing your Pipette
Tip ejector
Before you start to pipette you can adjust the tip-ejector button
according to your preferences.
1) Position the tip-ejector button. Simply rotate the tip-ejector
button to the most comfortable position: left, right, or middle.
The tip ejector is adjustable in height to
allow for different types of tip, where (for
example) the length of the collar is differ-
ent.
2) Set the stroke by rotating the adjust-
ment wheel until you find the position
where it is most easy to activate the tip
ejector.
You may want to reset the stroke after fitting a different type of tip.
Name Tag Label
You can identify your pipette with a color-coded name-tag:
1) Pry out the window by inserting a small screwdriver in the
access slot.
2) Position the name tag next to the LCD.
3) Clip the window back into place.
TIP EJECTOR BUTTON TIP EJECTOR BUTTON
(set for right-handed user)
STROKE ADJUST-
MENT WHEEL
PLASTIC WINDOW
ACCESS SLOT:
INSERT SCREW-
DRIVER BLADE
PLACE NAME TAG HERE

Tip-ejector Extension
For use with Pipetman Ultra U-2 and U-10
In order to eject micro-volume tips, tip-ejector extensions are sup-
plied with U-2 and U-10 pipettes. They may be already fitted to
the shaft on your U-2 or U-10 model, but if they are not fitted, fol-
low the instructions below.
The tip ejector extension (PVDF – polyvinylidene fluoride), can be
autoclaved.
To fit the tip-ejector extension:
Hold the pipette with the LCD window uppermost,
Hold the extension with the slot uppermost,
Slide the extension over the shaft,
Push the extension firmly onto the end of the tip ejector until it
clicks into place. (See “B”)
To remove the tip-ejector extension:
Hold the pipette in one hand and grip the extension with the other.
Gently twist the extension (either direction) and pull it away from
the pipette. (See “C”)
9
SLOT
A CB

10
Troubleshooting
You may be able to identify and to correct the problem by referring
to the following table.
Symptom Possible Cause Refer to page
Pipette is leaking sample Worn O-ring 13
Pipette won’t aspirate Worn O-ring 13
Unscrewed lower part of shaft 12
Damaged or corroded piston 13-15
Damaged shaft 12
Improper repair or assembly 13-15
Shaft coupling is loose 13
Noisy operation Piston needs lubricating 15
Pipette is inaccurate Improper repair or assembly 13-15
Unscrewed lower part of shaft 12
Pipette is out of calibration 18-20
Shaft coupling is loose 13
Pipette is not precise Unscrewed lower part of shaft 12
Volume setting not locked 3
Incorrect operator technique -
Worn O-ring 13
Shaft coupling is loose 13
Damaged or corroded piston 13-15
Damaged shaft 12
Tips fall off or don’t fit Low quality tips 4
Damaged shaft 12
Damaged tip ejector 11
No LCD display Pipette is not switched on 1
Battery has failed 15
PIPETMAN ULTRA MUST BE IN THE LOCKED POSITION
TO CHANGE THE BATTERY, OTHERWISE THE PIPETTE
WILL NEED RECALIBRATION.
Before returning any pipette, ensure that it is completely free
of chemical, biological, or radioactive contamination. Call
Tech. Support, 800-543-4030.

Error Messages
Contact RAININ at 800-543-4030 if you see any of these error
messages on the display:
Message Cause
ERR1 Battery changed when the pipette was in the
UNLOCKED position.
Volume not set to the correct calibration volume
when the calibration tool was plugged in (see
"Recalibration").
ERR2 Setting problems.
ERR3 Electronic problems (microchip).
If you see "RECAL" flashing in the top right of the LCD, you
must recalibrate the pipette. After user recalibration you will
see "RECAL" steady on the LCD (not flashing).
To remove “RECAL” and set Pipetman Ultra to original calibration,
return it to RAININ Service (see p. 20) for factory calibration.
If “RECAL” does not appear, there may be a problem with the
instrument. Contact RAININ Tech Support at 800-543-4030.
Maintenance
You may safely perform the following tasks:
Clean or autoclave parts listed in "Cleaning & Decontamination",
Replace the parts specified under "Spare Parts",
Lubricate the piston,
Change the battery, (lock the volume before removing battery)
Recalibrate the pipette. (You are recommended to use RAININ for
calibration.)
Shaft and Tip ejector
The shaft and tip ejector must be changed if they are accidentally
damaged or attacked chemically. You should also remove these
parts for cleaning or decontamination purposes.
Changing the Tip-ejector
1) Keep the tip-ejector button depressed and grip the top of the
tip ejector with the other hand.
☛
TIP EJECTOR
PRESS AND HOLD TIP EJECTOR BUTTON
11

2) Gently rotate the tip ejector counterclockwise and separate its
connector from the activating rod.
3) Pull the tip ejector away from the body of the pipette.
4) Clean or autoclave the tip ejector and refit it (or a new one)
by reversing the procedure.
Changing the Shaft (lower part)
After removing the tip ejector, you may remove the lower part of
the shaft, which is more likely to become contaminated or dam-
aged than the upper part. Removal of the lower part is shown
below; for the upper part see "Removing the Piston" (special pre-
cautions are necessary).
1) Gently rotate the lower part of the shaft counterclockwise to
unscrew it from the upper part.
2) Separate the parts and remove the O-ring (see "Changing the
O-ring").
3) Clean and if required autoclave the lower part of the shaft.
4) If required lubricate the piston (see "How to Lubricate the Pis-
ton") and fit a new O-ring.
5) Screw the two parts together by hand, making sure that the
two parts are fully tightened.
6) Refit the tip ejector.
SHAFT (UPPER)
SHAFT (LOWER)
PISTON
O-RING
12

Changing the o-ring
The o-ring is contained by the two halves of the shaft; it must not
be autoclaved, if worn or damaged in any way, it must be
replaced.
To access the o-ring, remove the tip ejector and unscrew the
lower part of the shaft - if the o-ring is not immediately visible on
the piston, set the pipette to its maximum volume, then press the
push-button to the second stop. You should now be able to
remove the O-ring from the piston. Sometimes, the o-ring may be
found in the recess at the top end of the lower part of the shaft.
If required lubricate the piston (see "How to Lubricate the Piston")
then fit a new o-ring by sliding it onto the piston. Reassemble the
pipette.
The dimensions of the o-ring vary according to the pipette model
- refer to "Spare Parts" for details.
Servicing the Piston
You may remove the piston assembly to clean, lubricate, or
change the piston.
The pipette must be recalibrated after removing and
replacing the piston.
Removing the Piston
1) Set the volume to zero and lock the pipette.
DO NOT UNLOCK THE PIPETTE OR TRY TO RESET THE VOL-
UME WHILE CHANGING THE PISTON ASSEMBLY, OTHER-
WISE DAMAGE MAY OCCUR TO INTERNAL COMPONENTS.
2) Remove the tip ejector and (optionally) the lower part of the
shaft.
If you remove the lower part, take care to remove the o-ring as
described in "Changing the o-ring".
3) Unscrew the shaft coupling (turn by hand, counterclock-
wise).
4) Pull on the spring guide to remove the piston assembly from
the body of the pipette - separate the parts (see next page).
13

For U-5000 and U-10ML the shaft coupling and the
upper part of the shaft are combined (see "Spare Parts").
5) Clean and autoclave (if required) the piston and holder,
together with any other parts that may need to be treated in
the same way (see "Cleaning and Decontamination").
6) Lubricate the piston; see next page.
7 ) Reassemble the piston, spring and spring guide; then care-
fully insert the assembly into the body of the pipette. The
spring guide should hold the piston assembly inside the
body of the pipette.
Take care to position the small-diameter end of the
spring as shown (innermost), and that the flanged
end of the spring guide is outermost.
8) Reassemble the upper part of the shaft and the shaft cou-
pling, then refit to the body of the pipette by rotating the shaft
coupling clockwise until it is finger tight. Fit the o-ring (or for
U-2 and U-10, the seal) and reassemble the lower part of the
shaft. Refit the tip ejector.
The seals for U-2 and U-10 are fragile and can only be
used once. So, after unscrewing the lower part of the
shaft you must fit a new seal.
☛
SHAFT
(LOWER)
SHAFT COUPLING
SHAFT
(UPPER)
PISTON
HOLDER PISTON SPRING (TAPERED) SPRING
GUIDE
SPRING GUIDE
(FLANGED END)
SPRING GUIDE
FLANGED END
SPRING (SMALL-DIAMETER END)
SHAFT COUPLING
☛
14

How to Lubricate the Piston (except U-2 and U-10)
Use the proper lubricant (Cat. No. 70902, supplied). Squeeze a
small quantity from the tube onto a clean, nonabrasive cloth. Use
the cloth to transfer the lubricant to the piston. Ensure that the pis-
ton is evenly lubricated, and that you wipe away any excess -
only a fine film of lubricant is required (over the entire piston).
Changing the Battery
PIPETMAN ULTRA MUST BE IN THE LOCKED POSITION
TO CHANGE THE BATTERY, OTHERWISE THE PIPETTE
WILL NEED RECALIBRATION.
The battery is a silver-oxide plated 1.5V low-drain type, generic
code 386 (size 11.6 x 4.2 mm).
Remember that locking your pipette when not in use will maxi-
mize the life of the battery. Battery life under normal use is 4
years. If you need to change it, proceed as follows:
1) LOCK THE VOLUME.
2) Remove the tip ejector.
3) Remove the battery compartment cover.
4) Pull out the battery holder (red plastic).
5) Lift up and remove the copper clip.
6) Lever-out the old battery and put it in a
secure bin for recycling.
7) Insert a new battery (see “Spare Parts”) into the battery holder.
Take care that the negative terminal of the battery is
uppermost (i.e. facing you).
8) Refit the copper clip.
9) Refit the battery compartment cover.
LIFT & REMOVE
BATTERY COMPARTMENT
COVER
BATTERY HOLDER
BATTERY NEGATIVE (-) TERMINAL
15

Cleaning and Decontamination
Pipetman Ultra is designed so that the parts normally in contact
with liquid contaminants can easily be cleaned and decontami-
nated.
Liquid must not enter the body (handle) of the pipette.
If you use chemical solutions for decontamination or detergents
for cleaning, other than specified below, you should check with
your supplier that the solution or detergent used does not attack
any of the following materials: stainless steel, POM (Poly-
oxymethylene), PVDF (Polyvinylidene Fluoride) and PC (Polycar-
bonate).
Cleaning
The pipette must be cleaned, as described below, before it is
decontaminated. Soap solution is recommended for cleaning
Pipetman Ultra.
External
1) Remove the tip ejector (see "Changing the Tip-ejector").
2) Wipe the tip ejector with a soft-cloth or lint-free tissue impreg-
nated with soap solution.
3) Wipe the entire pipette with a soft-cloth or lint-free tissue
impregnated with soap solution, to remove all dirty marks. If
the pipette is very dirty, a brush with soft plastic bristles may
be used.
4) Wipe the entire pipette and the tip ejector with a soft cloth or
lint-free tissue impregnated with distilled water.
Internal
The following components ONLY can be immersed in a cleaning
solution: tip ejector, shaft (both parts), shaft coupling, piston
(including holder), return spring, and spring guide.
1) Disassemble the pipette as described in "Maintenance".
2) Set aside the upper part in a dry and secure location.
3) Clean the individual components of the lower part of the
pipette using an ultrasonic bath (20 minutes at 50°C) or with
a soft-cloth and brushes. Small round brushes with soft plas-
tic bristles may be used to clean the interior of the shaft.
4) Rinse the individual components with distilled water.
5) Leave the parts to dry by evaporation or wipe them with a
clean soft-cloth or lint-free tissue.
6) Lubricate the piston and reassemble the pipette according to
the instructions given earlier in this chapter.
16

Decontamination
Autoclaving
The body (handle) of the pipette is not autoclavable. Only the
following parts may be autoclaved: tip ejector, shaft (both parts),
shaft coupling, piston (including holder), return spring and
spring guide. The O-ring is not autoclavable; it should be
replaced as specified in "Spare Parts".
1) Clean the parts to be autoclaved, especially the shaft.
2) Put the parts in an autoclaving sack.
3) Autoclave for 20 minutes at 121°C at 1 bar.
4) Check that the parts are dry before re-assembling the pipette.
5) Set the pipette aside to stabilize at room temperature.
Chemical Decontamination
You may choose to decontaminate your pipette chemically, in
accordance with your own procedures. Whatever decontaminant
you use, check that it is compatible with the plastics used in the
construction of the pipette: stainless steel, POM (Polyoxymethy-
lene), PVDF (Polyvinylidene Fluoride) and PC (Polycarbonate).
Non-immersible Parts
1) Wipe the body (handle) of the pipette with a soft-cloth or lint-
free tissue wetted with the chosen decontaminant.
2) Wipe the body of the pipette with a soft-cloth or lint-free tissue
wetted with distilled water or sterile water.
Immersible Parts
The following components only can be immersed in a decontam-
inant solution: tip ejector, shaft (both parts), shaft coupling, pis-
ton (including holder), return spring, and spring guide.
1) Disassemble the pipette as described in "Maintenance".
2) Immerse the components in the de-contaminant solution or
wipe them according the instructions given by the manufac-
turer or supplier of the decontaminant.
3) Rinse the individual components with distilled or sterile
water.
4) Leave the parts to dry by evaporation or wipe them with a
clean lint-free tissue or soft-cloth.
5) Lubricate the piston and reassemble the pipette according to
the instructions given earlier in this chapter.
17

Leak Test
After servicing or repair and before calibration, you are advised to
perform a leak test, as follows.
1) Mount a new RAININ tip.
2) Set the pipette to the maximum volume (in the specifica-
tions), or use the maximum reference mark on the tip.
3) Pre-rinse the tip, then aspirate the set volume from a beaker
of distilled water.
4) Maintain the pipette in the vertical position and wait for 20
seconds.
5) If a water droplet appears at the end of the tip there is a leak
(see “Troubleshooting”).
6) If you see no droplet, re-immerse the tip below the surface of
water.
7) The water level inside the tip should remain constant; if the
level goes down there is a leak (see “Troubleshooting”).
Recalibration (user Adjustment)
The following procedure is primarily used to check the accuracy
of a pipette following servicing (for example, after replacing the
piston assembly). Recalibration must be carried out by trained
people, under the conditions and using the equipment described
in the free publication “AB-15: Procedure for Evaluating Accuracy
and Precision of Gilson Pipettes”. For a downloadable copy of
AB-15 see RAININ’s website: www.rainin.com/pdf/ab15.pdf.
For more details call RAININ Technical Support at 800-543-
4030. The Tech. Support group can help you to implement these
pipette checking procedures or to build up your own procedures.
User should establish a routine for testing their pipettes at regular
intervals, taking into account the following factors: frequency of
use (see cycle counters), the nature and accuracy requirements
of the liquids being pipetted, the number of operators using the
pipette, and the number of cycles performed each time the pipette
is used.
Because Pipetman Ultra is designed with GLP in mind, you can
view the cycle counters each time you switch on the pipette.
18
This manual suits for next models
7
Table of contents
Other Rainin Laboratory Equipment manuals
Popular Laboratory Equipment manuals by other brands

Accuris
Accuris SmartDrop L NS1000 Operation manual

Mocom
Mocom Exacta operating manual

ThermoFisher Scientific
ThermoFisher Scientific HERASAFE 2030i Series operating instructions

Thermo IEC
Thermo IEC FRENCH Press FA-078A Operation manual

Medem
Medem SEC-Lw installation instructions

Agilent Technologies
Agilent Technologies M9302A Startup guide

Biolin Scientific
Biolin Scientific Theta installation manual

Metrohm
Metrohm Autolab RDE2 user manual

Hettich
Hettich ROTINA 420 operating instructions

Drucker Diagnostics
Drucker Diagnostics QBC 425740 Service manual

BURREL
BURREL 077-870-0300 operating manual

Visionix
Visionix VX90 Instructions for cleaning and sterilization