manuals.online logo
Brands
  1. Home
  2. •
  3. Brands
  4. •
  5. Ram Mounts
  6. •
  7. Automobile Accessories
  8. •
  9. Ram Mounts GDS RPR-INS-GDS-DOCKL-V2 User manual

Ram Mounts GDS RPR-INS-GDS-DOCKL-V2 User manual

Other Ram Mounts Automobile Accessories manuals

Ram Mounts No-Drill RAM-VB-136 User manual

Ram Mounts

Ram Mounts No-Drill RAM-VB-136 User manual

Ram Mounts TOUGH-TRAY User manual

Ram Mounts

Ram Mounts TOUGH-TRAY User manual

Ram Mounts GDS RAM-B-138U Installation guide

Ram Mounts

Ram Mounts GDS RAM-B-138U Installation guide

Ram Mounts GDS RAM-B-138U User manual

Ram Mounts

Ram Mounts GDS RAM-B-138U User manual

Ram Mounts RAM AQUA BOX PRO 10 Series User manual

Ram Mounts

Ram Mounts RAM AQUA BOX PRO 10 Series User manual

Ram Mounts Tough-Dock User manual

Ram Mounts

Ram Mounts Tough-Dock User manual

Popular Automobile Accessories manuals by other brands

Magneti Marelli AC161 Installation instruction

Magneti Marelli

Magneti Marelli AC161 Installation instruction

FDI uEZ GUI Start here

FDI

FDI uEZ GUI Start here

JCROffroad JT Install instructions

JCROffroad

JCROffroad JT Install instructions

Rostra VOXXElectronics 250-1930 owner's guide

Rostra

Rostra VOXXElectronics 250-1930 owner's guide

TOP VEHICLE TECH GR3FORD5 installation manual

TOP VEHICLE TECH

TOP VEHICLE TECH GR3FORD5 installation manual

Safe Fleet PRIME DESIGN AR-2000-BLK manual

Safe Fleet

Safe Fleet PRIME DESIGN AR-2000-BLK manual

Skoda Fabia Combi 5J Fitting instructions

Skoda

Skoda Fabia Combi 5J Fitting instructions

Camcar 40077 Al Mounting instructions

Camcar

Camcar 40077 Al Mounting instructions

Camcar 40089 AL Mounting instructions

Camcar

Camcar 40089 AL Mounting instructions

Impac Tradesman 2000 installation manual

Impac

Impac Tradesman 2000 installation manual

DVB OFFROAD BRSB-01 installation manual

DVB

DVB OFFROAD BRSB-01 installation manual

Safari Snorkel SS385HF installation guide

Safari Snorkel

Safari Snorkel SS385HF installation guide

ULTIMATE SPEED 279746 Assembly and Safety Advice

ULTIMATE SPEED

ULTIMATE SPEED 279746 Assembly and Safety Advice

SSV Works DF-F65 manual

SSV Works

SSV Works DF-F65 manual

ULTIMATE SPEED CARBON Assembly and Safety Advice

ULTIMATE SPEED

ULTIMATE SPEED CARBON Assembly and Safety Advice

Witter F174 Fitting instructions

Witter

Witter F174 Fitting instructions

WeatherTech No-Drill installation instructions

WeatherTech

WeatherTech No-Drill installation instructions

TAUBENREUTHER 1-336050 Installation instruction

TAUBENREUTHER

TAUBENREUTHER 1-336050 Installation instruction

manuals.online logo
manuals.online logoBrands
  • About & Mission
  • Contact us
  • Privacy Policy
  • Terms and Conditions

Copyright 2025 Manuals.Online. All Rights Reserved.

This document, including images, may not be reproduced partly or fully without the expressed written consent of National Products, Inc.To see more mounting options, visit rammount.com
Phone: 1.800.497.7479
www.rammount.com
[email protected]
While holding (H) nuts in place, attach ball adapter to back
of holder using (G) screws. RAM®logo must be facing in the
shown direction. Attach additional (L) screws.
Twist key lock to release
internal slide.
Position (H) nuts in nut pockets,
guiding them in place with a pen.
Note: Top cup may vary
Parts
index
3
4 6
Using (K) screws, attach bottom docking cup to vehicle
dock assembly. 5Using (K) screws, attach top
docking cup to top slide with
numbers facing down.
M
Insert top slide over internal vehicle dock.
7 9
2
Adhere foam pads to the inside
of top cup. Position evenly on top
cup, and cutting around any open
holes as needed.
1
This document, including images, may not be reproduced partly or fully without the expressed written consent of National Products, Inc.To see more mounting options, visit rammount.com
GDS®Locking Vehicle Dock
RPR-INS-GDS-DOCKL-V2
TAB-LOCK™
K GJ
4x 10x 2x 2x 2x
2x
2x 2x
L
2
3
5
7
9
11
13
15
17
19
21
23
25
27
29
31
33
4
6
8
10
12
14
16
18
20
22
24
26
28
30
32
34
For questions regarding the assembly of this holder, contact us at:
Phone: 1-800-497-7479 Email: [email protected]
2x
HN
Note: Ball adapter not included
8Place (N) nuts into top slide,
aligning with holes in internal slide.
Attach (M) screws from behind the
internal slide. Do not fully tighten
(slides must remain loose).
This document, including images, may not be reproduced partly or fully without the expressed written consent of National Products, Inc.To see more mounting options, visit rammount.com
Phone: 1.800.497.7479
www.rammount.com
[email protected]
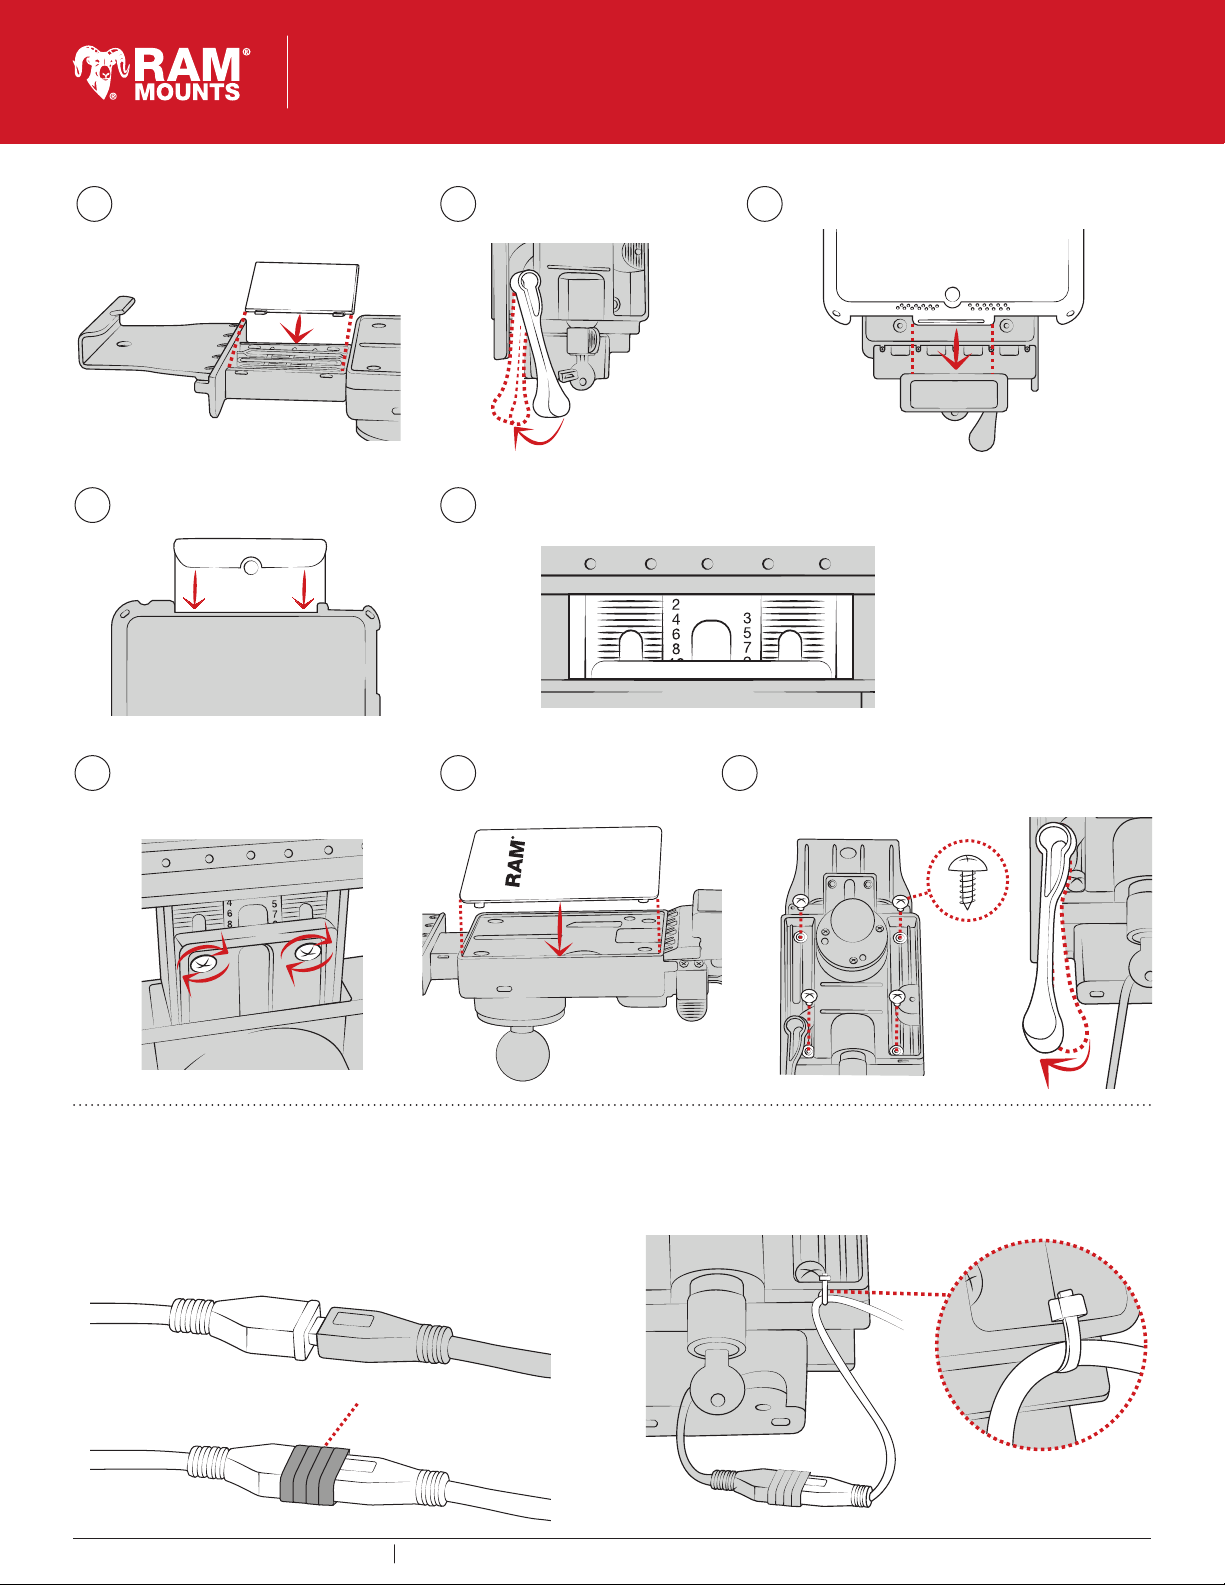
Secure using (J) screws on back of slide assembly. Lock
must be engaged to access all four holes as shown.
Position front cover over
vehicle dock assembly.
Remove your tablet. Set your top cup
to the appropriate setting using the
reference number from step 14. When in
place, fully tighten the (M) screws.
Cable Management
Insert Micro USB 2.0 cable into the GDS Dock’s Micro USB 2.0 receiver.
When plugged in, the tablet will detect the power source within two
seconds. User must supply a USB wall charger or cirgarette adapter
with appropriate charging specifications for the mounted device.
For open cockpit or outdoor use, it is recommended to apply
electrical tape to your USB connection.
Use cable tie to secure your USB cable to the slot behind vehicle
dock as shown.
Lack of, or improper use of wire retention/cable management,
may void warranty.
11
14
16 1715
12
13
Electrical tape
10
TAB-LOCK™
GDS®Locking Vehicle
This document, including images, may not be reproduced partly or fully without the expressed written consent of National Products, Inc.To see more mounting options, visit rammount.com
RPR-INS-GDS-DOCKL-V2
For recommended settings on
your specific tablet, visit
www.rammount.com/install
Place tablet with intelliSkin™ on bottom docking cup.
On the back of the top slide, review the numbers shown in the middle. Take note of the lowest
number that is fully visible. This reference will help you in the next step. In this example, the
lowest visible number is 8.
Press down on top cup to
secure over tablet.
Wedge top slide cover into top slide.
Using pressure, snap into place. Pull lever to engage lock.