RCA DRC480N User manual

DVD Player
User’s Guide
Changing entertainment. Again.
DRC480N

This symbol indicates that this
product incorporates double
insulation between hazardous mains
voltage and user accessible parts.
FCC INFORMATION
This equipment has been tested and found to comply with the limits for a Class
B digital device, pursuant to Part 15 of the FCC rules. These limits are designed
to provide reasonable protection against harmful interference in a residential
installation. This equipment generates, uses and can radiate radio frequency
energy and, if not installed and used in accordance with the instructions, may
cause harmful interference to radio communications. However, there is no
guarantee that interference will not occur in a particular installation. If this
equipment does cause harmful interference to radio or television reception,
which can be determined by turning the equipment off and on, the user is
encouraged to try to correct the interference by one or more of the following
measures.
• Reorient or relocate the receiving antenna.
• Increase the separation between the equipment and receiver.
• Connect this equipment into an outlet on a circuit different from that to
which the receiver is connected.
• Consult the dealer or an experienced radio/TV technician for help.
This class B digital apparatus meets all requirements of the Canadian
Interference--Causing Equipment Regulations.
Note:
This device is protected by U.S. patent
numbers 4,631,603 and 4,577,216 and
4,819,098 and other intellectual
property rights. The use of
Macrovision’s copy protection
technology in the device must be
authorized by Macrovision and is
intended for home and other limited
pay-per-view uses only, unless
otherwise authorized in writing by
Macrovision. Reverse engineering or
disassembly is prohibited.
This DVD player is designed and
manufactured to respond to the
Region Management Information. If
the Region number of a DVD disc does
not correspond to the Region number
of this DVD player, this DVD player
cannot play the disc. The Region
number for this DVD player is Region
No 1.
Refer to the identification/rating label located on the back
panel of your product for its proper operating voltage.
CAUTION
FCC Regulations state that
unauthorized changes or
modifications to this equipment may
void the user’s authority to operate it.
CAUTION
THIS PRODUCT UTILIZES A LASER. USE
OF CONTROLS OR ADJUSTMENTS OR
PERFORMANCE OF PROCEDURES
OTHER THAN THOSE SPECIFIED HEREIN
MAY RESULT IN HAZARDOUS
RADIATION EXPOSURE. DO NOT OPEN
COVERS AND DO NOT REPAIR
YOURSELF. REFER SERVICING TO
QUALIFIED PERSONNEL.
WARNING
To reduce the risk of fire or shock
hazard, do not expose this DVD player
to rain or moisture. No objects filled
with liquids, such as vases, shall be
placed on the apparatus.
CAUTION
RISK OF ELECTRIC SHOCK.
DO NOT OPEN.
This symbol indicates
“dangerous voltage” inside the
product that presents a risk of
electric shock or personal injury.
This symbol indicates
important instructions
accompanying the product
Keep your sales receipt to obtain warranty parts and service and for proof of purchase. Attach it here and record the
serial andmodel numbers in case you need them. The numbers are located on the back of the player.
Model number: DRC480N Serial Number: Purchase date:
Dealer address and phone:
CLASS 1
LASER
PRODUCT
Product Registration: Please fill out the product registration card packed with
this product, and return it. immediately Returning this card enables us to
contact you if necessary.

chapter 1 1
Table of Contents
Chapter 1: Setup and Connections
Things to consider before you connect ........................2
Types of Discs your DVD Player will play......................2
Install batteries in the remote control..........................2
Choose Your Connection ................................................3
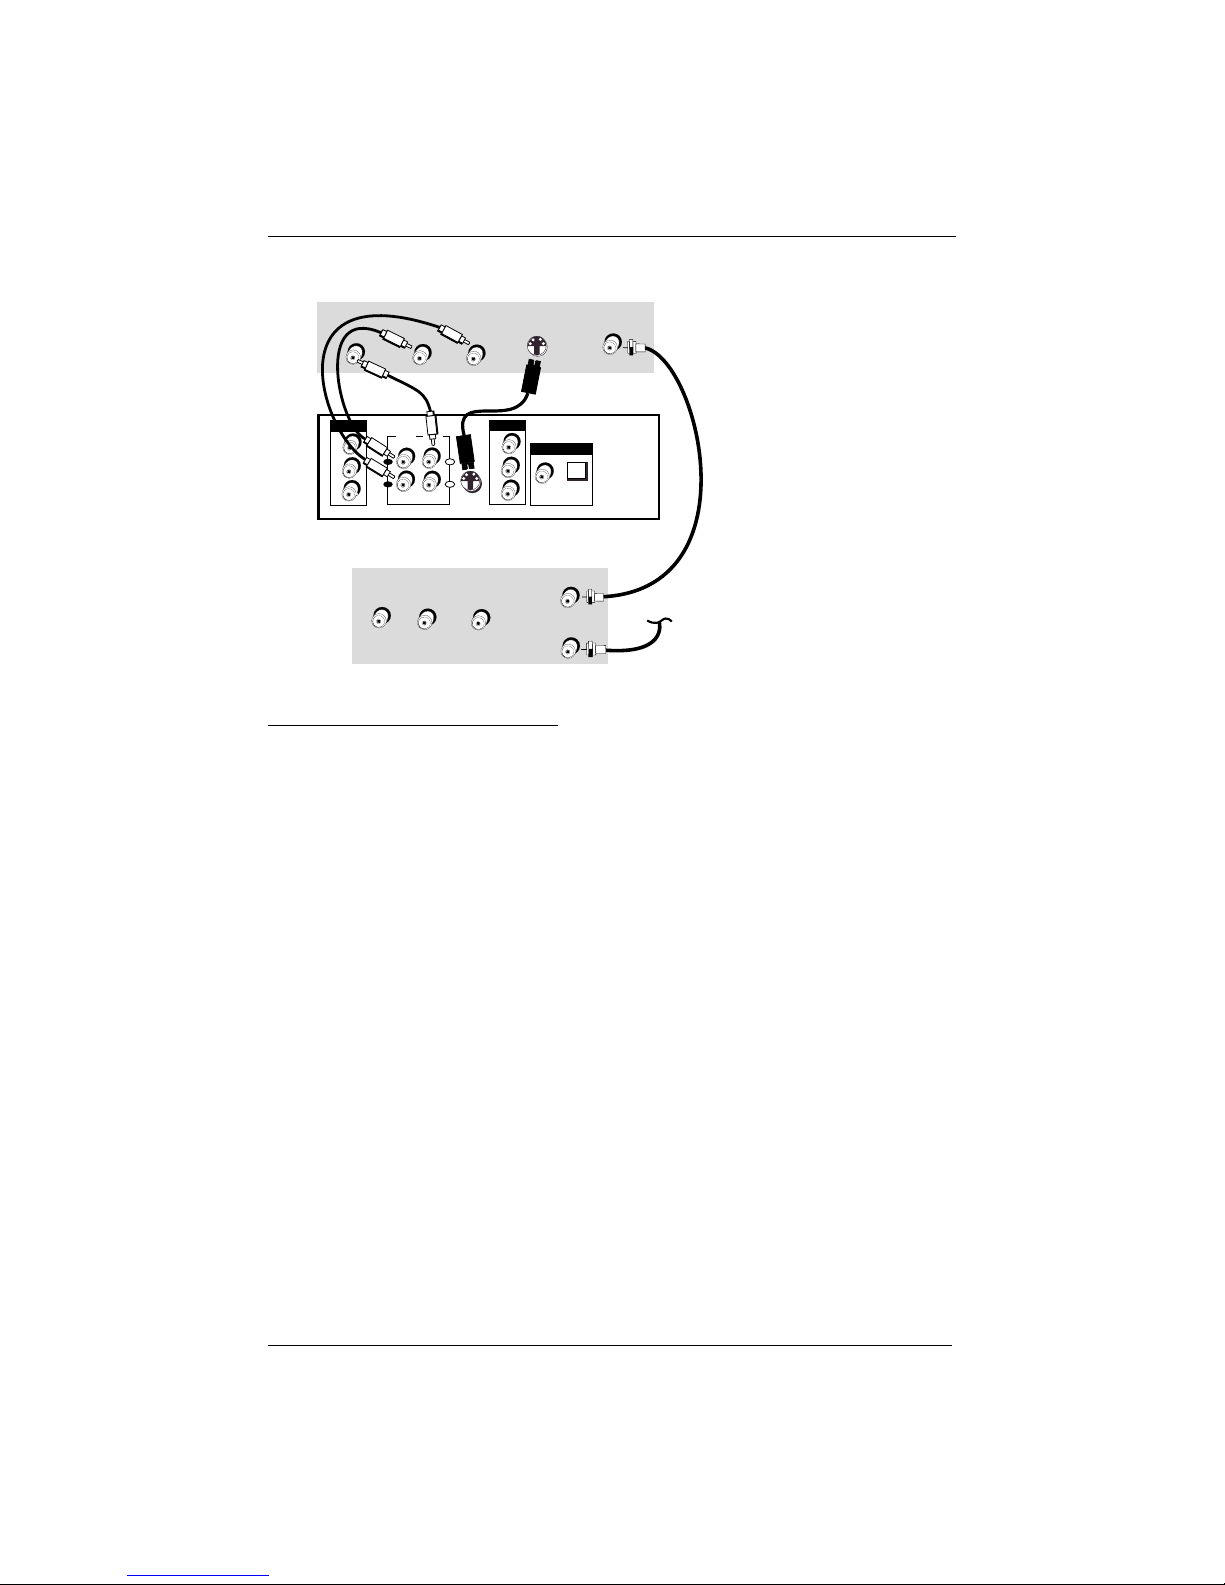
Connection: DVD + TV + VCR............................4
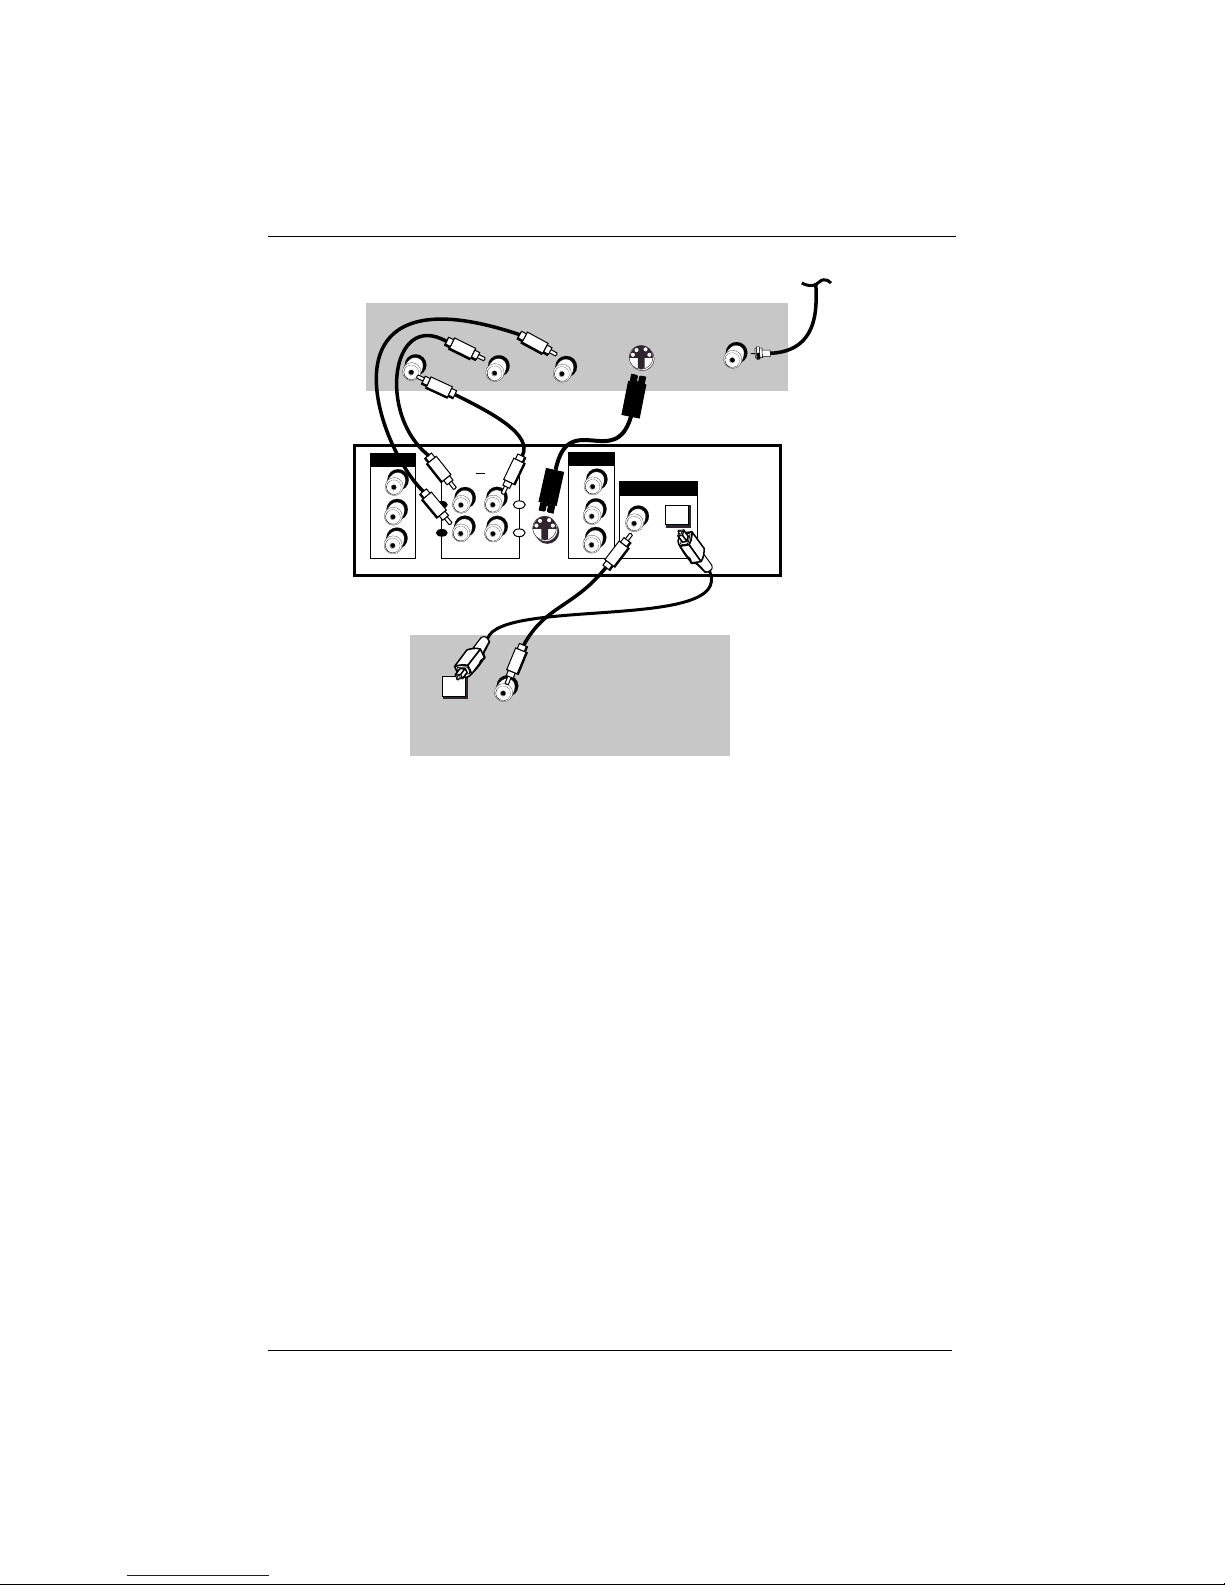
Connection: DVD + TV........................................5
DVD + TV + Audio Receiver ................................7
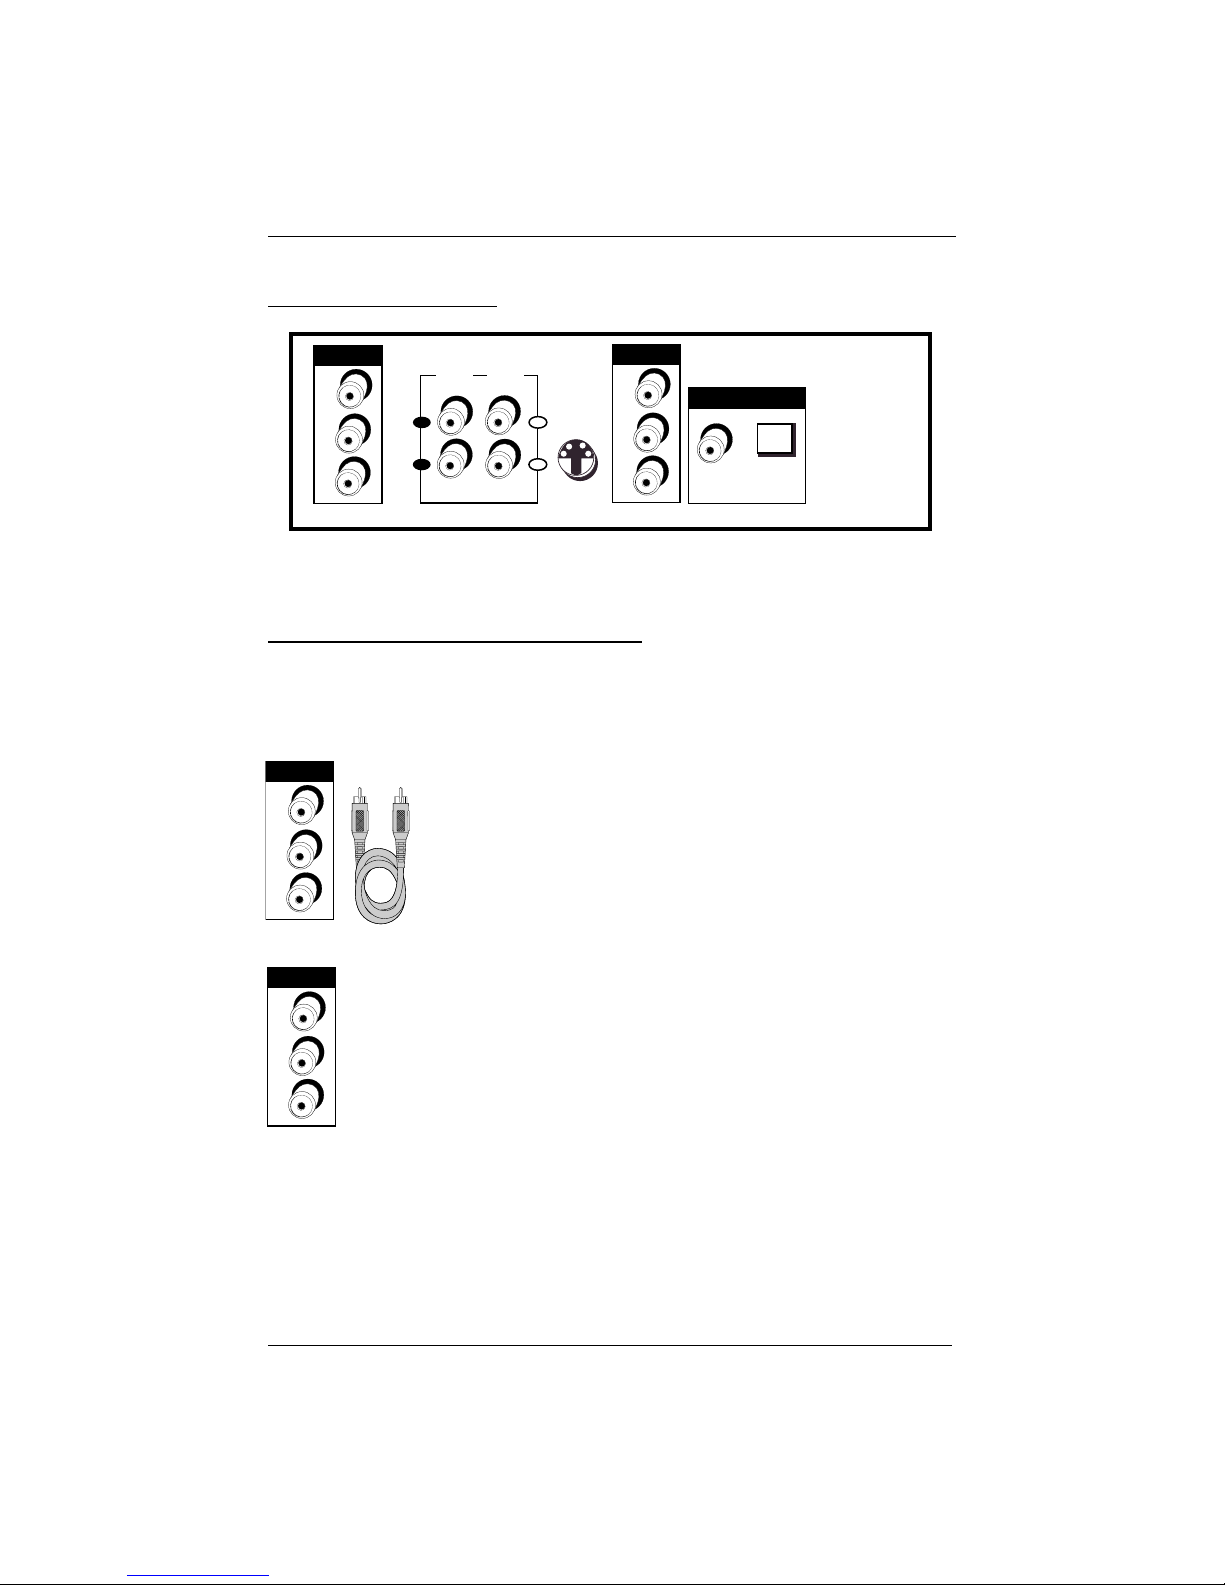
Back of the DVD Player ..................................................8
Explanation of cables and jacks ....................................8
Front of the DVD Player ................................................9
Put the Remote in DVD Mode ....................................10
Turn on the TV and the DVD player............................10
Next Steps ....................................................................10
Chapter 2: The Remote Control
The Remote Control ......................................................11
Navigating through On-Screen Menus ......................11
Find out if the remote can operate your TV ..............12
Tune o the TV’s video input channel ..........................12
Chapter 3: Playing Discs
Compatible discs ..........................................................13
Regional Coding ............................................................13
Using Different Menus ................................................13
How to Load and Play Discs ........................................14
Search Options ..............................................................14
Playback Options ..........................................................15
Zoom ..................................................................15
Scene Again ........................................................15
Smart Resume ....................................................15
Using the On-Screen Info Display ..............................15
DVD Disc Info Display........................................16
Audio Cd Info Display........................................16
Video Disc Info Display......................................16
Time Display ..................................................................17
Selecting a Title ............................................................17
Selecting a Chapter ......................................................17
Selecting Subtitles ........................................................18
Changing the Audio Language ....................................18
Using the Repeat Feature ............................................19
Using the Bookmark Feature ......................................20
Changing the Camera Angle ........................................21
(chapter 3 continued)
Using the Play Mode feature ......................................22
Introscan ........................................................................22
Virtual Light ..................................................................22
Playing MP3 Discs ........................................................23
The MP3 Display ..........................................................23
Virtual Light ..................................................................24
Displaying JPEG files during MP3 Playback ..............24
Viewing JPEG Files........................................................25
Chapter 4: DVD Menu System
The DVD Player Menu System ....................................26
Play Mode menu ..........................................................26
Standard Play......................................................26
Random Play ......................................................27
Program Play ......................................................27
Edit Program ......................................................27
AutoPlay..............................................................28
Lock menu ....................................................................28
Locking Player ....................................................29
Unlocking Player ................................................29
Changing Your Password ..................................30
Setting Ratings Limits (parental control) ........30
Display menu ................................................................32
TV Image ............................................................32
Front Display ......................................................33
Virtual Light........................................................33
Sound menu ..................................................................33
Sound Logic ........................................................33
Digital Output ....................................................34
Virtual Surround ................................................34
Languages menu ..........................................................35
Player Menus ......................................................35
Disc Menus..........................................................35
Audio ..................................................................36
Subtitles ..............................................................36
Chapter 5: Additional Information
Troubleshooting ............................................................37
Handling Cautions ........................................................40
How to find your TV’s Video Input Channel ..............41
Accessories ....................................................................42
Limited Warranty ..........................................................43

Chapter 1 Connections and Setup
2chapter 1
Things to consider before you connect
Protect components from overheating
• Don’t block ventilation holes on any of the components. Arrange the components so that
air can circulate freely.
• Don’t stack components.
• When you place components in a stand, make sure you allow adequate ventilation.
• If you connect an audio receiver or amplifier, place it on the top shelf.
Position cables properly to avoid audio interference
• Insert each cable firmly into the designated jack.
• If you place components above the TV, route all cables down the side of the back of the
TV instead of straight down the middle of the back of the TV.
• If your antenna uses 300-ohm twin lead cables, do not coil the cables. Also, keep the twin
lead cables away from audio/video cables.
Types of discs your DVD player can play
• DVD discs – contain picture and sound (DVD-R, DVD+RW are
compatible with this player) .
• CDs (CD-R, CD-RW) – Audio CDs contain musical or sound
content only. MP3 discs contain MP3 files. This player is also
capable of playing CDs that contain JPEG files.
• Video CD discs – Like DVD video discs, Video CDs contain picture
and sound content. The difference is the amount of information
that can be stored on the disc. VCDs typically have lower picture
and sound quality than DVD discs.
Some discs may not be
compatible due to laser
pickup and disc design.
VIDEO CD
Install Batteries in the Remote
1. Remove the battery compartment cover on the back of the remote.
2. Insert new batteries. Match the polarities (+ and –) on the batteries with the diagram on
the remote.
3. Put the battery compartment cover back on the remote.
Important Battery Information
• If you’re not going to use the remote for a month or more, be sure to remove the batteries
because they can leak and cause damage.
• Dispose of batteries in the proper manner, according to federal, state, and local regulations.
• Any battery may leak electrolyte if mixed with a different battery type, if inserted incorrectly, if
all batteries are not replaced at the same time, if disposed of in fire, or if an attempt is made
to charge a battery not intended to be recharged.
• Discard leaky batteries immediately. Leaking batteries can cause skin burns or other personal
injury.
This product incorporates copyright protection technology that is protected by method claims of certain U.S. patents and other
intellectual property rights owned my Macrovision Corporation and other rights owners. Use of this copyright protection technology
must be authorized by Macrovision Corporation, and is intended for home use only unless otherwise authorized by Macrovision
Corporation. Reverse engineering or disassembly is prohibited.

Connections and Setup
chapter 1 3
Choose Your Connection
There are several ways to connect your DVD player. Please use the following chart to
determine which connection is best for you. Turn to the appropriate page, and connect
your DVD Player.
Component Cables Needed Connection Go to...
• Coaxial DVD + TV + VCR 4
• Audio/video
• S-Video (optional)
• Coaxial DVD + TV 5
• Audio/video
• S-Video (optional)
• Coaxial DVD + TV + 6
• Audio/video Audio Receiver
• S-Video (optional)
DVD
TV
VCR
DVD
TV
DVD
TV
Audio
Receiver

Connections and Setup
4chapter 1
OPTICALCOAXIAL
Y
Pb
Pr
S-VIDEO OUT
L
R
1
2
STEREO
AUDIO
OUT
TV
VIDEO
OUT
COMPONENT
VIDEO OUT
DIGITAL AUDIO OUT
Y
Pb
Pr
PROGRESSIVE
SCAN
VIDEO
AUDIO
L R
S-VIDEO CABLE/ANTENNA
Back of TV (example)
Back of DVD Player
VIDEO
AUDIO
L R
OUT TO TV
Back of VCR (example)
CABLE
OR
OFF-AIR SIGNAL
IN FROM ANTENNA
12a 2b
3
Notes:
The back of your TV and VCR
might look different than the
ones pictured here. Details
about the different kinds of
cables used to connect your
DVD player are on page 8.
Don’t connect the DVD
player to the VCR, or through
the VCR. Doing so could
negatively affect the picture
quality and/or disable the
DVD player.
4
- OR -
Connection: DVD + TV + VCR
1. Connect the audio cables to the STEREO AUDIO OUT L (left – white) and R (right – red)
jacks on the back of your DVD Player, and to the corresponding Audio Input jacks on your
TV (sometimes labeled AUDIO IN L and R).
2. Connect the video cable.
A. Basic video connection – Connect the video cable (yellow) to the
TV VIDEO OUT jack on the back of your DVD Player, and to the Video Input jack on
your TV (sometimes labeled VIDEO IN).
– OR –
B. S-Video (optional) – If your TV has an S-Video jack, connect the S-Video cable (not
provided) to an S-VIDEO OUT jack on the back of your DVD Player and to the
S-VIDEO jack on your TV.
Note: If your TV has progressive scan (Y, Pb, Pr) jacks, use video-grade cables (not provided) to connect
the TV to the DVD player (progressive scan Y to Y, Pb to Pb, etc.). It is essential to match the color coded
connectors with a compatible TV.
If your TV has component video (Y, Pb, Pr) jacks, use video-grade cables (not provided) to connect the TV to
the DVD player (Y to Y, Pb to Pb, etc.). It is essential to match the color coded connectors with a
compatible TV.
3. Connect the antenna or cable to the Antenna Input jack on the VCR (sometimes labeled IN
FROM ANTENNA).
4. Connect a coaxial cable to the Antenna Output jack on the VCR (OUT TO TV) and to the
Antenna Input jack (CABLE/ANTENNA) on the TV.
5. Insert the AC power cord into an AC outlet.
Go to page 10

Connections and Setup
chapter 1 5
Connection: DVD + TV
1. Connect the audio cables to the STEREO AUDIO OUT L (left – white) and R (right – red)
jacks on the back of your DVD Player, and to the corresponding Audio Input jacks on your
TV (sometimes labeled AUDIO IN
L and R).
2. Connect the video cable.
A. Basic video connection – Connect the video cable (yellow) to the TV VIDEO OUT jack on
the back of your DVD Player, and to the Video Input jack on your TV (sometimes labeled
VIDEO IN).
– OR –
B. S-Video (optional) – If your TV has an S-Video jack, connect an S-Video cable (not
provided) to the S-VIDEO OUT jack on the back of your DVD Player and to the S-VIDEO
jack on your TV.
Note: If your TV has progressive scan (Y, Pb, Pr) jacks, use video-grade cables (not provided) to connect
the TV to the DVD player (progressive scan Y to Y, Pb to Pb, etc.). It is essential to match the color coded
connectors with a compatible TV.
If your TV has component video (Y, Pb, Pr) jacks, use video-grade cables (not provided) to connect the TV
to the DVD player (Y to Y, Pb to Pb, etc.). It is essential to match the color coded connectors with a
compatible TV.
3. Connect the AC power cord into an AC outlet.
4. Connect your cable or off-air antenna to your television as you normally would. You may
need to consult your television manual for details.
Go to page 10
OPTICALCOAXIAL
Y
Pb
Pr
S-VIDEO OUT
L
R
1
2
STEREO
AUDIO
OUT
TV
VIDEO
OUT
COMPONENT
VIDEO OUT
DIGITAL AUDIO OUT
Y
Pb
Pr
PROGRESSIVE
SCAN
VIDEO
AUDIO
L R
S-VIDEO CABLE/ANTENNA
Back of TV (example) CABLE
OR
OFF-AIR SIGNAL
Back of DVD Player
12a 2b
4
- OR -

Connections and Setup
6chapter 1
OPTICALCOAXIAL
Y
Pb
Pr
S-VIDEO OUT
L
R
1
2
STEREO
AUDIO
OUT
TV
VIDEO
OUT
COMPONENT
VIDEO OUT
DIGITAL AUDIO OUT
Y
Pb
Pr
PROGRESSIVE
SCAN
VIDEO
AUDIO
L R
S-VIDEO CABLE/ANTENNA
Back of TV (example)
Back of DVD Player
Back of Receiver (example)
OPTICAL COAXIAL
OFF AIR
SIGNAL
Both Dolby Digital® and DTS® are audio formats used to record 5.1-channel audio signals
onto the digital track of film (while the film is being made). Both of these formats provide up
to six separate channels: left, right, center, left rear, right rear, and common subwoofer. The
disc will play 5.1-channel sound only if you’ve connected a DTS or Dolby Digital receiver or
decoder and if the disc is encoded in the Dolby Digital or DTS format.
Please Read This Before Using the DIGITAL AUDIO OUT Jack!
This player’s digital output jack is designed for a connection to a Dolby Digital or DTS receiver or decoder.
Older digital equipment may not be compatible with the Dolby Digital bitstream. Such a connection can
create a high level of noise that may be harmful to your ears, and could damage headphones or speakers.
It is important to choose the correct Digital Output setting in the DVD Player’s Sound menu, especially
when you use either of the DIGITAL AUDIO OUT jack.
Consult the manual that came with your receiver to connect it completely.
Manufactured under license from Dolby Laboratories. “Dolby” and the double-D symbol are trademarks of Dolby
Laboratories. Confidential unpublished works. © 1992-1997 Dolby Laboratories, Inc. All rights reserved.
DTS is a registered trademark of Digital Home Theater Systems, Inc.
13a 3b
2
4
- OR -

Connections and Setup
chapter 1 7
DVD Player + TV + Audio Receiver
1. Connect the left and right audio cables to your audio/video receiver and to the STEREO
AUDIO OUT L (left – white) and R (right – red) jacks on the back of your DVD Player.
2. If you have a Dolby Digital or DTS receiver, use one of the DIGITAL AUDIO OUT jacks to
connect the receiver to the DVD player. You must also set the Digital Output setting in
the Sound menu (go to page 45).
Note: The DIGITAL AUDIO OUT jack has two options: OPTICAL and COAXIAL. Some Dolby Digital receivers
have one type of Digital Audio Input jack, and some have both. Under most conditions, optical and
coaxial connections work equally well — the only difference is the type of cable you connect to the jack.
If you want to use a less expensive cable, connect a coaxial cable to the COAXIAL jack. Rarely, but
sometimes, coaxial cables — especially long ones, pick up radio frequency (RF) interference from
household appliances, nearby power lines, and/or broadcast towers.
If you would rather use the OPTICAL jack, connect an optical digital cable to the DVD
player and to the corresponding digital optical input jack on the receiver.
3. Connect the video cable.
A. Basic video connection – Connect the video cable (yellow) to the TV VIDEO OUT jack
on the back of your DVD Player, and to the Video Input jack on your TV (sometimes
labeled VIDEO IN).
– OR –
B. S-Video (not provided) – If your TV has an S-Video jack, connect the S-Video cable
to the S-VIDEO OUT jack on the back of your DVD Player and to the S-VIDEO jack
on your TV.
Note: If your TV has progressive scan (Y, Pb, Pr) jacks, use video-grade cables (not provided) to connect
the TV to the DVD player (progressive scan Y to Y, Pb to Pb, etc.). It is essential to match the color coded
connectors with a compatible TV.
If your TV has component video (Y, Pb, Pr) jacks, use video-grade cables (not provided) to connect the TV
to the DVD player (Y to Y, Pb to Pb, etc.). It is essential to match the color coded connectors with a
compatible TV.
Go to page 10

Connections and Setup
8chapter 1
Component Video (Y, Pb, Pr) Jacks and Cables
The Y, Pb, Pr jacks provide excellent picture quality. To ensure maximum
picture quality, use three video-grade cables for the connection. There
are bundled component video cables sold that are color-coded to match
the Y, Pb, Pr jacks (red, green, and blue).
Explanation of Input Jacks and Cables
There are several ways to connect your DVD Player to your TV depending upon the cables you
have and the jacks that are on the back of your TV. Different jacks and cables provide a
different level of performance.
Back of the DVD Player
OPTICALCOAXIAL
Y
Pb
Pr
S-VIDEO OUT
L
R
1
2
STEREO
AUDIO
OUT
TV
VIDEO
OUT
COMPONENT
VIDEO OUT
DIGITAL AUDIO OUT
Y
Pb
Pr
PROGRESSIVE
SCAN
When connecting, make sure you connect Output jacks to Input jacks, Video to Video, Right Audio to Right Audio,
etc. A description of each jack follows.
Y
Pb
Pr
COMPONENT
VIDEO OUT
Y
Pb
Pr
PROGRESSIVE
SCAN
Progressive Scan Jacks
Your DVD Player is equipped to work with Faroudja Directional Correlational
Deinterlacing (*DCDiTM) progressive scan progressive scan. This technology
produces smoother and more natural images while eliminating jagged edges on
interlaced video. In order for you to take advantage of this technology, your
player must be connected through progressive scan jacks. to a TV that has
progressive scan capibility. If your TV has progressive scan capability, connecting
through the progressive scan jacks provides the best quality picture. If your TV
has Progressive Scan jacks, connect your DVD player using the progressive scan
jacks. Use three video-grade cables for the connection. These cables are color-
coded to match the Y, Pb, Pr jacks (red, green, and blue).
*“DCDi” is a trademark of Faroudja, a division of Sage, Inc.

Connections and Setup
chapter 1 9
STOP SKIPPLAY PAUS EOPEN/CLOSE
STANDBY/ON
DVD / VIDEO CD / CD PLAYER / PROGRESSIVE SCAN DECODER DRC 480
S
-
L
R
L
R
STEREO
AUDIO
OUT
TV
VIDEO
OUT
Audio/Video Jacks and Cables (RCA-type)
Stereo Audio Out
These jacks send the audio from the disc you’re playing in the DVD Player
to the TV. The audio jacks and cables are often color-coded (red for right
audio, and white for left audio). You must connect audio cables to the
AUDIO L and R jacks on the DVD Player and the corresponding Audio Input
Jacks on the TV no matter which Video jack you connect (TV VIDEO OUT; S-
VIDEO; Y, Pb, Pr)
Note: If your component has only one input for audio (mono), connect it to the left
(white L/Mono) audio jack on the TV and don’t connect the right audio part of the
cable.
TV Video Out
The basic Video jack (usually color-coded yellow) is also referred to as
composite video. Composite video is better than the video quality you get
from an RF coaxial cable (the type used to plug the cable feed into a TV).
STANDBY/ON – Turns the player on and off. The ON•OFF indicator lights when the player is
off.
OPEN/CLOSE – Press to open and close the disc tray.
PLAY – Press to begin playback.
PAUSE – During playback, press to pause.
PREV – Skips to previous chapter or track.
STOP – Stops disc play. – Skips to next chapter or track.
– Skips to next chapter or track.
– Skips to previous chapter or track.
S-Video Jacks and Cables
The S-Video (separate video) jack provides better picture quality than a
composite video. If your TV has an S-VIDEO jack, connect the DVD Player to
the TV with an S-Video cable (not provided).
Note: Remember to connect the left and right audio cables because the S-Video cable
carries only the picture signal, not the sound.
Front of the DVD Player

Connections and Setup
10 chapter 1
3. The first time you turn on your DVD player, the
Language menu appears.
If you want the DVD player’s menus to appear in
English, press the OK button on the remote control.
If you prefer another language, press the arrow
down button until that language is highlighted.
Press OK to select the language.
Put the Remote in DVD Mode
When you want the remote to operate the DVD Player, point the remote at the DVD Player,
not the TV. Make sure there is a clear path between the remote control and the component
you want to operate, so the signal isn’t blocked. Make sure the remote is in DVD mode — press
the DVD button.
Turn on the TV and DVD Player
1. Turn on your TV and tune it to the correct Video Input Channel (if you don’t know which
channel is your the Video Input channel, go to page 41 for help).
2. Press the ON•OFF button to turn on the DVD Player.
Next Steps
Before you start playing discs, you might want to get familiar with the remote control —
Chapter 2 has details.
If you want to skip straight to playing discs, go to Chapter 3. It explains playback features of
DVDs, Audio CDs, Video CDs, discs that contain MP3 files, and discs that contain JPEG files.
The DVD Player’s menu system is outlined in Chapter 4, and Chapter 5 contains
troubleshooting, your Limited Warranty, and additional information about your DVD Player.

chapter 2 11
Chapter 2 The Remote Control
DVD TV ON•OFF
GO BACK
AUDIO
SUBTITLE INFO GUIDE
ANGLE
MENU
VOL CH
ZOOM
AGAIN
INPUT
PLAY
REVERSE FORWARD
RECORD
STOP
OPEN•CLOSE
PAUSE
MUTE
CLEAR
The Remote Control
Use this remote to operate the DVD player, and to access the features available. To operate the
DVD player, press the DVD button to put the remote into DVD mode. The remote is also
designed to operate most RCA, GE, and Proscan TVs — just press the TV button to put the
remote into TV mode. The descriptions that follow describe how each button works when
operating the DVD player. Not all functions available for DVD mode are available for TV mode.
GO BACK Returns to the previous
menu.
GUIDE Accesses the DVD disc guide
(if available).
INFO Displays the
on-screen Info Display
MENU Accesses the disc’s menu
(disc guide) if available.
MUTE In TV and DVD modes, lowers
the volume to minimum level. Press
again to restore volume.
ON•OFF Turns the DVD Player on
and off. In TV mode, turns the TV
on and off.
OPEN•CLOSE Opens and closes the
disc tray (press and hold down the
STOP button for several seconds).
PAUSE Pauses disc play. When
using DVD discs, press again to
search forward a frame at a time.
PLAY Begins disc play.
RECORD Used with some TVs that
have an on-screen programming
guide that enables automatic
recording when connected to a VCR.
REVERSE Searches backward through
the disc.
STOP Stops playback. Press and hold
to open and close the disc tray. In
order to see the DVD Player menu,
press the STOP button.
0-9 (Number buttons) Use to input
information such as chapter numbers,
track numbers, or to make selections
on some menu screens.
ZOOM Enlarges the picture.
ANGLE Accesses various camera
angles that might have been added
to the disc when it was created.
CH +/- In DVD mode, advances to
the next/preceding chapter or track.
In TV mode, changes channels.
CLEAR Removes on-screen menus
and displays.
DVD Puts the remote in DVD mode
so it operates the DVD Player.
FORWARD Searches forward
through the disc.
Navigating through On-Screen Menus
Use the the arrow buttons on the remote to move through on-screen menus.
Press the OK button to select a menu item that is highlighted.
TV Puts the remote in TV mode so it
operates the TV.
AUDIO Accesses the the on-screen
Info Display that enables you to play
a disc in a different language.
SUBTITLE Accesses the the on-screen
Info Display that enables you to play
a disc with subtitles.
AGAIN Replays the last several
seconds of the title you’re playing.
VOL +/- In TV or DVD mode,
controls level of sound.
INPUT In TV mode, accesses the
video input channel(s).

The Remote Control
12 chapter 2
Find out if the remote can operate your TV
This remote control is designed to operate most RCA, GE, and Proscan TVs.
1. Press the TV button.
2. Press the ON•OFF button (if the TV turns on or off, this remote will operate the TV) You
can use the INPUT button to tune the TV to the correct video input channel.
Tune to the TV’s Video Input Channel
To watch DVDs, the TV needs to be tuned to the Video Input channel that corresponds with
the jacks you used to connect the DVD Player to the TV.
1. Press the TV button on the remote.
2. Press the INPUT button until you see the picture from the DVD Player (the DVD main
menu, or if a disc is playing, you’ll see the movie on the screen). If you need more help to
find your Video Input channel, go to page 41.

chapter 3 13
Chapter 3 Playing Discs
Regional Coding
Both the DVD Player and the discs are coded by region. These regional codes must match in
order for the disc to play. This player’s code is region 1.
Using Different Menus
Each disc is programmed with different features. There are three separate types of menus
that you can use to access features:
• The Disc menu – The Disc menu is part of each disc and is separate from the DVD player’s
menu. The contents of each Disc menu varies according to how the disc was authored
and what features are included. The Disc menu is turned on and off (while the disc is
playing) with the MENU button on the remote.
• The DVD player’s Info Display – The Info Display appears as icons across the top of the
screen. It can only be accessed while you are playing a disc. It’s turned on and off with
the INFO button on the remote.
• The DVD player menu – The DVD player’s menu system is accessed only when a disc isn’t
playing. It appears automatically when you press the STOP button on the remote.
Remember: A feature will only work if the disc was programmed with that feature. For example, if you
choose subtitles on the Info Display, the subtitles will only appear if the disc was created with subtitles.
If a menu or icon is “grayed out” it means that item (or feature) isn’t available.
Compatible discs
This DVD Player is capable of playing the following
types of discs: DVDs, audio CDs, Video CDs, MP3 CDs.
Before you put a disc in the player, make sure it is
compatible.
You can’t play the following types of discs:, Laserdiscs,
CD-I, CD-ROM (computer-only discs), DVD-ROM, or
discs recorded using other broadcast standards (i.e. PAL
or SECAM).
VIDEO CD

14 chapter 3
Playing Discs
To Load and Play a DVD Disc
Turn on the TV and your DVD Player (press ON•OFF on the remote or
press the STANDBY/ON button on the DVD Player).
1. If necessary, tune the TV to its Video Input channel (if you need more
information, go to page 41).
2. Press the OPEN/CLOSE button (the disc tray opens).
3. Place a disc gently into the tray with the disc’s label facing up
(double-sided discs have content on both sides, so you can place
either side up).
4. Press the OPEN/CLOSE or PLAY button. The disc tray closes. The DVD
Player reads the disc’s table of contents, and then one of three things
happens depending on how the disc was programmed:
• The disc starts playing.
• The disc menu appears on the screen. One of the options will
start disc play. Highlight that option and press OK.
• The DVD Player’s main menu appears on the screen. Highlight the
Play option and press OK.
When you stop playing a disc, the player remembers where you stopped.
When you start playing the disc again the DVD Player picks up where you
left off unless the disc is removed, or the player is unplugged, or you
press the STOP button twice.
C
a
n
'
t
C
a
t
c
h
U
p
C
a
n
'
t
C
a
t
c
h
U
p
C
a
n
'
t
C
a
t
c
h
U
p
(
W
i
d
e
s
c
r
e
e
n
V
e
r
s
i
o
n
)
On a two-sided
disc, the title is
usually in the
center of the disc.
An example of a
one-sided disc.
Search Options
To search a disc, you can use the FORWARD button or the REVERSE button. You can also
utilize the following search features:
Picture Scan — When you’re playing a disc, each time you press FORWARD or REVERSE, your
DVD Player scans the disc faster until you reach the fastest scan speed. To resume normal
playback, press PLAY.
Freeze Frame and Frame Advance – While a disc is playing, press PAUSE to freeze the picture.
To advance one frame at a time, press PAUSE again (the on-screen icon changes from PAUSE
to FRAME). Each time you press the FORWARD or REVERSE button, the picture goes to the
next (or previous) frame. To resume normal playback, press PLAY.
Slow Motion (in Freeze Frame Mode) – While a disc is playing, press PAUSE. Press REVERSE or
FORWARD (each time you press REVERSE or FORWARD the slow motion will get even slower
until you reach slowest speed). To resume normal playback, press PLAY.

chapter 3 15
Playing Discs
Playback options
Many of your DVD Player’s playback features are accessed through the Info Display.
Additionally, with some discs you can access playback features directly from the remote
control.
Zoom
1. While you’re playing a disc, press ZOOM. The ZOOM icon will be displayed. To zoom in,
press the CH+ button on the remote (the player zooms in on the image). Each time you
press SKIP NEXT, the player zooms in .5x, up to 15x. To zoom out, press the CH- button.
2. To see other parts of the picture when you’ve zoomed in on the image, press the up,
down, left, and/or right arrow buttons.
3. Press OK to keep current ZOOM setting and remove the ZOOM icon from the screen. Press
ZOOM again to resume normal playback.
Scene Again™
1. While you’re playing a disc, press the AGAIN button on the remote (the disc automatically
repeats the last few seconds of the movie).
Smart Resume
When you load a disc that was viewed on the player, the player remembers the last three
points when playback was stopped. As soon as the player reads the disc, the Smart Resume
menu will appear. It has 4 options:
Start – The beginning of the disc.
1 – The first place you stopped playback the last time the disc was played.
2 – The second place you stopped playback the last time the disc was played.
3 – The third place you stopped playback the last time the disc was played.
To use resume play:
1. Use the arrow buttons to highlight the position where you would like to begin playback.
2. Press OK or PLAY to begin playback.
Using the On-Screen Info Display
The on-screen Info Display contains many playback features. To see the Info Display, press the
INFO button on the remote while a disc is playing (the Info Display appears across the top of
the screen). Each feature is illustrated with an icon. Use the left and right arrow buttons to
move through the different icons in the Info Display. When an icon is highlighted, use the up
and down arrow buttons on the remote to scroll through the choices displayed in the text box
under the icons.

16 chapter 3
Playing Discs
You can only access the Info Display when you’re playing a disc. Also, the Info Display features
are only available if the disc was created with that particular feature. If one of the icons is
“grayed out,” the Info Display feature isn’t available for the disc you’re playing.
The invalid symbol appears on the screen when you press a button that doesn’t have
any function. To make the Info Display disappear from the screen, press INFO on the
remote.
Time display Chapter Audio Bookmark
Title Subtitles Repeat Angle
Time display Track Play Mode Repeat IntroScan Bookmark
Time display Track PlayBack Audio Repeat
Control
Video Disc Info Display
Audio CD Info Display
DVD Disc Info Display

chapter 3 17
Playing Discs
Time Display
This feature displays the time that has elapsed during playback. For
DVD discs, the time displayed refers to the current title and acts as a
Time Search feature. You can skip right to any scene.
1. Press INFO on the remote (the Info Display appears).
2. If the time box isn’t already highlighted, use the left/right arrow
buttons on the remote control to highlight it.
3. Use the number buttons on the remote to enter the elapsed time
you want to go to in that title. You must use two digits for each
field. For example, if you enter 01:35:12, playback will start one
hour, 35 minutes, and 12 seconds into the title.
Selecting a Title
Some discs contain more than one title. Each title is divided into chapters.
To select a title:
1. While the disc is playing, press INFO on the remote (the Info Display
appears).
2. If the Title icon on the Info Display isn’t highlighted, press the
right/left arrow buttons to highlight it.
3. Use the number button(s) on the remote to enter the title number or
press the up/down arrow buttons to go to the next or previous title.
Note: Some discs only have one title.
Selecting a Chapter
A title can be divided into individual chapters (similar to tracks on a CD).
To skip to a specific chapter:
1. While a disc is playing, press INFO on the remote (the Info Display
appears).
2. Press the right arrow button until the chapter icon is highlighted.
3. Press the number button(s) on the remote to enter the chapter you
want to play —enter 2 digits (for example, to go to chapter 4, press 0
and then press 4). The movie starts playing at the beginning of the
chapter you entered.
Note: The Chapter feature won’t work if the disc isn’t formatted with separate
chapters.

18 chapter 3
Playing Discs
Selecting Subtitles
By default, subtitles are off. To turn subtitles on:
1. While a disc is playing, press INFO (the Info Display appears).
2. Press the right arrow button until the Subtitle icon is highlighted.
3. Press SUBTITLE to turn on subtitles (the subtitles appear at the
bottom of the screen)
4. To change the subtitle language, press the up or down arrow button
repeatedly to see what subtitle languages are available (the subtitle
language options appear in the box at the bottom of the Info
Display).
5. To turn subtitles off, press the SUBTITLE button again.
Notes:
Changing the subtitle language with the Info Display will only affect the disc you
are currently playing. When the disc is removed or the player is turned off, the
subtitle language will revert to the language setting specified through the DVD
player’s main menu.
If the disc doesn’t contain the language you want to use, the disc’s default
language is automatically selected.
Some discs are programmed to only allow you to access the subtitle feature
through the disc’s menu.
Changing the Audio Language
If the disc was created with different language tracks (recorded in
different languages), you can change the language while you’re playing
the disc.
1. While a disc is playing, press INFO (the info display appears).
2. Press the right arrow button until the Audio icon is highlighted.
3. Press the down arrow button on the remote to scroll through the
available audio languages.
4. When the language you want to use is highlighted, press the OK
button (the dialog plays in the language you selected).
Notes:
The language feature only works if the disc was created with multiple language
tracks. If the disc doesn’t contain the language you selected, the disc will play in
the default language.
When you choose an audio language during disc playback, you only override the
audio language setting in the DVD Player’s main menu temporarily.
The audio language can also be changed through the DVD player menu.
Table of contents
Other RCA DVD Player manuals

RCA
RCA DRC6379T Configuration guide

RCA
RCA RTD217 - DVD/CD Home Theater System User manual

RCA
RCA DRC69705 - Dual Screen Portable DVD Player User manual

RCA
RCA DRC288SU User manual

RCA
RCA DRC620N User manual

RCA
RCA 7L400MDV User manual

RCA
RCA DRC232N User manual

RCA
RCA DRC300i Instruction Manual

RCA
RCA RC6001P User manual

RCA
RCA DRC212N User manual