RCA MR25515YX2AY1 User manual

isio sc;o

WARNING
To reduce the risk of fire or
shock hazard, do not expose
this TV to rain or moisture.
To reduce the risk of electric shock, do not remove
RISKOF ELECTRIC cover (or back). No user serviceable parts inside.
SHOCKDO NOT OPEN Refer servicing to qualified service personnel.
This symbol indicates
"dangerous voltage" inside
the product that presents a
risk of electric shock or
personal injury.
This symbol indicates
important instructions
accompanying the product.
Caution: To reduce the risk of electric shock, match wide
blade of plug to wide slot, fully insert.
POWER CONSUMPTION: 120V ~ 60 Hz A.C.
125 Watts (Models MR25515 and MR27315)
If fixed (non-moving) images are left on the screen for long
periods, they may be permanently imprinted on the screen. Such
images include network Iogos, phone numbers, and video games.
Extended viewing of channels displaying these images should be
avoided.
Cable TV Installer: This reminder is provided to call your attention to
Article 820-40 of the National Electrical Code which provides guidelines for
proper grounding and, in particular, specifies that the cable ground shall
be connected to the grounding system of the building as close to the point
of cable entry as practical.

SETUP AND CONNECTIONS .......................................................... 3
Step 1: Unpack the TV ...................................................................... 4
Step 2: Connect Your TV .................................................................. 4
TV Only ....................................................................................... 4
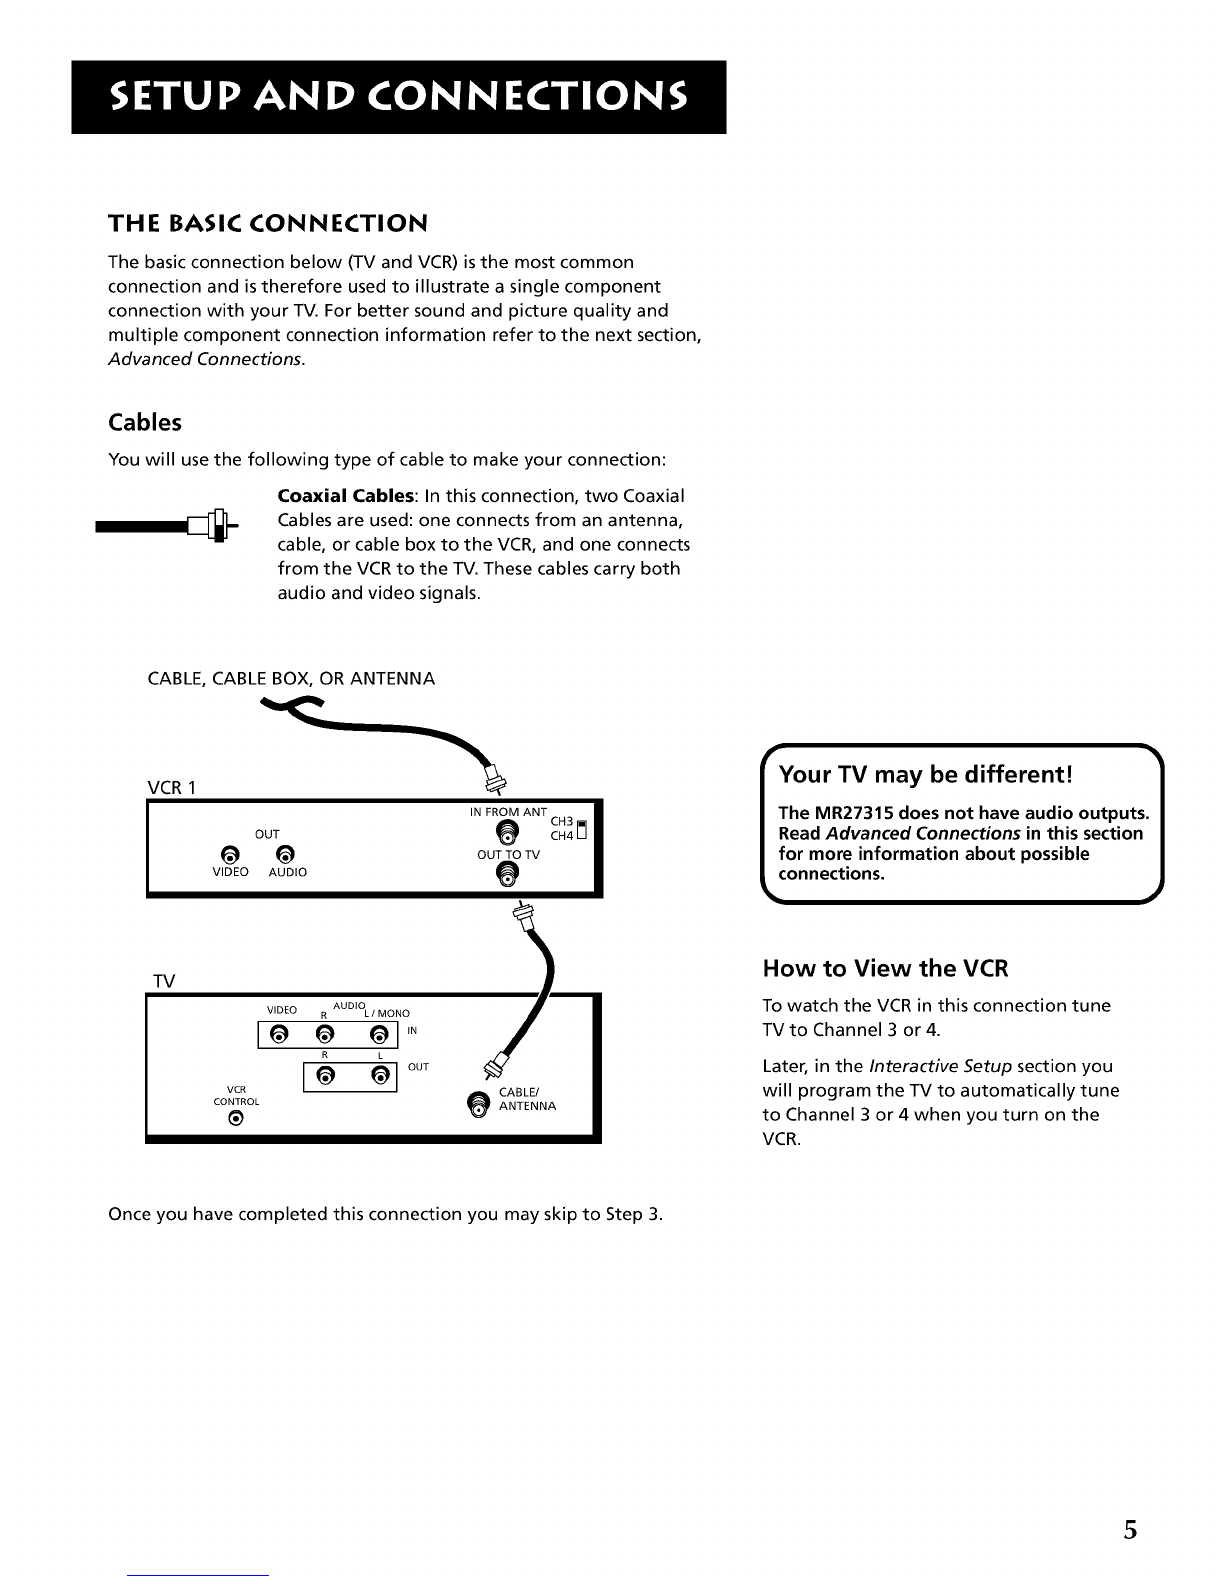
The Basic Connection ................................................................. 5
Advanced Connections .............................................................. 6
Step 3: Plug in the TV ..................................................................... 10
Step 4: Place Batteries in Remote .................................................. 10
Step 5: Turn On the TV ................................................................... 10
Step 6: Program the TV .................................................................. 10
INTERACTIVE SETUP .................................................................... 11
Using Point and Select Navigation ................................................ 12
Entering Setup ................................................................................ 12
Selecting aLanguage ..................................................................... 13
Auto Channel Search ..................................................................... 13
Setting the Time ............................................................................. 14
Setting the VCR1 Channel (Auto Tuning) ..................................... 15
Setting the VCR2 Channel (Auto Tuning) ..................................... 16
Setting the DVD Channel (Auto Tuning) ...................................... 17
Setting the SAT/CABLE Channel (Auto Tuning) ............................ 17
Labeling the Channels ................................................................... 18
USING THE REMOTE ..................................................................... 19
Remote Buttons .............................................................................. 20
Using the INPUT Button .......................................................... 21
Programming the Remote ............................................................. 22
Testing the Remote .................................................................. 22
Using the Remote to Control aDevice ................................... 23
Modes of Operation ................................................................ 23
Front Panel ..................................................................................... 23
Remote Codes ................................................................................. 24

MENUS AND FEATURES ............................................................... 25
Menus and Control Panels ............................................................. 26
Audio Menu .................................................................................... 28
Picture Quality Menu ..................................................................... 29
Screen Menu ................................................................................... 30
Using Closed Captioning ......................................................... 30
Channel Menu ................................................................................ 31
Time Menu ...................................................................................... 32
Parental Control Menu .................................................................. 33
Channel Block .......................................................................... 33
Front Panel Lockout ................................................................. 33
Setup Menu .................................................................................... 34
Channel Marker .............................................................................. 34
REFERENCE ..................................................................................... 35
Troubleshooting ............................................................................. 35
Care and Cleaning .......................................................................... 36
INDEX ............................................................................................. 37
2

GETTI NG STARTE D
This manual is designed to get you started quickly.
The first four sections of the manual show you how
to get your TV Setup and Connected, run the
Interactive Setup, Program the Remote, and use all of
the menus, features, and controls of your TV.
The Reference section in the back of the book
contains troubleshooting tips, as well as care and
cleaning instructions.
11 SETUP AND CONNECTIONS
Y
Y
Y
Y
ICheckout the notes that have been added /
throughout the manual in these Tip J
Boxes. There are some important
tips that will help you get the most from
your TV.
3

STEP 1: UNPACK THE TV
Make sure to locate the remote control.
STEP 2: CONNECT YOUR TV
There are three types of connections outlined in this section:
TV Only: If you're only going to connect the
TV to your home antenna or cable
system.
The Basic Connection: If you're going to connect the TV to a
VCR or satellite receiver.
Advanced Connections: If you're going to make multiple
connections, hooking up the TV to a
VCR and a satellite receiver.
Cable information and illustrations are given for each type of connection.
Once you have completed your desired connection you may skip forward
to Step 3.
TV ONLY
This is a basic connection from an antenna or cable system to your TV.
Connect the cable into the Cable/Antenna jack as shown.
Cables
You will use the following cable to make your connection:
Coaxial Cable: These cables carry audio and video
signals to the TV from an antenna, cable, or cable
box.
CABLE, CABLE BOX, OR ANTENNA
VIDEO R AUDIO / MONO
le
e CABLE/
CONTROL ANTENNA
Once you have completed this connection you may skip to Step 3.
4

THE BASIC CONNECTION
The basic connection below (TV and VCR) is the most common
connection and is therefore used to illustrate a single component
connection with your TV. For better sound and picture quality and
multiple component connection information refer to the next section,
Advanced Connections.
Cables
You will use the following type of cable to make your connection:
Coaxial Cables: In this connection, two Coaxial
Cables are used: one connects from an antenna,
cable, or cable box to the VCR, and one connects
from the VCR to the TV. These cables carry both
audio and video signals.
CABLE, CABLE BOX, OR ANTENNA
VCR 1
IN FROM ANT CH3 i_1
OUT e CH4 U
@ @ OUT TO TV
VIDEO AUDIO e
TV
AUDIO __
VIDEO R L/MONO
lee el 'N
out
VCR
e CABLE/
CONTROL ANTENNA
Your TV may be different!
The MR27315 does not have audio outputs.
Read Advanced Connections in this section
for more information about possible
connections.
How to View the VCR
To watch the VCR in this connection tune
TVto Channel 3 or 4.
Later, in the Interactive Setup section you
will program the TV to automatically tune
to Channel 3 or 4 when you turn on the
VCR.
Once you have completed this connection you may skip to Step 3.
5

ADVANCED CONNECTIONS
Advanced connections give you better sound and video by separating
the audio and video signals and enabling you to connect multiple
components.
This section describes the types of inputs available on the back of your
TV and suggests ways you can use them for optimum performance.
Once you have made your connections
you will need to program the TV to tune
to the correct Video INPUT channel in
order to see and hear audio and video
from the component. You will program
this later in the Interactive Setup.
Back of the TV
The number of jacks on the back panel of your TV depends on the model
number of your TV. Find out the model number of your TV and look for
its corresponding diagram either below or on the next page. When
connecting A/V cables, be sure to connect corresponding OUT and IN
jacks (Video to Video, Right Audio to Right Audio, etc.).
Model MR25515
AUDIO
VIDEO R L/MONO
" 1o o ol 'N
Rol
>I0
VCR I
CABLE/
CONTROL ANTENNA
VIDEO and AUDIO IN Use these input jacks to connect a VCR,
Laserdisc player, DVD player, satellite receiver or Internet Access
Device. To view the component connected to VIDEO, use the INPUT
button on the remote.
AUDIO OUT Use these output jacks to connect to an audio receiver
or amplifier for variable controlled or fixed level stereo output.
VCR CONTROL This jack is for a feature not available in your
market at the time of this printing. The circuitry that would allow
this feature to work has been disabled in your TV.
CABLE/ANTENNA Takes the signal input from a cable,
cable box, or an off-air antenna. Can also be used for basic
component connections.
6

Model MR27315
VIDEO AUDIO
R L /MONO
hie e el 'N
VCR _ CABLE/
CONTROL _ ANTENNA
VIDEO and AUDIO IN Use these input jacks to connect a VCR,
Laserdisc player, DVD player, satellite receiver or Internet Access
Device. To view the component connected to VIDEO, use the INPUT
button on the remote.
VCR CONTROL This jack isfor a feature not available in your
market at the time of this printing. The circuitry that would allow
this feature to work has been disabled in your TV.
CABLE/ANTENNA Takes the signal input from a cable,
cable box, or an off-air antenna. Can also be used for basic
component connections.
7

Sample Connections
The following are sample connection scenarios you may encounter when
connecting components to your TV.
Cables
You will use the following types of cables to make your connection:
Coaxial Cables: Carries the signal from the antenna
or cable directly to the television or through a cable
box, as needed by your cable system.
Audio/Video Cables: Carries audio and video from
a component to the TV.
TV and Stereo VCR
Compared to the Basic Connection, using Audio/Video cables will
enhance the sound and picture quality from a component.
CABLE, CABLE BOX, OR ANTENNA
VCR 1
OUT
VIDEO R
IN FROM ANT CH3lil
e CH4 m
OUT TO TV
Cautions:
Position cables to Avoid Audio Hum
or Interference
• Insert all cables firmly into jacks.
• Place the audio/video cables to the
sides of the TV's back panel instead of
straight down the middle.
•Try not to coil any twin-lead cables and
keep them away from the audio/video
cables.
Protect your components from
Overheating
•Do not block ventilation holes in any of
the components. Arrange the
components so that air can circulate
freely.
•Do not stack components.
•Allow adequate ventilation when
placing your components in a stand.
•Place your amplifier on the top shelf of
the stand so heated air rising from it
will not flow around other
components.
How to View Your VCR
TV
VCR
CONTROL e CABLE/
ANTENNA
To watch the VCR in this connection, press TV to put the
remote control into TV mode, then press INPUT to toggle
to the video (VID) inputs.
In the Interactive Setup section you can program the TV to
automatically tune to the VID input channel when you turn
on the VCR.
8

TV, VCR and Satellite Receiver
CABLE, CABLE BOX, OR ANTENNA
SATELLITE RECEIVER
IN )M ANT
OUT e
_ _ OUTTOTV
VIDEO R L
VCR 1
SATELLITE SIGNAL
SATELLITE
IN
IN FROM ANT CH3
e c"41il
OUT TO TV
e
How to View Your Components
To watch the satellite receiver in this connection,
press TV to put the remote control into TV mode,
then press INPUT to scroll through the video input
channels until you tune to VID.
To watch the VCR in this connection, enter 03 to
tune to the VCR channel.
In the Interactive Setup you can program the TV to
automatically tune to the correct input channel
when you turn on your component.
TV
VIDEO AUDIO
R L /MONO
le e el ,N
R L
@ G °UT
VCR
CONTROL e CABLE/
ANTENNA
9

STEP 3: PLUG IN THE TV
Plug the end into the wall outlet, matching the wide blade of the plug
with the wide slot in the outlet. Be sure to insert the plug completely.
[LII _\
_v
[_1 l\
STEP 4: PLACE BATTERIES IN REMOTE
Remove the battery compartment cover from the back of the
remote.
Insert fresh batteries. Make sure that the polarities (+ and -) are
aligned correctly.
• Replace the cover.
STEP 5: TURN ON THE TV
PressTV on the remote, or press POWER on the TV itself.
Pressing the TV button not only turns on the TV, but puts the remote
into TV mode, so that the buttons on the remote will control TV
functions.
STEP 6: PROGRAM THE TV
REW PLAY _F
STOP PAUSE
r_7
° Y@5
ITV
Proceed to the next section, Interactive Setup. The interactive setup
routine walks you through the steps needed to fully configure the TV.
The first steps ask you to select your preferred language for the menu
system and to begin the auto channel search, which puts available cable
TV or antenna signals into the TV's memory.
10

THERE'S AN ON-SCREEN SETUP ROUTINE
The Interactive Setup routine helps you through the steps
needed to configure the TV :
• Select a menu language
• Search for available channels
• Set the time
• Set the VCR1 channel
• Set the VCR2 channel
• Set the SAT/CABLE channel
• Make the channel list and labels
12
V
INTE RACTIVE SETU P
VI
V
11

USING POINT AND SELECT NAVIGATION
You only need to know one rule when using the remote to access on-
screen menus and control panels: point and select. The point and select
method has two steps.
1. Point to a menu item using the MOVE arrows on the remote.
To point up or down, press the up or down arrows. To point left or
right, press the left or right arrows.
2. Select a menu item by pressing MENU*PROG.
Selecting an item tells the TV's menu system to go ahead and make
the change or go to a place you have indicated.
ENTERING SETUP
The first screen of the Interactive Setup appears automatically when
you turn on your TV for the first time or after a power outage.
1. Press MENUoPROG to begin setup or CLEAR to exit.
Point and Select buttons
You can also access the Interactive Setup through the Main menu:
1. Press MENUoPROG to bring up the Main menu.
2. Point to Setup and press MENU*PROG. The first Setup screen comes
up, asking you to confirm that you want to begin.
You can also select amenu item by
entering the item number with the
number buttons on the remote.
Press CLEAR at any time to remove all
displays from the screen and return to TV
viewing.
Many VCR user manuals refer to a
PROGRAM button. The MENU.PROG
button on this remote works as a
PROGRAM button in VCR mode for RCA,
GE and PROSCAN VCRs.
12

3. Point to Begin setup now and press MENUoPROG.
SELECTING A LANGUAGE
The first part of the setup routine asksyou to select your preferred
language for the menu system.
1. Point to your preferred language for the menu system.
2. Press MENUoPROG to select that language.
AUTO CHANNEL SEARCH
The next part of the setup routine asks you if you want the TV to search
for all channels viewable through your antenna or cable TV system. This
is sometimes called "auto programming."
1, Press MENUoPROG to tell the TV to begin searching for channels.
The display gives you a progress report and tells you when it has
finished.
2. Press MENUoPROG to continue.
If you skip Auto Channel Search now, you
can access it later through the Channel
menu. See Menus and Features for more
details.
13

SETTING THE TIME
The next step in the Interactive Setup lets you set the time of day.
1. Press MENU*PROG to bring up the Set Time control panel.
2. Use the left and right arrows to point to the hour and minutes
spaces. Use the digits to enter the numbers and the up and down
arrows to change from AM to PM.
3. Press MENU.PROG to continue.
14

SETTING THE VCR1 CHANNEL
(AUTO TUN I NG)
The next step lets you set the VCR1 channel. When you set the VCR1
channel, you're telling the TV what channel to tune to when you press
the VCR1 button on the remote. This is called auto tuning.
Indicate which input you used to connect the VCR. If you don't have a
VCR1 component connected to the TV, skip this step or select Not
Connected from the VCR1 Channel choice list. (For more, see Auto
Tuning in the Menus and Features section.)
1. Press MENU.PROG to bring up the VCR1 choice list.
2. Point to the choice that matches the way you have your VCR
connected to the TV.
3. Press MENU.PROG to continue.
15

SETTING THE VCR2 CHANNEL
(AUTO TUN ING)
The next step lets you set the VCR2 channel. When you set the VCR2
channel, you're telling the TV what channel to tune to when you press
the VCR2oLD button on the remote.
Indicate which input you used to connect a second VCR, DVD player or
Laserdisc player. If you don't have a second VCR, DVD player or Laserdisc
player connected to the TV, skip this step or select Not Connected from
the VCR2 Channel choice list. (For more, see Auto Tuning in the Menus
and Features section.)
1. Press MENUoPROG to bring up the VCR2 choice list.
1 Not connected
2. Point to the choice that matches the way you have your DVD player,
Laserdisc player or second VCR connected to the TV.
3. Press MENUoPROG to continue.
16

SETTING THE DVD CHANNEL
(AUTO TUN I NG)
The remote control that came packed with your TV does not have a button
corresponding to this feature. This feature does, however, function with
other types of universal remote controls. If you are setting up your TV for
the first time, go ahead and skip this step or select Not Connected from the
DVD channel choice list. (For more, see Auto Tuning in the Menus and
Features section.)
SETTI NG TH E SAT/CABLE CHANN EL
(AUTO TUN I NG)
The next step lets you set the SAT/CABLE channel. When you set the SAT/
CABLE channel, you're telling the TV what channel to tune to when you
press the SAT.CABLE button on the remote.
Indicate which input you used to connect a satellite receiver or a cable box. If
you don't have a satellite receiver or cable box connected to the TV, skip this
step or select Not Connected from the SAT/CABLE Channel choice list. (For
more, see Auto Tuning in the Menus and Features section.)
1. Press MENU.PROG to bring up the SAT/CABLE choice list.
2. Point to the choice that matches the way you have your satellite receiver
or cable box connected to the TV, and press MENU.PROG to continue.
17

LABELING THE CHANNELS
This last step in the Interactive Setup lets you edit your channel list and
label your channels. (For more, see List and Labels in the Menus and
Features section.)
Use the CHAN A(channel up) or CHAN V
(channel down) buttons to change
channels in the Chan # field. This works
even if you're not in the Chan # field. Or,
enter the channel number directly using
the number buttons on the universal
remote. To enter a number greater than
99, press and hold "1" to enter the
hundreds digit, then press the two
remaining numbers.
The list and labels feature can also be
accessed from the Channel menu. Because
this procedure can be time consuming,
feel free to skip this step and come back
to it later.
1. Press MENU.PROG to bring up the List and Labels control panel.
2.
3,
4,
Use the left and right arrows to point to the three different areas of
the control panel (called "fields").
Use the up and down arrows to scroll through the numbers and
letters and select Yes or No in the Normal List field. You may wish to
refer to the call letters listed in your newspaper's TV section for ideas
on labeling the channels.
Repeat this process for each of your channels. Then press
MENU.PROG to continue. The TV can store up to 27 labels in
memory.
WHAT NOW?
Now that you've finished the interactive setup, you can sit back, relax,
and enjoy the TV. Or...
PROG RAMMI NG TH E REMOTE
Since you've gone this far, you can take a few minutes to program the
remote to control your VCR, Laserdisc player, satellite receiver, or other
components. To find out how to program the remote, go to the next
section.
18
This manual suits for next models
8
Table of contents
Other RCA TV manuals