RCA VRC440 User manual

VCR
User’s Guide
Changing Entertainment. Again.
VRC440
Please read these instructions
before operating this product
for the first time.
15763820 (VRC440)(E) 01 CVR 5/25/01, 12:51 PM1

This symbol indicates
"dangerous voltage" inside
the product that presents a
risk of electric shock or
personal injury.
WARNING
To reduce the risk of fire or
electric shock, do not expose
this product to rain or moisture.
To reduce the risk of electric shock, do not remove
cover (or back). No user serviceable parts inside.
Refer servicing to qualified service personnel.
This symbol indicates
important instructions
accompanying the product.
CAUTION
RISK OF ELECTRIC
SHOCK. DO NOT OPEN.
Caution: To prevent electric shock, match wide
blade of plug to wide slot, fully insert.
Cable TV Installer: This reminder is provided to
call your attention to Article 820-40 of the
National Electrical Code which provides
guidelines for proper grounding and, in
particular, specifies that the cable ground shall be
connected to the grounding system of the
building as close to the point of cable entry
as practical.
Power Consumption:
90v~250v, @ 50/60Hz
17W
.
Product Registration
Please fill out the product registration card and return it immediately. Returning the card allows us to contact
you if needed.
Keep your sales receipt to obtain warranty parts and service and for proof of purchase. Attach it here and
record the serial and model numbers in case you need them. The numbers are located on the back of the VCR.
Model No._______________________________________________________________________________________
Serial No. _______________________________________________________________________________________
Purchase Date:___________________________________________________________________________________
Dealer/Address/Phone: ___________________________________________________________________________
Important Information
i
1576382B (VRC440)(E) 01 CVR 7/19/01, 10:44 AM2

1
Introduction
Introduction
Key Features Overview
Your VCR is equipped with features that will add to your recording experience. The following
information summarizes a few of these features. Chapter 3 provides more information about the
rest of the VCR’s features and how to use them.
Remote Control
Description: The VCR’s remote control can operate most RCA, GE, and
Proscan VCR’s.
Requirements: Point the remote control at the VCR and press VCR, then
POWER, to see if the VCR can be operated.
One Touch Recording (OTR)
Description: OTR quickly records the remaining portion of a program already
in progress. OTR is a great way to capture the end of a sporting event that has
run into overtime or a live broadcast that runs long.
Requirements: Repeatedly press the RECORD button on the VCR front panel or
REC/OTR on the remote control to set the desired duration of time to record.
Timer Recordings
Description: Your VCR allows you to program up to eight different future
broadcasts to be recorded. You can catch a one-time, daily, or weekly
broadcast to record.
Requirements: The VCR’s clock must be set correctly. A tape with its safety
tab in place and enough tape to record a program must be inserted into the
VCR. For a cable box or satellite receiver, turn it on and tune it to the channel
you want to record before the recording is to begin.
Front Audio/Video Input Jacks
Description: The VCR has Audio/Video (A/V) input jacks on both the front and
rear of the unit (there are output jacks on the rear panel only). The front A/V
jacks make it easy to plug in an external A/V device, such as a camcorder.
Requirements: Make sure that all A/V connections are snug. To see a connected
device’s image, turn the VCR to its Video Line Input by pressing the remote
control’s INPUT button. Select L1 to select the jacks on the back of the VCR or
select L2 to select the jacks on the front of the VCR.
OTR CH 07
STEREO
EP
Record Length 0:30
REC Set Length
TIMER RECORDINGS
1 Make a New Program
2 Review/Cancel Programs
MENU Exit
1 2 3
4 5 6
7 8
0
9
EJECT
CM-SKIP
100
SPEED
REC/OTR
INPUT
TV/VCR MENU CLEAR DISPLAY
MUTE
ENTER
CABLE
TV
VCR
POWER
VOLUME SLOW/SHTCH/TRK
VIDEO AUDIO
15763820 (VRC440)(E) 02 Intr 5/25/01, 12:51 PM1

2
Introduction
Child Lock Protection System
Description: Locks the VCR so that buttons on the front panel and remote control won’t
operate the VCR. This feature protects timer programs from frustrating accidents such as being
left on at the time of recording.
Requirements: Lock the VCR by pressing and holding the POWER button on the remote
control for six seconds. The front panel display will blink for several seconds. The VCR
unlocks by pressing and holding the POWER button on the remote control, again for six
seconds. The front panel display will blink again and release the lock on the system.
15763820 (VRC440)(E) 02 Intr 5/25/01, 12:51 PM2

3
Table of Contents
Product Registration
............................................................................................................. i
Introduction
............................................................................................................................ 1
Key Features Overview ......................................................................................................... 1
Connections & Setup
........................................................................................................... 5
Things to Consider Before Connecting Components .......................................................... 6
Cable Considerations ............................................................................................................6
Choose Your Connection ...................................................................................................... 7
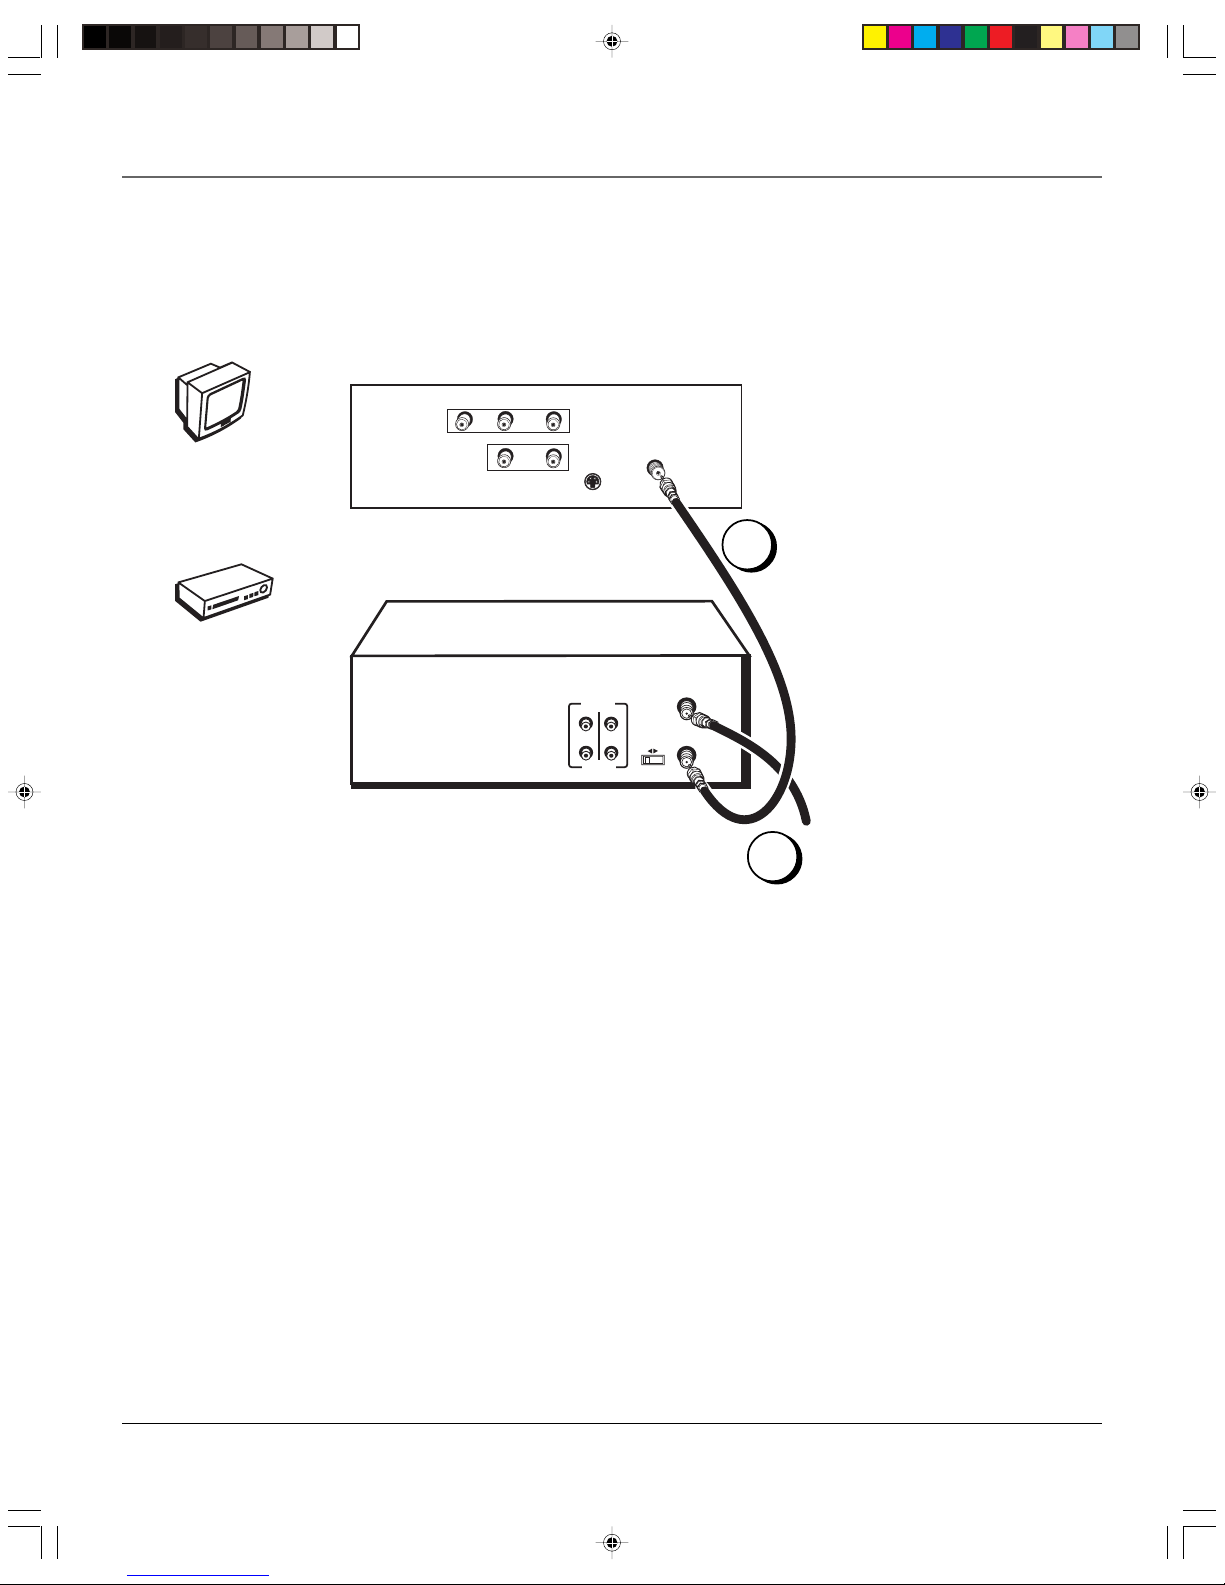
Using the RF Coaxial Cable to Connect the VCR to a TV .............................................. 7
TV + VCR .......................................................................................................................... 8
TV + VCR + Satellite Receiver ......................................................................................... 9
TV + VCR + Cable Box ................................................................................................... 10
Set the VCR’s CH 3/4 Switch ................................................................................................ 11
Plug in the VCR .................................................................................................................... 11
Put Batteries in the Remote Control .................................................................................. 11
Turn on the TV and VCR...................................................................................................... 11
Tune the TV.......................................................................................................................... 11
Using the Remote Control toNavigate On-Screen Menus ................................................ 12
Initial VCR Setup ........................................................................................................... 12
Accessing Menus ........................................................................................................... 12
VCR Basics ............................................................................................................................ 13
Playing a Tape ............................................................................................................... 13
Automatic Rewind ........................................................................................................ 13
Tape Eject ......................................................................................................................13
Recording ............................................................................................................................. 13
Check the Safety Tab .................................................................................................... 13
Using the VCR’s Menu System
....................................................................................... 15
Using On-Screen Menus to Set Up Features ...................................................................... 16
Language ....................................................................................................................... 16
Cable Box Setup ............................................................................................................ 16
VCR Channels List.......................................................................................................... 17
Auto Channel Searching ....................................................................................... 17
Changing the Signal Type ..................................................................................... 17
Adding or Removing Channels ............................................................................. 18
Time and Date ............................................................................................................... 18
Setting Time and Date .......................................................................................... 18
Setting Auto DST ............................................................................................. 18
Additional Set Up Features in the FUNCTIONS Menu ....................................................... 19
Auto Play .......................................................................................................................19
Auto TV/VCR.................................................................................................................. 19
Using the Remote Control
............................................................................................... 21
Remote Control Buttons ..................................................................................................... 22
Component Buttons ..................................................................................................... 22
VCR Function Buttons ................................................................................................... 22
TV Function Buttons ..................................................................................................... 23
Using the INPUT Button ........................................................................................ 23
15763820 (VRC440)(E) 03 ToC 5/25/01, 12:52 PM3

Table of Contents
4
Using the VCR’s Features
.................................................................................................. 25
Recording Features ............................................................................................................. 26
One Touch Recording (OTR) ......................................................................................... 26
Timer Recording ............................................................................................................ 27
Stopping a Timer Recording ................................................................................. 27
Reviewing and Clearing Programs ....................................................................... 27
Copying and Editing Tapes Using Two VCRs ............................................................... 28
Picture Search Options ........................................................................................................ 28
Forward and Reverse Search ........................................................................................ 28
Slow Motion .................................................................................................................. 29
Index Search .................................................................................................................. 29
Go-To Search ................................................................................................................. 30
Child Lock VCR-Disabling Feature ...................................................................................... 30
Tracking................................................................................................................................ 30
Time Counter ....................................................................................................................... 31
On-Screen Displays ..............................................................................................................31
Commercial Skip .................................................................................................................. 32
Other Information
.............................................................................................................. 33
Troubleshooting Tips ........................................................................................................... 34
General VCR Problems .................................................................................................. 34
Recording Problems ...................................................................................................... 35
Playback Problems ........................................................................................................ 35
Cleaning the VCR ................................................................................................................37
Specifications ....................................................................................................................... 37
Front Panel .......................................................................................................................... 38
Display Panel ....................................................................................................................... 39
Back Panel ............................................................................................................................ 39
Finding the TV’s Video Line Input ...................................................................................... 40
Advanced Connection ......................................................................................................... 41
TV + VCR + Satellite Receiver ....................................................................................... 41
Index .................................................................................................................................... 42
15763820 (VRC440)(E) 03 ToC 5/25/01, 12:52 PM4

5
Changing Entertainment. Again.
Connections & Setup
Chapter Overview:
• Things to Consider Before Connecting
• Cable Considerations
• Making the Connection
• Navigating On-Screen Menus
• Completing the Initial Setup
• Basic Recording
Chapter 1
15763820 (VRC440)(E) 04 S&C 5/25/01, 12:52 PM5

6Chapter 1
Connections & Setup
Things to Consider Before Connecting
Components
Protect Components From Power Surges
• Connect all components before plugging any power cords into the wall outlet.
• Always turn off the TV and other components before you connect or disconnect any
cables.
Position Cables to Avoid Audio Hum or Interference
• Insert all cable plugs firmly into their jacks.
• Place any Audio/Video (A/V) cables to the side(s) of the TV’s back panel instead of straight
down the back after connecting components.
• Try not to coil any twin-lead cables and keep them away from all A/V cables as much as
possible.
• Make sure all antennas and cables are properly grounded. Refer to the Safety Tips sheet
packed with your unit for detailed information.
Protect Components From Overheating
• Never block ventilation slots in any component. Arrange the components so that air can
circulate freely.
• Do not stack components.
• Allow adequate ventilation when placing components in a stand.
• Place an amplifier or satellite receiver on the top shelf of a stand so heated air rising from
it will not flow around other components.
Cable Considerations
The RF coaxial cable supplied with your VCR carries both sound and picture information. This
is the cable used in all connection diagrams in this chapter.
If your TV has A/V input jacks, you should use A/V cables (not supplied) to connect the VCR to
the TV. A/V cables provide better picture and sound quality than an RF coaxial cable. If you
would like to hook up your VCR using A/V cables, refer to the Advanced Connection
information on page 41 in the Other Information chapter of the manual.
15763820 (VRC440)(E) 04 S&C 5/25/01, 12:52 PM6

Chapter 1 7
Connections & Setup
Components Connection Go To
Title
TV + VCR page 8
TV + VCR +
Satellite Receiver page 9
TV + VCR +
Cable Box page 10
VCR
TV
Satellite
Cable Box
VCR
TV
VCR
TV
Using the RF Coaxial Cable to Connect the VCR
to a TV
The picture shows the RF coaxial cable supplied with your VCR. This will be
the cable used for the basic connections represented in this chapter.
Notes: A/V jacks and cables provide a superior image and sound quality.
You will need to purchase Audio/Video (A/V) cables (not provided) and
connect the VCR to the TV using A/V jacks. For details about using this
advanced setup, see the instructions on page 41.
Using A/V jacks to connect the VCR to the TV requires tuning to the TV’s
Video Line Input to see the VCR’s picture. For more information about
finding your TV’s Video Line Input, see page 40.
RF Coaxial Cable
Choose Your Connection
There are several ways to hook up your VCR depending on the components connected.
Please use the following chart to determine which connection is best for you and proceed
to the appropriate page.
15763820 (VRC440)(E) 04 S&C 5/25/01, 12:52 PM7

8Chapter 1
Connections & Setup
TV + VCR
Note: Your television back panel may not look exactly like the
model shown here.
1. Connect the VCR to the TV
Connect one end of the supplied RF coaxial cable to the RF OUT jack
on the back of the VCR and the other end to the TV’s antenna input
jack.
2. Connect the antenna/cable feed to the VCR
Connect your TV antenna/cable feed’s RF coaxial cable to the ANT.
IN jack on the VCR.
Note: Flip the CH 3/4 switch on the back of the VCR to the channel
that is not used in your area. This will be the channel that the TV
must be tuned to in order to see the VCR’s picture.
Go To Page 11
VCR
TV
CH
ANT. IN
OUT IN
AUDIO
VIDEO
3 4
RF OUT
VCR
TV (back panel)
CABLE/
ANTENNA
VIDEO RL / MONO
S-VIDEO
AUDIO
L
IN
OUT
From Cable
or Antenna
1
2
15763820 (VRC440)(E) 04 S&C 5/25/01, 12:52 PM8

Chapter 1 9
Connections & Setup
TV + VCR + Satellite Receiver
Note: Your television and/or satellite receiver back panels may not look
exactly like the models shown here.
1. Connect the VCR to the TV
Connect one end of the supplied RF coaxial cable to the RF OUT jack on the
back of the VCR and the other end to the TV’s antenna input jack.
2. Connect satellite receiver to the VCR
Connect one end of an RF coaxial cable (not included) to the antenna output
jack on the satellite receiver and the other end to the ANT. IN jack on the VCR.
3. Connect the antenna to your satellite receiver
If necessary, connect an antenna or cable box RF coaxial cable (not included) to
the antenna input jack on the satellite receiver.
4. Connect the satellite feed to the satellite receiver
Connect the satellite receiver’s RF coaxial cable feed (not included) to the
satellite input jack on the satellite receiver.
Go To Page 11
VCR
TV
Satellite
CABLE/
ANTENNA
VCR
TV
VIDEO RL / MONO
S-VIDEO
AUDIO
L
IN
OUT
CH3
CH4
SATELLITE
RECEIVER
S-VIDEO
L
R
VIDEO
OUT
IN FROM ANT
OUT TO TV SATELLITE
IN
From
Satellite
From Cable
or TV Antenna
CH
ANT. IN
OUT IN
AUDIO
VIDEO
3 4
RF OUT
1
4
3
2
15763820 (VRC440)(E) 04 S&C 5/25/01, 12:52 PM9

10 Chapter 1
Connections & Setup
TV + VCR + Cable Box
Note: Your television and/or cable box back panels may not look
exactly like the models shown here.
1. Connect the VCR to the TV
Connect one end of the supplied RF coaxial cable to the RF OUT jack on
the back of the VCR and the other end to the TV’s antenna input jack.
2. Connect the cable box to the VCR
Connect one end of a second RF coaxial cable (not included) to the cable
box’s TV output jack and the other end to the ANT. IN jack on the VCR.
3. Connect the cable feed to your cable box
Connect the RF coaxial cable feed (not included) to the antenna input
jack on the cable box.
Go To Page 11
VCR
TV
Cable Box
CABLE/
ANTENNA
VCR
TV
VIDEO RL / MONO
S-VIDEO
AUDIO
L
IN
OUT
CH3
CH4
CABLE BOX
L
R
VIDEO
OUT
IN FROM ANT
OUT TO TV
From Cable Feed
CH
ANT. IN
OUT IN
AUDIO
VIDEO
3 4
RF OUT
1
2
3
15763820 (VRC440)(E) 04 S&C 5/25/01, 12:52 PM10

Chapter 1 11
Connections & Setup
Set the VCR’s CH 3/4 Switch
The CH 3/4 switch on back of the VCR determines what channel the TV must be tuned to see
the VCR’s image. Choose whichever channel is not used locally in your area.
Note: If you connected components using A/V jacks and cables, the VCR’s signal must be
viewed using the TV’s Video Line Input. To find the Video Line Input, refer to the manual
that came with the TV or see Finding the TV’s Video Line Input on page 40 in the Other
Information section of this manual.
Plug in the VCR
Be sure to insert the plug completely.
Put Batteries in the Remote Control
1. Remove the battery compartment cover on the remote control.
2. Insert new batteries matching the polarities (+ and –) on the batteries with
the diagram in the battery compartment.
3. Put the battery compartment cover back on the remote.
Turn on the TV and VCR
Turn on the TV and press VCR, then POWER, on the remote control to turn on
the VCR.
Note: If you have an RCA, GE, or Proscan TV, your VCR’s remote control
may be able to operate it. Press the TV button on the remote control
and then the POWER button.
Tune the TV
Tune the TV to the VCR viewing channel. The VCR viewing channel is channel
3, 4, or the TV’s video line input.
• If you connect your VCR using RF coaxial cable only, turn the TV to
channel 3 or 4 (whichever was set on the CH 3/4 switch).
• If you connected the VCR using A/V jacks and cables, select the TV’s video
line input. For more information see Finding the TV’s Video Line Input on
page 40 in the Other Information section of this manual.
15763820 (VRC440)(E) 04 S&C 5/25/01, 12:52 PM11

12 Chapter 1
Connections & Setup
Using the Remote Control to
Navigate On-Screen Menus
The technical term is “Navigation” – how you move through the on-screen menus. The theory
is the same for all the menu screens; use the corresponding number button on the remote control
to select it.
To choose an on-screen item, press the remote control’s corresponding number button.
Note: Selecting a menu item can take you to another menu, activate a choice, or
activate a data entry field (such as the hour field in the TIME AND DATE SET menu).
LANGUAGE SELECT
Select a language.
1 Español
2>English
3 Français
MENU Continue
MENU
1 TIMER RECORDINGS
2 CLOCK SET
3 CHANNEL SET
4 FUNCTIONS
5 LANGUAGE SELECT
MENU Exit
Initial VCR Setup
The menu system in your VCR allows you to customize your preferences as
well as use all the VCR’s features.
The first time you turn on the VCR, we suggest you select a language, set up
available channels, and enter time and date information.
The first menu that may appear asks which language you prefer to have the on-
screen menus appear in.
Note: With numbered menu choices, you can also press the
corresponding number button on the remote control to automatically
select it. In the case of the language menu, press MENU to display the
main MENU. Press 5 to display the LANGUAGE SELECT menu, and press 1
for Español (Spanish), 2 for English, or 3 for Français (French).
The remaining menus will appear in the language chosen.
Accessing Menus
All on-screen menus are accessed the same way, starting in the main MENU
which is displayed by pressing the remote control’s MENU button.
Note: See chapter two, Using On-Screen Menus, for details about setting
up and changing the VCR’s individual settings.
All VCR on-screen menus are
accessed through the main
MENU. Press the remote
control’s MENU button to
start.
15763820 (VRC440)(E) 04 S&C 5/25/01, 12:52 PM12

Chapter 1 13
Connections & Setup
VCR Basics
Once your initial settings are complete, you can begin using your VCR. In order to begin, you
must first understand some basic concepts.
Safety Tab
Automatic Tracking
The VCR has automatic tracking
which adjusts the picture when
playing back a tape recorded on
another VCR. To adjust tracking
manually, press the
CHANNEL•TRACKING up or
down (CH/TRK up or down on
the remote control) buttons.
Playing a Tape
1. Tune the TV to your VCR viewing channel (03, 04, or the video line input).
2. Insert a tape in the VCR.
If the Auto Play feature is set to ON, the tape automatically begins
playback (if the safety tab on the tape is removed).
• Press REV or FWD ( or on the remote) to cue the tape at the
desired starting position.
• Press PLAY ( on the remote) if necessary, to begin tape play.
• Press PLAY again on the VCR ( on the remote) for stop action.
• Press CHANNEL•TRACKING up or down (CH/TRK up or down on the
remote control) to remove any streaks from the picture, if necessary.
• Press STOP•EJECT ( on the remote) to stop playback.
Automatic Rewind
The VCR automatically rewinds the tape if it reaches the end of the tape during
playback. While rewinding, you can press the POWER button and the VCR will
turn off after finishing. If the tape has no safety tab, it will be ejected.
Tape Eject
Press STOP•EJECT (EJECT on the remote) when stopped to eject the tape.
Recording
To Capture Programming with Basic Recording Methods:
1. Set the tape speed by pressing the SPEED button on the remote control
(see Recording Speed on page 26 for information about recording speeds).
2. Press RECORD (REC/OTR on the remote) to begin recording.
3. Press STOP•EJECT ( on the remote) to halt recording.
If you just want to pause the recording for a short time (like during a
commercial), press on the remote instead of STOP.
Check the Safety Tab
No matter which recording option you use, make sure there is a tape in the
VCR with its safety tab in place. You cannot record on a tape with its safety tab
removed. If the safety tab is removed and you want to record, simply cover the
hole with adhesive tape.
P
L
A
Y
R
E
V
F
W
D
R
E
C
O
R
D
C
H
A
N
N
E
L
T
R
A
C
K
I
N
G
VIDEO AUDIO
P
O
W
E
R
S
T
O
P
•
E
J
E
C
T
Your VCR may not look exactly like the
model used in the illustration.
15763820 (VRC440)(E) 04 S&C 5/25/01, 12:52 PM13

This page left blank intentionally
15763820 (VRC440)(E) 04 S&C 5/25/01, 12:52 PM14

15
Changing Entertainment. Again.
Using the VCR’s
Menu System
Chapter Overview:
•Using On-Screen Menus
•Cable Box Setup
•Setting Time and Date
•Setting VCR Preferences
Chapter 2
15763820 (VRC440)(E) 05 Menu 5/25/01, 12:52 PM15

16 Chapter 2
Using On-Screen Menus
CABLE BOX SETUP
On what channel do you
want to receive from
the cable box?
--
0-9 01-13
INPUT Video
MENU Cancel
Using On-Screen Menus to Set Up Features
You can set up many of the VCR’s features by using the menu system as discussed in the
previous section. Each feature you should set up to get the most out of your VCR is explained
in this section .
Note: Not all the VCR screens are shown in this manual when explaining the features.
Language
Selecting your preferred language determines how the on-screen displays will
appear. To change the language:
1. Press MENU to display the main MENU.
2. Press the 5 button to select LANGUAGE SELECT.
3. Select Spanish (Español), English, or French (Français).
NOTE: Should this be Portugese???
Cable Box Setup
This set up applies only when all channels are received through a cable box.
In this case, the VCR will automatically enter the channel used to view cable
box programming. Your VCR will use this channel for all future timer
recordings.
1. Press MENU to display the VCR main MENU.
2. Press 3 to display the CHANNEL SET menu.
3. Press 4 to display the CABLE BOX SETUP menu.
4. Enter the output channel of the cable box (usually 03 or 04), or if A/V
jacks connect the cable box to the TV, press the INPUT button on the
VCR’s remote control.
LANGUAGE SELECT
Select a language.
1 Español
2>English
3 Français
MENU Continue
CHANNEL SET
1 Auto Channel Search
2 Add/Remove Channels
3 Signal Type: Cable
4 Cable Box Setup
MENU Exit
Is Something Missing?
These instructions will not show
all of the step-by-step on-screen
menus. Make sure to follow the
instructions completely to get
to the menus being discussed.
15763820 (VRC440)(E) 05 Menu 5/25/01, 12:52 PM16

Chapter 2 17
Using On-Screen Menus
VCR Channels List
Your VCR may come with a list of channels preset at the factory. Even though it
may come with such a list, you may want to add or delete certain channels.
Note: If you use a cable box to view all channels, this step is not necessary.
Auto Channel Searching
Note: Use Auto Channel Search to place all available channels in memory.
If you ever change cable or antenna signals, you may need to run the Auto
Channel Search feature again.
1. Press the MENU button to display the main MENU.
2. Press 3 to select CHANNELS SET.
3. Press 1 to select AUTO CHANNEL SEARCH.
4. Select one of the three options:
Cable TV searches for cable stations.
Antenna searches for local broadcast stations.
Detect Automatically decides which input to use for you.
Note: With Detect Automatically, a strong cable or antenna signal in your
area may cause channels to be detected inaccurately. If this should
happen, manually select the input signal for the system you have.
The VCR begins scanning for channels available in the area (taking about
one-to-two minutes). When scanning is complete, the VCR tunes to the
lowest channel available. After completing Auto Channel Search, pressing
the remote control’s CH/TRK up or down buttons should only select active
channels.
Changing the Signal Type
This feature is useful if your cable signal goes out; it allows you to switch to a
regular antenna for alternate television reception.
1. Press the MENU button to display the main MENU.
2. Press the 3 button to choose CHANNEL SET.
3. Press 3 to choose between Signal Type: Cable and Antenna. When finished,
press MENU to exit back to the main MENU and MENU again to exit to
normal viewing.
AUTO CHANNEL SEARCH
What type of signal are
you using?
1 Cable TV
2 Antenna
3>Detect Automatically
MENU Exit
15763820 (VRC440)(E) 05 Menu 5/25/01, 12:52 PM17

18 Chapter 2
Using On-Screen Menus
CLOCK SET
1 Time and Date Set
2 Auto DST: ON
MENU Exit
Displaying Time and Date
Pressing the DISPLAY button
on the remote control or VCR
displays the time and date on
the screen temporarily.
Adding or Removing Channels
You might want to add or remove channels after using Auto Channel Search,
especially if there are weak signals or channels with content you don’t care
for.
1. Press the MENU button to display the main MENU.
2. Press 3 to choose CHANNEL SET.
3. Press 2 to choose ADD/REMOVE CHANNELS. To go to the channel you
want to add or remove, use the remote control’s CH/TRK up or down
buttons or enter a specific channel number using the number buttons.
Note: To enter a cable channel 100 or over, press the 100 button on the
remote control and then enter the other two numbers.
Once the desired channel is displayed, the on-screen menu will tell you if
the channel is currently in the VCR’s viewing list. Press the CLEAR button
to remove a channel from the available channels list or press the DISPLAY
button to add it.
4. Once finished adding/deleting channels, press the MENU button to exit
out of the menus.
Note: To view active channels, use the remote control’s CH/TRK up or
down buttons. You can also access channels not available in the active
channel list by using the remote control’s number buttons to enter the
specific channel number.
Time and Date
Setting Time and Date
1. Press MENU to display the main MENU.
2. Press 2 to choose CLOCK SET.
3. Press 1 to choose TIME AND DATE SET.
4. Enter the data using the number buttons. Press 0 before single-digit
numbers and follow the on-screen directions to exit the menus.
Setting Auto DST
1. Press MENU to display the main MENU.
2. Press 2 to choose CLOCK SET
3. In the CLOCK SET menu, press 2 repeatedly to switch between Auto DST:
ON and OFF.
• Select ON if you want the VCR to automatically adjust for daylight
savings time.
• Select OFF if you do not want the VCR to automatically adjust for
daylight savings time.
ADD/REMOVE CHANNELS
Channel 02
is now ADDED.
CLEAR Remove
MENU Exit
:
15763820 (VRC440)(E) 05 Menu 5/25/01, 12:52 PM18
Table of contents
Other RCA VCR System manuals