Rebel ACTIVE RBA-2007 User manual

ACTIVE
ADJUSTABLE
MULTIFUNCTIONAL
WEIGHT BENCH
USER’S
MANUAL
DE EN PL RO
model: RBA-2007

2 3
1
6
2
7
3
8
4
9
5
10
17
25
32
37
42
16
24
31
36
41
15
23
29
35
40
45
14
20
28
34
39
44
13
18
26
33
38
43
x1
x1
x1
x1 L
x1
x1
x1 M8x55 mm
x2 M6
x1 R
x1
x2
x1
x11
x2
x4 M8x40 mm
x13 M10
x1 L
x1
x3
x1
x4
x2 M10x115 mm
x9 M8x15 mm
x2 M6
x1
x1 R
x2
x8
x10
x3 M10x60 mm
x26 M10
x1
x1 L
x1 R
x1
x5
x8 M10x55 mm
x13 M8

4 5
MONTAGE / ASSEMBLY / MONTAŻ / ASAMBLARE
17
43
43
45
45
18
1. Attach the rear upri ht (R&L) (2,3) to the rear base (1), usin four M10 (37) bolts,
ei ht M10 (41) washers and four M10 (44) nuts.
2. Attach the support (4) to the rear upri ht (R&L) (2,3), usin four M10 (37) bolts,
ei ht M10 (41) washers and M10 (44) nuts.
3. Attach the safety hook (R&L) (17&18) to the rear upri ht (R&L) (2,3), usin two M6
(43) washers and two M6 (45) nuts.
1. Befesti en Sie die hinteren Pfosten (R&L) (2,3) an die hintere Halterun (1) mit
vier Schrauben M10 (37), acht Scheiben M10 (41) und vierMuttern M10 (44).
2. Befesti en Sie die Querstan e (4) an die hinteren Pfosten (R&L) (2,3) mit vier
Schrauben M10 (37), acht Scheiben M10 (41) und vierMuttern M10 (44).
3. Befesti en Sie die Sicherheitshaken (R&L) (17,18) an die hinteren Pfosten (R&L)
(2,3) mit zwei Scheiben M6 (43) und zweiMutternM6 (45).
1. Przymocować pionową podstawę (R&L) (2,3) do tylnej podstawy (10), używając
czterech śrub M10 (37), ośmiu podkładek M10 (41) i czterech nakrętek M10 (44).
2. Przymocowaćwspornik (4) do pionowej podstawy (R&L) (2,3) używając czterech
śrub M10 (37), ośmiu podkładek M10 (41) oraz czterech nakrętek M10 (44).
3. Przymocować hak zabezpieczający (R&L) (17,18) do pionowej podstawy (R&L)
(2,3), używając dwóch podkładek M6 (43) i dwóch nakrętek M6 (45).
1. Atașați baza R&L (2,3) la baza din spate (1), folosind patru șuruburi M10 (37), opt
șaibe M10 (41) și patru piulițe M10 (44).
2. Atașați suportul (4) la baza din spate (R&L) (2,3), folosind patru șuruburi M10
(37), opt șaibe (M10 (41) și piulițe M10 (44).
3. Atașați cârli ul de si uranță (R&L) (17,&18) la baza din spate (R&L) (2,3), folosind
două șaibe M6 (43) și două piulițe M6 (45).
1
DE
EN
PL
RO
2
1. Befesti en Sie den Hauptrahmen (5) an die Querstan e (4) mit einer Schraube
M10 (36), zwei Scheiben M10 (41), eine Mutter M10 (44) und einem Stift (20).
2. Befesti en Sie den vorderen Pfosten (7) an den Hauptrahmen (5) mit einer
Schraube M10 (36), zwei Scheiben M10(41) und eine Mutter M10 (44), eine
Schraube M8 (38) und einer Mutter (23).
3. Befesti en Sie den vordern Standfuß (6) an den vorderen Pfosten (7) mit drei
Schrauben M8 (40) und drei Scheiben M8 (42).
4. Befesti en Sie die seitlichen Grie (R&L) (9,10) an die hinteren Pfosten (R&L) (2,3)
mit zwei Schrauben M10 (35), vier Scheiben M10 (41) und zwei Muttern M10 (44).
DE

6 7
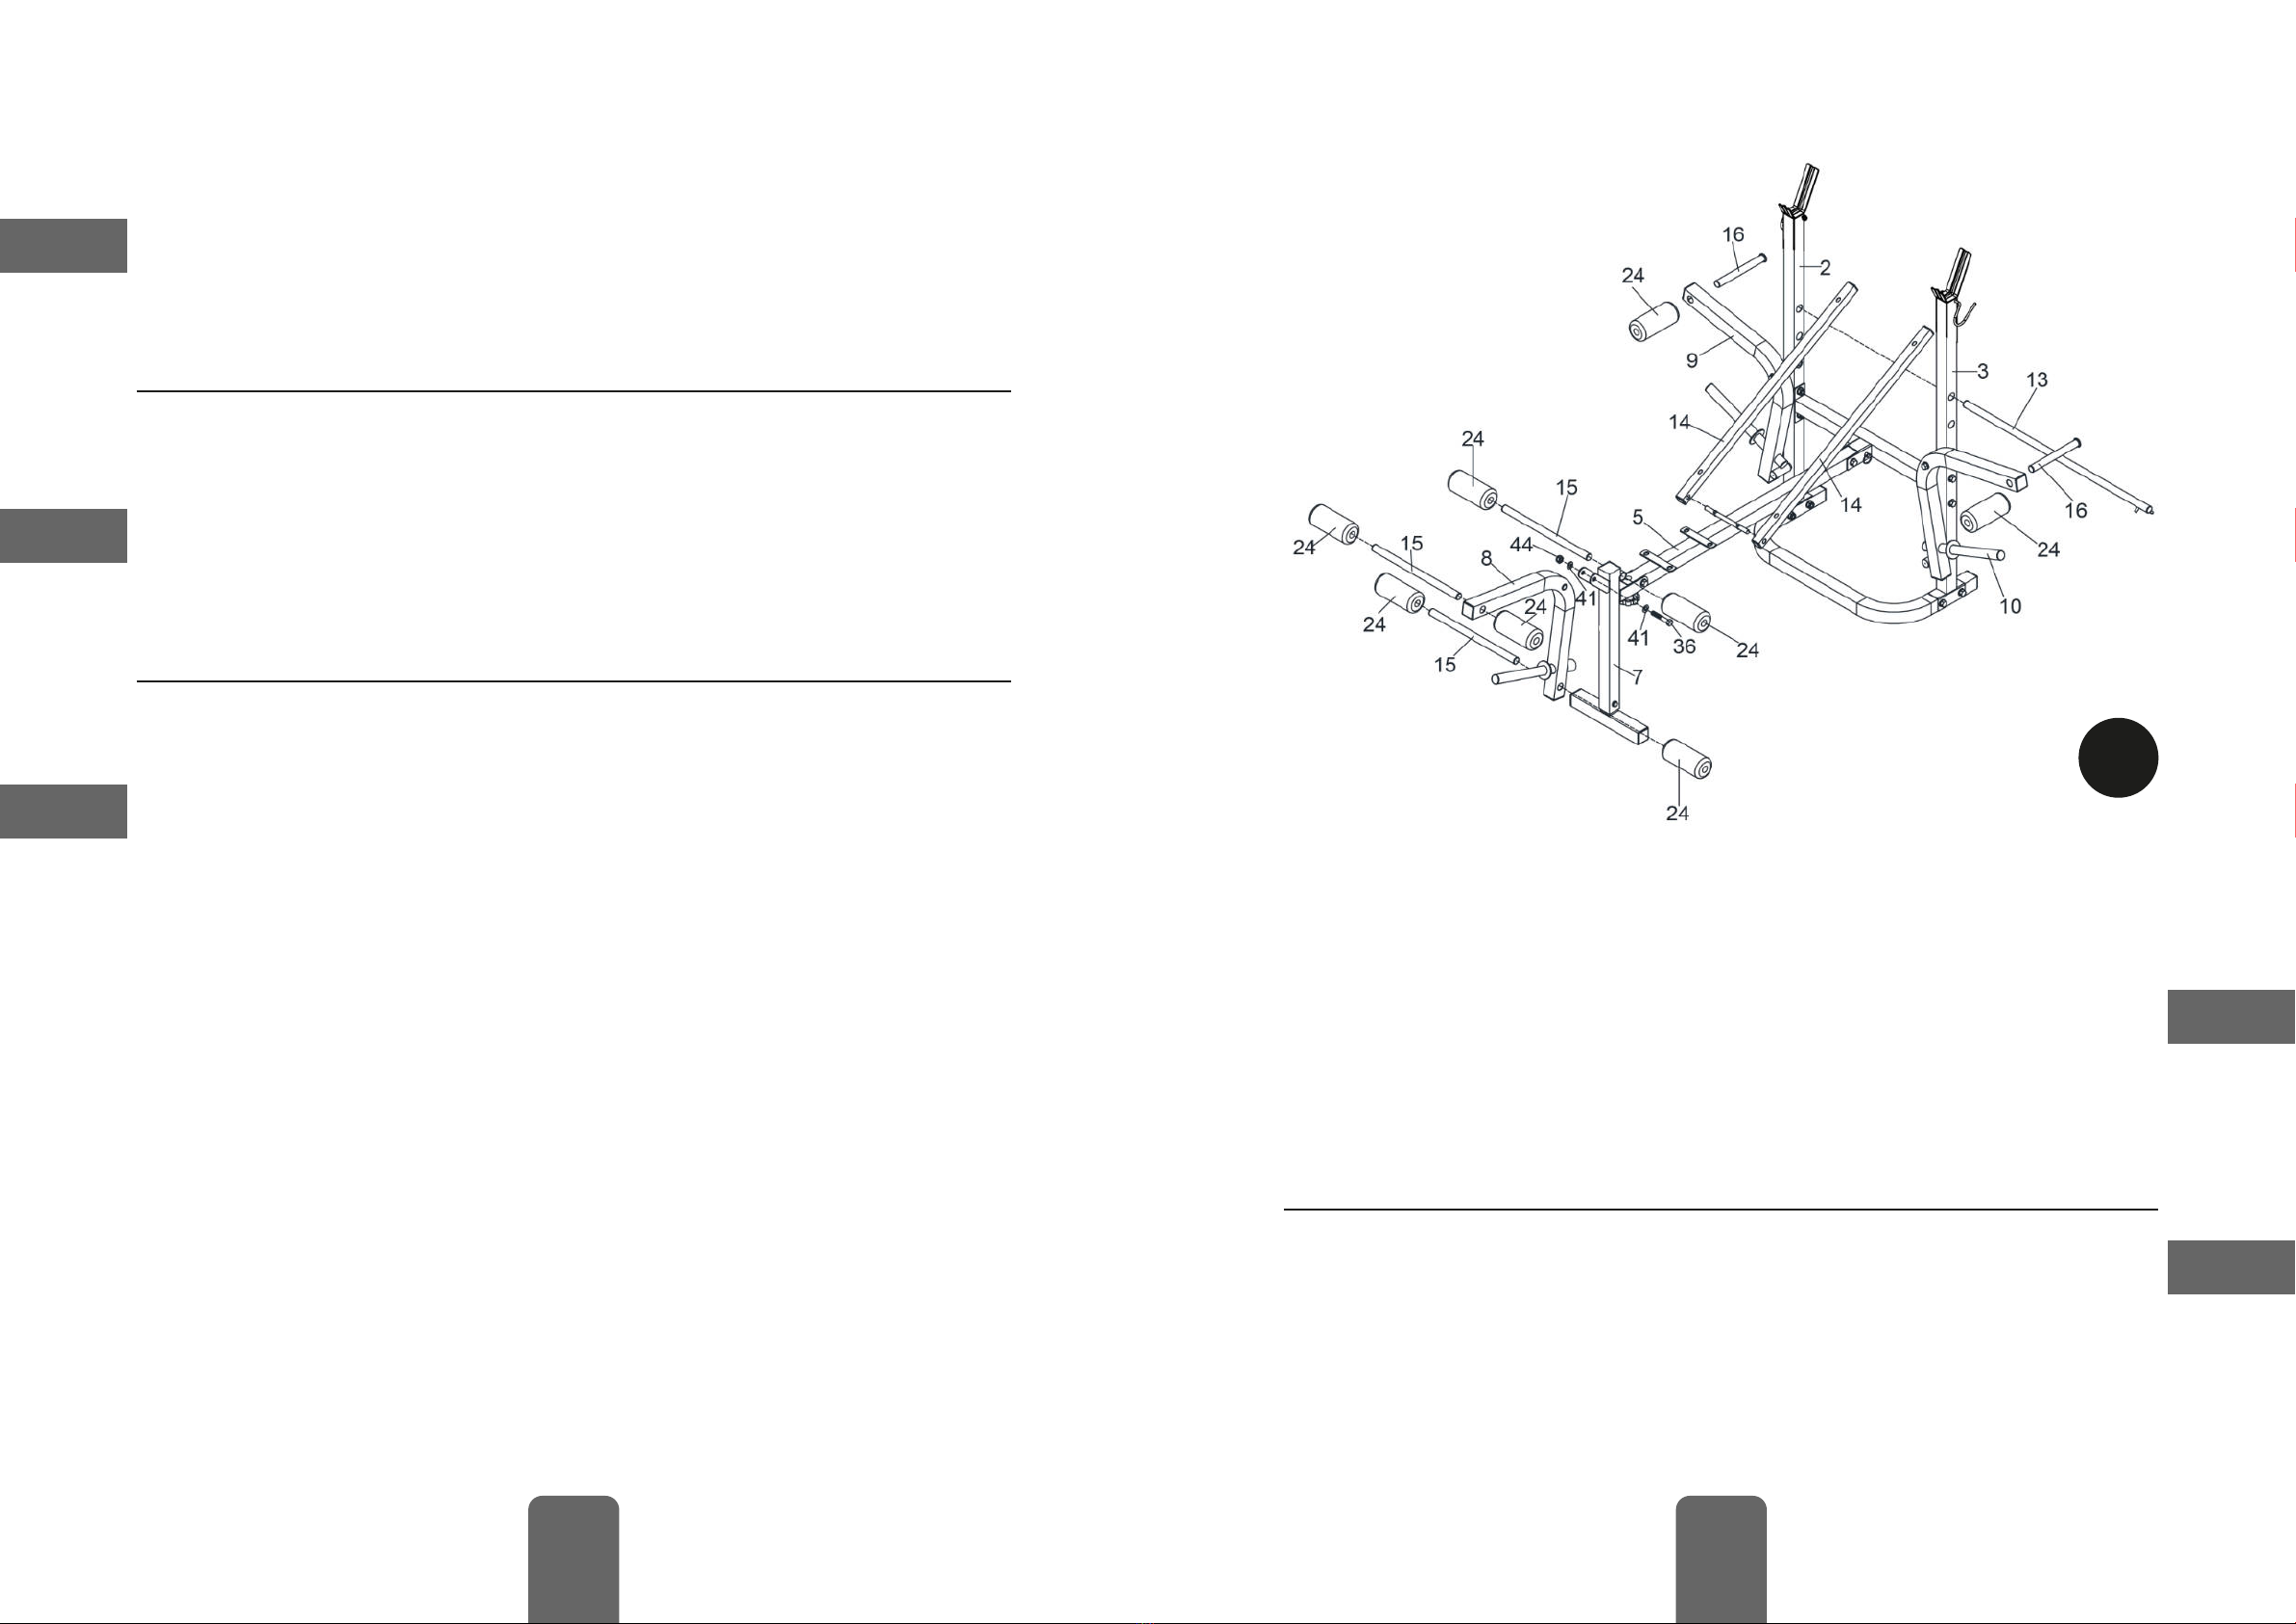
1. Attach the le extension (8) to the front upri ht (7), usin one M10 (36) bolt, two
M10 (41) washers and one M10 (44) nut.
2. Instert the backrest adjustment rod (13) into the rear upri ht (R&L) (2,3).
3. Insert the backrest support (14) into the main frame (5).
4. Insert the post (15) into the le extension (8) and front upri ht (7).
5. Insert the tube (16) into the arm (R&L) (9,10).
6. Slide the foam roller (24) onto the post (15) and the tube (16).
1. Befesti en Sie die Beinverlän erun (8) an den vorderen Pfosten (7) mit einer
Schraube M10 (36), zwei Scheiben M10 (41) und einer Mutter M10 (44).
2. Setzen Sie die Lehnenverstellstan e (13) in die hinteren Pfosten (R&L) (2,3) ein.
3. Setzen Sie den Rückenlehnenträ er (14) in den Hauptrahmen (5) ein.
4. Setzen Sie den Pfosten (15) in die Beinverlän erun (8) und den vorderen
Pfosten (7) ein.
5. Führen Sie das Rohr (16) in den seitlichenGri (R&L) (9,10) ein.
6. Schieben Sie die Schaumstorolle (24) auf den Pfosten (15) und das Rohr (16).
DE
EN
3
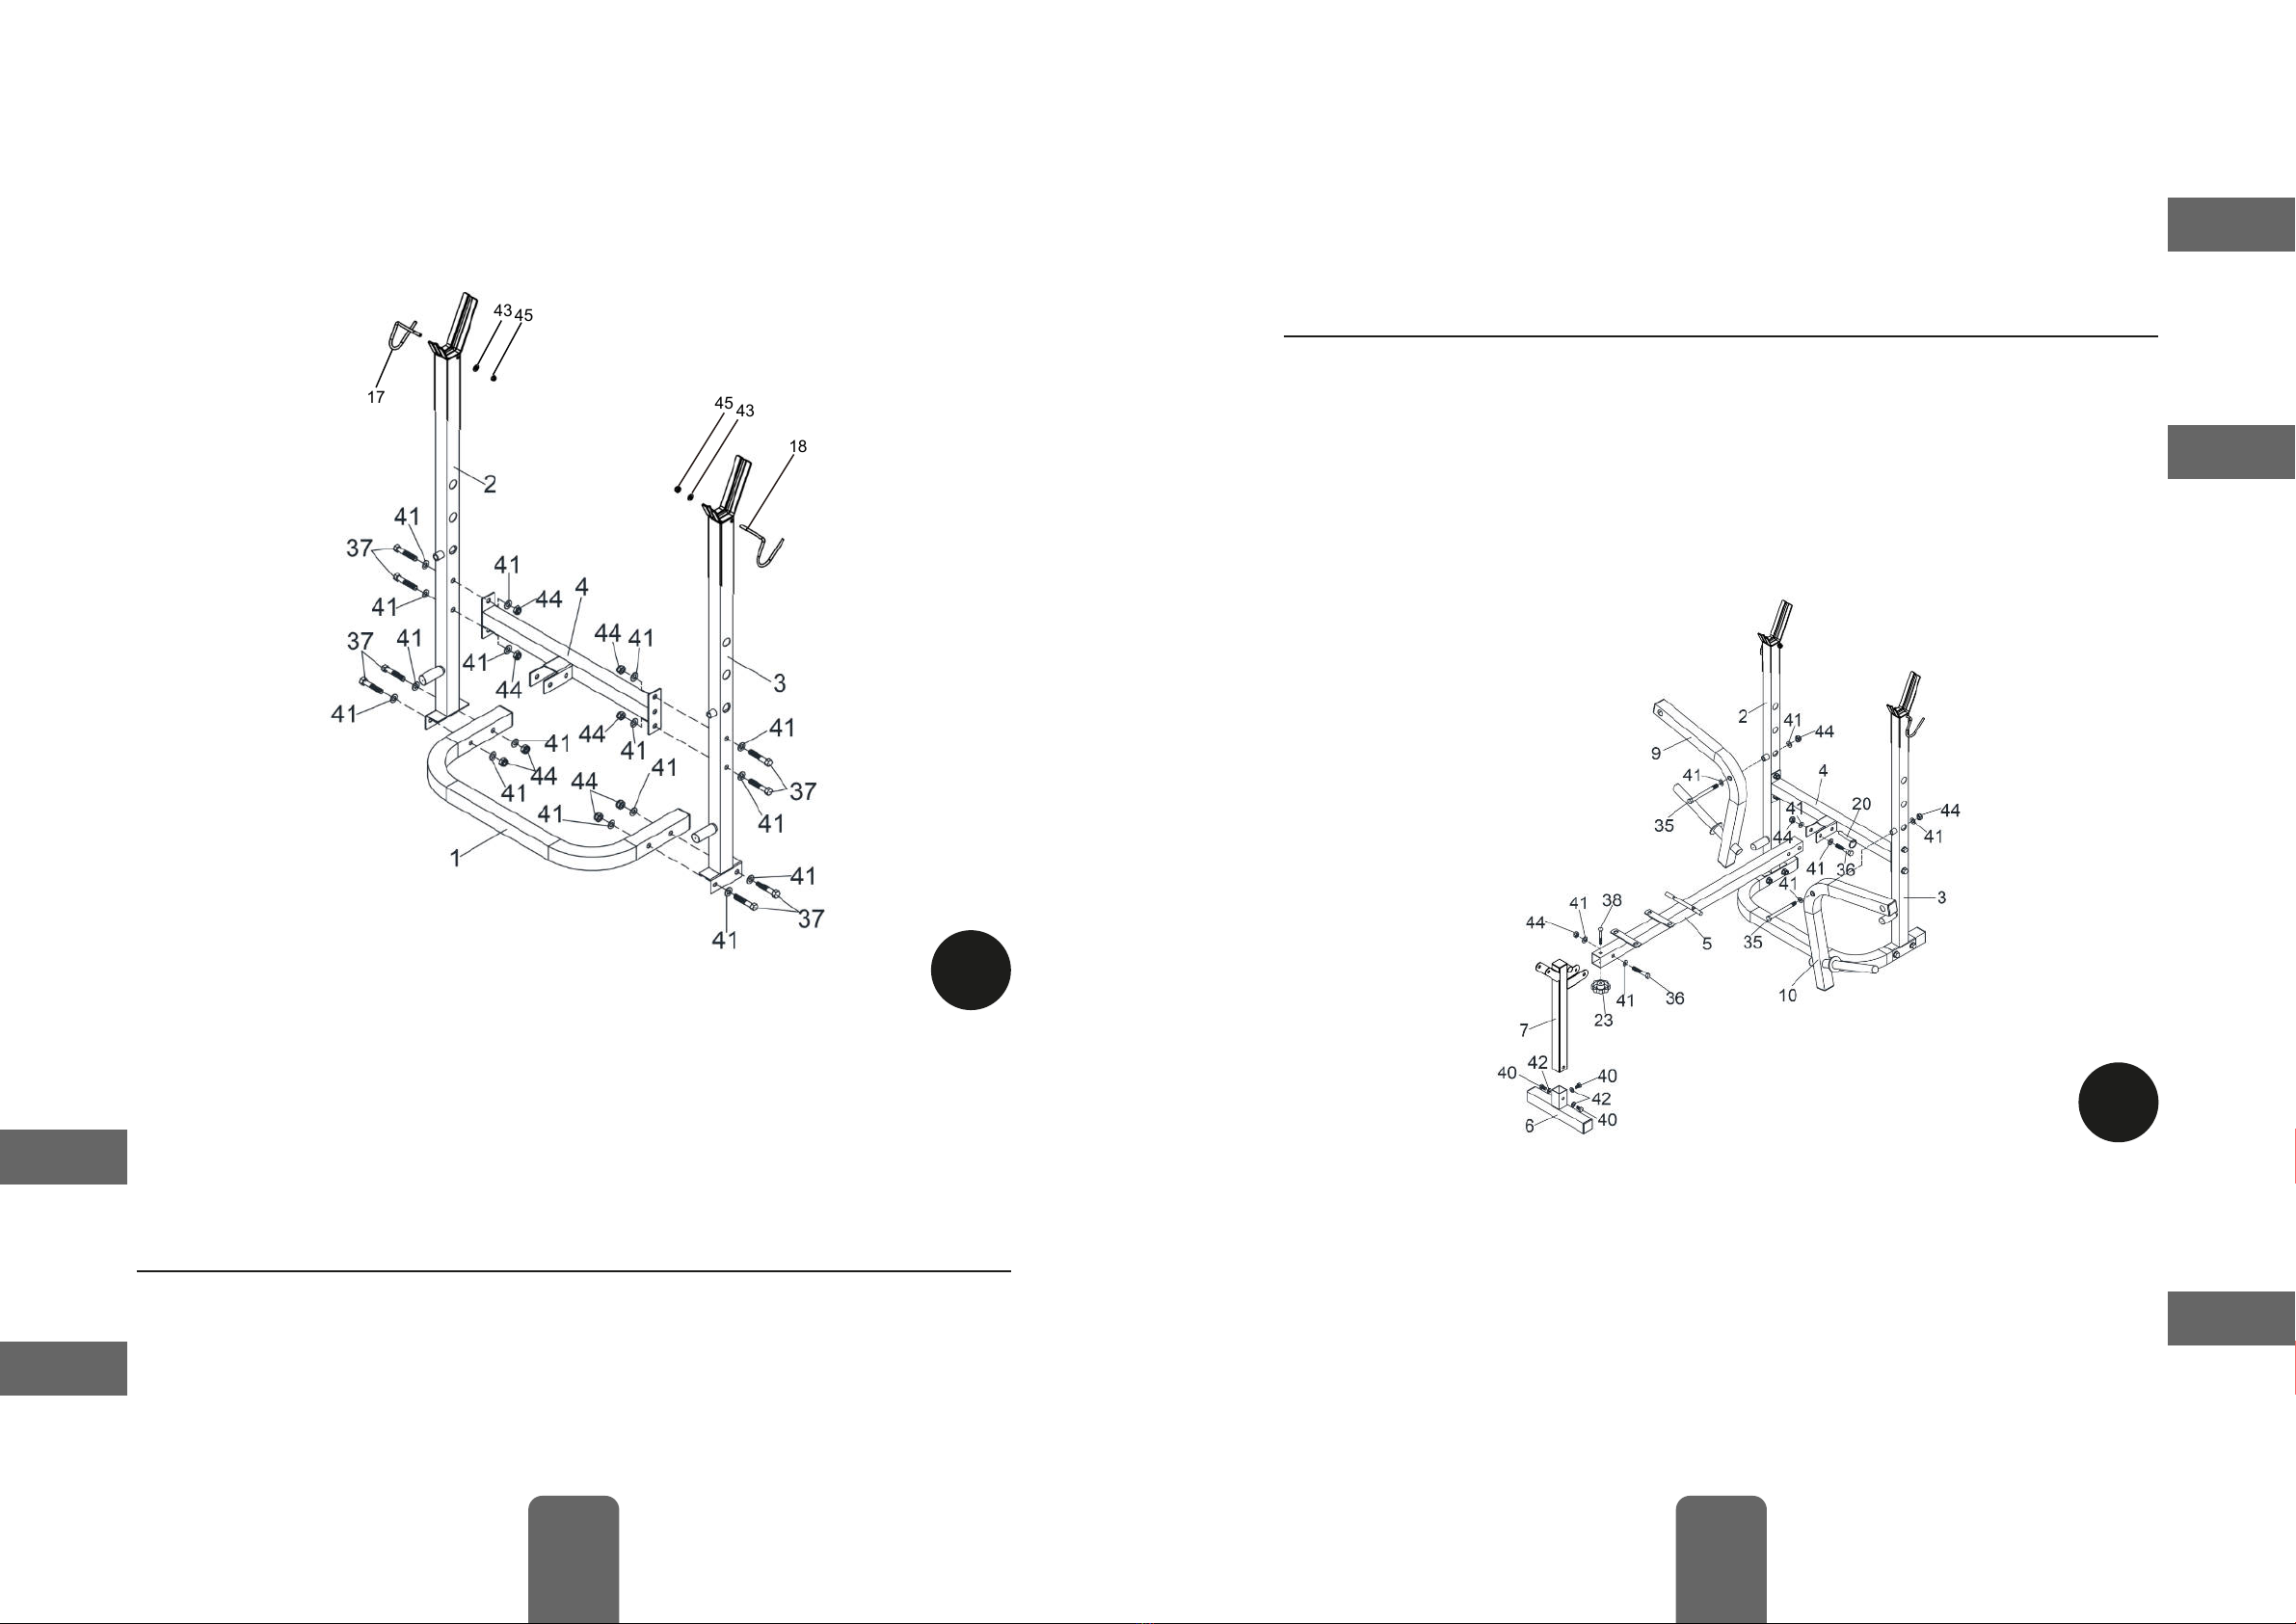
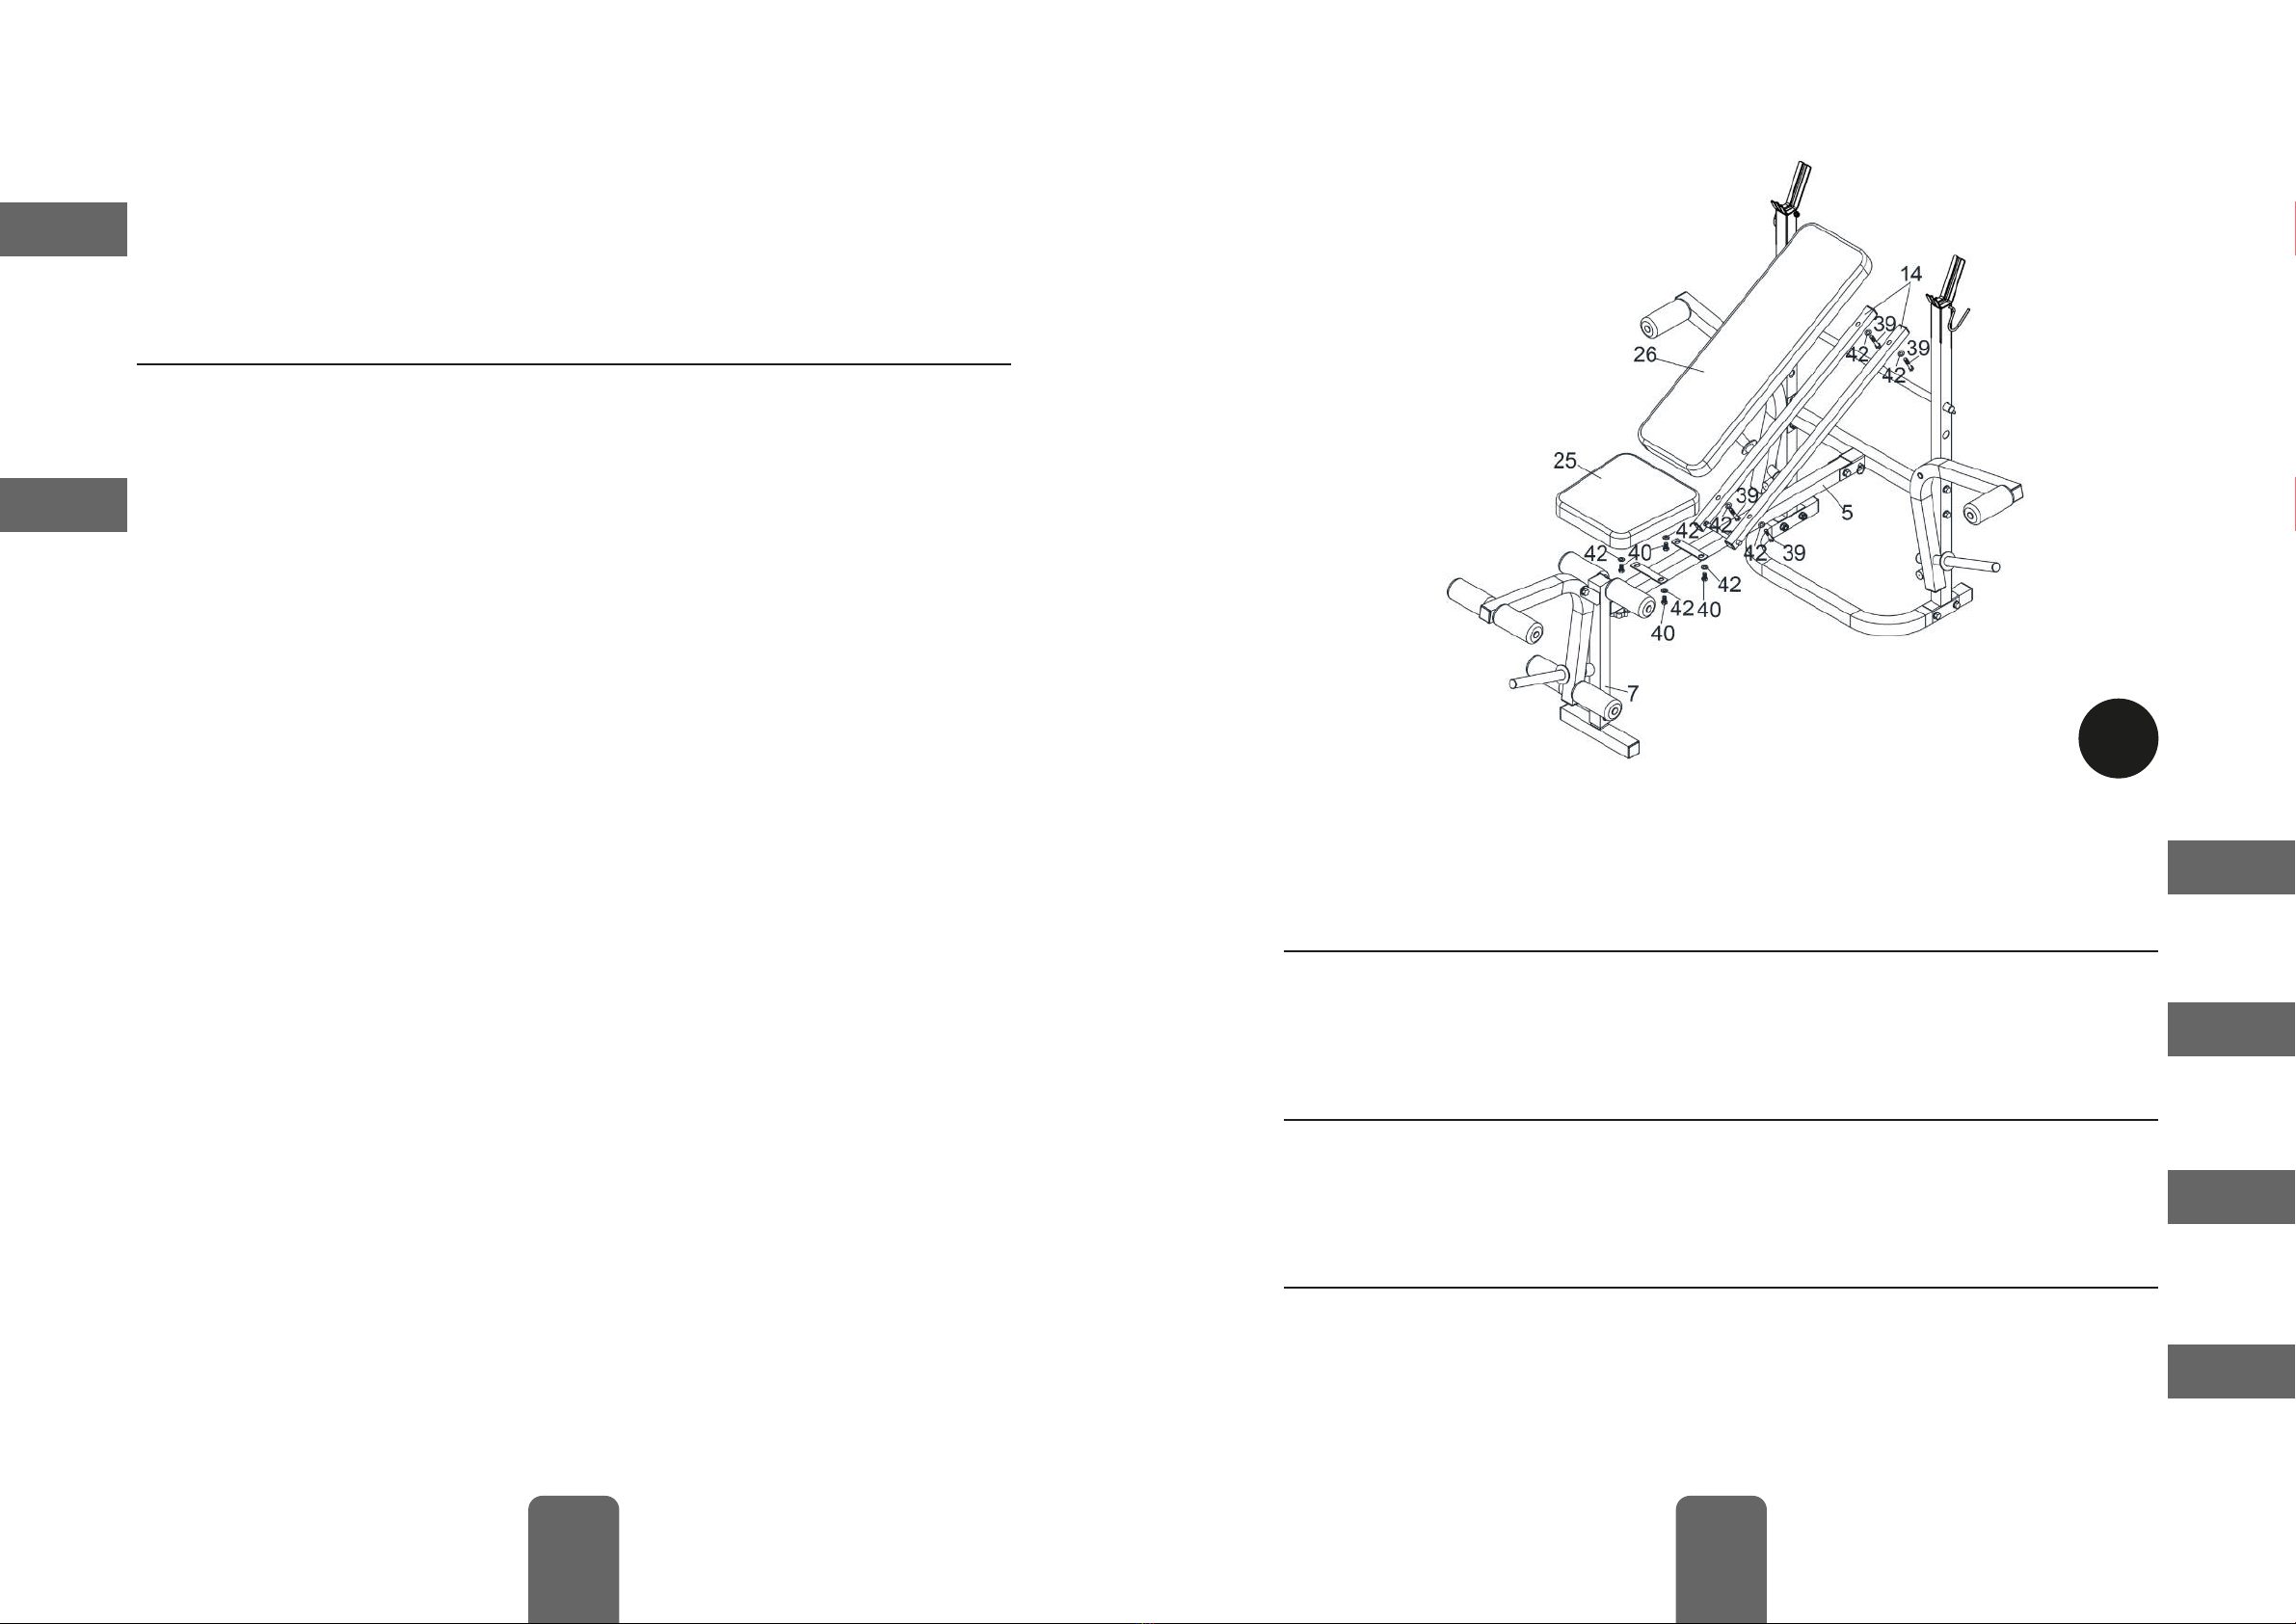
1. Attach the main frame (5) to the support (4), usin one M10 (36) bolt, two M10
(41) washers and one M10 (44) nut, one pin (20).
2. Attach the front upri ht (7) to the mail frame (5), usin one M10 (36) bolt, two
M10(41) washers and one M10 (44) nut, one M8 (38) bolt and one nut (23)
3. Attach the front base (6) to the front upri ht (7), usin three M8 (40) bolts and
three M8 (42) washers.
4. Attach the arm (R&L) (9,10) to the rear upri ht (R&L) (2,3), usin two M10 (35)
bolts, four M10 (41) washers and two M10 (44) nuts.
1. Przymocować ramę łówną (5) do wspornika (4) używając jednej śruby M10
(36), dwóch podkładek M10 (41), jednej nakrętki M10 (44) i jednej zawleczki (20).
2. Przymocować pionową część (7) do ramy łównej (5), używając jednej śruby
M10 (36), dwóch podkładek M10 (41) oraz jednej nakrętki M10 (44), jednej śruby
M8 (38) i jednej nakrętki (23).
3. Przymocować przednią podstawę (6) do pionowej części (7), używając trzech
śrub M8 (40) oraz trzech podkładek M8 (42).
4. Przymocować ramie (R&L) (9,10) do pionowej podstawy (R&L) (2,3), używając
dwóch śrub M10 (35), czterech podkładek M10 (41) i dwóch nakrętek M10 (44)
1. Atașați cadrul principal (5) la suport (4), folosind un șurub M10 (36), două șaibe
M10 (41) și o piuliță M10 (44), un știft (20).
2. Atașați suportul frontal (7) la cadrul principal (5) folosind un șurub M10 (36),
două șaibe M10 (41) și o piuliță M10 (44), un șurub M8 (38) și o piuliță (23).
3. Atașați baza frontală (6) la suportul frontal (7), folosind trei șuruburi M8 (40) și
trei șaibe M8 (42).
4. Atașați brațul (R&L) (9,10) la suportul din spate (R&L) (2,3), folosind două
șuruburi M10 (35), patru șaibe M10 (41) și două piulițe M10 (44).
EN
PL
RO

8
1. Przymocować siedzisko (25) do ramy łównej (5), używając czterech śrub M8
(40) i czterech podkładek M8 (42).
2. Przymocować oparcie (26) do wzmocnienia (14), używając czterech śrub M8
(40) i czterech podkładek M8 (42).
1. Atașați perna (25) la cadrul principal (5), folosind patru țuruburi M8 (40) și patru
șaibe M8 (42).
2. Atașați perna (26) la suportul spătarului (14), folosind patru șuruburi M8 (39) și
patru șaibe M8 (42).
1. Attach the cushion (25) to the main frame (5), usin four M8 (40) bolts and four
M8 (42) washers.
2. Attach the cushion (26) to backrest support (14), usin four M8 (39) bolts and
four M8 (42) washers.
1. Befesti en Sie das Sitzkissen (25) mit vier Schrauben M8 (40) und vier
Scheiben M8 (42) am Hauptrahmen (5).
2. Befesti en Sie das Rückenkissen (26) mit vier Schrauben M8 (39) und vier
Scheiben M8 (42) an der Rückenlehnenstütze (14).
4
DE
EN
PL
RO
1. Przymocować przedłużenie (8) do pionowej części (7), używając jednej śruby
M10 (36), dwóch podkładek M10 (41) oraz jednej nakrętki M10 (44).
2. Włożyć drążek re ulacji oparcia (13) do pionowej podstawy (R&L) (2,3).
3. Włożyćwzmocnienie(14) w ramę łówną (5).
4. Włożyć rurkę (15) w przedłużenie (8) i pionowej części (7).
5. Włożyć rurkę (16) w ramię (R&L) (9,10).
6. Wsuń piankowy wałek (24) w drążek (15) oraz rurkę (16).
1. Atașați extensia piciorului (8) la suportul frontal (7), folosind un șurub M10 (36),
două șaibe M10 (41) și o piuliță M10 (44).
2. Introduceți tija de re lare a spătarului (13) în suportul din spate (R&L) (2,3).
3. Introduceți suportul pentru spătar (14) în cadrul principal (5).
4. Introduceți stâlpul (15) în extensia piciorului (8) și în suportul frontal (7).
5. Introduceți tubul (16) în braț (R&L)(9,10).
6. Glisați rola de spumă (24 pe stâlp (15) și tub (16).
PL
RO

10 11
SICHERHEITSANWEISUNGEN F R TRAININGSBÄNKE UND -
REGALE
• Lesen Sie alle Anweisun en in dieser Bedienun sanleitun und
alle Warnhinweise, bevor Sie das Gerät zusammenbauen und
verwenden.
• Dieses Gerät ist nur für den Heim ebrauch bestimmt. Benutzen
Sie dieses Gerät nicht in ewerblichen Um ebun en.
• Dieses Gerät ist nur für den Innenbereich bestimmt. Benutzen
Sie dieses Gerät nicht im Freien.
• Stellen Sie das Gerät auf einer freien, ebenen Fläche auf.
• Stellen Sie vor der Verwendun sicher, dass das Gerät
ordnun s emäß zusammen ebaut ist und alle Schrauben und
Muttern fest an ezo en sind. Überprüfen Sie re elmäßi den
festen Sitz der Schrauben und Muttern.
• Benutzen Sie das Gerät nicht, wenn es beschädi t ist.
• Verwenden Sie nur autorisiertes Zubehör.
• Überschreiten Sie nicht das maximale Benutzer ewicht.
• Falsches oder übermäßi es Trainin kann zu Verletzun en oder
zum Tod führen. Wenn Sie Schmerzen je licher Art verspüren,
einschließlich Brustschmerzen, Übelkeit, Schwindel oder
Kurzatmi keit, brechen Sie das Trainin sofort ab und
konsultieren Ihren Arzt, bevor Sie fortfahren.
• Stellen Sie vor dem Trainin sicher, dass Sie sich aufwärmen.
• Tra en Sie beim Trainin an emessene Kleidun (einschließlich
Sportschuhe).
• Versuchen Sie nicht, dieses Gerät selbst zu reparieren. Nur
autorisiertes und qualifiziertes Personal darf dieses Gerät
reparieren.
SAFETY INFORMATION FOR WORKOUT BENCHES AND
RACKS
• Read all instructions in this manual and all warnin s before
assemblin and usin the equipment.
• This equipment is intended for home use only. Do not use this
equipment in commercial settin .
• This equipment is intended for indoor use only. Do not use this
equipment outdoors.
• Position the equipment on a clear level surface.
• Before use make sure the equipment is properly assembled and
all bolts and nuts are firmly ti htened. Check the ti htness of the
bolts and nuts re ularly.
• Do not use the equipment if it has been dama ed.
• Use only authorized accessories.
• Do not exceed the maximum user wei ht.
• Incorrect or excessive exercise may result in injury or death. If
you experience any kind of pain includin chest pains, nausea,
dizziness or shortness of breath, stop exercisin immediately
and consult your physician before continuin .
• Before exercisin make sure to do warm-up.
• Wear appropriate clothin durin workout (includin athletic
shoes).
• Do not attempt to repair this equipment yourself. Only
authorized and qualified personnel may repair this equipment.

12 13
KWESTIE BEZPIECZEŃSTWA DOTYCZĄCE ŁAWEK
TRENINGOWYCH I STOJAKÓW
• Przed rozpoczęciem montażu i korzystania ze sprzętu należy
zapoznać się z niniejszą instrukcją obsłu i.
• Sprzęt jest przeznaczony tylko do użytku domowe o. Nie
należy korzystać ze sprzętu do celów komercyjnych.
• Sprzęt jest przeznaczony wyłącznie do użytku wewnętrzne o.
Ze sprzętu nie należy korzystać na zewnątrz.
• Sprzęt należy ustawić na płaskiej i stabilnej powierzchni.
• Przed rozpoczęciem korzystania ze sprzętu należy upewnić się,
że wszystkie śruby i nakrętki zostały dokręcone z odpowiednią
siłą. Poziom dokręcenia należy sprawdzać okresowo.
• Ze sprzętu nie należy korzystać, jeżeli został uszkodzony.
• Należy używać tylko akcesoriów autoryzowanych przez
producenta.
• Nie należy przekraczać maksymalnej wa i użytkownika.
• Nieprawidłowe lub nadmierne ćwiczenia mo ą prowadzić do
kontuzji lub śmierci. W przypadku wystąpienia bólu klatki
piersiowej, nudności lub zawrotów łowy należy natychmiast
przerwać ćwiczenia i skonsultować się z lekarzem.
• Przed przystąpieniem do ćwiczeń należy wykonać roz rzewkę.
• Ćwiczenia należy wykonywać w odpowiednim stroju sportowym
(włącznie z odpowiednim obuwiem).
• Sprzętu nie należy naprawiać własnoręcznie. Wszelkie naprawy
należy powierzyć serwisowi producenta.
INFORMAȚII PRIVIND SIGURANȚA PENTRU BĂNCI ȘI
SUPORTURI DE ANTRENAMENT
• Citiți toate instrucțiunile din acest manual și toate
avertismentele înainte de asambla și utiliza echipamentul.
• Acest echipament este destinat doar pentru uz casnic. Nu
utilizați acest echipament în medii comerciale.
• Acest echipament este destinat doar utilizării în interior. Nu
utilizați acest echipament în aer liber.
• Poziționați echipamentul pe o suprafață plană.
• Înainte de utilizare, asi urați-vă că echipamentul este asamblat
corespunzător și că toate șuruburile și piulițele sunt bine
strânse. Verificați în mod re ulat strân erea șuruburilor și
piulițelor.
• Nu utilizați echipamentul dacă acest a fost deteriorat.
• Utilizați doar accesorii autorizate.
• Nu depășiți reutatea maximă a utilizatorului.
• Exercițiile incorecte sau excesive pot duce la rănire sau deces.
Dacă simțiți orice fel de durere, inclusiv dureri în piepr, reață,
amețeli sau dificultăți de respirație, opriți imediat exercițiile și
consultați-vă medicul înainte de a continua.
• Înainte de a face exerciții, asi urați-vă că faceți o încălzire.
• Purtați îmbrăcăminte adecvată în timpul antrenamentului
(inclusiv pantofi sport).
• Nu încercați să reparați sibn ur acest echipament. Numai
personalul autorizat și calificat poate repara acest echipament.


Other Rebel Fitness Equipment manuals
Popular Fitness Equipment manuals by other brands

CARE FITNESS
CARE FITNESS Striale SE-401 manual

Merrithew Health & Fitness
Merrithew Health & Fitness Stability Chair owner's manual

SportsArt Fitness
SportsArt Fitness A915 owner's manual

Weider
Weider 390 Power Tower user manual

Keys Fitness
Keys Fitness Leg Press Hack Squat KF-LPHS owner's manual

Hasomed
Hasomed RehaStim operating manual