Red Bull Racing RB-RTEN10-104F User manual

1
USER MANUAL FOR E-SCOOTER
RB-RTEN10-104F
Red Bull® Marks and the Red Bull Racing Logo are licensed by Red Bull GmbH/Austria

2
Page 3-32 EN USER MANUAL
Page 33 -64 FR MANUEL D'UTILISATION
Page 65-96 IT MANUALE D’USO
Page 97-127 ES MANUAL DEL USUARIO
Page 129-160 DE BEDIENUNGSANLEITUNG

3
RB-RTEN10-104F
E-SCOOTER
WARNING FOR ELECTRIC KICKSCOOTER
Read and follow all the instruction in the user manual before using the e-scooter.
Collisions, falls, and loss of control can damage people and objects around you.
Owners of the e-scooter must check and obey any local laws applicable to e-scooter usage concerning
helmet use, speed limits, and accessible areas.
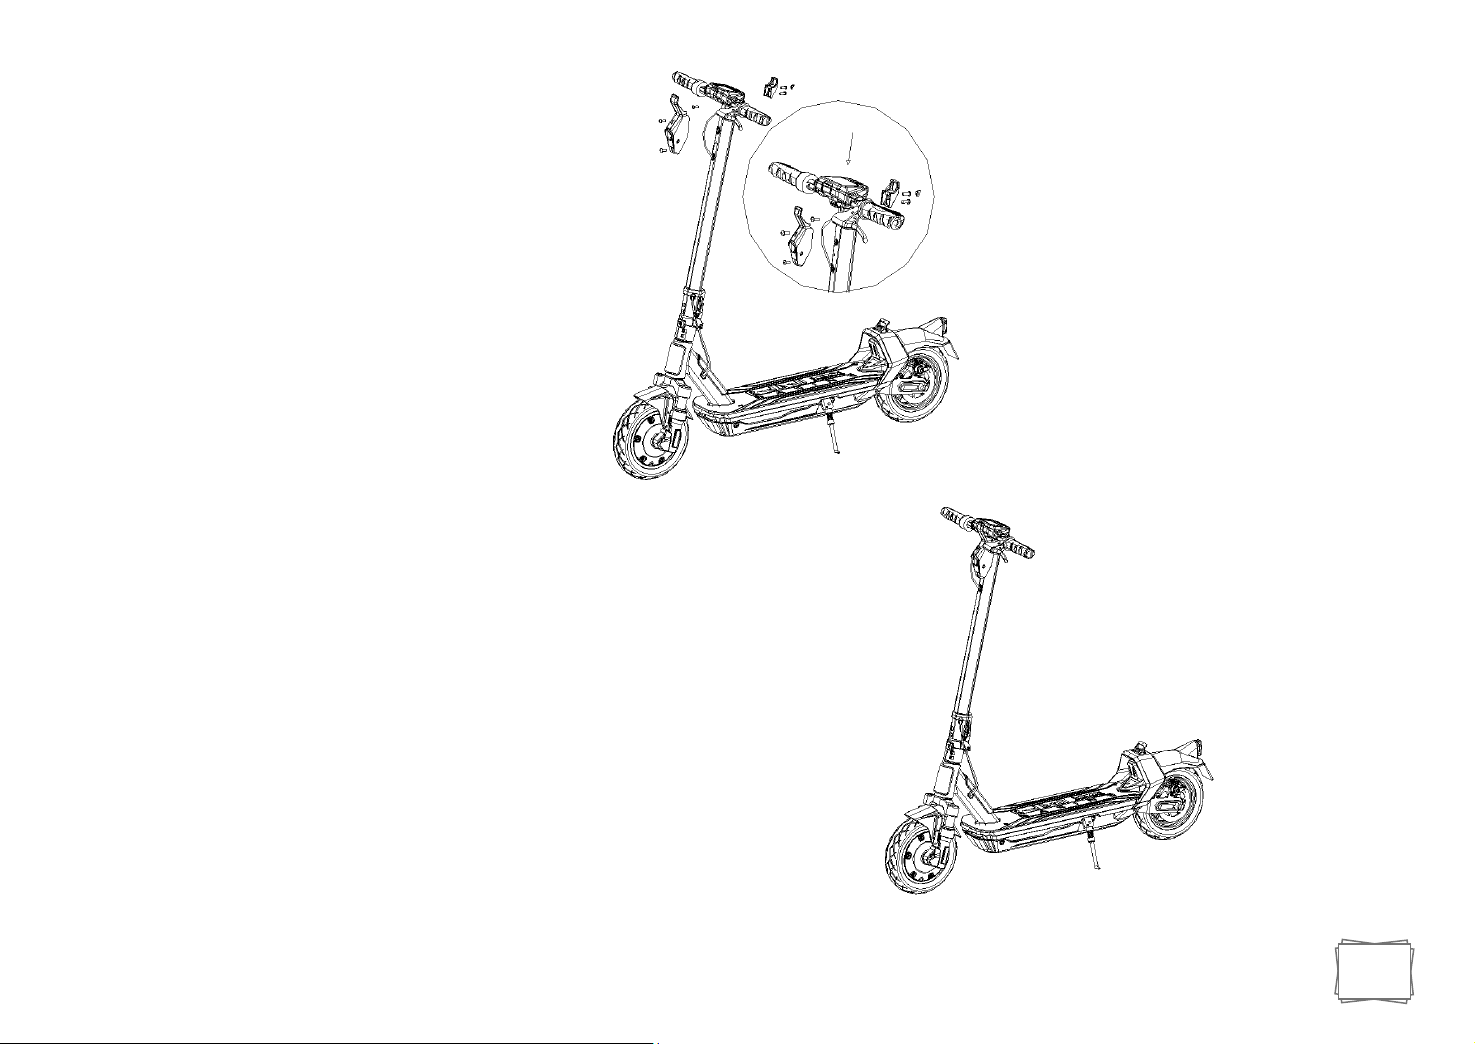
When installing/mounting the device, pay attention to the risk of pinching. Refer to the "Assembling” chapter
for more details.
This e-scooter conforms to the decree of electric mobility.
This electric kickscooter is not a toy and is not suitable for children under the age of 14 (check your local laws).
Adult supervision is required for riders under the age of 18.
This product can not transport more than one person at time.
This appliance can be used by persons with reduced physical, sensory or mental capabilities or lack of
experience and knowledge if they have been given supervision or instructions concerning use of the
appliance in a safe way and understand the hazards involved.
Children shall not play with the appliance. Keep the battery out of the reach of small children.
Cleaning and user maintenance shall not be made by children without supervision.
WARNING FOR BATTERY CHARGER
This appliance is not a toy.
Children shall not play with the appliance.
Adult supervision is required for minors.
This appliance can be used by persons with reduced physical, sensory or mental capabilities or lack of
EN

4
experience and knowledge if they have been given supervision or instructions concerning use of the
appliance in a safe way and understand the hazards involved.
Cleaning and user maintenance shall not be made by children without supervision.
Before carrying out maintenance operations, make sure that the power supply and the charging cable are
disconnected and that the device is switched off. Please refer to “Maintenance of the electric kickscooter” for
more details.
The device should only be used with the power supply supplied with the device (Ref: CP4215).
Normal temperature range for battery charging is 0-35°C.
High limit of charging voltage: 42V DC / Max 1.5A
Rated battery capacity: 10.4Ah
The battery must be removed from the device before it is disposed of. The device must be disconnected from
the mains supply when removing the battery.
Do not recharge non-rechargeable batteries.
The battery is to be disposed of safely.
CAUTION: To recharge the battery, use only the removable power supply unit supplied with the device.
This device contains batteries which can only be replaced by qualified personnel.

5
Introduction
For your better use experience, please read this product manual carefully. Keep this user manual for future references.
In order to avoid damage, carefully read and follow the instructions of this user manual.
The user is responsible of all consequences from the incorrect use of the electric kickscooter.
The Retailer and the Distributor are not responsible of damages to objects and/or people caused by the incorrect use of the device.
This e-scooter can be used by one user at one time only.
Please use the product if in good condition only. Please check whether the tires are damaged. If anything abnormal, please
provide for maintenance.
If you lose control during driving, you may cause damage to you or to other people.
For private use only. Forbid to use the electric kickscooter on vehicle roads (check the local laws).
Before riding the electric kickscooter, the battery must be fully charged or almost fully charged. Follow the instructions on this
user manual to avoid technical problems.
ATTENTION
The battery is the heart of the main energy resources of the device, pay attention to its habit when using the battery.
The battery cannot be discharged and should be fully powered before each use.
Avoid deep current discharge, recharge the battery in time when the level is very low.
Fully charge the battery every 2 months, even when the electric kickscooter is not used.
WARNING
When battery is completely empty (0% charge), a normal charge of 5-6 hours might not be sufficient.
It is necessary to proceed with a 8-hour charge (not more than 10 hours!).

6
The product

7
Assembling
For the very first use, the e-scooter is folded
inside its box.
Hand pull the handlebar from the rear wheel.
Upward the handlebar.
Close the lever on the handlebar.
Always check the e-scooter is turned off before
being unfolded.
For the very first use, please assemble the vertical handlebar.
Use the hexagon wrench to tighten the 4 screws on the
handlebar.

8
Install the handlebar on the standpipe.
When the installation is done, please test the power switch of the display.
If the display turns-on, the installation is well done.
You can use the easel to keep the kickscooter standing alone.

9
Folding steps
Always check the e-scooter is turned off before being folded.
Hold the standpipe by hand, rotate the folding wrench and align the front hook and the rear hook.
Fold the handlebar. Hook the handlebar to the rear wheel.
The folding procedure is now completed.
The product can be easily carried.

10
LED Display
The LED display is on top of the handlebar, in front of the user.
Press the power button to turn on the e-scooter.
Press the button one time to switch from Pedestrian mode to ECO to D to S+ mode.
Quickly press the power button to turn on/off the front LED light.
Quickly press the power button 5 times to switch the info from Km to miles and vice-versa.
Press the power button for 5 seconds to turn the display off.
The unit will automatically turn off when not in use for 3 minutes.
This is what the display looks like:

11
Current speed (1)
The speed is showed in Km/h. It will change along with the current speed.
Battery capacity (2)
The battery capacity of the e-scooter is displayed by bars, from 100% (full battery) to 0% (empty battery).
The display will light on all bars when the battery is full and one bar only for very low battery. During use the power of the
battery gradually decreases. When the energy of the battery is very low (one bar on only), please stop riding for your safety and
charge the battery for further use.
Remark: ERR 03 might appear on the display. It will disappear when the battery is charged again.
Mileage display (3) (4)
ODO info (total mileage) is visible when the unit is powered.
Trip info (single trip distance) is visible during normal use of the electric kickscooter.
Light indicator (5)
This symbol will turn-on when the front light is powered.
When the display is on, press the power button to turn on/off the front and rear LED light.
Cruise indicator (6)
If the e-scooter is used at a constant speed for more than 10 seconds, the Cruise control function will automatically enter. Use
the brake or the accelerator to deactivate the Cruise control function.
Bluetooth symbol (7)
The function is not working for this product. This indicator will never turn-on.
Modes (8) (9) (10)
Gear 1, pedestrian mode, is for low speed (6km/h max); gear 2, ECO mode, is for mid speed (15km/h max); gear 3, D mode, is
for high speed (20km/h max); gear 4, S+ mode, is for very high speed (25km/h max).
Short press twice the button to switch from one gear to the next one.
For safety reason, it is suggested to change the gear the kickscooter is stopped only.
Brake indicator (11)
Each time that the brake is used, this indicator turns on.
Logo (12)

12
Error status
When one of these error codes appear on the display, kindly contact your retailer or after-sale-service for immediate assistance.
Remarks: When the above error occurs, the rear tail lamp will flash at 10Hz high frequency. The motor will not operate; therefore,
the motor cannot be seen as damage when it does not operate when error occurs.
Part
Status
Meaning
Description
Controller
E01
Over-current protection.
When the vehicle travels on a slope or
accelerates suddenly with huge load, it would
trigger the alarm due to over-current. Recovery
needs to reduce load (reduce current).
E02
Low-voltage protection. Battery is nearly
out of power.
It usually appears during use, meaning the
battery is low.
E03
Over-voltage protection.
Normally it will not happen during customer
use. If this situation occurs during proper use
with right speedometer, it may apply the
battery with larger voltage than the right
battery of this model.
If the battery is correct, please check the
speedometer if it is 36V or 48V. This situation will
occur when speedometer of 36V match with
48V battery, because full battery level of 36V
battery is 42V.
E04
Rotor-lock protection.
It usually happens when the climbing slope is
too big, which causes rotor overload and finally
the motor would be locked.

13
E05
MOSFET up bridge-arm fault.
Due to program setting, it might trigger the
fault at the first use, but it would not happen
next time. If it happens during normal use, the
controller MOS tube may be damaged, please
replace controller.
E06
MOSFET down bridge-arm fault.
If it happens during normal use, the controller
MOS tube may be damaged, please replace
controller.
E07
Controller is broken. Hall of failure.
It is usually caused by:
a) Hall damage in motor.
b) Controller fail to receive Hall signal.
c) The reason for both a) and b) is the controller.
It can not receive the standard Hall signal or it
receives a wrong Hall signal, therefore the
speedometer would show E07 error. The
methods to fix the error are as follows:
Method 1. Use the diode gear in the multimeter
to separate the motor and controller. Connect
the 5V signal input with the red probe of
multimeter, and then use black probe of
multimeter to touch yellow, green, and then
blue Hall signal output cable in sequence. If the
multimeter displays infinity, which means Hall
damage in motor and needs the motor to be
replaced.
Method 2. Switch the multimeter to DC 20V and
turn on the motor controller speedometer, then
use the black probe of multimeter to connect

14
the GND of controller, which is the negative
cable. Next, use the red probe to connect the
Hall signal output cable, then turn on and roll
the motor. If the voltage is high and low
alternately, it means the Hall signal is normal
and three Hall cable shall be checked in
sequence.
If test by Method 1 and the break over voltage is
around 0.7V, it means the three Hall sensors are
normal. It might be due to the bad contact
between controller end and Hall cable terminal
pin in motor. You may check whether the
terminal pin connects properly to the other end,
whether it is skew thus not connected properly,
then use the buzzer gear in the multimeter to
check the terminal cables in the two ends. If
there is no buzzing sound, there is a
corresponding cable is open circuit, you shall re-
connect the cable or replace the electric parts
match with the cable.
If the connector clips connect properly, check
the terminal cables in the two ends via the
buzzer gear of multimeter. If there is buzzer
sound, which means the circuit is normal, and
E01 caused by the controller not receiving the
signal due to open circuit is excluded. In this
case, you shall replace the controller. The old
controller can be sent to Technical Team for
further test.

15
E08
Over-temperature protection.
It is usually over-temperature with the
controller, due to continued travelling on slopes
or overload for a long time. The initial protection
will limit current output and will not generate
error code. If the temperature continues to rise,
it will trigger the alarm and cut the electricity.
Speedometer
E09
Throttle failure.
It is because the throttle signal does not enter
the speedometer. The major reason is the one of
the three cables in connector has bad contact or
misplacement of the terminal. It might also be
due to non-wetting. You shall consider a
throttler or speedometer replacement.
E10
Brake failure.
The major reason is the bad contact between
brake and throttler or between brake and
speedometer, it is found the possibility of Hall
failure in throttler also. You shall adjust the
connector pin to ensure the connection or
replace the speedometer and throttler. In
normal case, the initial voltage signal is around
0.88V, after Hall throttler connects to 5V power
supply, or after vehicle turns on.
E11
Headlight switch malfunction.
This error is not valid for the current model.
E12
Communication failure.
It is usually due to bad contact for main cable or
connector clips and open circuit. The easiest
way is to change a main cable. If it is not
workable, you shall check whether open circuit

16
exists in the connection between controller and
main cable or in the connection between main
cable and speedometer. Measure with the
buzzer of the multimeter at the farthest end of
the corresponding cable connection. If there is
open circuit, you shall check which parts has
breaking circuit and replace that part.
E13
Start-switch failure.
This error is not valid for the current model.
Instructions for use
Before riding the electric kickscooter for the first time, the battery must be fully charged.
Follow the instructions on this user manual to avoid technical problems.
Try to recharge after each ride, which can greatly extend the service life of the battery.
First put the electric kickscooter on a flat surface.
The electric kickscooter is developed for flat grounds. Take care of uneven and bumpy grounds.
Press the power button on the display, to turn-on the display and the unit.
Verify the level of the battery power on the display.
Select the desired gear.
Turn on the lights when driving at night or dark places. Wear a reflective vest, if required by the local laws.
Put one foot on the pedal. Stand on the pedal with one leg only. Keep the two hands on the handlebar.
This e-scooter has a “kick-and-go” function for your safety: this will avoid a standing start.
Just push with the foot your e-scooter forward and the motor will be activated when you reach 3km/h.
Gently press the lever on the right handle: the device will accelerate.
Step on with the other foot whilst the electric kickscooter is moving.

17
Release the acceleration lever to slow-down.
Pull the brake lever on the left handle: the electric kickscooter will brake.
Stop the electric kickscooter and remove the feet, one by one.
Turn off the display.
Use the easel to keep the electric kickscooter standing alone, when not in use.
Distance
The maximum range of the scooter is 40 km approx.
This maximum range is affected by the road type (flat and smooth ground will increase the distance, otherwise the distance
will be reduced), ambient temperature, maintenance (tyres, battery), by the weight of the user (the heavier the user is, the
shorter the range is), the riding style (a lower speed extends the range).
Loading
Driver’s maximum weight should be of 100 Kg and minimum weight should be 30 Kg.
These limits ensure the driver’s safety and reduce damages to the scooter.

18
Battery
The battery charge (and therefore the maximum distance) is affected by some factors like:
1. Ground (when ground is not flat, the discharge is increased).
2. Weight of the user.
3. Ambient temperature.
4. Drive style and speed will affect the life of the battery charge: a constant and moderate speed, positively affect the charge
of the battery; a high and inconsistent speed, will reduce the life of the battery charge.
5. Maintenance (battery must be kept in good condition by the user and must be charged in the correct way).
WARNING
Charge the battery before first use.
Fully charge the battery every 2 months, even when the kickscooter is not used.
WARNING
When battery is completely empty (0% charge), a normal charge of 5-6 hours might not be sufficient.
It is necessary to proceed with a 8-hour charge (not more than 10 hours!).
Battery Charging
Charge the battery before using the electric kickscooter for the first time.
When you find the power-indicator shows very low energy, please stop riding for your safety.
Try to recharge after each ride, which can greatly extend the service life of the battery.
Charging should be in a safe, dry, and clean environment.
The kickscooter must be powered-off before proceeding with charging.
Do not use the kickscooter when charging the battery.
INSTRUCTIONS FOR CHARGING
1. Ensure the charging port is dry. Open the protective cover and insert the charger into the e-scooter charging port. The other
end of the charger must be connected to the mains to activate the charger.
2. First connect the cable of the battery charger to the e-scooter. Then, connect the cable of the battery charger to the mains.

19
3. The indicator light on the charger will be red: this grants that the charge is proceeding. Charging should be in a safe, dry,
and clean environment.
4. When the indicator light is turned to green colour, the battery is fully charged. Please stop charging or the battery life will
be reduced. Charging time is around 5-6 hours. Too long charging time will affect the battery life.
5. Remove the cable of the battery charger. Put the cover back to position.
Please check the battery capacity on the display.

20
Keep the product and the battery at the recommended temperature to keep the highest efficiency of the e-scooter and of the
battery. If used in an extreme cold or hot environment, the charging time sill be lengthened too. Working temperature: 0°C
40°C.
Please check the temperature of the battery during the charging process. Charging temperature must be: 0°C 40°C. Humidity
level during charge must be: 5% 95%.
If the temperature is higher than 40°C, the scooter functioning might be damaged and battery life might be reduced.
WARNING
When battery is completely empty (0% charge), a normal charge of 5-6 hours might not be sufficient.
It is necessary to proceed with a 8-hour charge (not more than 10 hours!).
WARNING/ATTENTION
The battery contains dangerous substances.
Do not charge the battery if the temperature is lower than 0°C.
Do not attempt to open the battery and do not insert objects inside it.
Do not charge overnight or when you are not able to observe the e-scooter.
Charge and store in an open dry area, away from combustibles (meaning items that can catch fire).
If giving to someone for the holidays, leave it in its partially charged state. Do not take it out of the package to bring it to a full charge
and then wrap it back up. Often, the product comes partially charged. Leave it in that state until it is ready to be used.
Correctly dispose and recycle the batteries according to local recycling and environmental regulation.
Never treat the batteries as common domestic waste, to prevent explosion and pollution.
Never throw the batteries into fire.
The battery must be removed from the kickscooter before it is scrapped.
Only the original charger must be used. Please refer to your retailer in case replacement is required.
CAUTIONS
Do not use the e-scooter if the battery is low.
Do not use the e-scooter in case of burning smell.
Table of contents
Languages:
Other Red Bull Racing Scooter manuals

Red Bull Racing
Red Bull Racing RB-RTENTAKEUP10-10 User manual

Red Bull Racing
Red Bull Racing RB-RTEEN10 User manual

Red Bull Racing
Red Bull Racing TURBO User manual

Red Bull Racing
Red Bull Racing RB-RTEN10 User manual

Red Bull Racing
Red Bull Racing RB-RTEEN85 User manual

Red Bull Racing
Red Bull Racing RB-RTEEN10 User manual