Redback SH4600 User manual

Knowledge Base
Guide – Resetting your Redback Inverter
Version 1.0 Date: 27/07/2018

Redback Technologies
GUI- 003 Knowledge Base -
Resetting your Redback Inverter
Audience: Home owner Installer .
Version 1.0 - 27/07/2018 - Page 2 of 16
Table of Contents
1. Introduction 3
2. Application 3
3. Tools and information required 3
4. Diagnostics 4
5. Internet connection 5
6. Resetting or restarting your Redback inverter 6
Soft reset 6
Hard reset (Restart) 7
7. Connecting the inverter to your Wi-Fi (Android devices, Redback App installed) 8
8. Connecting the inverter to your Wi-Fi (Apple iOS devices, Redback app installed) 11
9. Installer notes 15
10. Related documents 16
11. Revisions 16

Redback Technologies
GUI- 003 Knowledge Base- Resetting your Redback Inverter
Audience: Home owner Installer .
Version 1.0 - 27/07/2018 - Page 3 of 16
Introduction
This guide assists owners of Redback Inverters to diagnose and remedy simple communication errors. This guide includes:
•Diagnosis
•Communication failure cause and remedies
•Soft resetting your Redback Inverter
•Hard resetting your inverter
•Reconfiguring your Wi-Fi connection
Application
This guide applies to the following products:
•Redback Smart Hybrid Inverter SH4600
•Redback Smart Hybrid Inverter SH5000
SH4600 and SH5000 are quite similar in operation, with slight differences in the layout of controls.
Tools and information required
•Smart Phone or Tablet with internet access and Redback Energy app (from your app store)
•Your Wi-Fi network name and password (not required if your inverter is connected by ethernet)
•Your Redback Portal login details
•No special tools are required

Redback Technologies
GUI- 003 Knowledge Base- Resetting your Redback Inverter
Audience: Home owner Installer .
Version 1.0 - 27/07/2018 - Page 4 of 16
Diagnostics
Your Redback Inverter is equipped with a LED arrays to indicate system status and aid diagnosis.
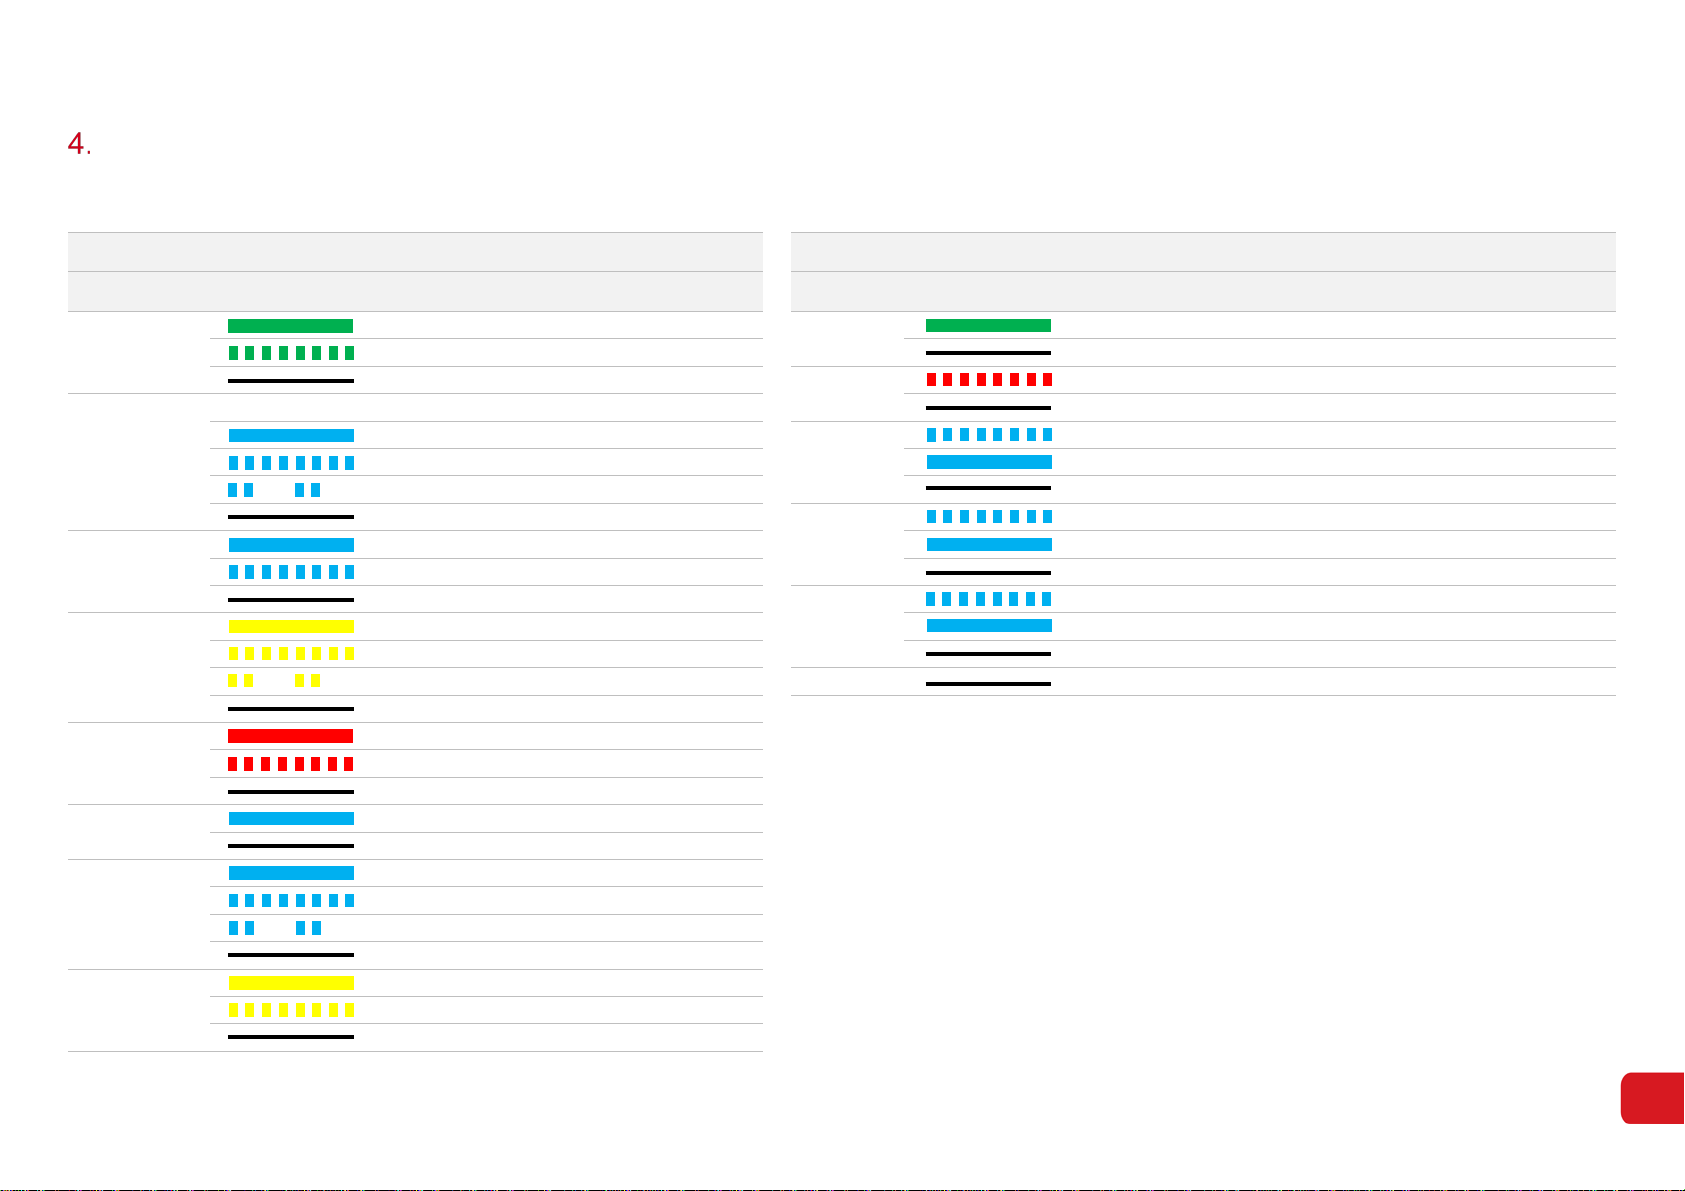
Inverter LEDs (SH4600 and SH5000) Ouija LEDs (visible on SH5000 only)
Name Colour/pattern Meaning Name Colour/pattern Meaning
System Ready ON: System ready Power ON: The Ouija Board is powered up
BLINK: System Starting up OFF: The Ouija Board is shut down
OFF: System is not operating Heartbeat BLINK: The Ouija Board software is operational
Solar Array Solar Input #1 Solar Input #2 OFF: The Ouija Board software is updating or not operational
Active Active Inverter BLINK: Inverter settings are being applied
Active Inactive ON: The Ouija Board is connected to the Inverter (internal)
Inactive Active OFF: The Ouija Board is not connected to the Inverter (internal)
Inactive Inactive Battery BLINK: The Inverter is not accepting battery information from the Ouija
Utility Grid ON: Grid Active and connected ON: The Ouija Board is connected to battery and BMS is communicating
BLINK: Grid is active but not connected OFF: Battery is disconnected or the Ouija & BMS are not communicating
OFF: Grid is not active Wi-Fi BLINK: Inverter Wi-Fi is in hotspot mode (discoverable)
Energy Flow ON: Consuming energy from grid / buying ON: Inverter is connected to the network via Wi-Fi or Ethernet
BLINK: Supplying energy to grid / zeroing OFF: Inverter is not connected to the network
BLINK 2: Supplying energy to grid / selling 4G OFF: Not used
OFF: Grid not connected or system not operating
System Error ON: Fault has occurred
BLINK: Overload of backup output / reduce load
OFF: No fault
Backup Power ON: Backup is ready/ power available
OFF: Backup is off / no power available
Storage Battery ON: Battery is charging
BLINK: Battery is discharging
BLINK 2: Battery is low / SOC is low
OFF: Battery is disconnected / not active
Communications ON: Online
BLINK: Local connection only (no internet)
OFF: Not connected

Redback Technologies
GUI- 003 Knowledge Base- Resetting your Redback Inverter
Audience: Home owner Installer .
Version 1.0 - 27/07/2018 - Page 5 of 16
Internet connection
Your Redback Inverter will perform best when it is connected to the internet. An internet connection enables the inverter to send data to the Redback cloud, where you can use
the Redback App or Portal to view performance and fine tune your system.
Occasionally, your inverter may lose internet connection and be reported as “offline”. Ethernet connected systems usually self-repair after a system restart. Wi-Fi problems
usually require that the installation details are updated.
The most common causes of “offline” reports are explained below.
Cause Ethernet connected
(wired) Wi-Fi connected
(wireless) Remedy
Change of Internet Service Provider e.g. Telstra, Optus, TPG, Dodo etc
Ethernet: Restart the System (Section 4)
Wi-Fi: Restart and reconnect (Sections 4 & 5)
New router or modem
Change of Network name or SSID
Change settings in ADSL modem
Changed Wi-Fi or Network password
Wi-Fi: Restart and reconnect (Sections 4 & 5)
Too many users or devices on your home Wi-Fi network
Limit users or devices; upgrade Wi-Fi router;
connect using ethernet.
Wi-Fi signal is weak or variable due to obstructions or distance between the inverter
and your Wi-Fi router’s antenna.
Experiment with Wi-Fi router locations; use a
Wi-Fi extender; connect using ethernet.

Redback Technologies
GUI- 003 Knowledge Base- Resetting your Redback Inverter
Audience: Home owner Installer .
Version 1.0 - 27/07/2018 - Page 6 of 16
Resetting or restarting your Redback inverter
Soft reset
Step Procedure SH4600 (Gen 1) SH5000 (Gen 2)
1. Open the access panel on the front of the
inverter.
Identify the three-position By-Pass switch.
Note the position of the switch.
☐Up ☐Down
Note: The switch must be returned to the
original position during restart.
OMRON OMRON
4600
NOARKNOARK
Nader
ON
OFF
ABB
1
POWER
HEARTBEAT
INVERTER
BATTERY
WIFI
4G
OMRON OMRON
1
2. Set the By-Pass Switch to the middle
position (OFF). Wait 5 seconds.
OMRON OMRON
4600
NOARKNOARK
Nader
ON
OFF
ABB
5s
2
POWER
HEARTBEAT
INVERTER
BATTERY
WIFI
4G
OMRON OMRON
5s
2
3. Return the By-Pass switch to its original
position.
OMRON OMRON
4600
NOARK
NOARK
Nader
ON
OFF
ABB
3
POWER
HEARTBEAT
INVERTER
BATTERY
WIFI
4G
OMRON OMRON
3
4. The Inverter will resume normal operation in
approximately 10 minutes. Check the LEDs

Redback Technologies
GUI- 003 Knowledge Base- Resetting your Redback Inverter
Audience: Home owner Installer .
Version 1.0 - 27/07/2018 - Page 7 of 16
Hard reset (Restart)
A hard reset completely powers-down the inverter and disconnects all inputs.
Step Procedure SH4600 (Gen 1) SH5000 (Gen 2)
1. Open the access panel on the front of the
inverter.
Switch the UTIL GRID circuit breaker to
OFF (UP).
PV ARRAY
DC ISOLATOR
ON
OFF
ON
MSB/MDB
Acrel Run
Com
R _P
FN S et
OMRON OMRON
4600
ABB
NOARKNOARK
Nader
ON
OFF
6
5
4
3 21
MAIN SWITCH BOARD
OR SUB-BOARD
SH4600 INVERTER
SOLAR PV
ISOLATOR
Acrel
Run
Com
R _P
FN S et Reset
6
POWER
HEARTBEAT
INVERTER
BATTERY
WIFI
4G
OMRON OMRON
21
43
5
MAIN SWITCH BOARD or SUB-BOARD
SH5000 INVERTER
2. Identify the three-position By-Pass switch.
Note the position of the switch.
☐Up ☐Down
Note: The switch must be returned to the
original position during restart.
Switch the By-Pass to OFF (middle
position).
3. Switch the BACKUP circuit breaker to OFF.
4. Switch the SOLAR PV Isolator to OFF
(SH4600 is located next to the inverter).
5. Switch the BATTERY circuit breaker OFF.
6. Turn the Solar Supply Main Switch OFF (on
the Main Switch Board or Sub-board)
7. To restart the system:
•Turn all the inverter switches ON in
reverse order i.e. 5,4,3,2,1
•Turn the Solar Main Switch ON (6).
8. The Inverter will resume normal operation in
approximately 10 minutes, indicated by the
Status LEDs.
SYSTEM: Green, ON
COMMUNICATIONS: Yellow, ON SYSTEM: Green, ON
COMMUNICATIONS: Yellow, ON
WI-FI: Blue, ON

Redback Technologies
GUI- 003 Knowledge Base- Resetting your Redback Inverter
Audience: Home owner Installer .
Version 1.0 - 27/07/2018 - Page 8 of 16
Connecting the inverter to your Wi-Fi (Android devices, Redback App installed)
To reconnect the inverter, you need the following information:
Your home Wi-Fi network name No idea? Look on your router. Your inverter serial number On the side of your inverter
Your home Wi-Fi password No idea? Look on your router.Your inverter Wi-Fi identity Discover in Step 3, below.
Step
Android Procedure
Illustration/comment
1. Stand beside your inverter (to ensure strong
reception). Open the Redback App.
2. Touch Settings to reveal options (7-1).
Touch Find Inverter.
Figure 7-1 Figure 7-2
Figure 7-3
3. Touch Find New Inverter (7-2)
You may receive a message:“Cannot connect to
the inverter. Please make sure you have
connected to the correct Wi-Fi access point”
Touch OK. You may need to select Scan again
to get the app to search for the inverter once
more.
4. When discovered, your inverter should appear as
shown in 7-3.
Touch Redback_XX to continue.

Redback Technologies
GUI- 003 Knowledge Base- Resetting your Redback Inverter
Audience: Home owner Installer .
Version 1.0 - 27/07/2018 - Page 9 of 16
Step
Android Procedure
Illustration/comment
5. Enter the password 12345678 if requested.
Touch Connect. (7-4). A success message will
appear (7-5).
Touch Yes to continue. A list of available
networks will appear (7-6). Select your home
network.
Enter your Password (7-7).
Figure 7-4
Figure 7-5
Figure 7-6
Figure 7-7
6. Message “Important. Wi-Fi setup is done! etc”will
appear.
STOP! DO NOT PRESS “OK” YET
Before finishing you must disconnect your
Android device from the inverter Wi-Fi and
connect it to the home network, as described
below.
7. Connect your device to your home network
•Swap back to Android Settings (7-8)
•Touch Wi-Fi (7-9)
•Select your home Wi-Fi network from the list
(7-10)
•Enter your password if requested
The inverter and your device are now connected
to the home network.
Figure 7-8
Figure 7-9
Figure 7-10
Figure 7-11
8. Return to the Redback App. The message
“Important. Wi-Fi setup is done! etc...” should still
be visible. Touch OK to continue (7-11).

Redback Technologies
GUI- 003 Knowledge Base- Resetting your Redback Inverter
Audience: Home owner Installer .
Version 1.0 - 27/07/2018 - Page 10 of 16
Step
Android Procedure
Illustration/comment
9. The message “Important. Do you want to connect
to an inverter on your local Wi-Fi etc” may
appear. Touch Local to continue (7-12).
Touch Find existing inverter. Redback inverters
connected to your home network are listed.
Select your serial number from the list.
Figure 7-12
Figure 7-13
Figure 7-14
Figure 7-15
10. Touch OK on the success message (7-14).
11. On the App System Tab,
between the Inverter,
Wi-Fi and Cloud icons indicate the system is
connected to the internet (7-15).
Confirm connection using the Redback Portal.

Redback Technologies
GUI- 003 Knowledge Base- Resetting your Redback Inverter
Audience: Home owner Installer .
Version 1.0 - 27/07/2018 - Page 11 of 16
Connecting the inverter to your Wi-Fi (Apple iOS devices, Redback app installed)
To reconnect the inverter, you need the following information:
Your home Wi-Fi network name No idea? Look on your router. Your inverter serial number On the side of your inverter
Your home Wi-Fi password No idea? Look on your router. Your inverter Wi-Fi identity XX Discover in Step 3, below.
Step Procedure iOS
1. Stand beside your inverter (to ensure
strong reception)
Figure 8-1
Figure 8-2
Figure 8-3
2. On your iOS device, open Settings.
Touch Wi-Fi (Figure 8-1). A list of Wi-
Fi networks will appear.
3. Select Redback_XX e.g. Redback_04.
If there is more than one Redback
listed, choose the one with strongest
reception.
Make a note of the Inverter number
(XX).
4. Enter password 12345678 and touch
Join. (8-3). Wait for the confirmation
message.
There is no need to close Settings.
5. Open the Redback App.

Redback Technologies
GUI- 003 Knowledge Base- Resetting your Redback Inverter
Audience: Home owner Installer .
Version 1.0 - 27/07/2018 - Page 12 of 16
6. Touch the Settings Icon (8-4).
Figure 8-4
Figure 8-5
Figure 8-6
Figure 8-7
7. Touch Find Inverter.The app will
search for the inverter (8-5).
8. Touch on Find new inverter (8-6)
9. Touch red Connect (8-7)
If ‘Connect’ is grey, you are not
connected to the Redback Wi-Fi
access point: Return to the Wi-Fi
settings on your device and connect
again.
10. You may receive a message “Result –
‘Failed to find Wi-Fi list”. Touch OK.
You may need to Connect to force the
App to repeat the search for the home
Wi-Fi.
Figure 8-8
Figure 8-9
Figure 8-10
Figure 8-11
11. If Wi-Fi networks are detected a
message “Important. Do you want to
connect etc?” is displayed. Touch Yes
to continue (8-8).
The “Found Wi-Fi” opens and
indicates search in progress (8-9).
A list of available networks will appear
(8-10).
Select your home Wi-Fi network.
Enter the Password when requested
(8-11).

Redback Technologies
GUI- 003 Knowledge Base- Resetting your Redback Inverter
Audience: Home owner Installer .
Version 1.0 - 27/07/2018 - Page 13 of 16
12. Message “Important. Wi-Fi setup is
done…” will appear (8-12).
STOP! DO NOT PRESS OK YET
Before finishing you must disconnect
your iOS device from the inverter Wi-Fi
and connect it to your home network,
as described below.
Figure 8-12
Figure 8-13
Figure 8-14
Figure 8-15
13. Connect your device to your home
network
•Swap back to iOS Settings (8-13)
•Touch Wi-Fi (8-14)
•Select your home Wi-Fi network
from the list (8-15)
•Enter your Password if requested
The inverter and your device are now
connected to the home network.
14. Return to the Redback App and touch
OK (8-16)
Figure 8-16 Figure 8-17 Figure 8-18
Figure 8-19
15. The message “Important. Do you want
to connect to an inverter on your local
Wi-Fi etc” may appear.
Touch Local to continue (8-17).
A reminder appears (8-18). Touch OK
to acknowledge and continue.
Touch Find existing inverter.
Redback inverters connected to your
home network are listed.
16. Select your serial number from the
list.

Redback Technologies
GUI- 003 Knowledge Base- Resetting your Redback Inverter
Audience: Home owner Installer .
Version 1.0 - 27/07/2018 - Page 14 of 16
17. Once you tap on your inverter, a
success message will appear (8-20).
Touch OK to continue.
Figure 8-20
Figure 8-21
Figure 8-22
Figure 8-23
18. Go to the System Status page (8-21).
between the Inverter and Wi-Fi
indicates the system is connected to
the home network.
between Wi-Fi and Cloud indicates
the Cloud Connection is disabled.
19. To enable the Cloud Connection
•Touch App Settings (8-21)
•Touch Network Settings (8-22)
•Slide Cloud Connection ON (8-23)
•Touch Apply to save
20. A pop-up indicates status (8-24).
Figure 8-24 Figure 8-25 Figure 8-26
21. Touch OK to acknowledge the
success message (8-25).
Return to System Status page
22.
between the Wi-Fi and Cloud
indicates the system is connected to
the internet (8-26).
Login to the Redback Portal at
https://portal.redbacktech.com.
Your inverter should have status
“Online”.

Redback Technologies
GUI- 003 Knowledge Base- Resetting your Redback Inverter
Audience: Home owner Installer .
Version 1.0 - 27/07/2018 - Page 15 of 16
Installer notes
No. Note Comment
5. When first turning on the inverter allow 10 minutes for the inverter to boot up and
establish the Wi-Fi hotspot. Turning the power off during this time may result in an
increase to the boot up time as well as potential software crashes.
If no ethernet connection exists, the Ouija board Wi-Fi LED begins to flash when the system is
ready to be connected to the internet.
6. The battery circuit breaker may trip at first use. The breaker can be turned back ON
immediately - no waiting required.
Better practice is:
•Turn the PV array DC isolator ON
•Wait for system to boot-up (approx. 10 minutes)
•Turn battery circuit breaker ON
Tripping is due to of the internal charge control capacitors’ in-rush current.
It takes about 10 minutes for the charge controllers capacitors to receive a full charge.
7. If the system is to be connected to the internet via ethernet cable the unit will
automatically connect and the Wi-Fi LED will be ON constantly after a short period.
8. Ensure all internal communication cables are present before staring on-boarding:
•Ouija board to inverter,
•Kilowatt hour meter to inverter
•Battery to Ouija board (if batteries are installed)
•Ouija board to Wi-Fi antenna OR ethernet
The Wi-Fi has three statuses:
•Blinking: Wi-Fi hotspot initialised; ready for connection to internet
•ON: Ethernet connection established
•OFF: Error
9. Familiarize yourself with the process before you start, especially the first time. Time is of the essence: there is a 3-minute opportunity to connect the Redback inverter to the
home Wi-Fi network.
10. Restart your device before beginning on-boarding. Apps are memory hungry even when in standby mode. Regular restarts close all apps and
frees up memory, reducing the chance of apps running slowly or freezing.
11. Turn mobile data OFF before starting on-boarding. Mobile data may interfere with the connection between your device and the Inverter’s Wi-Fi.
12. Following on-boarding of the inverter, check that your device’s Cloud Connection has
been enabled. Go to Settings>Network settings>Cloud connection. Then begin the
Wi-Fi connection process.

Redback Technologies
GUI- 003 Knowledge Base- Resetting your Redback Inverter
Audience: Home owner Installer .
Version 1.0 - 27/07/2018 - Page 16 of 16
Related documents
Document name
Comment
Link
Home Owner User Guide Day-to-day usage of your inverter and the
Redback Portal https://portal.redbacktech.com/support/GetFile?path=SupportDocuments%2FPublic%2FGuid
e%20-%20Home%20owner%20user%20guide.pdf
Revisions
Version Detail Author Date
1.0 First published version Adam Shipway, Technical Writer Click or tap to enter a date.
Document owner Kelly Garvin, Technical Customer Support Manager
Contributors
Kelly Garvin, Technical Customer Support Manager
Graham Fitzgerald, Technical Customer Support Officer
Approved by Name, Position
Filename Guide- Resetting your Redback Inverter.docx
Issue date 27/07/2018
This manual suits for next models
1
Table of contents
Other Redback Inverter manuals
Popular Inverter manuals by other brands

Global Specialties
Global Specialties 2001A instruction manual

Solectria Renewables
Solectria Renewables PVI 13KW Installation and operation manual

Purkeys
Purkeys INVERT user guide

Velux
Velux KSX 100 Service instructions

LONCIN
LONCIN WG6500M-1 owner's manual

Huawei
Huawei SUN2000-8KTL Quick installation guide