INSTRUCTIONS
L’outil PE Prep True Peel
®
est conçu pour ébavurer à la fois l’extrémité du tuyau et
les raccords du taraud pour l’électrofusion. Tourner le bouton de la vis d’alimentation
dans le sens des aiguilles d’une montre jusqu’à ce que le mandrin soit complète-
ment étendu. Insérez le mandrin dans le tuyau. Tout en maintenant le levier de la
lame enfoncé, poussez complètement le mandrin jusqu’à ce qu’il atteigne la petite
section conique du mandrin. Pressez fermement le mandrin dans le tuyau aussi loin
que possible pour empêcher le mandrin de tourner à l’intérieur du tuyau. Tournez
le corps de la machine à ébavurer dans le sens des aiguilles d’une montre d’un à
deux tours et vériez si l’extrémité de l’ébavure n’est pas coincée entre le tuyau et
l’intérieur du corps de la machine à ébavurer. Si oui, tirez simplement l’extrémité de
l’ébavure et continuez à faire tourner la machine à ébavurer. Tournez la machine à
ébavurer jusqu’à ce que l’extrémité du tuyau puisse être vue au centre de la fenêtre
d’observation. L’ébavure est complète. Maintenez le levier de la lame enfoncé pour
soulever la lame tout en retirant la machine à ébavurer du tuyau.
REMPLACEMENT DU MANDRIN
Chaque machine à ébavurer Reed est livré avec une dimension de mandrin spéci-
que pour l’épaisseur de la paroi. Pour certaines dimensions, d’autres mandrins
sont offerts an d’accueillir d’autres épaisseurs de paroi SDR/DR. Pour remplacer le
mandrin, retirez le guide et la vis de guidage. Retirez la vis du mandrin. Maintenez le
levier de la lame et retirez, puis remplacez le mandrin.
Pour une liste complète des dimensions de mandrins, reportez-vous à
www.reedmfgco.com.
Reed Manufacturing Company
1425 West 8th Street
Erie, PA 16502 É.-U.
Téléphone : 800-666-3691 ou 814-452-3691
Télécopieur : 800-456-1697 ou 814-455-1697
www.reedmfgco.com
0120-5463
3
Outils PE Prep True Peel
®
Mode d’emploi
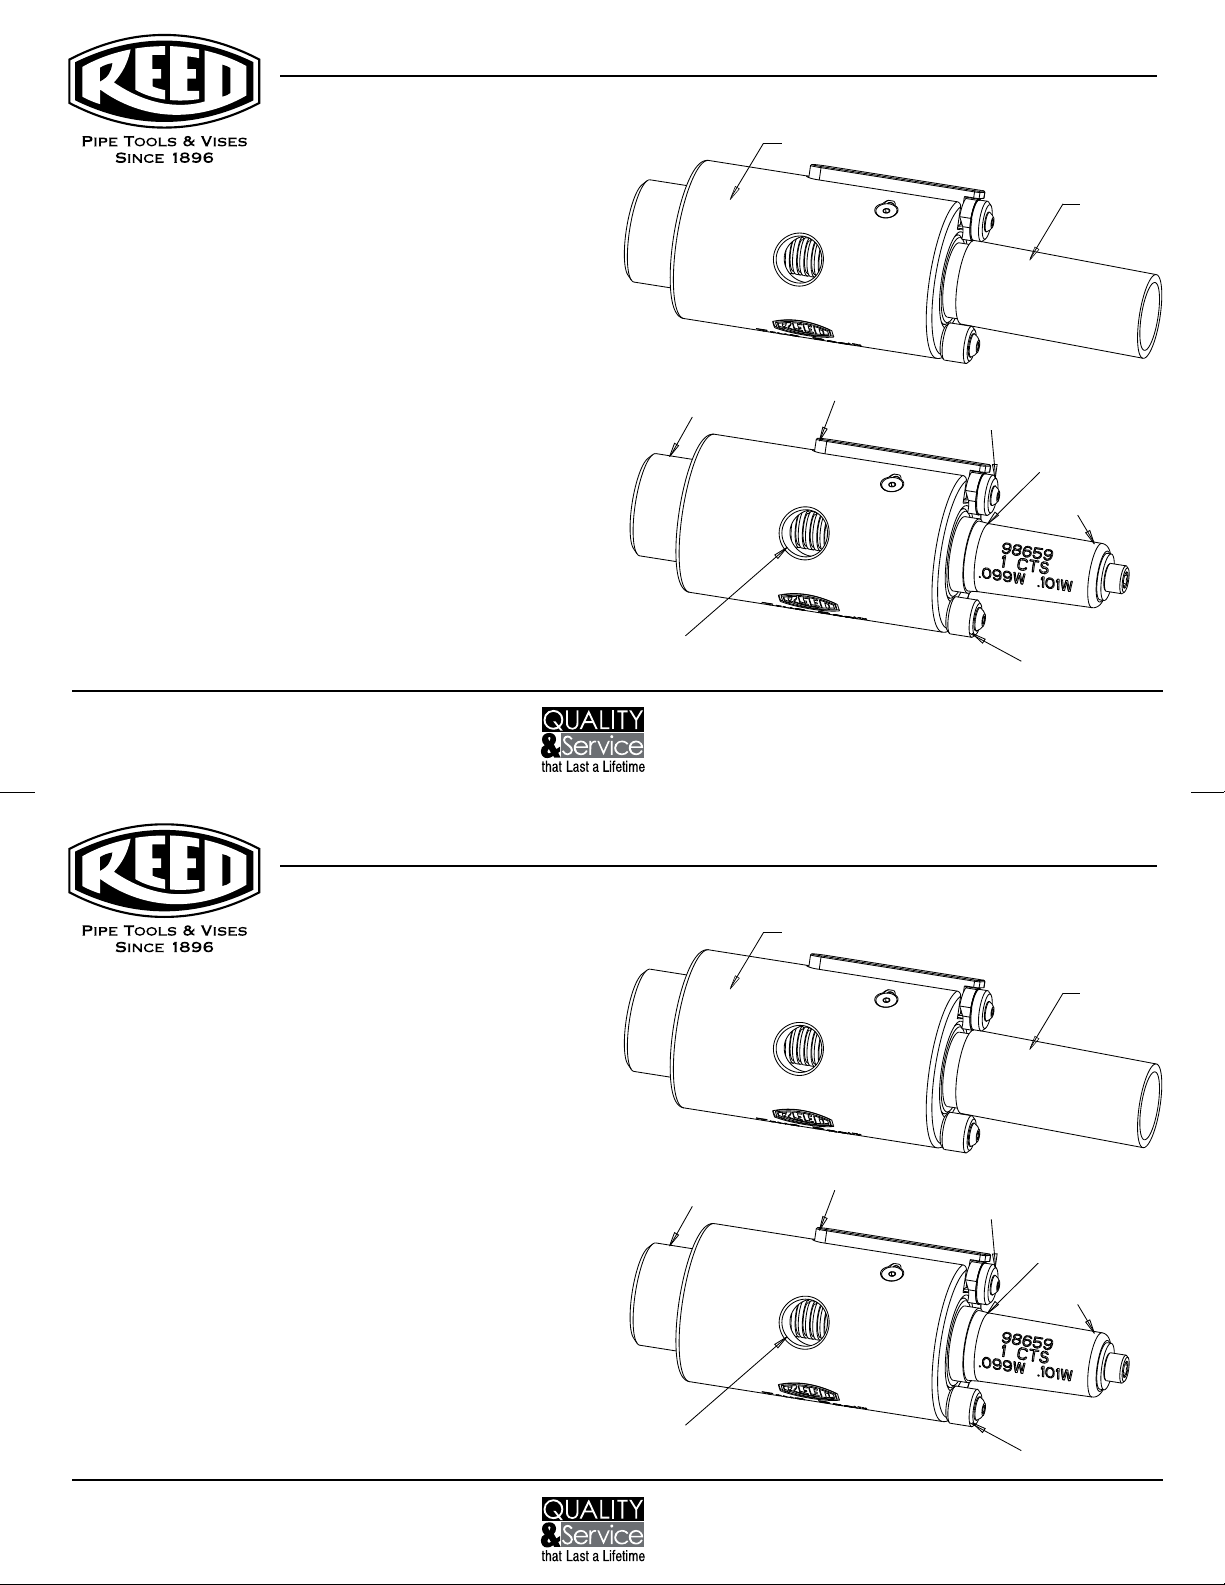
FEED SCREW KNOB
BLADE LEVER
BLADE
MANDREL
OBSERVATION WINDOW
TAPERED
SECTION
OF MANDREL
GUIDE
PIPE
PEELER BODY
INSTRUCCIONES
La herramienta True Peel
®
de Preparación de PE, está diseñada para pelar
tanto el extremo del tubo como perforar las Te para electro fusión. Gire la Pe-
rilla de tornillo de alimentación en el sentido del reloj hasta que el mandril esté
totalmente extendido. Inserte el Mandril dentro del tubo. Mientras mantiene
abajo la Palanca de hoja, empuje el mandril completamente hasta que llegue a
la pequeña sección perforada del mandril. Oprima rmemente el mandril dentro
del tubo lo más adentro que penetre, para evitar que el mandril gire dentro
del tubo. Gire una vuelta o dos el Cuerpo del pelador en el sentido del reloj
y revise para conrmar si el extremo de la peladura no se haya metido como
cuña dentro del cuerpo del pelador. De ser así, simplemente jale el extremo de
la peladura y siga girando el pelador. Gire el pelador hasta que el extremo del
tubo pueda verse en el centro de la ventana de observación. La peladura está
completa. Mantenga abajo la Palanca de hoja para elevar la hoja mientras jala
el pelador del tubo para sacarlo.
REEMPLAZO DE MANDRIL
Cada pelador Reed viene con un diámetro especíco de mandril para un
espesor de pared. Para algunos diámetros de cuerpo se tienen mandriles dis-
ponibles para dar cabida a otros espesores de pared SDR/DR. Para reempla-
zar el mandril, retire la guía y el tornillo de la guía. Retire el tornillo del mandril.
Mantenga oprimido la palanca de hoja y retire y reemplace el mandril.
Para una lista completa de los tamaños de mandril, consulte en
www.reedmfgco.com.
Reed Manufacturing Company
1425 West 8th Street
Erie, PA 16502 USA
Teléfono: 800-666-3691 o 814-452-3691
Fax: 800-456-1697 o 814-455-1697
www.reedmfgco.com
0120-54633
True Peel
®
Herramienta de Preparación de PE
Instrucciones de operación
FEED SCREW KNOB
BLADE LEVER
BLADE
MANDREL
OBSERVATION WINDOW
TAPERED
SECTION
OF MANDREL
GUIDE
PIPE
PEELER BODY
MACHINE À ÉBAVURER
CUERPO DEL PELADOR
BOUTON DE LA VIS
D’ALIMENTATION
PERILLA DEL TORNILLO DE
ALIMENTACIÓN
TUYAU
TUBO
LAME
HOJA
MANDRIN
MANDRIL
GUIDE
GUÍA
FENÊTRE D’OBSERVATION
VENTANA DE OBSERVACIÓN
SECTION
CONIQUE DU
MANDRIN
SECCIÓN PER-
FORADA DEL
MANDRIL
LEVIER DE LA LAME
PALANCA DE HOJA


