The first time the user interface is turned ON, the clock must be set to the
current time.
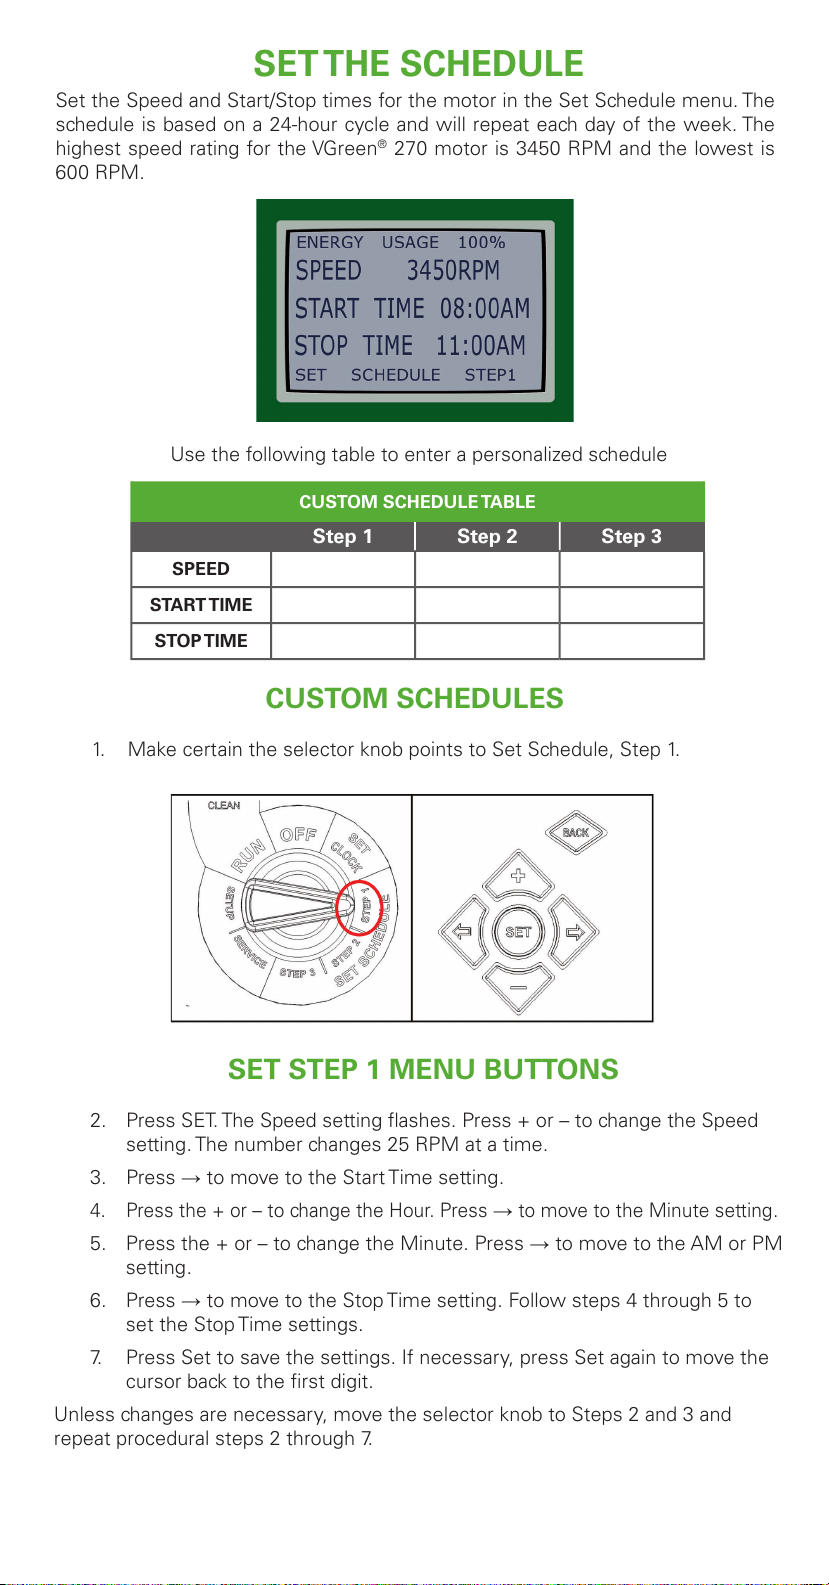
Set the Speed and Start/Stop times for the motor in the Set Schedule menu. The
schedule is based on a 24-hour cycle and will repeat each day of the week. The
highest speed rating for the VGreen® 270 motor is 3450 RPM and the lowest is
600 RPM.
SET CLOCK MENU BUTTONS
1. Turn the selector knob to SET CLOCK.
2. At any time, the user can press BACK to return to the previous area.
3. Press + or – to change the Month. Press
→
to move to the Day setting.
4. Press the + or – to change the Day. Press
→
to move to the Year setting.
5. Press + or – to change the Year. Press
→
to move to the Hour setting.
6. Press + or – to change the Hour. Press
→
to move to the Minute setting
.
7. Press + or – to change the Minute. Press → to move to the AM or PM
setting.
8. Press SET when the time is correct.
9. Press SET again if the user needs to make additional changes.
The cursor returns to the Month setting.
10. If the date and time are correct, move the selector knob to Set
Schedule, Step 1.
NOTE: Neither of the Override buttons affects this menu. The message
“Invalid Key” appears if the user presses an Override button.
KEY LOCKOUT FEATURE
The Century® VGreen® 270 user interface has a key lockout feature
to prevent unwanted changes to the settings. To lock the keys, hold
down the “+, -, and SET” buttons for more than 3 seconds. The display
will then show a symbol of a key indicating the buttons are locked. The
user can unlock the keys by holding down the same buttons for more
than 3 seconds.
CUSTOM SCHEDULE TABLE
Step 1 Step 2 Step 3
SPEED
START TIME
STOP TIME
SET STEP 1 MENU BUTTONS
2. Press SET. The Speed setting flashes. Press + or – to change the Speed
setting. The number changes 25 RPM at a time.
3. Press → to move to the Start Time setting.
4. Press the + or – to change the Hour. Press
→
to move to the Minute setting.
5. Press the + or – to change the Minute. Press → to move to the AM or PM
setting.
6. Press → to move to the Stop Time setting. Follow steps 4 through 5 to
set the Stop Time settings.
7. Press Set to save the settings. If necessary, press Set again to move the
cursor back to the first digit.
Unless changes are necessary, move the selector knob to Steps 2 and 3 and
repeat procedural steps 2 through 7.
SET THE CLOCK SET THE SCHEDULE PRIME CONFIGURATIONSETUP
Use the following table to enter a personalized schedule
CUSTOM SCHEDULES
1. Make certain the selector knob points to Set Schedule, Step 1.
Setup allows the user to configure the following parameters:
• Freeze Protection • Reset Factory Defaults • Prime Settings
• Auxiliary Load Settings • Set Contrast Level
Setup Menu Buttons
Freeze Protection can be either enabled or disabled when the user turns the
User Interface selector knob to Setup. If it is enabled, the user will be able to set
the temperature at which the pump will turn on. The control is designed to run
the pump for 8 hours at 2600 RPM if the temperature drops below the setpoint.
This cycle will repeat and the pump will
continue to run if the outside temperature
is below the setpoint.
FREEZE PROTECTION
The Auxiliary Load is a relay inside the control designed to provide AC power to
a load that should not be energized without adequate water flow from the pump
(i.e. heater, booster pump, salt water chlorinator).
The control is designed to turn on the Auxiliary
Load relay when the pump speed is above the
MINIMUM ON SPEED (default is 2000 RPM
and primed). The Auxiliary Load relay will stay
closed as long as the pump speed is above the
MINIMUM ON SPEED. In addition, the control
can be programmed to limit the amount of
time the Auxiliary Load relay is closed in a 24-
hour period. For example, if the pump runs at
3450 RPM for 12 hours a day, but the auxiliary
load only needs to be powered for 6 hours, the user can set the MAXIMUM RUN
TIME.
1. Make certain the selector knob points to Setup.
2. Press → one time to change the Auxiliary Load settings. Press SET to
enter “change mode.” Press + or – to increase or decrease the Minimum
Speed. Press → to change the Maximum Run Time. Press the + or – to
increase or decrease the Maximum Run Time. Press SET to save changes.
1. Make certain the selector knob points
to Setup.
2. Press either + or – to change the
Freeze Protection setting.
Press Set to save any changes.
WARNING! Freeze Protection will ONLY function with the selector
knob in the
RUN position. Damage may occur to the user’s pool system if Freeze Protection
is enabled and the switch is not in the RUN position.
AUXILIARY LOAD SETUP
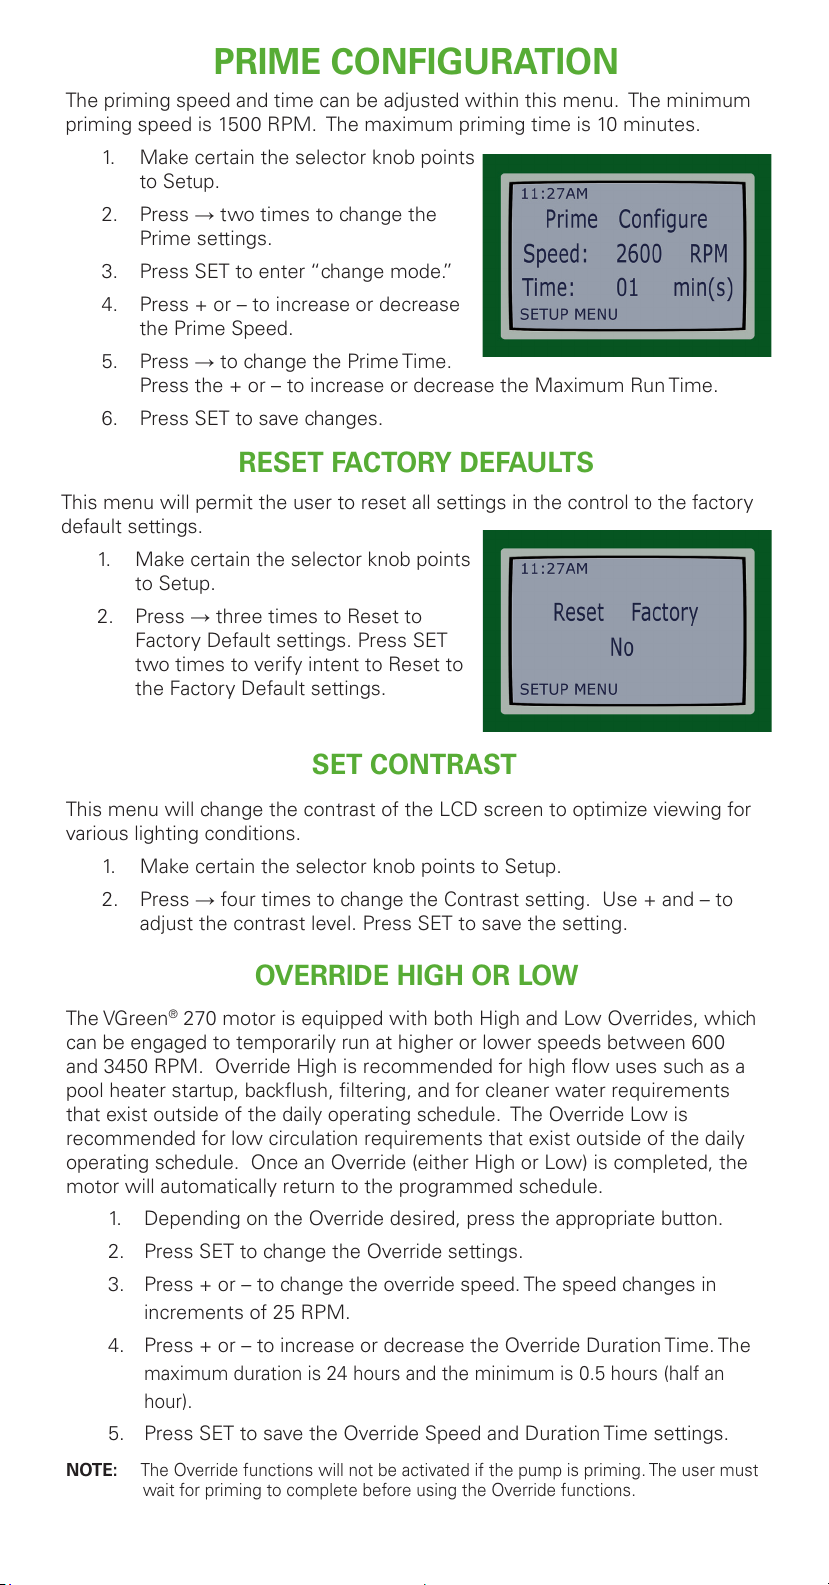
The priming speed and time can be adjusted within this menu. The minimum
priming speed is 1500 RPM. The maximum priming time is 10 minutes.
1. Make certain the selector knob points
to Setup.
2. Press → two times to change the
Prime settings.
3. Press SET to enter “change mode.”
4. Press + or – to increase or decrease
the Prime Speed.
5. Press → to change the Prime Time.
Press the + or – to increase or decrease the Maximum Run Time.
6. Press SET to save changes.
This menu will permit the user to reset all settings in the control to the factory
default settings.
1. Make certain the selector knob points
to Setup.
2. Press → three times to Reset to
Factory Default settings. Press SET
two times to verify intent to Reset to
the Factory Default settings.
This menu will change the contrast of the LCD screen to optimize viewing for
various lighting conditions.
1. Make certain the selector knob points to Setup.
2. Press → four times to change the Contrast setting. Use + and – to
adjust the contrast level. Press SET to save the setting.
The VGreen® 270 motor is equipped with both High and Low Overrides, which
can be engaged to temporarily run at higher or lower speeds between 600
and 3450 RPM. Override High is recommended for high flow uses such as a
pool heater startup, backflush, filtering, and for cleaner water requirements
that exist outside of the daily operating schedule. The Override Low is
recommended for low circulation requirements that exist outside of the daily
operating schedule. Once an Override (either High or Low) is completed, the
motor will automatically return to the programmed schedule.
1. Depending on the Override desired, press the appropriate button.
2. Press SET to change the Override settings.
3. Press + or – to change the override speed. The speed changes in
increments of 25 RPM.
4. Press + or – to increase or decrease the Override Duration Time. The
maximum duration is 24 hours and the minimum is 0.5 hours (half an
hour).
5. Press SET to save the Override Speed and Duration Time settings.
NOTE: The Override functions will not be activated if the pump is priming. The user must
wait for priming to complete before using the Override functions.
RESET FACTORY DEFAULTS
SET CONTRAST
OVERRIDE HIGH OR LOW