manuals.online logo
Brands
  1. Home
  2. •
  3. Brands
  4. •
  5. Remaco
  6. •
  7. Lifting System
  8. •
  9. Remaco PLT-419C User manual

Remaco PLT-419C User manual

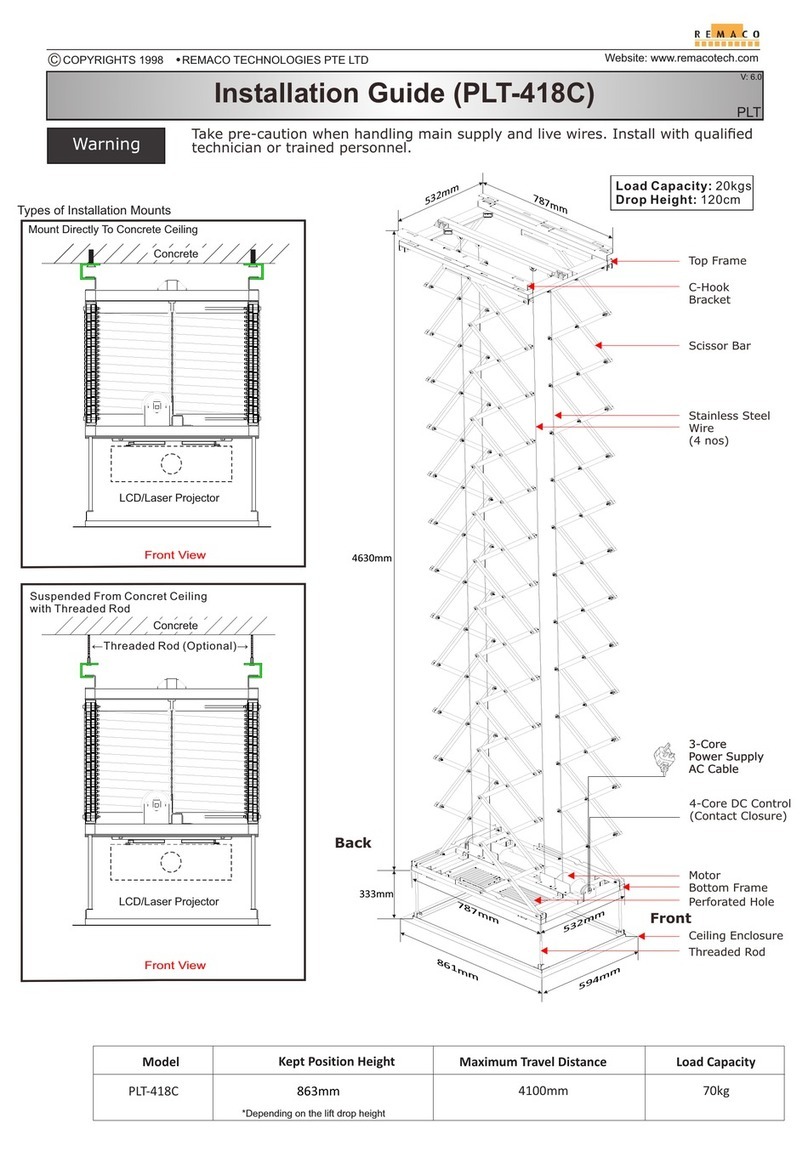
917mm
917mm
2000 to 7000 mm
917mm
991mm
991mm
300mm
Important Note
All connections are from the MPC.
For connection details, please refer to
the Installation Guide provided.
Model Kept Position Height Maximum Extended Height
PLT-419C 450mm to 750mm H = 2000mm to 7000mm
* Put the projector here
H
Warning Caution with main supply and live wires. Install with qualified technician or trained
personnel.
Installation Guide (PLT-419C)
CWebsite: www.remacotech.com
COPYRIGHTS 1998 REMACO TECHNOLOGIES PTE LTD
PLT
V: 1.0
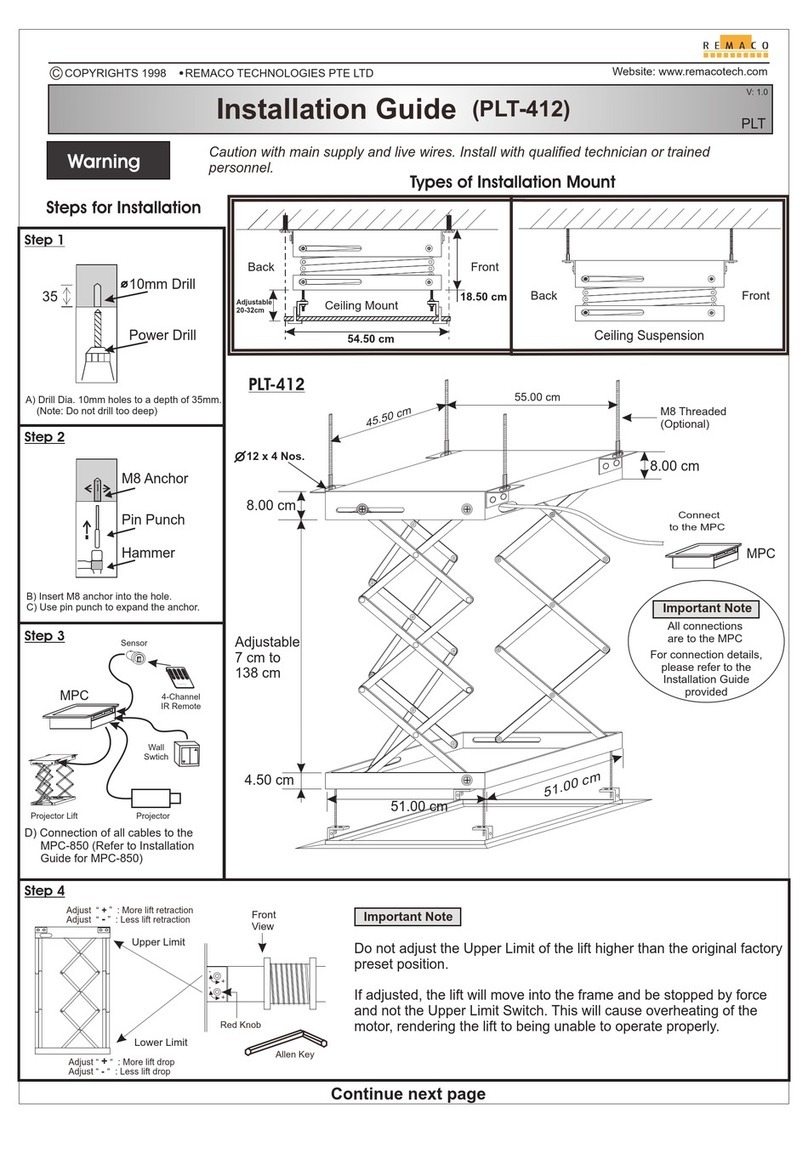
Steps for Installation
A) Drill Dia. 10mm holes to a depth of 35mm.
(Note: Do not drill too deep)
B) Insert M8 anchor into the hole.
C) Use pin punch to expand the anchor.
Hammer
Pin Punch
M8 Anchor
10mm Drill
Power Drill
35
AVA-200
Wall Switch
D) Connection of all cables to the MPC-851
(Refer to Installation Guide for MPC-851)
MPC-851
Motor Power Control
AVA-210A
Sensor
AVA-301
2-Channel
Infrared Remote
Projector
Projector Lift
STOP UP
DOWN
Step 1
Step 2
Step 3
AVA-316
15-Channel
RF Remote
917mm
*Depending on the lift drop height
35mm
Step 4: Pairing, Limit Position, and Deleting
Pairing RF remote to electronic motor
Up and down limit settings
P2 x 1
Switch (OFF) first then
Switch (ON)
Motor
beeps
press setting button (P2)
one time
within 5 sec.
press (DOWN) button
one time
Direction 1
press (UP) button
one time
UP x 1
DOWN x 1
OFF x 1
ON x 1
P2 x 1
press setting button (P2)
one time
within 5 sec.
Motor rolling
forward/
backward
Motor rolling
forward/
backward
Motor
beeps
Direction 2
(Change Direction)
Motor
beeps
P2 x 1
press setting button (P2)
one time
within 5 sec.
UP x 1
press (UP) button
one time
P2 x 1
press setting button (P2)
one time
within 5 sec.
UP x 1
press (UP) button
again to adjust
the upper limit
Switch (OFF) first then
Switch (ON)
Motor
beeps
OFF x 1
ON x 1
Motor rolling
forward/
backward
Motor rolling
forward/
backward
Motor rolling
forward/
backward
STOP (5sec)
press and hold
(STOP) button
for 5sec
prepare to press
(STOP)
when reaching desired
limit position
DOWN x 1
press (DOWN) button
again to adjust
the lower limit
STOP (5sec)
press and hold
(STOP) button
for 5sec
prepare to press
(STOP)
when reaching desired
limit position
Motor rolling
forward/
backward
Motor rolling
forward/
backward
Motor Beeps.
Limit setting
was successful.
Motor Beeps.
Limit setting
was successful.
Motor
beeps
Motor rolling
forward/
backward
Motor rolling
forward/
backward
STOP x 1
press (STOP) button
one time
STOP x 1
press (STOP) button
one time
Third limit position (Outside the limit)
P2 x 1
press setting button (P2)
one time
within 5 sec.
Motor rolling
forward/
backward
Down
limit position
DOWN x 1
press (DOWN) button
one time
Motor rolling
forward/
backward
DOWN x 1
press (DOWN) button
one time
Motor rolling
forward/
backward
press (DOWN) button
one at a time until
reaching desired limit.
Motor rolling
forward/
backward
P2 x 1
press setting button (P2)
one time
within 5 sec.
Motor rolling
forward/
backward
Motor
beeps
STOP x 1
press (STOP) button
one time
Motor rolling
forward/
backward
STOP (5sec)
press and hold
(STOP) button
for 5sec
Motor rolling
three times
forward/
backward
Motor
beeps
Delete the limit
P2 x 1
press setting button (P2)
one time
within 5 sec.
DOWN x 1
press (DOWN) button
one time
P2 x 1
press setting button (P2)
one time
within 5 sec.
Motor
beeps
Switch (OFF) first then
Switch (ON)
OFF x 1
ON x 1
Motor rolling
forward/
backward
Motor rolling
forward/
backward
Motor
beeps
Delete memory of RF remote pairing
P2 x 1
press setting button (P2)
one time
within 5 sec.
STOP x 1
press (STOP) button
one time
P2 x 1
press setting button (P2)
one time
within 5 sec.
Motor
beeps
Switch (OFF) first then
Switch (ON)
OFF x 1
ON x 1
Motor rolling
forward/
backward
Motor rolling
forward/
backward
Motor
beeps
Step 5: False Ceiling Support
M6 Threaded Rod
M6 Washer & Nut
Option 1
False Ceiling (Tile Ceiling Board)
M6 Threaded Rod
M6 Washer & Nut
Option 2
False Ceiling (Plaster Fiber Ceiling)Partition Screws
Wood or Board
(Not provided)
Simple Method to insert false ceiling
Lay false ceiling board 45 degree on false ceiling
frame as shown.
Rotate and false ceiling board will position correctly.
End

Other Remaco Lifting System manuals

Remaco PLT-418C User manual

Remaco

Remaco PLT-418C User manual

Remaco PLT-412 User manual

Remaco

Remaco PLT-412 User manual

Popular Lifting System manuals by other brands

LSP inc. LSC850D owner's manual

LSP inc.

LSP inc. LSC850D owner's manual

WOOD'S POWR-GRIP MRTALP6FS10TDC instructions

WOOD'S POWR-GRIP

WOOD'S POWR-GRIP MRTALP6FS10TDC instructions

Mec Nano10-XD Service manual

Mec

Mec Nano10-XD Service manual

Ravaglioli RAV232 N manual

Ravaglioli

Ravaglioli RAV232 N manual

LGMG SR2669D Operation and safety manual

LGMG

LGMG SR2669D Operation and safety manual

CMC S19HD PRO Use and maintenance manual

CMC

CMC S19HD PRO Use and maintenance manual

global lift corp R-375 owner's manual

global lift corp

global lift corp R-375 owner's manual

TechLine Tech Lift 500 Assembly instructions

TechLine

TechLine Tech Lift 500 Assembly instructions

Bruno JOEY VSL-4400 Operator's manual

Bruno

Bruno JOEY VSL-4400 Operator's manual

AutoCrib IntelliPort Operation manual

AutoCrib

AutoCrib IntelliPort Operation manual

BorMann BWR5137 manual

BorMann

BorMann BWR5137 manual

Sinoboom AB16EJ Plus Operation manual

Sinoboom

Sinoboom AB16EJ Plus Operation manual

morse 185A-GR Operator's manual

morse

morse 185A-GR Operator's manual

VMB TE-074 operating instructions

VMB

VMB TE-074 operating instructions

RGC HL9000 instructions

RGC

RGC HL9000 instructions

FAIE 12460 manual

FAIE

FAIE 12460 manual

iCONNECT TVL-RH installation instructions

iCONNECT

iCONNECT TVL-RH installation instructions

RGC VL16 T Series manual

RGC

RGC VL16 T Series manual

manuals.online logo
manuals.online logoBrands
  • About & Mission
  • Contact us
  • Privacy Policy
  • Terms and Conditions

Copyright 2025 Manuals.Online. All Rights Reserved.