Retevis RB17P User manual

RB17P
Two Way Radio
User’s Manual

Unpack and check the device
Please take the walkie-talkie out of package carefully.We recommend that check
all the accessories as the below table list before you discard the package. If you
find any accessory is missing or damaged, please contact your local seller.
Accessories
Charging battery
Please use the specified charger to charge the battery: the indicator light of the
charger can show the charging status.
About Radio
Item Quantity
Antenna 1
Sling 1
Belt Clip 1
Charger 1
Battery 1
Manual 1
Charging status Indicator Show
Battery charging mode The Red Light is on
Full battery The Green Light is on
1.PTT
Button
3.Antenna
4.Alarm
button
5.Speaker
6.Menu
button
8.Confirm
Button
10.Back
Button
11.Status
indicator
12.Power/
volume switch
13.MIC/SP jack
14.Battery pack
15.Battery lock
9.Down7.Up
2.Progra-
mmable
Side button
1

The parts of radio
1.PTT Button:
A:Press PTT can talk
2.Programmable Side button
A:Set as the CTCSS/DCS menu: Short press will switch: OFF -> CTCSS ->
DCS N -> DCS I -> OFF
B:Short press activate the function you set.Optional Function: scan, vox,
sub-channel transmit, NOAA, Monitor(Cancel squelch);
C:Long press activate Monitor Function(Cancel squelch)
3.Antenna
A:Receive and transmit signal
4.Alarm button
A:In standby state, press this top Alarm button to activate Alarm.The Alarm mode
can be programmed by its software. (local or local+ remote)
B: When alarm is on. No key operation will work.After sending the alarm bell for
20s, standby 10s and repeat again and again.
C: Press PTT button exit the alarm
5.Speaker
A: Output Audio
6.Menu button
A:Press will into Menu setting
7.Up
A: In the programming setting, press the up button.
B: In channel mode standby, switch scan direction in scan mode.
C: Long press to achieve quick rollover
8.Confirm Button
A: In menu operation, short press to confirm;
B: In standby, long press to open or close the keyboard lock.
9.Down
A: In the programming setting, press the down button.
B: In channel mode standby, switch scan direction in scan mode.
C: Long press to achieve quick rollover
10.Back Button
A: Short press during menu operation to return to the previous level, short press
during standby to switch the main frequency to A or B;
B: Long press to start scanning; Activate NOAA channel scan when NOAA is on.
When NOAA is off or standby, press to activate radio scan.
11. Status indicator
A: The red light is on when transmitting, and the green light is on when receiving.
12. Power/volume switch
A: Turn on or off the walkie-talkie/ Adjust the volume of the walkie-talkie.
13. MIC/SP jack
A: It is used for external earphones, and can also be connected to the
programming cable to program your radio
14. Battery pack
A: Supply power for your walkie talkie
2

LCD Display
Basic Operations
1.Power On:
A: When the radio is off, turn the power/volume switch knob clockwise to power
on the walkie-talkie.
2.Power off:
A: In the power-on state, turn the power/volume switch knob counterclockwise to
power off.
3.Adjust the volume
A: When turned on, turn the power/volume switch knob clockwise to increase
the volume; turn the power/volume switch knob counterclockwise to decrease
the volume.
Functions and Operation
A:In standby, Press button into menu; LCD display shows menu
introduction and settings.
No. Icon Describe
1 Save Mode 1:4
2 KeyTone
3 Battery status
4 CTCSS/DCS
5 Narrow band
6 Companding function
7 A band working frequency
8 / Current Channel Number
9 High power
10 Current working Channel
11 B band working frequency
6 NOAA
7 Keypad Lockout
8 Menu
9 A/B band switch
3

B:Press / button choose the menu you want, press to confirm
into setting
C:Press / button to choose the setting you want, press to confirm
your setting.
D:Press button to exit the menu.
Battery
A:When the battery is fully charged, the green battery icon will be displayed on
the upper right corner of the LCD display
B:When the battery is low, the battery is marked yellow.
C:When the battery is low power, the battery is marked with red; and the red
flashed and voice prompts: "low power"
D:When the battery is about to run out, radio will automatically shut down. The
LCD display will show: "please charge!" before shutting down.
NOAA function
A:When activating the NOAA, the squelch is also turn on. The state will be
maintained for 300 seconds(5 minutes) to return back to Channel Mode.
B:In NOAA working mode, radio can't receive and transmit signal.
C:When the NOAA watch function is enabled: In both NOAA and channel mode,
you need to receive 1050Hz signaling to enable NOAA reception, otherwise you
cannot switch to NOAA mode
D:In NOAA and Channel mode dual watch duty: At 1050Hz, it will switch to the
receiving state after the "beep, beep" tone is emitted.
Squelch level
A: This function can filter out incoming signals that are not strong enough to
produce clear emissions to eliminate unwanted noise.
B: Squelch level 0~9 can be selected, under normal circumstances, the default
setting is: 5;
users can set the appropriate squelch mode according to their needs.
CTCSS/DCS
You can set CTCSS/DCS. Select the CTCSS/DCS to encode or decode from the
existing list.( For specific CTCSS/DCS value, please refer to the following
CTCSS/DCS tables)
A: Decode: The walkie-talkie at the receiving end needs to decode the subtones
sent by the walkie-talkie at the sending end. When the subtone set here
matches the subtone from the sender, the speaker will be turned on and the
voice will be output;
B: Encode: The radio at the transmitting end encodes the sub-tones before
sending the voice and adds the code to the voice and sends it out through the
carrier. The receiver will turn on the speaker and output the voice when it
receives a match with the sub-tone set here.
4

Switch working channel
The current working interface can be set to different frequencies of the A/B
band, and the A/B band will be standby working when the dual watch function is
turned on. Press key to switch between A/B. In the upper right corner of the
current working frequency band, display.
1.Power saving mode
Enabling this function can make the walkie-talkie automatically enter the
power-saving mode. The power-saving mode can extend the battery standby
time, but it will also cause a delay in response time. The user can set the
wake-up time ratio when the machine enters the power-saving mode. You can
choose 1:4, 1:8, and off. The smaller the ratio, the more obvious the radio enters
the power-saving mode. The default power-saving mode:
2.Key tone
Allow users to turn on and off the key tone through the menu. The icon is
displayed when it is turned on, and it is not displayed when it is turned off.
3.Companding function
This function is an audio companding function that can improve the
signal-to-noise ratio of the received audio signal, make the subject's voice
clearer and reduce background noise. Show when turned on: No icon will
be displayed when turned off.
4.Power selection
Allows the user to adjust the high/low of the radio transmission power through
the menu. High power display: H, low power display: L.
5.Keyboard lock
Allow users to lock the keyboard through the menu. The keyboard lock screen
displays . In the keyboard lock, except PTT and side keys, no other key
operations can be performed; long press to unlock and lock operations.
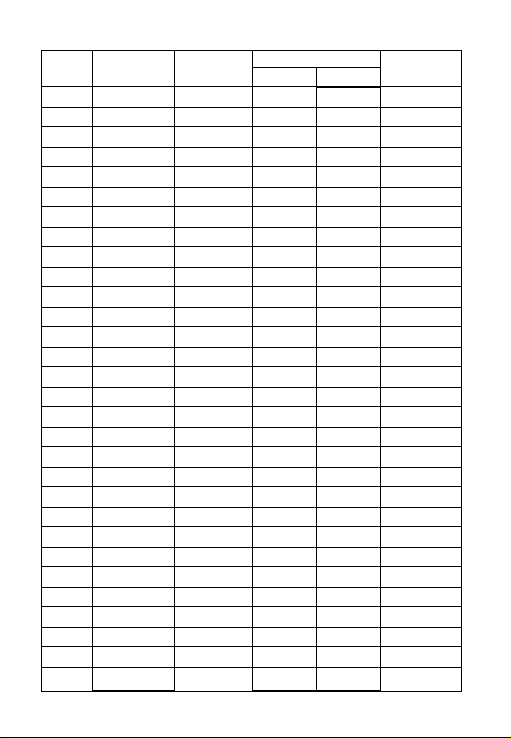
CTCSS Table
CTCSS Frequency CTCSS Frequeny CTCSS Frequency CTCSS Frequency
No. [Hz] No. [Hz] No. [Hz] No. [Hz]
1 67.0 14 103.5 27 159.8 40 199.5
2 69.3 15 107.2 28 162.2 41 203.5
3 71.9 16 110.9 29 165.5 42 206.5
4 74.4 17 114.8 30 167.9 43 210.7
5 77.0 18 118.8 31 171.3 44 218.1
6 79.7 19 123.0 32 173.8 45 225.7
7 82.5 20 127.3 33 177.3 46 229.1
8 85.4 21 131.8 34 179.9 47 233.6
9 88.5 22 136.5 35 183.5 48 241.8
10 91.5 23 141.3 36 186.2 49 250.3
11 94.8 24 146.2 37 189.9 50 254.1
12 97.4 25 151.4 38 192.8
13 100.0 26 156.7 39 196.6
5

CDCSS Standard Table
CDCSS Encode Decode CDCSS Encode Decode CDCSS Encode Decode
NO NO NO
1 D023N D023I 29 D174N D174I 57 D445N D445I
2 D025N D025I 30 D205N D205I 58 D464N D464N
3 D026N D026I 31 D223N D223I 59 D465N D465N
4 D031N D031I 32 D226N D226I 60 D466N D466I
5 D032N D032I 33 D243N D243I 61 D503N D503I
6 D043N D043I 34 D244N D244I 62 D506N D506I
7 D047N D047I 35 D245N D245I 63 D516N D516I
8 D051N D051I 36 D251N D251I 64 D532N D532I
9 D054N D054I 37 D261N D261I 65 D546N D546I
10 D065N D065I 38 D263N D263I 66 D565N D565I
11 D071N D071I 39 D265N D265I 67 D606N D606I
12 D072N D072I 40 D271N D271I 68 D612N D612I
13 D073N D073I 41 D306N D306I 69 D624N D624I
14 D074N D074I 42 D311N D311I 70 D627N D627I
15 D114N D114I 43 D315N D315I 71 D631N D631I
16 D115N D115I 44 D331N D331I 72 D632N D632I
17 D116N D116I 45 D343N D343I 73 D654N D654I
18 D125N D125I 46 D346N D346I 74 D662N D662I
19 D131N D131I 47 D351N D351I 75 D664N D664I
20 D132N D132I 48 D364N D364I 76 D703N D703I
21 D134N D134I 49 D365N D365I 77 D712N D712I
22 D143N D143I 50 D371N D371I 78 D723N D723I
23 D152N D152I 51 D411N D411I 79 D731N D731N
24 D155N D155I 52 D412N D412I 80 D732N D732N
25 D156N D156I 53 D413N D413I 81 D734N D734I
26 D162N D162I 54 D423N D423I 82 D743N D743I
27 D165N D165I 55 D431N D431I 83 D754N D754I
28 D172N D172I 56 D432N D432I
6

Frequency Table
Channel RX TX GMRS CTCSS/DCS
Power bandwidth
1 462.5625 462.5625 HIGH 12.5KHz 67.0
2 462.5875 462.5875 HIGH 12.5KHz 118.8
3 462.6125 462.6125 HIGH 12.5KHz 127.3
4 462.6375 462.6375 HIGH 12.5KHz 131.8
5 462.6625 462.6625 HIGH 12.5KHz 136.5
6 462.6875 462.6875 HIGH 12.5KHz 141.3
7 462.7125 462.7125 HIGH 12.5KHz 146.2
8 467.5625 467.5625 LOW 12.5KHz D243N
9 467.5875 467.5875 LOW 12.5KHz D032N
10 467.6125 467.6125 LOW 12.5KHz D047N
11 467.6375 467.6375 LOW 12.5KHz D051N
12 467.6625 467.6625 LOW 12.5KHz D053N
13 467.6875 467.6875 LOW 12.5KHz D065N
14 467.7125 467.7125 LOW 12.5KHz D116N
15 462.5500 462.5500 HIGH 12.5KHz 123.0
16 462.5750 462.5750 HIGH 12.5KHz D743I
17 462.6000 462.6000 HIGH 12.5KHz D332I
18 462.6250 462.6250 HIGH 12.5KHz 127.3
19 462.6500 462.6500 HIGH 12.5KHz D243I
20 462.6750 462.6750 HIGH 12.5KHz D606N
21 462.7000 462.7000 HIGH 12.5KHz D731I
22 462.7250 462.7250 HIGH 12.5KHz 136.5
23 467.5500 462.5500 HIGH 12.5KHz 136.5
24 467.5750 462.5750 HIGH 12.5KHz 136.5
25 467.6000 462.6000 HIGH 12.5KHz 136.5
26 467.6250 462.6250 HIGH 12.5KHz 136.5
27 467.6500 462.6500 HIGH 12.5KHz 136.5
28 467.6750 462.6750 HIGH 12.5KHz 136.5
29 467.7000 462.7000 HIGH 12.5KHz 136.5
30 467.7250 462.7250 HIGH 12.5KHz 136.5
7
Other manuals for RB17P
1
Table of contents
Other Retevis Two-way Radio manuals

Retevis
Retevis RT649B User manual

Retevis
Retevis RT36 User manual

Retevis
Retevis RT602 User manual

Retevis
Retevis RB19P User manual

Retevis
Retevis RT639 User manual

Retevis
Retevis RT618 User manual

Retevis
Retevis RT3 User manual

Retevis
Retevis RB637 User manual

Retevis
Retevis RT5 User manual

Retevis
Retevis RT-35 User manual

Retevis
Retevis RT28 User manual

Retevis
Retevis RB17A User manual

Retevis
Retevis RT66 User manual

Retevis
Retevis RA85 User manual

Retevis
Retevis RB627B User manual

Retevis
Retevis RT29 User manual

Retevis
Retevis TWINTALKER User manual

Retevis
Retevis H-777 User manual

Retevis
Retevis RB16 User manual

Retevis
Retevis RB616 User manual